Abstract
Understanding the dynamic behavior and the continuously changing composition of macromolecular complexes, subcellular structures and organelles is one of areas of active research in both cell and developmental biology, as these changes directly relate to function and subsequently to the development and homeostasis of the organism. Here, we demonstrate the use of the developing Drosophila oocyte to study dynamics of messenger ribonucleoprotein complexes (mRNPs) with high spatiotemporal resolution. The combination of Drosophila genetics with total internal reflection (TIRF) microscopy, image processing and data analysis gives insight into mRNP motility and composition dynamics with unprecedented precision.
Keywords: Ooplasmic extract, Intracellular motility, TIRF microscopy, Oocyte, ex vivo assay
Background
Intracellular transport is one of the fundamental processes in living cells. Almost everything within the cell–ions, molecules, complexes, organelles–is transported actively such that the local entropy is reduced. Although in recent years we have gained considerable understanding of the mechanisms underlying these transport process, most of our knowledge comes from in vitro and cell culture studies. In these simplified systems, it is difficult to establish whether the full potential of the transport regulatory processes is utilized. Tissues, organs, organoids and organisms, on the other hand, are often too complex to be studied efficiently with spatiotemporal resolution sufficient to match the scale of these transport processes. To combine the advantages of the bottom-up and top-down approaches, techniques have been developed that, while preserving complexity, make these processes more accessible. One example is the preparation of mass cytoplasmic extract from ambiphian (e.g., Xenopus laevis) oocytes and embryos to study cell divisions (Lohka and Masui, 1983; Murray, 1991; Sawin and Mitchison, 1991). We have recently shown that in cytoplasmic drops–i.e., non-purified cytoplasm directly extracted from the cell–released from single Drosophila embryos mitotic activity of the contained nuclei continues, allowing the probing of spindle properties by simple physical and chemical perturbations ( Telley et al., 2012 and 2013). Here, we describe a similar ex vivo preparation technique based on ooplasm of developing Drosophila egg-chambers. This method allows the study of intracellular transport processes (squash assay), such as the transport of localizing oskar mRNPs ( Gaspar et al., 2017 ).
Materials and Reagents
Coverslip stand for 5-10 coverslips (e.g., Wash-N-Dry, Diversified Biotech, catalog number: WSDR-1000)
Gloves
A small plastic Petri dish or the cap of a 50 ml Falcon tube (~30 mm diameter)
15 x 20 cm black plastic plate
High precision coverslips (e.g., Marienfeld Precision Cover Glass, 22 x 22 mm, Marienfeld-Superior, catalog number: 0107052)
X-ray film (e.g., Amersham HyperfilmTM ECL, GE Healthcare, catalog number: 28906835)
Double-sided adhesive tape (e.g., Tesa Doubleband Photostrip, Tesa, catalog number: 05338-00)
Cheesecloth
A fly line or a cross that yields females of the appropriate genotype (see Note 1)
Dry, granular baker’s yeast (e.g., Lesaffre Saf-Instant®)
Halocarbon oil (e.g., Voltalef 10S, VWR, catalog number: 24627.188)
100% ethanol (e.g., EMD Millipore, catalog number: 100983)
~5% dichlorodimethylsilane (DCDMS) in heptane (e.g., Silanization Solution, Sigma-Aldrich, catalog number: 85126)
PIPES (e.g., Sigma-Aldrich, catalog number: P3768)
Magnesium chloride hexahydrate (MgCl2.6H2O) (e.g., EMD Millipore, catalog number: 105833)
EGTA (e.g., Sigma-Aldrich, catalog number: E3889)
HEPES (e.g., Sigma-Aldrich, catalog number: H3375)
Potassium chloride (KCl) (e.g., EMD Millipore, catalog number: 104936)
Dextran sulfate, MW ~10 kDa (e.g., Sigma-Aldrich, catalog number: D4911)
Agar (e.g., from Pro-BIO)
Dry yeast (e.g., from Volk Klaus)
Soya powder (e.g., from Ruckemann)
Sirup (e.g., from Ruckemann)
Malt extract (e.g., from Baeko Rhei)
Corn powder (e.g., from Ruckemann)
-
Propionic acid (e.g., VWR, catalog number: ACRO447231000)
Manufacturer: Acros Organics, catalog number: 447231000.
Nipagin (e.g., Sigma-Aldrich, catalog number: H5501)
BRB80 (see Recipes)
1% injection buffer (1% IB) (see Recipes)
Cornmeal agar (see Recipes)
Equipment
Standard fly husbandry equipment (e.g., vials with cornmeal agar–see Recipes, 25 °C incubator with humidity controller, brushes, CO2 station, etc.)
3-9 well dissection plate (e.g., Corning, catalog number: 7220-85)
Vacuum desiccator (e.g., SP Scienceware - Bel-Art Products - H-B Instrument, catalog number: F42025-0000)
Dumont #5 forceps (e.g., Fine Science Tools, catalog number: 11252-20)
Dumont #55 forceps (e.g., Fine Science Tools, catalog number: 11255-20)
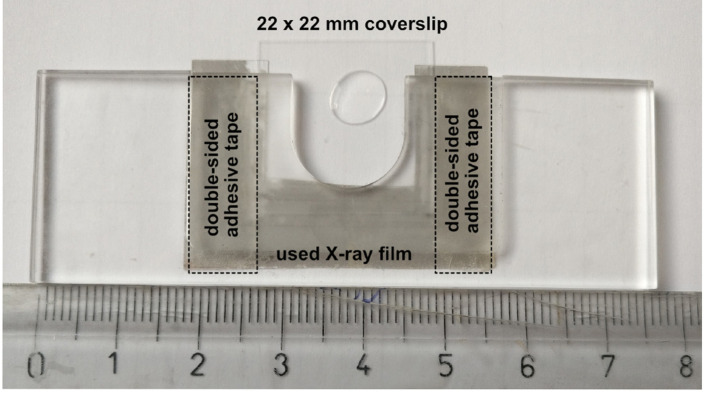
Custom made coverslip holder for microscopy (Figure 1)
Zooming stereomicroscope with 5-40x (or higher) magnification (e.g., Carl Zeiss, model: STEMI SV 11)
Sharp tungsten needles with handles (e.g., Fine Science Tools, catalog numbers: 10130-20 and 26018-17)
-
Total Internal Reflection Fluorescent (TIRF) microscope equipped with a high NA objective and a high sensitivity detector (Leica Microsystems, model: Leica AF7000)
Note: We use a Leica 7000 wide-field TIRF microscope with a 100x 1.46 NA oil immersion objective and a Photometrics Evolve Roper 512 EMCCD camera.
Figure 1. Vacuum desiccator loaded with the coverslip holder and the silane reservoir.
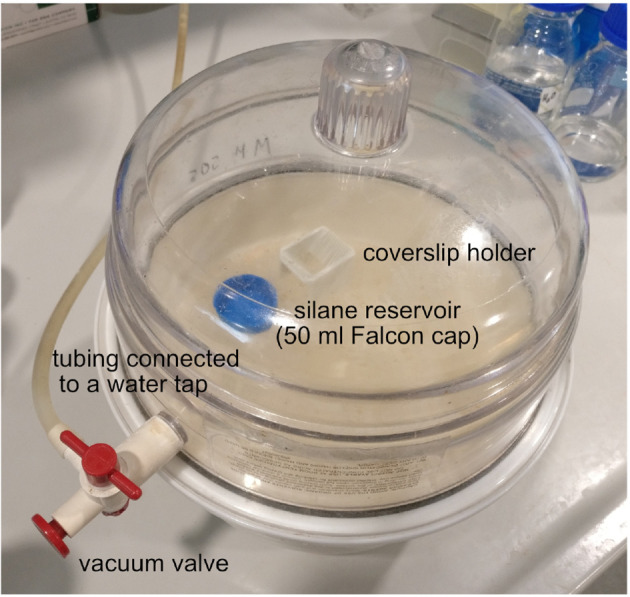
After replacing the lid of the device, apply vacuum by opening the vacuum valve and the water tap. Once the vacuum is formed–i.e., you can lift the entire device by the lid–close the vacuum valve and the water tap.
Software
Microscope controller software (e.g., Leica LASAF)
ImageJ/FIJI
Custom-made particle detector and tracker plug-in for ImageJ (available to download under https://github.com/Xaft/xs/blob/master/_xs.jar)
R (preferentially with RStudio), for data analysis
Procedure
-
Fly husbandry
Establish the cross(es) that yield female flies expressing the appropriate fluorescent marker(s) in the desired mutant genetic background (see Note 1). Depending on the complexity of the final genotype this might require multiple successive crosses.
The day before the experiment, collect a few (maximum six) young (maximum one week old) female flies and place them together with 2-3 males in a vial with fresh cornmeal agar and 20-30 grains of dry baker’s yeast (see Note 2).
-
Silanization of coverslips (see Note 3)
-
On the day of the experiment, take 5-10 factory clean coverslips and load them into the coverslip holder (see Note 4).
Note: Wear gloves.
Place 200 µl of silanization solution (5% DCDMS) into the Petri dish/Falcon tube cap (silane reservoir).
Place the coverslips next to the silane reservoir in the vacuum desiccator and apply vacuum (Figure 1).
Incubate the coverslips for 90-120 min under vacuum at room temperature (RT). The vaporized DCDMS will coat the surface of the coverslips. No changes in color or in transparency of the glass should be observed.
The silanized coverslips should be used on the same day and should not be stored.
-
-
Prepare the TIRF microscope
Before dissection, start the microscope, load the software and set up the imaging parameters.
If controlled temperature is essential, start the incubation chamber around the microscope at least half an hour before starting the imaging.
Make sure that the system is calibrated. The refraction index of the ooplasm is close to that of the halocarbon oil (η ~1.41), thus a coverslip with a drop of halocarbon oil could serve as reference.
-
Dissection of the ovaries (see Video 1)
Load one well (~2 ml) of the dissection plate with 100% ethanol and two other wells with BRB80 (see Recipes). Use the black plastic plate as a workplace for the fly and ovary manipulations.
Anesthetize a female fly and place it into the well with ethanol (see Note 5).
After 4-5 sec incubation, transfer the fly into a well with BRB80 using a #55 forceps, and after another 4-5 sec transfer to the last well containing BRB80.
Under a moderate magnification (10-15x) of the dissection microscope, with the #5 forceps in your non-dominant hand, crush the thorax of the fly to destroy it killing the animal and to maintain a firm grip. With the # 55 forceps, gently pierce the ventral-posterior side of the abdomen close to the midline.
Open the abdomen by removing the posterior part by pulling. Take out the pair of ovaries and transfer it to a clean, non-silanized coverslip in a drop of BRB80.
Place two drops of 1% IB (see Recipes) (~4-5 µl) on the same coverslip. Transfer the ovaries sequentially into each drop to remove BRB80 from around them.
-
Transfer the ovaries into a ~2 µl drop of 1% IB in the center of a silanized coverslip.
Note: Silanized coverslips needs to be used from this step onward.
-
Extraction of the ooplasm (see Videos 2 and 3)
Place a drop of halocarbon oil on the silanized coverslip such that it forms an interface with the drop containing the ovaries (see Video 2).
Wipe the tungsten needles with 100% ethanol and then rinse them in 1% IB.
Increase the magnification to about 20-25x. Using the two needles, separate the ovarioles (strings of egg-chambers) from each other.
-
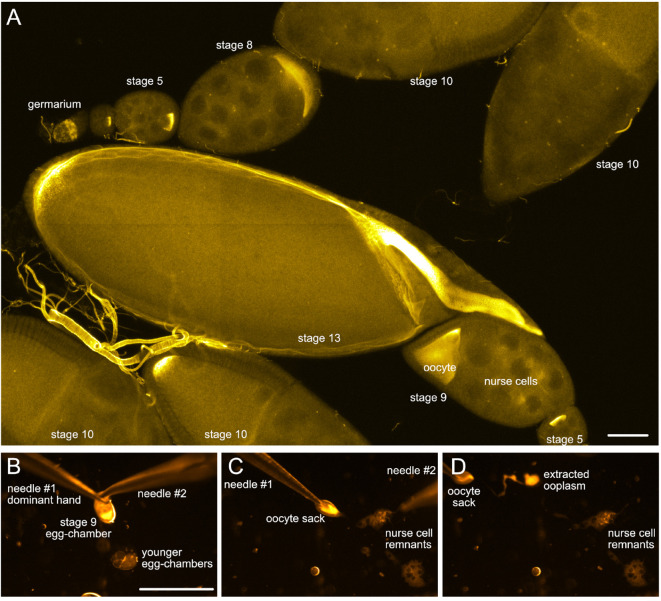
Identify ovarioles that contain egg-chambers of the developmental stage of interest (stage 9 or older, Figure 2A). Carefully remove the older stages with the needles
Note: By crossing them, using them as scissors.
Using your dominant hand, grab the trimmed ovariole on the side of the germarium and gently pull it under the oil.
Repeat steps E4 and E5. Ideally, one should have 5-10 egg-chambers of interest under the oil before proceeding further.
Zoom to about 40x magnification. Under the oil, first remove any egg-chambers younger than the stage of interest (e.g., stage 9), then start pricking the nurse cells (trophic sister cells of the oocyte) at the anterior tip of the egg-chamber (Figure 2B, see Video 3).
When none or only a few nurse cells remain, gently grab the oocyte-containing follicle sack (‘oocyte sack’) at the posterior pole with the needle in your dominant hand and start pulling it away from the rubble of nurse cells (Figure 2C).
The ooplasm should start flowing out. Adjust the speed of pulling to allow the ooplasm to touch the coverslip and adhere. You may help this adhesion with the other needle by creating tension anterior to the ooplasm (see Note 3).
Depending on the speed of pulling, the size of the ooplasm and the hydrophobicity of the coverslip, one to several round droplets of ooplasm (containing numerous large 1-10 µm large yolk vesicles visible under 40x zoom) should form (Figure 2D).
Troubleshooting: A too hydrophilic glass will result in an almost instantaneous, uncontrollable release of the ooplasm onto the surface, whereas a too hydrophobic glass usually repels the ‘oocyte sack’, causing it to float away from the surface. In either case, it is advised to restart the protocol from step B1, reducing or increasing the silanization time, respectively.
Repeat steps E7-E9 to deposit more ooplasmic extracts on the same cover glass. Ideally, four-six of such preparations (i.e., replicates) can be placed on one 22 x 22 mm coverslip.
-
TIRF microscopy
Load the coverslip onto the stand of the microscope using a coverslip holder (Figure 3).
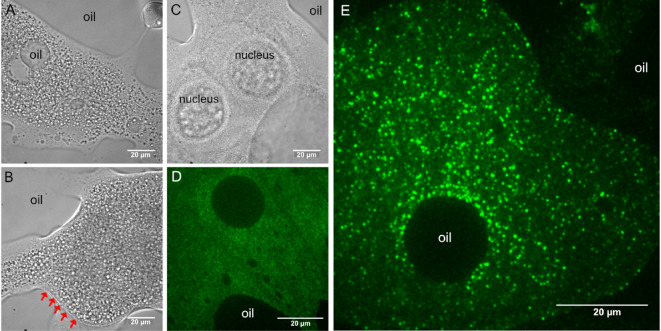
Using transmitted light, focus the specimen and locate one of the ooplasmic droplets. Droplets of ooplasm are recognized by the presence of yolk granules (Figures 4A and 4B), which are absent from the nurse cell cytoplasm (Figure 4C) (see Note 6). Sometimes, the membrane of the oocyte–reinforced by the forming vitelline layer–remains intact and therefore no ooplasm gets into contact with the glass surface. Such malformed oocytes can be recognized by the sharp, positively curved boundary with their surroundings (Figure 4B). Such ooplasms are inaccessible to TIRF microscopy (Figure 4D).
Optional: if the microscope is equipped with a 2D/3D motorized stage, it is recommended to localize and the store position of all droplets before switching to TIRF microscopy.
Start TIRF imaging and adjust parameters, such as exposure time, laser intensity, and camera gain to obtain a good quality signal (Figure 4E).
Temporal resolution is a critical parameter when studying the dynamics of moving objects. For motility analysis of oskar mRNPs, we exposed oskMS2-GFP particles for 20 msec, and simultaneously imaged EB1-mCherry (5 msec) to obtain information regarding the polarity of the underlying microtubule (MT) network. This resulted in a ~10-12 frame per second (FPS) acquisition, during which transported oskar mRNPs traveled ~50-150 nm (pixel size was 140 nm).
Video 1. Dissection of the ovaries.
Video 2. Separation and sorting of the ovarioles.
Figure 2. Drosophila egg-chambers under the microscope.
A. Different stages of Drosophila oogenesis. The oocyte and its 15 sibling cells (nurse cells) form a syncytium in the germarium through a series of incomplete cell divisions. These 16 cells stay interconnected by cytoplasmic bridges and become encapsulated by a layer of somatic follicle cells forming the egg-chambers. The egg-chambers mature/go through 14 different stages of oogenesis to give rise to a mature egg (for more details, please refer to e.g., [Bastock and St Johnston, 2008]). To visualize the different cell types, wash-free in situ hybridization to oskar mRNA was performed using a mixture of three different FIT probes ( Hovelmann et al., 2013 ). Scale bar is 50 µm. B-D. Different steps of ooplasm extraction from a stage 9 oocyte (stills taken from Video 3). Scale bar is 500 µm (B-D).
Video 3. Ex vivo ooplasmic preparation .
Figure 3. Custom made coverslip holder.
The basis of this coverslip holder is a plastic block with dimensions of a standard microscopy slide (76 x 25 x 2-3 mm) containing a 16-18 mm wide, 16-18 mm deep incision in one of its long sides. A hand cut piece of a (used) X-ray film (~40 x 25 mm, with a similar incision) is secured to the bottom of the plastic block by using two strips of double-sided adhesive tape. The two strips of adhesive tape should be placed such that the used coverslip (e.g., 22 x 22 mm) should fit firmly–in this example, these two strips are placed 22 mm apart. The silanized coverslips carrying the halocarbon oil with the ooplasmic squashes can be slid between the plastic block and the piece of X-ray film like a drawer. Scale unit is cm.
Figure 4. Typical appearance of droplets after ex vivo preparation.
A, B, D and E. Ooplasmic squash. A and B. Ooplasm from oocytes at mid-oogenetic stages onward can be recognized by the presence of large (1-10 µm) yolk granules. A and E. Sometimes, halocarbon oil droplets get mixed into the ooplasm, indicating that the plasma and the vitelline membranes surrounding the oocyte were removed. C. Droplet of nurse cell cytoplasm. Granularity is much finer than in the ooplasm A and B and very often the gigantic nurse cell nuclei remain intact. B and D. Ooplasm/oocyte with intact membranes (indicated by red arrows). D. In such preparations, the ooplasm cannot get into close contact with the glass surface and therefore no intraooplasmic complexes and organelles are detected by TIRF microscopy. E. In proper ooplasmic extracts, complexes and organelles contained within the ooplasm can be detected by TIRF microscopy (green–oskarMS2(10x)-MCP-EGFP mRNPs). Images in D and E were taken on the same day using the same microscopy setup.
Data analysis
Note: The obtained images can be analyzed in any software/pipeline of the experimenter’s choice. Here, we describe the motility and co-localization/co-migration analysis of oskar mRNPs in ImageJ/FIJI using our custom-made particle recognition and tracking algorithms. A detailed manual of the plugins is available athttps://github.com/Xaft/xs/blob/master/xs%20plug-ins.pdf.
-
Motility analysis (see Videos 4 and 5)
Video 4. Tutorial for the xsPT particle tracker plug-in of ImageJ, part one.
Download video file (21.9MB, mp4)
Note: Please watch the video in full screen for better clarity.
Video 5. Tutorial for the xsPT particle tracker plug-in of ImageJ, part two.
Download video file (77.9MB, mp4)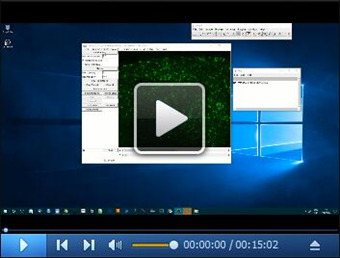
Note: Please watch the video in full screen for better clarity.
Load the acquired image sequence into ImageJ.
Apply a Gaussian filter (0.8 pixel size) to all channels to reduce noise.
Select the channel that contains information about the particles to be analysed (reference channel).
Start the plugin xsPT.
-
By using the pop-up window, enter the parameters for the particle detection and tracking.
Note: See detailed description bundled with the plug-ins.
After hitting ‘GO’, all frames of the reference channel are processed and initial tracks are created if selected (see Note 7).
-
By clicking on the tracks shown after the detection, select those that are of interest.
Note: In our example, these are tracks that appear long and linear.
After selecting the tracks, press the ‘Selection mode’ button. This will switch to ‘Comment mode’.
-
Change the channel to the EB1-mCherry signal. By playing the movie (e.g., ‘Play’ button, mouse scroll or dragging the scroll-bar), try to identify the MT along which a given particle run occurred.
Note: In our example, we managed to identify 85-90% of the underlying MTs and their polarity.
Click on the track and by using the 0-9 characters on the numerical keyboard, add a comment to represent the polarity of run (e.g., ‘1’ for plus tip directed, ‘2’ for minus end directed runs).
Once finished, save the selected and commented tracks by pressing the ‘Save selected’ button. This will save a .csv file that contains the identifier of a track (no.), the frame number, calibrated x and y coordinates, the comment (step A9) and information (e.g., area, integrated density, background) about the sequence of recognized spots that compose the track.
The motility information (e.g., speed, duration, displacement, pause and reversal frequencies) is extracted as described in ( Gaspar et al., 2014 ).
-
Co-migration analysis (see Videos 4 and 5)
The second channel (target channel) contains the signal intensity of the protein of interest (e.g., Kinesin heavy chain or Tropomyosin1-I/C) instead of MT polarity information.
Perform steps A1-A7 of section A.
-
After selecting tracks of interest, save those selected.
Note: This will save the integrated density of the detected spot in all channels.
To detect if a protein-of-interest was present on the tracked particle at a given moment, compare the mean signal intensity (integrated density/area) of the appropriate channel (typically stored as ‘integral_2’) against a threshold.
To determine the appropriate threshold, rerun the xsPT plugin by first selecting the target channel, i.e., making it the reference.
Save data of all spots by pressing ‘Save all’.
As a threshold, we used the lower 10th percentile of the mean signal intensity distribution determined in extracts of oocytes heterozygous for the fluorescently tagged protein-of-interest.
Analyze the data as described in ( Gaspar et al., 2017 ).
-
Object based co-localization analysis (see Video 6)
Note: Please watch the video in full screen for better clarity.
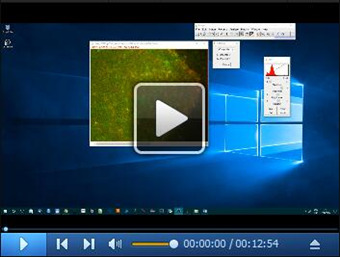
For cases in which no dynamic information is available, or if the signals of the two channels are not expected to overlap completely–e.g., the objects in the two channels are large, we developed a modified version of our particle tracker that determines the co-localization of objects (as opposed to raw signals) in single snapshot frames. This plugin estimates the likelihood of random (expected) co-localization by running a series of Monte Carlo simulations using the particle information of the image.
Load one frame of the acquired image into ImageJ.
Run the xsColoc plugin.
By selecting the channels from the drop-down menu of the pop-up window, adjust the parameters of particle detection for each channel (a detailed description is bundled with the plugins).
After hitting ‘GO’, select the reference and the target channels and the maximal distance allowed (in nm) between the centers of two neighboring objects (see Note 8).
Optional: if parts of the image do not contain any information about the specimen (usually blank regions), it is advised to restrict the analysis to a region of interest (drawn by the standard ROI tools of ImageJ). This will ensure accuracy of the simulated (expected) co-localization.
Run the analysis by hitting the ‘Test colocalization’ button.
A ‘Save’ dialog will open. Here, three files are saved: (i) the actual image (.tif), (ii) a descriptor file containing the parameters of particle detection and the coordinates of the ROI (.mcc), and (iii) a file (.csv) containing the features of all objects in the reference channels, the features of a co-localizing object (if any, otherwise -1) from the target channel, and 100 distance entries (in nm, for the 100 Monte-Carlo simulation runs) between the reference object and a simulated particle of the target channel.
Analyze the data as described in ( Gaspar et al., 2017 ).
Video 6. Tutorial for the xsColoc colocalization analysis plug-in of ImageJ.
Notes
To label oskar mRNPs we used transgenic oskMS2(10x) combined with monomeric MCP-EGFP ( Zimyanin et al., 2008 ). To polarity mark MTs, we expressed UASp-EB1-mCherry (gift of Damian Brunner) in the female germline using the oskar-Gal4 driver ( Telley et al., 2004 ). For co-migration analyses, we endogenously tagged Kinesin heavy chain and Tropomyosin1-I/C with mKate2 and mCherry, respectively ( Gaspar et al., 2017 ).
Protein-poor diet and other sources of stress (overcrowding, lack of mates) were shown to negatively influence oskar mRNP motility and result in rapid redistribution of oskar mRNA into sponge/processing bodies (Snee and Macdonald, 2009; Shimada et al., 2011 ).
Proper hydrophobicity is key for successful ooplasmic extraction. Glass that is too hydrophilic results in aspecific binding of proteins–including components of oskar mRNPs–to the surface, rendering the particles immotile, whereas a surface that is too hydrophobic prevents adherence of the ooplasm.
In our experience, washes with 1 N HCl, 2 N H2SO4 or 1 N NaOH result in the appearance of blinking, red fluorescent spots on the glass that are often indistinguishable or stronger than the red fluorescence of the tagged protein molecules. Therefore, we recommend against cleaning the coverslips with acidic or alkaline washes before silanization.
100% ethanol quickly dissolves the hydrophobic wax layer that covers the fly cuticle and thus allows flies to sink to the bottom of the wells. Moreover, it terminally anesthetizes the fly.
The droplets derived from a single egg-chamber are often connected by thin strings of liquid that can be traced under the halocarbon oil, facilitating the sometimes tedious search for the droplets using the 1,000x magnification on the TIRF microscope.
The xsPT plugin allows online switching between automated and manual tracking. Moreover, tracks selected from automated tracking are transferred to the manual tracking mode, allowing the manual fixing of tracking errors.
If there is a third channel available, it may be used as a mask channel, i.e., only those objects of the reference and target channel that are within a certain distance (‘mask distance’ in nm) to an object of the mask channel are taken into consideration.
Recipes
-
BRB80
80 mM PIPES, pH 6.9
2 mM MgCl2
1 mM EGTA
-
1% injection buffer (1% IB)
10 mM HEPES, pH 7.7
120 mM KCl
1 mM MgCl2
1% (w/v) dextran sulfate (MW ~10 kDa)
-
Cornmeal agar
10 L H2O
120 g agar (e.g., from Pro-BIO)
180 g dry yeast (e.g., from Volk Klaus)
100 g soya powder (e.g., from Ruckemann)
220 g sirup (e.g., from Ruckemann)
800 g malt extract (e.g., from Baeko Rhei)
800 g corn powder (e.g., from Ruckemann)
62.5 ml propionic acid (e.g., VWR)
24 g nipagin (e.g., Sigma-Aldrich)
Boil agar (90 °C) in half of the water in a kettle until agar has dissolved completely. Dissolve everything except the propionic acid and nipagin in the rest of water and add to the agar-water mixture in the kettle
Cook for 2 h, stirring every 10 min
Reduce heat (80 °C)
Add nipagin and propionic acid
Pour vials, bottles and cover them immediately with cheesecloth
Let bottles dry for several hours; vials should be dried overnight before stoppering
Store fly food at 18 °C or 4 °C
Acknowledgments
This work was funded by the EMBL. This protocol is adapted from Gaspar et al., 2017 .
Citation
Readers should cite both the Bio-protocol article and the original research article where this protocol was used.
References
- 1.Bastock R. and St Johnston D.(2008). Drosophila oogenesis . Curr Biol 18: R1082-1087. [DOI] [PubMed] [Google Scholar]
- 2.Gaspar I., Sysoev V., Komissarov A. and Ephrussi A.(2017). An RNA-binding atypical tropomyosin recruits kinesin-1 dynamically to oskar mRNPs . EMBO J 36(3): 319-333. [DOI] [PMC free article] [PubMed] [Google Scholar]
- 3.Gaspar I., Yu Y. V., Cotton S. L., Kim D. H., Ephrussi A. and Welte M. A.(2014). Klar ensures thermal robustness of oskar localization by restraining RNP motility . J Cell Biol 206(2): 199-215. [DOI] [PMC free article] [PubMed] [Google Scholar]
- 4.Hovelmann F., Gaspar I., Ephrussi A. and Seitz O.(2013). Brightness enhanced DNA FIT-probes for wash-free RNA imaging in tissue. J Am Chem Soc 135: 19025-19032. [DOI] [PubMed] [Google Scholar]
- 5.Lohka M. J. and Masui Y.(1983). Formation in vitro of sperm pronuclei and mitotic chromosomes induced by amphibian ooplasmic components . Science 220(4598): 719-721. [DOI] [PubMed] [Google Scholar]
- 6.Murray A. W.(1991). Cell cycle extracts. Methods Cell Biol 36: 581-605. [PubMed] [Google Scholar]
- 7.Sawin K. E. and Mitchison T. J.(1991). Mitotic spindle assembly by two different pathways in vitro . J Cell Biol 112(5): 925-940. [DOI] [PMC free article] [PubMed] [Google Scholar]
- 8.Shimada Y., Burn K. M., Niwa R. and Cooley L.(2011). Reversible response of protein localization and microtubule organization to nutrient stress during Drosophila early oogenesis . Dev Biol 355(2): 250-262. [DOI] [PMC free article] [PubMed] [Google Scholar]
- 9.Snee M. J. and Macdonald P. M.(2009). Dynamic organization and plasticity of sponge bodies. Dev Dyn 238(4): 918-930. [DOI] [PMC free article] [PubMed] [Google Scholar]
- 10.Telley I. A., Gaspar I., Ephrussi A. and Surrey T.(2012). Aster migration determines the length scale of nuclear separation in the Drosophila syncytial embryo . J Cell Biol 197(7): 887-895. [DOI] [PMC free article] [PubMed] [Google Scholar]
- 11.Telley I. A., Gaspar I., Ephrussi A. and Surrey T.(2013). A single Drosophila embryo extract for the study of mitosis ex vivo . Nat Protoc 8(2): 310-324. [DOI] [PubMed] [Google Scholar]
- 12.Zimyanin V. L., Belaya K., Pecreaux J., Gilchrist M. J., Clark A., Davis I. and St Johnston D.(2008). In vivo imaging of oskar mRNA transport reveals the mechanism of posterior localization . Cell 134(5): 843-853. [DOI] [PMC free article] [PubMed] [Google Scholar]


