Abstract
PURPOSE
This study is to evaluate the internal fit of the crown manufactured by CAD/CAM milling method and 3D printing method.
MATERIALS AND METHODS
The master model was fabricated with stainless steel by using CNC machine and the work model was created from the vinyl-polysiloxane impression. After scanning the working model, the design software is used to design the crown. The saved STL file is used on the CAD/CAM milling method and two types of 3D printing method to produce 10 interim crowns per group. Internal discrepancy measurement uses the silicon replica method and the measured data are analyzed with One-way ANOVA to verify the statistic significance.
RESULTS
The discrepancy means (standard deviation) of the 3 groups are 171.6 (97.4) µm for the crown manufactured by the milling system and 149.1 (65.9) and 91.1 (36.4) µm, respectively, for the crowns manufactured with the two types of 3D printing system. There was a statistically significant difference and the 3D printing system group showed more outstanding value than the milling system group.
CONCLUSION
The marginal and internal fit of the interim restoration has more outstanding 3D printing method than the CAD/CAM milling method. Therefore, the 3D printing method is considered as applicable for not only the interim restoration production, but also in the dental prosthesis production with a higher level of completion.
Keywords: CAD/CAM milling system, 3D printing system, Interim crown, Fitness
INTRODUCTION
The interim restoration is an important part of the fixed prosthesis treatment, which is used from the time of tooth preparation to the time of final cementation.1,2,3,4 In addition, it also has a role in protection of abutment teeth, dental pulp, and gingiva in case of unexpected situation such as delay in final prostheses fabrication and extension of the patient's visiting interval.5,6,7
The fixed interim prosthesis is manufactured in the dental lab or dental office in direct and indirect method.8,9 It may be manufactured manually, but the manual work's dependence on the worker's skill and several processing steps may serve as a weakness. On the other hand, as CAD/CAM system is recently available for prosthesis production, the processing error may be reduced.10 The CAD/CAM production results in consistently high quality prosthesis by using various materials, satisfying the demands of patients.11 The prosthesis production method that uses the CAD/CAM system may be divided into the subtractive manufacturing and additive manufacturing. The CAD/CAM milling is the method to obtain the designed shape by grinding the materials of block or disc. This method may result in the waste of materials and strict maintenance, and has disadvantage of poor micro reproducibility in concaved region depending on the diameter of the cutting device.12 In addition, there is a research result that the marginal and internal fit, the most important evaluation element of the prosthesis, is not great when subtractive manufacturing is applied.13 The additive manufacturing system is the method to manufacture the product by consecutively piling up the powder and liquid type of materials.14,15 In the recent dental restoration processing field, to supplement the weakness of the CAD/CAM milling system (subtractive manufacturing), the 3-D printing system (additive manufacturing) was emerged; this system has the strength to manufacture the precise prosthesis with minimal materials.13
In the current dentistry, the 3D printer is spreading fast and various resins are used to manufacture coping for PFM (porcelain fused to metal), interim crown, RPD (removable partial denture) frame, orthodontic model, and surgical guide for implant. As such, there is a steady increase of prosthesis production by using the 3D printing system. Therefore, it requires more research and evaluation on the prosthesis manufactured by the 3D printing method. However, the studies on the internal fit of the prosthesis made with the CAD/CAM milling method to the present time are the main studies, and there is insufficient internal fit study on the 3D printing technology. Therefore, in this study, the internal and marginal fit of the crown manufactured with the CAD/CAM milling technology and 3D printing technology is evaluated with regard to the clinical importance. The null hypothesis is that there is no difference in the fit of the interim crown that is manufactured for each system.
MATERIALS AND METHODS
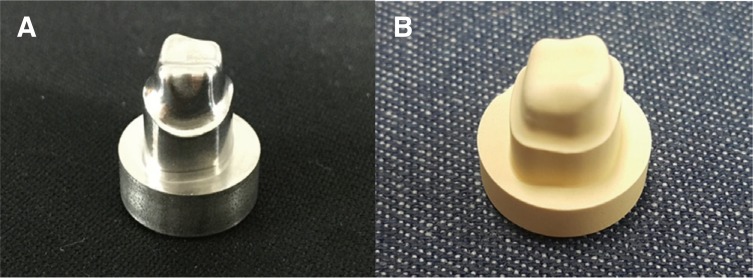
The upper 1st molar of the standard dental model (AG-3 ZPVK 16; Frasaco, Tettnang, Germany) was scanned by the model scanner (Identica Hybrid, Medit, Seoul, Korea). The 3D data of the upper 1st molar were formed with the virtual abutment tooth by using the haptic device (Geomagic Touch, 3D Systems, Cary, NC, USA) and CAD program (Power mill, Delcam Plc., Birmingham, UK). The tooth preparation was done with 1.5 mm of occlusal surface reduction, 1 mm of axial wall reduction, 1.2 mm chamfer of margin and 6 degree of vertical angle. The virtual abutment data were converted into the appropriate type to use in the CAM program (Power mill, Delcam Plc., Birmingham, UK) and the master model was fabricated with stainless steel by using CNC machine (Fig. 1A). The 10 vinyl-polysiloxane (Deguform Plus, DeguDent GmbH, Hanau-Wolfgang, Germany) impressions for the work model production were formed in the master model. Type IV dental stone (Fujirock EP, GC, Leuven, Belgium) was mixed with the ratio of 20.0 mL/100 g to pour into the impression and, after hardening for one hour, it was removed from the impression. A total of 10 working models were manufactured (Fig. 1B).
Fig. 1. (A) Master model (metal abutment), (B) Working model (stone abutment).
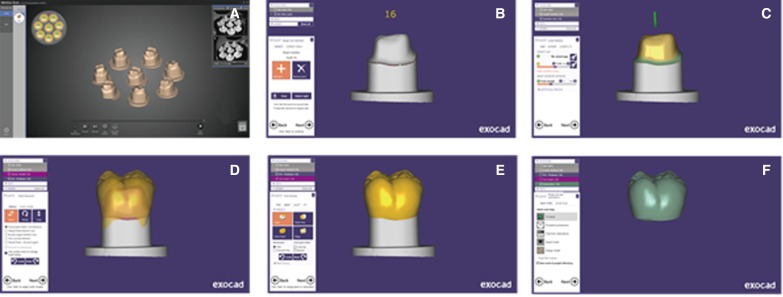
After scanning the working model, the scan data were retrieved with the design software. After setting the margin, the cement space 1 mm from upper side for 60 µm is granted. The same crowns were selected from the library to design 10 crowns and save them in the STL (Stereolithography) file (Fig. 2).
Fig. 2. Interim crown design. (A) Multi die scan, (B) Margin set-up, (C) Cement space set-up, (D) Tooth placement, (E) Margin modification, (F) Merge and save restoration.
The 10 STL files saved are used on the CAD/CAM milling method (Fig. 3) and two types of 3D printing method (Fig. 4 and Fig. 5) to produce a total of 30 interim crowns. Table 1 displays the resin material used for the crown manufacturing in this study. One type of milling for resin block and two types of resin for printing were used.
Fig. 3. (A) 3D Milling system (Zirkonzahn), (B) Manufactured crown.
Fig. 4. (A) 3D printing system (Stratasys), (B) Manufactured crown.
Fig. 5. (A) 3D printing system (Dentis), (B) Manufactured crown.
Table 1. Resin material used in the study.
| Classification | Product | Manufacturer |
|---|---|---|
| Milling block | Vipi block | VIPI, Brazil |
| Printing resin (S*) | VeroGlaze MED620 | Stratasys, USA |
| Printing resin (D*) | ZMD-1000B | Dentis, Korea |
* S, Stratasys; D, Dentis
The internal fit evaluation used the silicon replica method and was processed in the following sequence. The crown inside was filled up with the light body silicone (Aquasil Ultra XLV; Dentsply Detrey GmbH, Konstanz, Germany) and, after adapting the crown on the master model (metal abutment), the pressure of 50 N was applied. When the polymerization of the light body silicon was completed and the crown was removed, the light body silicon film remained in the abutment. The medium body silicone (Aquasil Ultra Monophase; Dentsply Detrey GmbH, Konstanz, Germany) was used to form the stable layer to support the light body silicon.
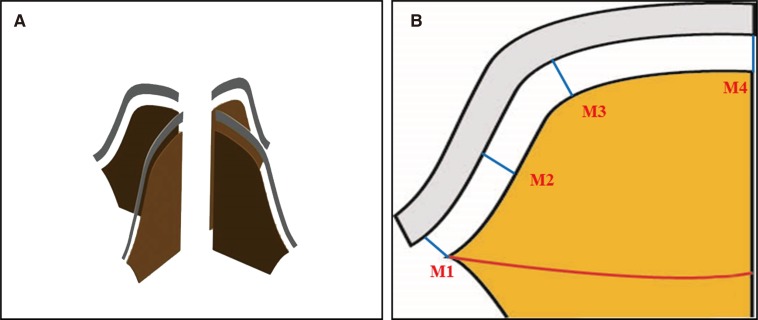
The marginal and internal discrepancy was measured in 4 points of each piece after cutting the completed silicon replica in the mesio-distal and bucco-lingual directions (Fig. 6). The measurement was administered at magnification of × 300 by using the image microscope system (EZVM-452M, SomeTech, Seoul, Korea). With the photos, the image measurement software (IT plus 5.0, Some Tech, Seoul, Korea) was used to measure the marginal and internal fit.
Fig. 6. Divided surface (A) and measured position (B) of the silicone replica.
The discrepancy value of the interim crown was presented as the mean and standard deviation by using the statistics software (IBM SPSS Version 20 for win, SPSS Inc., Chicago, IL, USA). The normality verification of the data was administered, and as a result, the data was confirming the normality (P > .05). In order to find out the difference of these 3 groups, the One-way ANOVA analysis was administered, and in order to analyze the difference of groups, the Tukey HSD (Honestly Significance Difference) test was implemented. The statistics significance was determined based on the significant level of 0.05.
RESULTS
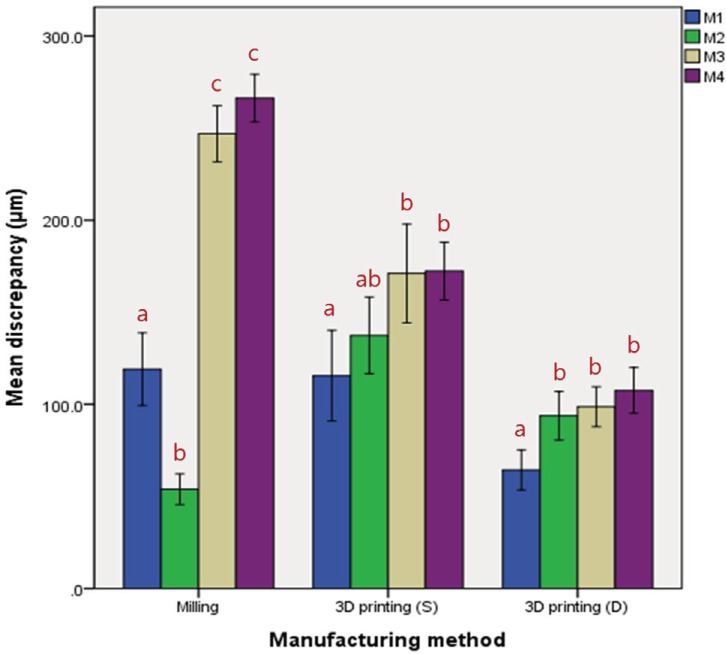
The discrepancy of the interim restoration as classified for the CAD/CAM milling group and 3-D printing group was measured at the designated location. The smallest area with the measurement value in the CAD/CAM milling group was M2 (53.9 ± 23.2 µm) and the largest area was M4 (266.3 ± 36.0 µm). The smallest area of the measurement value in the 3-D printing group was M1 (64.3 ± 30.1 µm) and the largest point was M4 (172.4 ± 43.3 µm). The discrepancy mean (standard deviation in parenthesis) of those 3 groups were 171.6 (97.4) µm for CAD/CAM milling group, and 149.1 (65.9) and 91.1 (36.4) µm for 3D printing group S (Stratasys) and D (Dentis), respectively (Table 2). The discrepancy value of the three groups showed statistically significant difference and the 3D printing group showed lower value than the CAD/CAM milling group (P < .05). In order to find out the statistically significant difference between the measured areas, One-way ANOVA analysis was implemented and the statistically significant difference was shown in the measurement point among the manufacturing method (Fig. 7).
Table 2. Mean and standard deviation of discrepancy for each group in the measurement area (Unit: µm).
| Measurement point | Milling | 3D printing (S) | 3D printing (D) | P value |
|---|---|---|---|---|
| Mean ± SD | Mean ± SD | Mean ± SD | ||
| M1 | 119.1 ± 54.8a* | 115.6 ± 68.4a | 64.3 ± 30.1b | < .001 |
| M2 | 53.9 ± 23.2a | 137.4 ± 57.7b | 93.8 ± 36.6c | < .001 |
| M3 | 247.0 ± 42.1a | 171.0 ± 74.5b | 98.7 ± 30.2c | < .001 |
| M4 | 266.3 ± 36.0a | 172.4 ± 43.3b | 107.5 ± 34.5c | < .001 |
S, Stratasys; D, Dentis
* Values with the same letter are not statistically different based on Tukey's test at P < .05.
Fig. 7. Mean and standard deviation of discrepancy following the measurement point from each group (Unit: µm).
DISCUSSION
The dental CAD/CAM milling method resulted in unnecessary exhaustion of materials and it would have significant loss of time in the production process. Furthermore, existing studies have reported that the marginal and internal fit, the most important evaluation elements, were not excellent when such fabrication method was applied. With the increase of interests in the 3D printing technology to supplement such weaknesses and with the increasing penetration rate of the 3D printer, the use of 3D printing is increasing as well.
This study is to evaluate the internal fit of the interim crown manufactured with the CAD/CAM technology. The marginal discrepancy between the restoration and abutment can lead to failure of the temporary crown and it may cause periodontitis, plague increase, secondary dental caries, or dental pulp lesion.16,17
There are several fit measurement method of the dental prosthesis; Sorensen18 reported 4 types of personally viewing method, cut and viewing the cross-section method, method to evaluate after the impression taking, and visual observation by the probe. In addition, according to the report of Grenade et al.,19 the core is used with the cement on the abutment model to bond and the cemented part is cut to measure the cross-section. According to Molin and Karlsson,20 the silicon replica method is reported to prevent the deformation as the core is not required to cut off. In this study, the silicon replica method was used and it was cut for mesio-distal and bucco-lingual to designate 4 measured areas to measure with the digital microscope. The clinically permitted range of the restoration margin has been presented by many researchers. Ostlund21 reported that 50 µm would be clinically outstanding, but McLean et al.22 presented 120 µm as the typical clinically permitted range. In addition, Boening et al.23 reported that it may exist within the clinically permitted scope up to 100 - 200 µm. In this study, as a result of measuring the fit of interim crown manufactured by the CAD/CAM milling and 3D printing technology, the marginal part of all groups showed the discrepancy value of 120 µm or less. In the result shown in the measurement part for each system, the discrepancy value in the M2 area having the relatively even surface was shown to be the smallest in the CAD/CAM milling method and the discrepancy values in the M1, M3, and M4 area with the curved surface showed small values in the 3D printing method. It is attributed to having the uneven surface of the occlusal surface compared to other area along with the limitation in the accurate reproduction for the diameter of the cutting device used in the CAM equipment. In addition, Liu et al.24 reported that the sharp edge, protruded part and undercut part of the CAD/CAM milling method would be more difficult to reproduce in the 3D printing method.
Overall mean (standard deviation) on the discrepancy of the interim crown as shown in the study was 171.6 (97.4) µm for CAD/CAM milling group and 120.1 (51.2) µm for the 3D printing group. In general, the 3D printing method has shown more outstanding fit than the CAD/CAM milling processing method. In this study, a number of efforts have been made to heighten the reliability of the experiment result. The control group, the CAM equipment of the CAD/CAM milling system, has been selected to have the equipment most frequently used in clinical situation and the experimental group in the 3D printer has extremely outstanding surface illumination to be selected with the SLA method and multi jet modeling method that have high precision. However, this study has a few limits. There was a few numbers of specimens, various printers were not used, and the same method of equipment was not used.
Therefore, there will be a need to secure a greater number of specimens and additional equipment in the future study, and furthermore, there is a need to make continuous studies on the fit of the fixed bridge manufactured by the 3D printing method.
CONCLUSION
In conclusion, the marginal and internal fit of the interim restoration is more outstanding in 3D printing method than in the CAD/CAM milling method. Therefore, the 3D printing method is considered to be applicable to the dental prosthesis production with high level of completion in addition to the interim restoration production. S, Stratasys; D, Dentis * Values with the same letter are not statistically different based on Tukey's test at P < .05.
Footnotes
This research was financially supported by the Ministry of Trade, Industry, and Energy (MOTIE), Korea, under the “Regional industry based organization support program”(reference number R0002883) supervised by the Korea Institute for Advancement of Technology (KIAT) and this work was supported by Institute for Information & Communications Technology Promotion (IITP) grant funded by the Korea government (MSIP) (B0101-16-1081, Development of ICT based software platform and service technologies for medical 3D printing applications).
References
- 1.Balkenhol M, Knapp M, Ferger P, Heun U, Wöstmann B. Correlation between polymerization shrinkage and marginal fit of temporary crowns. Dent Mater. 2008;24:1575–1584. doi: 10.1016/j.dental.2008.07.001. [DOI] [PubMed] [Google Scholar]
- 2.Ehrenberg D, Weiner GI, Weiner S. Long-term effects of storage and thermal cycling on the marginal adaptation of provisional resin crowns: a pilot study. J Prosthet Dent. 2006;95:230–236. doi: 10.1016/j.prosdent.2005.12.012. [DOI] [PubMed] [Google Scholar]
- 3.Ehrenberg DS, Weiner S. Changes in marginal gap size of provisional resin crowns after occlusal loading and thermal cycling. J Prosthet Dent. 2000;84:139–148. doi: 10.1067/mpr.2000.108027. [DOI] [PubMed] [Google Scholar]
- 4.Oxman JD, Anderson SE, inventors. Dental crown liner composition and methods of preparing provisional applications. U.S. Patent No 5,709,548. United States patent. 1998
- 5.Abouelatta OB, El-Bediwi A, Sakrana A, Jiang XQ, Blunt L. Surface integrity of provisional resin materials. Meas Sci Technol. 2006;17:584–591. [Google Scholar]
- 6.Nejatidanesh F, Lotfi HR, Savabi O. Marginal accuracy of interim restorations fabricated from four interim autopolymerizing resins. J Prosthet Dent. 2006;95:364–367. doi: 10.1016/j.prosdent.2006.02.030. [DOI] [PubMed] [Google Scholar]
- 7.Michalakis K, Pissiotis A, Hirayama H, Kang K, Kafantaris N. Comparison of temperature increase in the pulp chamber during the polymerization of materials used for the direct fabrication of provisional restorations. J Prosthet Dent. 2006;96:418–423. doi: 10.1016/j.prosdent.2006.10.005. [DOI] [PubMed] [Google Scholar]
- 8.Heying JJ, Gratton DG. Flexural strength of interim fixed prosthesis materials after simulated function. MS Thesis. University of Iowa; 2009. [Google Scholar]
- 9.Regish KM, Sharma D, Prithviraj DR. Techniques of fabrication of provisional restoration: An overview. Int J Dent. 2011;2011:134659. doi: 10.1155/2011/134659. [DOI] [PMC free article] [PubMed] [Google Scholar]
- 10.Alharbi N, Osman R, Wismeijer D. Effects of build direction on the mechanical properties of 3D-printed complete coverage interim dental restorations. J Prosthet Dent. 2016;115:760–767. doi: 10.1016/j.prosdent.2015.12.002. [DOI] [PubMed] [Google Scholar]
- 11.Syed M, Chopra R, Sachdev V. Allergic reactions to dental materials-a systematic review. J Clin Diagn Res. 2015;9:ZE04–ZE09. doi: 10.7860/JCDR/2015/15640.6589. [DOI] [PMC free article] [PubMed] [Google Scholar]
- 12.Torabi K, Farjood E, Hamedani S. Rapid prototyping technologies and their applications in prosthodontics, a review of literature. J Dent (Shiraz) 2015;16:1–9. [PMC free article] [PubMed] [Google Scholar]
- 13.Frazier WE. Metal additive manufacturing: A review. J Mater Eng Perform. 2014;23:1917–1928. [Google Scholar]
- 14.Stopp S, Wolff T, Irlinger F, Lueth T. A new method for printer calibration and contour accuracy manufacturing with 3D-print technology. Rapid Prototyp J. 2008;14:167–172. [Google Scholar]
- 15.Sun J, Zhang FQ. The application of rapid prototyping in prosthodontics. J Prosthodont. 2012;21:641–644. doi: 10.1111/j.1532-849X.2012.00888.x. [DOI] [PubMed] [Google Scholar]
- 16.Kelvin Khng KY, Ettinger RL, Armstrong SR, Lindquist T, Gratton DG, Qian F. In vitro evaluation of the marginal integrity of CAD/CAM interim crowns. J Prosthet Dent. 2016;115:617–623. doi: 10.1016/j.prosdent.2015.10.002. [DOI] [PubMed] [Google Scholar]
- 17.Pimenta MA, Frasca LC, Lopes R, Rivaldo E. Evaluation of marginal and internal fit of ceramic and metallic crown copings using x-ray microtomography (micro-CT) technology. J Prosthet Dent. 2015;114:223–228. doi: 10.1016/j.prosdent.2015.02.002. [DOI] [PubMed] [Google Scholar]
- 18.Sorensen JA. A standardized method for determination of crown margin fidelity. J Prosthet Dent. 1990;64:18–24. doi: 10.1016/0022-3913(90)90147-5. [DOI] [PubMed] [Google Scholar]
- 19.Grenade C, Mainjot A, Vanheusden A. Fit of single tooth zirconia copings: comparison between various manufacturing processes. J Prosthet Dent. 2011;105:249–255. doi: 10.1016/S0022-3913(11)60040-1. [DOI] [PubMed] [Google Scholar]
- 20.Molin M, Karlsson S. The fit of gold inlays and three ceramic inlay systems. A clinical and in vitro study. Acta Odontol Scand. 1993;51:201–206. doi: 10.3109/00016359309040568. [DOI] [PubMed] [Google Scholar]
- 21.Ostlund LE. Cavity design and mathematics: their effect on gaps at the margins of cast restorations. Oper Dent. 1985;10:122–137. [PubMed] [Google Scholar]
- 22.McLean JW, von Fraunhofer JA. The estimation of cement film thickness by an in vivo technique. Br Dent J. 1971;131:107–111. doi: 10.1038/sj.bdj.4802708. [DOI] [PubMed] [Google Scholar]
- 23.Boening KW, Wolf BH, Schmidt AE, Kästner K, Walter MH. Clinical fit of Procera AllCeram crowns. J Prosthet Dent. 2000;84:419–424. doi: 10.1067/mpr.2000.109125. [DOI] [PubMed] [Google Scholar]
- 24.Liu Q, Leu M, Schmitt S. Rapid prototyping in dentistry: technology and application. Int J Adv Manuf Technol. 2006;29:317–335. [Google Scholar]


