Abstract
Awake filling cystometry has been used for a long time to evaluate bladder function in freely moving mice, however, the specific methods used, vary among laboratories. The goal of this study was to describe the microsurgical procedure used to implant an intravesical tube and the experimental technique for recording urinary bladder pressure in an awake, freely moving mouse. In addition, experimental data is presented to show how surgery, as well as tubing type and size, affect lower urinary tract function and recording sensitivity. The effect of tube diameter on pressure recording was assessed in both polyethylene and polyurethane tubing with different internal diameters. Subsequently, the best performing tube from both materials was surgically implanted into the dome of the urinary bladder of male C57BL/6 mice. Twelve-hour, overnight micturition frequency was recorded in healthy, intact animals and animals 2, 3, 5, and 7 days post-surgery. At harvest, bladders were assessed for signs of swelling using gross observation and were subsequently processed for pathological analysis. The greatest extent of bladder swelling was observed on day 2 and 3, which correlated with behavioral voiding data showing significantly impaired bladder function. By day 5, bladder histology and voiding frequency had normalized. Based on the literature and evidence provided by our studies, we propose the following steps for in vivo recording of intravesical pressure and voided volume in an awake mouse: 1) Perform the surgery using an operating microscope and microsurgical tools, 2) Use polyethylene-10 tubing to minimize movement artifacts, and 3) Perform cystometry on post-operative day 5, when bladder swelling resolves.
Keywords: Medicine, Issue 123, Awake cystometry, mouse, bladder tube implantation, cystometric evaluation, tubing standardization, voided volume
Introduction
Filling cystometry (FC) is a diagnostic method that involves placing a catheter into the urinary bladder to record pressure during slow bladder filling. First introduced in 1927 as a clinical diagnostic method to evaluate lower urinary tract function, it has remained widely used.1 In research applications, FC can be used to test bladder function in healthy and diseased animal models and to study the effects of pharmacological agents. Rodent animal models are commonly used to investigate lower urinary tract function.2 In this group of mammals, FC was first developed for use in rats.3 Here, the methodology to implant a tube into the urinary bladder and perform FC has been well described and used by many researchers with an acceptable level of reproducibility.4 The availability of transgenic and knock out strains make mice a valuable species for numerous research areas, including the field of lower urinary tract dysfunction. The methodology used for performing mouse cystometry varies appreciably between laboratories, making it difficult to compare results.5
Compared to ex vivo models, FC preserves lower urinary tract anatomy, allowing the coordinated function between the bladder and its outlet during the storage and voiding phases of the micturition cycle to be assessed. Previous research shows that numerous, commonly used anesthetics suppress micturition contraction. Agents that preserve urinary bladder smooth muscle contraction (urethane, α-chloralose, ketamine and xylazine), allowing the animal to micturate, still significantly reduce functional bladder capacity and suppress neurotransmission.6,7,8,9 Although technically more challenging, FC performed in awake ambulating animals preserves the functional integrity of the micturition reflex.
Lower urinary tract function is influenced by multiple factors, including post-operative bladder wall swelling, stress due to pain and discomfort, and environmental influences. Using a surgical technique that minimizes tissue damage during tube implantation and recording methods that reduce tube movement, while simultaneously allowing the animal to ambulate freely, are essential for obtaining accurate and reproducible recordings.
If performed adequately, in vivoFC in freely moving animals can provide data that reliably reflects physiological bladder function.10 FC in freely moving animals can provide data on the following parameters; Basal or baseline pressure: Minimum pressure between two micturitions. Intermicturition pressure: Mean pressure between two micturitions. Threshold pressure: Intravesical pressure immediately before micturition. Maximum pressure: Maximum bladder pressure during a micturition cycle. Spontaneous activity (or mean intermicturition oscillatory pressure): Intermicturition pressure minus basal pressure. Non-voiding contractions: Increase in intravesical pressure during the filling phase, not associated with the release of fluid. Bladder compliance: Bladder capacity divided by threshold pressure minus basal pressure. Micturition frequency: Number of micturitions per unit of time. Intermicturition interval: Period between two maximum voiding pressures. Bladder capacity: Infused volume divided by the number of micturitions. A detailed description of these parameters and standardized terminology has been previously published.11
FC can be performed using a continuous or single cycle intravesical infusion method. Continuous cystometry allows for recording of multiple micturition cycles and selecting representative data based on reproducibility. Its accuracy in measuring bladder capacity is limited due to the unknown residual volume. In addition, it is challenging to collect small voided volumes (which based on strain and sex vary between 30 and 184 µL) in freely ambulating mice. Using this method to record voided volume is less accurate compared to an anesthetized preparation, but it is superior in that it avoids the suppressive effects of anesthetics on bladder function. Single cycle cystometry should be used to assess bladder capacity. In this method, the bladder is emptied by aspiration prior to infusion and capacity is calculated as a function of infusion rate multiplied by time to maximum pressure.
Although the technique of performing cystometry in small rodents has been published, it described the surgery performed in a rat and recommended that mouse cystometry should be performed under urethane anesthesia.10 The goal of this communication is to describe both the microsurgical techniques used to implant an intravesical tube into the dome of the urinary bladder and the experimental set-up used to record lower urinary tract function, in vivo, during continuous bladder filling and micturition in an awake freely moving mouse. In addition, experiments were performed to address how tubing length, diameter, and material, as well as the methodology for performing in vivo FC, affect the recording. This experimental protocol summarizes previously published techniques and proposes a number of modifications based on experimental results.
Protocol
Animals were housed in the University of Vermont Animal Care Facility according to institutional guidelines. All animal experiments were carried out in accordance with the National Institutes of Health guide for the care and use of laboratory animals.
1. Intravesical Tube Implantation
- Preparation of tubing and instruments for the surgical procedure
- Cut a 7-cm piece of PE10 tubing to make the catheter for implantation.
- Create a flare at one end of the PE10 tube by slowly advancing the end towards an open flame. NOTE: Quickly withdraw the tube as soon as the flare develops.
- Apply three drops of all-purpose hot glue, using the low heat setting on a glue gun, at 4.5, 5, and 5.5 cm from the flared end on the outside of the PE10 tube. These will help secure the tube at the animal's back. (Figure 1)
- Sterilize the tubing by soaking it in 70% ethanol and then flush it with sterile 0.9% NaCl prior to use. Leave the tube filled to avoid introducing air bubbles into the system.
- Create a 30-gauge plug to seal the end of the PE10 catheter by separating a 30-gauge needle from the hub by manually manipulating the proximal end side-to-side. Apply a drop of hot glue to the end. Ensure that the seal is watertight. (Figure 2)
- Use the following microsurgical instruments: Two pairs of Dumont #7 curved microforceps, two pairs of Dumont #5 curved microforceps, a 21 G needle, ultrafine straight hemostat, micro scissors, small dissecting scissors, and a micro needle holder.
- Sterilize all instruments before starting the procedure.
- Preparation of the animal
- After anesthetizing the animal, shave the lower half of the abdomen first, then turn the animal prone and shave and clean the area on the upper back with 70% alcohol followed by betadine. Apply vet ointment to the eyes to prevent dryness. Next, use a pair of straight, blunt scissors and pair of Dumont #7 curved microforceps to make a 1.5 cm long skin incision between the scapulae and place the animal supine on top of a heating pad (37 °C) covered with sterile drapes.
- Finally, clean the abdomen with alcohol and betadine.
- Surgical procedure NOTE: Perform all surgical procedures under an operating microscope with magnification ranging from 3.15X to 20X. After placing the animal onto the sterile drapes, put on sterile gloves. Continue using sterile procedures throughout the entire surgery.
- Place the animal in an induction box and anesthetize using 2% inhaled isoflurane with an oxygen carrier (1 L/min). Maintain anesthesia throughout the procedure by placing the animal's head in a nose cone and using 2% inhaled isoflurane with an oxygen carrier (1 L/min). Begin the surgery after receiving a negative response from the toe-pinch test.
- Use a pair of straight, blunt scissors and pair of Dumont #7 curved microforceps to make a 1.5 cm lower, midline abdominal incision through the skin. Subsequently, create a matching incision through the fascia along the linea alba and muscle to expose the dome and upper half of the urinary bladder. Avoid injuring the bladder by applying upward traction to each tissue layer using a pair of Dumont #7 curved microforceps. Keep the abdominal viscera from desiccation by adding drops of warm physiological saline.
- Rotate the animal onto its side to access the incision on the nape of the neck. Push a narrow hemostat subcutaneously though the incision. The subcutaneous channel should start on the back, and continue along the side.
- Once the tip of the instrument reaches the bottom of the rib cage, turn the tip towards the midline and inside of the abdomen (there will be a slight pop when piercing the abdominal wall muscles). Continue advancing the hemostat until the tip is exposed at the abdominal incision under the muscular layer. (Figure 3)
- Grasp the "non-flared" end of the tubing with the hemostat and slowly retract the tool, pulling the end of the tube out via the incision at the back of the neck. Adjust the flared end of the tubing so that it lies directly above the dome of the bladder.
- Make a loose tie of 6-0 monofilament suture (non-absorbable) and place it on top of the bladder dome. This tie will be used later to secure the tube in the bladder.
- Place a small roll of lint-free tissue in the abdomen and behind the bladder to help stabilize and elevate it.
- Prepare to insert the flared end of the PE10 catheter into the bladder.
- In the non-dominant hand, hold the dome of the bladder with Dumont #7 curved microforceps and maintain this grip until the catheter is placed in the bladder.
- Use a 21-gauge needle to make a cystotomy in the apex of the dome. Gently probe the cystotomy with a closed pair of #5 curved microforceps to make sure the catheter can easily pass through the hole.
- While still holding the bladder dome in the non-dominant hand, place the flared end of the PE10 catheter into the bladder (push the flare down to the bladder neck so that it does not slip out while securing it).
- Tie the 6-0 monofilament suture around the dome of the bladder and tubing with the tie placed anterior to the tubing. Be sure to tie the suture as high up on the bladder as possible to avoid artificially reducing bladder capacity. (Figure 4)
- Alternatively, secure the catheter using a purse string suture as follows. Make a loose purse string suture on the dome of the bladder using 6-0 monofilament. Follow steps 1.3.8.1 - 1.3.8.3 to perform the cystotomy and insert the catheter. Secure the tube by tying the purse string suture. (Figure 5)
- Test the patency and seal of the tube in the bladder by attaching a 0.5 mL insulin syringe with a 30-gauge needle to the distal end of the tube. Slowly fill the bladder with 0.1 - 0.2 mL of 0.9% NaCl until a drop appears at the urethral orifice, then empty the bladder by aspiration. It is important that the bladder can be both filled and emptied.
- If no leaks occur at the dome, brace the bladder with a pair of curved microforceps and gently pull on the tubing until the flare is resting against the inside of the bladder dome.
- Before closing, remove the small roll of tissue, and make sure that the bladder is in its normal position.
- Close the abdominal wall in two layers (muscle and skin) with 6-0 running suture. It is preferable to approximate the rectus abdominis muscle by suturing only the edges of the anterior abdominal fascia (anterior wall of the rectus sheath).
- To secure the tubing at the animals back, gently rotate the animal onto its abdomen. Insert the subcutaneous portion of the metal anchor into the interscapular incision. (Figure 12) Use a 6-0 suture to secure the tube and anchor by encircling them with a vertical mattress suture.
- Make sure a glue bubble remains above and below the skin to prevent the tube from pulling out. Cut the tube approximately 2 cm above the skin.
- Gently insert the 30-gauge plug (step 1.1.5) into the end of the tube to prevent urine from leaking out.
- Inject 0.5 mL 0.9% NaCl subcutaneously for hydration. Give post-operative analgesia immediately following surgery and maintain for 48 h.
- Place the animal back into its cage located under an infrared lamp. Maintain constant observation until the animal moves around the cage freely.
Monitor the animal daily and allow it to recover for 5 days before recording.
2. Awake Cystometry Recording
- Preparation of the recording program, pressure transducer, and infusion pump.
- Before anesthetizing the animal, connect the infusion pump, pressure transducer, and 22 G swivel using PE50 tubing. (Figure 6)
- Open the recording program (see table of materials for an example), on a computer to calibrate the system pressure and prepare for recording. Make sure to use the same settings during calibration and recording.
- Fill a 20 mL syringe with 10 - 15 mL of room temperature 0.9% NaCl and load into the infusion pump. Program the pump to infuse at a rate of 0.6 mL/h.
- Secure the pressure transducer at the same height as the animal's bladder or the bottom of the recording cage.
- Attach the 22-gauge swivel to the end of the pressure transducer (PE50 - tubing - pressure transducer to swivel) NOTE: The swivel is used to prevent the tube from twisting or kinking as the animal moves.
- Advance the syringe pump to flush 0.9% NaCl through the system. Make sure to remove all air bubbles before calibrating.
- With the recording program running, use a ruler to calibrate the pressure (cm/H2O). Slowly move the end of the PE50 tether from 0 to 30 cm. Adjust the zero if needed. NOTE: The 0-cm mark should be at the same height as the floor of the recording cage and pressure transducer.
- Suspend the 22-gauge swivel above the center of the recording cage. Ensure that the cage bottom allows urine to fall onto the collecting device of the balance positioned below the cage. Adjust the height of the tether so the mouse can freely move around the cage without straining or stretching the tubing. (Figure 7)
- When finished, check to make sure the system and external PE50 tubing are full of 0.9% NaCl and all air bubbles have been removed.
- Preparation of the animal for recording
- Anesthetize the animal with 2% inhaled isoflurane and place it on its abdomen. Remove the 30-gauge plug and slide the PE10 tubing (bladder catheter) into the end of the PE50 tether. Use hot glue to form a watertight seal.
- Turn off the anesthesia and place the animal in the recording cagewith a parallel-wire floor, which will allow urine to fall directly onto a collecting device placed on top of an analytical balance. (Figure 7)
- Start the recording once the animal is in the cage, but do not start infusing. Monitor the animal until it fully recovers from the anesthesia. Once the bladder pressure stabilizes, begin infusing 0.9% NaCl at a rate of 0.6 mL/h. NOTE: Make a note in the recording program when any changes are made. It is important to have a record of when infusion starts, stops, or irregularities occur.
- Check the system for leaks and make sure the animal has easy access to food and water.
- Continue recording in a quiet room until three reproducible micturition cycles are obtained. NOTE: The animal should be completely undisturbed throughout the recording. Preferably, use remote video monitoring to observe behavior.
Representative Results
There was no significant difference between the tubing materials and diameters in the consistency of pressure rise and fall within the system during tube occlusion. Bladder wall swelling post intravesical tube implantation was significant for both polyethylene (PE) and polyurethane (PU) materials. On day 2, severe submucosal swelling developed. It occupied half the cross-section of the bladder, leading to obstruction of the lumen. On day 5, the edema resolved completely, leaving the submucosal areas infiltrated with inflammatory cells that partially invaded the muscularis. On day 7, the inflammatory infiltration was reduced significantly and the bladder wall histology returned to normal (Figure 8). The greatest extent of tissue swelling observed on day 2 and day 3 correlated with behavioral voiding data showing significantly impaired bladder function (Figure 9). Voiding frequency normalized by post-operative day 5.
Intravesical pressure in an awake freely moving mouse (with minimal movement artifacts) is characterized by a baseline pressure of 10-15 cm H2O, which may remain unchanged or gradually increase by no more than 10-cm H2O during the filling cycle, followed by a sudden, pulsatile pressure increase and then drop during voiding (Figures 10 and 11).
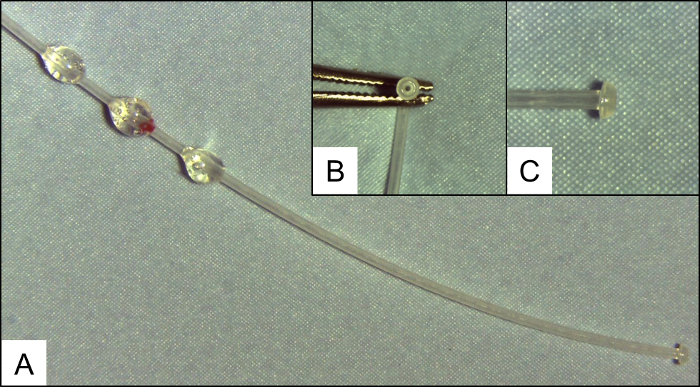 Figure 1: PE10 Tubing for Implantation into the Urinary Bladder. (A) A 7 cm piece of PE10 tubing with drops of hot glue at 4.5, 5, and 5.5 cm from the flared end. (B and C) A detailed picture showing the flared end of the tube (used to secure tube in bladder). Please click here to view a larger version of this figure.
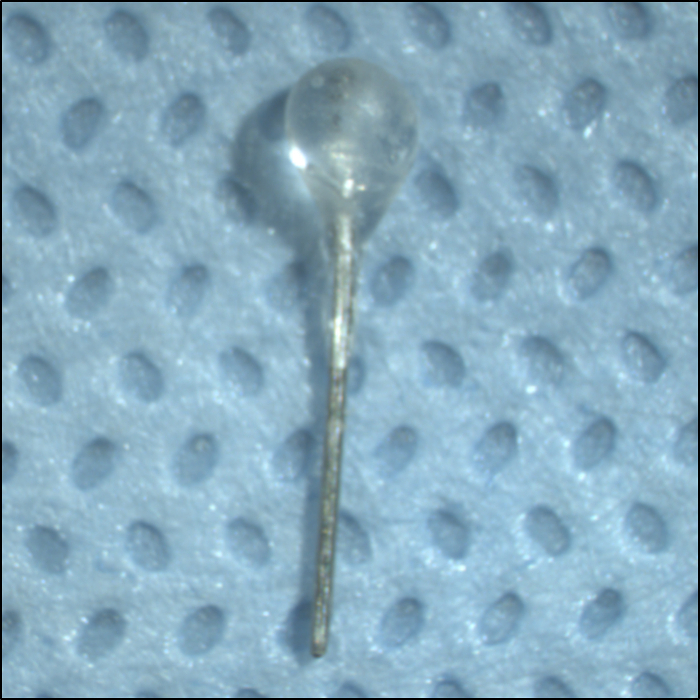 Figure 2: Plug for the External Portion of the PE10 Bladder Tubing. Plug is made from a 30 G needle and hot glue. Please click here to view a larger version of this figure.
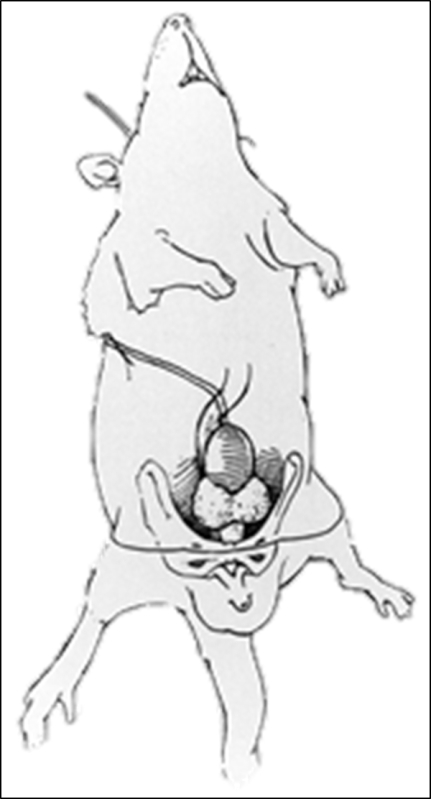 Figure 3: Course of the Bladder Tubing. Schematic line drawing illustrating the placement of the tubing through the abdomen and its subcutaneous route towards the nape of the neck. Please click here to view a larger version of this figure.
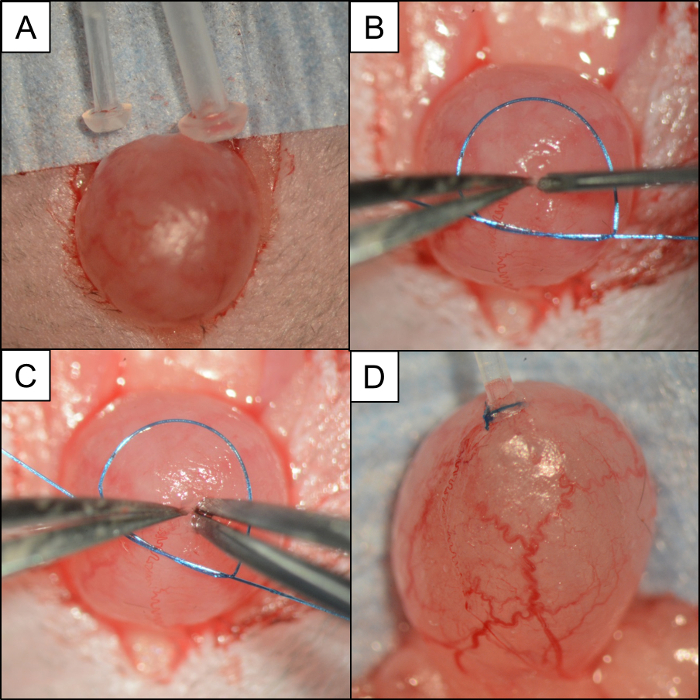 Figure 4: Bladder/Tubing Comparison and Steps used to Insert and Secure the Tube using a Lose Monofilament Suture. Intraoperative photographs depicting:(A) Picture comparing PE50 and PE10 to a mouse urinary bladder. (B) A small loop of 6-0 monofilament suture placed around the bladder. A pair of #5 microforceps clasps the dome of the bladder while a 21 G needle is used to make the cystotomy. (C) Without releasing the dome of the bladder, a pair of #5 microforceps in the opposite hand probes the hole before inserting the PE10 catheter. (D) PE10 catheter secured in the dome of the bladder with 6-0 monofilament suture. Please click here to view a larger version of this figure.
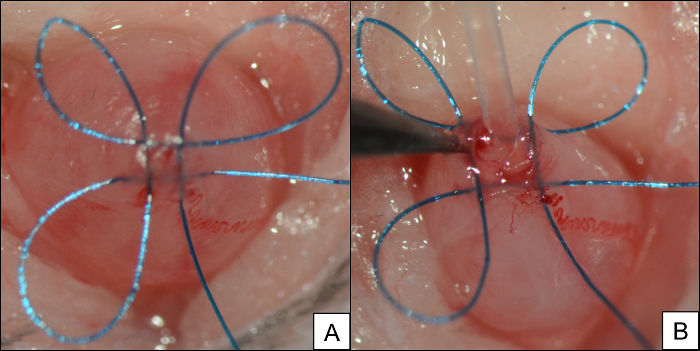 Figure 5: A Purse String Suture can be used as an Alternative Method for Securing the Tube in the Bladder. (A) Purse string suture in the dome of the bladder. (B) PE10 tubing inserted through a center of the purse string. Please click here to view a larger version of this figure.
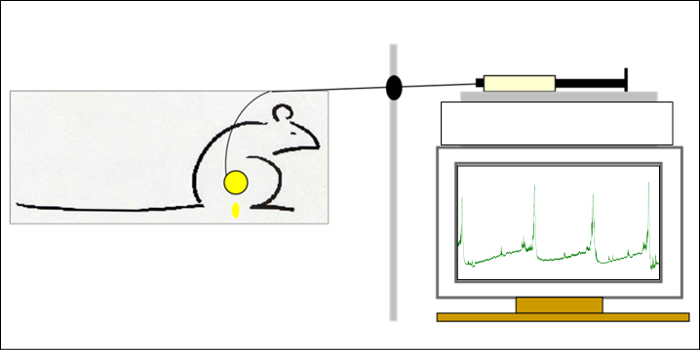 Figure 6: Experimental Set-up. Syringe containing 0.9% NaCl in the infusion pump connected in series to the pressure transducer and intravesical catheter. The computer screen in the bottom right shows three reproducible micturition cycles. Please click here to view a larger version of this figure.
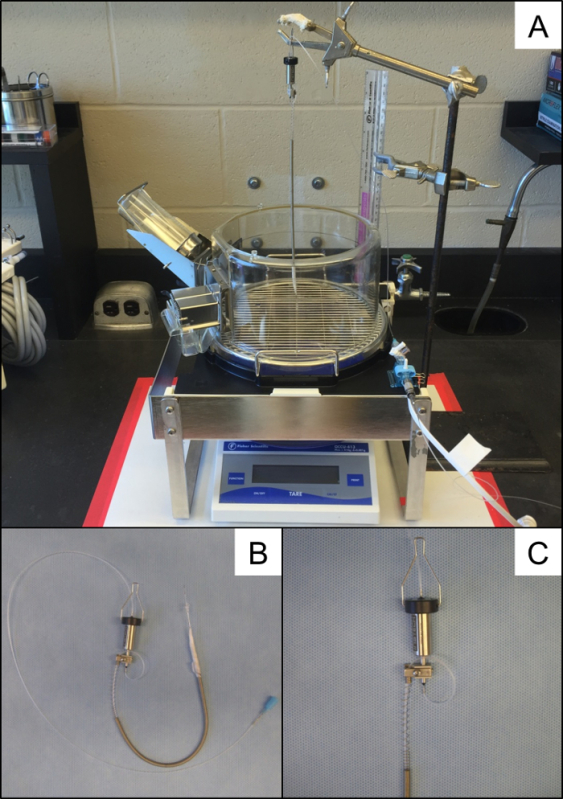 Figure 7: Experimental Recording Set-up. (A) 22 G swivel suspended over a recording cage and balance. (B) Photograph showing entire length of the external portion of the infusion tubing with a 22 G swivel and a PE50 tether. (C) A 22 G swivel with a spring sheath covering PE50 tubing. Please click here to view a larger version of this figure.
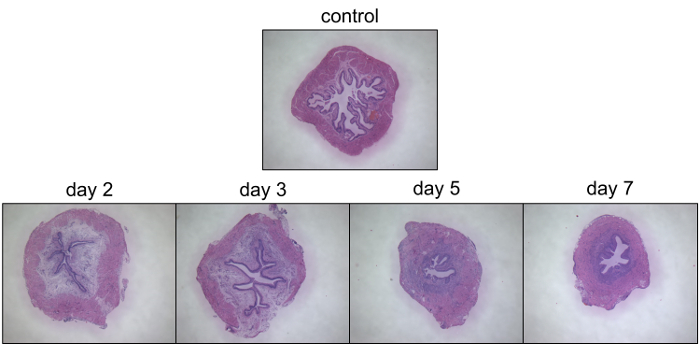 Figure 8: Histological Evaluation of the Response of the Urinary Bladder Wall to an Implanted PE10 Tube. Cross-sections of the urinary bladder stained with hematoxylin and eosin (H&E) before, 2, 3, 5 and 7 days post surgery. Bladder wall swelling resolved on post-operative day 5. Please click here to view a larger version of this figure.
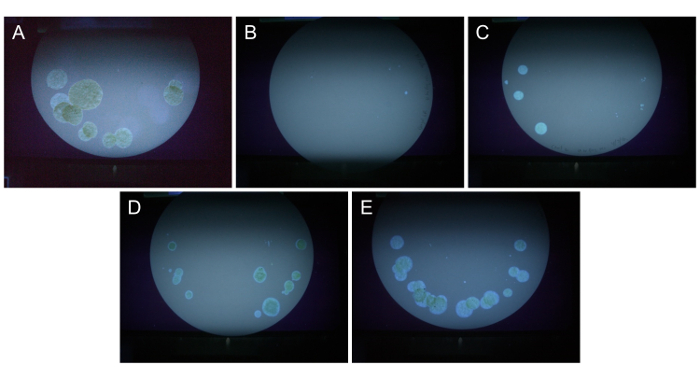 Figure 9: Functional Bladder Evaluation using Voiding Spot Assay. Urine spots on filter paper viewed with UV light documenting the representative micturition pattern on day 0 (prior to tube implant), 2, 3, 4, 5 and 7 post-intravesical tube implant. Please click here to view a larger version of this figure.
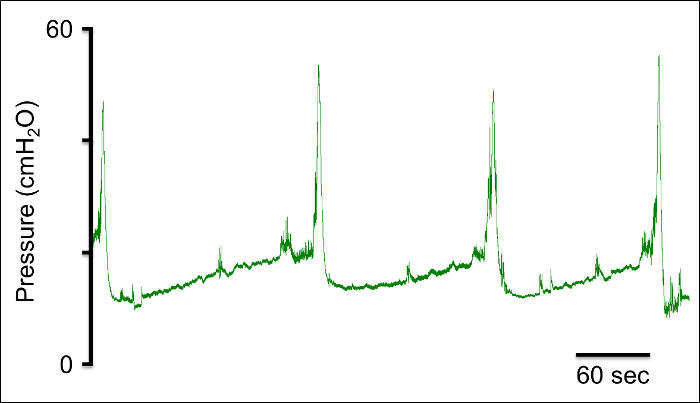 Figure 10: Cystometrogram. Representative trace of intravesical bladder pressure in an awake, freely moving mouse. Trace showing 3 reproducible micturition cycles. Please click here to view a larger version of this figure.
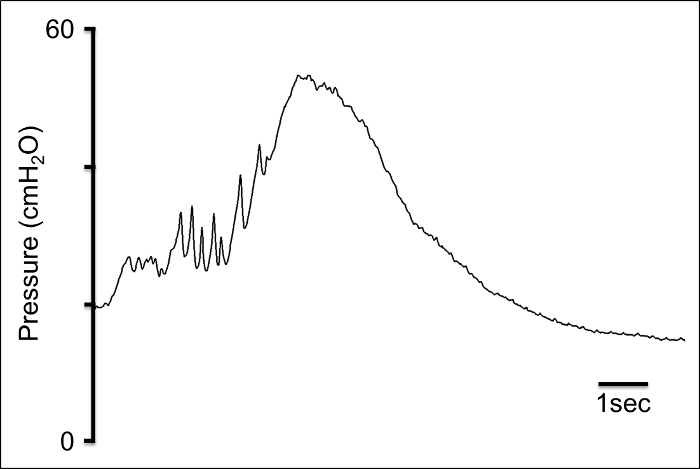 Figure 11: Micturition Phase. Trace depicting the micturition phase with high frequency oscillations during the initial increase in pressure, peak pressure, and a rapid pressure drop to baseline. Please click here to view a larger version of this figure.
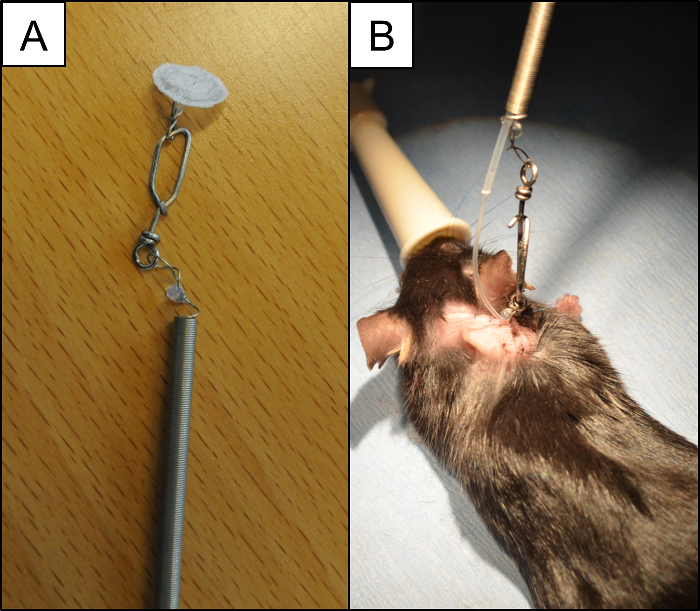 Figure 12: Anchoring the Tether. (A) Anchor used to secure the PE10 catheter in the animal and prevent the tube from puling on the bladder. The disk is attached to the spring sheath. (B) Internal PE10 catheter connected to the external PE50 tubing. Please click here to view a larger version of this figure.
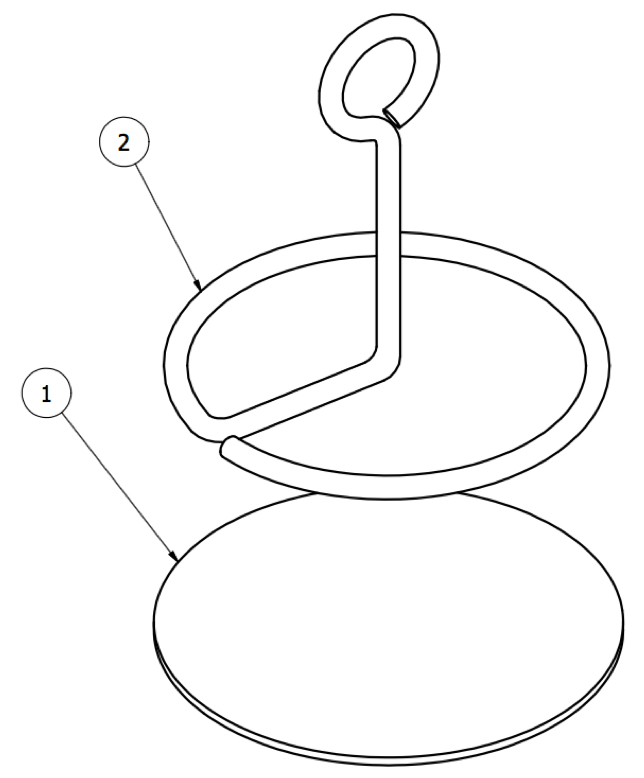 Figure 13: Swivel Anchor. Subcutaneous portion of the anchor consisting of (1) a disc made of fabric and (2) a metal loop.
Discussion
Optimal material and size of intravesical tubing
To determine the effect tubing diameter has on pressure recordings, we tested different microfluidic tubes; PE50 (0.58 mm ID), polyurethane PU027 (0.4 mm ID), PE25 (0.46 mm ID), and PE10 (0.28 mm ID). For each tube, pressure was recorded with the infusion pump running at 1 mL/h, while rapidly moving the tube vertically from 0 to 30 cm. Initial in vivo experiments attempted to use PE50 tubing, but were unsuccessful due to the size of tubing compared to the mouse bladder (Figure 4A). While this supports the finding by Smith and Kuchel, who suggest that using PE50 tubing for awake cystometry in a mouse creates artifacts, making it difficult to interpret the data,12 it is important to note that others have successfully used PE50 tubing in both awake nonrestrained, awake restrained, and anesthetized mouse cystometry.9,13,14 Compared to PE50, PE10 is more flexible, which reduces the amount of tension the tube applies to the bladder as the mouse moves, reducing movement artifacts. It is important that the section of PE10 is as short as possible (≤ 7cm). Longer PE10 tubing leads to a greater likelihood that the pressure reading will be dampened. Although there is a theoretical advantage to using a softer, more bio-inert material like PU for intravesical implantation to decrease the inflammatory reaction, it did not result in a significant difference in post-operative bladder swelling. Further, trials which used the softer PU tubing, were associated with kinking and plugging.
Effects of surgery on bladder wall contractility and swelling
Until now, data on bladder function and bladder wall swelling, post implant of an intravesical tube, were only available for rats. According to previous studies, micturition volume was lower and micturition frequency was higher on post-operative days 1 - 3.15 It was also shown that alterations in bladder function of a rat were associated with severe swelling of the bladder, with the edema starting to subside after 3 days.16 To gain a better understanding of the change in urinary bladder function, bladder wall swelling, and repair timeline of male, C57BL/6 mice, which occur from implanting PE10 tubing, 12-hour behavioral voiding frequency was assessed using the filter paper recording method. Following the last recording, the mouse was anesthetized and the bladder was grossly assessed, harvested, fixed, and evaluated histologically. On post-surgery day 1 and 2, voiding frequency decreased and spotting increased, followed by an increase in voiding by day 3. Voiding behavior normalized by day 5. Gross evaluation of bladders at harvest and following H&E staining revealed the greatest amount of suburothelial swelling on post-operative day 2 and 3, with bladders becoming similar to the control bladders at day 5 and 7 following the tube implant.
Similar to clinical urodynamic studies, the majority of laboratories used room temperature 0.9% NaCl.11 The rate of infusion in previous studies varies significantly from 10 µL/min to 100 µL/min.17,18 A study comparing the effects of different infusion rates on bladder function in a mouse have not been done, however, data obtained in larger animal studies recommended that slower filling rates should be used. Due to the small volume of the mouse bladder, peristaltic pumps are not appropriate and a continuous mechanism infusion pump is necessary.
The most accurate and usable FC recordings balance good transmittance of changes in pressure with limited artifacts. The results obtained using a short segment of PE10 tubing connected directly to PE50 provided an accurate measurement of pressure in the mouse urinary bladder. Pressure fluctuations caused by animal movement can be limited by anchoring the tube to the skin at the point where it exits at the nape of the neck (Figures 12 and 13). This could be achieved with the use of glue bubbles and a special anchor consisting of a metal fabric-covered plate placed subcutaneously, and the external piece, which is attached to the metal spring covering the tube. Additional methods for preventing the tube from pulling on the bladder include creating a curved subcutaneous track for the internal portion of the PE10 tubing, which provides slack in the tube, and using a swivel and tether, which prevent twisting and kinking. Based on the literature and evidence provided by these studies, the following steps are recommended to provide the most reproducible and physiologically accurate method for in vivo recording of intravesical pressure in a mouse. Use an operating microscope and microsurgical tools to implant the catheter into the dome of the urinary bladder. Allow a 5 day recovery period between the surgery and recording. Acclimate the animal in the same cage that the recording will be performed in and provide free access to food and water. Perform the experiment in a quiet environment with minimal human contact, ideally use remote video monitoring to observe the animal's behavior.
Disclosures
The authors have nothing to disclose.
Acknowledgments
This study was funded by the Department of Surgery University of Vermont, Danish Council for Independent Research, and by the Odense University Hospital.
References
- Perez LM, Webster GD. The History of Urodynamics. Neurourol Urodyn. 1992;11(1):1–21. [Google Scholar]
- Fry CH, et al. Animal models and their use in understanding lower urinary tract dysfunction. Neurourol Urodyn. 2010;29(4):603–608. doi: 10.1002/nau.20903. [DOI] [PubMed] [Google Scholar]
- Maggi CA, Santicioli P, Meli A. The nonstop transvesical cystometrogram in urethane-anesthetized rats: a simple procedure for quantitative studies on the various phases of urinary bladder voiding cycle. J Pharmacol Methods. 1986;15(2):157–167. doi: 10.1016/0160-5402(86)90064-1. [DOI] [PubMed] [Google Scholar]
- Malmgren A, et al. Cystometrical evaluation of bladder instability in rats with infravesical outflow obstruction. J Urol. 1987;137(6):1291–1294. doi: 10.1016/s0022-5347(17)44485-5. [DOI] [PubMed] [Google Scholar]
- Pandita RK, Fujiwara M, Alm P, Andersson KE. Cystometric evaluation of bladder function in non-anesthetized mice with and without bladder outlet obstruction. J Urol. 2000;164(4):1385–1389. [PubMed] [Google Scholar]
- Chang HY, Havton LA. Differential effects of urethane and isoflurane on external urethral sphincter electromyography and cystometry in rats. Am J Physiol Renal Physiol. 2008;295(4):F1248–F1253. doi: 10.1152/ajprenal.90259.2008. [DOI] [PMC free article] [PubMed] [Google Scholar]
- Matsuura S, Downie JW. Effect of anesthetics on reflex micturition in the chronic cannula-implanted rat. Neurourol Urodyn. 2000;19(1):87–99. doi: 10.1002/(sici)1520-6777(2000)19:1<87::aid-nau9>3.0.co;2-o. [DOI] [PubMed] [Google Scholar]
- DePaul MA, Lin CY, Silver J, Lee YS. Peripheral Nerve Transplantation Combined with Acidic Fibroblast Growth Factor and Chondroitinase Induces Regeneration and Improves Urinary Function in Complete Spinal Cord Transected Adult Mice. PLoS One. 2015;10(10):e0139335. doi: 10.1371/journal.pone.0139335. [DOI] [PMC free article] [PubMed] [Google Scholar]
- Kadekawa K, et al. Characterization of bladder and external urethral activity in mice with or without spinal cord injury--a comparison study with rats. Am J Physiol Regul Integr Comp Physiol. 2016;310(8):R752–R758. doi: 10.1152/ajpregu.00450.2015. [DOI] [PMC free article] [PubMed] [Google Scholar]
- Uvin P, et al. The use of cystometry in small rodents: a study of bladder chemosensation. J Vis Exp. 2012. [DOI] [PMC free article] [PubMed]
- Andersson KE, Soler R, Fullhase C. Rodent models for urodynamic investigation. Neurourol Urodyn. 2011;30(5):636–646. doi: 10.1002/nau.21108. [DOI] [PubMed] [Google Scholar]
- Smith PP, Kuchel GA. Continuous uroflow cystometry in the urethane-anesthetized mouse. Neurourol Urodyn. 2010;29(7):1344–1349. doi: 10.1002/nau.20850. [DOI] [PMC free article] [PubMed] [Google Scholar]
- Aizawa N, Homma Y, Igawa Y. Influence of High Fat Diet Feeding for 20 Weeks on Lower Urinary Tract Function in Mice. Low Urin Tract Symptoms. 2013;5(2):101–108. doi: 10.1111/j.1757-5672.2012.00172.x. [DOI] [PubMed] [Google Scholar]
- Bjorling DE, et al. Evaluation of voiding assays in mice: impact of genetic strains and sex. Am J Physiol Renal Physiol. 2015;308(12):F1369–F1378. doi: 10.1152/ajprenal.00072.2015. [DOI] [PMC free article] [PubMed] [Google Scholar]
- Morikawa K, et al. Effects of various drugs on bladder function in conscious rats. Jpn J Pharmacol. 1989;50(4):369–376. doi: 10.1254/jjp.50.369. [DOI] [PubMed] [Google Scholar]
- Yaksh TL, Durant PA, Brent CR. Micturition in rats: a chronic model for study of bladder function and effect of anesthetics. Am J Physiol. 1986;251(6 Pt 2):R1177–R1185. doi: 10.1152/ajpregu.1986.251.6.R1177. [DOI] [PubMed] [Google Scholar]
- Cornelissen LL, Misajet B, Brooks DP, Hicks A. Influence of genetic background and gender on bladder function in the mouse. Auton Neurosci. 2008;140(1-2):53–58. doi: 10.1016/j.autneu.2008.04.001. [DOI] [PubMed] [Google Scholar]
- Lemack GE, Zimmern PE, Vazquez D, Connell JD, Lin VK. Altered response to partial bladder outlet obstruction in mice lacking inducible nitric oxide synthase. J Urol. 2000;163(6):1981–1987. [PubMed] [Google Scholar]


