Abstract
Given the highly predictable nature of their development, Arabidopsis embryos have been used as a model for studies of morphogenesis in plants. However, early stage plant embryos are small and contain few cells, making them difficult to observe and analyze. A method is described here for characterizing pattern formation in plant embryos under a microscope using the model organism Arabidopsis. Following the clearance of fresh ovules using Hoyer's solution, the cell number in and morphology of embryos could be observed, and their developmental stage could be determined by differential interference contrast microscopy using a 100X oil immersion lens. In addition, the expression of specific marker proteins tagged with Green Fluorescent Protein (GFP) was monitored to annotate cell identity specification during embryo patterning by confocal laser scanning microscopy. Thus, this method can be used to observe pattern formation in wild-type plant embryos at the cellular and molecular levels, and to characterize the role of specific genes in embryo patterning by comparing pattern formation in embryos from wild-type plants and embryo-lethal mutants. Therefore, the method can be used to characterize embryogenesis in Arabidopsis.
Keywords: Developmental Biology, Issue 126, Embryogenesis, ovule clearing, Hoyer's solution, marker gene, differential interference contrast microscopy, confocal laser scanning microscopy, Arabidopsis
Introduction
Embryogenesis is the earliest event in higher plant development. A mature embryo forms from a zygote through cell division and differentiation under strict genetic control1,2. Arabidopsis embryos are a useful model to study the control of morphogenesis because the sequence of cell divisions during embryogenesis follows an expected pattern3,4. However, an Arabidopsis embryo containing one to several cells is too small to be observed and analyzed. In addition, the mutation of certain genes can cause embryo lethality5, indicating the key role of those genes in embryogenesis. The characterization of pattern formation in the embryo-lethal mutants provides a basis for understanding the molecular mechanism whereby essential genes regulate embryo development.
A detailed method is described here for the characterization of embryo pattern formation in the model plant Arabidopsis by direct microscopic observation. The method involves ovule clearance followed by the microscopic observation of an embryo. The characterization of an embryo-lethal mutant is also described.
The morphology of embryos at different developmental stages can be determined directly by microscopy using the ovules that have been cleared with Hoyer's solution6,7. Such ovules exhibit a high refractive index; thus, this ovule clearing method is especially advantageous for specimens that must be observed by differential interference contrast (DIC) microscopy.
In addition, the genes that are expressed in a particular cell or a limited number of cells during embryogenesis can be used as markers to identify the cells in an embryo. Therefore, the cell identity specification during embryogenesis can be annotated by monitoring the expression of GFP-tagged marker proteins using confocal laser scanning microscopy. Conversely, observing the expression pattern of an unknown functional gene-GFP fusion during embryogenesis can provide a link between embryo patterning and the expression of that gene, and facilitate the identification of new genes that are required for embryogenesis in Arabidopsis.
The method described here can also be used to characterize the phenotype of an embryo-lethal mutant, and to determine the impact of the affected gene on embryogenesis at the cellular level. Furthermore, in combination with a comparison of the expression pattern of marker genes during embryogenesis between wild-type and mutant plants, the method can yield clues about the molecular mechanisms and signaling pathways involved in embryogenesis8,9. Indeed, the method was applied to naa10 plants, and it was found that the abnormal division of the hypophysis in the mutant may be caused by a change in the auxin distribution during embryogenesis5.
Protocol
NOTE: This protocol has three parts: 1) observing the pattern formation in wild-type Arabidopsis embryos using DIC microscopy; 2) characterizing the embryo pattern formation via the observation of marker protein expression using confocal laser scanning microscopy; and 3) determining the role of a specific gene in embryogenesis (using the naa10 mutant as an example).
1. Ovule Clearing
- Plant material preparation NOTE: The protocol described here is an example on how to grow healthy plants; other ways to grow healthy plants also work.
- Add 100 seeds to a 1.5 mL tube, and then add 1 mL of 1.5% sodium hypochlorite (mix 15 mL of 10% chlorine with 85 mL of water) to sterilize the seeds for 5 min. Invert the tube several times to ensure that the seeds and solution are well-mixed to sterilize the surface seeds completely.
- Force the seeds to the bottom of the tube by centrifugation for 30 s at 1,200 x g, remove the supernatant, and wash the seeds with sterile water four times at a bench to remove the residual sodium hypochlorite.
- Add 4.4 g of Murashige and Skoog (MS) basal salt mixture and 10 g of sucrose to 1 L of ultrapure water. Stir the mixture to dissolve the salts and sucrose. Adjust the solution to pH 5.8 with 1 M KOH, add 3 g of gelling agent, such as Phytagel, to the MS-sucrose solution, and sterilize the solution at 121 °C for 15 min to make MS medium.
- Pour 30 mL of the MS medium into a 12-cm culture dish to generate MS medium plates.
- Place the sterilized seeds on the MS plate. Transfer the plate to a growth chamber and keep the plate under long-day conditions (22 °C for 16 h in the light and 18 °C for 8 h in the dark) after seed stratification (3 days at 4 °C in the dark).
- After 8 days of growth, transfer the plants to soil (mix nutrient-rich soil and vermiculite at a 1:1 ratio) in a tray, cover the tray with a white, transparent lid for 5 days to avoid water loss, and leave a gap to avoid vitrification of the plants.
- Take the lid off the tray and cultivate the plants in a walk-in chamber under long-day conditions (see 1.1.5). Switch the light on at 6:00 am and off at 10:00 pm. After about 20 days of growth in the walk-in chamber, the plants will have flowered and produced siliques.
- Mark the flower buds with a thread at the position of the seed stalks in the inflorescence at 8:00 pm (do not use the first to the third flower buds; the siliques generated from these flower buds usually develop a few aborted seeds, and this may alter the proportion of normal to abnormal ovules). Define the beginning of pollination of the ovule as when the marked bud opens to flower at 8:00 am the next morning.
- Preparation of Hoyer's solution
- Add 24 g of chloral hydrate to a 50-mL tube and wrap the tube completely with aluminum foil (solutions of chloral hydrate are not stable under light).
- Next, add 9 mL of ultrapure water and 3 mL of glycerol to the above solution and shake the tube to dissolve the chloral hydrate. To make Hoyer's solution, let the tube stand overnight at room temperature to eliminate any bubbles.
- Ovule separation and clearance
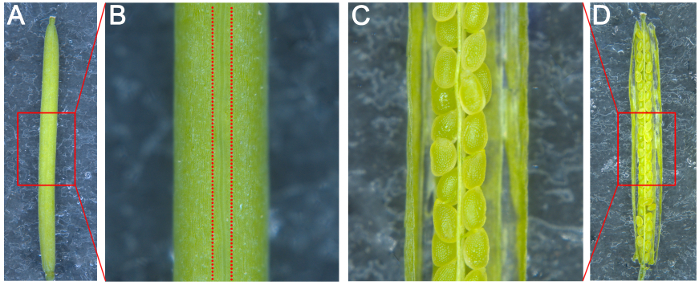
- Attach a piece of double-sided adhesive tape to a microscope glass slide. Place a silique grown for the desired number of days after pollination (DAP) on the slide with the pseudoseptum perpendicular to the surface; this will make it easy to split the carpels (Figures 1A and 1B).
- Split the carpels on both sides of the pseudoseptum with a syringe needle and attach the two dissected carpels to the slide so that the ovules in the silique are visible under a stereoscope (Figures 1C and 1D).
- Dispense 70 µL of Hoyer's solution onto the glass slide, and then moisten the tip of a pair of fine-tipped tweezers with Hoyer's solution by dipping. Using the stereoscope, move the ovules into the Hoyer's solution on the slide with the tweezers to clean the embryos. Apply a coverslip to the slide gently to avoid generating any bubbles.
- Put the finished slide into a box in a dark room for 2 - 12 h (the more mature an ovule is, the more time will be needed) at room temperature. Embryos at the 2/4-cell stage (1 - 2 DAP) can be observed microscopically after 2 h, while embryos between the octant and early globular stages (3 DAP) can be observed after 4 h. More mature embryos (4 - 8 DAP) can be observed after 12 h.
- Examine the cleared ovules using the DIC function of a microscope. Locate the embryos under a low-power field (10X) and then change to a high-power field (100X oil immersion lens) to observe the cellular pattern in the developed embryos.
- Examine the embryos at different developmental stages.
2. Characterization of Embryo Patterning and Cell Identity via the Observation of Marker Protein Expression
- Preparation of plant materials
- Clone the promoter and coding sequence of the marker gene or hormone response element and then fuse it with a fluorescent protein (such as GFP); next, insert the construct into the binary vector (such as pCambia1300). Here, the auxin response element DR5 is presented as an example10.
- Introduce the resulting DR5-GFP plasmid into the wild-type plants by Agrobacterium tumefaciens-mediated transformation11. Select the T1 plants using MS medium plates containing hygromycin (50 mg/mL of mother liquor, diluted 1:1,000). The transgenic plants will exhibit long roots and generate two rosette leaves after 8 days of growth under the conditions described in 1.1.5.
- Transfer the transgenic plants to soil and cultivate them as indicated in 1.1.6 and 1.1.7.
- Collect the T2 seeds from the independent T1 lines. Sow the seeds on MS-hygromycin plates, select the plants carrying one copy of the DR5-GFP insertion (the ratio of resistant plants to sensitive plants will be roughly 3:1), and transfer them to soil.
- Cultivate the T2 plants as indicated in 1.1.6 and 1.1.7.
- Collect the T3 seeds from the T2 plants. Sow the seeds on MS-hygromycin plates, select the homozygous transgenic plants (all of the plants from a single line will exhibit hygromycin resistance), and transfer them to soil.
- Mark the flower buds of the homozygous T3 plants as indicated in 1.1.8.
- GFP signal observation
- Mix 3 mL of glycerol with 47 mL of ultrapure water to generate a 6% glycerol solution.
- Attach a piece of double-sided adhesive tape to a glass microscope slide and fix a silique as indicated in 1.3.1.
- Split the carpels on both sides of the pseudoseptum with a syringe needle and attach the two dissected carpels to the slide under a stereoscope as indicated in 1.3.2.
- Dispense 30 µL of 6% glycerol onto the glass slide and place all of the ovules from the dissected carpels into the solution using fine-tipped tweezers. Place a coverslip on the slide gently.
- As the seed coat and endosperm in each ovule can prevent the observation of GFP signals in the embryo, extract the embryo from the ovule. Tap the slide quickly and gently to extrude the embryo from the ovule (the more mature an ovule is, the less force should be applied to the slide).
- Examine the slide for GFP fluorescence using confocal laser scanning microscopy. Find the isolated embryos under a low-power field (10X) and record their location, then change to a high-power field (100X oil immersion lens) to observe DR5-GFP expression in the embryos by setting the excitation light source to 488 nm for detection of the GFP signal.
- Detect the GFP expression in the embryos to select the suitable T3 line for further analysis.
3. Characterization of Embryo Pattern Formation in an Embryo-lethal Mutant via Ovule Clearance and Marker Protein Observation: Naa10 as an Example
- Embryo patterning in naa10 mutant plants
- Prepare the plant materials as indicated in 1.1.1-1.1.7.
- Identify the naa10+/− plants by PCR using gene-specific primers5, and then mark the flower buds of the naa10+/− plants as indicated in 1.1.8.
- Perform ovule clearance and the microscopic examination of naa10+/− embryos as indicated in 1.2 and 1.3.
- Marker protein analysis using naa10 embryos
- Obtain suitable DR5-GFP transgenic lines using the procedure outlined in 2.1 - 2.2.
- Cross a homozygous DR5-GFP transgenic line with an naa10+/− plant to obtain naa10+/− plants that are homozygous for the GFP fluorescence marker at the F2 generation (identified by gene-specific PCR) to characterize naa10+/−5 and observe the GFP signal under a microscope using a homozygous DR5-GFP line.
- Mark the flower buds of naa10+/− plants that are homozygous for DR5-GFP as indicated in 2.1.7.
- Search for the GFP signal in naa10 embryos that are homozygous for DR5-GFP as indicated in 2.2.
Representative Results
The method described in this paper can be used to observe embryogenesis directly under a microscope, annotate the cell identity specification during embryogenesis with specific markers, and characterize the role of a particular gene during embryogenesis.
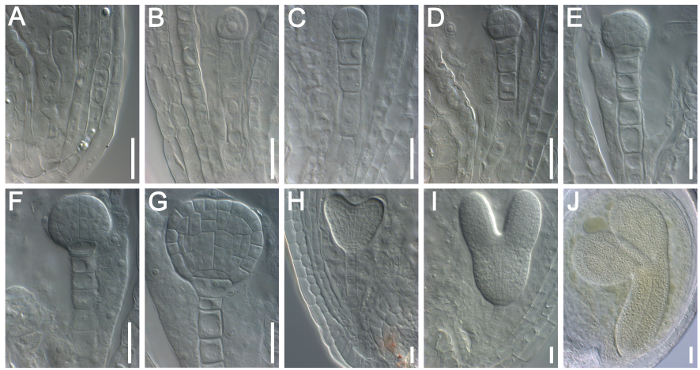
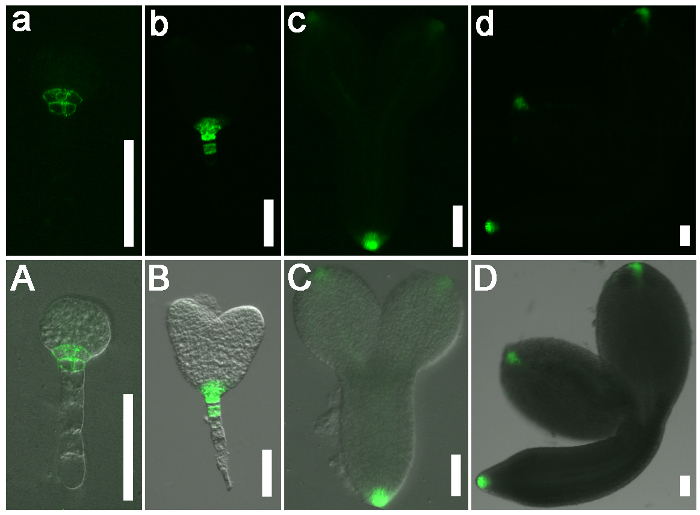
Representative results from the analysis of embryo patterning (from the elongated zygote stage to the mature walking-stick stage) in the wild-type Arabidopsis are shown in Figure 2. After ovule clearance, the embryos at different developmental stages could be distinguished by DIC microscopy (Figure 2). The expression pattern of DR5-GFP was recorded during embryogenesis under confocal laser scanning microscopy (Figure 3) to determine the distribution of auxin in the embryo and examine the potential role of auxin during embryogenesis in Arabidopsis.
This protocol can also be used to characterize the roles of specific genes during embryogenesis. Here, the role of Naa10 during embryogenesis in Arabidopsis was examined as an example. Abnormal division of the hypophysis was observed (askew and vertical division of the hypophysis in Naa10 compared with transverse asymmetric division of the hypophysis in wild-type plants, Figure 4). The distribution of auxin at the globular stage was nearly uniform in most Naa10 embryos and retained a broader signal in the hypophysis, as compared to the wild type embryos (Figure 5). These results indicate that Naa10 is required for embryogenesis, and that it may be involved in embryogenesis via the auxin signaling pathway in Arabidopsis.
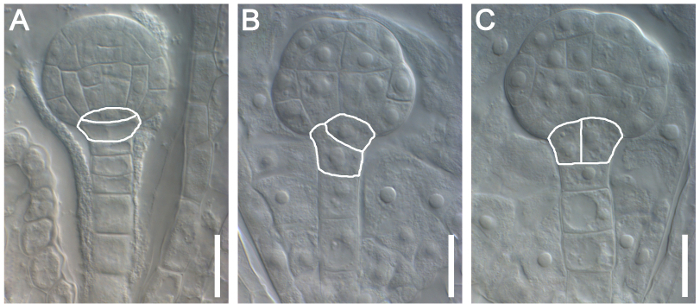
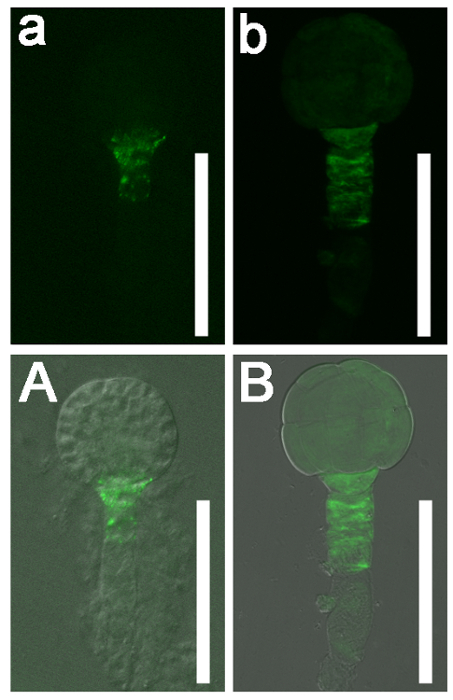
Figure 1: Schematic Diagram for the Dissection of Arabidopsis Silique. (A) The silique attached on the glass slide was pasted with a piece of double-sided adhesive tape. (B) The enlarged image of the box in A. The two imaginary lines represented the location to be split. (C) The enlarged image of the split silique in the box in D. (D) The image of the split silique.Please click here to view a larger version of this figure.
Figure 2: Examination of Embryogenesis in Wild-type (Col-0) Arabidopsis by DIC Microscopy. (A) Elongated zygote. (B) A 1-cell stage embryo at 1 DAP. (C) A 2/4-cell stage embryo at 2 DAP. (D) An octant stage embryo at 3 DAP. (E) A dermatogen stage embryo at 3 DAP. (F) An early globular stage embryo at 4 DAP. (G) A late globular stage embryo at 5 DAP. (H) A heart stage embryo at 6 DAP. (I) A torpedo stage embryo at 7 DAP. (J) A walking-stick stage embryo at 8 DAP. Scale bars = 10 µm. Please click here to view a larger version of this figure.
Figure 3: The Expression Pattern of DR5 in Wild-type (Col-0) Arabidopsis Embryos. (a-d) GFP signals. (A-D) Merged images with bright field images. DR5 was expressed in the root pole of the wild-type globular stage (a and A, 4 DAP) and heart stage (b and B, 6 DAP) embryos. DR5 was also expressed in the embryonic cotyledon tips (c and C, 7 DAP) and in the vasculature of mature wild-type embryos (d and D, 8 DAP). Scale bars = 50 µm. Please click here to view a larger version of this figure.
Figure 4: Characterization of the Role of Naa10 during Embryogenesis in Arabidopsis. Normal division of the hypophysis in a wild-type plant (A). Abnormal division of the hypophysis in Naa10 mutant plants is marked with a white line in (B) (askew division of the hypophysis) and (C) (vertical division of the hypophysis). Scale bars = 10 µm. Please click here to view a larger version of this figure.
Figure 5: The DR5 Expression Pattern in Globular Stage wild-type (Col-0) Arabidopsis and Naa10 Embryos. (a and b) GFP signals. (A and B) Merged images with bright field images. DR5 was expressed in the root pole of a wild-type globular stage embryo (a and A). DR5 was nearly uniformly expressed in a globular stage Naa10 embryo and retained the broader signal in hypophysis as compared to the wild type (b and B). Scale bars = 50 µm. Please click here to view a larger version of this figure.
Discussion
Ovule clearance is a useful method for detecting cell division and assessing morphology during embryogenesis in Arabidopsis; using this technique, embryos can be observed directly under DIC microscopy5,12. The critical step for ovule clearance is step 1.3.4. The time required for ovule clearance in step 1.3.4 is variable. Embryos at the 2/4-cell stage can be clearly observed after 2 h in the Hoyer's solution, whereas they look indistinct after 12 h. Thus, the more mature an ovule is, the longer the time required for clearance.
In step 2.2.5, to isolate an embryo from an ovule, the amount of force applied to the slide is critical. Embryos can be crushed if too much force is applied; however, an embryo cannot be extruded from the ovule if too little force is used. In our experience, the more mature an ovule is, the less force is needed. Torpedo stage and mature embryos can be isolated directly by peeling open an ovule using a syringe needle. As some of suspensor cells might be destroyed in the isolated embryo during the isolation process, the fluorescence signal from the suspensor might be lost or incomplete. Another limitation of this method is that the embryos before the 4-cell stage were difficult to find from the extruded embryos as they are too small and shielded by ovule fragment.
The developmental stage and morphology of an embryo can be affected by the mutation of certain genes; such effects can be demonstrated by microscopy following ovule clearance. This approach will aid in the understanding of the molecular mechanism by which specific genes mediate embryogenesis5. Observing the expression pattern of an unknown functional gene-GFP fusion during embryogenesis can provide a link between the embryo patterning and the expression of that gene, and facilitate the identification of new genes that are required for embryogenesis in Arabidopsis13. Thus, the protocol described here provides a basic method for the characterization of embryogenesis in Arabidopsis.
Disclosures
The authors have nothing to disclose.
Acknowledgments
We thank Dr. Jessica Habashi for critically reading of the manuscript. We thank Dr. Xianyong Sheng of the Imaging Center, College of life Sciences, Capital Normal University (Beijing, China), for performing the localization of DR5-GFP assay. This work was supported by grants from the Beijing Municipal Government Science Foundation (CIT&TCD20150102) and from the National Natural Science Foundation of China (31600248).
References
- Jenik PD, Gillmor CS, Lukowitz W. Embryonic patterning in Arabidopsis thaliana. Annu Rev Cell Dev Biol. 2007;23:207–236. doi: 10.1146/annurev.cellbio.22.011105.102609. [DOI] [PubMed] [Google Scholar]
- Lau S, Slane D, Herud O, Kong J, Jurgens G. Early embryogenesis in flowering plants: setting up the basic body pattern. Annu Rev Plant Biol. 2012;63:483–506. doi: 10.1146/annurev-arplant-042811-105507. [DOI] [PubMed] [Google Scholar]
- Wendrich JR, Weijers D. The Arabidopsis embryo as a miniature morphogenesis model. New Phytol. 2013;199(1):14–25. doi: 10.1111/nph.12267. [DOI] [PubMed] [Google Scholar]
- ten Hove CA, Lu KJ, Weijers D. Building a plant: cell fate specification in the early Arabidopsis embryo. Development. 2015;142(3):420–430. doi: 10.1242/dev.111500. [DOI] [PubMed] [Google Scholar]
- Feng J, et al. Protein N-terminal acetylation is required for embryogenesis in Arabidopsis. J Exp Bot. 2016;67(15):4779–4789. doi: 10.1093/jxb/erw257. [DOI] [PMC free article] [PubMed] [Google Scholar]
- Berleth T, Jurgens G. The role of the monopteros gene in organising the basal body region of the Arabidopsis embryo. Development. 1993;118:575–587. [Google Scholar]
- Luo Y, et al. D-myo-inositol-3-phosphate affects phosphatidylinositol-mediated endomembrane function in Arabidopsis and is essential for auxin-regulated embryogenesis. Plant Cell. 2011;23(4):1352–1372. doi: 10.1105/tpc.111.083337. [DOI] [PMC free article] [PubMed] [Google Scholar]
- Nodine MD, Yadegari R, Tax FE. RPK1 and TOAD2 are two receptor-like kinases redundantly required for Arabidopsis embryonic pattern formation. Dev Cell. 2007;12(6):943–956. doi: 10.1016/j.devcel.2007.04.003. [DOI] [PubMed] [Google Scholar]
- Ulmasov T, Murfett J, Hagen G, Guilfoyle TJ. Aux/IAA proteins repress expression of reporter genes containing natural and highly active synthetic auxin response elements. Plant Cell. 1997;9(11):1963–1971. doi: 10.1105/tpc.9.11.1963. [DOI] [PMC free article] [PubMed] [Google Scholar]
- Friml J, et al. Efflux-dependent auxin gradients establish the apical-basal axis of Arabidopsis. Nature. 2003;426(6963):147–153. doi: 10.1038/nature02085. [DOI] [PubMed] [Google Scholar]
- Clough SJ, Bent AF. Floral dip: a simplified method for Agrobacterium-mediated transformation of Arabidopsis thaliana. Plant J. 1998;16(16):735–743. doi: 10.1046/j.1365-313x.1998.00343.x. [DOI] [PubMed] [Google Scholar]
- Fiume E, Fletcher JC. Regulation of Arabidopsis embryo and endosperm development by the polypeptide signaling molecule CLE8. Plant Cell. 2012;24(3):1000–1012. doi: 10.1105/tpc.111.094839. [DOI] [PMC free article] [PubMed] [Google Scholar]
- Jurkuta RJ, Kaplinsky NJ, Spindel JE, Barton MK. Partitioning the apical domain of the Arabidopsis embryo requires the BOBBER1 NudC domain protein. Plant Cell. 2009;21(21):1957–1971. doi: 10.1105/tpc.108.065284. [DOI] [PMC free article] [PubMed] [Google Scholar]


