

Abstract
Symptomatic scapular winging resulting in scapular dyskinesia leads to a wide spectrum of clinical complaints, most notably periscapular pain. The malpositioning of the scapula, termed through use of the acronym SICK (scapular malposition, inferior-medial border prominence, coracoid pain and malposition, and dyskinesia of scapular movement), is due to the irregular activity of one or more of the periscapular muscles. In particular, the serratus anterior, innervated by the long thoracic nerve, is a key muscle that stabilizes the scapula and provides coordinated scapulohumeral rhythm. If the long thoracic nerve is injured, this results in significant shoulder dysfunction and scapular winging that may require surgical intervention. The purpose of this Technical Note is to present our preferred technique to treat symptomatic scapular winging due to long thoracic nerve palsy through transfer of the pectoralis major with its bone insertion to the inferior edge of the scapula.
The asymmetrical positioning of the scapula, caused by alterations in muscles that produce the native kinematics of the scapula, leads to SICK (scapular malposition, inferior-medial border prominence, coracoid pain and malposition, and dyskinesia of scapular movement) scapula syndrome.1, 2 This lack of symmetry results in scapular dyskinesia and, ultimately, a myriad of clinical complaints. Symptomatic patients with SICK scapula syndrome may complain of anterior as well as superior shoulder pain, posterosuperior scapular pain, or proximal-lateral arm pain.1 Of all complaints, the most common is anterior shoulder pain localized to the site of the coracoid process.1, 3 At first, a clinician may inadvertently diagnose anterior shoulder instability, unless the coracoid is thoroughly examined for tenderness. This, along with an asymmetrical appearance of the scapula, is a key clinical clue that points to SICK scapula syndrome.1, 3, 4
Most commonly, SICK scapula syndrome is treated through an aggressive and focused rehabilitation program that centers on regaining control of scapular protraction, retraction, depression, elevation, and rotation.5, 6, 7 A variety of exercises, including closed- and open-chain exercises, Blackburn retraction exercises, and low row exercises for strengthening of the serratus anterior, are implemented.5, 6, 7 The muscles around the scapula, made up of the serratus anterior, levator scapulae, rhomboids (minor and major), trapezius, and pectoralis minor, provide stability to the scapula and, ultimately, allow for proper scapular kinematics.8
In particular, the serratus anterior is one of the principal periscapular muscles responsible for stabilization of the scapula and coordinated scapulohumeral rhythm.9 This muscle receives innervation from the long thoracic nerve, which may be injured because of trauma,10 as a result of an iatrogenic lesion,11 or idiopathically,12 thereby causing scapular dyskinesia.13, 14 Although this may be treated conservatively, as described earlier, surgical intervention may be warranted if symptoms do not resolve within a year. Scapulothoracic fusion may be performed to resolve symptoms stemming from a long thoracic nerve injury.15, 16 However, the extreme loss of motion as well as the high rate of nonunion and pulmonary complications associated with this procedure is unappealing. Therefore, a viable alternative to treat scapular dyskinesia in the setting of long thoracic nerve palsy is a “direct” transfer of the pectoralis major to the inferior edge of the scapula as proposed by Povacz and Resch17 in 2000. The purpose of this Technical Note is to present our preferred technique to treat symptomatic scapular winging due to long thoracic nerve palsy through transfer of the pectoralis major with its bone insertion to the inferior edge of the scapula.
Surgical Technique
Preoperative Setup
The patient is first placed supine on the operative table, and general anesthesia is then induced. After this, the patient is repositioned in the lateral decubitus position through use of the Arthrex Shoulder Suspension System (Arthrex, Naples, FL) with all bony prominences appropriately padded (Fig 1). For appropriate visualization of the joint throughout the case, 10 lb of balanced suspension is used. Once appropriate suspension is achieved, the shoulder is prepared and draped in a standard sterile fashion, while the scapula is kept exposed for the procedure. The arm remains free to allow for intraoperative manipulation of the upper extremity.
Fig 1.

To perform the arthroscopic portion of the procedure in this right shoulder, the patient is positioned in the lateral decubitus position using the Arthrex Shoulder Suspension System (arrows).
Initial Arthroscopic Evaluation
A diagnostic arthroscopy is first performed to thoroughly evaluate the joint and rule out any possible concomitant pathology. A standard posterior portal and a midglenoid portal with a 5-mm cannula are used for this portion of the procedure. At this point, the surgeon addresses any other pathology before proceeding to the open portion of the procedure. Any synovitis, scar tissue, or thickening of the bursa throughout the joint is addressed through use of a shaver and radiofrequency wand.
Exposure of Humeral Shaft
After the arthroscopic procedure, the open approach begins. A 7-cm incision directly at the pectoralis major insertion over the axillary fold is performed for exposure of the tendon insertion (Fig 2). The subcutaneous tissue is then bluntly dissected, medially and laterally, to expose the fascia. After this, the fascia is incised in line with the skin incision with Metzenbaum scissors. The cephalic vein and biceps tendon are both identified and retracted laterally and medially, respectively, using a Homan retractor. Afterward, the insertion of the pectoralis muscle on the humeral shaft is identified.
Fig 2.

After the arthroscopic portion of the procedure in this right shoulder, the open portion of the procedure for transfer of the pectoralis major is begun. (A) The insertion of the pectoralis major tendon on the humeral shaft (arrow) is marked with a surgical pen. (B) A 7-cm incision (arrow) over the axillary fold is performed. (C) The fascia over the pectoralis major insertion is fully exposed and then incised in line with the initial incision.
Release of Pectoralis Major Tendon
An osteotome is used to mark the site of the osteotomy to be completed with an oscillating saw. The osteotomy begins medially and then progresses to the inferior aspect of the tendon insertion and finally to the lateral edge of the insertion. The oscillating saw is then used over the line previously marked, and the insertion of the pectoralis major is released with its bone fragment with an approximate size of 1.5 to 2 cm × 2 cm (Fig 3). Given that the sternal and clavicular tendon heads merge before attaching onto the humeral shaft, the 2 heads are differentiated from one another by use of Metzenbaum scissors. Once the heads are differentiated, each tendon head is whipstitched with FiberWire (Arthrex). Whereas the sternal head will be transferred to the inferior edge of the scapula, the clavicular head will be repaired back onto its footprint on the humeral shaft. Hemostasis is then performed to avoid excessive intraoperative bleeding. After this, the incision is thoroughly cleaned with saline solution through pulsatile lavage and a sterile lap sponge is then placed over the incision. Afterward, the tendon is mobilized anteriorly, inferiorly, and posteriorly. Care must be taken to avoid potential injury to the axillary area as well as the conjoint tendon during this portion of the procedure.
Fig 3.

Once the pectoralis major tendon insertion (arrow) on the humerus of this right shoulder is identified, an oscillating saw is used to detach it from medially to laterally. Care must be taken to avoid damage to the biceps tendon during this portion of the procedure.
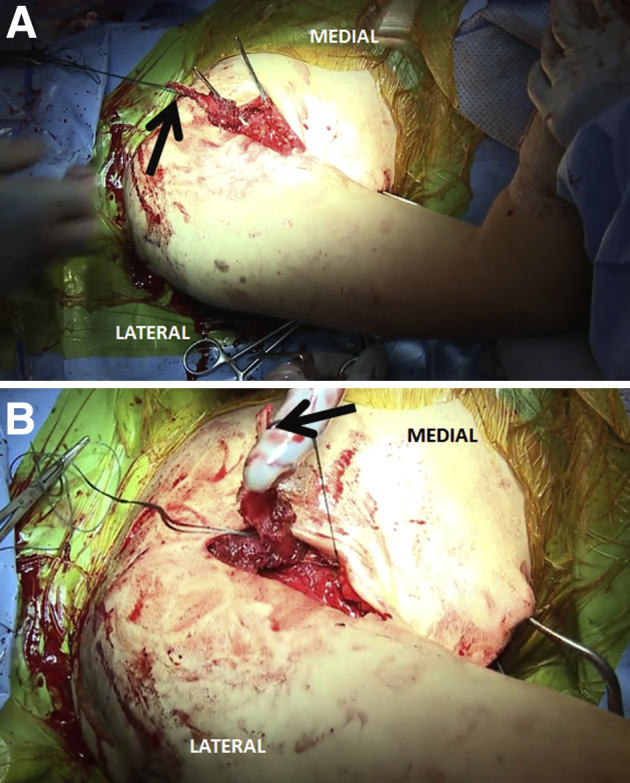
Exposure of Inferior Tip of Scapula
With the arm manipulated into a forward flexion position, the lateral border of the scapula is identified. The lateral border is then marked with a surgical pen. An incision beginning at the inferior tip of the scapula and extending laterally for approximately 5 cm is performed (Fig 4). After this, the layers of subcutaneous tissue are bluntly dissected. The latissimus dorsi is identified and retracted to avoid potential injury. The lateral border of the scapula is then fully exposed, and the native attachment of the serratus anterior is identified. As in this case example, fatty infiltration and atrophy of the musculature are expected as a result of the long thoracic nerve palsy. The lateral aspect of the scapula, just above the tip, is then prepared by use of a high-speed acorn-tip burr and rongeur before transfer of the pectoralis major muscle with its bony attachment (Fig 5).
Fig 4.

To transfer the pectoralis major tendon to the inferior scapula, the scapula of this right shoulder is first palpated and the borders of the scapula are then marked with a surgical pen. A 12-cm incision (arrow) is then made over the lateral border of the scapula from inferiorly to superiorly.
Fig 5.

The location of the scapular border to be prepared for pectoralis major transfer (arrows) in this right shoulder is identified, and the teres minor insertion is then partially detached with care. After this, the combination of a high-speed acorn-tip burr (A) and rongeur (B) is used to remove any overlaying soft tissue. The asterisks indicate retractors.
Transfer of Pectoralis Major Tendon
A 3.7-mm spade-tip drill (Arthrex) is used to form 3 equidistant 2.0-mm tunnels to achieve fixation of the pectoralis major tendon to the lateral-inferior edge of the scapula (Fig 6). It is important that the tunnels are placed 1 cm from the border of the scapula to decrease the risk of an iatrogenic injury. It is absolutely necessary to avoid damage to the thoracic cavity organs and neurovascular bundle located medially and laterally, respectively, to the inferior edge. The sternal head of the pectoralis major is then brought to the inferior edge of the scapula by way of curved Rochester-Carmalt forceps (Fig 7). Once the tendon has been moved proximal to the inferior edge, it is further whipstitched with FiberTape (Arthrex) and FiberWire. A total of 1 FiberWire suture and 1 FiberTape suture resulting in 4 limbs of suture are used in this repair. Once the tendon is whipstitched, the suture limbs are passed into the previously drilled tunnels. Then, two 3.2-mm × 11-mm Pec Buttons (Arthrex) are loaded with two limbs of suture each. The distribution of suture limbs is even through the 2 Pec Buttons, including 1 FiberWire suture limb and 1 FiberTape suture limb passed through each button. Then, the sutures are toggled to employ the locking mechanism of the first Pec Button. The button is flipped, and the tendon is fastened to the lateral-inferior edge of the scapula by a tension slide technique with the assistance of a knot pusher (Fig 8). This is repeated for the second Pec Button to complete the transfer of the pectoralis major muscle. Next, the bone fragment of the pectoralis major tendon is placed directly in apposition to the prepared bony scapular surface to arrive at a strong final fixation.
Fig 6.

Once the lateral-inferior aspect of the scapula (blue) is prepared by use of a high-speed acorn-tip burr and rongeur and the three 2.0-mm tunnels (red) are formed 1 cm from the border of the scapula, the suture limbs are passed into the previously drilled tunnels.
Fig 7.
(A) A curved Rochester-Carmalt forceps is used to create a soft-tissue tunnel in a posterior-to-anterior direction for successful transfer of the pectoralis major tendon (arrow) in this right shoulder. Care must be taken to avoid damage to the intrathoracic organs located medially and the neurovascular bundle located laterally. (B) The same clamp is used to pass the pectoralis major tendon (arrow) to the scapular border.
Fig 8.

(A) Through use of Pec Buttons (arrow), the sternal head of the pectoralis major tendon in this right shoulder is fixed onto the prepared bony bed on the scapular border, previously prepared with the combination of a high-speed burr and rongeur. (B) Both FiberTape and FiberWire (arrow) are used to fix the sternal head of the pectoralis major tendon into position.
Verification of Transfer and Closure
Once the transfer is complete, the repair is verified by attempting to lift the scapula. In this case example, the scapula moves 2 to 3 mm off the rib cage, which indicates dynamic stability and appropriate tensioning of the pectoralis major muscle. A standard layered closure is then performed with No. 0 Vicryl (Ethicon, Somerville, NJ) for initial closure, No. 2-0 Monocryl (Ethicon) for the deep layer, and No. 3-0 Monocryl for the subcuticular closure.
Repair of Clavicular Head to Its Footprint
Once the sternal head of the pectoralis major has been successfully transferred, the clavicular head is prepared for repair to its native footprint on the humeral shaft. The clavicular head is further whipstitched with FiberTape, in addition to the FiberWire already used. In total, 2 sutures are used, 1 FiberWire and 1 FiberTape, which totals 4 suture limbs. The 2 FiberWire and 2 FiberTape suture limbs are then loaded into a 3.2-mm × 11-mm Pec Button. Once loaded, the button is inserted into the cortex at the site of the native footprint of the clavicular head. The sutures are then toggled to employ the locking mechanism. The button is flipped while the tendon is fully reapproximated through use of a tension slide technique. The arm should be positioned in slight external rotation and abduction to avoid inappropriate tensioning of the tendon. Care must be taken to avoid damage to the biceps tendon during this portion of the technique. After this, the subcutaneous and skin tissue layers for the incision over the axillary fold, as well as the incisions for the portals corresponding to the initial diagnostic arthroscopy, are closed in a standard layered fashion. The advantages and disadvantages associated with the technique are listed in Table 1, and pearls and pitfalls are shown in Table 2. The narrated video (Video 1) should be reviewed in full for an overview of the technique.
Table 1.
Advantages and Disadvantages
| Advantages | Disadvantages |
|---|---|
| The procedure provides an effective method for treating scapular winging that is not as aggressive as scapulothoracic fusion. | The nonanatomic transfer of one of the heads of the pectoralis major tendon is required. |
| The procedure can be performed with the patient in the same semilateral position for its entirety. | The detachment of both portions of the pectoralis major tendon is required. |
| Fixation of the pectoralis major tendon head onto the inferior scapular border is strong and reliable because of the use of Pec Buttons. | The procedure is technically demanding. |
| Refixation of the clavicular head to its native insertion site allows for partial anatomic integrity of the pectoralis major. |
Table 2.
Pearls and Pitfalls
| Pearls | Pitfalls |
|---|---|
| The surgeon should start the pectoralis major detachment medially and then progress inferiorly and laterally for a safe and effective method of detachment. | Damage to the cephalic vein is a risk during exposure of the pectoralis major tendon. |
| Care must be taken to avoid detachment of all of the teres minor tendon on its scapular insertion. | Damage to the biceps tendon may occur if the tendon is not properly retracted and protected during the procedure. |
| The surgeon should create the soft-tissue tunnel in a posterior-to-anterior fashion. | The neurovascular bundle or intrathoracic organs may be damaged during the creation of the soft-tissue tunnel. |
| For refixation of the pectoralis muscle to its anatomic footprint, the arm should be placed in slight abduction and external rotation. |
Postoperative Rehabilitation
For the first 6 weeks after surgery, the patient is immobilized in a sling and restricted to movement of the hand, elbow, and shoulder only in the horizontal plane (i.e., internal and external rotation) with pendulum exercises. After the first 6 weeks, active-assisted range-of-motion exercises are initiated. At 12 weeks, strengthening exercises are encouraged once a computed tomography (CT) scan of the scapula allows for confirmation of proper healing at the site of the sternal head attachment to the scapula. A CT scan may be obtained at 6 weeks postoperatively instead of 12 weeks if the patient wishes to return to sports more quickly. Once the bone attachment is fully healed, as confirmed on CT, the patient is allowed to progress quickly from range-of-motion to strengthening exercises.
Discussion
Although uncommon, shoulder dysfunction resulting from scapular winging is a debilitating condition that may be overlooked and inappropriately diagnosed as anterior shoulder instability. The serratus anterior, one of the principal periscapular muscles, may lead to scapular dyskinesia if not functioning appropriately.18 The diagnosis of scapular winging, resulting from dysfunction of the serratus anterior, is clinical in essence. First, a thorough evaluation of the patient's history including any previous operations as well as traumatic events is necessary. In addition, a physical examination that assesses for periscapular pain with particular attention paid to tenderness to palpation of the coracoid, while any decrease in shoulder range of motion and strength is also noted, is needed for an accurate diagnosis.18, 19 As part of the physical examination, evaluation of the positioning of each scapula with respect to the other scapula as the shoulder goes through its range of motion is particularly important, with attention paid to the inferior-medial border of the symptomatic scapula. If any sign of asymmetry is recognized, this will reveal the cause of the patient's complaints.18
Dysfunction of the serratus anterior, which may result from a long thoracic nerve injury, results in superior translation and medial rotation of the inferior pole of the scapula, which can be recognized through a wall push-up test or during active forward flexion.18 However, a careful evaluation is required given that lateral winging alludes to improper function of the trapezius muscle, not the serratus anterior.18, 20, 21 Most cases of scapular winging stemming from dysfunction of the serratus anterior may be resolved through a strict rehabilitation protocol.
If unresponsive to physical therapy, scapular winging due to serratus anterior dysfunction may be treated through scapulothoracic fusion and fascial slings. However, aside from these more aggressive treatment options, direct transfer of a neighboring muscle may provide dynamic restabilization of the scapula.22 The muscles that may be transferred to treat scapular winging include the pectoralis major and minor, teres major, and rhomboids.22 In particular, transfer of the pectoralis major to treat dysfunction of the serratus anterior muscle has been shown to be effective.12, 23, 24
Perlmutter and Leffert12 performed a pectoralis major transfer with a fascia lata autogenous graft in 16 patients. Of these 16 patients, 8 were pain free after surgery and returned to full activity and participation in sports. Moreover, Noerdlinger et al.22 reported positive outcomes after pectoralis major transfer and suggested that achieving at least 60° of external rotation is crucial to arrive at a positive outcome. Furthermore, at an average follow-up of 27.1 months, Post25 reported excellent results in all 8 patients treated by a pectoralis major transfer with augmentation through a fascia lata autograft. In a systematic review performed by Chalmers et al.19 comparing direct versus indirect pectoralis major transfer for serratus anterior palsy, patients who underwent an indirect transfer (i.e., performed with augmentation through use of an autograft) were significantly more likely to have recurrent medial instability develop and show lower postoperative forward flexion than those who underwent a direct transfer. In all, we believe direct transfer of the pectoralis major to the inferior border of the scapula, as described, provides an effective and safe method to treat scapular winging resulting from serratus anterior dysfunction.
Footnotes
The authors report the following potential conflict of interest or source of funding: M.T.P. receives support from Arthrex, JRF Ortho. Consultant. Patent numbers (issued): 9226743, 20150164498, 20150150594, 20110040339. Arthrex, SLACK. Publishing royalties. Full ICMJE author disclosure forms are available for this article online, as supplementary material.
Supplementary Data
The patient is first placed supine on the operative table, and general anesthesia is induced. After this, the patient is repositioned in the lateral decubitus position. A diagnostic arthroscopy is first performed in this right shoulder to thoroughly evaluate the joint and rule out any possible concomitant pathology. At this point, the surgeon addresses any other pathology before proceeding to the open portion of the procedure. After the arthroscopic procedure, the open approach begins. A 7-cm incision directly at the pectoralis major insertion over the axillary fold is performed for exposure of the tendon insertion. Afterward, the insertion of the pectoralis muscle is identified on the humeral shaft. The osteotomy begins medially and then progresses to the inferior aspect of the tendon insertion and finally to the lateral edge of the insertion. The oscillating saw is used over the line previously marked, and the insertion of the pectoralis major is released with its bone fragment. The 2 heads are differentiated from one another by use of Metzenbaum scissors. Whereas the sternal head will be transferred to the inferior edge of the scapula, the clavicular head will be repaired back onto its footprint on the humeral shaft. Once the heads have been differentiated, an incision beginning at the inferior tip of the scapula and extending laterally for approximately 5 cm is performed. Fatty infiltration and atrophy of the musculature are expected as a result of the long thoracic nerve palsy. The lateral aspect of the scapula, just above the tip, is then prepared with a high-speed acorn-tip burr and rongeur. A 3.7-mm spade-tip drill is used to form 3 equidistant 2.0-mm tunnels at the lateral-inferior edge of the scapula. The sternal head of the pectoralis major is then brought to the inferior edge of the scapula by way of curved Rochester-Carmalt forceps. A total of 1 FiberWire suture and 1 FiberTape suture leading to 4 limbs of suture are used in this repair. After this, two 3.2-mm × 11-mm Pec Buttons are loaded with 2 limbs of suture each. Once the suture limbs have been inserted into the button, they are passed into the previously drilled tunnels. Then, the sutures are toggled to employ the locking mechanism of the Pec Button. The button is flipped, and the tendon is fastened to the lateral-inferior edge of the scapula. This is repeated for the second Pec Button. A standard layered closure is then performed. Once the sternal head of the pectoralis major has been successfully transferred, the clavicular head is prepared for repair to its native footprint on the humeral shaft. The 2 FiberWire and 2 FiberTape suture limbs, whipstitched through the clavicular head, are then loaded into a 3.2-mm × 11-mm Pec Button. Once loaded, the button is inserted into the cortex at the site of the native footprint of the clavicular head. The button is then flipped while the tendon is fully reapproximated through use of a tension slide technique. The arm should be positioned in slight external rotation and abduction to avoid inappropriate tensioning of the tendon. After this, the subcutaneous and skin tissue layers for the incision over the axillary fold, as well as the incisions for the portals corresponding to the initial diagnostic arthroscopy, are closed.
References
- 1.Burkhart S.S., Morgan C.D., Kibler W.B. The disabled throwing shoulder: Spectrum of pathology Part III: The SICK scapula, scapular dyskinesis, the kinetic chain, and rehabilitation. Arthroscopy. 2003;19:641–661. doi: 10.1016/s0749-8063(03)00389-x. [DOI] [PubMed] [Google Scholar]
- 2.Burkhart S.S., Morgan C.D., Kibler W.B. Shoulder injuries in overhead athletes. The “dead arm” revisited. Clin Sports Med. 2000;19:125–158. doi: 10.1016/s0278-5919(05)70300-8. [DOI] [PubMed] [Google Scholar]
- 3.Lukasiewicz A.C., McClure P., Michener L., Pratt N., Sennett B. Comparison of 3-dimensional scapular position and orientation between subjects with and without shoulder impingement. J Orthop Sports Phys Ther. 1999;29:574–583. doi: 10.2519/jospt.1999.29.10.574. [DOI] [PubMed] [Google Scholar]
- 4.Bagg S.D., Forrest W.J. A biomechanical analysis of scapular rotation during arm abduction in the scapular plane. Am J Phys Med Rehabil. 1988;67:238–245. [PubMed] [Google Scholar]
- 5.Cools A.M., Struyf F., De Mey K., Maenhout A., Castelein B., Cagnie B. Rehabilitation of scapular dyskinesis: From the office worker to the elite overhead athlete. Br J Sports Med. 2014;48:692–697. doi: 10.1136/bjsports-2013-092148. [DOI] [PubMed] [Google Scholar]
- 6.Kibler W.B., Sciascia A. Current concepts: Scapular dyskinesis. Br J Sports Med. 2010;44:300–305. doi: 10.1136/bjsm.2009.058834. [DOI] [PubMed] [Google Scholar]
- 7.Kibler W.B., Ludewig P.M., McClure P.W., Michener L.A., Bak K., Sciascia A.D. Clinical implications of scapular dyskinesis in shoulder injury: The 2013 consensus statement from the ‘Scapular Summit’. Br J Sports Med. 2013;47:877–885. doi: 10.1136/bjsports-2013-092425. [DOI] [PubMed] [Google Scholar]
- 8.Kibler W.B. The role of the scapula in athletic shoulder function. Am J Sports Med. 1998;26:325–337. doi: 10.1177/03635465980260022801. [DOI] [PubMed] [Google Scholar]
- 9.Crowe M.M., Elhassan B.T. Scapular and shoulder girdle muscular anatomy: Its role in periscapular tendon transfers. J Hand Surg Am. 2016;41:306–314. doi: 10.1016/j.jhsa.2015.06.123. [DOI] [PubMed] [Google Scholar]
- 10.Wiater J.M., Flatow E.L. Long thoracic nerve injury. Clin Orthop Relat Res. 1999:17–27. [PubMed] [Google Scholar]
- 11.Belmonte R., Monleon S., Bofill N., Alvarado M.L., Espadaler J., Royo I. Long thoracic nerve injury in breast cancer patients treated with axillary lymph node dissection. Support Care Cancer. 2015;23:169–175. doi: 10.1007/s00520-014-2338-5. [DOI] [PubMed] [Google Scholar]
- 12.Perlmutter G.S., Leffert R.D. Results of transfer of the pectoralis major tendon to treat paralysis of the serratus anterior muscle. J Bone Joint Surg Am. 1999;81:377–384. [PubMed] [Google Scholar]
- 13.Borges C.S., Ruschel P.H., Ferreira M.T. Pectoralis major to scapula transfer for patients with serratus anterior palsy. Tech Hand Up Extrem Surg. 2011;15:135–137. doi: 10.1097/BTH.0b013e3181fb5478. [DOI] [PubMed] [Google Scholar]
- 14.Connor P.M., Yamaguchi K., Manifold S.G., Pollock R.G., Flatow E.L., Bigliani L.U. Split pectoralis major transfer for serratus anterior palsy. Clin Orthop Relat Res. 1997:134–142. [PubMed] [Google Scholar]
- 15.Atasoy E., Majd M. Scapulothoracic stabilisation for winging of the scapula using strips of autogenous fascia lata. J Bone Joint Surg Br. 2000;82:813–817. doi: 10.1302/0301-620x.82b6.10187. [DOI] [PubMed] [Google Scholar]
- 16.Jakab E., Gledhill R.B. Simplified technique for scapulocostal fusion in facioscapulohumeral dystrophy. J Pediatr Orthop. 1993;13:749–751. doi: 10.1097/01241398-199311000-00011. [DOI] [PubMed] [Google Scholar]
- 17.Povacz P., Resch H. Dynamic stabilization of winging scapula by direct split pectoralis major transfer: A technical note. J Shoulder Elbow Surg. 2000;9:76–78. doi: 10.1016/s1058-2746(00)90015-6. [DOI] [PubMed] [Google Scholar]
- 18.Lee S., Savin D.D., Shah N.R., Bronsnick D., Goldberg B. Scapular winging: Evaluation and treatment: AAOS exhibit selection. J Bone Joint Surg Am. 2015;97:1708–1716. doi: 10.2106/JBJS.O.00727. [DOI] [PubMed] [Google Scholar]
- 19.Chalmers P.N., Saltzman B.M., Feldheim T.F. A comprehensive analysis of pectoralis major transfer for long thoracic nerve palsy. J Shoulder Elbow Surg. 2015;24:1028–1035. doi: 10.1016/j.jse.2014.12.014. [DOI] [PubMed] [Google Scholar]
- 20.Teboul F., Bizot P., Kakkar R., Sedel L. Surgical management of trapezius palsy. J Bone Joint Surg Am. 2005;87:285–291. doi: 10.2106/JBJS.E.00496. [DOI] [PubMed] [Google Scholar]
- 21.Goransson H., Leppanen O.V., Vastamaki M. Patient outcome after surgical management of the spinal accessory nerve injury: A long-term follow-up study. SAGE Open Med. 2016;4 doi: 10.1177/2050312116645731. 2050312116645731. [DOI] [PMC free article] [PubMed] [Google Scholar]
- 22.Noerdlinger M.A., Cole B.J., Stewart M., Post M. Results of pectoralis major transfer with fascia lata autograft augmentation for scapula winging. J Shoulder Elbow Surg. 2002;11:345–350. doi: 10.1067/mse.2002.124525. [DOI] [PubMed] [Google Scholar]
- 23.Warner J.J., Navarro R.A. Serratus anterior dysfunction. Recognition and treatment. Clin Orthop Relat Res. 1998:139–148. [PubMed] [Google Scholar]
- 24.Galano G.J., Bigliani L.U., Ahmad C.S., Levine W.N. Surgical treatment of winged scapula. Clin Orthop Relat Res. 2008;466:652–660. doi: 10.1007/s11999-007-0086-2. [DOI] [PMC free article] [PubMed] [Google Scholar]
- 25.Post M. Pectoralis major transfer for winging of the scapula. J Shoulder Elbow Surg. 1995;4(pt 1):1–9. doi: 10.1016/s1058-2746(10)80001-1. [DOI] [PubMed] [Google Scholar]
Associated Data
This section collects any data citations, data availability statements, or supplementary materials included in this article.
Supplementary Materials
The patient is first placed supine on the operative table, and general anesthesia is induced. After this, the patient is repositioned in the lateral decubitus position. A diagnostic arthroscopy is first performed in this right shoulder to thoroughly evaluate the joint and rule out any possible concomitant pathology. At this point, the surgeon addresses any other pathology before proceeding to the open portion of the procedure. After the arthroscopic procedure, the open approach begins. A 7-cm incision directly at the pectoralis major insertion over the axillary fold is performed for exposure of the tendon insertion. Afterward, the insertion of the pectoralis muscle is identified on the humeral shaft. The osteotomy begins medially and then progresses to the inferior aspect of the tendon insertion and finally to the lateral edge of the insertion. The oscillating saw is used over the line previously marked, and the insertion of the pectoralis major is released with its bone fragment. The 2 heads are differentiated from one another by use of Metzenbaum scissors. Whereas the sternal head will be transferred to the inferior edge of the scapula, the clavicular head will be repaired back onto its footprint on the humeral shaft. Once the heads have been differentiated, an incision beginning at the inferior tip of the scapula and extending laterally for approximately 5 cm is performed. Fatty infiltration and atrophy of the musculature are expected as a result of the long thoracic nerve palsy. The lateral aspect of the scapula, just above the tip, is then prepared with a high-speed acorn-tip burr and rongeur. A 3.7-mm spade-tip drill is used to form 3 equidistant 2.0-mm tunnels at the lateral-inferior edge of the scapula. The sternal head of the pectoralis major is then brought to the inferior edge of the scapula by way of curved Rochester-Carmalt forceps. A total of 1 FiberWire suture and 1 FiberTape suture leading to 4 limbs of suture are used in this repair. After this, two 3.2-mm × 11-mm Pec Buttons are loaded with 2 limbs of suture each. Once the suture limbs have been inserted into the button, they are passed into the previously drilled tunnels. Then, the sutures are toggled to employ the locking mechanism of the Pec Button. The button is flipped, and the tendon is fastened to the lateral-inferior edge of the scapula. This is repeated for the second Pec Button. A standard layered closure is then performed. Once the sternal head of the pectoralis major has been successfully transferred, the clavicular head is prepared for repair to its native footprint on the humeral shaft. The 2 FiberWire and 2 FiberTape suture limbs, whipstitched through the clavicular head, are then loaded into a 3.2-mm × 11-mm Pec Button. Once loaded, the button is inserted into the cortex at the site of the native footprint of the clavicular head. The button is then flipped while the tendon is fully reapproximated through use of a tension slide technique. The arm should be positioned in slight external rotation and abduction to avoid inappropriate tensioning of the tendon. After this, the subcutaneous and skin tissue layers for the incision over the axillary fold, as well as the incisions for the portals corresponding to the initial diagnostic arthroscopy, are closed.