Abstract
In vivo wound healing experiments remain the most predictive models for studying human wound healing, allowing an accurate representation of the complete wound healing environment including various cell types, environmental cues, and paracrine interactions. Small animals are economical, easy to maintain, and allow researchers to take advantage of the numerous transgenic strains that have been developed to investigate the specific mechanisms involved in wound healing and regeneration. Here we describe three reproducible murine wound healing models that recapitulate the human wound healing process.
Keywords: Wound healing, Mouse model, Excisional wound, Ischemic wound, Pressure ulcer
1 Introduction
1.1 Splinted Excisional Wound
Chronic non-healing wounds are a morbid condition and place a huge financial burden on the health system. Non-healing ulcers in diabetics alone account for almost two-thirds of all non-traumatic amputations in the United States [1]. Excisional wound models are commonly employed to recapitulate this disease process in animal models. We have utilized a splinted excisional wound model which prevents wound margin contracture. Wound contracture by the panniculus carnosus is the primary mode of murine wound healing as opposed to granulation tissue formation and reepithelialization in humans [2, 3]. In addition to preventing wound contracture, the silicone splint provides a constant reference to use for calculating wound size when assessing wound closure. The wound bed can also be easily accessed to apply topical or subcutaneous agents to study wound healing modulation.
1.2 Ischemia Reperfusion Model
Pressure ulcers commonly affect the elderly population and patients who are debilitated due to spinal cord or traumatic brain injury and cause significant morbidity and even mortality. They are increasingly becoming a complication of acute hospitalizations as well with an 80 % increased incidence in the United States between 1993 and 2006. The treatment of these wounds costs up to $11 billion per year in the United States [4]. The pathogenesis of pressure ulcers is thought to be mediated by cycles of ischemia followed by reperfusion injury. Wasserman et al. implemented a model using a metal disk implanted below the mouse gluteal muscle [5]. A magnet is placed on the skin to cause ischemia in the tissue between the magnet and metal disk and is cycled on and off. This model is able to reproduce up to a stage IV pressure ulcer with muscle necrosis. This approach however requires invasive methods and leaves a foreign material within the wound, both of which can confound wound characteristics. A simple noninvasive method was described by Stadler et al. which can achieve a stage III pressure ulcer [6]. Two ceramic magnetic disks are placed to “pinch” the dorsal skin and apply 50 mmHg of pressure which has been shown to decrease blood flow by 80 % [7]. This is followed by removal of the magnets to allow for a period of reperfusion injury. Wounds can be followed to analyze wound closure rate and tissue is easily harvested for histology, RNA, and protein analysis.
1.3 Ischemic Flap Model
Neovascularization is critical in the wound healing process. Recent studies have suggested that this process consists of both angiogenesis (sprouting of new vessels from existing endothelium) and vasculogenesis (creating of de novo vessels by progenitor cells). Neovascularization is dependent on numerous factors including ischemic signaling and mobilization and migration of progenitor cells. We have employed a three-sided full-thickness peninsular flap on the dorsum of the mouse with an impermeable silicone sheet beneath. This prevents neovascularization from below the wound leaving only the flap pedicle as a vascular source. A reproducible ischemic gradient is created within the flap allowing for analysis of differential ischemic signaling.
2 Materials
2.1 Splinted Excisional Wound
Fabrication of Silicone Splints
0.5 mm thick silicone sheet.
10 and 16 mm skin biopsy punches.
70 % EtOH.
50 mL polypropylene conical tube.
Excisional Wounding
Anesthesia.
Electric hair trimmer.
Depilatory cream.
Gauze.
70 % EtOH.
6 mm Skin biopsy punch.
Cyanoacrylate adhesive (super glue).
Forceps.
Scissors.
Needle driver.
6-0 nylon suture.
Mastisol.
Occlusive dressing (Tegaderm).
Digital Analysis of Wound Closure
Digital camera.
ImageJ software.
Harvesting of Tissue for Analysis
Forceps.
Scissors.
Tissue capsule pads.
Biopsy cassette.
Cryovials.
Liquid nitrogen.
2.2 Ischemia Reperfusion Model
12 mm diameter × 5 mm thick magnetic ceramic disk.
Anesthesia.
Electric hair trimmer.
Depilatory cream.
Gauze.
70 % EtOH.
2.3 Ischemic Flap Model
0.133 mm thick medical grade silicone sheet.
Anesthesia.
Electric hair trimmer.
Depilatory cream.
Gauze.
70 % EtOH.
Template (10 mm × 25 mm).
Forceps.
#10 scalpel.
Microsurgical scissors.
Needle driver.
6-0 nylon suture.
Phosphate-buffered saline.
3 Methods
3.1 Splinted Excisional Wound
Fabrication of Silicone Splints
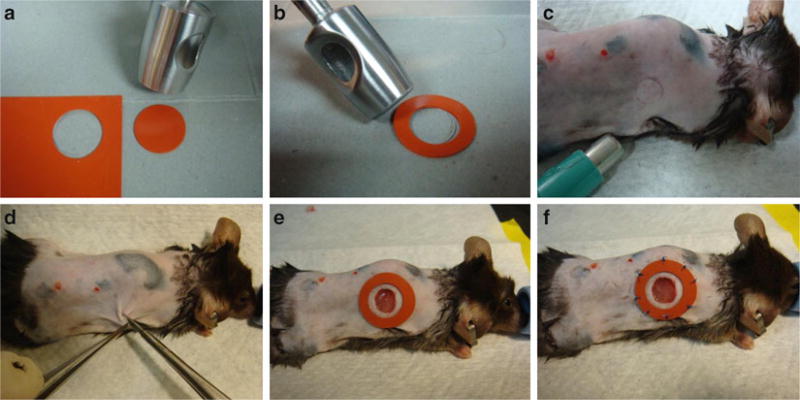
Punch out the desired number of silicone splints using 16 mm biopsy punch (Fig. 1a). Each animal requires two splints.
Using the 10 mm biopsy punch, remove the inner diameter from each silicone disk to form a ring (Fig. 1b).
Place splints in 70 % EtOH in a 50 ml conical tube to keep disinfected until ready for use.
Fig. 1.
Splinted excisional wound model. (a) The 16 mm punch is used to cut out the desired number of splints. (b) The 10 mm punch is then placed inside each silicone circle to remove the inner diameter and create the silicone splint. (c) A 6 mm punch is used to mark the location of the excisional wound. (d) Forceps retract the skin outward and scissors are used to sharply excise a circular piece of skin down through the panniculus carnosus. (e) The silicone splint is glued concentrically around the excisional wound. (f) Eight interrupted stitches reinforce the splint to the intact tissue surrounding the wound to prevent wound edge contracture
Excisional Wounding
Induce adequate anesthesia through either intraperitoneal or inhaled anesthesia.
Shave back of anesthetized mouse with electric hair trimmer. Be careful not to induce any trauma with razor teeth.
Apply depilatory cream to shaved skin and let sit for 2 min.
Wipe off cream and hair with gauze. Prepared skin should be completely bare.
Wipe the shaved back with 70 % EtOH.
Using a 6 mm biopsy punch, mark out the location of excisional wounds by pressing down gently and tracing with a fine marking pen. Bilateral wounds should be equidistant from the midline and spaced on either side of the dorsum (Fig. 1c).
Lift the skin away from the dorsum to incise and perform full-thickness excisional wound through the panniculus carnosus carefully with scissors (Fig. 1d).
Remove the skin flap by sharply dissecting the skin from the wound bed and cutting any connective tissue.
Apply a thin layer of glue fixative to one side of the silicone splint and affix the splint concentrically around the wound (Fig. 1e).
Secure each splint with eight evenly spaced interrupted stitches (Fig. 1f, see Note 1).
Apply Mastisol to intact skin surrounding the silicone splints and the splints themselves. Place occlusive dressing over wound to protect the splint from scratching or chewing by the animal.
Return mouse into individual cage and observe to ensure recovery from anesthesia and surgery (see Note 2).
Digital Analysis of Wound Closure
Obtain digital pictures of the wounds on the day of surgery and every other day thereafter (see Note 3).
Open the image of each wound in ImageJ software.
Draw a line of the inner diameter using the straight measuring tool.
Set scale under the analyze menu in the toolbar by entering known distance as 16 mm.
Measure the area of each wound by tracing the perimeter of the wound using the freehand tracing tool and selecting measure under the analyze menu (see Note 4).
After obtaining all wound areas, calculate the size of the wound at each time point as a percentage of the wound size on day 1 (see Note 5).
Harvesting of Tissue for Analysis
Determine which animals will be sacrificed for each time point (see Note 6).
Euthanize animal by CO2 and confirm by cervical dislocation (see Note 7).
Excise the wound bed keeping approximately 2 mm of adjacent normal tissue to include the wound margin.
Bisect the wound and then cut one of the halves into quarters.
Place the larger specimen between foam tissue capsule pads in a tissue cassette and fix in 4 % paraformaldehyde for fixation.
The two smaller quartered specimens can be stored in cryovials, snap-frozen in liquid nitrogen, and processed for RNA and protein isolation (see Note 8).
3.2 Ischemia Reperfusion Model
Induce adequate anesthesia through either intraperitoneal or inhaled anesthesia.
Shave back of anesthetized mouse with electric hair trimmer. Be careful not to induce any trauma with razor teeth.
Apply depilatory cream to shaved skin and let sit for 2 min.
Wipe off cream and hair with gauze. Prepared skin should be completely bare.
Wipe the shaved back with 70 % EtOH.
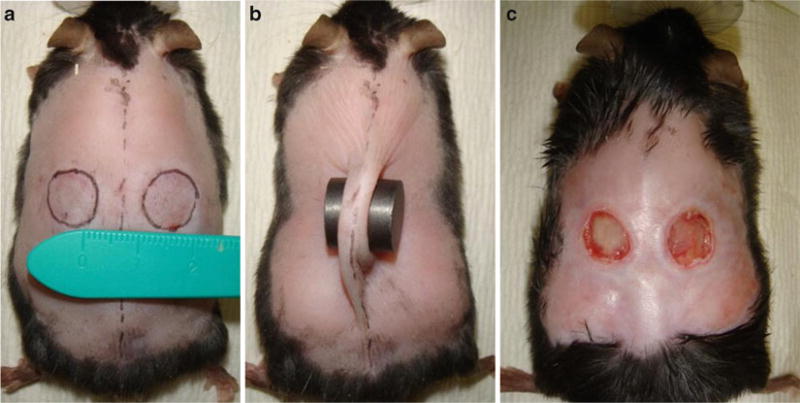
Draw two outlines of the magnets, each 5 mm from the mid-line (Fig. 2a, see Note 9).
Place the magnets on the designated areas so that a fold of skin is pinched between the magnets (Fig. 2b, see Note 10).
Return mouse to an individual cage.
Keep magnets on for 12 h of ischemia time.
After 12 h remove the magnets from each mouse (see Note 11).
Repeat 24-h ischemia–reperfusion cycle for a total of three cycles (see Note 12).
Monitor mice daily; ulcers will become visible after 3–4 days. Ulcers reach maximum depth at 10 days (Fig. 2c).
Fig. 2.
Ischemia reperfusion model. (a) Use a template to mark the position of the magnets half way between the fore and hindlimbs. Note a 1 cm skin bridge between the magnet placement. (b) Pinch fold of skin and place magnets around skin fold. (c) Representative animal on day 5 displaying bilateral stage 3 ulcers
3.3 Ischemic Flap
Induce adequate anesthesia through either intraperitoneal or inhaled anesthesia.
Shave back of anesthetized mouse with electric hair trimmer. Be careful not to induce any trauma with razor teeth.
Apply depilatory cream to shaved skin and let sit for 2 min.
Wipe off cream and hair with gauze. Prepared skin should be completely bare.
Wipe the shaved back with 70 % EtOH.
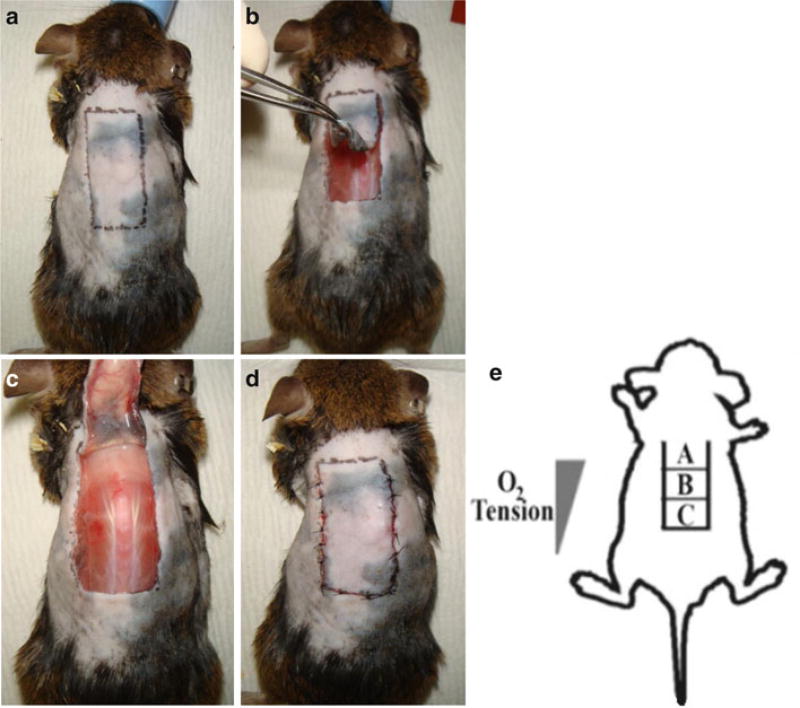
Using a template, mark off a 10 mm × 25 mm longitudinal rectangle on the dorsal midline. The cranial edge of the rectangle should be at the level of the shoulder blades (Fig. 3a).
Use scalpel to incise the skin along the caudal edge.
Use microsurgical scissors to extend the incisions along the caudal edge and along the longitudinal edges. The cranial edge will remain intact as the pedicle.
Raise a full-thickness peninsular flap by sharply dissecting any connective tissue between the skin flap and underlying muscle (Fig. 3b).
Place a 10 mm × 25 mm silicone sheet within the wound between the muscle and skin (Fig. 3c, see Note 13).
Keep the wound bed moist by periodically wetting with PBS.
Suture the flap using interrupted 6-0 nylon stitches (Fig. 3d, see Note 14).
Return mouse to individual cage.
Monitor the mouse to ensure recovery from anesthesia and surgery.
Monitor wounds daily.
Fig. 3.
Ischemic flap model. (a) Mark a 10 mm × 25 mm rectangle with the long dimension in the cranial–caudal axis. The cranial edge of the rectangle should be between the scapulae. (b) Raise a full-thickness flap leaving the cranial pedicle intact. (c) Place the impermeable silicone sheet flat on the wound and lay the flap down over the sheet. Note the superficial perforators that can be seen originating from the pedicle. (d) Suture the flap down using interrupted stitches. (e) Schematic of the O2 gradient produced with the ischemic flap model
4 Notes
4.1 Splinted Excisional Wound
-
1
Sutures should be tied with minimal tension as suture material can be easily cut through the silicone rings if too tight. Splints may need to be resutured or replaced especially in wild-type mice as they tend to be more active and are able to bite at the splint.
-
2
Daily monitoring should take place to both evaluate the wound and replace the dressing should it start to come off. Diabetic mice often are unable to reach the splint; however daily monitoring should still occur.
-
3
Individual cages are necessary as fighting may lead to damaged splints and other mice will chew through the silicone splints.
-
4
We obtain the best results using the macro function on most digital cameras and avoiding the use of flash. Care should be taken to make sure that images are obtained holding the camera in a plane parallel to the wound.
-
5
The scale must be set individually for each image as photographs are likely to be taken at various distances.
-
6
The wound area measured on day 1 is used as the original wound area as opposed to day 0 because the excisional wound tends to transiently widen immediately after surgery.
-
7
In our experience, usual time points to evaluate the acute phases of wound healing are days 0, 3, 5, 7, and 14. A minimum of three mice (six wounds) should be allocated to each time point to increase statistical validity.
-
8
Confirmation of death by cervical dislocation is necessary; however it should be performed carefully to prevent disruption of the wound which would affect histological results.
In our laboratory, common histological assays include measuring the epithelial gap and immunostaining for CD31 to measure vessel density in each tissue sample. RNA and protein are evaluated for the presence of multiple vasculogenic genes including VEGF, EPO, SDF-1α, and HIF-1α. It is not within the scope of this chapter to detail the methods for these assays; however standard techniques are adequate to provide results.
4.2 Ischemia Reperfusion Model
-
9
Magnets should be placed equidistant from the forelegs and hindlegs to minimize tension on the skin bridge and reduce chances of skin necrosis. The original method by Stadler describes a 5 mm skin bridge. In our experience, especially with mice with impaired wound healing (diabetic, aged, etc.), this bridge is too narrow and leads to ischemia and skin necrosis. A 1 cm bridge provides adequate perfusion to the bridge.
-
10
The skin fold should include epidermis, dermis, subcutaneous fat, panniculus carnosus, and subcutaneous loose connective tissue layer (hypodermis), but not muscle.
-
11
The skin may remain creased after removing the magnets. The skin may need to be stretched back out in this case to insure proper reperfusion.
-
12
In our experience of using leptin receptor-deficient diabetic (db/db) mice, three 6-h ischemia/6-h reperfusion cycles provide adequate trauma to induce pressure ulcers.
4.3 Ischemic Flap
-
13
The oxygen tension gradient produced by this model has been validated with direct oxygen tension measurements. The cranial 1/3rd of the flap exhibits oxygen tensions of 22 mmHg proximally and 18 mmHg distally. The middle 1/3rd of the flap exhibits oxygen tensions of 18 mmHg proximally and 11 mmHg distally. The caudal 1/3rd of the flap exhibits oxygen tensions of 11 mmHg proximally and 4 mmHg distally.
-
14
Start by suturing down the two caudal corners. Eight stitches for each longitudinal edge and five stitches for the caudal edge are adequate for closure. The devascularized skin flap is very delicate and care should be taken to minimize manipulation. Always use a new needle for each animal and avoid handling the flap with forceps when possible.
References
- 1.Ramsey SD, Newton K, Blough D, McCulloch DK, Sandhu N, Reiber GE, Wagner EH. Incidence, outcomes, and cost of foot ulcers in patients with diabetes. Diabetes Care. 1999;22:382–387. doi: 10.2337/diacare.22.3.382. [DOI] [PubMed] [Google Scholar]
- 2.Davidson JM. Animal models for wound repair. Arch Dermatol Res. 1998;290(Suppl):S1–S11. doi: 10.1007/pl00007448. [DOI] [PubMed] [Google Scholar]
- 3.Galiano RD, Michaels J, Dobryansky M, Levine JP, Gurtner GC. Quantitative and reproducible murine model of excisional wound healing. Wound Repair Regen. 2004;12:485–492. doi: 10.1111/j.1067-1927.2004.12404.x. [DOI] [PubMed] [Google Scholar]
- 4.Reddy M, Gill SS, Rochon PA. Preventing pressure ulcers: a systematic review. JAMA. 2006;296:974–984. doi: 10.1001/jama.296.8.974. [DOI] [PubMed] [Google Scholar]
- 5.Wassermann E, van Griensven M, Gstaltner K, Oehlinger W, Schrei K, Redl H. A chronic pressure ulcer model in the nude mouse. Wound Repair Regen. 2009;17:480–484. doi: 10.1111/j.1524-475X.2009.00502.x. [DOI] [PubMed] [Google Scholar]
- 6.Stadler I, Zhang RY, Oskoui P, Whittaker MS, Lanzafame RJ. Development of a simple, noninvasive, clinically relevant model of pressure ulcers in the mouse. J Invest Surg. 2004;17:221–227. doi: 10.1080/08941930490472046. [DOI] [PubMed] [Google Scholar]
- 7.Peirce SM, Skalak TC, Rodeheaver GT. Ischemia–reperfusion injury in chronic pressure ulcer formation: a skin model in the rat. Wound Repair Regen. 2000;8:68–76. doi: 10.1046/j.1524-475x.2000.00068.x. [DOI] [PubMed] [Google Scholar]


