Abstract
Obtaining acute brain slices for electrophysiology or amperometric recordings has become a routine procedure in most labs in the field of neuroscience. Yet, protocols describing the step by step process are scarce, in particular for routine acute preparations such as from the mouse hippocampus. Here we provide a detailed protocol for the dissection, extraction and acute slicing of the mouse brain, including tips and list of material required.
Keywords: Acute brain slices, Hippocampus, Dissection, Brain extraction, Electrophysiology, Mouse
Background
With the democratization of in vitro electrophysiology and amperometry recording techniques, obtaining acute slices from rodent brains has become a classic and pivotal procedure in neuroscience research. Yet, the know-how required to achieving this procedure is typically passed on verbally, and most labs have developed home-made recipes and adapted the most important steps to their own needs or region of interest, such that there is a lack of protocols describing how to obtain high-quality acute brain slices in a step by step manner. While some protocols can be found describing particularly challenging preparations, such as acute slicing of adult mouse spinal cord (Garre et al., Bioprotocol 2017: https://doi.org/10.21769/BioProtoc.2102), a description of the basic procedure for more routine preparations (e.g., hippocampal slices) is particularly lacking. Aside from the practical aspect, this is a major problem because extracellular field recordings from hippocampal slice have become widely employed, due to their relative simplicity and little equipment-requirement, including by labs without electrophysiology and acute brain slices preparation expertise. Given that the slices’ quality is the limiting factor to obtaining reliable electrophysiological recordings, this poses a major challenge for the reproducibility of results within and across labs. In light of these needs and caveats, we here provide a detailed protocol for the dissection, brain extraction and acute slicing of the mouse hippocampus, including tips and list of material required. It will allow beginner and non-experts to obtain acute hippocampal brain slices of the required quality for follow-up studies such as field recordings, patch-clamp recordings or amperometric recordings ( Papouin et al., 2017 ).
Materials and Reagents
Materials
-
For the ‘nest beaker’
Nylon tights
Instant superglue (such as Scotch Super Glue, 3M, catalog number: AD124)
15 ml tubes (such as VWR, catalog number: 89039-670 US, 525-0450 Europe)
Disposable 6 cm diameter plastic Petri dish (such as Thermo Fisher Scientific, Thermo ScientificTM, catalog number: 123TS1)
-
For dissection
Large kitchen scissors or guillotine
Straight fine scissors (such as Fine Science Tools, catalog number: 14060-11)
Curved spatula (such as Fine Science Tools, catalog number: 10092-12)
Scalpel (such as Fine Science Tools, catalog number: 91003-12)
Glass disposable Pasteur pipet (such as Fisher Scientific, FisherBrand, catalog number: 13-678-6A)
Dropper bulb (such as Fisher Scientific, FisherBrand, catalog number: 03-448-25)
Plastic container, about 2.5 cm high and 150 ml, such as the lid of a pipet tip box or a large glass Petri dish (Cole-Parmer Instrument, catalog number: EW-34551-06)
Whatman paper (GE Healthcare, Whatman, catalog number: 1001-090)
-
Disposable Razor blade (such as Personna Double Edge Razor Blades [Amazon, PERSONNA, catalog number: BP9020])
Reagents
Glucose (Sigma-Aldrich, catalog number: G7021)
Sodium chloride (NaCl) (Sigma-Aldrich, catalog number: S7653)
-
Sodium phosphate monobasic anhydrous (VWR, catalog number: 470302-666)
Manufacturer: ALDON, catalog number: SS0756-500GR.
Sodium bicarbonate (NaHCO3) (Sigma-Aldrich, catalog number: S5761)
Potassium chloride (KCl) (Sigma-Aldrich, catalog number: P9333)
Magnesium chloride solution (1 M) (Sigma-Aldrich, catalog number: 63069)
Calcium chloride solution (1 M) (Sigma-Aldrich, catalog number: 21115)
Stock artificial cerebrospinal fluid (ACSF) solution (see Recipes)
Ice-cold Slicing ACSF solution (see Recipes)
Recovery ACSF solution (see Recipes)
Experimental ACSF (see Recipes)
Equipment
250 ml Pyrex beaker (such as VWR, catalog number: 10754-952)
Straight spring scissors (such as Fine Science Tools, catalog number: 15018-10)
Curved fine forceps (such as Fine Science Tools, catalog number: 11152-10)
600 ml Pyrex beaker (such as VWR, catalog number: 10754-956)
95% O2/5% CO2 tank (such as AirGas, catalog number: Z02OX9522000043)
Vibratome (such as Leica, model: Leica VT 1200 S, catalog number: 14048142066)
Bath heater (such as Thermo Fisher Scientific, Thermo Scientific, model: Precision 180, catalog number: 51221073)
Procedure
Before starting:
-
Assemble the ‘nest beaker’ (Figure 1) and a modified Pasteur pipet dropper (Figure 2).
-
‘Nest beaker’ preparation (Figure 1)
Using nylon tights, a 6 cm plastic Petri dish, a 15 ml tube, superglue and a 250 ml beaker, prepare a ‘nest beaker’ in which slices will be incubated during and after recovery. Using kitchen scissors (or a ‘Dremel’ if you have one) cut out or simply open the base of the Petri dish, preferably without breaking the wall.
Stretch the nylon around the open Petri dish to form a firm mesh base, and secure it by tying it or by using elastic bands. Glue the nylon on the outside wall of the Petri dish. Do not use excessive amounts of glue as this can be toxic to slices and would prevent proper drying. Let dry for 24 h.
Using a scalpel or fine scissors, cut out the excess nylon. Rinse abundantly and soak in clear water overnight (we had instances where ‘fresh’ glue revealed toxic to slices). Cut and discard the conical end of the 15 ml tube, and cut out a rectangular window near the bottom end.
Assemble all three elements as shown. Plastic tubing from the 95% CO2/5% O2 tank will be lowered into the 15 ml tube to maintain appropriate pH and oxygenation.
Modified Pasteur pipette dropper (Figure 2)
-
Prepare 1 L of ACSF the day prior and store overnight at 4 °C.
Figure 1. Nest beaker.
Using nylon tights, a 6 cm plastic Petri dish, a 15 ml tube, superglue and a 250 ml beaker, prepare a ‘nest beaker’ in which slices will be incubated during and after recovery.
Figure 2. Modifier Pasteur pipette dropper.
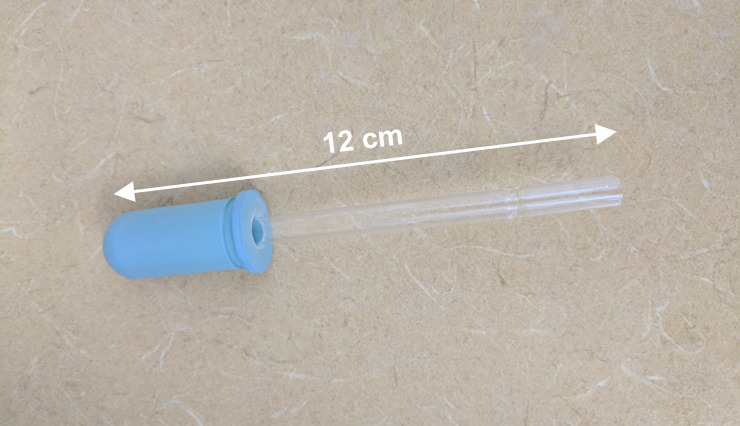
Break the thinnest end of a Glass disposable Pasteur pipet, and insert that end in a Dropper bulb.
Setting up:
On the day of the experiment, prepare 300 ml of ice-cold slicing ACSF (see Recipes) in a 600 ml Pyrex beaker (by adding 2 mM of MgCl2 and 1 mM of CaCl2 to 300 ml of stock ACSF) and place in a -20 °C freezer for about 20-30 min or until a thin layer of ice on the walls of the beaker and at the surface forms. Agitate vigorously to break the ice into a homogeneous icy solution. Avoid over-freezing as this will drastically change the osmolarity of the solution and reduce the quality of the slices. However, the amount of ice should be enough that the solution remains at 0-1 °C throughout the entire slicing procedure. Therefore it is recommended to adjust the iciness of the solution to your need/speed. We recommend against placing the beaker of slicing ACSF in a -80 °C freezer.
While the ice-cold slicing ACSF is in the freezer, prepare 150 ml of recovery ACSF in the ‘nest beaker’ (by adding 1.5 mM of MgCl2 and 2 mM of CaCl2 to 150 ml of stock ACSF). Warm up in the heated bath at 33 °C while oxygenating with 95% O2/5% CO2 for at least 25 min before to start (Figure 3B).
Prepare the vibratome by placing a mix of ice and water in the tray surrounding the slicing chamber. Cut a razor blade in half with the kitchen scissors (or use two blades): place one half in the blade holder of the vibratome and keep the other half for the dissection Procedure B.
Familiarize yourself with the Procedures A to C below and prepare your tools accordingly, to optimize the process. Typically, this consists in placing the tools in the following order (right to left but adjust depending on your dominant hand): Large kitchen scissors, scalpel, fine scissors, fine forceps, plastic container or large glass Petri dish with a piece of Whatman paper at the bottom (this will help increasing visual contrast and providing greater surface grip) and the curved spatula nearby, ready-to-grab second half of the razor blade, vibratome cutting plate and tube of glue, modified Pasteur pipet dropper and spring scissors (Figure 3A).
Figure 3. Set-up.

A. The tools on the dissection and slicing bench are set up from right to left according to the sequence of steps described in this protocol. B. Close up view of the nest beaker filled with recovery ACSF bubbling with 95%O2/5%CO2 and incubating at 33 °C.
-
Quickly extract the brain
Pour about half (150 ml) of the ice-cold slicing ACSF into the plastic container or large glass Petri dish and oxygenate.
Anesthetize the mouse using isoflurane, check for the absence of reflex upon tail or paw pinching and quickly decapitate the mouse using a small guillotine or large kitchen scissors (Figures 4A and 4B). Expose the skull with a large incision through the skin down the midline (Figure 4C) and cut the auditory conducts on each side (Figures 4D and 4E). Pull the skin toward the nose of the animal to fully expose the skull (Figure 4F). This will also provide a better grip of the head.
Place the head in ice-cold oxygenated slicing ACSF. Leave it submerged for 10 sec to chill.
While making sure the head remains submerged at all times, with fine scissors, open the back of the skull by making a cut immediately caudal to the cerebellum (Figures 4G and 4H), and then cut the skull open along the midline from the caudal end working your way up to the olfactory bulbs (Figures 4I-4L). Avoid putting pressure on the skull and make sure no damage is made to the brain underneath with the lower scissors tip. We also recommend making a lateral cut at the base of the skull through the jaw bones, this will help to extract the brain (Figure 4M).
Using fine forceps grab the open edge of the skull on one side of the midline, hold firmly and open to the side while steadily holding down the head with the other hand (Figures 4N and 4O, ideally, your index and thumb should be on each side of the mouse ‘face’, roughly on the eyes. Having the skin tight under your fingers usually helps).
Then proceed to the other side (Figures 4P and 4Q). Using a curved spatula, and being extremely gentle reach under the brain (let the floor of the skull guide you) and gently scoop out the brain, without pulling (Figures 4R-4T). The optic nerve, on the ventral part, and the cranial nerves, caudally, might need to be cut with the fine scissors or directly with the spatula to completely free the brain. Leave the extracted brain in the ice-cold slicing ACSF (Figure 4U). Make sure you keep the brain submerged in the ice-cold ACSF throughout this entire procedure.
-
Isolate the region of interest
-
With the razor blade, remove the unwanted parts of the brain, rostral and caudal to the region of interest. In the case of the hippocampus: place the brain ventral side down, locate the superior colliculi, make a transverse cut and discard the caudal part (cerebellum, Figure 5A).
Note: Make sure the cut is perpendicular to the rostro-caudal axis as this face will be glued on the cutting-plate of the vibratome.
Then flip the brain ventral side up, locate the optic chiasma and make a transverse cut (Figures 5B and 5D). This should expose the fimbria of the fornix, which is immediately rostral to the hippocampus (i.e., the hippocampus lies under it). Spread just enough glue on the cutting plate (make sure the plate is dry beforehand, Figure 5E).
-
Using the curved spatula and your index and thumb as an abutment (do not grab the brain with your fingers!), pick up the brain rostral side up and ventral side facing you (Figures 5F and 5G). Gently place the bottom of the spatula on a paper towel, to drain the excess of ACSF by capillarity (do not touch the brain with the paper towel). Place the spatula immediately above the glue (without touching it) and gently transfer the brain on the glue in a single motion by pushing it off the spatula with your finger (Figure 5H).
Note: Being slow or hesitant will ‘stretch’ the brain and reduce the quality of the slices. Do not press down on the brain, tap the plate or wait and let the brain dry off, or this will dramatically reduce the quality of the slices as well.
-
-
Obtain brain slices
Immediately transfer the plate into the slicing chamber (Figure 6A), with the ventral part of the brain facing you and the dorsal part (i.e., the surface of cortex) facing the back of the vibratome. Gently pour the rest of the ice-cold oxygenated slicing ACSF (Figure 6B).
-
Lower the blade in the solution and, using the vibratome control panel, set up a fairly narrow yet safe ‘slicing window’ (~2 mm on each side). Lower the blade to the surface of the brain (do not press the blade on the brain) and start the slicing to obtain 300-350 μm hippocampal coronal slice (thickness should be pre-set).
Notes:
Avoid pouring the ACSF directly onto the brain and be careful not to drop pieces of ice onto the brain. Oxygenate while ensuring that the agitation caused by the bubbling is not excessive as this may be a problem once slices come unattached.
To optimize the quality of the slices and minimize the total duration of the procedure, we recommend adjusting the speed of the vibratome to medium (0.12-0.16 mm/sec on Leica VT1200s) when the blade is not in any region of interest, and to low when the blade is in the hippocampus or region of interest (0.08-0.1 mm/sec on Leica VT1200s).
Once the blade reaches the last ventral micrometers, the optic chiasma or meninges can resist and prevent full detachment of the slice. This can also distort or ‘pull’ the slice before it is entirely freed. In most cases, gently holding the slice onto the blade with the spring scissors without applying any pressure (Figure 6C) will suffice to help the blade cut through the chiasma or meninges. In extreme cases, we recommend quickly but very carefully sniping the meninges or the remaining part if the slice with spring scissors. In any case, be extremely careful not to push on the vibrating blade, on the brain underneath, or to pull the slice while still attached. Any sort of mechanical pressure (‘pulling’) will damage the slice. This could also cause the brain to come unglued.
Once the first slice is freed (Figure 6D), with spring scissors, separate both hemispheres (Figure 6E) and, using the Pasteur pipet dropper, transfer them into the nest beaker containing the recovery ACSF (see Recipes), incubating at 33 °C in the bath heater (Figure 6F).
Repeat until all slices are obtained and all hemi-slices are transferred in the nest beaker containing the recovery ACSF. Incubate at 33 °C for an additional 30 min.
Carefully remove the nest beaker from the heating bath and let recover at room temperature for 45 min.
Slices are now ready to be used for electrophysiology or other procedures such as Bio-protocol ‘D-serine measurement in brain slices or other tissue explants’ (Papouin and Haydon, 2018).
Figure 4. Extracting the brain from the skull.
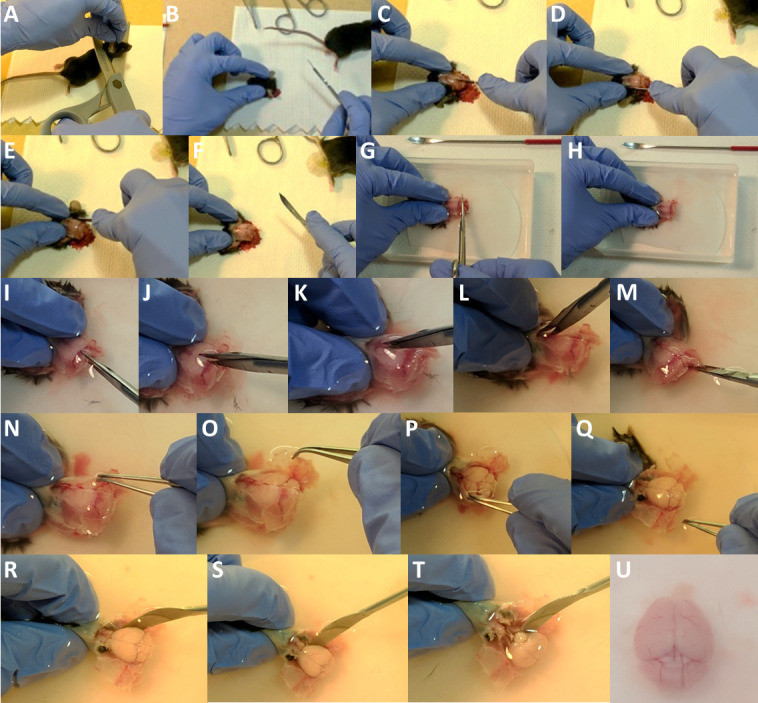
A. Decapitate the anesthetized animal; B-F. Using the scalpel, incise the skin, cut the auditory conducts and pull the skin to expose the skull. G-H. Open the back of the skull by making a cut immediately caudal to the cerebellum. I-L. Using fine scissors, carefully cut through the skull along the midline. Angle the scissors to minimize potential damage by the tip to the brain underneath. M. If animals used are adults, we recommend making a lateral cut at the base of the skull through the jaw bones. N-Q. Using fine tweezers, grab the open edge of the skull on one side, hold firmly and open to the side while firmly holding down the head by the ‘nose’ with the other hand. Then proceed to the other side. R-U. Using the curved spatula, carefully reach under the brain (let the floor of the skull guide you) and gently scoop out the brain. Cut through the optic chiasma with fine scissors or directly with the spatula (T). For clarity purpose, there is no ice and no bubbling in the solution in Panels G-U.
Figure 5. Isolate the region of interest.
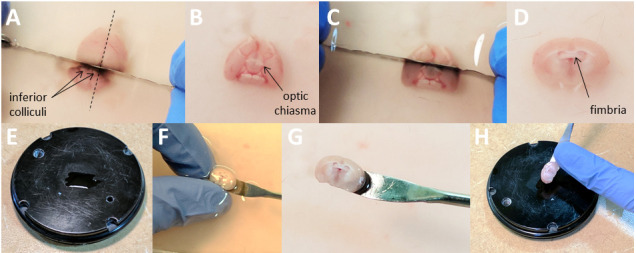
A. While the brain is dorsal side up, locate the inferior colliculi and, using a razor blade, make a cut immediately above them perpendicular to the rostro-caudal axis. Discard the part containing the cerebellum. B-C. Flip the brain ventral side up, locate the optic chiasma and using the razor blade, make a cut perpendicular to the rostro-caudal axis. Discard the frontal part. This should free the fimbria of the fornix, which lies immediately above the hippocampus. E-H. Apply just the required amount of glue on the vibratome plate. F. Using the curved spatula and your index and thumb as an abutment (do not grab the brain with your fingers!) pick up the brain. Use your finger to push the brain off the spatula immediately above the glue and delicately ‘drop’ in on the glue in a single motion. For clarity purpose, there is no ice and no bubbling in the solution in Panels A-D and F.
Figure 6. Obtain brain slices.
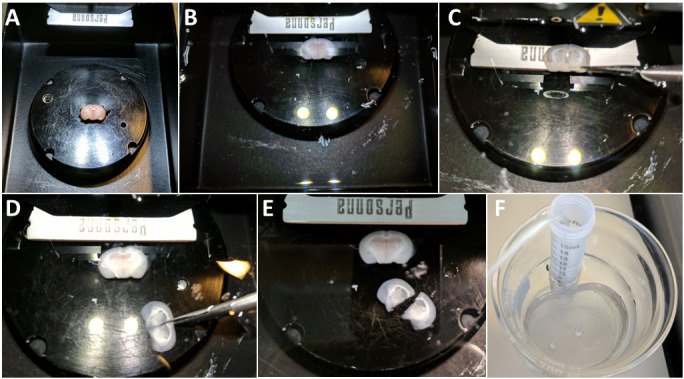
A. Transfer the plate with the glued brain in the slicing chamber of the vibratome and lower the blade holder. B. Poor the remaining of the ice-cold Slicing aCSF. C. If meninges or the optic chiasma are an issue during slicing, gently hold the slice onto the blade with the spring scissors (without applying any pressure) to help cut through. D. Once the slice is freed, separate the two hemispheres with the spring scissors (you can use the fine forceps to hold the bottom of the slice) and transfer to the nest beaker with Recovery ACSF incubating and bubbling at 33 °C. For clarity purpose, there is no ice and no bubbling in the solution in Panels B-E.
Data analysis
The quality of slices (notably hippocampal slices) can be very easily assessed visually with the 5x objective of any given microscope (Figure 7). Typically, healthy slices show stark contrasts and differential coloring across layers and regions. The stratum oriens and radiatum will have a bright orange color. The stratum lacunasorum molecular generally appears much darker (deep brown to deep grey). The pyramidal layer, while clear in comparison, will appear thin or ‘compact’ and, depending on the angle of the slicing, can be delineated from the s. oriens and radiatum by thin dark lines. Unhealthy slices take greyish and uniform tints. The pyramidal layer of an unhealthy slice appears exceedingly white or transparent and usually ‘swollen’.
Figure 7. A healthy hippocampal slice.
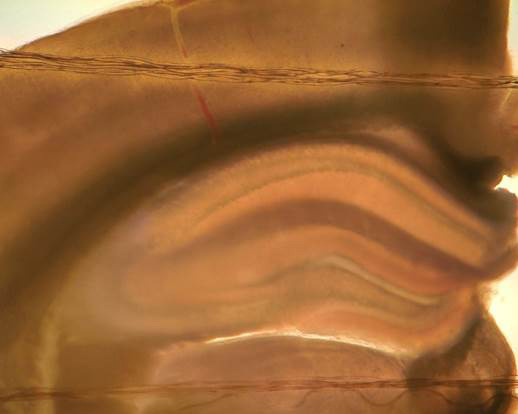
Healthy, brain/hippocampal slices typically show orange coloring with obvious differences in tints and contrasts across layers. Layers are also evident in the cortex.
Note: The two sets of horizontal ‘strings’ are from the ‘harp’ system that holds the slice down under the microscope (not described in this protocol).
Notes
From our experience, Steps A2 (once the mouse is decapitated) to C4 (when the last slice is extracted) should be achieved within 10 min for optimal brain slices quality. In particular, the complete extraction of the brain should be achieved in less than 2 min, i.e., no more than ~2-3 min should elapse between the decapitation of the animal and the transfer of the brain into the vibratome chamber.
Please note that contrary to most of labs or protocols we strongly advice against using a sucrose-based slicing solution. We found that reducing calcium concentration while increasing that of magnesium and ensuring that the procedure is performed rapidly (see above) and in ice-cold ACSF throughout is the most efficient way to reduce excitotoxicity and the best guarantee of good slice quality.
Please note that contrary to most of labs or protocols we also strongly advice against using a paint brush to manipulate slices. While they feel soft to the touch of one’s finger, at the scale of a 350 µm slice, paint brushes are the equivalent of many small knives bundle together and result in multiple stab wounds to slices.
Recipes
-
Stock artificial cerebrospinal fluid (ACSF) solution (1 L, store at 4 °C)
Glucose 10 mM (1.8 g for 1 L)
Sodium chloride 125 mM (7 g for 1 L)
Sodium phosphate monobasic anhydrous 1.25 mM (0.119 g for 1 L)
Potassium chloride 2.5 mM (0.23 mg for 1 L)
Sodium bicarbonate 26 mM (2.18 mg for 1 L)
Adjust pH to 7.3 and osmolarity to 290-300 mOsm L-1
Make up to 1 L with ddH2O
-
Ice-cold slicing ACSF (~300 ml)
Stock ACSF
2 mM magnesium chloride
1 mM calcium chloride
-
Recovery ACSF (~150 ml)
Stock ACSF
1.5 mM magnesium chloride
2 mM calcium chloride
-
Experimental ACSF (~550 ml) for follow-up electrophysiological or amperometric recordings
Stock ACSF
1.3 mM magnesium chloride
2 mM calcium chloride
Acknowledgments
This work was supported by two Philippe Foundation grants and a Human Frontier Science Program long-term fellowship (LT000010/2013) awarded to T.P., and two NIH/NINDS R01 grants (NS037585 and AA020183) awarded to P.G.H. who is also the founder of GliaCure. Authors declare no conflict of interest. We thank Jaclyn M. Dunphy for her careful proofreading of this protocol.
Citation
Readers should cite both the Bio-protocol article and the original research article where this protocol was used.
References
- 1. Garré J. M., Yang G., Bukauskas F. F. and Bennett M. V.(2017). An acute mouse spinal cord slice preparation for studying glial activation ex vivo . Bio-protocol 7(2): e2102. [DOI] [PMC free article] [PubMed] [Google Scholar]
- 2. Papouin T., Dunphy J. M., Tolman M., Dineley K. T. and Haydon P. G.(2017). Septal cholinergic neuromodulation tunes the astrocyte-dependent gating of hippocampal NMDA receptors to wakefulness. Neuron 94(4): 840-854 e847. [DOI] [PMC free article] [PubMed] [Google Scholar]
- 3. Papouin T and Haydon P. G.(2018). D-serine measurements in brain slices or other tissue explants. Bio-protocol 8(2): e2698. [DOI] [PMC free article] [PubMed] [Google Scholar]


