Abstract
Bone healing models are necessary to analyze the complex mechanisms of fracture healing to improve clinical fracture treatment. During the last decade, an increased use of mouse models in orthopedic research was noted, most probably because mouse models offer a large number of genetically-modified strains and special antibodies for the analysis of molecular mechanisms of fracture healing. To control the biomechanical conditions, well-characterized osteosynthesis techniques are mandatory, also in mice. Here, we report on the design and use of a closed bone healing model to stabilize femur fractures in mice. The intramedullary screw, made of medical-grade stainless steel, provides through fracture compression an axial and rotational stability compared to the mostly used simple intramedullary pins, which show a complete lack of axial and rotational stability. The stability achieved by the intramedullary screw allows the analysis of endochondral healing. A large amount of callus tissue, received after stabilization with the screw, offers ideal conditions to harvest tissue for biochemical and molecular analyses. A further advantage of the use of the screw is the fact that the screw can be inserted into the femur with a minimally invasive technique without inducing damage to the soft tissue. In conclusion, the screw is a unique implant that can ideally be used in closed fracture healing models offering standardized biomechanical conditions.
Keywords: Medicine, Issue 133, Fracture healing, closed bone healing model, minimally invasive, mice, intramedullary screw, biomechanics, endochondral healing
Introduction
Bone healing studies in mice are in great demand because of a broad spectrum of antibodies and genetically-modified animals. These facts allow to study the molecular mechanisms of bone healing1. In the past few years, different bone healing models for mice have been developed2. These models can be divided into open models, in which the bone is osteotomized using an open lateral surgical approach and in closed models, in which the bone is fractured based on the fracture model introduced by Bonnares and Einhorn3. Using this technique, a standardized transverse fracture can be produced by a 3-point bending device and intramedullary implants can be inserted through a small medial parapatellar incision in a minimally invasive technique avoiding a major soft tissue trauma.
The intramedullary screw can be applied for closed fracture stabilization in mice. The screw offers rotational and axial stability. This is achieved by fracture compression through a proximal thread and a distal head4. Further advantages of the screw are the simple surgical technique, the low grade of invasivity, the low implant weight and, most notably, a higher stability providing standardized and controlled biomechanical conditions compared to other intramedullary implants5. In fact, in the most closed fracture models, the fragments are stabilized only by simple pins, which is associated with a complete lack of rotational and axial stability and a high risk of pin and also fracture dislocation. This can markedly influence the healing process, which may result in delayed healing or non-union formation.
It is well known that the stability of the fracture fixation has a tremendous impact on the healing process6,7. A high rigid fixation results in intramembranous healing, while a less rigid fixation, which may allow micromovements in the fracture gap, results in endochondral healing. Stabilization of the fracture with the intramedullary screw shows predominantly an endochondral healing with a large amount of callus tissue, particularly after 2 weeks of fracture healing. The possibility to harvest a large amount of callus tissue enables the analysis of multiple parameters by different techniques.
Here, we report on the design and application of the intramedullary screw in mice, as well as on its advantages and disadvantages in experimental studies on normal endochondral bone healing.
Protocol
All procedures were performed according to the National Institutes of Health guidelines for the use of experimental animals and followed institutional guidelines (Landesamt für Verbraucherschutz, Zentralstelle Amtstierärztlicher Dienst, Saarbrücken, Germany).
1. Preparation of Surgical Instruments and Implants
Select a scalpel blade (size 15), a small swab, fine forceps, a 27 G needle, a non-resorbable 5-0 suture, scissors and a needle holder from the microsurgical instrument box.
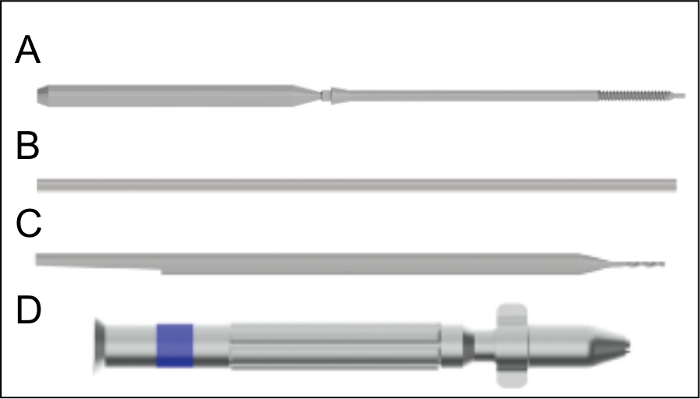
Unpack the intramedullary screw, the guide wire (0.3/0.2 mm diameter, 10 cm length), the centering drill bit (0.5 mm diameter) and the hand drill (Figure 1; see Table of Materials). NOTE: The intramedullary screw (0.5 mm diameter, 17.2 mm length) is made of medical-grade stainless steel for retrograde implantation into the femur. The screw has a proximal thread (0.5 mm diameter, 4 mm length) with a nose (0.2 mm diameter, 0.4 mm length) at the tip and distal cone-shaped head (0.8 mm diameter, 0.9 mm length) to achieve fracture compression as well as axial and rotational stability.
Expose the implants and all surgical instruments to a disinfecting solution (96 % alcohol) for 5 min or sterilize them (steam sterilization, 130 °C, 25 min). After disinfection or sterilization, place the instruments on an operation cloth. Position the operation cloth directly adjacent to the small animal operation table.
2. Animals, Anesthesia, and Analgesia
Choose the strain, age, and sex of the mice according to the study question which is addressed. NOTE: For this study 12- to 14-week-old male CD-1 mice were used. The appropriate body weight to use the intramedullary screw is between 25-35 g.
Anesthetize the mice with an intraperitoneal injection of 15 mg/kg xylazine and 75 mg/kg ketamine. Confirm the anesthetization by toe pinch. Apply eye lubricant to protect the animals' eyes from drying during anesthesia. After induction of anesthesia, place the mouse under a heat radiator to keep the body temperature constant. During the procedure, animals were monitored with repeated toe pinch to ensure an appropriate plane of anesthesia.
Apply tramadol-hydrochloride in the drinking water (1.0 mg/mL) for analgesia from day 1 before the surgery until day 3 after the surgery. NOTE: Analgesia and infection prevention should be in agreement with the respective guidelines of the country and institution where the experiments are to be performed.
3. Surgical Procedure and Intramedullary Screw Implantation
Before surgery, shave the entire right hind leg and apply a depilatory cream. After 5 min, remove the cream and clean the leg with water. Then, apply a disinfecting solution with 96 % alcohol. Betadine or chlorhexidine can be added to the alcohol to ensure complete asepsis.
Under aseptic conditions, place the mouse in the supine position on the small animal operation table. Bend the right knee to allow for an anterior approach to the condyles of the knee. Perform a 5-mm medial parapatellar incision at the right knee using the scalpel blade.
Mobilize the patellar ligament carefully with the scalpel blade and the swab. Then, shift the patella laterally with the fine forceps to expose the intercondylar notch of the femur.
- Open the intercondylar notch exactly in the middle of the femur between both condyles. Make sure not to exceed 1.0 mm in depth for the drill hole.
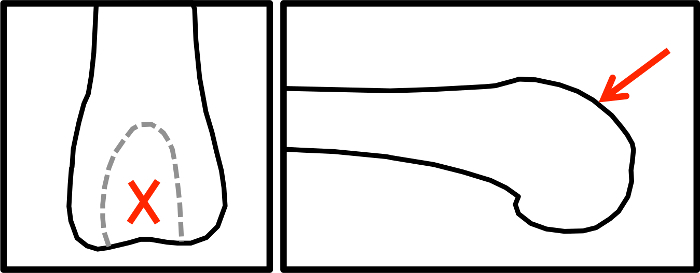
- Start manual drilling at a slow speed and a 45 ° offset ventrally to the femur axis using the 0.5 mm centering drill bit and the hand drill (Figure 1C and D, Figure 2). During drilling, continuously decrease the angle to 0 ° offset (parallel with the bone axis of the femur). Stop drilling when a depth of 1.0 mm is reached.
After opening the bone at the intercondylar notch, insert the 27 G needle into the intramedullary cavity over the whole length of the femur. Ream the intramedullary cavity of the femur manually through rotary motions of the 27 G needle. Push the needle forward to perforate the cortical bone at the greater trochanter proximally.
- Remove the 27 G needle and apply the guide wire through the distal part of the femur.
- Make a skin incision with a scalpel blade (size 15) proximally over the guide wire and push the guide wire forward until both ends of the guide wire are outside. Make sure to keep the guide wire in place.
- Create a defined closed fracture by using the guillotine.
- Place the mouse in lateral position with the right leg under the guillotine. Make sure that the diaphyseal part of the femur is placed in the middle of the guillotine.
- Drop the weight (200 g) from the defined distance of 25.5 cm.
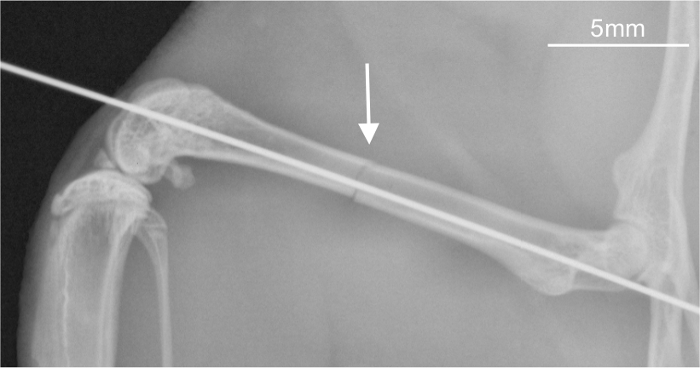
Control the fracture configuration and fracture position as well as the position of the guide wire (Figure 3) using the x-ray device (see Table of Materials).
- Connect the intramedullary screw with the nose at the distal end to the 0.2 mm guide wire and insert it into the femur under continuous pressure, and clockwise rotation.
- Shear of the drive shaft when the sufficient torque is achieved.
- Remove the guide wire proximally.
Reposition the patella and fix the patella tendon to the muscles with one single suture using a 5-0 synthetic, monofilament, nonabsorbable polypropylene suture. Use single sutures of the same material and size to close the wound. Control the reduction of the fragments and the screw position radiologically using the x-ray device (see Table of Materials).
Keep the animals under the heat radiator until they recover from anesthesia. Do not leave the animals unattended until they have regained sufficient consciousness to maintain ventral recumbency. Return the animals to single cages in the animal facility. Do not return the animals to the company of other animals during the first 24 h, even if they have fully recovered from anesthesia.
Monitor the animals carefully every day. Maintain postoperative analgesia using tramadol-hydrochloride in the drinking water with a dosage of 1.0 mg/mL during the first three days. Continue analgesia if, on day 4 after surgery, the animals still show evidence of pain, as indicated by vocalization, restlessness, lack of mobility, failure to groom, abnormal posture, and lack of normal interest in surroundings. Terminate analgesia when the animals are pain-free.
At the end of the experiment euthanize the animal by an overdose of barbiturate.
Representative Results
The operating time from skin incision to wound closure was 20 min. The surgery can be performed without a stereo-microscope. Postoperatively, the animals were monitored daily. Post-operative analgesia was terminated after 2 days because none of the animals showed evidence of pain after this time period. The animals showed also normal weight-bearing within 2 days after surgery. Wound infections were not observed during the entire observation period.
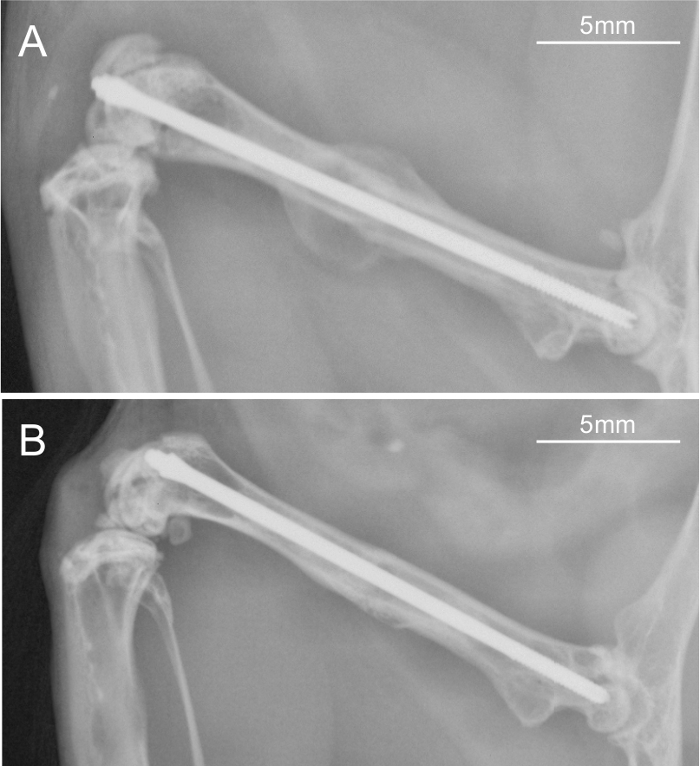
Radiological analyses after 2 weeks showed an obvious formation of callus tissue bridging the fracture gap (Figure 4A). After 5 weeks, the fracture was healed, and the periosteal callus was almost completely remodeled (Figure 4B).
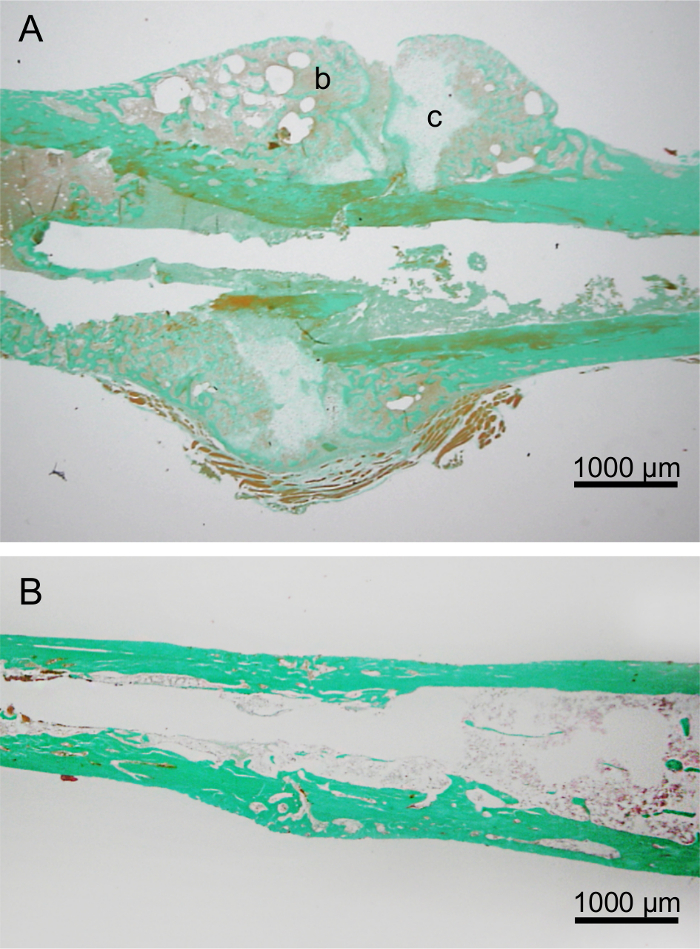
Histological analyses of the callus and the fracture zone after 2 weeks showed typical tissue distribution of endochondral healing with cartilage tissue built during the chondrogenic process and woven bone (Figure 5A). After 5 weeks, the cartilage tissue disappeared, and the woven bone was converted to the lamellar bone in order to reconstitute the normal anatomical and load-carrying properties of the bone (Figure 5B).
Biomechanical analyses after 2 weeks indicated a bending stiffness of 37 % compared to the contralateral unfractured bone. After 5 weeks, the bending stiffness was almost 100 % indicating complete healing (Figure 6).
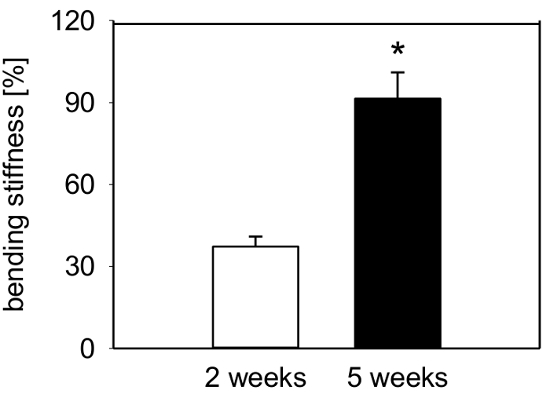
Figure 1: Implants.A. The intramedullary screw (0.5 mm diameter, 17.2 mm length) with the thread (0.5 mm diameter, 4 mm length) and the nose (0.2 mm diameter, 0.4 mm length) proximal and a cone-shaped head (0.8 mm diameter, 0.9 mm length) distal. B. The guide wire (0.3/0.2 mm diameter, 10 cm length). C. The centering drill bit (0.5 mm diameter). D. The hand drill. Please click here to view a larger version of this figure.
Figure 2: Schematic drawing of the femur condyles indicating the entry point for the intramedullary screw. Femur condyles with the intercondylar notch in anterior-posterior view (left) and sagittal view (right). The cross (left) indicates the entry point for the intramedullary screw, the arrow (right) indicates the 45 ° offset to the femur axis to start drilling. Please click here to view a larger version of this figure.
Figure 3: Radiograph of the femur with a transverse fracture and the inserted guide wire. Radiograph shows the transverse fracture configuration in the diaphyseal part of the femur (arrow) and the guide wire within the intramedullary cavity bridging the fracture. Scale bars represent 5 mm. Please click here to view a larger version of this figure.
Figure 4: Radiographs after 2 and 5 weeks of bone healing.A. Radiographic analysis of a femur stabilized with the screw after 2 weeks, demonstrating obvious callus formation. B. Radiographic analysis of a femur stabilized with the screw after 5 weeks, demonstrating almost complete healing of the fracture with the remodeling of the callus. Scale bars represent 5 mm. Please click here to view a larger version of this figure.
Figure 5: Histological sections after 2 and 5 weeks of bone healing.A. Histological analysis of a femur stabilized with the screw after 2 weeks, demonstrating the typical tissue distribution during endochondral bone healing with cartilage (c) and bone (b) tissue within the callus. B. Histological analysis of a femur stabilized with the screw after 5 weeks, demonstrating the almost complete remodeling to lamellar bone. The histological sections were stained according to the trichrome method. Scale bars represent 1000 µm. Please click here to view a larger version of this figure.
Figure 6: Biomechanical analysis. Biomechanical analysis of the bending stiffness after 2 weeks (white bar, n=9) and 5 weeks (black bar, n=8). Bending stiffness is given in percent to the contralateral non-fractured femur. Data are given as mean ± standard error of the mean (SEM), *p<0.05 vs. 2 weeks. After proving the assumption for normal distribution (Kolmogorov-Smirnov-test) and equal variance (F-test), the comparison between the two experimental groups was performed using Student´s t-test. Please click here to view a larger version of this figure.
Discussion
Critical steps of the surgical procedure are to find the correct entry point for screw implantation in the middle of the femur condyles at the intercondylar notch as well as the optimal orientation of the needle parallel to the bone axis for reaming of the intramedullary cavity. To avoid an incorrect entry position, the surgeon should prepare the notch until an optimal view is achieved. To control the orientation during reaming, the femur of the mice should be held with the fingers in a stable position. A further critical step is the insertion of the screw into the femur over the guide wire because the guide wire can slip out of the proximal bone fragment resulting in a fracture dislocation. In this case, the surgeon can try to thread the bone fragments again, but this maneuver is mostly unsuccessful, and the animals have then to be excluded from the study.
In addition, the surgical procedure may develop some complications. For example, the patellar ligament, which is shifted laterally to get an optimal view to the condyles, may rupture. This requires suturing of the ligament after screw insertion. During opening the bone at the condyles and reaming the intramedullary cavity, the condyles may burst. In this case, there is no possibility of troubleshooting, because the screw cannot adequately be fixed at the distal end and the compression of the fracture is not achieved. Another complication is the dislocation of the inserted guide wire or an incorrect position out of the bone. This complication can be reduced by handling with caution and by radiographic analysis after insertion to confirm the correct placement during surgery. Furthermore, the surgeon should pay attention that the screw is completely inserted because a protrusion of the screw can restrict the mobility of the mouse or reduce the fracture compression. Therefore, an x-ray device is mandatory for the surgical procedure. Only animals after radiographic confirmation at the end of surgery should be included in the study protocol.
Removal of the intramedullary screw at the end of the experiment can be performed without any difficulties, because the head of the screw can be connected to a special removal instrument or, alternatively, the screw can be removed also with the needle holder.
One limitation of the technique is that the intramedullary screw is provided by the company only in one size with a defined length of 17.2 mm and therefore the size of the femur must be considered. A further limitation on the use of the intramedullary screw is that in vivo micro computed tomography- (CT) or magnetic resonance imaging (MRI) analyses of the healing process are almost impossible due to the implant material, which affects the image quality. Therefore, these analyses can only be performed after euthanasia and removal of the implant at the end of the study period. Finally, the screw cannot be used to analyze bone defect healing, because the axial stability is achieved through the compression of the bone fragments by the proximal thread and the distal head.
Bone healing studies use either open8,9,10,11,12,13,14 or closed4,15,16,17 bone healing models. Open bone healing models allow a more rigid fixation of the fragments compared to closed bone healing models, resulting in a higher amount of intramembranous healing without a pronounced callus formation. Because open models are associated with little callus formation, these models may not be preferred in experiments that require larger amounts of callus tissue for biochemical and molecular analyses. A further disadvantage of the open models is the need for an invasive lateral approach with a major soft tissue trauma. In contrast, the use of a closed model requires only a small less invasive incision. Until now only a few closed models exist in mice2.
In closed bone healing models, mostly a simple intramedullary pin is used. However, this technique has distinct disadvantages. Most notably, the lack of axial and rotational stability. This can result in a heterogeneous healing response5. Although this disadvantage is known to influence experimental results18, recent studies, which intend to analyze the mechanisms of bone healing, still use murine models in which the fracture is stabilized only with a pin or is even left unstabilized7. We feel that stable osteosynthesis techniques, comparable to those used in clinical practice, should also be used in mice. To achieve axial and rotational stability, the intramedullary screw was developed which induces fracture compression by a distal head and a proximal thread. Of interest, the application of the intramedullary screw does not produce a rigid fixation, and, thus, the torsional stiffness of fractured femora stabilized with the intramedullary screw is significantly lower when compared to that of fractured femora stabilized by an external fixator or a locking plate5. However, a less rigid fixation is required to study endochondral bone healing, because only a less rigid fixation allows the micromovements of the bone fragments, which provoke the endochondral healing process. Nonetheless, as shown in a previous ex vivo study, the intramedullary screw produces a distinct axial and rotational stability. Biomechanical analyses revealed that the intramedullary screw achieves a torsional stiffness of 0.34 ± 0.18 Nmm/°, which is significantly higher when compared to that achieved with a conventional pin (0.00 ± 0.00 Nmm/°)5. Thus, the intramedullary screw introduced here is the only implant that can be used in a minimally invasive technique and that provide standardized biomechanical conditions for the study endochondral fracture healing in mice.
Disclosures
The authors declare that they have no competing financial interests.
Acknowledgments
This work was supported by RISystem AG, Davos, Switzerland.
References
- Jacenko O, Olsen BR. Transgenic mouse models in studies of skeletal disorders. J Rheumatol Suppl. 1995;43:39–41. [PubMed] [Google Scholar]
- Histing T, et al. Small animal bone healing models: standards, tips, and pitfalls results of a consensus meeting. Bone. 2011;49(4):591–599. doi: 10.1016/j.bone.2011.07.007. [DOI] [PubMed] [Google Scholar]
- Bonnarens F, Einhorn TA. Production of a standard closed fracture in laboratory animal bone. J Orthop Res. 1984;2(1):97–101. doi: 10.1002/jor.1100020115. [DOI] [PubMed] [Google Scholar]
- Holstein JH, et al. Development of a stable closed femoral fracture model in mice. J Surg Res. 2009;153(1):71–75. doi: 10.1016/j.jss.2008.02.042. [DOI] [PubMed] [Google Scholar]
- Histing T, et al. Ex vivo analysis of rotational stiffness of different osteosynthesis techniques in mouse femur fracture. J Orthop Res. 2009;27(9):1152–1156. doi: 10.1002/jor.20849. [DOI] [PubMed] [Google Scholar]
- Claes L, Augat P, Suger G, Wilke HJ. Influence of size and stability of the osteotomy gap on the success of fracture healing. J Orthop Res. 1997;15(4):577–584. doi: 10.1002/jor.1100150414. [DOI] [PubMed] [Google Scholar]
- Histing T, et al. Characterization of the healing process in non-stabilized and stabilized femur fractures in mice. Arch Orthop Trauma Surg. 2016;136(2):203–211. doi: 10.1007/s00402-015-2367-7. [DOI] [PubMed] [Google Scholar]
- Thompson Z, Miclau T, Hu D, Helms JA. A model for intramembranous ossification during fracture healing. J Orthop Res. 2002;20(5):1091–1098. doi: 10.1016/S0736-0266(02)00017-7. [DOI] [PubMed] [Google Scholar]
- Cheung KM, Kaluarachi K, Andrew G, Lu W, Chan D, Cheah KS. An externally fixed femoral fracture model for mice. J Orthop Res. 2003;21(4):685–690. doi: 10.1016/S0736-0266(03)00026-3. [DOI] [PubMed] [Google Scholar]
- Garcia P, et al. A new technique for internal fixation of femoral fractures in mice: impact of stability on fracture healing. J Biomech. 2008;41(8):1689–1696. doi: 10.1016/j.jbiomech.2008.03.010. [DOI] [PubMed] [Google Scholar]
- Histing T, et al. An internal locking plate to study intramembranous bone healing in a mouse femur fracture model. J Orthop Res. 2010;28(3):397–402. doi: 10.1002/jor.21008. [DOI] [PubMed] [Google Scholar]
- Garcia P, et al. The LockingMouseNail-a new implant for standardized stable osteosynthesis in mice. J Surg Res. 2011;169(2):220–226. doi: 10.1016/j.jss.2009.11.713. [DOI] [PubMed] [Google Scholar]
- Histing T, Klein M, Stieger A, Stenger D, Steck R, Matthys R, Holstein JH, Garcia P, Pohlemann T, Menger MD. A new model to analyze metaphyseal bone healing in mice. J Surg Res. 2012;178(2):715–721. doi: 10.1016/j.jss.2012.04.007. [DOI] [PubMed] [Google Scholar]
- Histing T, Menger MD, Pohlemann T, Matthys R, Fritz T, Garcia P, Klein M. An Intramedullary Locking Nail for Standardized Fixation of Femur Osteotomies to Analyze Normal and Defective Bone Healing in Mice. J Vis Exp. 2016. [DOI] [PMC free article] [PubMed]
- Hiltunen A, Vuorio E, Aro HT. A standardized experimental fracture in the mouse tibia. J Orthop Res. 1993;11(2):305–312. doi: 10.1002/jor.1100110219. [DOI] [PubMed] [Google Scholar]
- Manigrasso MB, O'Connor JP. Characterization of a closed femur fracture model in mice. J Orthop Trauma. 2004;18(10):687–695. doi: 10.1097/00005131-200411000-00006. [DOI] [PubMed] [Google Scholar]
- Holstein JH, Menger MD, Culemann U, Meier C, Pohlemann T. Development of a locking femur nail for mice. J Biomech. 2007;40(1):215–219. doi: 10.1016/j.jbiomech.2005.10.034. [DOI] [PubMed] [Google Scholar]
- Claes LE, et al. Effects of mechanical factors on the fracture healing process. Clin Orthop Relat Res. 1998;355 Suppl:S132–S147. doi: 10.1097/00003086-199810001-00015. [DOI] [PubMed] [Google Scholar]


