Abstract
A spheroid (a multicellular aggregate) is regarded as a good model of living tissues in the human body. Despite the significant advancement in the spheroid cultures, a perfusable vascular network in the spheroids remains a critical challenge for long-term culture required to maintain and develop their functions, such as protein expressions and morphogenesis. The protocol presents a novel method to integrate a perfusable vascular network within the spheroid in a microfluidic device. To induce a perfusable vascular network in the spheroid, angiogenic sprouts connected to microchannels were guided to the spheroid by utilizing angiogenic factors from human lung fibroblasts cultured in the spheroid. The angiogenic sprouts reached the spheroid, merged with the endothelial cells co-cultured in the spheroid, and formed a continuous vascular network. The vascular network could perfuse the interior of the spheroid without any leakage. The constructed vascular network may be further used as a route for supply of nutrients and removal of waste products, mimicking blood circulation in vivo. The method provides a new platform in spheroid culture toward better recapitulation of living tissues.
Keywords: Bioengineering, Issue 134, Vascular network, microfluidic device, tissue culture, organ-on-a-chip, angiogenesis, spheroid, three-dimensional culture
Introduction
Shifting from a monolayer (two-dimensional) culture to a three-dimensional culture is motivated by the need to work with culture models that mimic the cellular functions of living tissues1,2,3. Flat and hard plastic substrates commonly used in cell culture do not resemble most of the extracellular environments in the human body. In fact, many studies demonstrate that three-dimensional culture recreate tissue-specific architecture, mechanical and biochemical cues, and cell-cell communication, which have not been observed in conventional two-dimensional culture4,5,6,7,8.
A multicellular aggregate or spheroid, is one of the most promising techniques to realize this three-dimensional culture9,10. Cells secrete the extracellular matrix (ECM) and can interact with others in the spheroid. Although some other bioengineering approaches11,12,13,14, such as cell stacking, successfully replicate spatial complexity of the human body, these approaches have only two or three kinds of cells for the ease of analysis and focused on only one function of target organs. In contrast, cells in spheroids are exposed to different culture environments depending on their positions in the spheroid due to the heterogeneous supply of nutrients, oxygen, and paracrine and autocrine signaling molecules in the spheroid. This feature of spheroids partially mimics in vivo culture condition and enable the cells in spheroids to create much more complex, organized tissue structure in vitro than those cultured in stacking tissue9,15,16. Note that if a spheroid is comprised of a single kind of cells, the function of the cells in the spheroid is not uniform due to the heterogeneous environment in the spheroid. In the past few years, spheroid cultures allowed embryonic stem cells (ESCs), induced pluripotent stem cells (iPSCs) or tissue-resident stem cells to mimic in vivo developmental sequences and recreate mini-organs such as the brain17, liver18and kidney19,20.
Despite significant progress in spheroid culture techniques, culturing large spheroids for a long time is still problematic. In a three-dimensional tissue, cells need to be located within 150-200 µm of a blood vessel because of the limited supply of oxygen and nutrients21. Vascular networks within the spheroid are necessary to recapitulate exchanging substances between blood and tissues in vivo. To achieve this, other groups have co-cultured endothelial cells with target cells22,23,24 or induced the differentiation of pluripotent cells into CD31-positive cells20. Nevertheless, the reported vessel-like structures do not have the open ends of the lumina to supply oxygen and nutrients to the center of the spheroid. To mimic the vascular role to nourish cells in the three-dimensional culture, open-ended and perfusable vascular network must be developed in the spheroid.
During the past few years, some research groups in the microengineering field reported methods to construct a perfusable vascular network, spontaneously formed in a microfluidic device by utilizing angiogenic factors from cocultured fibroblast cells25,26. These vascular networks have a similar morphology to their in vivo counterparts and can be remodeled by environmental factors, making them suitable for mimicking vascular functions in a spheroid culture. The purpose of this protocol is to construct a perfusable vascular network in a spheroid using a microfluidic platform27. The microfluidic device is modified from the previously reported device25 so that a spheroid can be incorporated. By directing the angiogenic secretion from fibroblast cells in a spheroid to endothelial cells in microchannels, angiogenic sprouts from the microchannels anastomosed with the spheroid and formed a perfusable vascular network. This method allows a direct delivery of a wide range of substances, such as fluorescent molecules and micrometer-scale beads into the interior of a spheroid, which provides the framework for a long-term tissue culture with vascular networks.
Protocol
1. Fabrication of the Microfluidic Device Mold
Design the pattern of the microfluidic device using commercially available software (Clewin5 or AutoCAD 2016, etc.). For the function of the Clewin5, see the user manual (http://manualzz.com/doc/7159150/clewin-user-s-manual). NOTE: The design file is available in Supplementary File 1.
Transfer the design file to a micro pattern generator and load the tool with a chromium mask coated with the positive photoresist.
Expose the positive photoresist in the pattern area using a micro pattern generator.
Develop the positive photoresist using the developer (Table of Materials) and rinse the mask with deionized (DI) water.
Using the chromium etchant (Table of Materials), etch the chromium in the exposed area where the positive photoresist was removed. Rinse the mask with DI water.
Remove the remaining the photoresist on the mask using acetone. NOTE: Transparency mask can be an alternative for the Cr mask.
Prepare a clean silicon wafer (4 inch, P(100)) and spin coat hexamethyldisilazane (HMDS) at 3,000 rpm for 30 s.
Softbake HMDS for 5 min at 120 °C and cool the wafer for 5 min at room temperature.
Spincoat the negative photoresist (Table of Materials) at 500 rpm for 10 s and 1,200 rpm for 30 s. NOTE: The spin coating condition should yield the photoresist layers with a thickness of approximately 100 µm on the wafers after photolithography.
Prebake the negative photoresist for 45 min at 95 °C and cool the wafer for 60 min at room temperature.
Check the UV light intensity in each experiment and calculate the exposure time for a total exposure energy dose at 250 mW/cm2. Place the photomask (step 1.1-1.6) on the wafer and expose them to the UV light.
Postbake the negative photoresist for 1 min at 65 °C and 5 min at 95 °C. Allow the wafer to cool down for 1 min at room temperature.
Develop the negative photoresist layer for 15 min in the first developer (Table of Materials) bath and 2 min in the second bath. Rinse the wafer in the first isopropanol (IPA) bath for 10 s and in the second IPA bath for 10 s.
Hardbake the negative photoresist for 30 min at 200 °C and cool the wafer for 5 min at room temperature.
Measure the thickness of the negative photoresist layer using a surface profiler.
Place the wafer in a desiccator connected to a vacuum pump and add 200 µL of silane (trichloro(1H,1H,2H,2H-perfluorooctyl)silane). Turn on the pump for 10 min, then turn it off and keep the wafer in the desiccator for 4 h.
2. Fabrication Steps and the Assembly of PDMS Layers
Cast the polydimethylsiloxane (PDMS) pre-polymer (PDMS base: curing agent = 10:1 (w/w)) and degas in a vacuum chamber for 2 h.
Cure PDMS at 80°C in an air-vented oven overnight.
Peel off the PDMS from the silicon wafer.
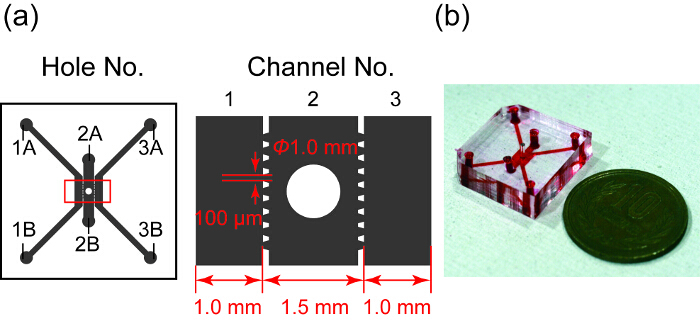
Punch the holes 1A - 3B (Figure 1) and the spheroid culture well. Use a 2-mm diameter punch for holes 1A - 3B, and a 1-mm diameter punch for the spheroid well.
Clean the PDMS slab and a glass cover slip (24 mm × 24 mm) with adhesive tape, by repeatedly sticking and peeling off the tape. Then treat the PDMS slab with air plasma for 40 s (40 mW, 50 sccm).
Bond the PDMS slab onto the glass cover slip to expel any air bubbles from the surface between the PDMS slab and the cover slip and cure at 80 °C for at least 12 h.
3. Spheroid Preparation
NOTE: In the study, red fluorescent protein expressing human umbilical vein endothelial cells (RFP-HUVECs) and green fluorescent protein expressing HUVECs (GFP-HUVECs) are used in the spheroid and microchannels, respectively, to distinguish the origin of HUVECs after the construction of a perfusable vascular network. If the origin of HUVECs is not needed, unlabeled HUVECs are enough for the experiment.
Thaw the RFP-HUVECs (3.0 × 10⁵ cells/vial) and human lung fibroblast (hLF) (1.0 × 10⁶ cells/vial) and add them into 10 mL of medium for endothelial cells and fibroblast cells, respectively (Table of Materials). Culture them in a 100-mm dish at 37 °C and 5% CO2 for 2-3 days for sub-confluent RFP-HUVECs and hLFs. This preparation will yield ~200 spheroids.
Detach the RFP-HUVECs and hLFs from the dishes with 2 mL of 0.05% trypsin-EDTA and stop the trypsin reaction with 4 mL of DMEM containing 10% (v/v) fetal bovine serum (FBS) and 1% (v/v) penicillin/streptomycin.
After centrifugation at 220 x g for 3 min, remove the supernatant, and resuspend the RFP-HUVECs and hLFs in the endothelial medium to final cell concentrations at 2.5 × 10⁴ and 1.0 × 10⁵ cells/mL, respectively.
Gently add 200 µL of the cell suspension (5,000 cells for RFP-HUVECs and 20,000 cells for hLFs) per well in a 96-well plate with ultra-low binding surface.
Incubate the 96-well plate at 37 °C and 5% CO2 for a period of 2-4 days. NOTE: Since the spheroid diameter depends on the culture period and initial cell number in the 96-well plate, it can be controlled by these two parameters.
4. Cell Seeding in the Microfluidic Device
Note: The naming convention for the holes, channels and the spheroid well are demonstrated in Figure 1. We define day 0 as the day when cell harvesting into the microfluidic device is finished. Schematic of the experimental timelines is shown in Figure 2.

- Day −1) Spheroid loading NOTE: The following step should be performed on ice to prevent gelation of collagen and fibrin.
- Dissolve fibrinogen in phosphate buffered saline (PBS) for a final concentration of 2.80 mg/mL.
- Prepare neutralized collagen (3.0 mg/mL in PBS) according to the manufacturer's protocol.
- Combine 107.2 µL of fibrinogen solution (2.80 mg/mL), 8.0 µL of neutralized collagen (3.0 mg/mL), and 3.6 µL of aprotinin (5 U/mL) per reaction in a tube. This solution is labelled "master mix solution" (MS). NOTE: The volume is enough for loading one spheroid. If there is more than one spheroid, multiply each volume by the number of spheroids.
- Dissolve thrombin in PBS for a final concentration of 50 U/mL. NOTE: Aliquots of 50 U/mL thrombin (20 µL/tube) are stored at −30 °C and are thawed before each experiment.
- Place the 96-well plate containing the spheroids inside the biosafety cabinet.
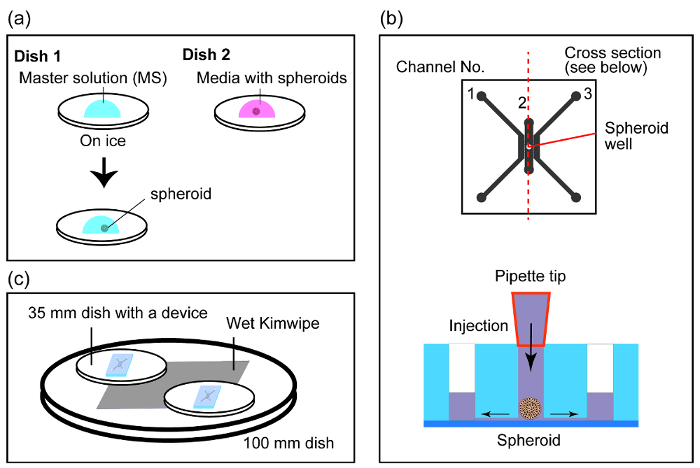
- Prepare two 35-mm Petri dishes inside the biosafety cabinet, with one dish on ice (dish 1) and the other dish on the benchtop (dish 2). Pipet 99 µL of MS at the center of dish 1 (Figure 3a) to form a droplet.
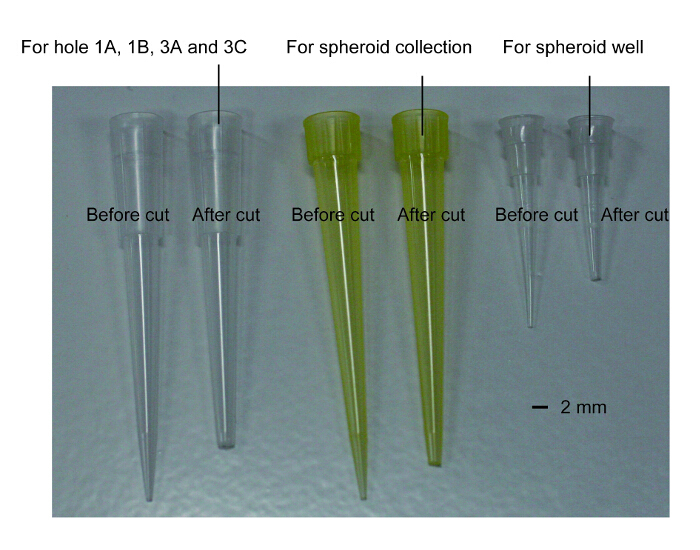
- Trim the tips of 2 yellow (10-100 µL) and 3 clear pipette tips (1-100 µL) for the collection of spheroids from the 96-well plate, mixing thrombin with MS, precise collection of the spheroids, injecting the spheroids into the device, and injecting media into the device, respectively. The pore size of the tip should be slightly larger than the diameter of holes 1A - 3B of channels 1 and 3 or the spheroid well in channel 2 for a snug fit. NOTE: Hereafter, unless otherwise noted, use the pipette tips cut in this step. The photograph of cut tips is available in Figure 4.
- Collect a spheroid with 100 µL of medium from the 96-well plate and add it to dish 2 (Figure 3a).
- Pick up the spheroid with minimum volume of media from dish 2. While holding the pipettor upright, the spheroid should move towards the bottom of the pipet tip by gravity. Eject the spheroid by touching the pipet tip onto the meniscus of the MS droplet in dish 1 (Figure 3a). NOTE: The following steps 4.1.10 & 4.1.11 should be performed quickly.
- Add 1 µL of thrombin (50 U/mL) and mix gently with the yellow pipet tip.
- With the pipette set to 7 µL, pick up the spheroid and slowly place it into the spheroid well (Figure 3b).
- Incubate for 15 min at 37 °C for the gelation of fibrin.
- Slowly inject the endothelial medium from holes 1A and 3A and fill channels 1 and 3 with media (20~30 µL/channel).
- Place the device in a 100-mm dish with a wet Kimwipe to prevent evaporation of media from the device (Figure 3c).
- Place the device at 37 °C and 5% CO2 for 24 h to remove the bubbles at the interface between the media and fibrin.
- Day 0) HUVECs loading
- Thaw GFP-HUVECs (3.0 x 10⁵ cells/vial) and add them to 10 mL of the endothelial medium. Culture them in a 100-mm dish at 37 °C and 5% CO2 for 2-3 days to reach sub-confluency. One dish of sub-confluent GFP-HUVECs is enough for preparing 8-10 devices.
- Detach GFP-HUVECs from the dishes with 2 mL of 0.05% trypsin-EDTA and stop the trypsin reaction with 4 mL of DMEM containing 10% (v/v) fetal bovine serum (FBS) and 1% (v/v) penicillin/streptomycin.
- After centrifugation at 220 x g for 3 min, resuspend the GFP-HUVECs in the endothelial medium at 5.0 x 10⁶ cells/mL.
- Inject HUVECs cell suspension into channel 1 through hole 1B (20 µL/channel).
- Tilt the microfluidic device 90°, place it on the side and incubate at 37 °C for 30 min to ensure that the HUVECs adhere to the fibrin in channel 2.
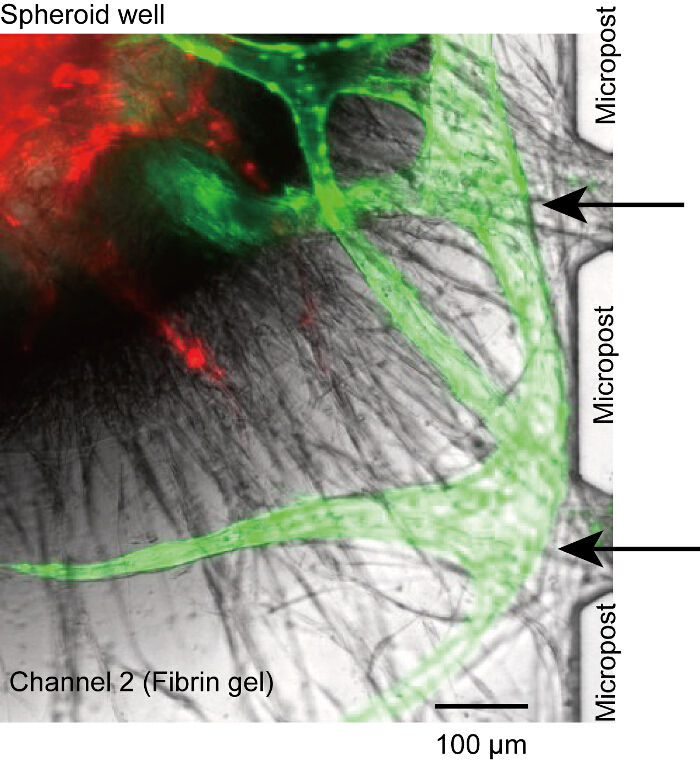
- Confirm the attachment of HUVECs on the fibrin. When the number of HUVECs attached at the interface between the gel and medium is not sufficient, the vasculature may be disconnected at the vascular root after a few days of device culture (Figure 5). In the protocol, the success rate of the perfusion is >50%.
- Repeat steps 4.2.4 and 4.2.5 for channel 3.
- Culture cells in a 100-mm dish with a damp Kimwipe at 37 °C and 5% CO2 for 7-14 days.
- Day 1~) Media exchange
- Exchange half of the media in channels 1 and 3 every day.
5. Nuclei Staining
Prepare 4% paraformaldehyde (PFA) in PBS.
Remove the media from channels 1 and 3 and add 20 µL of 4% PFA per channel. To replace the solution in 4% PFA, repeat removing the solution from the device and adding 4% PFA three times.
Incubate the device at 4 °C overnight.
Remove 4% PFA from the device and wash the channels three times with PBS.
Add 20 µL of 10 µg/mL the fluorescent dye (Table of Materials) per channel to stain cellular nuclei. To exchange the solution in the device, repeat removing the solution from the device and adding 10 µg/mL the fluorescent dye three times.
Store the device at 4 °C for 24 h.
6. Fluid Perfusion of a Spheroid
Prepare the spheroid after culturing for more than 7 days in the device at 37 °C and 5% CO2 for the completion of a continuous vascular pathway.
Remove the medium from holes 1A, 1B, 3A and 3B.
Introduce 10 µL of 10 µM solution of fluorescein isothiocyanate (FITC)-dextran in PBS into holes 1A and 1B.
Monitor the flow of microbeads or FITC dye under an inverted microscope.
7. Quantification of Sprout Length
NOTE: ImageJ ver. 1.49 software is used for all of analysis of the image in this study.
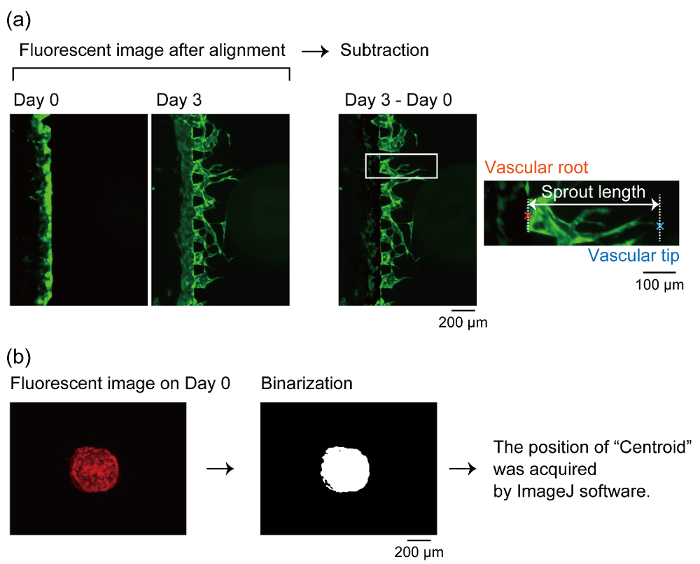
Overlap the images of GFP-HUVECs days 0, 1, 3, 5 and 7.
Subtract the position of the vasculature tip of day 0 from the same position at images taken on days 1, 3, 5 and 7.
Determine the growth of the vascular tip from the root position (Figure 6). The distance between the vascular tip and root was defined as the sprout length in this study (Figure 7b).
8. Quantification of Vascular Angles
NOTE: Vascular angle was defined as the angle consisted by vascular angle, root and the center of the spheroid (Figure 7c).
Binarize the fluorescent images of the coculture spheroid containing RFP-HUVECs and measure "centroid" position by analysis function in ImageJ. In this study, the measured "centroid" position is defined as the center of the spheroid (Figure 6).
Determine the position of the vascular tips and roots in same way in step 7.
Measure the vascular angles using analysis function in ImageJ software.
Representative Results
Figure 1 shows a design and photo of the microfluidic device. It has three parallel channels, in which channel 2 contains the spheroid well. Channels 1 and 3 are used for the HUVEC culture and channel 2 is for the spheroid. Each channel is separated by trapezoidal microposts designed to pattern PDMS. The microposts prevent the hydrogel in channel 2 from leaking into channels 1 and 3 by surface tension and allow exchanging substances between the spheroid and HUVECs in microchannels28.
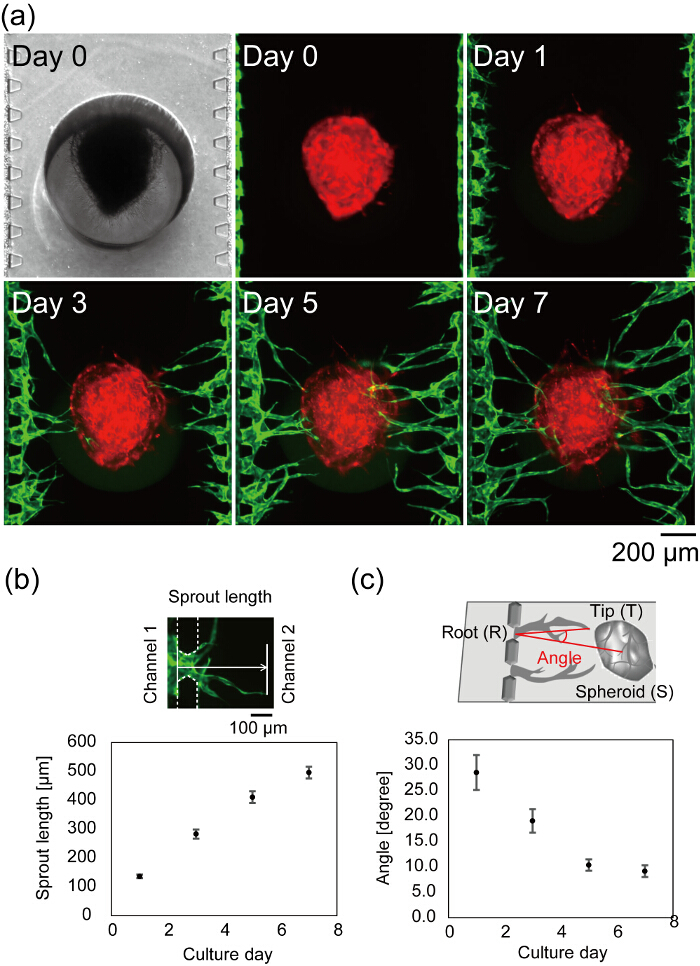
Figure 7a shows the center of a microfluidic device after cell seeding. Bright field and fluorescent images taken on day 0 show that fibrin gel filled only channel 2 without any leakage into channels 1 and 3, and HUVECs successfully attached to the sidewall of the fibrin gel. The bright field image is in focus on the both the loaded spheroid and microposts, indicating that the spheroid properly settled at the bottom of the device. The angiogenic sprouts are observed on day 1 and the length of the sprouts increases with time (Figure 7b). On day 3, the longest sprout reached the spheroid and on day 7, most of the angiogenic sprouts reached the spheroid (average distance from the channels 1 and 3 to the spheroid < 500 µm). In the best case, after 4 days in device culture, flow through the vascular lumens can be observed. The vascular angle was defined as the directions of the vascular tip and the center of the spheroid from the vascular root. Figure 7c shows the quantified vascular angle during 7 days in the device culture. The vascular angles decreased in a time-dependent manner, indicating that the angiogenic sprouts migrated toward the spheroid.
Figure 8 indicates the section of the vascular network where RFP-HUVECs and GFP-HUVECs have merged. RFP-HUVECs and GFP-HUVECs coordinately formed a single vascular lumen as shown by arrow heads, which clearly indicate angiogenic sprouts from channels 1 and 3 anastomosed to RFP-HUVECs in the spheroid and formed a continuous vascular network. To confirm the perfusability of the vascular network, FITC-dextran was injected into channel 1. FITC-dextran in channel 1 flowed into the constructed vascular network and interior of the spheroid and finally reached to channel 3 (Figure 9). During the perfusion of FITC-dextran solution, there is no leakage from the vascular network into the extravascular space. It was previously shown that small molecules injected in the vascular lumen pass through the vascular wall and react with the cells in the extravascular regions. In addition, the permeability coefficient of the vascular network was shown to be close to that in vivo27. These results imply that the integrated vascular network could supply the nutrients to the spheroid and remove the waste product.
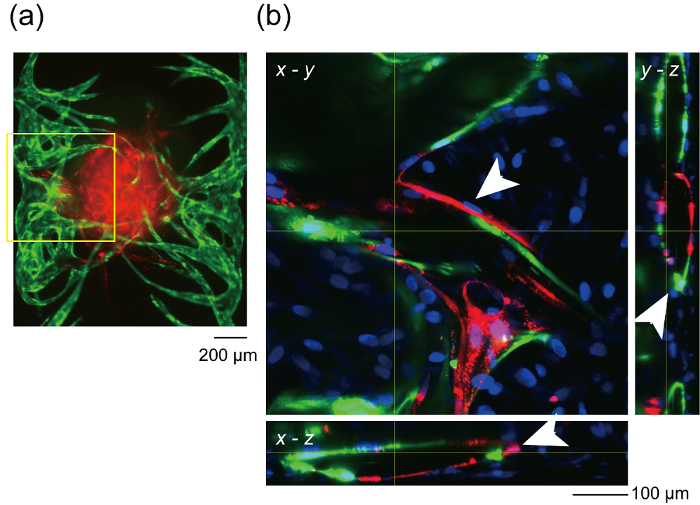
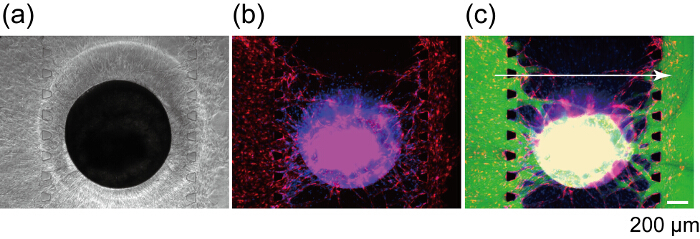
Figure 1: Design and a photograph of the microfluidic device. (a) Overview of the design of the microfluidic device. Gray area indicates three microfluidic channels separated by trapezoidal microposts. Channel 2 has a well for a spheroid culture. Right figure shows the enlarged view in the red rectangle in the left. (b) Photograph of the microfluidic device whose channels are filled with red ink. Please click here to view a larger version of this figure.
Figure 2 : Experimental time. Please click here to view a larger version of this figure.
Figure 3: Method to load a spheroid into the microfluidic device. (a) Making a drop of MS and media with a spheroid in two separate dishes. Then, transfer the spheroid into MS with thrombin. (b) Schematic sectional view of the device during the injection of the spheroid. Excess amount of gel flows out through the holes 2A and 2B. However, the spheroid stays at the bottom of the device due to the physical confinement. (c) Schematic of the devices when they are in an incubator. Wet Kimwipe was placed in a 100-mm dish and two 35-mm dishes with the device were put on the Kimwipe. Please click here to view a larger version of this figure.
Figure 4: The photographs of pipette tips cut for cell seeding to the device. The left white tip is for holes 1A, 1B, 3A and 3C and transferring spheroid to a drop of fibrin gel (steps 4.1.9, 4.1.13, 4.2.4 and 4.2.6). The middle yellow tip is for the collection of the spheroid from 96-well (step 4.1.7). The right white tip is for the spheroid well (step 4.1.11). The tips before cut are also shown in the photograph. Please click here to view a larger version of this figure.
Figure 5: Non-perfusable vasculature. Angiogenic sprouts from microchannels did not connect to the opening between microposts and lost the connection between the lumen and microchannels (black arrows). It is caused by the insufficient HUVECs seeded in channels 1 and 3. Red: RFP-HUVECs in the spheroid, green: GFP-HUVECs from microchannels. The cells were cultured in the device for 14 days. Please click here to view a larger version of this figure.
Figure 6: Definition of the vascular root, tip and the center of the spheroid. (a) The method to determine the position of the vascular root and tip to measure the sprout length. After aligning the time-lapse fluorescent images, the fluorescent image taken a few days after culturing in the device is subtracted by the image on day 0. We measured the length of the sprouts after the subtraction by ImageJ software. (b) Definition of the center of the spheroid. The fluorescent images of the RFP-HUVECs are binarized and measured at its centroid by ImageJ software. We define the centroid as the center of the spheroid. Please click here to view a larger version of this figure.
Figure 7: Formation of a vascular network in the microfluidic device. (a) Time-lapse images of a center of a microfluidic device after cell seeding. Red: RFP-HUVECs cultured in the spheroid, green: GFP-HUVECs harvested in channels 1 and 3. Quantitative analysis of the sprout length (b) and vascular angle (c) (n = 42 sprouts in 3 devices, the error bars indicate the standard errors (S.E.)). The sprout length was defined as the distance from the position of HUVECs on day 0 to the vascular tip (b, top). The angle (∠TRS) was defined by the vascular root (R), tip (T) and the center of the spheroid (S) (c, top). See Figure 6 for the definition of vascular root, tip and the center of the spheroid. These data were obtained using ImageJ software. The schematics explaining the definition of the sprout length and the vascular angle are modified from Nashimoto, Y. et al.27. Please click here to view a larger version of this figure.
Figure 8: Formation of vascular lumen by HUVECs from microchannels and the spheroid. (a) Fluorescent image of the overview of the sample after 14 days in device culture. Yellow rectangle indicates the x-y position of the optical section shown in (b). (b) x-y, y-z and x-z optical section of the constructed vascular network. White arrows indicate vascular lumen. Red: RFP-HUVECs cultured in the spheroid, green: GFP-HUVECs cultured in the microchannels, blue: Cellular nuclei. (a) shows no blue fluorescence because (a) is the image before the fixation. Please click here to view a larger version of this figure.
Figure 9: Perfusion of a spheroid using a constructed vascular network. Bright field (a) and fluorescent (b) images of the spheroid after 7 days in device culture. (c) Fluorescent image of the same spheroid after FITC-dextran (70 kDa) loading. Red: RFP-HUVECs in the spheroid and channels 1 and 3, Green: FITC-dextran, blue: Cellular nuclei. Please click here to view a larger version of this figure.
Supplementary File 1: The design of the microfluidic device. The file is in dxf format. Please click here to download this file.
Discussion
Previous reports show that hLFs secrete a cocktail of multiple angiogenic factors, such as angiopoietin-1, angiogenin, hepatocyte growth factor, transforming growth factor-α, tumor necrosis factor and some extracellular matrix proteins29,30. This assay relies on the angiogenic secretion from hLFs in a coculture spheroid, which is the limitation of the technique. Therefore, it is critical for a stable vascular formation to set a coculture spheroid at the bottom of a well so that the distance between the coculture spheroid and the HUVECs in channels 1 and 3 can be shortened. The vascular length from fibroblasts was inversely proportional to the distance between the endothelial cells and fibroblasts31, so that the shorter distance is advantageous for stable vascular formation. However, to open a spheroid hole (1 mm in diameter) without damaging channels 1 and 3, the minimum width of channel 2 was 1.5 mm.
Although the spheroid settles at the bottom of the well, vascular roots were occasionally disconnected from the microposts or microchannels (Figure 5). In this case, no reagent could reach the vascular lumen through microchannels (channels 1 or 3). Although we could not solve this problem completely, we presume that the problem is due to the insufficient number of HUVECs at the surface of the fibrin gel (step 4.2.1-4.2.6). Make sure the HUVECs stably attach the side wall of channel 2.
Toward the successful injection of a spheroid into the well, optimizing the inner and outer diameter of micropipette tips in step 4.1.7 is important: 1) the inner diameter should be larger than that of the spheroid. 2) The outer dimeter should fit to the edge of the well so that no leakage of the gel occurs at the top of the well during the injection and the tip can be easily removed after the gel injection. In the present protocol (φ1 mm of a spheroid well), around 700 µm is the maximum diameter for the injectable spheroid. If the well diameter is designed larger than that in this protocol, larger spheroids can be injected because the tip can be cut to have larger inner diameters. Spheroid diameters can be controlled easily by changing the cell number harvested in the 96-well plate.
This protocol firstly shows novel microfluidic platform to construct a perfusable vascular network in a spheroid. Although the coculture with HUVECs allows the formation of vessel-like structures in a spheroid18,23,24, these were not perfusable due to the dead ends of the lumina. Because fibroblast cells exist in versatile tissues (bone, adipocyte and cancer, etc.), by the addition of some other targeting cells to the coculture spheroid, a vascularization of a various kind of spheroids can be expected, which can mimic the in vivo environment better than the conventional spheroid culture. To expand the application of the technique, future work would include the vascularization of spheroids without the addition of fibroblast cells. Some recent works report bone-marrow stromal cells32 and muscle cells33 can induce angiogenesis in the microfluidic devices. Utilizing the stromal or muscle cells instead of the fibroblast cells would increase the number of tissues that can be vascularized in the microfluidic device. This protocol provides a basic platform for tissue vascularization, which is a long-awaited technique in the field of three dimensional cultures.
Disclosures
The author declare that they have no competing financial interests.
Acknowledgments
This work was supported by CREST JST (grant number JPMJCR14W4), Society for the Promotion of Science (JSPS) KAKENHI (grant number 25600060, 16K16386), The Center of Innovation Program from MEXT and JST, Project Focused on Developing Key Evaluation Technology from Japan Agency for Medical Research and Development, AMED, Mizuho Foundation for the Promotion of Sciences. Microfabrication was supported by Kyoto University Nano Technology Hub.
References
- Abbott A. Cell culture: Biology's new dimension. Nature. 2003;424(6951):870–872. doi: 10.1038/424870a. [DOI] [PubMed] [Google Scholar]
- Pampaloni F, Reynaud EG, Stelzer EHK. The third dimension bridges the gap between cell culture and live tissue. Nature Reviews Molecular Cell Biology. 2007;8(10):839–845. doi: 10.1038/nrm2236. [DOI] [PubMed] [Google Scholar]
- Shamir ER, Ewald AJ. Three-dimensional organotypic culture: experimental models of mammalian biology and disease. Nature Reviews Molecular Cell Biology. 2014;15(10):647–664. doi: 10.1038/nrm3873. [DOI] [PMC free article] [PubMed] [Google Scholar]
- Abu-Absi SF, Friend JR, Hansen LK, Hu WS. Structural polarity and functional bile canaliculi in rat hepatocyte spheroids. Experimental Cell Research. 2002;274(1):56–67. doi: 10.1006/excr.2001.5467. [DOI] [PubMed] [Google Scholar]
- Bissell MJ, Radisky DC, Rizki A, Weaver VM, Petersen OW. The organizing principle: microenvironmental influences in the normal and malignant breast. Differentiation. 2002;70(9-10):537–546. doi: 10.1046/j.1432-0436.2002.700907.x. [DOI] [PMC free article] [PubMed] [Google Scholar]
- Liu Y, et al. Novel role for netrins in regulating epithelial behavior during lung branching morphogenesis. Current Biology. 2004;14(10):897–905. doi: 10.1016/j.cub.2004.05.020. [DOI] [PMC free article] [PubMed] [Google Scholar]
- Sato T, et al. Single Lgr5 stem cells build crypt-villus structures in vitro without a mesenchymal niche. Nature. 2009;459(7244):262–U147. doi: 10.1038/nature07935. [DOI] [PubMed] [Google Scholar]
- Torisawa YS, Shiku H, Kasai S, Nishizawa M, Matsue T. Proliferation assay on a silicon chip applicable for tumors extirpated from mammalians. International Journal of Cancer. 2004;109(2):302–308. doi: 10.1002/ijc.11693. [DOI] [PubMed] [Google Scholar]
- Fennema E, Rivron N, Rouwkema J, van Blitterswijk C, de Boer J. Spheroid culture as a tool for creating 3D complex tissues. Trends in Biotechnology. 2013;31(2):108–115. doi: 10.1016/j.tibtech.2012.12.003. [DOI] [PubMed] [Google Scholar]
- Sutherland RM. Cell And Environment Interactions In Tumor Microregions - The Multicell Spheroid Model. Science. 1988;240(4849):177–184. doi: 10.1126/science.2451290. [DOI] [PubMed] [Google Scholar]
- Rothbauer M, Zirath H, Ertl P. Recent advances in microfluidic technologies for cell-to-cell interaction studies. Lab on a Chip. 2017. [DOI] [PubMed]
- Matsuura K, Utoh R, Nagase K, Okano T. Cell sheet approach for tissue engineering and regenerative medicine. Journal of Controlled Release. 2014;190:228–239. doi: 10.1016/j.jconrel.2014.05.024. [DOI] [PubMed] [Google Scholar]
- Esch EW, Bahinski A, Huh D. Organs-on-chips at the frontiers of drug discovery. Nature Reviews Drug Discovery. 2015;14(4):248–260. doi: 10.1038/nrd4539. [DOI] [PMC free article] [PubMed] [Google Scholar]
- Bhatia SN, Ingber DE. Microfluidic organs-on-chips. Nature Biotechnology. 2014;32(8):760–772. doi: 10.1038/nbt.2989. [DOI] [PubMed] [Google Scholar]
- Lancaster MA, Knoblich JA. Organogenesis in a dish: Modeling development and disease using organoid technologies. Science. 2014;345(6194) doi: 10.1126/science.1247125. [DOI] [PubMed] [Google Scholar]
- Hirschhaeuser F, et al. Multicellular tumor spheroids: An underestimated tool is catching up again. Journal of Biotechnology. 2010;148(1):3–15. doi: 10.1016/j.jbiotec.2010.01.012. [DOI] [PubMed] [Google Scholar]
- Lancaster MA, et al. Cerebral organoids model human brain development and microcephaly. Nature. 2013;501(7467):373. doi: 10.1038/nature12517. [DOI] [PMC free article] [PubMed] [Google Scholar]
- Takebe T, et al. Vascularized and functional human liver from an iPSC-derived organ bud transplant. Nature. 2013;499(7459):481. doi: 10.1038/nature12271. [DOI] [PubMed] [Google Scholar]
- Taguchi A, et al. Redefining the In Vivo Origin of Metanephric Nephron Progenitors Enables Generation of Complex Kidney Structures from Pluripotent Stem Cells. Cell Stem Cell. 2014;14(1):53–67. doi: 10.1016/j.stem.2013.11.010. [DOI] [PubMed] [Google Scholar]
- Takasato M, et al. Kidney organoids from human iPS cells contain multiple lineages and model human nephrogenesis. Nature. 2015;526(7574):564–568. doi: 10.1038/nature15695. [DOI] [PubMed] [Google Scholar]
- Auger FA, Gibot L, Lacroix D. Yarmush ML, editor. Annual Review of Biomedical Engineering. 2013. pp. 177–200. [DOI] [PubMed]
- Inamori M, Mizumoto H, Kajiwara T. An Approach for Formation of Vascularized Liver Tissue by Endothelial Cell-Covered Hepatocyte Spheroid Integration. Tissue Engineering Part A. 2009;15(8):2029–2037. doi: 10.1089/ten.tea.2008.0403. [DOI] [PubMed] [Google Scholar]
- Kunz-Schughart LA, et al. Potential of fibroblasts to regulate the formation of three-dimensional vessel-like structures from endothelial cells in vitro. American Journal of Physiology-Cell Physiology. 2006;290(5):C1385–C1398. doi: 10.1152/ajpcell.00248.2005. [DOI] [PubMed] [Google Scholar]
- Rouwkema J, De Boer J, Van Blitterswijk CA. Endothelial cells assemble into a 3-dimensional prevascular network in a bone tissue engineering construct. Tissue Engineering. 2006;12(9):2685–2693. doi: 10.1089/ten.2006.12.2685. [DOI] [PubMed] [Google Scholar]
- Kim S, Lee H, Chung M, Jeon NL. Engineering of functional, perfusable 3D microvascular networks on a chip. Lab on a Chip. 2013;13(8):1489–1500. doi: 10.1039/c3lc41320a. [DOI] [PubMed] [Google Scholar]
- Moya ML, Hsu YH, Lee AP, Hughes CCW, George SC. In Vitro Perfused Human Capillary Networks. Tissue Engineering Part C-Methods. 2013;19(9):730–737. doi: 10.1089/ten.tec.2012.0430. [DOI] [PMC free article] [PubMed] [Google Scholar]
- Nashimoto Y, et al. Integrating perfusable vascular networks with a three-dimensional tissue in a microfluidic device. Integrative Biology. 2017;9(6):506–518. doi: 10.1039/c7ib00024c. [DOI] [PubMed] [Google Scholar]
- Huang CP, et al. Engineering microscale cellular niches for three-dimensional multicellular co-cultures. Lab on a Chip. 2009;9(12):1740–1748. doi: 10.1039/b818401a. [DOI] [PMC free article] [PubMed] [Google Scholar]
- Newman AC, et al. Analysis of Stromal Cell Secretomes Reveals a Critical Role for Stromal Cell-Derived Hepatocyte Growth Factor and Fibronectin in Angiogenesis. Arteriosclerosis Thrombosis and Vascular Biology. 2013;33(3):513. doi: 10.1161/ATVBAHA.112.300782. [DOI] [PMC free article] [PubMed] [Google Scholar]
- Newman AC, Nakatsu MN, Chou W, Gershon PD, Hughes CCW. The requirement for fibroblasts in angiogenesis: fibroblast-derived matrix proteins are essential for endothelial cell lumen formation. Molecular Biology of the Cell. 2011;22(20):3791–3800. doi: 10.1091/mbc.E11-05-0393. [DOI] [PMC free article] [PubMed] [Google Scholar]
- Griffith CK, et al. Diffusion limits of an in vitro thick prevascularized tissue. Tissue Engineering. 2005;11(1-2):257–266. doi: 10.1089/ten.2005.11.257. [DOI] [PubMed] [Google Scholar]
- Zheng Y, et al. Angiogenesis in Liquid Tumors: An In Vitro Assay for Leukemic-Cell-Induced Bone Marrow Angiogenesis. Advanced Healthcare Materials. 2016;5(9):1014–1024. doi: 10.1002/adhm.201501007. [DOI] [PMC free article] [PubMed] [Google Scholar]
- Osaki T, Sivathanu V, Kamm RD. Crosstalk between developing vasculature and optogenetically engineered skeletal muscle improves muscle contraction and angiogenesis. Biomaterials. 2018;156:65–76. doi: 10.1016/j.biomaterials.2017.11.041. [DOI] [PubMed] [Google Scholar]


