Abstract
The data included in this article provides additional supporting information on our recent publication (Liravi et al., 2018 [1]) on a novel hybrid additive manufacturing (AM) method for fabrication of three-dimensional (3D) structures from silicone powder. A design of experiments (DoE) study has been carried out to optimize the geometrical fidelity of AM-made parts. This manuscript includes the details of a multi-level factorial DOE and the response optimization results. The variation in the temperature of powder-bed when exposed to heat is plotted as well. Furthermore, the effect of blending ratio of two parts of silicone binder on its curing speed was investigated by conducting DSC tests on a silicone binder with 100:2 precursor to curing agent ratio. The hardness of parts fabricated with non-optimum printing conditions are included and compared.
Specifications table
| Subject area | Engineering, Materials Science |
| More specific subject area | Additive Manufacturing |
| Type of data | Table, figure |
| How data was acquired | Design of Experiments, Thermocouple |
| Data format | Raw, Analyzed |
| Experimental factors | The samples were 3D printed based on the experimental design factor treatments in a completely randomized fashion. |
| Experimental features | For geometrical fidelity optimization, the effects of different values of two factors (layer thickness (LT) and binder dispensing frequency (Fr)) on height and diameter of 3D printed cylinders were studied. The effects of factors on all three responses were simultaneously investigated using desirability function method. |
| For measurement of powder-bed’s temperature a thermocouple was used. | |
| The crosslinking kinetics of 100:2 silicone binder was studied using a DSC at isothermal temperatures of 85, 90, 95, and 100 oC. | |
| A handheld durometer was used for Shore 00 hardness tests. | |
| Data source location | Multi-Scale Additive Manufacturing Laboratory, University of Waterloo, Waterloo, ON, Canada. |
| Data accessibility | This article. |
| Related research article | Liravi et al., 2018 [1] |
Value of the Data
-
•
The raw data of dimensional features provided in Table 1 provides the readers with the chance of fact checking the results by following the analysis steps.
-
•
The desirability function response optimization (Table 5) shows the values of LT and Fr (in the investigated region) resulting in dimensional features closest to their target values.
-
•
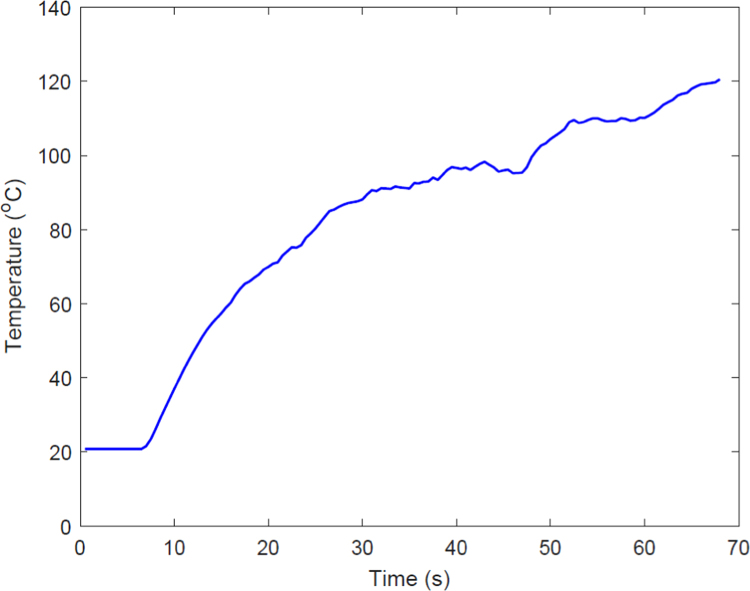
The temperature vs. time data provided in Fig. 1 supports our interpretation of thermal analysis of silicone binder using differential calorimetry scanning (DSC).
-
•
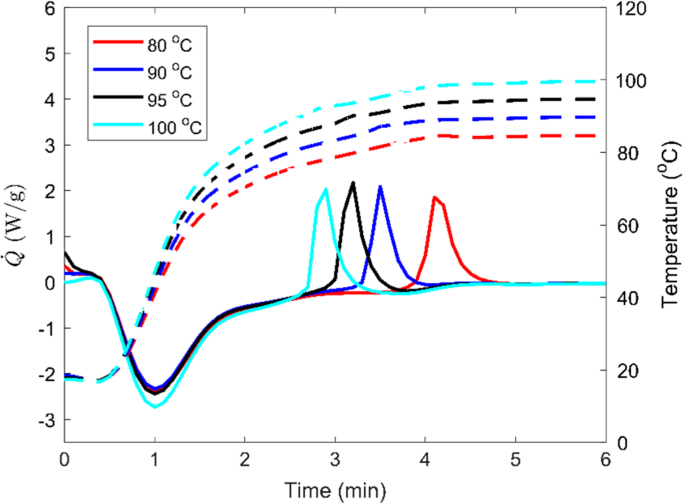
The thermal behavior of 100:2 silicone binder provided in Fig. 2 shows that increasing the amount of curing agent does not speed up the full crosslinking process, however, it reduces the crosslinking initiation temperature.
-
•
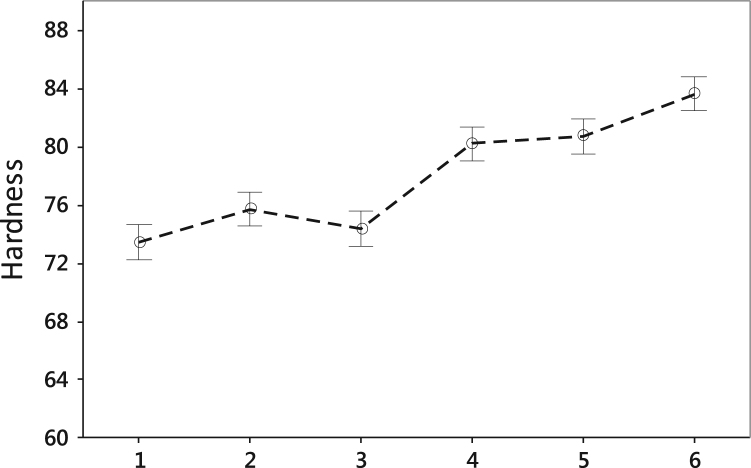
The comparison of hardness values shown in Fig. 3 and Table 6, Table 7, Table 8, Table 9, Table 10 is indicative of the insignificant effect of process parameters on the hardness of fabricated parts for the selected silicone binder and powder.
Table 1.
The measured values for the H, ID, and DD for the experimental design.
| Standard Order | Run Order | LT | Fr | H (μm) | ID (μm) | DD (μm) |
|---|---|---|---|---|---|---|
| 9 | 1 | 50 | 300 | 4130.676 | 5407.209 | 1563.818 |
| 1 | 2 | 50 | 100 | 5685.574 | 6966.943 | 1476.194 |
| 7 | 3 | 50 | 100 | 5907.289 | 6904.469 | 1256.984 |
| 12 | 4 | 100 | 300 | 3673.833 | 5579.145 | 1283.139 |
| 6 | 5 | 100 | 300 | 3863.966 | 5329.552 | 1930.681 |
| 8 | 6 | 50 | 200 | 3852.614 | 5685.995 | 1905.692 |
| 4 | 7 | 100 | 100 | 4894.481 | 7436.540 | 2126.095 |
| 3 | 8 | 50 | 300 | 4116.611 | 6160.803 | 2074.107 |
| 2 | 9 | 50 | 200 | 3909.257 | 6762.391 | 1615.955 |
| 11 | 10 | 100 | 200 | 3619.815 | 6588.914 | 1835.162 |
| 5 | 11 | 100 | 200 | 3645.568 | 6307.557 | 1137.825 |
| 10 | 12 | 100 | 100 | 5904.600 | 7353.762 | 1869.109 |
Table 5.
Desirability function response optimization.
| Response | Goal | Lower | Target | Upper | Weight |
|---|---|---|---|---|---|
| DD | Minimμm | * | 1137.82 | 2126.09 | 1 |
| ID | Target | 4500 | 5000 | 7436.54 | 1 |
| H | Target | 2700 | 3000 | 5907.29 | 1 |
Fig. 1.
Temperature of the powder bed vs. time under heat lamp exposure.
Fig. 2.
Thermal analysis results for silicone binder with 100:2 precursor to curing agent ratio.
Fig. 3.
Comparing the average and standard deviation of hardness measurements for: (1) 50 μm and 1 drop per 100 μm; (2) 50 μm and 1 drop per 200 μm; (3) 50 μm and 1 drop per 300 μm; (4) 100 μm and 1 drop per 100 μm; (5) 100 μm and 1 drop per 200 μm; and (6) 100 μm and 1 drop per 300 μm.
Table 6.
The durometry results for the 3D printed cylinders. Printing condition: 50 μm layer thickness and 1 drop per 100 μm dispensing frequency (n = 3).
| Sample | Hardness (shore 00) 50 μm | 1 drop per100 μm |
|||
|---|---|---|---|---|
| Test 1 | Test 2 | Test 3 | Average | |
| Cylinder 1 (batch 1) | 72.4 | 72.1 | 79.8 | 74.77 |
| Cylinder 2 (batch 1) | 68.5 | 70.2 | 70 | 69.57 |
| Cylinder 3 (batch 1) | 69.5 | 75.1 | 74.6 | 73.07 |
| Cylinder 1 (batch 2) | 76.1 | 75.1 | 75.5 | 75.57 |
| Cylinder 2 (batch 2) | 74.3 | 72.2 | 75.1 | 73.87 |
| Cylinder 3 (batch 2) | 70.7 | 77.8 | 73.2 | 73.90 |
| Total average for cylindrical samples | 73.46 | |||
Table 7.
The durometry results for the 3D printed cylinders. Printing condition: 50 μm layer thickness and 1 drop per 200 μm dispensing frequency (n = 3).
| Sample | Hardness (shore 00) 50 μm | 1 drop per 200 μm |
|||
|---|---|---|---|---|
| Test 1 | Test 2 | Test 3 | Average | |
| Cylinder 1 (batch 1) | 75.2 | 75.7 | 78.8 | 76.57 |
| Cylinder 2 (batch 1) | 76.2 | 73.7 | 70.1 | 73.33 |
| Cylinder 3 (batch 1) | 75.9 | 76.8 | 75.5 | 76.07 |
| Cylinder 1 (batch 2) | 73.4 | 77.1 | 76.1 | 75.53 |
| Cylinder 2 (batch 2) | 76.8 | 76.1 | 75.8 | 76.23 |
| Cylinder 3 (batch 2) | 75.4 | 77.9 | 76.8 | 76.70 |
| Total average for cylindrical samples | 75.74 | |||
Table 8.
The durometry results for the 3D printed cylinders. Printing condition: 50 μm layer thickness and 1 drop per 300 μm dispensing frequency (n = 3).
| Sample | Hardness (shore 00) 50 μm | 1 drop per 300 μm |
|||
|---|---|---|---|---|
| Test 1 | Test 2 | Test 3 | Average | |
| Cylinder 1 (batch 1) | 77.2 | 72.3 | 72.9 | 74.13 |
| Cylinder 2 (batch 1) | 73.3 | 73.4 | 74.9 | 73.87 |
| Cylinder 3 (batch 1) | 78.5 | 71.3 | 74.6 | 74.80 |
| Cylinder 1 (batch 2) | 71.3 | 77.5 | 71.1 | 73.30 |
| Cylinder 2 (batch 2) | 76.6 | 79.9 | 78.9 | 78.47 |
| Cylinder 3 (batch 2) | 72.1 | 72.5 | 70.7 | 71.77 |
| Total average for cylindrical samples | 74.39 | |||
Table 9.
The durometry results for the 3D printed cylinders. Printing condition: 100 μm layer thickness and 1 drop per 100 μm dispensing frequency (n = 3).
| Sample | Hardness (shore 00) 100 μm | 1 drop per 100 μm |
|||
|---|---|---|---|---|
| Test 1 | Test 2 | Test 3 | Average | |
| Cylinder 1 (batch 1) | 80.9 | 80.6 | 78 | 79.83 |
| Cylinder 2 (batch 1) | 80 | 76.1 | 80.1 | 78.73 |
| Cylinder 3 (batch 1) | 85.8 | 78.5 | 76.1 | 80.13 |
| Cylinder 1 (batch 2) | 81.9 | 87 | 79.6 | 82.83 |
| Cylinder 2 (batch 2) | 77.9 | 76.9 | 88.6 | 81.13 |
| Cylinder 3 (batch 2) | 80.5 | 79.4 | 76.4 | 78.77 |
| Total average for cylindrical samples | 80.24 | |||
Table 10.
The durometry results for the 3D printed cylinders. Printing condition: 100 μm layer thickness and 1 drop per 200 μm dispensing frequency (n = 3).
| Sample | Hardness (shore 00) 100 μm | 1 drop per 200 μm |
|||
|---|---|---|---|---|
| Test 1 | Test 2 | Test 3 | Average | |
| Cylinder 1 (batch 1) | 76.4 | 84.5 | 76 | 78.97 |
| Cylinder 2 (batch 1) | 82.8 | 82.2 | 76.5 | 80.50 |
| Cylinder 3 (batch 1) | 79.3 | 79.5 | 84.1 | 80.97 |
| Cylinder 1 (batch 2) | 83.5 | 82.2 | 78.6 | 81.43 |
| Cylinder 2 (batch 2) | 81.6 | 83.6 | 81.6 | 82.27 |
| Cylinder 3 (batch 2) | 81.7 | 76.3 | 83.1 | 80.37 |
| Total average for cylindrical samples | 80.75 | |||
1. Data
In order to optimize the 3D printing parameters, a multi-level experimental design was formed with layer thickness (LT) and dispensing frequency (Fr) of the silicone binder deposition as the control factors. The height (H), inner diameter (ID), and the diameter difference (DD) between the inner and outer circles fitted to the cross section of parts are the responses. The outer diameter (OD) is the diameter of the largest circle fitted to the cross-section of the cylindrical parts so that it covers the entire cross-section including the irregular edges. The diameter of the circle that only covers the central parts of the cross-section and not the irregularity caused by the lateral infiltration of silicone binder is ID. The structure of DoE and the measurement details are provided in Table 1. The analysis of variance (ANOVA) results are shown in Table 2, Table 3, Table 4 for H, ID, and DD, respectively.
Table 2.
ANOVA results for the average height.
| Source | Degree of Freedom | Adjusted Sum of Squares | Adjusted Mean Square | F-Value | P-Value | |
|---|---|---|---|---|---|---|
| Model | 5 | 8550286 | 1710057 | 18.49 | 0.001 | |
| Linear | 3 | 8538548 | 2846183 | 30.78 | 0 | |
| LT | 1 | 333253 | 333253 | 3.6 | 0.106 | |
| Fr | 2 | 8205295 | 4102648 | 44.36 | 0 | |
| 2-Way Interaction | 2 | 11738 | 5869 | 0.06 | 0.939 | |
| LT × Fr | 2 | 11738 | 5869 | 0.06 | 0.939 | |
| Error | 6 | 554859 | 92476 | |||
| Total | 11 | 9105145 | ||||
Table 3.
ANOVA results for the inner diameter.
| Source | Degree of Freedom | Adjusted Sum of Squares | Adjusted Mean Square | F-Value | P-Value |
|---|---|---|---|---|---|
| Model | 5 | 5160132 | 1032026 | 6.59 | 0.02 |
| Linear | 3 | 4831906 | 1610635 | 10.29 | 0.009 |
| LT | 1 | 41732 | 41732 | 0.27 | 0.624 |
| Fr | 2 | 4790174 | 2395087 | 15.3 | 0.004 |
| 2-Way Interaction | 2 | 328226 | 164113 | 1.05 | 0.407 |
| LT×Fr | 2 | 328226 | 164113 | 1.05 | 0.407 |
| Error | 6 | 939373 | 156562 | ||
| Total | 11 | 6099505 |
Table 4.
ANOVA results for the diameter differences.
| Source | Degree of Freedom | Adjusted Sum of Squares | Adjusted Mean Square | F-Value | P-Value |
|---|---|---|---|---|---|
| Model | 5 | 534849 | 106970 | 0.94 | 0.516 |
| Linear | 3 | 23421 | 7807 | 0.07 | 0.975 |
| LT | 1 | 6973 | 6973 | 0.06 | 0.813 |
| Fr | 2 | 16449 | 8224 | 0.07 | 0.931 |
| 2-Way Interaction | 2 | 511428 | 255714 | 2.25 | 0.187 |
| LT × Fr | 2 | 511428 | 255714 | 2.25 | 0.187 |
| Error | 6 | 682013 | 113669 | ||
| Total | 11 | 1216862 |
The path to the optimized region for each parameter was found using the response surface method. Finally, all three responses were optimized simultaneously using desirability function technique (utility transfer function). The optimization results are demonstrated in Table 5. The levels of significant factors were selected so that DD was minimized, and H and ID approached the target values of 3 mm and 5 mm, respectively.
The DSC results for the silicone binder reveal that it gets cured almost immediately at a temperature in the range of 100–110 °C. In order to make sure this polymerization temperature is reached in 60 s, the temperature of powder bed was measured using a thermocouple. The temperature increase is plotted in Fig. 1 .
2. Experimental design, materials, and methods
To measure the temperature of powder-bed, a thermocouple was fixed on the surface of the feeding chamber filled with silicone powder using a Kapton tape. The powder-bed temperature was increased by exposing it to the heat provided by a thermal lamp. The temperature values were transferred to a computer using a data acquisition device (NI USB-6009, National Instrμments, TX, USA), and recorded using an in-house developed program in LabView environment.
Footnotes
Supplementary data associated with this article can be found in the online version at 10.1016/j.dib.2018.04.068.
Transparency document. Supplementary material
Supplementary material
.
Reference
- 1.Liravi Farzad, Vlasea Mihaela. Powder bed binder jetting additive manufacturing of silicone structures. Addit. Manuf. 2018 doi: 10.1016/j.dib.2018.04.068. [DOI] [PMC free article] [PubMed] [Google Scholar]
Associated Data
This section collects any data citations, data availability statements, or supplementary materials included in this article.
Supplementary Materials
Supplementary material


