

Abstract
Animal models are essential to dissect host-microbiota interactions that impact health and the development of disease. In addition to providing pre-clinical models for the development of novel therapeutics and diagnostic biomarkers, mouse systems actively support microbiome studies by defining microbial contributions to normal development and homeostasis, and as well as their role in promoting diseases such as inflammatory auto-immune diseases, diabetes, metabolic syndromes, and susceptibilities to infectious agents. Mice provide a genetically tenable host that can be reared under gnotobiotic (germfree) conditions, allowing colonization studies with human or mouse-origin defined or complex microbial communities to define specific in vivo effects. The protocols and background information detail key aspects to consider in designing host-microbiome experiments with mouse models, and to develop robust systems that leverage gnotobiotic mice, microbial consortia, and specific environmental perturbations to identify causal effects in vivo.
Keywords: host-microbiome, microbiota, murine models, germfree, gnotobiotic
INTRODUCTION
Murine model systems provide one of the most common ways to study host-microbiota interactions in vivo (Fiebiger, 2016). Among species, mice are genetically tenable and can be made germfree. Furthermore, it is possible to introduce defined dietary changes (Carmody, 2015; Kübeck, 2016), human and other animal microbial species (von Klitzing, 2017; Bry, 1996), and additional perturbations to study effects on host-microbial ecosystems and their impact on particular outcomes and underlying processes.
Microbes colonize all mammalian species during and after birth, and come to greatly outnumber the number of cells of the host proper. Though microbial cells are smaller in size and have smaller genomes than their host eukaryotic counterparts, given the many hundreds of species colonizing ecosystems in the gut, skin, respiratory and genitourinary tracts, they in aggregate provide a large set of genomic information and metabolic capability than that is independent of the host and that has, in fact, shaped host evolution. This is evident in the role of microbes in the production of oxygen as a byproduct of early forms of photosynthesis and the subsequent development of oxygen-transporting hemoglobin in red cells that support aerobic respiration. In addition, it is seen in digestive processes that require microbial metabolism that allows derivation of nutrients and calories from foodstuffs, as occurs in ruminants and hindgut fermenters.
When developing animal models, particularly to replicate or support studies in other species such as humans, groups should first consider cases where mice capitulate or differ from human physiology. In particular, similarities or differences among the following areas can help assess utility of a mouse model for human disease:
Digestive tract adaptions relative to diet: Mice are hindgut fermenters while humans are omnivores (Bleich, 2015). As hindgut fermenters, foodstuffs, commonly high in fibers and other materials innately indigestible to the host, are digested primarily in the cecum, the site of the densest microbial ecosytems. Here microbes produce short chain fatty acids (SFCA) (Kasubuchi, 2015) and other metabolites that the host can absorb. Mice are also corporphagic in that they eat their feces, allowing them to obtain up to 40% of additional calories from hindgut metabolism, that can them be absorbed in the small bowel with the second passage of materials through the GI tract. These behaviors are not normal in humans and many other animal species, and should thus be considered in studies evaluating digestive capacity or assuming a single-passage of dietary and administered materials through the gut. Use of metabolic cages and cage meshes can reduce the extent of corprophagia if relevant to the experimental system under study.
Dietary differences: The normal murine diet is grain-based and very different from the standard human diet. In the wild, mice may also consume insects and other protein sources but do not commonly replicate a modern human diet. However, human foodstuff have been prepared and administered to mice. Diets with varying fat, protein and carbohydrate contents may also be used to more closely approximate certain diets encountered in human populations.
In utero and post-natal development of mice also have similarities and differences from humans and other species. Notably, murine gestation runs for approximately 19 days, and mice become sexually mature over 6–8 weeks of age.
Gut and Immunologic Processes: While the intestinal cell lineages are largely shared between humans and mice, gross, ultrastructural differences exist as result of the differing physical sizes of both species and the different needs for digestion of herbivores versus omnivores. Immunologically, mice also have many similarities to and certain differences from humans. When using genetically inbred lines, most of which have in-bred immune defects, consideration should be given to the possibility that these defects may alter responses to gut microbes, such as toll-like receptor (TLR) defects known to occur in C3H and other strains (Berin, 2006). Investigators should thus assess effects in humans or other animal species, to understand where the mouse may or may not replicate physiologic and disease processes in the species that is the target of study.
Other tissue compartment differences: mouse skin also differs from human by being covered in fur, and oral cavity and dentition also differ from human. Thus, analyses of microbial ecosystems in skin, oral cavity, upper respiratory tract, and genitourinary tract need to consider where physiologic and developmental differences may mimic or differ from a given target species for which the mouse is being used as a model system.
Mouse microbiota have different species and strain compositions from human though there is substantive overlap in the microbial families and genera that are present. Mice do have special areas of colonization not found in humans and other omnivores, including a squamous forestomach that is densely colonized by Gram positive species, and a diverse ecosystem of both Gram positive and Gram negative organisms of various phyla, that live in the cecum, the primary site of hindgut fermentation. Furthermore, different species can be found on skin and in the vaginal and genitourinary systems. Mice and other rodents are also colonized with unique species, such as the segmented filamentous bacteria (SFB) (Klaasen, 1992), obligately anaerobic spore formers that live in close association with the small intestinal epithelium, and are known stimulators of mucosal Th17 responses (Atarashi, 2015). Gnotobiotic colonization studies with human-origin microbes can also be used to assess capacity of commensal and pathogenic species to mirror comparable effects on the host.
Sourcing of mice for experiments
When working with host-microbiome systems, particular care should be paid to the origins of mouse lines. Strains across and even from the same vendor can have very different microbiota. For vendors with different production sites, each location may have a very different microbiota, even though all facilities support commercial animal release. The differing microbiotas can mean that experimental results may vary significantly even if mice are ordered from the same vendor. Some vendors also maintain all or immunocompromised lines under germfree states or with a limited, defined microbiota to prevent untoward inflammatory responses. These mice may be released directly from the contained colony, or may be periodically moved into the production colony where they are exposed to a different microbiota. Animals treated in this manner may thus develop varying microbiota over time per when they were introduced into different environments, and per their source origins.
While vendors currently lack quality control methods for the microbiota in their lines, investigators can often contact client services and inquire or request if mice can consistently come from a dedicated facility or potentially be colonized with a particular source origin microbiota. Of the commercial vendors, Taconic Farms tends to offer more flexibility and insight into the microbiota of their mice. In our hands, the complex mouse microbiota of Taconic-bred mice also tends to be the most diverse across phyla and common taxa found in mice.
Local animal facility considerations
For mice maintained locally, a number of factors are essential to control and to improve the likelihood of obtaining consistent and stable results in animal model systems.
Cage Effects
In mice colonized with a complex microbiota, changes can arise across cages that may drive phenotypes in some but not other animals. Effects can be quite profound for animals raised in different rooms of the facility or from separate breeding of wild-type and knock-out lines. To mitigate the effects, investigators should consider the following:
Conduct experiments with heterozygous, HET X HET matings so both wild-type, knockout and heterozygous individuals in mouse litters are exposed to the same conditions and microbiota up until the point of weaning.
Consider in analyses whether mice should be singly or group housed. Single housing tends to best highlight the diversity of the microbiota that may occur within and across cohorts. However, group housing may be needed if inter-animal sharing of microbes is deemed important in the system under study.
If group housing mice across multiple cages, include at least 3 cages per condition to control for individual cage effects.
Changing or sharing of used bedding across cages is often not as effective as HET X HET matings or maintenance of all mouse lines under study in the same room of the animal facility. We have performed studies for groups where, six months after externally received mice were initially exposed to bedding from the receiving facility, the microbiome signatures still largely reflected that of the vendor of origin. Furthermore, molecular and microbiologic analyses can also show cage-based differences at the level of individual species and strains, even for mice housed on the same rack (Cebula, 2013).
Studies must be adequately powered with respect the numbers of mice to answer the questions being asked. Even among genetically identical mice receiving the same diet, differences in commensal communities may require 8–10 or more mice per group to control for natural variation among individuals. With perturbations or interventions that cause profound changes in the microbiota, such as treatment with antibiotics, fewer mice per group may be needed, but in cases with more subtle effects, larger numbers are needed. It is advised to work with a statistician to determine an appropriate cohort size.
Enterohepatic Helicobacters
Studies evaluating effects of the normal commensal microbiota need to be conducted in facilities and space negative for enterohepatic Helicobacter species (Taylor, 2007). Countless resources and many millions of dollars have been lost on studies in Helicobacter-infected mice, which prevent understanding of commensal-specific effects given the lack of an uninfected control. These pathogens cause both colitis and hepatitis, and are capable of invading through colonic epithelium to disseminate and infect the liver. Disease effects can be profound in many immunodeficient mouse models, (Nguyen, 2013; Bang, 2016) with effects often improving or disappearing with use of antibiotics that eradicate these pathogens, but that also disrupt the underlying microbiota. In the absence of having an uninfected control, it becomes impossible to assess effects from the infecting Helicobacter species versus other commensals. If systems require presence of an enterohepatic Helicobacter to induce effects, as seen in many mouse models of IBD, appropriately controlled studies are best conducted under BL2 conditions with introduction of a defined Helicobacter strain vs random acquisition of one or multiple different strains from the infected rodent colony.
Gnotobiotic systems and high-throughput cage containment systems
Systems for maintaining mice germfree include solid or flexible film gnotobiotic isolators (as shown in BASIC PROTOCOL 1), which provide a complete barrier around mouse cages. Gloves into the isolator allow handling of mice, cages and materials, while a front port system supports movement of supplies in and out of the isolator. To maintain the sterile barrier, all materials must be sterilized via methods including autoclaving, irradiation, and ethylene oxide treatment. The port chamber commonly supports fogging of materials with aerosolized sterilants such as Clidox, which surface sterilizes all materials before being moved into the inner chamber.
Isolators have dedicated air handling systems which pump air through HEPA filtration systems to remove organisms and prevent any organisms within the isolators from exiting the containment barrier (important for BL2 studies with defined flora and pathogens).
Isolators can support short and long-term experiments, in addition to breeding programs. Different isolator configurations can be ordered from vendors, with sizes that can accommodate 1–2 cages up to 55 cages or more, and for handling at BL0 or for BL1 colonizations to BL2 colonizations conducted in negative pressure isolators.
High-throughput cage containment systems, such as the Animal Care Systems OptiMice racks described in BASIC PROTOCOLS 13 and 14, provide a higher throughput and lower cost solution for short-term germfree or defined colonization studies, and long-term colonization studies with complex donor microbiota. However, these systems do not provide the robust barrier of gnotobiotic isolators and are thus not an appropriate platform for studies requiring frequent animal handling or procedures such as weighing of mice or stool collections that require opening of the cage.
Selection of the appropriate platform should be done in the early planning stages of experiments by working with staff well versed in the strengths and weaknesses of each, and with an understanding of the experimental aims and requirements.
BASIC PROTOCOL 1. Gnotobiotic Isolator Setup (Flexible Film)
This protocol describes the setup and sterilization of a flexible film isolator, such as those provided by Class Biologically Clean (CBC).
Materials
Gnotobiotic isolator bubble and frame (CBC or other isolator vendor)
-
Removable metal air intake and outflow chambers, two per isolator (CBC or other isolator vendor).
HEPA filtration media (available from CBC)
Metal connector ring for each air filter (CBC or may use a plumbing metal connector ring that is available from home improvement shops).
Plastic sheet for bottom of the isolator (available from CBC)
Flat-head and Philips screw drivers
Internal and external port covers with rubber bands
Large 20cm forceps
Clidox sterilant, prepared per SOP for Clidox
Atomizer (Standard Safety or other vendor), air hose and air compressor or compressed air tank to provide airflow to power atomization of sterilant.
Personnel safety gear for working with atomized sterilant, namely Facemask/breathing apparatus, eye protection, lab coat or coveralls, and gloves for all personnel working on the isolator or in immediate area.
Electrical supply for air pump once isolator is setup
Autoclavable mylar tape (clear)
Autoclavable vinyl stretchable tape (yellow) –
Roll of autoclavable mylar sheet which will be cut to size to provide membrane barriers for openings on the air handling chambers.
As needed, replace HEPA filter paper from the metal air filtration units – commonly after not more than 10 sterilization cycles of if the filtration media is obviously fraying or demonstrates water damage from prior autoclaving. To replace, remove vinyl/mylar tape holding it in place on the metal unit. Cut a new sheet of HEPA filter paper to wrap around the unit 3 times. Tape in place with the autoclavable mylar tape, then over the mylar tape with the stretchable vinyl tape. Stretch the vinyl tape as it is applied over the mylar tape so a tight seal is formed.
The top air port of each metal unit needs a mylar seal. First, cut a small circle of mylar with a 1–2″ margin over the metal tube.
Tape the mylar circle in place over the opening with clear mylar tape.
-
Next, wrap the stretchy vinyl tape over the mylar seal and over the metal of the filtration unit, stretching as tape is applied to form a tight seal.
Make certain there are no air bubbles, wrinkles or breaks as these could trap contaminating organisms.
Place the filtration units in an autoclavable bin and autoclave. Monitor autoclave quality control parameters to insure success of the run.
-
As needed, prepare a canister to move reagents/materials into the isolator after setup is completed.
If space in the autoclave permits, the canister can be included in the load.
-
Remove autoclaved filtration units; check that the autoclave cycle was successful.
Make certain the mylar seal is intact; if not the metal units will need to be re-autoclaved with a new seal.
Next, run plastic sleeves over the filtration units, as shown Figure 1. The plastic sleeves ARE NOT autoclaved and provide an outer cover over the HEPA filtration media. Align the plastic airflow port on the appropriate side of the metal unit so it will connect with the air flow hoses on the isolator frame. In Figure 1, the plastic airflow port is on the LH side in the middle of the unit.
Tape the plastic sleeve in place with yellow vinyl tape at the top and bottom of the sleeve – the tape creates a sealed (though non-sterile) chamber into which air enters before passing through the HEPA filters into the isolator. See Figure 2.
Screw the metal filters onto the isolator frame; make certain to place them appropriately on the RH or LH side.
Connect the plastic tube on the air filtration sleeve to the white airflow pipe on the isolator frame. See Figure 3.
Before connecting the top of the air filtration unit, slide the metal connector ring over the airflow port at the top of the metal filtration unit as shown in Figure 4. If you forget to do this after setting up the isolator, the ring can be completely opened by unscrewing it, placed around the tube connector and re-tightened.
-
Place the metal tube of the air filtration unit into the corresponding plastic tube on the isolator. Place the ring at the edge of the metal tube so there is as small a gap as possible with the plastic tube from the isolator (prevent spores/microbes from getting into this space). Using a flat-head screw-driver, tighten the ring on top of the plastic tube so it seals the isolator to the metal filtration unit as shown in Figure 5.
Be careful to always work away from the isolator so if the screwdriver slips it will not puncture the isolator.
Repeat for the filtration unit on the opposite side.
Next, move the bottom plastic sheet and a 20cm pair of forceps into the isolator through the open port.
Two people are needed for the sterilization.
Prepare 500mL of Clidox, and place in atomizer bottle with atomizer.
Connect to air compressor or compressed air tank.
As shown in Figure 6, one person sprays into the open port of the isolator while the second person wipes clidox around the interior of the isolator chamber. Personnel need to wear particulate/droplet face masks with eye protection so as not to breathe free clidox or get it in the eyes.
-
Through the glove ports, the second person wipes clidox over all interior surfaces of the isolator (see Figure 7).
It is particularly important to wipe over and under the bottom plastic sheet and around the plastic tube of the connector to the air filtration units to make certain Clidox gets up to the mylar seal on the filtration units.
The chamber should become foggy with sterilant (see Figure 8). If it doesn’t tighten the atomizer head to give a better droplet spray.
After spraying from the front, the person standing at the port should pass the atomizer to the second person who will spray the front of the isolator and port area.
The second person returns the atomizer to the first and continues to wipe down all interior surfaces, including those on the gloves and the glove connections to the isolator.
Next, spray down the internal port cover, 20cm forceps and a brown rubber band (see Figure 9), either inside the isolator or within a fume hood.
The second person will wipe all surfaces of the internal port cover, rubber band and forceps with Clidox within the isolator.
The second person will then need to place the internal port cover over the Plexiglas port at the front of the isolator. Use the plastic phlange to pull it as tightly over the port as possible.
Next, place the rubber band over the port.
The isolator chamber should still be foggy with Clidox, per Figure 10.
The second person will continue rubbing Clidox over the inside of the isolator chamber and port cover while the first person sprays the port interior.
Next, take the external port cover and 2 green stoppers.
Spray down the external port cover with Clidox, including the tubes.
Place the external port cover over the external port edge, sliding it over the Plexiglas as far as it will go (Figure 11).
Move the black rubber band over the external port cover, flipping once or twice as needed so that the grooved side is faced up (Figure 12).
Place the metal wire/winch into the groove along the entire circumference of the rubber band with the winch at the top of the isolator (Figure 13).
Tighten the winch by rotating the lever from left to right (Figure 14).
Atomize Clidox in to the ports/tubes on the external cover so that the interior is foggy.
Spray down the green stoppers, the tubes, and tightly seal the tubes with the stoppers.
Let isolator bubble sit overnight.
Figure 1.

An isolator air filtration unit containing the HEPA paper air filter, plastic sleeve, and mylar tape covering the opening of the unit.
Figure 2.

Isolator filtration unit containing the HEPA air filter, covered by the plastic sleeve secured to the unit via vinyl tape.
Figure 3.

Isolator air filtration unit attached to isolator frame. PVC piping for airflow into the isolator ready to be attached to the plastic sleeve.
Figure 4.

Top of the air filtration unit with the metal connector ring (un-tightened) ready for attachment to the isolator bubble.
Figure 5.

Top of the air filtration unit connected and secured to the isolator bubble by the metal connector ring.
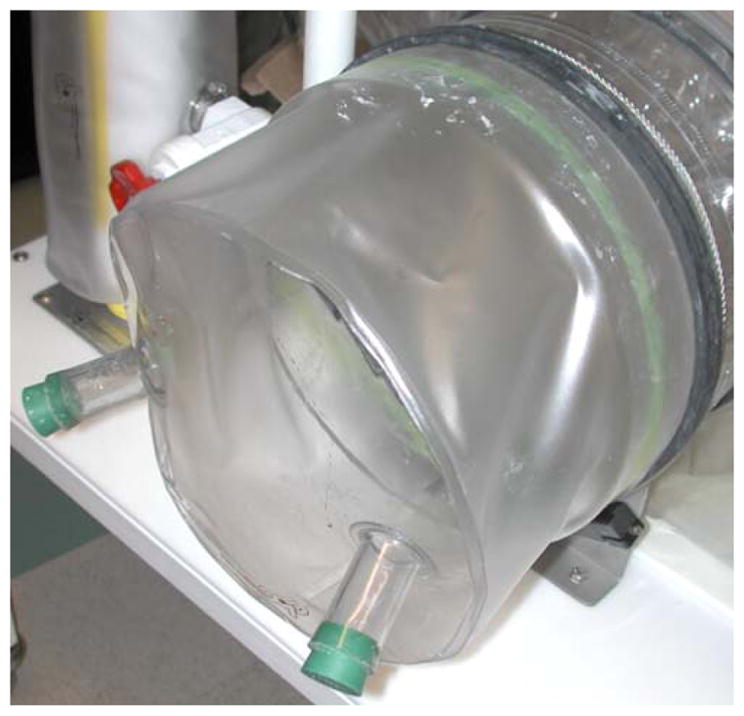
Figure 6.

Deflated isolator bubble mounted on isolator frame. Air filtration unit attached to the isolator frame and bubble. In order to completely sterilize the interior of the bubble, an atomizer with Clidox is used to spray the inside by reaching through the port. Note the use of the face mask in order to prevent inhalation of Clidox and eye/skin irritation.
Figure 7.

Person with their hands inside of the gloves of the isolator bubble. Using the gloves one can wipe the Clidox over the interior of the bubble.
Figure 8.

Isolator bubble “fogged” with Clidox spray from the atomizer.
Figure 9.

Internal isolator port cover, rubber band for securing internal port cover, and 20cm forceps.
Figure 10.

Isolator bubble with the inner port cover on and secured by the rubber band. The bubble is still foggy with Clidox.
Figure 11.
External isolator port cover slipped over the isolator port. The external port cover contains two nipples and two green stoppers. Black rubber band is off of the external port cover.
Figure 12.

External isolator port cover with the black rubber band over it.
Figure 13.

External isolator port cover on with rubber band and wire clamp (open).
Figure 14.

External isolator port cover secured to isolator port via rubber band and wire clamp (closed).
BASIC PROTOCOL 2. Gnotobiotic Isolator breakdown (Flexible Film)
This protocol describes the breakdown of an existing gnotobiotic isolator so it may be cycled for re-use. While isolators used for breeding or long-term studies should be broken down as little as possible, experimental isolators in a core resource may be turned over frequently to support ongoing studies for different groups.
When working with infectious materials in BL2 negative pressure isolators, all materials need to be bagged within the isolator, transferred to the exit port, fogged with sterilant and left to sit for adequate time to insure contact sterilization of the given agents in use prior to removing the bags and autoclaving them.
Materials
GF isolator bubble already setup
-
Intake and outflow metal containers for air/HEPA-filters (2, one for RH side, one for LH side, marked on the metal containers)
HEPA filter paper
Metal connector ring for each air filter
Plastic sheet for bottom of the isolator
Flat-head and Philips screw drivers
Internal and external port covers with rubber bands
Large 20cm forceps
Clidox sterilant, prepared per SOP for Clidox
Facemask/breathing apparatus for working with Clidox, eye protection, lab coat and gloves for all personnel working on the isolator or in immediate area.
Atomizer (Standard Safety), air hose and air compressor or compressed air tank.
Electrical supply for air pump once isolator is setup.
Mylar tape (clear) – survives autoclaving
Vinyl stretchy tape (yellow) – survives autoclaving
Mylar sheet
Isolator breakdown (if operating a BL01 or BL1 isolator)
Prepare Clidox solution as described in Support Protocol 1.
Turn air flow to isolator off. If a second isolator on the unit is to remain operational, make certain air continues to flow to this unit.
For BL1 isolators, remove internal and external port covers from the isolator to be broken down.
Remove all items from the isolator. Store, dispose, autoclave as needed.
Clean bottom of isolator with damp towel to pick up any bedding or other materials that may have fallen out. Dispose of towels in trash can in room.
Unscrew metal rings holding the air filters in place. Place a flat-head screw-driver into the screw and turn counterclockwise to loosen.
Once ring is loosened, disconnect isolator from the metal filtration unit.
Put metal rings somewhere accessible for when filtration units are re-connected.
Remove yellow vinyl tape and clear mylar tape from each metal unit.
Slide the plastic sleeve off of the metal unit.
Remove bottom plastic sheet. Spray both sides down with Clidox using a squirt bottle. Wipe down on a free lab bench and let dry, or roll up until ready to place back into the isolator.
Initial decontamination of a BL-2 isolator housing infected mice prior to isolator breakdown
Bag all materials and supplies within the isolator in BL2 bags, sealing each with a wire tie and tie-off of the bag opening. Make certain filled bags will fit completely in the exit port chamber.
Move bags into the exit port chamber form within the isolator and seal the inner port.
Through the external port nipples, fog the port chamber and allow adequate time for surface sterilization of the agents used. For most BL-2 pathogens 20′ is sufficient. Check with your institutional biosafety officer to confirm for specific agents that may be more resistant to sterilants.
After time has elapsed, remove the outer port cover and place the bag into a second biohazard bag. Tie off and place in an autoclave bin for autoclave decontamination.
For equipment of other materials that cannot be autoclaved, such as scale. Double bag the removed biohazard bag and decontaminate with ethylene oxide or other appropriate method.
Once all internal materials have been removed, with the external port cover remaining on, remove the inner port cover and fog the entire chamber through one of the nipped in the outer port cover. A second person using the gloves will insure sterilant contacts all surfaces within the isolator.
Seal the outer port cover and nipple and let sit to insure contact sterilization.
Proceed to break-down the isolator as described above and then re-sterilize the air handling and other autoclavable components.
BASIC PROTOCOL 3. Preparation of isolator supply canisters
This protocol details preparation and sterilization of isolator supplies in metal canisters with HEPA filtration media covering. The filtration media allows penetration of steam during autoclaving to sterilize canister contents. Place food, bedding, cages and other items needed to maintain gnotobiotic mice in isolators.
As the setup, autoclaving and connection of supply canisters can commonly take a day or more, needs are best planned in advance to understand requirements for initial isolator setup and to support breeding colonies or experimental studies. Furthermore, in cases where multiple canisters may be needed to setup a given isolator, considerations should be given to adequately distribute the weight and types of supplies that may be present. For instance, heavy 500mL water bottles are best distributed among isolators, and the first canister to be connected should have essential equipment, including forceps and the canister “grabber” to facilitate import of supplies from subsequent canister.
Materials
18″ X 30″ or 12″X24″ CBC stainless steel canisters
HEPA filtration media, wrapped 3X around each canister and sealed into place with mylar and vinyl autoclavable tape
Mylar membrane for sealing canister end
-
Mylar and vinyl autoclave tape for sealing canister
Mylar tape – CBC# 3900040
Vinyl tape – Standard Safety 044-4000-0005 1″ X 60yds or 044-4066-0522 2″ X 60 yds or CBC# 390003
Autoclave with pre-vacuum cycle
Brown paper bags for holding bedding and food
Cage bedding
Mouse chow. For maintenance of gnotobiotic mice, a low fiber, nutrient dense chow is recommended to improve breeding and reduce risks of bowel perforation from accumulation of undigested dietary fibers per the absence of metabolizing microbes. An example diet is LabDiet’s #5021 autoclavable chow.
Clean cages with wire cage racks.
If 500mL water bottles, used to fill water bottled for individual mouse cages, need to be included in the supply canister, use special bottle with fitted silicone rubber caps.
Mouse cage bottles
-
Transfer sleeve with phlanges – size based on diameter of canister and diameter of isolator port. Phlanges on the ends of the sleeves are needed to pull them over the ports.
12″ X 12″ X 12″ with phlange – CBC# 231212121
-
12″ X 12″ X 36″ with phlange – CBC# 231212361
Useful mostly for isolator -> isolator transfer 18″ X 12″ X 12″ with phlange - #241218181
2 large brown rubber bands and/or metal port winch to go over the canister to seal the transfer sleeve during transfer of materials into the isolator
Stable stand on which to place canister, including stands sold by CBC or an adjustable height scissor lift
Clidox-S sterilant and atomizer with air compressor
Aerosol mask, eye goggles, lab coats and gloves need to be worn by staff performing sterilization with atomized Clidox-S
Other items, to be included in supply canisters (place in isolator or experimental plan checklist):
“Grabber” (especially for 18″ diameter canisters) – pulled out wire coat hanger with Teflon tape wrapped around the wire hanger (and any other sharp edges). Used to pull supplies into isolator from a large canister.
Eppendorf tubes, pre-labeled for collecting fecal pellets.
Large forceps (>20cm long) or smaller forceps for collection of fecal pellets/sterility checks (Fisher Sci).
Paper towels, gauze or other types of wipes for use within isolators.
Cotton gloves to protect the vinyl or rubber isolators gloves (Fisher Sci).
Syringes – pre-sterilized or glass.
Hematocrit tubes for collecting blood
5′ high adjustable metal rack shelving or plastic tables – can be used as a stable stand for 12″ canisters to be connected to the lower isolator port or 12″ or 18″ isolators to the top port.
Stable step stool – depending upon height of technical staff – useful for working in the top isolator. Do not use stools with rollers underneath, should they slip while performing work.
Canisters to use
18″ diameter canisters are much easier to use for transferring materials into 12″ port isolators. Use the telescoping 18″ -> 12″ connecting sleeves (12″ in length). If set up appropriately, the 12″ port can often be placed at the opening of the 18″ canister. Make certain the plastic flanges of the connector sleeves are out to provide an open channel through which to bring in materials. If using a scissor lift or other platform to connect, insure the canister is firmly held in place on the platform prior to connecting.
12″ isolators may be preferred for moving material into the upper isolator, particularly if a stable stand of appropriate height is not available. However, 2 people will need to hold the canister while the third person brings materials in.
Day Before
-
1
Prepare or select which checklist to use for loading the canister, to make certain all required items are included.
-
2
Prepare the canister with items needed.
Dry items such as food and bedding should be placed in brown paper bags. Fold the top of the bag over and tape with a piece of autoclave tape. -
3
Make certain the GF isolator into which the canister’s contents will be transferred has a pair of large forceps or other instrument which can be used to puncture the mylar.
-
4
Cut out a roughly circular piece of mylar that extends beyond the edges of the canister by 1–2 inches.
-
5
First, using the mylar tape, tape the mylar over the edge of the canister.
You may need to fold/crimp sections of the mylar so it fits tightly over the canister edge.
-
6
Run the mylar tape over the mylar seal 1–2 times so tape completely covers the edge of the mylar onto the canister metal.
Be certain there are no folds/gaps in the tape, which could allow microbes to survive.
-
7
Next, run the yellow vinyl tape over the mylar tape seal, 1–2 times so it also is sealed against the metal of the canister. Pull/stretch the tape as you are running it over the edge to form a tighter seal.
Avoid gaps/bubbles or folds in the tape as these are prime sites for contamination.
-
8
Place a piece of autoclave tape on top of the mylar/vinyl tape seals.
-
9
Autoclave in the Channing 6 autoclave using the pre-vac cycle. Make certain the pre-vac cycle attains appropriate vacuum, and after autoclaving, make certain the autoclave record states the autoclave got to temperature. If it didn’t the canister will need to be re-autoclaved.
-
10
Take the canister out to cool.
Day Of
-
11
Prepare 500mL of Clidox-S sterilant (Pharmacal) for use in atomizer (see Support Protocol 1).
-
12
Take appropriate sleeve of diameter and length to fit the canister, isolator port and allow ready transfer of materials into the isolator.
-
13
Take 2 large rubber bands to fit around each end of the sleeve (two 12″, or one 12″, one 18″).
-
14
Place canister on a stable platform – either 4 overturned bins or on the metal shelf with shelves set to place the canister even with the upper or lower ports of the isolator receiving materials.
Make certain the front casters of the cart are locked so it doesn’t move.
-
15
Spray down the interior of the sleeve, edge of the canister, interior of the isolator, as well as plugs for the isolator port and sleeve.
-
16
For the sleeve end to go over the canister, place 2 brown rubber bands around the tube. These will be put in place over the canister and the isolator port to hold the sleeve in place (Figure 15).
-
17
Connect the canister to the isolator port.
-
18
Open the plugs on the sleeve and thoroughly spray the interior of the sleeve with the atomizer+Exspor or Clidox.
This step is essential to obtain surface sterilization of the interior as well as kill any spores, etc that may be in air inside the sleeve.
-
19
Respray the ports and plugs, and replace the plugs.
-
20
Let sit for at least 2 hours.
Figure 15.

Canister containing isolator supplies with the plastic transfer sleeve attached. Rubber band ready to slide up and secure the sleeve to the canister.
Transfer From Canister To Isolator
-
It is generally helpful to have 2 people transfer materials from the canister into the isolator.
It may also help to turn off the isolator pump so it’s possible to lean into the bubble to reach to the isolator port. The user who will work inside the canister will need to pull off the isolator’s internal seal (brown rubber band and plastic cover).
Taking 12″ pair of forceps, the user in the isolator punctures the mylar seal of the canister to open it.
If the canister sleeve allows use of the canister sled, the sled can be pulled into/toward the isolator to move materials in. However, care must be taken not to puncture plastic in sleeve or the isolator.
Use the forceps to grab the grabber that has been placed in front of the canister.
With the grabber, pull across cages or other materials.
As needed, the second user may need to shake or move the canister closer to the isolator port so the second user can transfer materials in. However, in a well-packed canister and the use of the grabber, this is rarely needed.
Once transferred, the user in the isolator needs to replace the plastic cover and rubber bands over the internal opening of the port.
Clean Up
Sleeve and canister may be removed once the isolator’s internal plastic cover + rubber band is replaced.
Immediately spray clidox-S within isolator port and around edges.
Spray the external port cover and plugs for the isolator.
Place external cover over isolator and hold in place with rubber bands.
Open plugs and spray additional sterilant in the chamber.
Spray down plugs and replace.
Remove tape and mylar from the canister. Replace in storage area.
Note: hepa filter paper needs to be replaced after about 5.
Replacing Hepa Filtration Media on Canister
Using an indelible marker note the date of HEPA filtration placed on the isolator by marking on tape sealing the filtration media. Note each use by the date with a line, and slashed line at the 5th use. HEPA media is generally good for 10 autoclaving cycles as long as the material does not get wet. After each autoclaving, go over the filter material to check for any rips/tears or wet areas. To replace:
Remove vinyl and mylar tape at both ends of the canister that holds the HEPA filter in place. Remove any autoclave tape on the back of the canister.
-
With roll of filter paper provided by CBC (stored in EBRC-420), cut the width of the roll to a length that will complete 3 rotations around the canister
~4.7 feet for 18″ canisters.
~3.2 feet for 12″ canisters.
The filter paper needs to complete 3 revolutions around the canister; pull tightly while wrapping to avoid slack.
Tape filter paper to the canister at either end first with the mylar tape.
Next, use the stretchable vinyl tape to overlap the filter paper and mylar tape. Make certain the seal is tight.
Replace metal rings over the tape to secure the tape and the new filter.
The leftover HEPA filter material can be folded and placed in the bottom of the canister, under the sled. The padding will absorb any water/moisture that drips to the bottom, instead of getting the covering HEPA filter material wet, thus prolonging its life.
SECTION: STERILIZATION PROTOCOLS
SUPPORT PROTOCOL 1: Preparing Clidox Sterilant
This protocol describes the preparation and use of Clidox solutions to surface sterilize isolators and supporting equipment being moved into isolators, or to decontaminate materials coming out of isolators, if operated at BL2. While many sterilants are used, Clidox has good capacity for surface sterilization and is safer to use than alternatives such as para-acetic acid or formaldehyde.
For aerosolized applications, staff must wear protective respirator masks, eyeware, gloves and labcoats or coveralls. Filtration media in respirator masks should be changed out per vendor recommendations, commonly every 3 months or sooner if the clidox odor is apparent during use.
Materials
-
Clidox-S Activator and Base (made by Pharmacal; order from Fisher)
Alternative: ExSpor from EcoLabs (also available from Fisher but is being phased out in 2017) – uses lactic acid as the organic acid; base is comparable to Clidox-S. MilliQ filtered water – fine filtration is strongly suggested to remove small particulates that will clog atomizer heads.
100 or 500mL graduated cylinder
500mL or 1L bottle. The bottles sold by the vendor tend to be expensive and may develop loosened threads over time. If so, Teflon plumbing tape can be used to tighten connections. In some cases, standard soda bottles can be used by punching a hole in the bottle cap to accommodate the atomizer wick, and then connecting the attached cap to the soda bottle.
Atomizer with plastic bottle (from Standard Safety), tubing and compressor (from Home Depot or other hardware store) or pressurized air source such as a standard air tank from a gas tank vendor
-
1
Prepare Clidox fresh for each use, in a ratio of 1 part activator to 1 part base to 3 parts water. First add activator to 300mL of water, mix, then add the base – to prepare 500mL. This volume is generally adequate to spray the interior of two small isolator bubbles.
100mL Activator
300mL milliQ water
-
100mL base
Prepared solution is stated to be active for up to 2 weeks, but in general should be made fresh and used that day.
-
2
If not able to use milliQ water, run distilled water over a 0.22uM filter.
Any particulate matter may get stuck in the atomizer head, limiting its effectiveness and life.
-
3
Pour mixed solution into atomizer spray bottle.
-
4
Screw atomizer/bottle lid on tightly.
Air compressor hose should already be screwed onto the compressor. If not, screw the hose onto the spigot on the compressor.
A female-to-female metal attachment should be put on the other end of the hose. If not, these can be purchased from hardware supply stores such as Home Depot or Lowes – best to take the hose into the store to make certain the attachment fits. The male ends of the hose can be wrapped in Teflon tape to insure a tighter fit with the metal fitting. Any leaks will reduce air pressure and effectiveness of the atomizer.
Screw the atomizer onto the remaining end of the metal fitting.
-
5
Turn the compressor on. Pull the handle of the atomizer to check that it is spraying well. Adjust the air pressure as needed, or screw/unscrew the atomizer to adjust flow.
Cleanup
-
6
Rinse atomizer bottle and refill with milliQ-water.
-
7
Re-attach to the atomizer head and spray for ~minute to wash the atomizer head.
-
8
With a wet towel, wipe down any surfaces on the isolator, atomizer or air compressor that came in contact with Clidox – to prevent corrosion and damage.
SUPPORT PROTOCOL 2. Ethylene Oxide (EtO) Sterilization System (AN200 Anprolene Sterilizer)
Use of ethylene oxide sterilization for materials and equipment that cannot be autoclaved, such as scales for weighing, Sharpie pens, plastic syringes and other non-autoclavable materials. In cases of moving electrical equipment that is battery powered, check with the manufacturer first for any considerations exposing the equipment to EtO, both for any impact to adequate functioning of the equipment and any potential safety hazards.
EtO units must be appropriately vented to insure the exhaust gas does not enter work areas. Check with institutional environmental safety personnel to identify optimal means to setup and manage EtO sterilization units before putting them in place and starting operations.
Materials
Items to be sterilized
-
Anprolene AN 71 kit* (Figure 16):
Sterilization liner bag
Gas release bag containing gas ampoule
2 Twist ties
Appropriate indicator: AN 85 exposure indicator (Figure 17)
- Alternative indicator: self-sealing sterilization pouch (Figure 18)* Anprolene AN 71 Kit and AN 85 exposure indicators can be ordered from: ANDERSEN STERILIZERS, INC, Haw River, NC 27258 USA, LOT# 111134
Figure 16.

Anprolene AN 71 ethylene oxide kit. Sterilization liner bag, and gas bag and ampule containing ethylene oxide.
Figure 17.

AN 85 Ethylene Oxide Exposure Indicators that change from yellow/green to blue upon exposure to ethylene oxide.
Figure 18.

Sterilization pouch with arrows that turn gold/brown with exposure to ethylene oxide.
Prepare sterilization liner bag
-
1
Obtain sterilization liner bag, gas release bag containing a gas ampoule, and two twist ties from kit (Figure 16).
-
2
Place items to be sterilized into sterilization liner bag. Insert applicable indicator.
-
3
Unroll gas release bag containing the gas ampoule, without opening it, and place on top of items in the center where the ampoule can easily be broken during sterilization process.
Load sterilization liner bag into sterilizer
-
4
Turn on the AN2000 Anprolene Sterilizer by pressing the right side of the black power switch located on the back upper right corner.
-
5
Press button next to “START.” Sterilizer should begin self test.
-
6
Take out the purge tube (Figure 19) and insert into the sterilization liner bag outside of sterilizer cabinet.
-
7
Close the opening of the sterilization liner bag around the silver neck of the purge tube. Securely close with twist ties (twist two twist ties together to make one long one).
There may be an extra set of twist ties in the hood that you can use to reinforce an airtight seal.
-
8
When the self test is complete the screen should display “LOAD STERILIZER BAG/CLOSE BAG OVER TUBE/PURGE BAG.” Press the button next to “PURGE.” This will create a vacuum inside the bag (Figure 20) which takes about 90 seconds.
-
9
When the timer is at “00:00:00” the purge is complete, break the ampoule in the bag, place the sterilization liner bag in the sterilizer cabinet, and close the door.
-
10
Select the length of sterilization cycle (24 hour for plastics).
-
11
When the cycle is finished, there will be an additional two-hour ventilation cycle so plan accordingly when to remove sterilization liner bag.
Figure 19.

The purge tube of the AN2000 Anprolene Sterilizer. The opening of the purge tube is to the right of the figure. The sterilization bag is pressed tight and tied to the large silver cylinder so as to keep the ethylene oxide from escaping the bag.
Figure 20.

Sterilizer bag containing items to be sterilized. The bag is secured to the purge tube by twist ties on the purge tube neck (left side of the figure). Notice the inside of the bag is a vacuum due to the purge process. The ethylene oxide ampoule can now be broken and sterilization can begin.
Remove sterilization liner bag from sterilizer
-
12
When the screen displays “UNLOAD STERILIZER” the sterilization process has completed. Press the button next to “EXIT.”
-
13
Remove the entire setup, sterilization liner bag and purge tube, out of the sterilizer cabinet.
-
14
Keep a firm grip around the opening of the sterilization liner bag. Untwist the ties and without opening the bag remove the purge tube. IMMEDIATELY close the sterilization liner bag with twist ties, try not to allow any air from the outside leak in.
-
15
Turn off sterilizer by pressing the left side of the black power switch located on the back upper right corner.
-
16
Allow gas absorbent materials such as rubber or plastic to aerate for additional 24 hours before they are used.
BASIC PROTOCOL 4: Autoclave Monitoring and Quality Control Procedures
The maintenance and monitoring of supporting autoclaves is essential to the support of gnotobiotic operations. Sites establishing new programs are strongly encouraged to run tests in isolators with commercially imported gnotobiotic mice to validate that sterilization cycles insure sterility of the chows without degrading nutrient quality. Breeding program may need additional fine tuning given the additional needs for key nutrients during pregnancy. Each autoclave may need to have its cycles specifically calibrated and confirmed for support of gnotobiotic mice to insure adequate performance.
Autoclaves are mission critical equipment and must have vendor service contracts with preventive maintenance schedules and ongoing monitoring of performance. The following steps detail use of biological checks, and per-run verification of autoclave performance for sterilization of supplies supporting isolators.
Biological test ampules commonly use vials of a thermophilic spore-forming species such as Geobacillus to demonstrate killing in the autoclave cycle. To test adequate performance of temperature and pressure parameters, ampules should be placed in the middle of a supply canister, e.g. within a food bag, to confirm adequate penetration of steam to kill the heat-resistant spores.
In addition, autoclave vendors provide additional per-run checks that will confirm adequacy of pre-vacuum cycles, temperature and pressure parameters.
Lastly, the printed tracing from each autoclave run should be manually verified for attaining appropriate temperature, pressure and time parameters at each step. Discard supplies from any run with failed parameters. Retain printed autoclave tracings with QC documentation so it is available if any issues arise including questions of a contamination breach.
Biological and Chemical Indicators
Materials
Geobacillus or appropriate autoclave vendor biological test ampule
Vendor-appropriate probes or tests for autoclave pre-vac, temperature and pressure parameters
Autoclave cycle tracings
The Propper Vapor Line PCD Challenge Test (Order # 269069)
Propper Manufacturing., Inc. Vapor Line Steam Sterilization Type 5 Integrators
≥1 time per week insert biological indicator into a test canister with materials, and a second near the autoclave steam vent and run the autoclave cycle.
≥Incubate the Geobacillus indicator once it has been removed from autoclave or canister at 65°C for 24 hrs and read results.
≥1 time per week add the QC materials “Proper Manufacturing Vapor Line Steam Sterilization Integrator” to the Proper Vapor Line PCD Challenge Test in the autoclave near the steam vent and then run the autoclave cycle. This test will indicate if the steam from the autoclave can penetrate all materials intended for sterilization.
Read results as soon as vapor line system is cool enough to open.
For each supply run, include vendor-provided checks for success of the autoclave run. If specific probes are used, note the probe readings in the supply canister log book to record success or any issues.
Manually review the autoclave tracings from each run for successful completion of each stage of sterilization. Include tracing with the log book for each supply run.
SUPPORT PROTOCOL 3: Quality Control: Isolator sterility checks
Routine checks of gnotobiotic and defined-colonization isolators are essential to insure mice remain under the appropriate state for gnotobiotic breeding programs and for experimental studies. Periodic collection of fecal material and used bedding from cages should be timed with routine points of moving materials in and out of isolators ports so as to reduce isolator entry. For experimental isolators requiring frequent port entry, sterility checks may be performed more frequently, particularly if risky procedures, such as adoptive transfer of cultured immune cells from conventional donors, or use of injectable materials that are not easily sterilized, such as Freund’s adjuvant, are being used.
Confirmation of sterility, or identification of potential contaminants, uses a combination of methods, including:
Microbiologic stains of materials: Gram stain (see APPENDIX 3O) is the primary stain used to detect bacterial and potential fungal elements (Figures 21, 22, and 23). For concerns of contamination or associations with organisms that do not stain robustly with the Gram stain, Steiner stain, GMM or acid fast stains may also be used.
Microbiologic culture of materials on non-selective rich media such as Brain Heart Infusion media (BHI) under aerobic and anaerobic conditions. For sites lacking accessible anaerobic hoods, groups may consider use of anaerobic jars with gas pak catalysts, or contract with a microbiology group, with expertise working with anaerobes and aerotolerant species, to provide robust support.
Molecular identification methods including 16S rRNA gene amplification and sequencing (see UNIT 7.41), and 18S rRNA gene and ITS regions for fungal and other types of contaminants. Of note, high numbers of amplification cycles (commonly ≫40) may produce false positive signal through amplification of residual microbial DNA in foodstuffs. Molecular platforms should be calibrated with serially diluted positive controls and negative controls including water controls and extraction of known sterile foodstuffs, to define the Ct values used to make calls of contamination events. Of note, mice fed certain high fat irradiated diets will be strongly positive by 16S rRNA PCR due to the high biomass of Lactococcus lactis and other lactic acid bacterial species used to generate certain formulations. In such cases, diets should first be confirmed microbiologically to lack viable organisms before use in isolators.
Breeding isolators and other isolators maintained long-term should also maintain sentinel mice for standard assessments to rule-out viral, parasite or ecto-parasite contamination.
Figure 21.

Typical Gram stain of a germ-free stool sample, observed at 1000x magnification.
Figure 22.

Gram stain of stool from a mouse with a defined mono-colonization of the Gram-positive Clostridium scindens, observed at 1000× magnification.
Figure 23.

Gram stain of stool from a mouse with a defined mono-colonization of the Gram-negative Bacteroides thetaiotaomicron, observed at 1000× magnification.
Isolators should also have routine visual checks and monitoring for potential signs of contamination. For instance, fuzzy or light cottony material on bedding raises concerns for fungal contamination, though certain types of nestlets may also generate fuzzy accumulations. Gram stain or fungal GMM stain of materials can quickly assess if fungal contamination exists; positive results is then followed by routine fungal culture to identify filamentous molds or yeasts. Production of volatile end-products of fermentation can also produce odors ranging from rancid butter to a general barnyard smell which may indicate contamination with species producing high levels of volatile short-chain fatty acids such as proprionate, butyrate or acetolactate. In such cases, samples should be immediately collected to rule-in or rule–out the presence of contaminants.
Sites or programs lacking microbiologic expertise should contract with a reputable microbiology lab or program to provide such testing.
Individual isolators operating to gnotobiotic specifications should be checked during the time of moving in or out of supplies, or as-needed per given needs or concerns (post tear of a glove, for instance). Fecal pellets will be collected and assessed by Gram stain and culture for organisms, with follow-up molecular studies as warranted or as scheduled in the quality control program.
Potential contaminants and root-cause analyses include:
Temperature-resistant sporulating organisms where spores survive after an autoclave cycle, largely thermophilic Bacillus or Clostridium species but some fungal and Streptomycetes species can potentially survive failed autoclave cycles. Action: Review autoclave tracings and perform immediate biological indicator checks to confirm autoclave performance.
Skin flora entering isolators through damaged gloves. Examples could include species of Staphylococcus or Corynebacteria. Regular checks of isolator gloves and use of cotton gloves within the isolator to cover vinyl/neoprene isolator gloves while handling mice and materials will reduce incidence of such contamination. Check isolator gloves for leaks by pulling the glove inside out of the isolator and placing in clidox sterilant. If air bubbles appear from a positive pressure isolator, seal off the glove and proceed with immediate procedures to temporarily change out the affected area until a new glove can be put in place.
Environmental contaminants entering via the isolator port or through tears in the plastic isolators, such as fungi or hardy Gram positive and Gram negative organisms. ** Insure consistent use of atomized sterilant (Clidox) and regular checks for isolator integrity + signs of wear with replacement of equipment to prevent such contamination. Check integrity of HEPA filtration media, the vinyl isolator barrier, port covers and rubber bands or winches holding port covers in place.
Atypical fecal or mouse flora, particularly contamination with multiple species – check isolator activity logs for recent use of new compounds that could not be sterilized or adoptive transfer of cultured immune cells. Review with experimental staff the methods for aseptic technique and means to reduce risk of contamination (e.g., use of antibiotics in cell culture media, maintenance of sterile hoods and incubators for handling).
Radio-resistant species including Deinococcus, Paenibacillus and certain fungi (Aspergillus, Tricoderma species), evaluate radiation regimens and Grey delivered to foodstuffs. Culture foodstuffs to assess if materials were inadequately irradiated.
Confirmation of contamination events requires evaluation of multiple testing modalities. For instance, Gram stain alone cannot effectively rule-in low biomass contaminants that grow poorly in the gut. Falsely positive results are also common, particularly if staff to not have extensive expertise in reading stool preparations from germfree mice. Components in normal germfree intestinal contents and food will produce rare Gram+ or Gram− rod forms (generally <1 form per 5 HPF). These forms may be fragments of dead cells or dead bacteria present in food that are not digested.
The Gram stain’s primary utility is to allow rapid detection of bacterial overgrowth in a germfree mouse, or to confirm defined colonization after specific mono-association. Stains should be read by a qualified microbiologic with expertise in evaluating stool and other complex primary samples.
Gram stains concerning for microbial contamination must be confirmed by culture, and commonly also with molecular methods. The vast majority of contaminants can be grown in a well-maintained anaerobic chamber. For sites unable to detect organisms grown in anaerobic jars it is worth contracting with a microbiology lab to provide anaerobic culturing support.
Note: Exercise full sterile technique at all times in processing samples.
Materials
Pre-labeled, sterile Eppendorf or other collection tubes transferred into GF isolator. In general, these will be transferred in the supply canister used to setup a gnotobiotic isolator for use.
Forceps transferred into the isolator for collection of fecal pellets from cages.
Sterilant (Clidox), atomizer + compressed air source to spray down isolator port after removal of fecal samples.
-
Outside of the isolator:
Sterile PBS
P200 pipettor with sterile filter-tip pipette tips
Glass slides
Gram stain reagents (Fisher Sci.)
Culture media – chocolate agar, BHI or Brucella agar plates (Fisher Sci).
Sterile spreaders
Anaerobic jars with catalyst
37°C incubator
Microscope with 10–100X objectives
Immersion oil (Sigma Chemical) for reading Gram stains at 100X magnification.
When transferring materials into an isolator, include a container of pre-labeled Eppendorf tubes (can be numbered 1 – N) on tube top. Label with an indelible black ink pen or autoclave-safe barcode labels.
Collect fecal pellets from a cage and place into sterile Eppendorf tube. Depending on the isolator, pellets should be collected at least from the sentinel Swiss-Webster mice. For breeding isolators, two fecal pellets should be collected once every two weeks to ensure sterility is maintained. For experimental isolators, it will vary on the study parameters, however checking once a week should be standard.
After collection, transfer tubes from the isolator.
On log sheet, record the # of the Eppendorf tube(s) removed.
Add 500uL of Sterile PBS to each tube. Use filter-tip pipette tips and perform under full sterile technique.
Place tubes on the lab vortexer until fecal pellets are fully homogenized in PBS.
-
With a sterile, filter pipette-tip, spread 10uL of material on glass slide labeled with the Eppendorf tube#.
Let slide dry/heat fix on hot plate set to 42°C, or heat fix later over Bunsen burner, after streaking out plates.
Perform Gram stain
Read slides under 100X oil immersion to look for bacterial overgrowth.
-
Spread 100uL of material to two Brucella, BHI or chocolate agar plates.
Use P200 pipettor with filter tips to transfer material
Spread with sterile, single-use spreader.
Place plates upside down for placement into aerobic incubator or anaerobic cage.
One plate will be placed at 37°C under aerobic conditions.
The second plate will be placed in anaerobic jar with catalyst, and incubated at 37°C.
After all samples have been processed and streaked to agar media, place rack with plates for anaerobic incubation in anaerobic jar.
Add anaerobic catalyst pack to side of jar + 10mL water to the pack (water can be non-sterile). Place anaerobic indicator strip on side of jar and seal top on the jar.
Place aerobic plates and anaerobic jar at 37°C.
Check aerobic plates daily for 3 days for growth. Anaerobic plates should be checked at 72h.
Record data on log sheet (see Table 1).
If Gram stain or cultures show any colonies/growth, see Support Protocol 3 for discussion of potential contaminants and root-cause analyses.
Table 1.
Log Sheet – Isolator Sterility Checks
| Date | Initials | Isolator | PI | Aerobic Plates | Anaerobic Plates | Gram Stain | Comments |
|---|---|---|---|---|---|---|---|
GNOTOBIOTIC MOUSE PROCEDURES
BASIC PROTOCOL 5. Ear Notching Mice Within Isolators for Identification
Ear notching is commonly the easiest procedure to identify animals co-housed as equipment can be autoclaved to perform the procedure. Staff should have demonstrated good dexterity in handling mice and performing clear ear notching outside of isolators, and practice the method on sentinel animals within isolators before attempting with experimental animals. While standard notching schemes use full versus partial notches to assign numbers from 0–100, given the difficulties in handling mice within isolators, a simple scheme to notch on a cage-by-cage basis allows numbering mice from 1–5 in each cage. Animals are then tracked by the cage# and specific mouse #.
Facilities should develop their own standard notching schema. An example used at the MHMC is below:
Mouse 1: no notches
Mouse 2: notch on the R ear
Mouse 3: notch on the L ear
Mouse 4: 2 notches on the R ear
Mouse 5: 2 notches on the L ear
Materials
-
Ear notcher
Introduced to isolator sterilely by autoclaving within a supply canister Sharpie Markers; irradiated for cage card and data documentation
Cage Cards
Carefully holding mouse with control over head mobility to notch the desired ear for identification (Right or Left).
Indicate what designation you are attaching to each mouse on the cage card.
BASIC PROTOCOL 6. Weighing Mice in Gnotobiotic Isolators
Many experimental protocols require weighing animals as a key clinical marker for alterations that may be affected by the microbiota. Inflammatory bowel disease and most diabetes or obesity studies will include changing mouse weights as a critical factor in analyses.
Animals may be weighed using battery-powered scales that can be subjected to ethylene oxide treatment. While groups may try to place scales under isolators, on the exterior, these methods are highly inaccurate per bearing changing weights from the above isolator, and per the positive- or negative-pressure air handling systems used within isolators, which can significantly alter accuracy of individual animal weights.
Groups should be aware that ethylene oxide treatments will often significantly reduce the usable life of equipment, sometimes to only 2–3 rounds of sterilization.
Materials
-
battery-powered scale accurate to 0.01g
Place battery within scale, wipe down the exterior with clidox and dry, then cover the sealed opening to the battery chamber with mylar and vinyl autoclave tape to seal the area.
Plastic Nalgene container (13cm × 13cm × 14cm)
Ethylene oxide sterilize (see Support Protocol 2) the scale (12–24hrs) and spray the bag containing the sterilized scale into the isolator.
With one person other to record data, zero a nalgene container on the scale.
To weigh each mouse, use forceps to grasp mouse by the base of the tail and place it into the Nalgene container. Once the weight of the mouse is recorded, place the mouse back in the cage by picking it up with the forceps by the tail. Clean the container and re- zero the scale between each mouse. After all mice are weighed, clean out the Nalgene container.
BASIC PROTOCOL 7: Fecal Sample Collection
Many studies in gnotobiotic or defined-colonized mice collect fecal pellets for single-timepoint and longitudinal studies.
Materials
sterilized appropriately and moved into isolators
Plastic Nalgene containers
Large 30 cm forceps. If concerns for cross-contamination across mice or cages, use one pair of dedicated forceps per cage.
Paper towels
Eppendorf tubes 1.8 ml
Cryovial tubes 1.8 ml
Irradiated Sharpie marker
Sprayed Items
Plastic Nalgene containers
Cryovioal tubes in a bag can be sprayed in the isolator
Irradiated markers
Autoclaved Items
Forceps
Eppendorf tubes
Paper towels; autoclaved in a canister
Using forceps place mice in Nalgene containers (Figure 24) and let them defecate per usual.
Within the isolator, label tubes using the sterile Sharpie marker, indicating the mouse ID#, date and timepoint number.
Gently pick up pellets with forceps and transfer into Eppendorf (Figure 25) or Cryovial tubes (Figure 26) as specified in a protocol. Place a minimum of 2 pellets per tube or a number as indicated in the experimental protocol.
For samples going into tubes with RNAlater, Trizol or other fixative, these reagents can damage the plastic isolator bubble, and thus need to be added to the tubes outside of the isolator prior to bringing them into the isolator to add samples. Within the isolator, handle tubes over an open, un-occupied cage or other chemically-resistant tray to prevent the fixatives from contacting the isolator should any materials spill. Once fecal pellets are added shake each tube to immediately disaggregate and disperse materials into the fixative.
When samples are collected and taken out of the isolator, snap freeze immediately in liquid nitrogen (LN2) or handle as indicated for the experimental protocol.
Transfer frozen samples from LN2 into a −80°C freezer.
Figure 24.

Nalgene Conainer
Figure 25.

Eppendorf Tube
Figure 26.

Cryovial Tube
BASIC PROTOCOL 8. Blood Collection within Isolators
Many studies may need to collect periodic blood samples from gnotobiotic or defined-colonized mice, where animals cannot be removed from isolators, per risks of contamination. This method is the safest way to collect blood inside of the isolator and is less invasive than other methods. Between 20 ul – 200 ul can be collected with the procedure described below.
Given the complexities of working in the isolators, any staff performing the lancet procedures should gain good proficiency first outside of the isolator on conventional mice before attempting the procedure within the isolators.
Materials
-
Goldenrod Animal Lancet (Braintree Scientific)
Introduced to isolator sterilely by autoclaving within a supply canister
Use the 4 mm lancet for mice < 2 months old
Use the 5 mm lancet for mice >2 months old
1.5 mL Eppendorf Tube to collect blood.
Include sterilized anti-coagulant in tubes if whole blood is needed for cellular or plasma-based studies (EDTA, lithium heparin, etc. as indicated per experimental protocol). Insure the anti-coagulant is added with aseptic methods to the tubes.
Prepare the Goldenrod lancet by opening the package and placing it to a side for easy access. Be certain not to rub against the gloves or any isolator surfaces so as to prevent punctures.
Carefully hold mouse by the loose skin in the nape area, between the index finger and thumb as to be able to control mobility of the head.
While holding the mouse, pick up Goldenrod lancet and lance the facial vein along the jaw line at the point midways between the eye and ear of the mouse.
As droplets form, gently hold the mouse over the open collection tube and allow blood to collect.
Once blood clots, wipe away excess blood and return the mouse to its cage.
If anti-coagulated blood is required, gently invert the tube to insure good mixing of collected blood with the anti-coagulant.
BASIC PROTOCOL 9. Isolator Gavage procedures
Many studies require gavage of liquid compounds or particular single or defined consortia of microbial species. This procedure describes how to perform gavage of mice given the additional technical challenges of working in the isolators, with the thick isolator gloves and limitations in mobility of the person performing the procedure. Mice can receive up to a 200uL volume of fluid by gavage. The procedure and all materials being administered must be detailed in the approved IACUC protocol.
Given complexities of working in isolators, use of flexible, neonatal gavage tubes are preferred to reduce injury while adequately delivering materials into the stomach.
Materials
-
Disposable sterile neonatal oral gavage needle (VWR)
Introduced sterilely to isolator by autoclaving in a supply canister 1 mL Sterile Syringe (BD). Glass syringes may be moved into isolators via supply canisters, or pre-sterilized, single-use plastic syringes may be sprayed directly if they are contained within a plastic covering that can be adequately surface sterilized with Clidox.
-
Screened Gavage materials
Defined consortia or other Protocol approved materials
Prepare Clidox sterilant spray mixture spray materials to be gavaged and sterile packaged 1 mL syringe in to port and allow to acclimate for ≥30 minutes.
Pull gavage materials in to isolator and prepare gavage fluid by pulling 200uL per mouse of the cocktail into the syringe.
Gently hold the mouse by the nape of neck and tail to restrain movement.
Insert the flexible neonatal gavage needle in the mouth of the mouse.
Once needle has safely passed in to the esophagus of the mouse, gently inject 200 uL of fluid.
Carefully remove the gavage tube and return the mouse to its cage.
Repeat this procedure for the cohort of experimental mice.
Save any leftover gavage materials for QC testing of materials administered, as defined by the study protocol, and for any needed downstream analyses. Remove gavage materials from the isolator after the procedure and sterily close the isolator port.
SECTION: TRANSFERRING MICE BETWEEN GNOTOBIOTIC ISOLATORS
BASIC PROTOCOL 10: Direct inter-isolator transfer of mice
Connecting two isolators on the same level provides one of the easiest and least-risky methods of mouse transfer. This requires that isolators have ports that can be connected with a plastic transfer sleeve that is as short as possible, preferably a foot, to facilitate transfer from isolator to isolator. The procedure may require 2–3 technical personnel once the isolators are connected and the transfer sleeve firmly held in place with tightened winches on each isolator port. The person in the transferring isolator moves cages to the opened port and places them into the transfer sleeves. With short sleeves, materials can often go directly into the port area of the receiving isolator, else a second technical staff member can help “massage” materials through the plastic transfer sleeve to the second isolator, where a third technical resource in the receiving isolator then brings the mice into the isolator bubble.
Once complete, the inner port covers are returned on each isolator, the sleeve connector is removed, and each isolator port separately fogged to return sterile state, with replacement of the external port covers.
Materials
For same level transfer –
transfer sleeves of appropriate diameter for sending and receiving isolators. Shorter is better – 12″ in length if possible.
-
For different-level transfer –
Within-isolator cages or CBC transfer disks to move mice.
Large pair of forceps in the sending isolator
Cages, water, food, bedding, etc. as needed for mice in receiving isolator
Clidox for sterilizing port chambers of sending and receiving isolators (see SOP for preparing Clidox).
Atomizer (Standard Safety) with hose and air compressor
Personal safety equipment for working with atomized Clidox (respirator, lab coat, gloves and eye protection)
NOTE: To move mice: (1) verify that sending and receiving isolators are of the same state – germfree or specifically-associated: (2) Check sterility reports of germfree donor and recipient isolators before setting up the move: (3) For same-level transfers, use a transfer sleeve hooked up between isolators to facilitate the move.
Remove outer port covers from sending and receiving isolators.
Spray ports and interiors down with Clidox.
Place rubber band for 12″ diameter sleeve ends or for 18″ diameter sleeve ends over the transfer sleeve. If available, use a large rubber band with metal winch to insure as a tight a seal as possible.
Connect an appropriate transfer sleeve to the open ports.
Secure in place by moving the rubber bands over the area of sleeve that has been pulled over the port cover.
Fog the inside of the transfer sleeve through the 2 tubes on the sides.
Spray sealing stoppers and let sit for an hour.
Open the interior port cover from the sending isolator. Make certain the transfer sleeve remains in place.
Repeat in the receiving isolator.
-
Transfer cages through the sleeve into the receiving isolator.
It may help to have a second person “massage” the cage across to the second isolator port if needed.
When finished, replace internal port covers.
Remove the transfer sleeve.
Spray down the open ports with Clidox.
Replace the port covers and fog the chambers, then seal with stoppers.
Rinse down the atomizer and transfer sleeve.
Verify that mice are OK.
Confirm sterility of sending and receiving isolators before undertaking further experimental procedures to ensure that you are not using contaminated mice for subsequent experiments (Support Protocol 3). To confirm that sterility was maintained in both isolators during the transfer, wait three days and then perform a standard sterility check on both isolators.
BASIC PROTOCOL 11. Perotec Transtainer Transfers
Trans-Tainer Perotec Tube and Disk Transfers (different-level transfers)
The Trans-tainer system provides an autoclavable and HEPA-filter sealable solution to transfer mice between isolators or event between facilities. Autoclavable and re-usable Trans-tainer tubes can hold multiple mice, or single unrelated adult males. HEPA filters snapped on the ends allow animal to breathe during the transfers.
Materials
Clidox solution
Compressed air tank with fitting for the atomizer
Atomizer
Pre-sterilized towels in recipient isolator to wipe-down jar for removing excess clidox and to make it easier to handle
Appropriate number of cages and materials for recipient mice
Sterilized Trans-Tainer® M10-3 One-way Shipper and autoclaved filter caps
11″ CBC TransDisk
Timer, set to 20 minutes, with audible alarm set at 15′ and 20′
NOTE: Two people must be available for the transfer.
-
Verify donor isolator has sufficient transfer tubes and filter caps (Figure 27) for transferring mice.
3–5 mice may be accommodated per tube depending upon the size of individual mice and per local institutional allowances for how many mice may be placed in each tube. DO NOT co-house unrelated males in the same tube. Verify recipient isolator has needed cages, food, bedding and water for incoming mice.
Personnel need to wear gloves, labcoat, respirator masks and protective eyeware when spraying Clidox in the isolator room.
If transfer involves move to a BL-2 isolator that is non-infectious at the time of transfer, turn off the negative-pressure air handler.
Prepare Clidox solution and connect it to the atomizer. Make certain the ports of the sending and receiving bubbles can be easily reached with the atomizer – move isolators in place and lock the wheel as needed.
Make certain the external port cover of the sending isolator is secure and that the port chamber is sterile.
From within the sending isolator, place a paper towel or some bedding and moisturized food pellets in the tube to accompany mice during transport.
-
Place appropriate number of mice in the transfer tube.
Do not mix adult males from different litters as they may fight.
Tightly secure the filter caps (Figure 28).
-
The second person in the room will set the alarm to 20′.
Work quickly from this point forward.
From within the isolator, remove the inner GF isolator rubber band and seal and place the tube(s) with mice in the port chamber.
Replace the inner seal and rubber band so they are securely in place.
From the external side of the port remove the second person will remove the tube(s) with mice.
Outside of the isolator, place the tubes on a tray and spray down. First, spray one side of the tube with Clidox, then place on the tray and turn while spraying the remaining sides. Be certain to thoroughly spray the connection between the tube caps and Perotec portion with Clidox to make certain Clidox penetrates to where the caps and tube meet, but does not penetrate the HEPA filter.
Spray the receiving isolator port, wiping down all surfaces with Clidox. Place tube(s) in the receiving isolator port. Replace the external port cover and thoroughly fog the chamber with Clidox to surface sterilize the tube exterior. The HEPA filter will prevent Clidox entry into the tube.
Set a timer to 10 minutes to give the Clidox time to act.
Observe mice at all times while they are in the chamber. If any signs of distress occur (difficulty breathing, lethargy), remove the mouse from the chamber via the external port cover and open the tube on one side by breaking a tab on either of the filter caps.
After 15 minutes, from within the receiving chamber, remove the inner port cover and bring the tube(s) into the isolator.
Replace the inner port cover.
Wipe down tubes with paper towels to remove excess Clidox and reduce slippage while handling.
Open one of the tube caps and transfer mice to cages.
Observe mice for regular activity after the transfer.
Figure 27.

An open Trans-tainer tuber and filter caps, when preparing for use, place one of the filter caps on to one of the ends of the tube and begin outline procedure for transferring mice.
Figure 28.

Trans-tainer tube with filter caps tightly secured on both ends ready to transfer in to transfer to desired location. Some protocols may require that food and some bedding be placed in transfer containers when containing mice.
BASIC PROTOCOL 12. CBC Transfer Disk Transfers
The CBC transfer disks allow transfer of up to 8 mice between isolators, particularly for transports taking an hour or less to complete. The HEPA filtration media in the disk lid supports access to air during transfer. Given the close proximity of mice to one another in the pie-shaped apparatus, adult males should be separated with an empty chamber between them.
Materials
For preparing the TransDisk
-
11″ CBC TransDisk (may need assembly)
Disk base
Disk lid
Upper Long Separator
Lower Long Separator
4 Small Separators
Circular Separator Holder
Bilayered Perforated Metal Cover
Autoclave vinyl tape 3 M Vynil yellow Tape # 471 Item # 3900031 CBC
Materials for Autoclave (see Canister Prep and Autoclave SOPs)
For transferring the TransDisk into the New Isolator
Exspor
Autoclave vinyl tape
Spray bottle
Atomizer with air compressor
Aerosol mask, eye goggles, lab coats and gloves need to be worn by staff performing sterilization with atomized solution
Prepare for Transfers and TransDisk Assembly (if needed)
-
1
Obtain components of 11″ CBC TransDisk.
-
3
Put circular separator holder in middle of disk base (Figures 29 and 30).
-
3
Place lower long separator in one of the groves of the circular separator holder (Figures 31 and 32).
-
4
Place the upper long separator perpendicular to the lower long separator so that they form an ‘X’ in the disk (Figure 33).
-
5
Insert small separators (Figure 34) in between the long separators (total 4). They will be held in place by the circular separator holder (Figure 35).
-
6
Place bilayered perforated metal cover on top (Figure 36).
-
7
Cover with disk lid (Figure 37) to complete assembly (Figure 38).
Figure 29.

TransDisk base.
Figure 30.

Circular separator holder.
Figure 31.

Upper long separator.
Figure 32.

Lower long separator.
Figure 33.

TransDisk with Upper and Lower long separators placed in x formation inside of base held by circular separator holder.
Figure 34.
Small separator.
Figure 35.

Small separator holders assembled with upper and lower long separators by circular separator holder in TransDisk base.
Figure 36.

Bilayered perforated metal cover over assembled TransDisk base.
Figure 37.

TransDisk lid.
Figure 38.

Completely assembled TransDisk transfer container. When using to transfer mice, the lid should be taped to the base 2–3 times around the assembled container. The protocol may require food and bedding be placed in each of the separated sections when mice are inside of the TransDisk.
Autoclave TransDisk and Putting in Isolator
-
8
Place TransDisk and autoclave vinyl tape in a supply canister.
Placement of materials within a mesh laundry bag able to withstand autoclaving conditions allows for easy removal of the materials from the canister into an isolator.
-
9
Follow Basic Protocol 3 for canister preparation and autoclaving.
Place Mice in TransDisk
-
10
Transfer TransDisk into isolator see canister preparation SOP (Basic Protocol 3).
-
11
Remove disk lid.
-
12
Place one mouse at a time in each TransDisk section (8 sections) through the perforated metal cover.
-
13
Cover with disk lid.
-
14
Seal the disk lid to disk base with vinyl tape. Wrap the tape 2–3 times around to ensure a tight seal.
-
15
Open the internal plastic cover of the port and place the TransDisk inside the port.
-
16
Replace the plastic cover and rubber band.
-
17
Now it is safe to remove the TransDisk from the port.
Transfer TransDisk into the New Isolator
-
18
Prepare Exspor in spray bottle and atomizer.
-
19
Seal the holes on the disk lid with vinyl tape. From this point on monitor the mice for any signs of distress (difficulty breathing, lethargy).
The TransDisk holds about enough oxygen for 8 mice to breath for 15–20 min.
-
20
Open isolator’s outer plastic cover.
-
21
Spray port, external port cover and sealed TransDisk with Exspor.
-
22
Place TransDisk in port.
-
23
Place external cover over isolator opening and hold in place with rubber band.
-
24
Open plug and spray additional Exspor in the chamber with atomizer.
-
25
Spray down plug and replace.
-
26
Wait 15 min for Exspor to take effect.
Continue to monitor mice, if there are signs of distress bring the mice into the isolator immediately.
-
27
Remove the inner port cover. Bring the mice into the isolator.
-
28
Remove tape from holes and the seal between the lid and disk base.
-
29
Transfer mice to cages.
-
30
Observe mice for regular activity after transfer.
BASIC PROTOCOL 13. High-throughput Cage Containment Systems
High throughput cage containment systems provide HEPA-level air filtration in and out of a sealable cage, thus providing a closed environment. While developed to support conventional barrier and biohazard facilities, many systems can also be adopted for use in microbiome studies, particularly (1) short-term germfree studies, maintaining mice commonly for less than a week, or not more than a couple of weeks, (2) defined colonization studies, timeframes comparable to studies with gnotobiotic mice, or (3) indefinite-term studies of mice colonized with complex microbiota (mouse, human, or other source), with the intent to prevent introduction of environmental or other colonizing microbes from the surrounding facility.
Points of risk for contamination include placing the mice into the cage, and with each cage opening or cage change. The system is thus sub-optimal for studies needing frequent sampling or handling of mice.
Cages, pre-loaded with bedding and chow are autoclaved to sterilize, as are water bottles – which may be autoclaved separately in a seal-able container to prevent leakage in the cage. All handling is done in a biolaminar flow hood with a surgical sterile field setup in which staff are gowned and handle all materials under full aseptic technique.
The techniques described use the OptiMice system, which is used extensively in the MHMC resource.
Short Term Studies
Short term studies typically involve germ-free mice housed in OptiMice cages as control with a variety of Protocol approved procedures that will last less than 2–4 weeks.
Materials
Cages autoclaved with food, bedding, and enrichment (nestlettes)
Cages with autoclaved water bottles with water
Sterilized forceps
Sterilized Nitrile or alternative gloves
-
Sterilized collection materials
Collections tubes such as cryovials or Eppendorf tubes
Sterilized Nalgene containers with aluminum foils covers
Using an appropriate transfer method (Trans-tainer tube or TransDisk from Basic Protocols 11 and 12) recipient mice can be moved from a donor isolator to optimice cages for a study (Figure 39).
Once the mice are removed from the isolator two people will work place the mice in Optimice cages aseptically.
One person will open the cage inside of a germicidal hood with UV light to improve sterilization of the interior cabinet when not in use (Figure 40).
The Second person will carefully remove the Jar lid and aseptically transfer mice into the sterile cage.
Study will proceed as specified by investigator minimizing manipulations to the cages
-
Any manipulations will occur with 2 people:
The Sterile person will put on sterile individually packaged gloves (Kimberly Clark).
The Non-sterile person with be responsible for opening cages and removing collection cup coverings without touching sterile areas.
The Non-sterile person will remove wrapping of autoclaved forceps for sterile person.
Using sterile forceps and gloves the mice can now be manipulated by either placing them in to the collection cups or moving them in to new cages for basic husbandry.
Experimental design is usually between 2–4 weeks with minimal manipulations to the cages and mice.
Figure 39.

An assembled autoclaved cage with food, bedding, a nestlette and autoclaved water ready for experimental use.
Figure 40.

A typical set-up for manipulating mice a dirty cage (right) to a new clean cage (left) with sterilized forceps within the germicidal bio-safety cabinet. This format can also be used to perform other procedures on the mice that are in the optimice caging system, with one sterile person to work within the cages and one non-sterile person to work outside of the cages.
BASIC PROTOCOL 14. Short Term Defined Colonizations
Cage containment systems can also be used to transfer and inoculate gnotobiotic mice with defined organisms or consortia for short-term studies. Inoculations are done at the point of introducing mice into their cages. In our experience, when done by well-trained staff, the contamination rate is <2%.
Materials
-
Defined Bacterial Community
Composition confirmed microbiology and, as indicated, by 16S rRNA gene sequencing or other method. -
Pre-reduced 1× PBS with 0.05% Cysteine as a reducing agent. Materials may be pre-reduced by storing them in an appropriately maintained anaerobic hood overnight. Control materials with 1% methylene blue or 1% resazurin added will indicate if appropriate anaerobicity has been maintained in the hood. Both chemicals will be clear when in a reduced state.
-
Or pre-reduced carrier media (BHI, LB, etc.)
Inoculum vehicles need to be introduced to an appropriate anaerobic environment and allowed to acclimate so that the oxygen present diffuses out of the media or other vehicle.
-
(Optional) Anaerobic Chamber
20–200 uL Pipette (Eppendorf or Fisherbrand)
0.5–10 uL Pipette (Eppendorf or Fisherbrand)
Multiguard Barrier Tips 20–200 uL and 0.1–10 uL (Sorensen, VWR)
Septum Cap tube (10 mL)
1 mL Syringe (BD)
Needle (18 – 21 GG) (BD)
Disposable sterile neonatal oral gavage needle (VWR)
Cages autoclaved with food, bedding, and enrichment (nestlettes)
Cages with autoclaved water bottles with water
Sterilized forceps
Sterilized Nitrile or alternative gloves
-
Sterilized collection materials
Collections tubes such as cryovials or Eppendorf tubes
Sterilized Nalgene containers with aluminum foils covers
-
Prepare the inoculum based on the type of colonization to be performed.
Studies can vary from complex microbiota, defined microbial consortium, donor mouse microbiota, or human fecal microbiota. Using different level transfer method (Trans-tainer tube or TransDisk from Basic Protocols 11 and 12) move recipient mice from a donor isolator to optimice cages (Figure 41) for a study.
Once the mice are removed from the isolator two people will work place the mice in Optimice cages aseptically.
One person opens the cage inside of a germicidal hood.
A second person carefully removes the jar lid and aseptically pour mice in to sterile cage.
Study will proceed as specified by investigator minimalizing manipulations to the cages.
-
Any manipulations such as gavage or sample collection is completed with 2 people.
The Sterile person puts on sterile individually packaged gloves (Kimberly Clark).
The Non-sterile person is responsible for opening cages and removing collection cup coverings without touching sterile areas.
The Non-sterile person removes wrapping of autoclaved forceps for sterile person.
The non-sterile person aseptically prepares any materials needed for gavage.
Using sterile forceps and gloves the mice can now be manipulated by either placing them in to the collection cups, preparing them for oral gavage, or moving them in to new cages for basic husbandry.
Once the manipulation is completed, the cage must be immediately covered by the non-sterile person.
Experimental design is usually between 2–4 weeks with a defined colonization with minimal manipulations to the cages and mice.
Figure 41.

An empty optimice caging system rack, where optimice cages can be placed during experiments.
BASIC PROTOCOL 15. Long Term Defined Colonizations
Longer-term colonizations, generally >4 weeks, can be supported in high-throughput containment systems but run increased risks for contamination with each cage change. We have successfully run studies up to 2 months in duration with 10–30% contamination rates. The method is primarily used for studies needing to prototype many different organisms and/or conditions where the number of isolators needed is either not feasible from a time and resources perspective, or becomes cost-prohibitive. Discussion with study staff is essential to note the risks for contamination and assess if experiments can be reasonably conducted to obtain needed information.
This method details colonizations with a defined microbiota, ranging from one to a known number of organisms. Again, long-term colonizations with complex donor microbiota are supported for an indefinite period.
Materials
Cecum and cecal contents from donor mouse
Fecal Material from Human Donor
(Optional) Conventional mice for co-housing (SPF or variation with supporting document)
-
Pre-reduced 1× PBS with 0.05% Cysteine
Or pre-reduced carrier media (BHI, LB, etc.)
(Optional) Anaerobic Chamber
20–200 uL Pipette (Eppendorf or Fisherbrand)
0.5–10 uL Pipette (Eppendorf or Fisherbrand)
Multiguard Barrier Tips 20–200 uL and 0.1–10 uL (Sorensen, VWR)
Septum Cap tube (10 mL)
1 mL Syringe (BD)
Needle (18 – 21 GG) (BD)
Disposable sterile neonatal oral gavage needle (VWR)
Cages autoclaved with food, bedding, and enrichment (nestlettes)
Cages with autoclaved water bottles with water
Sterilized forceps
Sterilized Nitrile or alternative gloves
-
Sterilized collection materials
Collections tubes such as cryovials or Eppendorf tubes
Sterilized Nalgene containers with aluminum foils covers
-
Prepare the inoculum based on the type of colonization to be performed.
Donor mouse microbiota or and human fecal microbiota.
-
(Optional) Conventional mice can be co-housed with germ-free mice for a period of time, if approved in the protocol, to facilitate mouse-to-mouse transfer of complex microbiota.
This method can be used to gradually introduce organisms that may be difficult to gavage due to their intolerance to oxygen in the environment. Using different level transfer method (Trans-tainer tube or TransDisk from Basic Protocols 11 and 12) recipient mice are moved from a donor isolator to optimice cages for a study.
Once the mice are removed from the isolator two people work together to place the mice in Optimice cages aseptically.
One person opens the cage inside of a germicidal hood.
The second person carefully removes the jar lid and aseptically pours the mice into sterile cage.
Study proceeds as specified by investigator minimalizing manipulations to the cages.
-
Any manipulations such as gavage or sample collection is completed with 2 people:
The Sterile person will put on sterile individually packaged gloves (Kimberly Clark).
The Non-sterile person is responsible for opening cages and removing collection cup coverings without touching sterile areas.
The Non-sterile person removes wrapping of autoclaved forceps for sterile person.
The non-sterile person will aseptically prepare any materials needed for gavage.
Using sterile forceps and gloves the mice can now be manipulated by either placing them in to the collection cups, preparing them for oral gavage, or moving them in to new cages for basic husbandry.
Once the manipulation is completed, the cage must be immediately covered by the non-sterile person.
Experiment can persist for long periods of time with minimal risk of contamination.
SECTION: MICROBIOTA RELATED PROCEDURES
BASIC PROTOCOL 16. Complex Microbiota Preparation
Complex microbiota can be used in both long term and short term gnotobiotic studies. The complex microbiota can be acquired from a range of sources such as donor stool (discussed in greater detail in Basic Protocol 18 and 19) or consortia grown in controlled in vitro conditions such as a bioreactor. Complex microbiota can be used to experimentally define microbial interactions from subsets of a larger communities. These experiments can include using different fractions of donor flora to determine the microbial-microbial and host-microbial interactions. These different fractions would need to be screened by molecular or microbiological methods to confirm the contents and purity of the community. Another way to prepare these complex communities is to grow a set organisms in a bioreactor and prepare the community under the appropriate conditions prior to colonization. Use of fermentation systems allows for the addition of supplemental nutrient requirements for each organism that allow small defined consortia to grow with maximum efficiency.
This method details the preparation and colonization of complex microbiota in to a germ-free model.
Materials
-
Defined Bacterial Community
Screened for purity by 16s rRNA Sequencing, microbiological, or other method -
Pre-reduced 1x PBS with 0.05% Cysteine
Or pre-reduced carrier media (BHI, LB, etc.)
(Optional) Anaerobic Chamber
20–200 uL Pipette (Eppendorf or Fisherbrand)
0.5–10 uL Pipette (Eppendorf or Fisherbrand)
Multiguard Barrier Tips 20–200 uL and 0.1–10 uL (Sorensen, VWR)
Septum Cap tube (10 mL)
1 mL Syringe (BD)
Needle (18 – 21 GG) (BD)
Disposable sterile neonatal oral gavage needle (VWR)
-
Prepare pure cultures of defined complex donor flora.
Can come from fecal material, broth cultures, fermentation, or other screened microbial sources. -
Under optimal conditions for community to be introduced (Anaerobic vs Aerobic) prepare inoculum with desired dose of each organism.
Dose is usually total amount of Colony Forming Units (CFUs) delivered in each 200 uL gavage volume.
-
Calculation to determine volume of each individual component of complex community is .
Example: .
This calculation needs to be completed for each organism, component, or mixture being gavaged.
Sum each of the component volumes to determine what the lowest total volume is and if it is greater than the gavage volume without adding any carrier volume, proceed by concentrating the needed components by centrifugation and resuspension.
Prepare a gavage volume (200 uL per mouse) that is ≥ the number of mice to be gavaged under appropriate conditions (anaerobic vs aerobic) in septum cap tube adding additional carrier volume (PBS or desired media) as needed.
(Optional) If placing in to isolator, spray inoculum in septum cap tube, needles, and syringe in to isolator.
Using 1 mL syringe and needle pierce septum cap tube and draw in appropriate oral gavage volume in to syringe.
Gavage mice and repeat until completed.
Save residual gavage materials for downstream analyses (remove from isolator if necessary). Analyses may include quality control testing to confirm what was delivered, and to provide a baseline sample for material introduced into mice.
BASIC PROTOCOL 17. Preparation of Defined Microbial Consortia
An advantage of gnotobiotic systems is capacity to introduce single or defined consortia of organisms to study specific effects of microbial communities in vivo. Preparation needs to consider the growth conditions and requirements of organisms, the method of delivery and desired biomass. For introduction into the GI tract, component members are best cultured individually, with confirmation of culture purity and of biomass, followed by methods to create the aggregate consortium.
In cases where defined colonizations are to be performed with GI, skin and genitourinary tract species, separate inoculate may be generated for target sites.
Materials
-
Defined Bacterial Community
Can be as simple as a mono-association with a single organism to highly diverse defined microbial community -
Pre-reduced 1× PBS with 0.05% Cysteine
Or pre-reduced carrier media (BHI, LB, etc.)
Anaerobic Chamber if inoculating with obligately anaerobic species
20–200 uL Pipette (Eppendorf or Fisherbrand)
0.5–10 uL Pipette (Eppendorf or Fisherbrand)
Multiguard Barrier Tips 20–200 uL and 0.1–10 uL (Sorensen, VWR)
Septum Cap tube (10 mL)
1 mL Syringe (BD)
Needle (18 – 21 GG) (BD)
Disposable sterile neonatal oral gavage needle (VWR)
-
Prepare pure cultures of defined microbial community.
These organisms should be prepared as pure cultures and quantified prior to preparation of community for gavage.Can be frozen in aliquots and stored at −80°C. -
Under optimal conditions for microorganisms to be introduced (Anaerobic vs Aerobic) prepare inoculum with desired dose of each organism.
Dose is usually total amount of Colony Forming Units (CFUs), Spores, or other unit to be delivered in each 200 uL gavage volume.
-
Calculation to determine volume of each individual component of complex community is .
Example: .
This calculation needs to be completed for each organism, component, or mixture being gavaged.
Sum each of the component volumes to determine what the lowest total volume is and if it is greater than the gavage volume without adding any carrier volume, proceed by concentrating the necessary components by centrifugation.
Prepare a gavage volume (200 uL per mouse) that is ≥the number of mice to be gavaged under appropriate conditions (anaerobic vs aerobic) in septum cap tube.
(Optional) If placing in to isolator, spray inocula in septum cap tube, needles, and syringe in to isolator.
Using 1 mL syringe and needle pierce septum cap tube and draw in appropriate oral gavage volume in to syringe.
Gavage mice and repeat until completed.
Save residual materials for quality control purposes and downstream analyses (remove from isolator if necessary).
BASIC PROTOCOL 18. Preparation of Mouse Donor Microbiota for Colonization Studies
Gnotobiotic mice can also be inoculated with complex donor microbiota from conventional mice. If materials cannot be prepared immediately in an anaerobic hood, donor microbiota should be snap frozen as soon as possible after collection to maximize preservation of as many species as possible with minimum handling that might also impact survival of highly fastidious anaerobes. Thaw and subsequent handling should then be performed in an anaerobic hood to prepare the inoculum, which is delivered to recipient mice by gavage and spreading over the fur.
Aliquots of the initial sample and of material administered to mice should be saved to test for the community composition prior to administering to recipient mice, so as to assess taxa that colonize and persist in the recipient.
If recipient mice will be placed in a conventional colony, the microbiota donor should be thoroughly tested for rodent pathogens, including enterohepatic Helicobacters, to prevent un-wanted introduction of pathogens into the larger colony.
Materials
Cecum and cecal contents from donor mouse
Anaerobic chamber
Pre-reduced 1× PBS with 0.05% Cysteine
Septum Cap tube (10 mL)
Needle (18 – 21 GG) (BD)
1 mL Syringe
Disposable sterile neonatal oral gavage needle (VWR)
Sterilized Surgical Scissors (2× per mouse)
Sterilized Fine Tip Forceps (2× per mouse)
Sterilized Blunt tip Forceps for Each Mouse
-
Sterilized Surgical Packet for Each mouse
2 glass microscope slides
2 disposable razor blades
Wrapped in Aluminum Foil and Autoclaved
Receive donor mouse from approved vendor with paper work indicating health status and screening completed by facility.
Euthanize mice by CO2 and cervical dislocation.
Prepare sterile field in Germicidal Laminar Flow Hood by opening sterilized surgical packet aseptically and placing mouse in sterile field.
Open the abdominal cavity by cutting through the epidermis with one of the pair of scissors that will no longer be considered sterile.
Use the blunt end forceps to pull the outer skin layer away from the subcutaneous membrane.
Use the second pair of sterile scissors and the fine tip forceps to open the subcutaneous membrane and expose the abdominal cavity.
-
Using the sterile fine tip forceps, located the stomach and starting at the Duodenum, ascetically remove the entire small intestine and the cecum of the mouse and place in sterile field.
(Optional) Save any tissues necessary for the study by fixing in stabilization solution or snap freezing. -
Place Cecum on top glass slides and cut away from remaining intestinal tract with sterile razor blade and place in to collection tube for processing.
(Optional) A transverse cross section can be cut from the cecum and saved if needed. -
Homogenize donor cecal contents in 1 mL Pre-reduced 1× PBS with 0.05% Cysteine under anaerobic conditions.
The cecum can be included in the colonization grinding the cecum and cecal contents in the pre-reduced 1× PBS with 0.05% Cysteine. Aseptically put donor flora homogenate in to septum cap tube and move out anaerobic conditions.
(Optional) If placing in to isolator, spray inocula in septum cap tube, needles, and syringe in to isolator.
Using 1 mL syringe and needle pierce septum cap tube and draw in appropriate oral gavage volume in to syringe.
Gavage mice and repeat until completed.
(Optional) Save additional gavage materials for downstream analysis (remove from isolator if necessary).
BASIC PROTOCOL 19. Human Fecal Donor Microbiota Preparation
When using human donor microbiota for mouse studies, donors should be screened for appropriate infectious agents to both limit risk of infection in animal handlers, and to prevent infections in mice with pathogens that infect both species. The donor questionnaires and screening protocols used for fecal microbiota transplant (FMT) donors is recommended, such as those developed by OpenBiome (https://www.openbiome.org/). If donors are not screened it is recommended to conduct colonization studies at biohazard level 2, or as advised by the local institutional biosafety committee.
To maximize viability of the commensal microbiota, unless the donor is providing materials that can be immediately processed, stool samples are best snap frozen on liquid nitrogen (preferred) or on dry ice if liquid nitrogen is not available. Covidien stool sample containers, that come with a scoop embedded in the cap, of 5mL stool aliquot containers may be used – both of these latter aliquot containers will not survive liquid nitrogen exposure and should thus be rapidly frozen on dry ice. Containers made of low-temperature resistant plastic should be used for rapid snap freezing on liquid nitrogen.
In cases where the donor may provide the stool sample offsite (at home) or send it in, samples should be stored on ice packs and containers rated to keep materials frozen, below 0°C. Example packs and storage containers are detailed in the Human Microbiome Project (https://hmpdacc.org/) stool collection protocols. Maintaining samples frozen best preserves obligately anaerobic species that do not sporulate. Adding of buffers and any further manipulations tends to expose stool microbes to oxygen. While species within the Bacteroidetes and many Actinobacteria can survive short or many-hour exposures, most highly fastidious microbes will not survive. Thus, consideration should be given to the types of microbes that are important experimentally in the animal studies and to tailor the collection, processing and storage of donor human materials appropriately.
Materials
Fecal Material from Human Donor
Anaerobic chamber
Sterilized and pre-reduced 1× PBS containing 0.05% Cysteine weight by volume as a reducing agent.
10mL septum cap tube
Needle (18 – 21 GG) (BD)
1 mL Syringe
Disposable sterile neonatal oral gavage needle (VWR)
Consent patients per IRB protocol for collection of stool samples, and use of appropriate stool collection container.
Receive fecal material from the donor along with all supportive documents that identify all screening completed on the donor.
Weight materials, blanking against and empty tube, and move fresh or frozen materials into an anaerobic hood to thaw.
Homogenize donor fecal material in 1 mL Pre-reduced 1× PBS with 0.05% Cysteine under anaerobic conditions using a disposable homogenizing pestle for a 1.8 Eppendorf tube. The fecal slurry may vary depending upon the application but 1 gram/mL is a commonly used mass::volume ratio.
Larger volumes may be prepared in a pre-sterilized glass Dounce homogenizer to create homogenates of up to 10mL.
Aseptically transfer donor flora homogenate in to septum cap tube and move out the anaerobic chamber.
(Optional) If placing in an isolator, spray inocula in septum cap tube, needles, and syringe in to isolator.
Using 1 mL syringe and needle pierce septum cap tube and draw in appropriate oral gavage volume in to syringe.
Gavage mice and repeat until completed.
Save remaining gavage materials for downstream analysis and any quality control that may be needed per the experimental protocol (remove from isolator if necessary). Samples may be snap frozen and stored at −80°C to support molecular or culture-based studies. To confirm biomass of highly fastidious species, microbiologic analyses are best performed on materials before freezing.
BASIC PROTOCOL 20. Dietary Perturbations
Dietary changes can also assess effects of foodstuffs on host-microbiota interactions and their contributions to diseases such as diabetes, obesity, normal development, and immune responses. Manipulations may include altering the general fat, protein and carbohydrate content of different diets, concentration of specific vitamins and micronutrients, and even introducing human foodstuffs that are prepared in a format for mice.
Mice can also be fed drugs including antibiotics to perturb the microbiota, and soluble small molecules such as sugars or other defined carbon or nitrogen sources to assess their effects on microbial communities and host outcomes.
Materials
-
Altered Diet (Research Diets)
Irradiated (10 to 20 kGy)
Can be any variety of protocol-approved alterations such as High Fat, Low Fat, Polysaccharide Free, etc.
-
Carbon Sources for Altered Drinking Water
Filter sterilized in 500–1000 mL volumes over a 0.22uM filter.
Any protocol-approved monosaccharides, disaccharides, or polysaccharides
-
Antibiotics
Filter sterilized in 500–1000 mL volumes
Any protocol-approved antibiotics such as aminoglycosides, beta-lactams, etc.
Antibiotics should be added to a 3% sucrose solution (filter sterilized) so mice do not become averse to drinking water per the bitter flavor of many antibiotics. In such studies, insure control animals receive 3% sucrose alone.
-
Supportive supplies for altered diets, pre-sterilized in isolator
Aluminum foil to cover H2O bottles with antibiotics, additional food hoppers to measure consumption, clean and used graduated water bottles, wire mesh for cage bottoms in place of bedding (also requires additional enrichment)
Weighing container
-
For Altered Diets:
Introduce irradiated diets to isolator by standard sterilization techniques and leave in isolator port to acclimate 3–24 hrs.
After acclimation period, pull diet in to isolator.
Remove breeding or standard diet from hopper.
(Optional) Weigh diet inside of weighing container, record data with help and add specialized food to hopper.
Repeat these steps if changing diet in multiple isolators or cages.
Change as often as necessary according to experimental protocol.
-
For Altered Carbon Sources: sugars, amino acids, etc.
-
Introduce irradiated diets needed to accompany carbon source change to isolator by standard sterilization techniques and leave in isolator port to acclimate 3–24 hrs.
Usually carbon source perturbations require a low polysaccharide diet.
At the same time, spray in filter sterilized Carbon source in 500 mL or 1000 mL volumes at the desired concentration.
After acclimation period, pull materials in to isolator.
Pour desired volume of altered water in to clean unused graduated water bottles.
Remove breeding or standard diet from hopper.
(Optional) Weigh diet inside of weighing container, record data with help and add specialized food to hopper.
Repeat these steps if changing diet in multiple isolators or cages.
Change as often as necessary according to experimental protocol.
-
-
For Antibiotic Use:
-
Prepare antibiotic water by determining the desired dose to give over the number of days the mice will be on the antibiotic.
The dose should take in to account the average amount of water a mouse will consume per day.
The water may need to be supplemented with a sweetener such as sucrose or sucralose as some antibiotics are extremely bitter.
Spray in filter sterilized antibiotic water in 500 mL or 1000 mL volumes at the desired concentration.
After acclimation period, pull materials in to isolator.
Pour desired volume of altered water in to clean unused graduated water bottles.
Change as often as necessary according to experimental protocol.
-
Statistical Analyses
Given the complexity of microbiome studies, groups are strongly encouraged to work with statistical and computational personnel to define appropriate numbers of mice to power underlying scientific questions, and to have a clear and well-defined plan for bioinformatic, computational and statistical analyses of microbiome and other ‘omic or biomarker-specific analyses that will be evaluated from experimental studies. Attempting to undertake studies after completion of technical analyses, such as next generation sequencing, frequently leads to disaster, per lack for the needed forethought and planning to structure and conduct studies in a way that results will be obtained to answer the specific questions and move experimental work forward.
Power analyses to identify numbers of animals to be used in each group. Consider potential effect sizes that will relate to a desired level change in a given subset of microbial taxa, such as 20% change in 10% of operational taxonomic units (OTUs) if using a method such as 16S rRNA gene phylotyping for analyses. Similar approaches can be used in evaluated changes to species- or strain-level quantitative biomass, metagenomic signatures, or qPCR-detected transcripts. Such requires thinking through effects of particular interventions on the microbiota. For instance, antibiotics will profoundly change the composition of the microbiota and will likely need fewer mice to power such studies (Cebula, 2013) where a genetic knockout, with no obvious phenotypes at baseline, may have no-to-modest change, and would require a larger number of mice to adequately power analyses evaluating if significant differences exist between knock-out and wild-type control populations.
Longitudinal time series are often helpful to overcome issues with sparse sampling or cross-sectional analyses that only look at single or limited time points in a larger cohort of mice. How to structure longitudinal time series analyses to identify optimal points of sampling has been well described in Gerber, 2012, including use of small cohort-size pilot human or animal model cohort to optimize points of sampling relative to a specific intervention or a sporadically occurring phenotype.
Bioinformatic and computational methods to evaluate datasets are best defined at the earliest stages of experimental design, to define the tools to be used and, as importantly, collaborators or specific groups with the needed knowledge to undertake these analyses. Computational analyses may often include not only molecular or taxa-based analyses, but indicators of microbiologic biomass or activities, host-specific parameters, and metagenomic or other complex sequence and ‘omic datasets.
Acknowledgments
This work was supported by the National Institutes of Health and Harvard Digestive Diseases Center grant P30 DK034854; a Capital Grant from the Massachusetts Life Sciences Center; and Brigham & Women’s Hospital Department of Pathology and Office of the President.
LITERATURE CITED
- Atarashi K, Tanoue T, Ando M, Kamada N, Nagano Y, Narushima S, Suda W, Imaoka A, Setoyama H, Nagamori T, Ishikawa E, Shima T, Hara T, Kado S, Jinnohara T, Ohno H, Kondo T, Toyooka K, Watanabe E, Yokoyama S, Tokoro S, Mori H, Noguchi Y, Morita H, Ivanov II, Sugiyama T, Nuñez G, Camp JG, Hattori M, Umesaki Y, Honda K. Th17 Cell Induction by Adhesion of Microbes to Intestinal Epithelial Cells. Cell. 2015 Oct 8;163(2):367–80. doi: 10.1016/j.cell.2015.08.058. [DOI] [PMC free article] [PubMed] [Google Scholar]
- Bang B, Lichtenberger LM. Methods of inducing inflammatory bowel disease in mice. Curr Protoc Pharmacol. 2016 Mar 18;72:5.58.1–42. doi: 10.1002/0471141755.ph0558s72. [DOI] [PubMed] [Google Scholar]
- Berin MC, Zheng Y, Domaradzki M, Li XM, Sampson HA. Role of TLR4 in allergic sensitization to food proteins in mice. Allergy. 2006 Jan;61(1):64–71. doi: 10.1111/j.1398-9995.2006.01012.x. [DOI] [PubMed] [Google Scholar]
- Bleich A, Fox JG. The Mammalian Microbiome and Its Importance in Laboratory Animal Research. ILAR J. 2015;56(2):153–8. doi: 10.1093/ilar/ilv031. [DOI] [PMC free article] [PubMed] [Google Scholar]
- Bry L, Falk PG, Midtvedt T, Gordon JI. A model of host-microbial interactions in an open mammalian ecosystem. Science. 1996 Sep 6;273(5280):1380–3. doi: 10.1126/science.273.5280.1380. [DOI] [PubMed] [Google Scholar]
- Carmody RN, Gerber GK, Luevano JM, Jr, Gatti DM, Somes L, Svenson KL, Turnbaugh PJ. Diet dominates host genotype in shaping the murine gut microbiota. Cell Host Microbe. 2015 Jan 14;17(1):72–84. doi: 10.1016/j.chom.2014.11.010. [DOI] [PMC free article] [PubMed] [Google Scholar]
- Cebula A, Seweryn M, Rempala GA, Pabla SS, McIndoe RA, Denning TL, Bry L, Kraj P, Kisielow P, Ignatowicz L. Thymus-derived regulatory T cells contribute to tolerance to commensal microbiota. Nature. 2013 May 9;497(7448):258–62. doi: 10.1038/nature12079. [DOI] [PMC free article] [PubMed] [Google Scholar]
- Fiebiger U, Bereswill S, Heimesaat MM. Dissecting the Interplay Between Intestinal Microbiota and Host Immunity in Health and Disease: Lessons Learned from Germfree and Gnotobiotic Animal Models. Eur J Microbiol Immunol (Bp) 2016 Dec 1;6(4):253–271. doi: 10.1556/1886.2016.00036. [DOI] [PMC free article] [PubMed] [Google Scholar]
- Gerber GK, Onderdonk AB, Bry L. Inferring dynamic signatures of microbes in complex host ecosystems. PLoS Comput Biol. 2012;8(8):e1002624. doi: 10.1371/journal.pcbi.1002624. [DOI] [PMC free article] [PubMed] [Google Scholar]
- Kasubuchi M, Hasegawa S, Hiramatsu T, Ichimura A, Kimura I. Dietary gut microbial metabolites, short-chain fatty acids, and host metabolic regulation. Nutrients. 2015 Apr 14;7(4):2839–49. doi: 10.3390/nu7042839. [DOI] [PMC free article] [PubMed] [Google Scholar]
- Klaasen HL, Koopman JP, Poelma FG, Beynen AC. Intestinal, segmented, filamentous bacteria. FEMS Microbiol Rev. 1992 Jun;8(3–4):165–80. doi: 10.1111/j.1574-6968.1992.tb04986.x. [DOI] [PubMed] [Google Scholar]
- Kübeck R, Bonet-Ripoll C, Hoffmann C, Walker A, Müller VM, Schüppel VL, Lagkouvardos I, Scholz B, Engel KH, Daniel H, Schmitt-Kopplin P, Haller D, Clavel T, Klingenspor M. Dietary fat and gut microbiota interactions determine diet-induced obesity in mice. Mol Metab. 2016 Oct 13;5(12):1162–1174. doi: 10.1016/j.molmet.2016.10.001. [DOI] [PMC free article] [PubMed] [Google Scholar]
- Nguyen DD, Muthupalani S, Goettel JA, Eston MA, Mobley M, Taylor NS, McCabe A, Marin R, Snapper SB, Fox JG. Colitis and colon cancer in WASP-deficient mice require Helicobacter species. Inflamm Bowel Dis. 2013 Sep;19(10):2041–50. doi: 10.1097/MIB.0b013e318295fd8f. [DOI] [PMC free article] [PubMed] [Google Scholar]
- Taylor NS, Xu S, Nambiar P, Dewhirst FE, Fox JG. Enterohepatic Helicobacter Species Are Prevalent in Mice from Commercial and Academic Institutions in Asia, Europe, and North America. J Clin Microbiol. 2007 Jul;45(7):2166–2172. doi: 10.1128/JCM.00137-07. [DOI] [PMC free article] [PubMed] [Google Scholar]
- von Klitzing E, Öz F, Ekmekciu I, Escher U, Bereswill S, Heimesaat MM. Comprehensive Survey of Intestinal Microbiota Changes in Offspring of Human Microbiota-Associated Mice. Eur J Microbiol Immunol (Bp) 2017 Mar 16;7(1):65–75. doi: 10.1556/1886.2017.00002. [DOI] [PMC free article] [PubMed] [Google Scholar]