

Abstract
CRISPR/Cas9-based genome editing can easily generate knockout mouse models by disrupting the gene sequence, but its efficiency for creating models that require either insertion of exogenous DNA (knock-in) or replacement of genomic segments is very poor. The majority of mouse models used in research are knock-in (reporters or recombinases) or gene-replacement (for example, conditional knockout alleles containing LoxP sites flanked exons). A few methods for creating such models have been reported using double-stranded DNA as donors, but their efficiency is typically 1–10% and therefore not suitable for routine use. We recently demonstrated that long single-stranded DNAs serve as very efficient donors, both for insertion and for gene replacement. We call this method Easi-CRISPR (Efficient additions with ssDNA inserts-CRISPR), a highly efficient technology (typically 30%−60%, and up to 100% in some cases). The protocol takes approximately two months to generate the founder mice.
Keywords: CRISPR/Cas9, Homology directed repair, Easi-CRISPR, Long ssDNA donors, CRISPR ribonucleoproteins, Cre-LoxP, Conditional knockout mice, Reporter and recombinase knock-in mice, ivTRT (in vitro Transcription and Reverse Transcription), Artificial microRNA
INTRODUCTION
The latest advances in genome editing technologies, specifically those using the CRISPR/Cas9 system, have helped simplify the process of generating genetically engineered animal models. Genome editing is performed, in cells or in zygotes, through two molecular events. First, the Cas9 nuclease is taken to the target site through a guide RNA and creates a double-stranded DNA break (DSB) at the target site. In the second step, the DSB is repaired by one of the two major DSB repair events, either through non-homologous end joining (NHEJ), which usually leads to a change in the nucleotide sequence or homology-directed repair (HDR), if an exogenous repair template is supplied that contains homology arms.
During the past 3–4 years, CRISPR/Cas9 technology has significantly impacted how mouse genome engineering is performed[1,2]. It is now used routinely to generate gene disruptions through short insertions or deletions (indels) via NHEJ, and also to insert short exogenous sequences provided as single-stranded oligodeoxynucleotides (ssODNs) via HDR. The ssODN repair templates used are typically 100–200 bases long, consisting of a few bases of altered sequence flanked by homology arms of 40–80 bases[3,4]. In contrast, double-stranded DNAs (dsDNAs) are used as repair templates for projects requiring insertion of longer sequences (such as reporter/recombinase knock-ins). Compared with ssODN donors, however, the insertion efficiency of dsDNA donors is poor[5], often requiring homology arms of at least 0.5–1 kb or longer[6,7]. Creating conditional knockout models requires even higher technical precision because these involve replacing a gene fragment (target exon/s) with a floxed (LoxP flanked exon) cassette gene replacement.
Development of Easi-CRISPR
We hypothesized that if longer ssDNAs could be used as donors, they, too, would be inserted at a similar efficiency as ssODNs, typically higher than that of the dsDNA donors. When we began to test our hypothesis, single-stranded DNAs (ssDNAs) of longer than 200 bases were not commercially synthesizable. To generate longer ssDNAs, we used classical molecular biology steps such as converting dsDNA to an RNA (using an in vitro transcription step) and reverting the RNA back to DNA (using a reverse transcription step) to obtain ssDNAs. We named this strategy (synthesizing ssDNAs from dsDNA templates) “in vitro transcription and reverse transcription,” or ivTRT. Using long ssDNAs as donor templates, we developed highly efficient CRISPR-HDR protocols in three stages, as described below.
In the first stage, we demonstrated that longer sequences consisting of ~404 bases of new sequence with ~55 base homology arms on each side could be inserted at Cas9 cleavage sites[8]. These experiments demonstrated that artificial microRNA sequences can be inserted at introns of genes (host genes). Inserted cassettes are transcribed as part of the host gene transcription and eventually processed into mature microRNAs to knock-down the protein expression of their target genes. We tested introns of the eEF2 gene, which enabled ubiquitous expression of microRNA sequences. Insertion of artificial microRNA sequences into an intronic site of eEF2 locus resulted in knock-down of target genes (eGFP and Otx2) as analyzed at the embryonic stages. Targeted insertion was found in up to 83% of offspring.
Extending this work further, in the second stage, we demonstrated that sequences up to ~1.5 kb can be inserted to express various types of proteins[9]. Our aim in those experiments was to further develop the method to achieve generation of germ-line, transmittable knock-in models that can express protein coding sequences such as recombinases, reporters, or transcriptional inducers. Indeed, the method worked at very high efficiency for precisely fusing expression cassettes to specific codons of genes. The method is shown to be robust (consistent performance at over six loci) and is highly efficient (25% to 67%).
As the third stage of developing high efficiency HDR protocols, we tested whether a gene segment can be excised by cleaving at two sites in the genome, and replacing the segment with a modified piece (such as a floxed-exon cassette). Even though the efficiency varied from loci to loci (8.5% to 100%), the method has worked for many loci.
The sgRNA and Cas9 mRNA were used as CRISPR reagents in the first stage of experiments[8], whereas separated crRNA + tracrRNA and Cas9 protein (ctRNP) were used in the second and third stage experiments[9].
Systematic testing of the above three ssDNA insertion approaches led to our establishing streamlined protocols for generating many types of commonly used mouse models, including knock-down, knock-in, and conditional knockout mouse models. These protocols have worked at high efficiency for over a dozen loci, and experiments have been performed in at least three different laboratories[9]. We named the method Easi-CRISPR (Efficient additions with ssDNA inserts-CRISPR), and here we provide detailed protocol for Easi-CRISPR.
Applications of the Easi-CRISPR method
Many types of genetically engineered mouse models are used in biomedical research, and most of these rely on precise insertion of donor cassettes. Examples of a few commonly used models are: (i) floxed models that contain two LoxP sites flanking a target exon to allow for conditional deletion of the gene segment[10]; (ii) Cre or CreERT2 driver lines that are used to delete a floxed gene segment in a given tissue and/or at a given time[11]; (iii) reporter strains used to monitor Cre specificity and sensitivity and/or to monitor gene expression[12]; and (iv) inducible transcriptional regulator strains (rtTA/tTA) that permit doxycycline-regulated expression of tetO-containing promoters[13]. The Easi-CRISPR approach can be used for generating all of the above types of animal models. In addition, because the Easi-CRISPR strategy works very efficiently for gene replacements (demonstrated up to about 1 kb ssDNAs thus far), the method can also be used for developing multiple point mutation knock-in animal models, and for swapping gene segments from other species in this size range. The method can also be applied to generate knock-down mice by introducing an artificial microRNA sequence at the intronic region of an endogenous gene, as described in ref. 8.
The Easi-CRISPR method was developed using microinjection delivery in mice. The approach can also be adapted for use with electroporation or hydrodynamics gene delivery[14–16]. Easi-CRISPR can also be used to generate genome-edited animals in other species wherever zygote/embryo delivery of CRISPR components via microinjection or electroporation is possible (such as fruit flies[17], zebrafish[18], rat[19], and rabbit[20], as well as livestock species such as cattle[21], sheep[22], goats[23] and pigs[24]).
Comparison of other methods of knock-in and conditional knockout model generation
Mouse genome engineering experiments are commonly performed using one of two approaches [AU: Edits correct?]: 1) using direct injection of DNA to create transgenic models where DNA is integrated at random genomic locations; and 2) classical homologous recombination-mediated gene targeting in embryonic stem (ES) cells to create knock-in and (conditional) knockout models. The ES cell-based methods were the only choices before programmable nucleases were demonstrated for gene targeting. However, the ES cell-based methods are laborious, time-consuming, expensive, and, more importantly, may not lead to generation of a germ line-established mutant line. Soon after the CRISPR/Cas system was developed for genome editing in mammalian cells[25,26], it was demonstrated that mouse knock-in and conditional knockout alleles could be generated rapidly[6]. The research community anticipated that this technology would soon replace ES cell-based gene targeting[27], because the required components can be introduced directly into mouse embryos using the same microinjection techniques commonly used for random transgenesis. However, many laboratories have been unsuccessful in employing CRISPR strategies for generating knock-in and conditional knockout alleles[28].
One of the main reasons for this lack of success is that HDR efficiency using dsDNA donors is generally poor. However, a few strategies for increasing the targeting efficiency of dsDNA donors have been reported. These include: (1) inhibition of NHEJ or enhancement of HDR through chemical treatments[29,30]. Such methods have not become popular because they only provide a marginal gain in their efficiencies, and these strategies have been shown to be toxic to cells, disrupting fundamental DNA repair processes[31]. (2) Certain strategies use circular donors with built-in synthetic guide sequences. The donors are linearized inside the cell/embryo through Cas9 cleaving (using synthetic guide recognition sites that are strategically placed flanking the insertion DNA cassettes), to enhance their insertion at the target site via microhomology-mediated end joining (MMEJ) – this targeting strategy was termed precise integration into the target chromosome (PITCh)[32]. The PITCh strategy offers a better solution, than classical dsDNA-based homologous recombination strategy, for designing targeting constructs because they do not need long homology arms. The insertion efficiency of PITCH-MMEJ could be enhanced up to 35.7% when Exo1 nuclease was included in the injection mix[33]. Comparison of different features of ssDNA-, dsDNA donor- and MMEJ-based approaches are listed in Table 1.
Table 1 |.
Comparison of knock-in strategies
| Feature | Easi-CRISPR | HR using dsDNA donor | MMEJ using dsDNA donor (PITCh) |
|---|---|---|---|
| Insert size | Up to ~1.5 kb [8,9,43] | Up to 11 kb [31,33,44–48] | Up to 4–5 kb [32] |
| Length of homology arms | 55–105 bases | Typically ~0.5kb to 2 kb (up to ~7.5 kb) [31,33,44–48] | ~40 bases |
| Difficulty of donor DNA construction | Easy | Difficult in most cases | Easy |
| Knock-in efficiency | 8.5% to 100% (typically 30–60%) [8,9,43] | 0% to 50% (typically about 10% or less) [31,33,44–48] | 12.0% (without Exo1), 35.7% (with Exo1) [32] |
In direct comparison to circular dsDNA donor-based strategies, the ssDNA donors used in Easi-CRISPR offer some advantages such as: (i) donor ssDNAs are simple to design; (ii) they do not need long homology arms (~50–100 base arms are long enough), and; (iii) efficiency is very high (typically 30–60%, reaches up to 100% for some loci). The linear dsDNAs are the standard forms of DNA cassettes used in generating transgenic animals (where the DNA is inserted at random locations). Although injection of dsDNAs would lead to many random transgene insertions, in our first-stage experiments developing Easi-CRISPR, we compared targeted insertion efficiency by linear dsDNA (PCR product) vs ssDNA (synthesized using ivTRT) with the same sequence (and the same lengths of homology arms). We found that insertion efficiency was 2.5 times higher and the viability of injected embryos was 2.4 times higher using ssDNA donor than the dsDNA donor[8].
Conditional knock-out models are the most commonly produced type of genetically engineered models. The genetic manipulation required to create such alleles using CRISPR/Cas strategies involves a much higher level of technical skill than for knock-in designs because it requires two cleavages in the genome and precise replacement of the gene segment with a floxed DNA cassette between the cleavage sites. An approach where two ssODN donors could be used to insert LoxP sites, resulting in two cleavages in the genome, was initially feasible[6], but this approach has proved to be highly challenging due to many undesired outcomes. These include insertion of only one LoxP, deletion of the target exon between the genomic cleavages, and insertion of LoxP sites in trans[34]. The method has failed for many loci[28]. Easi-CRISPR is less likely to result in these unwanted outcomes, especially compared to the two-ssODN oligo-based method. Additionally, using circular dsDNAs (as standard knock-in donors) and inserting them through nicking (using Cas9 nickase) has been reported for generating conditional alleles[35], but this approach is also not used routinely due to low efficiency.
Limitations of Easi-CRISPR
The Easi-CRISPR strategy allows for generation of various kinds of mouse models at an efficiency much higher than that of any previously described methods. Some of the limitations of Easi-CRISPR method are discussed below:
The length of the ssDNA donor:
one of the current technical limitations of Easi-CRISPR is the synthesis of longer ssDNA molecules. We have successfully made ssDNAs up to ~2kb, which is sufficient for most of the commonly needed mouse models. Because of the enzymatic amplification steps involved in ivTRT method, some sequences may be challenging to synthesize.
Possible sequence mis-incorporations arising during ssDNA preparation steps:
because of enzymatic amplification steps, nucleotide mis-incorporations can occur during ssDNA synthesis. Some of the ssDNA preparations made at the first stage of developing this method had such mutations. We presume that a portion of these mutations may have resulted from the unintended use of standard grade enzymes rather than high-fidelity enzymes. Some knock-in mouse models generated may contain such incorporations, and therefore, the full cassettes should be sequenced in both the founders and the F1 offspring (to exclude the possibility of undetected mutations transmitted due to mosaicism) [AU: Edits correct?]. Although most reverse transcriptase enzymes do not have proofreading capabilities, the development of enzymes with proofreading function will be helpful to prevent mis-incorporations[36]. The CRISPR generated animal models, in general, can be mosaic and therefore there is a certain level of uncertainty the mutant allele is not guaranteed to be transmitted to the F1 offspring [AU: Edits correct?]. As a general practice, we suggest breeding two or more founders, if more than one founder is available. Once germ line transmission of the correctly inserted allele is confirmed from any of the founders for that locus, it can be decided, at that point, if it is necessary to continue breeding rest of the founders.
Possible random insertion of ssDNA donors:
even though ssDNAs are less likely to be randomly inserted into the genome compared to dsDNA, such a possibility cannot be excluded completely. Occasionally, some negative founders (as judged by the two junction PCR results) showed positive amplicons using internal primers suggestive of random insertion events.
Experimental Design
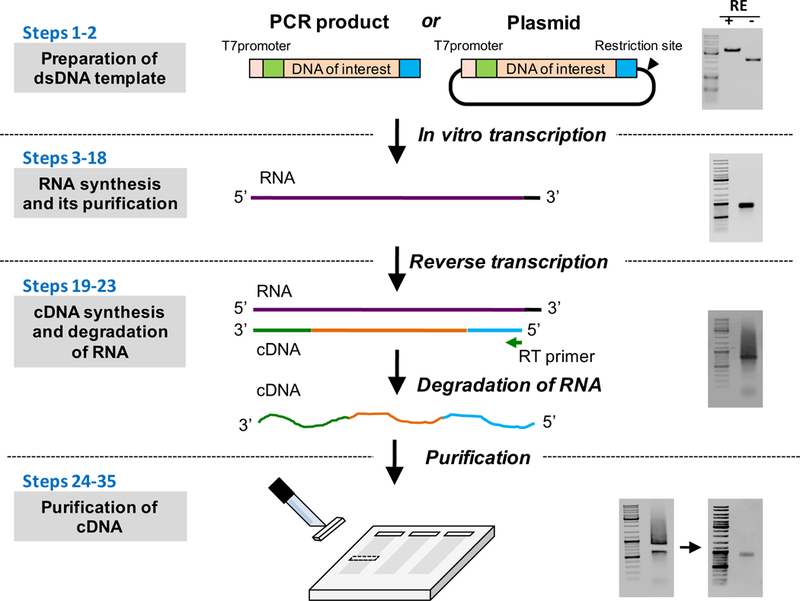
The Easi-CRISPR method involves four major stages, as described in more detail below: (1) designing an Easi-CRISPR strategy; (2) synthesis and purification of ssDNA and other CRISPR components for microinjection; (3) preparation of Easi-CRISPR components and their microinjection into mouse zygotes; and (4) genotyping of offspring. A diagram of the workflow is presented in Figure 1.
Figure 1: Schematic of Easi-CRISPR.
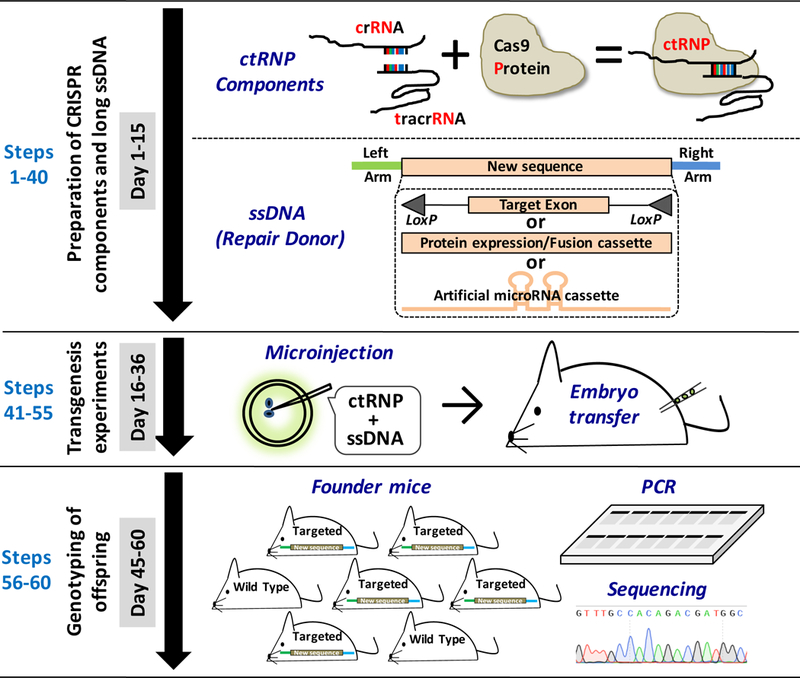
The procedure involves three broad stages: (i) assembling of CRISPR Ribonucleoprotein components (crRNA + tracrRNA + Cas9 Protein: ctRNP) and generating a long ssDNA donor (Steps 1–40); (ii) preparation of Easi-CRISPR components, their microinjection into mouse zygotes and generation of founder offspring (Steps 41–53), and; (iii) genotyping of offspring (Steps 54–59). All experimental procedures using animals should be carried out according to relevant institutional regulations for animal usage.
1. Designing an Easi-CRISPR strategy.
Designing an Easi-CRISPR strategy involves two main parts: searching for CRISPR target sites and designing guide RNA sequences, and designing ssDNA donor cassettes for HDR.
Searching for CRISPR target sites and designing guide RNAs.
[AU: Edits OK?] CRISPR target search is an essential step in CRISPR genome engineering, and has been described in numerous publications including mouse genome engineering protocols[37]. Briefly, the genomic sequence around the region of interest is retrieved from a genome browser such as http://asia.ensembl.org/index.html and the CRISPR target sites are found using CHOPCHOP (http://chopchop.cbu.uib.no/index.php) and/or CRISPR Design (http://crispr.mit.edu/) sites. Select the target site as close as possible to the desired insertion site.
The Easi-CRISPR method was developed to be suitable for most commonly used mouse model designs, including insertion of protein coding sequences to fuse with genes (also known as knock-in models), conditional knockout mouse models (also known as floxed models), and knocking-down genes through insertion of artificial microRNA sequences into intronic sites. In all three designs, long ssDNAs are used as donors, regardless of the differing location of guide sequences on genes and the types of insertion cassettes.
For knock-in models (Fig. 2), determine the target site to insert a desired DNA cassette to fuse with either 5’ end or 3’ end of the gene (start or stop codons respectively). Identify guides that recognize sequences very close to the start or stop codons for precise fusion. For floxed/conditional knockout models (Fig. 3), determine the target exon, the deletion of which will lead to predicted to loss of protein expression upon Cre-mediated recombination. Insert LoxP sites in the flanking introns to the target exon. Because it is difficult to accurately predict the regulatory sequences necessary for splicing (e.g. splicing donor/acceptor sites, branch site, and polypyrimidine tract), we suggest placing LoxP sites at least about 100 bases away from the intron/exon boundaries. Care should be taken not to insert LoxPs at the evolutionary conserved regions to avoid disruption of functional sequences such as enhancers. To knock-down genes through insertion of artificial microRNA sequences into intronic sites of ubiquitously expressed genes and/or introns of genes with desired tissue-specific expression patterns (Fig. 4), it is necessary to determine the intron to target for insertion [AU: Edit correct?], avoid choosing evolutionary conserved regions that potentially contain sequences of some important (albeit unknown) function (choosing such regions may inadvertently cause disruption of the evolutionarily functional sequences), and, similar to floxed model design, choose regions sufficiently far away from exon boundaries to avoid disrupting splicing signals. Potential splicing events in a given sequence can be predicted using the GENESCAN tool (exon prediction algorithm; http://genes.mit.edu/GENSCAN.html). Both wild type (untargeted) and theoretical sequence of the modified locus (after cassette insertion) should be analyzed using this tool.
Figure 2: Design principles of knocking-in using Easi-CRISPR and the architecture of ssDNA donor.
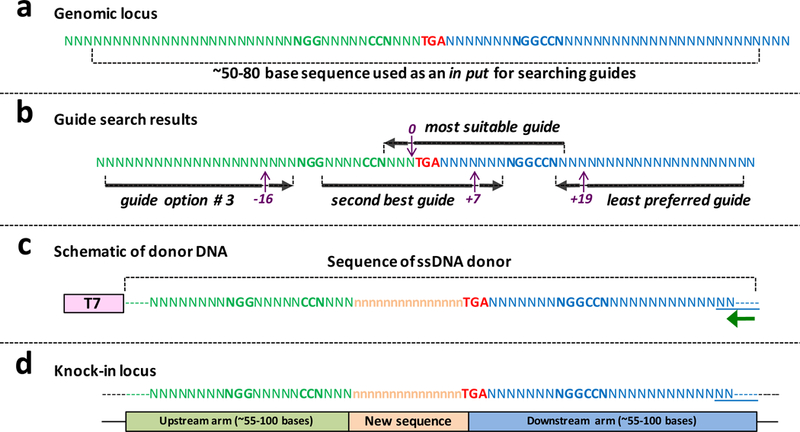
(a) Genomic locus of a hypothetical gene’s last exon showing the stop codon in red (TGA). The green sequence upstream of- and the blue sequence downstream of- the stop codon will be included as parts of upstream and downstream arms of the ssDNA donor, respectively. (b) Hypothetical guide search results showing four guide options along with their protospacer adjacent motif (PAM) sequences (5’-NGG-3’). The guide that cleaves immediately upstream of the stop codon will be the most preferred guide for use in the Easi-CRISPR procedure. If such a guide is not available for a given locus, a next closest one should be chosen. In the example shown here, a guide that cuts 7 bases downstream should be the second option. The guide option # 3 and “the least preferred guide” cleave at −16 bases and +19 bases from the target site. Farther the guide from the target site, poorer will be the correct insertion frequency because imprecise insertion rates become higher. If either of the last two guides are chosen, the donor cassette should preferably contain mutation/s in the guide recognition sites (or PAM) to prevent Cas9 re-cleaving after the cassette is inserted. (c) Schematic of a donor DNA showing T7 promoter and the ssDNA region. The T7 promoter sequence is included in the dsDNA template (used for ivTRT) but it will not get included in the final ssDNA. Green arrow shows the primer for reverse transcription. (d) Knock-in locus showing correct fusion of new sequence.
Figure 3: Design principles of floxing using Easi-CRISPR and the architecture of ssDNA donor.
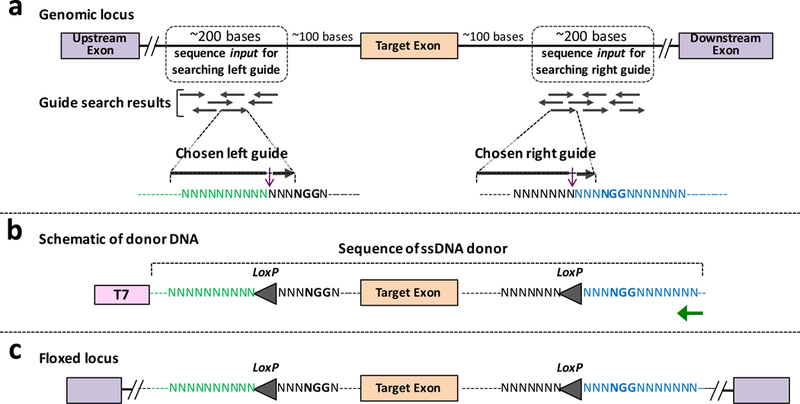
(a) Genomic locus of a hypothetical gene’s target exon and its surrounding regions, used for guide search. Hypothetical guide search results showing multiple guide options for left and right guides. Two guides (one each for upstream and downstream ends) with high guide scores, and least (or no) off target cleavage sites, are chosen. The typical distance between the two guide target sites are ~0.5 kb to 0.8 kb, and they should be placed sufficiently away from the target exon (at least about 100 bases), to prevent disruption of splice donor/acceptor regulatory elements in the floxed allele. (b) Schematic of donor DNA showing T7 promoter (as part of dsDNA template) and the actual part of ssDNA donor. The LoxP insertion sites are placed precisely at the Cas9 cleavage sites. Green arrow shows the primer for reverse transcription. (c) Floxed locus showing correct insertion of the new sequence.
Figure 4: Design principles of inserting knock-down cassette using Easi-CRISPR and the architecture of ssDNA donor.
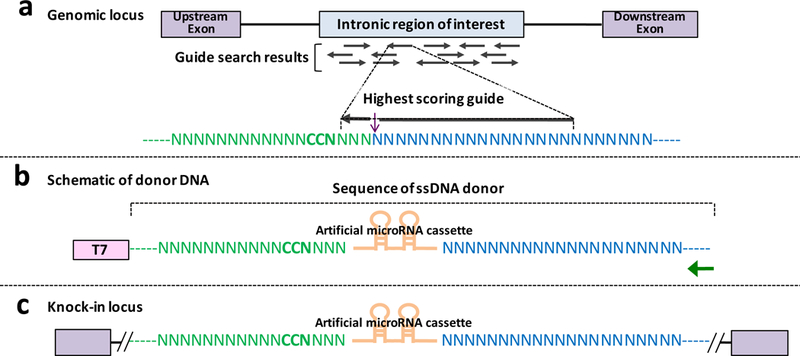
(a) Genomic locus of a hypothetical gene’s target intron and its surrounding regions chosen for guide search. The guide search results showing multiple guide options. A guide with high score, and least (or no) off target cleavage sites, is chosen for the design. (b) Schematic of a donor DNA showing T7 promoter and the ssDNA region. The T7 promoter sequence is included in the dsDNA template (used for ivTRT) but it will get excluded in the final ssDNA. Green arrow shows the primer for reverse transcription. (d) Knock-in locus showing correct insertion of the new sequence.
The guide RNA for knock-in designs should be very close to the desired insertion site. The guide that cleaves at the exact insertion site would be the preferred guide. In the absence of a guide that cleaves exactly at the insertion site, the next closet one (preferably within a couple bases distance from the insertion site), should be chosen (see Fig. 2 for examples of hypothetical guides and their locations with respect to the desired site of insertion and see Supplementary Table 1 for information about the polarity of guides and ssDNA donors with respect to the genomic locus of previously published genes [AU: Edits correct?]). Irrespective of the guide cleaving location, the inside termini of homology arms of the ssDNA donor (that meet the new sequence) will remain the same (as though the cassette were still be inserted at the desired location), while the lengths of homology arms are maintained at least 55 bases long by extending their outside termini. Hypothetical scenarios of guide options for knock-in designs are shown in Figure 2. Examples of guide sequences and their cleavage sites, with respect to the desired insertion of the new cassette sequence, that were used in our previously published reports, are shown in Supplementary Table 1. In case of floxing and knock-down designs, the guide locations can be somewhat flexible because the insertion sites are in the intronic regions in these designs. Because LoxP sites/microRNA cassettes can be placed anywhere within a region that was originally narrowed for searching guides, any guide with a good score and with the lowest or no potential off target cleavage can be chosen for the design. The floxing designs include the use of two guides (one in each of the introns flanking the target exon). Examples of guide options for floxing designs are shown in Figure 3. Based on our experience, from engineering of several loci[9,38], we think that orientation of the two guides, in floxing designs, does not matter for the overall success in inserting a floxed cassette: the two guides can face each other or face opposite to each other or they both can run in the same direction (Supplementary Table 1).
Designing ssDNA repair cassettes.
The typical architecture of cassettes constitutes two homology arms (left and right) and a middle region (new sequence to be inserted). Homology arms are about 55 to 100 bases long. A T7 RNA polymerase promoter site is included, just upstream of one of the homology arms (referred as upstream arm), and is needed for in vitro transcription. A unique restriction site is included after the distal arm (one that does not need a T7 promoter), for use to linearize the plasmid (Fig. 5). The central region can be up to about 2 kb or more. The design principles and architecture of ssDNA donors and dsDNA templates for knock-in, floxing, and knock-down are shown in Figures 2, 3 and 4 respectively. Note that the design principles for inserting artificial microRNA cassettes share some features between floxing and knock-in designs: one cleavage insertion as in the case of knock-in, and; insertion of cassettes at an intronic region as in the case of floxing. The repair cassette should be carefully designed to not include the guide recognition sequence, and thus avoid re-cleaving by the Cas9/guide RNA after the correct insertion. This can be achieved simply by inserting the new sequence at the exact cleavage site in the ssDNA design that will split the guide recognition site when the donor cassette is inserted in the genome. While this can be an option in floxing and knock-down designs (as the insertion sites are flexible because they are in the intronic sites), this may not be an option in case of knock-in designs (unless the chosen guide cleaves precisely at the insertion site). Even if the guide cleaves a little away from the cleavage site, the donor design should avoid re-cleavage of the modified allele. If necessary, silent mutations in the donor design can also be included to avoid re-cleavage. If suitable guides are not available for a locus, for targeting via Cas9, targeting via other CRISPR enzymes such as Cpf1 can also be considered[16].
Figure 5: Schematic of ivTRT and ssDNA preparation steps.
A dsDNA template can be a PCR product, or a plasmid with a suitable restriction enzyme (RE) site distal to the insertion cassette (Steps 1–2). The gel on the right shows a plasmid digested with a RE. RNA is synthesized using in vitro transcription (Steps 3–18). The gel on the right shows an RNA of ~ 900 bases long. cDNA is synthesized by reverse transcription using a reverse primer (Steps 19–23). The gel on the right shows a sample ssDNA (cDNA). Note that the cDNA preparation typically runs like a smear with a prominent band within the smear. Purification of ssDNA (Steps 24–35). The image on the left shows the gel after excision of the prominent band (for purification) and the gel on the right shows the purified ssDNA. The GeneRuler DNA Ladder Mix (ThermoFisher Scientific, cat. no. SM0331) was used in all the gels as a DNA size marker.
The T7 promoter sequence is inserted immediately upstream to the left or right homology arms. The arm to which the T7 promoter is added is referred as upstream arm. Note that the final ssDNA donor strand synthesized will be the strand opposite to the one that contains the T7 promoter: if the T7 promoter is tethered to the sense strand the final ssDNA donor synthesized will be anti-sense strand and vice versa. In our experiments thus far, even though we have added T7 promoter to only the sense strands we think that the T7 promoter can also be added to the antisense strand, which finally results in a sense ssDNA donor.
The upstream homology arm corresponds to the upstream sequence from the point in the genome where the new sequence must be inserted (this is generally the sequence to the left of the cleavage point). We have not done a systematic study to identify optimal lengths for best performance; our initial studies contained arms from 55–105 bases long. It is preferable to choose a ‘G’ (ideally ‘GG’), at the 5’ end of the homology arm, to which the T7 promoter will be added upstream. It is known that presence of one or two Gs immediately 3’ to the T7 promoter increases T7 RNA polymerase transcription efficiency. Note that if a suitable sequence that matches this criterion is not available in the left homology arm, the T7 promoter can be added to the right homology arm, in which case the right homology arm will be referred to as the upstream homology arm (with respect to donor DNA direction).
The downstream homology arm corresponds to the downstream sequence from the point in the genome where the new sequence must be inserted (generally the sequence on the right of the cleavage point). This arm is also typically about 55 to 105 bases long. We have kept the lengths of both the (upstream and downstream) arms somewhat similar lengths. A primer that binds at the 3’ end of downstream homology arm is used for reverse transcription. Therefore, the terminal region should possess an optimal sequence for primer binding to be suitable for RT reaction (for example optimal GC content and the sequence devoid of unusual repetitive nucleotides). A unique restriction site (that produces 5’ overhang or blunt end) should be added downstream of the right arm to linearize the plasmid before using it in in vitro transcription reaction (Fig. 5).
The middle region constitutes the new sequence to be inserted. The 3’ end of the upstream arm will continue to the 5’ end of the middle region (new sequence) and the 3’ end of the middle region will continue to the 5’ end of the downstream arm. For floxing designs (and for knock-down designs), once the theoretical sequences of the ssDNA cassette are designed, the cassettes can be built by custom synthesis from commercial vendors (such as Bio Basic, Integrated DNA Technologies, GENEWIZ, GeneArt, GenScript, or Life Technologies). For knock-in designs consisting of expression cassettes such as recombinases or reporters, any known plasmids can be used as templates to amplify the cassette using primers that contain the homology arms (and the T7 promoter sequence).
2. Synthesis and purification of ssDNA and other CRISPR components for microinjection.
The components of Easi-CRISPR system are ssDNA donor and CRISPR reagents (crRNA + tracrRNA + Cas9 protein). Described below are the experimental methods to prepare these reagents.
Synthesis of ssDNA using ivTRT method.
This method uses a dsDNA template to transcribe into RNA (Steps 1–18). The RNA is then reverse-transcribed back to DNA (to generate ssDNA molecules), followed by RNaseH degradation of RNA and purification of the ssDNA (Steps 19–35). The dsDNA templates can be either PCR products or plasmids that contain a T7 promoter and the insertion cassette (homology arms with the new sequence of interest in the middle). A schematic of ivTRT and ssDNA preparation steps is shown in Figure 5. Another method of generating ssDNAs was reported recently that uses DNA nicking endonucleases to make nicks on a plasmid dsDNA, followed by separation and purification of the desired ssDNA fragment from a denaturing agarose gel[39]. Very recently Integrated DNA Technologies launched a custom ssDNA synthesis service offering DNA cassettes up to 2 kilobases long (Megamers™). Megamers can be commercially procured, as an alternative to generating them via ivTRT.
Preparation of Easi-CRISPR microinjection mix.
The ssDNA synthesized by ivTRT (or purchased as Megamer™) is then used for microinjection along with the other CRISPR components. Our first set of Easi-CRISPR method development experiments used in-house generated Cas9 mRNA and single-guide RNA (sgRNA), via in vitro transcription, as CRISPR components, but in our recent experiments we observed that commercial synthetic RNAs (as separate crRNA and tracrRNA molecules) and the Cas9 protein have better rates of correct insertion. One reason for the high efficiency of Cas9 protein containing complex could be that the pre-assembled RNP would be immediately available for cleavage upon injection, whereas there would be some delay in formation of Cas9 protein from the mRNA. Note that sgRNAs are also commercially available and they can be complexed with Cas9 protein in vitro. We proposed the term ctRNP (crRNA + tracrRNA + Cas9 Protein) and sgRNP (sgRNA + Cas9 Protein) ribonucleoprotein complexes for these combination of CRISPR reagents[9]. One major advantage of RNP compositions (in single, or two-part guide formats), is that all reagents can be commercially synthesized at much lower cost than by preparing sgRNAs and Cas9 mRNA through in vitro transcription methods (that were described in Harms et al. 2014[37] and they were quite prevalent before commercial synthesis was possible). To prepare Easi-CRISPR components for microinjection, ctRNP and ssDNA are mixed together; the process is described in detail in Steps 36–40.
3. Microinjection of Easi-CRISPR components into mouse zygotes.
The microinjection step involves a series of transgenic technologies that are typically performed at specialized core facility labs. These steps, have been published previously[37,40], and have now become standard methods. The Easi-CRISPR microinjection protocol also follows these standard steps (Steps 41–53). We used both pronuclear and cytoplasmic injection in the initial stage of development of this method, particularly when Cas9 mRNA was used in our first report[8]. We switched to performing only pronuclear injection after we switched to using ctRNP components. Based on the efficiencies we have observed, using the pronuclear-only injection of ctRNP components, we suggest that only pronuclear injection would be sufficient for creating, knock-in, conditional knockout and knock-down mouse models using the Easi-CRISPR method.
4. Genotyping of offspring.
A general schematic of genotyping strategies is shown in Figure 6. At least two PCRs, one each for 5’ and 3’ junctions, are essential for genotyping Easi-CRISPR-derived offspring (Steps 54–59). A third PCR, specific to internal sequences (in case of longer knock-in cassettes), to identify cis-inserted LoxP sites (in case of floxing) would be necessary.
Figure 6. Genotyping schematics.
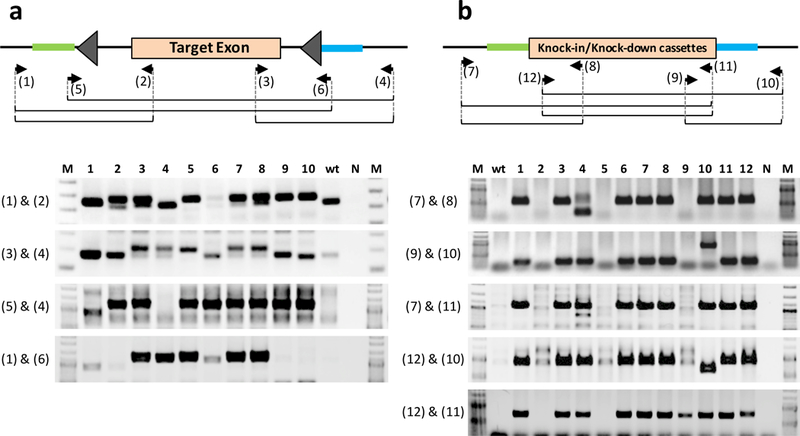
(a) Genotyping floxed alleles. Primer sets 1–2 and 3–4 amplify single LoxP insertion at the two separate sites but cannot suggest if they are inserted in cis or in trans. Correct insertion genotype (in cis) can be determined by PCR using the primer sets 5–4 and 1–6, and confirmed by sequencing the PCR products. Note that the 3’ ends of primers 5 & 6 bind to the first 15 bases of LoxP sites (primer 5; 5’-NNNNNNNNNNNNNNNNNNNNataacttcgtatagc-3’: primer 6; 5’-NNNNNNNNNNNNNNNNNNNNataacttcgtataat-3’). (b) Genotyping knock-in (and knock-down) alleles. Three PCRs are performed; one each for 5’ and 3’ junctional regions (primer sets 7–8 and 9–10), and the third PCR for insert-specific regions (primer set 12–11). PCR with outer primer sets (7–11 and 12–10) amplify longer PCR fragments, including the full knock-in cassette. If amplification of longer sequences is not successful (for example if primers 7–11 and 12–10 that amplify nearly the full length of the cassette do not work well), alternate primers within the insertion cassette should be tried. Similarly, alternate primers of 9 and 8 (within the cassette) can also be tried to obtain smaller amplicons (if larger products cannot be amplified efficiently for the junctional PCRs). The amplified fragments in both (a) and (b) should be sequenced to ensure sequence fidelity. The examples of PCRs of primer pairs 1–2 and 3–4 (for Pitx1 floxing), and 7–8 & 9–10 (MMP9-T2AmCitrine knock-in) were previously reported in Quadros et al., 2017[9]. All experimental procedures using mice was carried out according to Tokai University institutional regulations for animal usage (permit number: #165009).
Genotyping of floxed alleles.
Primers that can amplify each of the two separate LoxP sites are necessary for detecting LoxP insertions [AU: Edits correct?]. When genotyping floxed alleles, we always use primer sets that amplify a single LoxP insertion (for both LoxPs: Fig. 6a). Because the LoxP-inserted allele can be seen as a slightly larger band compared to the wild type, PCR products from wild type control should be included in agarose gel electrophoresis. When both LoxPs are positive, these pups can be candidates for floxed mice. However, it is often difficult to judge whether these two LoxPs are inserted in cis. Complete insertion of a floxed cassette (in cis) can be determined by PCR using primer sets (one outer primer and one other primer that bind to a distantly located LoxP site: Fig. 6a), and subsequent sequencing of the amplified fragments to determine whether the fragment contains an internal LoxP site. Optimization of PCR conditions may be necessary, when LoxP sequence-containing primers are used for PCR, because LoxP sites contain palindromic sequences and thus they may not yield optimal PCR reactions for certain loci. We used the following PCR conditions when using LoxP-containing primers: in a 10 μL of 1X PrimeSTAR Buffer(Mg2+ plus) containing genomic DNA (1 μL), dNTP (0.2 mM each), primers, and 0.25 U of PrimeSTAR HS DNA Polymerase using denaturation (94°C for 3 min), 35 cycles of 98°C for 10 sec, 62°C for 5 sec, 72°C for 2 min, and extension (72°C for 10 min).
Even when the correctly inserted floxed cassette is identified, it is desirable to check for the presence of a floxed allele and its nucleotide sequence in the next generation. The recombination capability of the floxed allele is confirmed by breeding the mouse line with a Cre driver line. A quick analysis for recombination of the floxed allele can also be performed using an in vitro Cre reaction, where the target region is PCR-amplified and incubated with a Cre protein, and the recombination products are analyzed on agarose gel[6].
Genotyping of knock-in and knock-down alleles.
We recommend PCR is performed for both the 5’ and 3’ junctional regions and for insert-specific regions (using internal primer sets) (Fig. 6b). Even though all three sets of PCR reactions can show expected amplicons, all junctions and the insertion cassette must be fully sequenced to ensure sequence fidelity, to rule out any indels near the junctions, and to check for nucleotide mis-incorporations in the insert regions that may arise from the enzymatic synthesis steps in preparing the ssDNA donor. PCR with an outer primer set (that bind outside the homology arms) amplifies longer PCR fragments, including the entire knock-in cassette, as well as the shorter wild-type sequence (or not inserted but with indel derived from NHEJ). In this PCR, amplification of only the wild-type (or indel) band does not always guarantee that it can serve as a negative sample, because a smaller amplicon (wild-type) gets preferentially amplified rather than the longer band (the correctly targeted allele). The insertion allele (larger band) may be amplified efficiently if the insertion event is biallelic (with no wild type or indel alleles)[9]. Regardless of the PCR amplification results, sequencing of the entire knock-in cassette is mandatory to confirm the correctness of the targeted allele. Sequencing should also be performed in F1 animals to rule out any hidden mosaic alleles that may contain mutations from the founders and be transmitted to the offspring.
MATERIALS
REAGENTS
CRISPR REAGENTS
crRNA (minimum-modified) and tracrRNA (cat. no. 1072534) from Integrated DNA Technologies (IDT). The crRNA part is custom synthesized for each specific guide RNA, whereas tracrRNA is universal
Nuclease-Free Duplex Buffer (cat. no. 11–05-01–12) from IDT
Alt-R® S.p. Cas9 Nuclease 3NLS (cat. no. 1074181) from IDT
REAGENTS FOR ssDNA SYNTHESIS
▲ CRITICAL listed below are the standard kits and reagents that have been tried in our laboratories. Comparable kits and reagents from other vendors may also be used in place of these.
Standard desalt Ultramers (long primers) from IDT to use as primers for PCR of insert or custom gene-synthesized plasmid (from any commercial vendor)
KOD plus neo (TOYOBO, cat. no. KOD-401) or any suitable high-fidelity PCR mixes
dNTP mix (New England Biolabs, cat. no. N0447L)
SeaKem ME Agarose (Lonza, cat. no. 50011) and SeaPlaque GTG Agarose (Lonza, cat. no. 50110)
Wizard SV Gel PCR Clean up System kit (Promega, cat. no. A9282) or NucleoSpin Gel and PCR Clean-up (MACHEREY-NAGEL, cat. no. 740609)
MEGAclear Kit (Ambion- Life Technologies. cat. no. AM1908)
T7 RiboMax Express Large Scale RNA Production System (Promega, cat. no. P1320)
Ethanol 200 Proof ACS Grade (Deacon Laboratories) or Ethanol (99.5) (Wako, cat. no. 057–00456)
M-MuLV Reverse Transcriptase (New England Biolabs, cat. no. M0253S) or SuperScript Ⅲ Reverse Transcriptase (Life Technologies, cat. no. 18080051) or SuperScript Ⅳ Reverse Transcriptase (Life Technologies, cat. no. 18090010)
RNaseH (New England Biolabs, cat. no. M0253S)
S1 nuclease (TaKaRa, cat. no. 2410A)3mol/l-Sodium Acetate Buffer Solution (pH5.2) (Nakalai Tesque, cat. no. 06893–24)
-
Phenol, Saturated with TE buffer (Nakalai Tesque, cat. no. 26829–54)
! CAUTION Phenol is toxic and cause burns. Should be opened in fume hood wearing proper protective equipment.
Modified TE: 10mM Tris-HCl, 0.1mM EDTA, pH8.0 (e.g., Affymetrix, cat. no. 75793)
-
Ethidium bromide (Sigma, cat. no. E1510–10ml)
! CAUTION Ethidium Bromide is carcinogenic and mutagenic. Wear personal protective equipment.
Embryo Max Microinjection Buffer (EMD Millipore, cat. no. MR-095–10F), or a microinjection buffer containing 10 mM Tris-Cl pH 7.5, 0.1mM EDTA
MILLEX-GX 0.22μm Filter Unit (EMD Millipore, cat. no. SLGV004SL)
REAGENTS FOR MOUSE TRANSGENESIS EXPERIMENTS
Pregnant mare serum gonadotropin (PMSG) and Human chorionic gonadotropin (HCG) (National Hormone and Peptide Program (Harbor–UCLA Medical Center, Torrance, CA).
EmbryoMax M2 media for embryo handling (Millipore, cat. no. MR-015-D)
Hyaluronidase (Millipore, cat. no. MR-051-F)
-
KSOM + AA for embryo incubation (Millipore, cat. no. MR-106-D)
▲ CRITICAL Media should be stored at −20oC, after using it store at 4 oC and use it before expiration date.
Light mineral oil (Millipore, cat. no. ES-005-C)
MICE
! CAUTION Experimental procedures involving animals should be carried out according to relevant institutional and governmental regulations.
Donor females: Three week old C57BL6 females from Charles River Laboratories (Wilmington, MA) or Jackson Laboratories (Bar Harbor, Maine)
Stud males: C57BL6 males from Charles River Laboratories (Wilmington, MA) or Jackson Laboratories (Bar Harbor, Maine)
Pseudopregnant recipients: Crl: CD-1(ICR) female mice at 5–6 weeks of age from Charles River Laboratories (Wilmington, MA)
Vasectomized males: 5–6 week old CD-1 mice from Charles River Laboratories (Wilmington, MA). Perform vasectomies as described previously[41].
REAGENTS FOR MOUSE GENOTYPING
Cell Lysis Solution (Qiagen, cat. no. 158908)
Protein Precipitate Solution (Qiagen, cat. no. 158912)
DNA Hydration Solution (Qiagen, cat. no. 158914)
TaKaRa Taq (TaKaRa, cat. no. R001) or PrimeSTAR HS DNA Polymerase (TaKaRa, cat. no. R010)
2xGC buffer (TaKaRa, cat. no. 9154)
Allele-In-One Mouse Tail Direct Lysis Buffer (KURABO, cat. no. ABP-PP-MT01500)
Agarose (Phenix Research Products, cat. no. RBA 500)
50X TAE Buffer (ThermoFisher Scientific, cat. no. BP1332–20)
Nuclease free water (many common vendors)
TA Cloning® Kit, with pCR™2.1 Vector (Life Technologies, cat. no. K202020)
LB agar Ampicillin-100, Plates (Sigma, cat.no. L5667–10EA)
Mix & Go Competent cells – Strain Zymo 5α (Zymo Research, cat.no. T3007), used for DNA cloning
QIAprep Spin Miniprep Kit (Qiagen, cat. no. 27106)
Proteinase K solution (10ml; 5Prime, cat. no. 2500150)
GeneRuler DNA Ladder Mix (ThermoFisher Scientific, cat. no. SM0331)
Gel Loading Dye Purple (6X), no SDS (New England Biolabs, cat. no. B7025S)
Kimwipes for general cleaning (Kimtech Science, cat. no. KCK-280–4.4 × 8.4)
EQUIPMENT
PCR tubes (ThermoFisher Scientific, cat. no. AB-1114) or 8-strip of 0.2ml Thin Wall PCR Tube and Caps (ThermoFisher Scientific, cat. no. 435440-Q)
1.5ml tube (BM Bio, cat. no. NT-175)
Parafilm M (Sigma, cat. no. P7793–1EA)
RNase free Pipet Tips (ART-Aerosol Resistant Tips)
Falcon IVF dish (cat. no. 353653)
Falcon tissue culture dish 35 × 10 mm (cat. no. 353001)
Falcon tissue culture dish 60 × 15mm (cat. no. 353002)
Micro Fill 28 gauge/97mm long. (World Precision Instrument Inc. Item #MF28G); used for administration of hormones
Flexipet oocyte/embryo pipettes (Cook Medical cat. no. K-FPIP-1130–10BS-5)
Holding pipettes. (Humagen cat. no. MPH-SM-20)
Tuberculin syringes (NORM-JECT cat. no. 4010–200V0); used for administration of hormones
Thermocycler (BioRad T100 or equivalent)
UV spectrophotometer (NanoDrop-1000, Thermo Scientific) Gel documentation System (Gel Doc XR+, BioRad)
LED light (BioSpeed ethidium bromide-VIEWER)
Tabletop micro-centrifuge (Model Eppendorf 5417C or equivalent)
Tabletop micro-centrifuge-refrigerated (Model Eppendorf 5417R or equivalent)
Micropipettes (Eppendorf Research Plus)
Gel Electrophoresis and EPS (Electrophoresis Power Supplies or equivalent)
Shaking heat block (Eppendorf, Thermomixer Comfort)
Heat block (TAITEC, Dry ThermoUnit)
Water baths (Fisher Scientific)
Vortex Genie 2 (Scientific Industries, Inc)
Microwave and weighing balances
Glass pipette puller (Sutter Instrument Co. model #P97), outfitted with a 2.5mm X 2.5mm Box filament (cat. no. FB255B)
Glass Capillaries World Precision Instrument Item # TW100F-4 w/ Filament 1.0mm 4in. Sarasota FL. USA
Microinjection needles: Injection capillaries are made fresh the morning of injection using the Sutter Model –P97 pipette puller outfitted with 2.5mm × 2.5mm Box filament (FB255B).
Nikon Eclipse TE 2000-E w/ DIC (or Leica DM IRB) equipped with Narishige IM 300 microinjector and NT-88-V3 micromanipulators (or Leica manipulators)
Leica MZ 9.5. Condenser lens: PLAN 0.5x, model #10 446 157Base: Model #10 445 367Tilt headHeating glass (Live Cell Instrument, cat. no. HG-T-Z002) with temperature controller (Live Cell Instrument, cat. no. CU-301)
Heraeus Hera cell 150 Tri-gas incubator equipped with Coda inline filters
Nunc Lab-Tek Chamber Slide System (Lab-Tek, cat. no. 177372)
Standard surgical equipment such as scissors, fine forceps, suturing material, anesthesia chambers, etc.
Large slide warmer (Spectrum Scientifics, cat. no. 3875)
Mouth pipetting apparatus
Microinjection scope: Leica DM IRB specifications: Eyepiece: HC PLAN 10x/22 w/tilt, model #11 507 804. Condenser lens: .30 S70. Objectives: C PLAN 4X/.10, model #11 506 074, N PLAN L20X/0.40 CORR, model #11 506 057, N PLAN L40X/0.55 CORR, model #11 506 059
REAGENT SETUP
Oligonucleotides and Ultramers
Re-suspend oligonucleotides or ultramers to a final concentration 100μM in nuclease free water and store at −80°C for up to several years for future use.
1X TAE Electrophoresis Buffer
Dilute 50X TAE buffer in distilled water to a 1X working solution. 1X solution can be stored at room temperature (25 °C) for up to 3 months.
Ethanol
For 100ml of ethanol (70% (vol/vol)) solution, combine 70 ml 99.5% (vol/vol) ethanol with 30 ml of Nuclease free water and store it in a tightly sealed tube at room temperature.
Cas9 protein
Dilute Cas9 protein in microinjection buffer to a working stock (e.g. 3.1μM [500ng/μl]) as described in Step 37. This can be stored at −20 °C [AU: Is this correct or −80?] for up to 18 months.
crRNA and tracrRNA
Re-suspend crRNA and tracrRNA to a final concentration 100μM (approx. 1.2μg/μl for crRNA and 2.2μg/μl for tracrRNA) in microinjection buffer or Nuclease-Free Duplex Buffer and store aliquots at −80°C for future use. Dilute each RNA to a concentration of 6.1μM with microinjection buffer prior to annealing (Step 36).
The ctRNP complex preparation
CRISPR system comprises three components: crRNA, tracrRNA, and Cas9 protein. The crRNA is unique to each project, whereas the other two components are universal. The crRNA is 36 bases long and tracrRNA is 67 bases long. The crRNA can be custom synthesized (e.g., Alt-R® system from IDT); they can also be chemically modified, which is known to increase their stability[42]. The two RNAs (crRNA and tracrRNA) are annealed as described in Step 36 and mixed with Cas9 protein to generate ctRNP complexes (Step 38).
Preparation of MILLEX-GX (0. 22μm Filter Unit)
Cut one PCR tube from an 8-strip of 0.2ml Thin Wall PCR Tubes and place the filter unit MILLEX-GX (0.22μm Filter Unit) into the 0.2 ml PCR tube (Fig. 7). Insert this column (consisting of the filter unit in the PCR tube) into a 1.5ml micro-centrifuge tube.
Figure 7. Assembling of MILLEX-GX 0.22 μM filter unit.
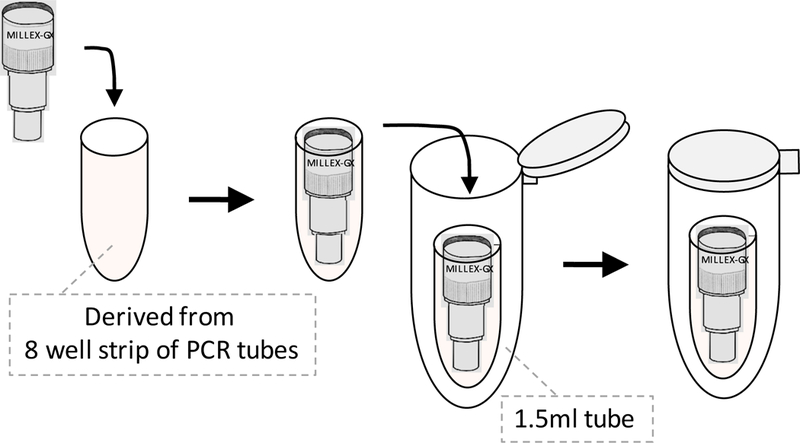
Insert a Millex-Gx 0.22 μM filter unit into a PCR tube (cut from an 8-well strip), insert the PCR tube containing the filter into a 1.5ml micro-centrifuge tube.
Preparation of Dishes and Reagents for Embryo Collection and Microinjection
Prepare oviduct collection dish: 35 mm tissue culture dish with 2 ml M2 media (one dish per female up to 10 females).
Prepare hyaluronidase dish: 35 mm tissue culture dish with 1.5 ml hyaluronidase media (one dish per up to 10 females).
Prepare wash dish: 35 mm tissue culture dish with 1.5 ml M2 media.
Prepare KSOM rinse dish: 35 mm tissue culture dish with 1.5 ml KSOM media (pre-equilibrated).
Prepare incubation dish: IVF/organ culture dish with 1 ml KSOM (pre-equilibrated in the 5% CO2 incubator).
Prepare embryo transfer dish: 35 mm tissue culture dish with 1.5 ml M2 media.
PROCEDURE
Preparation of dsDNA template ● TIMING 5h
- 1) There are two options for generating the dsDNA template: using a linearized plasmid DNA (option A) or a PCR product (option B).
- A: Using linearized plasmid as a template:
- i) Digest 2.5–4μg of plasmid with suitable restriction enzyme (e.g. NcoI) at 37°C for 3 hours in a volume of 100μl.
-
B: Using PCR product as a template:
- i) Generate about 50 to 100μl of PCR product using any high fidelity Taq DNA polymerase (for example, KOD plus polymerase), by setting up and running the following PCR. Approximate yield of DNA from the PCR reaction should be about 5–15μg.
Reagent Volume per reaction Final concentration 10×buffer 5μl 1X 2mM dNTP 5μl 200μM 25mM MgSO4 3μl 1.5mM Primers
(20μM stock)1μl sense primer
1μl anti-sense primer0.4μM
0.4μMEnzyme (KOD-plus) 1U/μl 1μl 1U/50μl Water 33μl Template DNA 1μl <1ng Total 50μl Cycle number Denature Anneal/Extend 1 95°C for 1 minutes 2–31 95°C for 15 seconds 68°C for 3 minutes 32 68°C for 7 minutes Hold at 4°C. ▲ CRITICAL STEP Use Hi-Fidelity Taq polymerase (e.g. KOD plus neo) for generating template using PCR.CRITICAL STEP Primers used for amplifying PCR products can be standard desalt grade custom synthesized from any commercial vendor.
2) Run the sample on an agarose gel, to check for complete digestion of the plasmid, or for efficient amplification of the PCR product. Load ~1–2μl of the RE digested sample from Step 1A, or 1/10 volume of the PCR product from Step 1B and add 2μl of 6x gel loading buffer, on a 1% agarose gel (SeaKem ME) in 1× TAE. Run at 135V for 30 minutes.
- 3) Purify the dsDNA template prepared in Step 1 using option A if linearized plasmid was used as a template, or option B if PCR product was used as a template
- A: Purify dsDNA if linearized plasmid was used as a template
- Add 100μl of modified TE into the sample tube (total 200μl).
-
Add 200μl of TE-saturated phenol and centrifuge (21,000g, 20°C, 6 minutes).! CAUTION Phenol is toxic and cause burns. Should be opened in fume hood wearing proper protective equipment.
- Transfer the supernatant to a new tube, add 20μl 3M sodium acetate (pH5.2) and 500μl of 99.5% ethanol, vortex and centrifuge at 21,000g, 10 minutes, at room temperature.
- Decant the supernatant, add 130μl 70% ethanol, centrifuge at 21,000g, for 2 minutes at 4°C.
- Completely remove the supernatant and dry the pellet. Dissolve the pellet in 10 μl of modified TE buffer and use about 1 or 2μl to estimate the DNA concentration using a Nano Drop. [AU: Please add a step about how to estimate the DNA concentration at this stage prior to adding it to the reaction in Step 4]
-
B: Purify dsDNA if PCR product was used as a template
- Gel purify the PCR product using Wizard SV Gel PCR Clean up System kit following the manufacturer’s instructions and perform two elutions in 20μl Elution buffer. Estimate the concentration using Nano Drop.
! CAUTION Phenol is toxic and cause burns. Should be opened in fume hood wearing proper protective equipment.
RNA synthesis using T7 RiboMax Express ● TIMING 1– 4h
-
4) Synthesize RNA using the T7 RiboMAX Express Large Scale RNA Production System according to manufacturer’s instructions. Add the following reagents into a PCR tube or micro-centrifuge tube and mix by pipetting and give a short spin. Use about 1μg of template DNA from Step 3 for in vitro transcription.
! CAUTION Avoid repeated freeze-thaw of buffers. Thaw all the reagents on ice and be sure to use RNase-free tips and gloves.
Component Amount per Reaction (μl) RiboMAX Express T7 2×Buffer 10μl Template DNA from Step 3 ..μl* Nuclease free water ..μl Enzyme Mix, T7 Express 2μl Total 20μl *1μg of template from Step 3A or 3B is used (adjust the volume according to the DNA concentration). 5) Incubate the reaction at 37°C in a thermocycler for 30 minutes to 3 hours.
-
6) Add 1μl of RQ1 RNase-Free DNase, mix well, and incubate at 37°C in a thermocycler, or in a water bath, for 15 minutes to eliminate the DNA template.
! CAUTION Wrap the caps of micro-centrifuge tube caps with parafilm to prevent contamination if water bath is used for the incubation.
Purification of RNA using MEGAclear kit● TIMING 1h
7) To purify RNA using MEGAclear Kit according to manufacturer’s instructions, firstly preheat a dry heat block at 65–70°C and pre-warm the elution solution.
8) Add 80μl of elution solution to the sample from Step 6 (total volume to 101μl) and mix by gentle pipetting.
9) Add 350μl of Binding Solution and mix by gentle pipetting.
10) Add 250μl of >99.5% ethanol and mix by gentle pipetting.
11) Transfer the sample to the column and centrifuge (21,000 g, 1 minute, room temperature).
12) Discard the flow-through and re-insert the column into the micro-centrifuge tube.
13) Add 500μl of washing solution to the column and centrifuge (21,000g, 1 minute, room temperature).
14) Discard the flow-through and repeat washing (as in Step 13).
15) Discard the flow-through and centrifuge (21,000g, 30 seconds at room temperature) to completely remove traces of ethanol.
16) Insert the column into newly labelled 1.5ml micro-centrifuge and add 25–50μl of pre-warmed elution solution from Step 7 directly into the column bed, incubate for 10 minutes, and centrifuge at 21,000g, 1 minute, at room temperature. A second elution can be performed to recover more RNA.
17) Check the quality and concentration of RNA by analyzing 1μl of sample in a Nano Drop.
-
18) Confirm the quality of RNA by agarose gel electrophoresis (Fig. 5).
■ PAUSE POINT Store the samples at −80°C until use.
▲ CRITICAL STEP Aliquot about 3–5μg RNA/tube to avoid repeated freezing and thawing of RNA.
? TROUBLESHOOTING
Synthesis of cDNA from RNA ● TIMING 1.5h
-
19) To synthesize cDNA according to manufacturer’s instructions following the Superscript III RT protocol add the following reagents to a PCR tube or micro-centrifuge tube (Tube A) and mix by pipetting and give a short spin. Use about 3–5μg of purified RNA as template from Step 18 for cDNA Synthesis. Mix the reaction by pipetting and short spin in centrifuge.
Component Amount per Reaction (μl) Final (in 30μl) RNA Template from Step 18 ..μl ~5μg RT Primer (100μM) 1.5μl 5μM dNTP Mix, NEB (10mM) 3.0μl 1mM Nuclease free water ..μl Total 30μl* *Reactions can be scaled up to obtain higher quantity of cDNA. This reaction is 3x scale (3 X 10 μl) of manufacturer’s protocol. 20) Incubate the tube at 65°C for 5 minutes.
-
21) Immediately place the tube (Tube A) on ice, wait for at least one minute and then proceed to cDNA synthesis. Mix the following reagents in a new tube (Tube B).
Component Amount per Reaction (μl) Final (in 30μl) 10XRT Buffer 6μl 0.1M DTT 3μl 0.01M 25mM MgCl2 12μl 10mM RNase Out 3μl Super Script III RT 3μl Nuclease free water ..μl Total 30μl ! CAUTION DTT is harmful when inhaled, it may cause irritation to skin and eye. Wear gloves and proper equipment when working with DTT.
-
22) Combine contents of both tubes (Tubes A and B). Mix well and incubate the reaction at 50°C for 50 minutes in a water bath or thermocycler. Stop the reaction by heat-inactivating at 85°C for 5 minutes. Cool down the reaction to room temperature.
! CAUTION Wrap the caps of micro-centrifuge tube caps with parafilm to prevent contamination if water bath is used for incubation.
-
23) Add 3μl of RNase H to the tube, mix by pipetting and incubate it at 37°C for 20 minutes in water bath.
? TROUBLESHOOTING
! CAUTION Wrap the micro-centrifuge tube caps with parafilm to prevent any contamination from water bath.
◼ PAUSE POINT The samples can be stored at −20°C until use.
Ethanol precipitation of cDNA and gel purification ● TIMING 1.5h
24) Add 40μl of modified TE, 10μl of 3M Sodium acetate (pH5.2) and 250μl of 99.5% ethanol to 63μl of sample from Step 23. Vortex and centrifuge at 21,000g, 4°C, 10 minutes. Discard the supernatant, add ~130μl 70% ethanol and centrifuge (21,000g, 4°C, 2 minutes).
25) Completely remove the supernatant using micropipette and air-dry the pellet. Dissolve the pellet in 8μl of modified TE.
26) Add 2μl of 6x gel loading buffer, load the sample in to 1% low-melting gel (SeaPlaque GTG agarose), and perform electrophoresis (135V, 30 minutes).
-
27) Stain the gel with ethidium bromide, excise the gel piece containing the major band under LED light (BioSpeed ethidium bromide-VIEWER), and transfer it to a new 1.5ml micro-centrifuge tube. A sample electrophoresis image of a cDNA preparation and excising of a prominent band for gel purification is shown in Figure 5.
! CAUTION Ethidium bromide is carcinogenic and mutagenic. Wear personal protective equipment to avoid exposure to the UV light, if a UV light source is used for viewing the gels. Long-wave length UV can be used to prevent damage to the DNA sample.
28) Extract DNA from the gel slice using NucleoSpin Gel or PCR Clean-up (TaKaRa) kit (option A) or by Phenol extraction and ethanol precipitation (option B).
A: DNA extraction using NucleoSpin Gel and PCR Clean-up (Column purification) ● TIMING 20 minutes
Use NucleoSpin Gel and PCR Clean-up (MACHEREY-NAGEL) for purification of cDNA according to manufacturer’s instructions: Add 200μl Buffer NT1 to each 100mg of agarose gel (containing cDNA) and mix well.
Determine the weight of the gel piece before adding Buffer NT1.
Incubate the tube for 10 minutes at 50°C to completely dissolve the gel piece (briefly vortex the sample every 2–3 minutes).
Transfer the sample (up to 700μl) into a column and centrifuge for 30 seconds at 11,000g at room temperature.
Discard flow-through and add 700μl Buffer NT3 to the column and centrifuge for 30 seconds at11,000g at room temperature.
Repeat Step 28Aiv washing with Buffer NT3
Centrifuge for 1 minute at 11,000g at room temperature to completely remove Buffer NT3.
Place the column into a new micro-centrifuge tube, add 15–30μl Buffer NE, and incubate at room temperature for 1 minute.
Centrifuge for 1 minute at 11,000g [1st elution] at room temperature.
Place the column into the tube and add 15–30μl Buffer NE and incubate room temperature for 1 minute.
-
Centrifuge for 1 minute at 11,000g [2nd elution at room temperature] (total elution volume will be 30–60μl).
▲ CRITICAL STEP Multiple elutions yield higher cDNA recovery; for example, three elutions of 20 μl each can also be performed.
B: DNA extraction by phenol extraction and ethanol precipitation ● TIMING 50 minutes
Add 200μl of modified TE into the gel piece-containing tube and place it at −80°C for more than 20 minutes (can be left overnight).
Thaw the sample at room temperature and transfer the solution to a new tube.
-
Add 200μl of TE-saturated phenol and centrifuge (21,000g, 20°C, 6 minutes).
! CAUTION Phenol is toxic and cause burns. Should be opened in fume hood wearing proper protective equipment.
Transfer the supernatant to a new tube, add 20μl of 3M sodium acetate (pH5.2) and 500μl of 99.5% ethanol, vortex and centrifuge at 21,000g, 10 minutes, at room temperature.
Decant supernatant, add 130μl of 70% ethanol, centrifuge at 21,000g, 2 minutes, 4°C.
-
Completely remove the supernatant and dry the pellet. Dissolve the pellet in 11μl of injection buffer.
◼ PAUSE POINT Store the samples at −20°C (short term) or −80°C (long term).
Filter purification of cDNA solution ● TIMING 1.5h
29) Pre-cool the centrifuge at 4°C.
30) Add injection buffer to the MILLEX-GX (0.22μm Filter Unit: see reagent setup for assembling a filter) and centrifuge the tube (13,000g, 4°C, 1 minute) (Fig. 7).
31) Take the filter unit only from the PCR tube and place it into a new PCR tube, then re-insert into the 1.5ml micro-centrifuge tube.
32) Add the 11μl of sample to the filter and centrifuge (13,000g, 4°C, 2 minutes).
33) Take the filter-containing PCR tube from the 1.5ml micro-centrifuge tube and transfer the filtered sample (in the bottom of the PCR tube) solution to a new 1.5ml tube.
-
34) Transfer 1μl of sample to another new tube and dilute with 4μl injection buffer (total 5μl). Use 1μl for concentration determination using Nano Drop, and remaining 4μl for agarose gel electrophoresis (Fig. 5).
? TROUBLESHOOTING
35) Store the remaining sample (10μl) at −20°C or −80°C for future use.
Preparation of guide RNA by annealing crRNA and tracrRNA ● TIMING 30 minutes
-
36) Anneal crRNA and tracrRNAs by mixing equi-molar ratios. Mix 10μl of 6.1μM crRNA (approx. 72ng/μl) and 10μl of 6.1μM tracrRNA (approx. 135ng/μl) and anneal in a thermocycler (94°C for 2 minutes and then place at room temperature, about 10 minutes). The crRNA/tracrRNA complex (3.1μM each) can be stored at −80°C until use.
▲ CRITICAL STEP Annealing of crRNA and tracrRNA is an important step to obtain active guide RNA and for the formation of ctRNP complex.
Preparation of ctRNP + ssDNA Injection mix ● TIMING 1h
37) To prepare the ctRNP injection mix (10–20μl volume), dilute the Cas9 protein in microinjection buffer to a concentration of 500 ng/μl (equivalent to 3.1μM).
-
38) Mix the components on ice as below (10μl scale).
Component Amount per Reaction (μl) final concentration* crRNA/tracrRNA complex (3.1μM [104ng/μl]) from Step 36 2μl 0.61μM (10.3ng/μl) ssDNA (30–100ng/μl) from Step 35 ..μl 5–10ng/μL Cas9 protein (3.1μM [500ng/μl]) from Step 37 (50ng/μl) 1μl 0.3μM microinjection buffer ..μl Total 10μl *We typically use 0.3μM (10.3ng/μl) of guide RNA and 0.3μM (50ng/μl) of Cas9 protein for mouse zygote microinjections. When two guides are used (e.g., floxing) use 0.15 μM of each guide RNA. Many other concentrations, even though not equimolar, have also worked successfully [for example : 20ng/μl guide 1 + 50ng/μl Cas9 + 10ng/μl ssDNA (20:50:10); 10ng/μl guide 1 + 10ng/μl guide 2 + 50ng/μl Cas9 + 10ng/μl ssDNA (2X10:50:10); 10ng/μl guide 1 + 10ng/μl Cas9 + 10ng/μl ssDNA (10:10:10); 10ng/μl guide 1 + 10ng/μl guide 2 + 10ng/μl Cas9 +10ng/μl ssDNA (2X10+10+10); 5ng/μl guide 1 + 20ng/μl Cas9 + 10ng/μl ssDNA (5:20:10); 5ng/μl guide 1 + 5ng/μl guide 2 + 10ng/μl Cas9 + 10ng/μl ssDNA; + 10ng/μl ssDNA (2X5:10:10)]▲ CRITICAL STEP Microinjection reagent mix should be prepared just before performing the injections.
39) Incubate injection mixture at 37°C for 10 minutes just before injection and keep it at room temperature until use for injection. The injection mix can remain at room temperature until the injection process is completed, which usually takes about 1–2 hours. [AU: Please check and clarify – how long can it be left at room temperature for? Should it not be warmed to 37 degrees and then injected immediately while at this temperature?].
-
40) Load injection mix into needles following microinjection procedures described in ref.[37], ready for use to inject Zygotes in Step 48.
CRITICAL STEP: Preparation of zygotes in Steps 41–47 should be performed concurrently with the earlier part of this protocol, and injection mix prepared immediately prior to zygote injection. Specifically, the steps 37 to 40 are performed on the day of microinjection (steps 44 to 47). [AU: Please check and clarify – it needs to be made clear that the loaded injection needles in Step 40 are not just left while zygotes are prepared over several days in the next set of steps – either the zygote preparation steps (41–47) should be moved out of the Procedure into a box, or information such as this CRITICAL Step needs to be added to make it clear that the flow of the Procedure steps is not linear, but that zygotes are prepared in advance of the injection mix being prepared?]
Mouse transgenesis ● TIMING 5–6h
CRITICAL These experiments follow well-established standard protocols of mouse transgenesis, typically performed at specialized core facility laboratories. Such protocols have been described in detail elsewhere[37,40]. As mentioned above, we switched to performing only pronuclear injection, after we switched to ctRNP components. Based on the efficiencies we have observed, using the pronuclear-only injection of ctRNP components, we suggest that only pronuclear injection would be sufficient for the Easi-CRISPR method.
! CAUTION Experimental procedures involving animals should be carried out according to relevant institutional and governmental regulations.
41) House mice in Individually Ventilated Cages (IVCs) on a 14–10 light cycle (Light on at 06:00, Light turns off at 19:00).
42) Intraperitoneally inject female donor mice, each with 5.0 IU PMSG around noon on day 1.
43) Approximately 48 hours after the PMSG injection, intraperitoneally inject female mouse with 5.0 IU hCG on day 3 and breed with stud males overnight.
44) Check for plugged donor females next morning on day 4 and euthanize plugged females.
-
45) Dissect oviducts and place the samples at 37°C heated slide warmer.
▲ CRITICAL STEP Dissection of oviducts should be done as quickly as possible, approx. 10 minutes after euthanasia.
-
46) Quicky dissect cumulus-oocyte complexes by disrupting ampulla using forceps and then pick oocytes from dish by mouth pipetting.
▲ CRITICAL STEP transfer the oocytes to the wash dish and wash a few times by mouth pipetting to remove cumulus complexes and hyaluronidase.
-
47) Record the number of zygotes and unfertilized zygotes, transfer healthy embryos to KSOM dish and culture at 5% CO2 incubator at 37°C until used for injection (up to about 1– 2 hours).
! CAUTION Zygotes should not be allowed to pass the one-cell stage because they will no longer be suitable for injection.
-
48) Prepare a slide using a Lab-Tek chamber by making two side-by-side 150 μl drops of M2 medium. Flatten the drops into discs with a pipette tip to minimize their height. Overlay the drops with ~1 ml of mineral oil. Assemble microinjection set up including micromanipulator system, holding pipettes and microinjection needles containing the injection mix prepared in Step 40. Place the slide on the microscope stage, mounted with a slide warmer adjusted at 37°C, and transfer about 20–30 zygotes from Step 47 at a time into one of the drops of M2 medium for each injection session [AU: Edits correct?].
▲ CRITICAL STEP Maintain the temperature at 37°C on a slide warmer. Two drops of M2 media are placed on the slide so that the second drop can be used if the first drop is accidentally blown during mouth pipetting.
-
49) Perform pronuclear injection of zygotes from Step 46, maintaining positive pressure on the injection needle at all times, by inserting the needle into the zona pellucida and bringing the needle to the closest pronucleus.
▲ CRITICAL STEP Inject about 20–30 zygotes per batch. All zygotes, in each batch, must be injected within 10 minutes, thus the number of zygotes taken per batch depends on the efficiency of the injector. A beginner may start with as few as 4 to 6 per batch; an experienced technician can inject as many as 50 zygotes in 10 minutes.
50) Penetrate the membrane of the pronucleus. A slight swelling of the pronucleus may be noticed once the membrane is penetrated. Otherwise, press the injection foot pedal to observe a slight swelling of the pronucleus.
51) Carefully withdraw the needle from the zygote.
-
52) After injecting all the zygotes, use the mouth pipetting apparatus to collect and transfer zygotes to the embryo transfer dish.
? TROUBLESHOOTING
▲ CRITICAL STEP Discard lysed zygotes.
53) Incubate surviving zygotes at 37°C in KSOM until embryo transfer (usually within the next 1–2 hours).
-
54) Transfer of injected embryos into pseudo-pregnant mice. Obtain pseudo-pregnant mice by mating 8–12 week old CD-1 females to vasectomized CD-1 males. On the morning of microinjection day, use plugged females for oviduct transfers.
▲ CRITICAL STEP Typically, 10–20 CD-1 females are bred in each session to obtain an average of 4–8 plugged females.
-
55) Transfer viable embryos from Step 53 to the oviducts of pseudo-pregnant foster mothers from Step 54, following established surgical procedures as previously described[41]. Transfer about 15–25 injected zygotes per female. The optimal number of embryos transferred is 18 total per female (9 per side). After the embryo transfer surgery, the animals are monitored until recovered from anesthesia, and housed and cared for until they deliver offspring.
▲ CRITICAL STEP If an insufficient number of pseudopregnant females are available on the day of microinjection, the microinjected embryos can be cultured overnight and 2-cell stage embryos can be transferred next day to newly generated pseudopregnant females.
? TROUBLESHOOTING
Genotyping of offspring to identify transgenic founders● TIMING 1–3d
CRITICAL Samples from the offspring (tail or ear piece) are collected at suitable age as following the institutional animal care and use committee approved protocols and genotyping of each offspring is done using multiple sets of PCRs.
-
56) Mouse tail or ear DNA extraction. Use option A, the longer protocol, to produce cleaner DNA, or option B, the rapid protocol to produce crude DNA for quick genotyping. DNA preparations from both methods work well for genotyping PCRs.
! CAUTION Experimental procedures involving animals should be carried out according to relevant institutional and governmental regulations.
- A: Longer protocol: ● TIMING 3h
-
Collect ~2–3mm tail pieces from each offspring (generated from Step 55) in 1.5ml micro-centrifuge tubes. Collect a sample from a wild type mouse as control. Add 300μl Cell Lysis Solution containing 3μl proteinase K and incubate at 65°C overnight in a heat block.▲ CRITICAL STEP To save time and reagent loss, make a master mix for the lysis solution and proteinase K. This can then be distributed to 300μl aliquots in separate micro-centrifuge tubes.
- Next day cool the samples at room temperature. Add 100μl of protein precipitation solution and vortex thoroughly for ~20 seconds.
- Place the tubes on at 4°C for 10 minutes, and then centrifuge at 21,000g for 5 minutes at room temperature.
-
Transfer supernatants to newly labeled micro-centrifuge tubes containing 800μl of 100% ethanol. Mix by inverting the tubes 8–10 times.▲ CRITICAL STEP Use ethanol resistant markers for labeling the tubes because spills of ethanol solutions on the tubes can wipe away the labels.
- Centrifuge at 21,000g for 5 minutes at room temperature.
- Slowly discard the supernatant, add 700 μl of 70% ethanol, mix by inverting 8–10 times.
- Centrifuge at 21,000g for 5 minutes at room temperature, then slowly discard supernatant.
- Centrifuge at 21,000g for 4 minutes at room temperature.
-
Aspirate remaining 70% ethanol using a 200μl pipette tip and air dry DNA pellet for ~5 minutes (do not exceed 5 minutes).! CAUTION It is important to change tips between samples to avoid cross-contamination.▲ CRITICAL STEP The DNA pellet is very loose at this step; the aspiration step should be performed with care to avoid losing the pellet.
-
Add 100μl DNA Hydration Solution to the pellet and flick the side of the tube to mix. Incubate tubes at 65°C in dry bath for 15–30 minutes to solubilize the DNA.■ PAUSE POINT Genomic DNA samples can be stored at 4°C for about two months.
-
- B: Rapid protocol: ● TIMING 4h
- Collect ~2mm ear pieces from each offspring (generated from Step 55) in 1.5ml micro-centrifuge tubes. Collect a sample from a wild type mouse as control. Add 40μl Allele-In-One Mouse Tail Direct Lysis Buffer and incubate at 55°C with shaking using shaking heat block for more than 3 hours, or overnight.
-
Incubate tubes at 85°C in a heat block for 45 minutes to inactivate the protease in the solution.◼ PAUSE POINT Genomic DNA samples can be stored at −20°C for years.
- Centrifuge at 21,000g for 2 minutes (because the samples are crude) and use for PCR reactions.
-
57) Perform genotyping PCRs using the appropriate combinations of primer sets on all samples including a DNA sample from wild type mouse as a control. Prepare PCR reactions as follows , distribute the master mix and add ~1μl of mouse tail DNA (from Step 56), in a total volume of 20μl/sample. CRITICAL STEP: Genotyping of each offspring is done using multiple sets of PCR (see Experimental Design for further details: For knock-in alleles, both junctions PCRs are performed including amplifying all of the internal sequences, either as small overlapping segments or as one full length PCR product. The genotyping of conditional alleles is performed by at least three independent PCR reactions, one short fragment for each LoxP insertion and a full-length PCR to include both LoxPs in one amplicon. The genotyping of knock-down alleles are performed similar to the knock-in alleles, which include two junction PCRs along with either a full length or multiple small amplicon PCRs to cover the full insertion cassette. [AU: Please add a description for how to genotype knock-down alleles as well as knock-in and conditional] Schematics, and examples of PCRs, are shown in Fig 6.
To amplify short PCR fragments (Fig.6b (7)&(8), (9)&(10), (12)&(11)):
Reagent Volume per reaction Volume for 10 reactions Final concentration 2X GC buffer 5μl 50μl 1X 2.5 mM dNTP 0.8μl 8μl 200μM Primers
(20μM stock)0.25μl sense primer
0.25μl anti-sense primer2.5μl sense primer
2.5μl anti-sense primer0.5μM
0.5μMEnzyme (TaKaRa Taq: 5U/μl) 0.025μl 0.25μl 0.125U/10μl Water 2.675μl 26.75μl Genomic DNA 1μl -~100ng Total 10μl The following PCR mixtures are suggested for the long PCR reactions shown in Fig.6a, 6b (7)&(11), (12)&(10)):Reagent Volume per reaction Volume for 10 reactions Final concentration 5X PrimeSTAR buffer 2μl 20μl 1X 2.5 mM dNTP 0.8μl 8μl 200μM Primers
(20μM stock)0.12μl sense primer
0.12μl anti-sense primer1.2μl sense primer
1.2μl anti-sense primer0.24μM
0.24μMEnzyme (PrimeSTAR HS DNA Polymerase: 2.5U/μl) 0.1μl 1μl 0.25U/10μl Water 5.86μl 58.6μl Genomic DNA 1μl -~100ng Total 10μl -
58) Run the PCR reactions in a thermocycler using the following standard PCR conditions:
The following cycling conditions are suggested for PCR amplification with TaKaRa Taq polymerase. These conditions were used for generating short PCR fragments (Fig.6b (7)&(8), (9)&(10), (12)&(11).
Cycle number Denature Anneal Extend 1 95°C for 5 minutes 2–36 95°C for 45 seconds 58°C for 30 seconds 72°C for 1 minute 37 72°C for 5 minutes Hold at 4°C. The following cycling conditions are suggested for PCR amplification with PrimeSTAR HS DNA polymerase. These conditions were used for generating long PCR fragments shown in Fig.6a, 6b (7)&(11), (12)&(10).
Cycle number Denature Anneal Extend 1 94°C for 3 minutes 2–36 98°C for 10 seconds 62°C for 5 seconds 72°C for 1 minute/kb 37 72°C for 10 minutes Hold at 4°C. -
59) After adding Gel Loading Dye into the samples, run PCR products on a 1% agarose gel electrophoresis along with control PCRs and DNA markers (GeneRuler DNA Ladder Mix) at 135V for 30–60 minutes. Stain the gel with ethidium bromide. Analyze gels using a gel documentation system.
! CAUTION Ethidium Bromide is carcinogenic and mutagenic. Wear personal protective equipment.
? TROUBLESHOOTING
-
60) Sequence PCR products directly, or clone PCR products by TA Cloning kit by following standard DNA cloning protocols[3] and sequence them to confirm the genotypes.
? TROUBLESHOOTING
Troubleshooting advice can be found in Table 2.
Table 2 |.
Troubleshooting table.
| Step # | Problems | Possible Reasons | Solutions |
|---|---|---|---|
| 18 | Poor RNA yield | Possible batch to batch variation among RNA synthesis Kits | Some kits such as T7 RiboMAX Express and NEB HiScribe kits have yielded more consistent results
than others Incubating reaction for longer than 3 hours improves the RNA Yield Reaction can be scaled up to obtain more RNA |
| T7 promoter driven transcription is not adequate | Including two Gs (GG) in the T7 promoter sequence enhances transcription | ||
| Synthesis of shorter and stronger RNA bands in addition to an expected sized band | Presence of trace amounts of primer dimers (that contain T7 promoter), in the dsDNA template | Gel purification of the dsDNA template will reduce this problem | |
| Presence of cryptic terminator sequences for RNA polymerase | Synthesizing the opposite strand can eliminate the problems arising from the unknown terminators | ||
| 23 | RNA degradation | Contamination of RNase | Ensure that the reagents and equipments are RNase free |
| 34 | Poor cDNA synthesis yield | Degraded RNA template (RNA can get degraded very quickly) | Make aliquots of RNA and store them at −80°C for long term use Reaction can be scaled up to increase the yield |
| Less template to start the reaction | Reaction can be scaled up to increase the yield (Supplementary Fig. 3) | ||
| ssDNA appears like a smear in gel | Smear-like appearance of ssDNA preparations is normal especially when larger quantity of preparations are loaded in gels | Prominent band(s) can be gel extracted (Supplementary Fig. 4) | |
| There will be detectable prominent band(s), present in the smear, corresponding to expected size of ssDNA of interest | |||
| Synthesizing the opposite strand can eliminate the problems arising from the unknown terminators | If there are prominent shorter sized bands, they could be arising from partial length strands (from premature reverse transcription termination) | ||
| 52 | Embryo lysis during microinjection | Clogging of injection needles | Centrifugation (e.g. 21,000g, 2 minutes) and filtration of microinjection mix can prevent clogging of needles |
| 55 | Loss of embryos and low birth rate | Some component in the injection mix may be toxic | Rule out toxicity of each component by injecting the mix without one component in a few zygotes
(~20) and assess the toxicity by culturing them up to blastocyst stage Prepare fresh batch of ssDNA, purchase a new batch of crRNA/tracrRNA if the toxicity persists |
| Some unknown animal husbandry factor/s affecting birth rates | Examine if any changes in general husbandry practices that can be fixed | ||
| 59 | Insertion frequency of ssDNA is low | Inefficient annealing of crRNA and tracrRNA and ctRNP complexes are not formed efficiently | Anneal in the thermocycler and incubate at room temperature with Cas9 protein for 15 minutes to form RNP complex |
| Degraded ssDNA donor | Check the intactness of ssDNA in agarose gel electrophoresis and prepare a new batch if necessary | ||
| Errors in guide RNA and ssDNA donor designs or, poor cleaving efficiency of the chosen guide/s | Re-visit the designs to check flaws. Change the guides if your design allows |
||
| 60 | Mutations in the insertion cassette | Mis-incorporations arising from PCR and/or RT reactions | Use high fidelity enzymes for ssDNA preparation steps |
| Inaccurate repair | Additional founder pups may be created and sequence verified | ||
TIMING
A typical Easi-CRISPR mouse genome engineering project can be completed in about 2 months from the time the CRISPR strategy is designed up to identifying the genome-edited G0 founder mice. The general time frame required for different stages of Easi-CRISPR are outlined in Figure 1. Even though designing the overall strategy (first stage) can only take about 2–3 hours for an experienced person, this is the most critical part of the Easi-CRISPR protocol. Even slight errors in the donor design can result in a mouse model that may not be exactly as intended. We recommend that two or three independent persons verify the targeting strategy, particularly the donor design. One of these people should preferably be an expert with previous experience in designing genetically engineered models. The next critical step is the preparation of ssDNA donors, which requires the most hands-on time of the Easi-CRISPR protocol.
● TIMING
Steps 1–2, Preparation of dsDNA template: 5h
Steps 3–5, RNA synthesis using T7 RiboMax Express: 1–4h
Steps 6–18, Purification of RNA using MEGAclear kit: 1h
Steps 19–23, Synthesis of cDNA from RNA: 1.5h
Steps 24–28, Ethanol precipitation of cDNA and gel purification: 1.5h
Step 28A, Using NucleoSpin Gel and PCR Clean-up (Column purification): 30min
Step 28B, Phenol extraction and ethanol precipitation: 50min
Steps 29–35, Filter purification of cDNA solution: 1.5h
Step 36, Preparation of guide RNA by annealing crRNA and tracrRNA: 30 min
Steps 37–40, Preparation of ctRNP + ssDNA Injection mix: 1h
Steps 41–55, Protocol steps of mouse transgenesis: 5–6h
Steps 56–60, Genotyping of offspring to identify transgenic founders: 1–3 days
Anticipated results
Easi-CRISPR has the potential to generate various kinds of mouse models including conditional knockout mice (floxed), knock-in mice (to fuse protein expression cassettes with genes), and knock-down mice (artificial microRNA knock-in mice). The method invariably generates intended mouse models in about 50 to 100 [AU: Please clarify – if these are absolute numbers why is it 50–100, why is it not a specific number?]of zygotes injected. The method has been successful for over a dozen loci thus far, and the experiments performed in at least three independent laboratories. Described below are the anticipated results for each of the major experimental stages.
Designing guide RNAs.
In some cases, we have chosen guides up to about 15 bases away from the insertion site, but have noticed imprecise insertions in some founders (deletion of the 15 nucleotides)[43]. If the chosen guide is farther from the desired insertion site, more founders may need to be generated to obtain correctly inserted founders.
Preparation of ssDNA.
This involves three stages: preparation of dsDNA templates; preparation of RNA from dsDNA; and preparation of ssDNA from RNA. The anticipated results in each of these steps are:
Preparation of dsDNA templates.
This stage (either using a plasmid source or a PCR product) invariably yields more than several μgs of DNA.
Preparation of RNA from dsDNA.
Typical yields range between 5–140μg of RNA, but are dependent on kits used. Even though about 5 μg of RNA is sufficient for the next step, in our experience a total yield of about ~30 μg indicates an optimal quantity for an in vitro transcription reaction of 10 μl volume. A sample gel image depicting variable results is shown in Supplementary Figure 1.
Preparation of ssDNA from RNA.
Typical yields, after the final step of gel purification, range from 0.2 to 2 μg of cDNA, depending on kits and scale of synthesis used. A sample gel showing comparable performance of three different reverse transcription reactions are shown in Supplementary Figure 2. The effects of the total amount of input RNA and incubation periods on the total yield of cDNA is shown in Supplementary Figure 3. These data indicate that about 5μg of input RNA and at least 10 minutes (per the manufacturer’s recommendations) or longer incubation is necessary to obtain optimal ssDNA yields. Note that gel extraction of cDNA is a critical step to remove partially synthesized ssDNAs, and that the presence of incompletely synthesized ssDNA molecules can hamper insertion of full-length molecules. In this step, we load higher amounts of cDNA preparations to reduce the gel volume. When higher amounts are loaded, we often see a smear with one prominent band and another less prominent band migrating just above the prominent band. This is shown in Supplementary Figure 4, where the prominent band and the slower migrating bands are marked as 1 and 2, respectively. Purification of the two bands and running them at lower concentrations reveal that both bands migrate at the same rate (Supplementary Fig. 4). Based on this experiment, we presume that a differential migration of molecules can occur when loaded at a higher concentration; one reason could be that some molecules may migrate at different rates due to their secondary structures. Despite the fact that the majority of ssDNA is lost during purification steps, the amount obtained at the end would be sufficient for at least two-to-three sessions of microinjections, given that 50–200 ng of ssDNA is used for one injection session. Finally, the ssDNA preparation can be tested by subjecting an aliquot to S1 nuclease digestion, which digests it completely if the prep only contains ssDNA (Supplementary Fig. 5).
Microinjection and transgenesis.
Similar to transgenic microinjection experiments, overall birth rates vary from 10 to 30% among Easi-CRISPR experiments. However, insertion frequencies among live-born offspring is quite high in Easi-CRISPR, with the majority of projects completed by injecting about 50, or even fewer, zygotes.
Genotyping.
In general, genotyping of CRISPR-generated animal models is very challenging given the potential for mosaicism and for many possible genome editing outcomes, including NHEJ-indels and large deletions or insertions. Identifying desired insertion alleles among such mixtures is certainly a difficult task. To ensure identification of correctly targeted alleles, we perform at least three independent sets of PCRs (Fig. 6), followed by full sequencing of the targeted alleles. We have noticed higher rates of imprecise or partial insertions in some loci more than others,[8] which could be attributed to the mechanism of ssDNAs donor-mediated DNA repair, and is not yet fully understood. Further, some loci may be challenging for PCR genotyping and may require testing of many primers until some are found that work. A few examples of genotyping results are shown in Supplementary Figures 6 to 8. It should be noted that, even though a desired allele is detected by PCR(s), the CRISPR generated alleles may not be transmitted to the next generation. Also, the germ line transmitted alleles need to be re-confirmed by all sets of genotyping primers and sequencing of the PCR products to ensure that the correct allele is transmitted and established in the next generation. Genotyping by southern blotting can additionally ensure the correctness of the targeted allele. Consideration to include suitable restriction enzymes can become useful for southern blot-based genotyping.
Overall efficiency of Easi-CRSPR protocol.
Experiments to target long ssDNA cassettes at 14 independent loci have been reported [9,43]. The results from these studies indicate that Easi-CRISPR is a robust and highly efficient method for creating knock-in and conditional knockout animal models Among the 97 live born animals generated by injecting 680 zygotes 38 contained the correctly inserted cassettes. The overall targeting efficiency, for any given locus, ranged from 8.5% to 100% of live born animals [AU: Please add reference and the number of experiments/pups this range was obtained from], most commonly showing a frequency of 30–60% [AU: Edit correct? Please add reference for this] [9,43]. Cleaving efficiency of the guides could be one of the major factors affecting insertion frequencies, and thus targeting efficiencies for some loci can be more efficient than others.
Supplementary Material
Comparison of RNA yield between kits. 1μg DNA was used for RNA synthesis according to each manufacturer’s protocol. The RNA samples in lanes 1 and 2 were synthesized using kits from two different vendors. 1% of the eluates, from purification using the MEGAclear columns, were loaded. This figure illustrates that kits can vary in their efficiencies. It should be noted that the identity of the products is not an important point: we have observed a little better performance of a different batch from vendor 1, and somewhat poorer performance of another batch of kit from vendor 2.
Comparison of cDNA yield among different kits. cDNAs (ssDNA) were synthesized using reverse transcriptases from three different vendors (1 to 3). 1.7μg RNA was used for cDNA synthesis according to each manufacturer’s protocol and 50% of the reaction volumes were loaded. The cDNA yield from all three transcriptases are comparable.
Comparison of cDNA synthesis parameters. 1.7μg (lane 1 and 2) or 5μg (lanes 3 and 4) of RNA was used for cDNA synthesis and the reactions were incubated for 10 minutes (lanes 1 and 3) or 2 hours (lanes 2 and 4). 15% of the reaction volume was loaded. The band intensities suggest that 5μg RNA input produces optimal yields of cDNA.
Gel extraction of band/s from cDNA preparations. (a) Typical smear-like appearance of the cDNA (ssDNA) preparations in an agarose gel showing a prominent band (box # 1) and a less prominent band (box # 2). (b and c) Gel slices excised for DNA extraction. (d) The purified ssDNAs loaded in another gel showing both bands migrate similarly. Either of the gel preparations (1 or 2) can be used for microinjection, or both preparations can be pooled before use.
Verification of ssDNA using S1 nuclease. About 150 ng of ~0.5kb cDNA was incubated with or without S1 nuclease at 37°C for 15 minutes.
The polarity of guides and the ssDNA donor strands with respect to the genomic loci, in the previously published genome engineering projects using Easi-CRISPR
EDITORIAL SUMMARY:
This protocol describes Easi-CRISPR, a method for creating, knock-in, conditional knockout and knock-down mouse models by CRISPR/Cas9-based genome engineering using long single-stranded DNA donor templates
ACKNOWLEDGMENTS
This work was supported in part by Grant-in-Aid for Young Scientists (B) (16K18821) from the Ministry of Education, Culture, Sports, Science and Technology (MEXT) to H.M, and by 2014 Tokai University School of Medicine Research Aid, MEXT-Supported Program for the Strategic Research Foundation at Private Universities 2015–2019 to Tokai University, Research and Study Project of Tokai University General Research Organization, 2016–2017 Tokai University School of Medicine Project Research to M.O and by an Institutional Development Award (PI: Shelley Smith) P20GM103471 (to C.B.G and R.M.Q). We thank Dr. Adrian Koesters, UNMC for her editorial contribution and Joseph M. Miano, University of Rochester for his helpful comments on the manuscript. We also gratefully acknowledge the contribution of the staff of the Support Center for Medical Research and Education, Tokai University, for sequencing and microinjection.
Footnotes
COMPETING FINANCIAL INTERESTS
C.B.G., M.O. and H.M. have filed a patent application relating to the work described in this manuscript on international application number PCT/US2016/035660 filed June 3, 2016 (DNA editing using single stranded DNA).
AUTHOR CONTRIBUTIONS
M.O conceived the idea of using long ssDNAs as donors in genome editing, which was further tested and improved upon by the other three authors. All authors contributed equally in writing the manuscript.
REFERENCES
- [1].Gurumurthy CB, Joshi PS, Kurz SG, Ohtsuka M, Quadros RM, Harms DW, et al. Validation of simple sequence length polymorphism regions of commonly used mouse strains for marker assisted speed congenics screening. Int J Genomics 2015;2015:735845. doi: 10.1155/2015/735845. [DOI] [PMC free article] [PubMed] [Google Scholar]
- [2].Gurumurthy CB, Grati M, Ohtsuka M, Schilit SLP, Quadros RM, Liu XZ. CRISPR: a versatile tool for both forward and reverse genetics research. Hum Genet 2016;135:971–6. doi: 10.1007/s00439-016-1704-4. [DOI] [PMC free article] [PubMed] [Google Scholar]
- [3].Quadros RM, Harms DW, Ohtsuka M, Gurumurthy CB. Insertion of sequences at the original provirus integration site of mouse ROSA26 locus using the CRISPR/Cas9 system. FEBS Open Bio 2015;5:191–7. doi: 10.1016/j.fob.2015.03.003. [DOI] [PMC free article] [PubMed] [Google Scholar]
- [4].Inui M, Miyado M, Igarashi M, Tamano M, Kubo A, Yamashita S, et al. Rapid generation of mouse models with defined point mutations by the CRISPR/Cas9 system. Sci Rep 2014;4. doi: 10.1038/srep05396. [DOI] [PMC free article] [PubMed] [Google Scholar]
- [5].Horii T, Hatada I. Challenges to increasing targeting efficiency in genome engineering. J Reprod Dev 2016;62:7–9. doi: 10.1262/jrd.2015-151. [DOI] [PMC free article] [PubMed] [Google Scholar]
- [6].Yang H, Wang H, Shivalila CS, Cheng AW, Shi L, Jaenisch R. One-step generation of mice carrying reporter and conditional alleles by CRISPR/Cas-mediated genome engineering. Cell 2013;154:1370–9. doi: 10.1016/j.cell.2013.08.022. [DOI] [PMC free article] [PubMed] [Google Scholar]
- [7].Ma Y, Zhang X, Shen B, Lu Y, Chen W, Ma J, et al. Generating rats with conditional alleles using CRISPR/Cas9. Cell Res 2014;24:122–5. doi: 10.1038/cr.2013.157. [DOI] [PMC free article] [PubMed] [Google Scholar]
- [8].Miura H, Gurumurthy CB, Sato T, Sato M, Ohtsuka M. CRISPR/Cas9-based generation of knockdown mice by intronic insertion of artificial microRNA using longer single-stranded DNA. Sci Rep 2015;5:12799. doi: 10.1038/srep12799. [DOI] [PMC free article] [PubMed] [Google Scholar]
- [9].Quadros RM, Miura H, Harms DW, Akatsuka H, Sato T, Aida T, et al. Easi-CRISPR: a robust method for one-step generation of mice carrying conditional and insertion alleles using long ssDNA donors and CRISPR ribonucleoproteins. Genome Biol 2017;18. doi: 10.1186/s13059-017-1220-4. [DOI] [PMC free article] [PubMed] [Google Scholar]
- [10].George M, Rainey MA, Naramura M, Foster KW, Holzapfel MS, Willoughby LL, et al. Renal thrombotic microangiopathy in mice with combined deletion of endocytic recycling regulators EHD3 and EHD4. PloS One 2011;6:e17838. doi: 10.1371/journal.pone.0017838. [DOI] [PMC free article] [PubMed] [Google Scholar]
- [11].Jaisser F Inducible gene expression and gene modification in transgenic mice. J Am Soc Nephrol JASN 2000;11 Suppl 16:S95–100. [PubMed] [Google Scholar]
- [12].Ohtsuka M, Miura H, Gurumurthy CB, Kimura M, Inoko H, Yoshimura S, et al. Fluorescent transgenic mice suitable for multi-color aggregation chimera studies. Cell Tissue Res 2012;350:251–60. doi: 10.1007/s00441-012-1470-0. [DOI] [PubMed] [Google Scholar]
- [13].Olou AA, Sarkar A, Bele A, Gurumurthy CB, Mir RA, Ammons SA, et al. Mammalian ECD Protein Is a Novel Negative Regulator of the PERK Arm of the Unfolded Protein Response. Mol Cell Biol 2017;37:e00030–17. doi: 10.1128/MCB.00030-17. [DOI] [PMC free article] [PubMed] [Google Scholar]
- [14].Suda T, Gao X, Stolz DB, Liu D. Structural impact of hydrodynamic injection on mouse liver. Gene Ther 2006. doi: 10.1038/sj.gt.3302865. [DOI] [PubMed] [Google Scholar]
- [15].Takahashi G, Gurumurthy CB, Wada K, Miura H, Sato M, Ohtsuka M. GONAD: Genome-editing via Oviductal Nucleic Acids Delivery system: a novel microinjection independent genome engineering method in mice. Sci Rep 2015;5:11406. doi: 10.1038/srep11406. [DOI] [PMC free article] [PubMed] [Google Scholar]
- [16].Ohtsuka M, Miura H, Arifin N, Nakamura S, Wada K, Gurumurthy C, et al. In situ genome editing method suitable for routine generation of germline modified animal models. bioRxiv 2017. doi: 10.1101/172718. [DOI] [Google Scholar]
- [17].Yu Z, Ren M, Wang Z, Zhang B, Rong YS, Jiao R, et al. Highly efficient genome modifications mediated by CRISPR/Cas9 in Drosophila. Genetics 2013;195:289–91. doi: 10.1534/genetics.113.153825. [DOI] [PMC free article] [PubMed] [Google Scholar]
- [18].Hwang WY, Fu Y, Reyon D, Maeder ML, Tsai SQ, Sander JD, et al. Efficient genome editing in zebrafish using a CRISPR-Cas system. Nat Biotechnol 2013;31:227–9. doi: 10.1038/nbt.2501. [DOI] [PMC free article] [PubMed] [Google Scholar]
- [19].Li D, Qiu Z, Shao Y, Chen Y, Guan Y, Liu M, et al. Heritable gene targeting in the mouse and rat using a CRISPR-Cas system. Nat Biotechnol 2013;31:681–3. doi: 10.1038/nbt.2661. [DOI] [PubMed] [Google Scholar]
- [20].Yang D, Xu J, Zhu T, Fan J, Lai L, Zhang J, et al. Effective gene targeting in rabbits using RNA-guided Cas9 nucleases. J Mol Cell Biol 2014;6:97–9. doi: 10.1093/jmcb/mjt047. [DOI] [PMC free article] [PubMed] [Google Scholar]
- [21].Gao Y, Wu H, Wang Y, Liu X, Chen L, Li Q, et al. Single Cas9 nickase induced generation of NRAMP1 knockin cattle with reduced off-target effects. Genome Biol 2017;18. doi: 10.1186/s13059-016-1144-4. [DOI] [PMC free article] [PubMed] [Google Scholar]
- [22].Hongbing H, Yonghe M, Tao W, Ling L, Xiuzhi T, Rui H, et al. One-step generation of myostatin gene knockout sheep via the CRISPR/Cas9 system. Front Agric Sci Eng 2014;1:2. doi: 10.15302/J-FASE-2014007. [DOI] [Google Scholar]
- [23].Ni W, Qiao J, Hu S, Zhao X, Regouski M, Yang M, et al. Efficient Gene Knockout in Goats Using CRISPR/Cas9 System. PLoS ONE 2014;9:e106718. doi: 10.1371/journal.pone.0106718. [DOI] [PMC free article] [PubMed] [Google Scholar]
- [24].Hai T, Teng F, Guo R, Li W, Zhou Q. One-step generation of knockout pigs by zygote injection of CRISPR/Cas system. Cell Res 2014;24:372–5. doi: 10.1038/cr.2014.11. [DOI] [PMC free article] [PubMed] [Google Scholar]
- [25].Cong L, Ran FA, Cox D, Lin S, Barretto R, Habib N, et al. Multiplex Genome Engineering Using CRISPR/Cas Systems. Science 2013;339:819–23. doi: 10.1126/science.1231143. [DOI] [PMC free article] [PubMed] [Google Scholar]
- [26].Mali P, Yang L, Esvelt KM, Aach J, Guell M, DiCarlo JE, et al. RNA-Guided Human Genome Engineering via Cas9. Science 2013;339:823–6. doi: 10.1126/science.1232033. [DOI] [PMC free article] [PubMed] [Google Scholar]
- [27].Skarnes WC. Is mouse embryonic stem cell technology obsolete? Genome Biol 2015;16. doi: 10.1186/s13059-015-0673-6. [DOI] [PMC free article] [PubMed] [Google Scholar]
- [28].Cohen J “Any idiot can do it.” Genome editor CRISPR could put mutant mice in everyone’s reach. Science 2016. doi: 10.1126/science.aal0334. [DOI] [Google Scholar]
- [29].Maruyama T, Dougan SK, Truttmann MC, Bilate AM, Ingram JR, Ploegh HL. Increasing the efficiency of precise genome editing with CRISPR-Cas9 by inhibition of nonhomologous end joining. Nat Biotechnol 2015;33:538–42. doi: 10.1038/nbt.3190. [DOI] [PMC free article] [PubMed] [Google Scholar]
- [30].Nakao H, Harada T, Nakao K, Kiyonari H, Inoue K, Furuta Y, et al. A possible aid in targeted insertion of large DNA elements by CRISPR/Cas in mouse zygotes. Genes N Y N 2000. 2016;54:65–77. doi: 10.1002/dvg.22914. [DOI] [PubMed] [Google Scholar]
- [31].Wang B, Li K, Wang A, Reiser M, Saunders T, Lockey RF, et al. Highly efficient CRISPR/HDR-mediated knock-in for mouse embryonic stem cells and zygotes. BioTechniques 2015;59. doi: 10.2144/000114339. [DOI] [PubMed] [Google Scholar]
- [32].Aida T, Nakade S, Sakuma T, Izu Y, Oishi A, Mochida K, et al. Gene cassette knock-in in mammalian cells and zygotes by enhanced MMEJ. BMC Genomics 2016;17. doi: 10.1186/s12864-016-3331-9. [DOI] [PMC free article] [PubMed] [Google Scholar]
- [33].Aida T, Chiyo K, Usami T, Ishikubo H, Imahashi R, Wada Y, et al. Cloning-free CRISPR/Cas system facilitates functional cassette knock-in in mice. Genome Biol 2015;16. doi: 10.1186/s13059-015-0653-x. [DOI] [PMC free article] [PubMed] [Google Scholar]
- [34].Bishop KA, Harrington A, Kouranova E, Weinstein EJ, Rosen CJ, Cui X, et al. CRISPR/Cas9-Mediated Insertion of loxP Sites in the Mouse Dock7 Gene Provides an Effective Alternative to Use of Targeted Embryonic Stem Cells. G3 Bethesda Md 2016;6:2051–61. doi: 10.1534/g3.116.030601. [DOI] [PMC free article] [PubMed] [Google Scholar]
- [35].Lee AY, Lloyd KCK. Conditional targeting of Ispd using paired Cas9 nickase and a single DNA template in mice. FEBS Open Bio 2014;4:637–42. doi: 10.1016/j.fob.2014.06.007. [DOI] [PMC free article] [PubMed] [Google Scholar]
- [36].Ellefson JW, Gollihar J, Shroff R, Shivram H, Iyer VR, Ellington AD. Synthetic evolutionary origin of a proofreading reverse transcriptase. Science 2016;352:1590–3. doi: 10.1126/science.aaf5409. [DOI] [PubMed] [Google Scholar]
- [37].Harms DW, Quadros RM, Seruggia D, Ohtsuka M, Takahashi G, Montoliu L, et al. Mouse Genome Editing Using the CRISPR/Cas System. Curr Protoc Hum Genet 2014;83:15.7.1–27. doi: 10.1002/0471142905.hg1507s83. [DOI] [PMC free article] [PubMed] [Google Scholar]
- [38].Jacobi AM. Simplified CRISPR tools for efficient genome editing and streamlined protocols for their delivery into mammalian cells and mouse zygotes. Methods 2017. [DOI] [PMC free article] [PubMed] [Google Scholar]
- [39].Yoshimi K, Kunihiro Y, Kaneko T, Nagahora H, Voigt B, Mashimo T. ssODN-mediated knock-in with CRISPR-Cas for large genomic regions in zygotes. Nat Commun 2016;7:10431. doi: 10.1038/ncomms10431. [DOI] [PMC free article] [PubMed] [Google Scholar]
- [40].Schilit SLP, Ohtsuka M, Quadros RM, Gurumurthy CB. Pronuclear Injection-Based Targeted Transgenesis: Pronuclear Injection-Based Targeted Transgenesis In: Haines JL, Korf BR, Morton CC, Seidman CE, Seidman JG, Smith DR, editors. Curr. Protoc. Hum. Genet, Hoboken, NJ, USA: John Wiley & Sons, Inc.; 2016, p. 15.10.1–15.10.28. [DOI] [PMC free article] [PubMed] [Google Scholar]
- [41].Behringer R, Gertsenstein M, Nagy KV, Nagy A. Manipulating the mouse embryo: a laboratory manual. 2014. [Google Scholar]
- [42].Hendel A, Bak RO, Clark JT, Kennedy AB, Ryan DE, Roy S, et al. Chemically modified guide RNAs enhance CRISPR-Cas genome editing in human primary cells. Nat Biotechnol 2015;33:985–9. doi: 10.1038/nbt.3290. [DOI] [PMC free article] [PubMed] [Google Scholar]
- [43].Jacobi AM, Rettig GR, Turk R, Collingwood MA, Zeiner SA, Quadros RM, et al. Simplified CRISPR tools for efficient genome editing and streamlined protocols for their delivery into mammalian cells and mouse zygotes. Methods 2017. doi: 10.1016/j.ymeth.2017.03.021. [DOI] [PMC free article] [PubMed] [Google Scholar]
- [44].Raveux A, Vandormael-Pournin S, Cohen-Tannoudji M. Optimization of the production of knock-in alleles by CRISPR/Cas9 microinjection into the mouse zygote. Sci Rep 2017;7:42661. doi: 10.1038/srep42661. [DOI] [PMC free article] [PubMed] [Google Scholar]
- [45].Chu VT, Weber T, Graf R, Sommermann T, Petsch K, Sack U, et al. Efficient generation of Rosa26 knock-in mice using CRISPR/Cas9 in C57BL/6 zygotes. BMC Biotechnol 2016;16. doi: 10.1186/s12896-016-0234-4. [DOI] [PMC free article] [PubMed] [Google Scholar]
- [46].Ménoret S, De Cian A, Tesson L, Remy S, Usal C, Boulé J- B, et al. Homology-directed repair in rodent zygotes using Cas9 and TALEN engineered proteins. Sci Rep 2015;5. doi: 10.1038/srep14410. [DOI] [PMC free article] [PubMed] [Google Scholar]
- [47].Wang L, Shao Y, Guan Y, Li L, Wu L, Chen F, et al. Large genomic fragment deletion and functional gene cassette knock-in via Cas9 protein mediated genome editing in one-cell rodent embryos. Sci Rep 2015;5. doi: 10.1038/srep17517. [DOI] [PMC free article] [PubMed] [Google Scholar]
- [48].Zhang L, Jia R, Palange NJ, Satheka AC, Togo J, An Y, et al. Large Genomic Fragment Deletions and Insertions in Mouse Using CRISPR/Cas9. PLOS ONE 2015;10:e0120396. doi: 10.1371/journal.pone.0120396. [DOI] [PMC free article] [PubMed] [Google Scholar]
- [49].Miura H CRISPR/Cas9-based generation of knockdown mice by intronic insertion of artificial microRNA using longer single-stranded DNA. Sci Rep 2015;5. doi: 10.1038/srep12799. [DOI] [PMC free article] [PubMed] [Google Scholar]
Associated Data
This section collects any data citations, data availability statements, or supplementary materials included in this article.
Supplementary Materials
Comparison of RNA yield between kits. 1μg DNA was used for RNA synthesis according to each manufacturer’s protocol. The RNA samples in lanes 1 and 2 were synthesized using kits from two different vendors. 1% of the eluates, from purification using the MEGAclear columns, were loaded. This figure illustrates that kits can vary in their efficiencies. It should be noted that the identity of the products is not an important point: we have observed a little better performance of a different batch from vendor 1, and somewhat poorer performance of another batch of kit from vendor 2.
Comparison of cDNA yield among different kits. cDNAs (ssDNA) were synthesized using reverse transcriptases from three different vendors (1 to 3). 1.7μg RNA was used for cDNA synthesis according to each manufacturer’s protocol and 50% of the reaction volumes were loaded. The cDNA yield from all three transcriptases are comparable.
Comparison of cDNA synthesis parameters. 1.7μg (lane 1 and 2) or 5μg (lanes 3 and 4) of RNA was used for cDNA synthesis and the reactions were incubated for 10 minutes (lanes 1 and 3) or 2 hours (lanes 2 and 4). 15% of the reaction volume was loaded. The band intensities suggest that 5μg RNA input produces optimal yields of cDNA.
Gel extraction of band/s from cDNA preparations. (a) Typical smear-like appearance of the cDNA (ssDNA) preparations in an agarose gel showing a prominent band (box # 1) and a less prominent band (box # 2). (b and c) Gel slices excised for DNA extraction. (d) The purified ssDNAs loaded in another gel showing both bands migrate similarly. Either of the gel preparations (1 or 2) can be used for microinjection, or both preparations can be pooled before use.
Verification of ssDNA using S1 nuclease. About 150 ng of ~0.5kb cDNA was incubated with or without S1 nuclease at 37°C for 15 minutes.
The polarity of guides and the ssDNA donor strands with respect to the genomic loci, in the previously published genome engineering projects using Easi-CRISPR