Abstract
This unit describes a protocol for generation of lung organoids. A lung organoid is a 3D cell/hydrogel composite that resembles the morphology and cellular composition of the human distal lung. These tissue-engineered constructs provide an in vitro model of human lung and are best suited for disease modeling applications. The organoid generation methodology is flexible, allowing for easy scalability in the number of organoids produced and in the ability to accommodate a wide range of cell types.
Keywords: distal airway, lung disease modeling, pluripotent stem cells, 3-D cell culture, tissue engineering
INTRODUCTION
This unit describes a protocol for the generation of bioengineered lung-like tissue known as the lung organoid. The main function of the lung organoid is to serve as a platform for 3D cell culture and pulmonary disease modeling. Tissue generation is achieved by a cell-directed, self-assembly process wherein cells adhere to multiple hydrogel beads and contract forming a network of cell-bead adhesions thereby resulting in a uniform, coherent cell-hydrogel composite. Cells are restricted to the interstitial spaces between the hydrogel beads mimicking the architecture of human distal lung. Multiple cell types may be included in the organoid formation process with sole requirement that ⅓ of the cells must be fibroblasts. Fibroblasts are necessary as they are the cell type responsible for forming the cell-bead adhesions and providing the contractility necessary to achieve tissue formation.
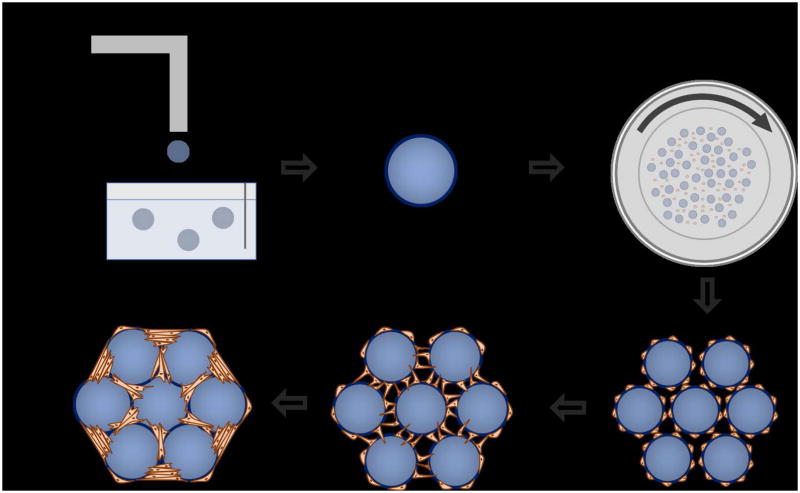
This procedure is designed to be both modular and scalable allowing for the inclusion of various cell types and ability to easily increase the number of organoids generated. Lung organoid generation can be summed up in four steps: 1) Generation of the hydrogel beads that constitute the alveolar scaffold, 2) Functionalization of the beads allowing for cellular adhesion to the bead surface, 3) Coating of the functionalized beads with cells in a rotating bioreactor, and 4) Aggregating the cell coated beads into the bottom of a well plate to allow for organoid formation, further experimentation, and analysis (Figure 1).
Figure 1.
Organoid formation graphic. a) Alginate beads are generated using an electrostatic droplet generator. b) Alginate beads are functionalized for cellular adhesion by performing a two-step process of collagen I precipitation and dopamine polymerization c) Cells and beads are combined in a high aspect ratio bioreactor vessel and rotated. This provides the flow condition necessary to achieve a uniform coating of cells onto the alginate beads. d) Cell coated beads are compacted together in the bottom of a standard tissue culture well plate. e) Fibroblasts that are included in the seeding process for bead-bead bridges and establish a tension that acts to pull the beads together into a single unit. e) A mature, fully formed organoid.
PDMS BIOREACTOR CHAMBER PROTOCOL
This protocol is used for the fabrication of the PDMS-based bioreactor chambers necessary for the generation of lung organoids. The primary function of the bioreactor chamber is to provide the flow conditions necessary to coat cells onto the functionalized hydrogel beads. The bioreactor chamber is templated using a 3D printed mold. 3D printing is a materials fabrication technique that allows for the production of 3D objects using a process known as additive manufacture. By following a blueprint outlined by a computer-aided drafting (CAD) file, a 3D printer will automatically produce 3D replica. The most common 3D printers use a technique known as extrusion in order to sequentially add layers of melted plastic to a base plate. By building up layers of material the printer can fabricate parts of a wide range of geometries.
Materials
-
Silicone Elastomer Kit 184 (Sylgard)
Silicone Elastomer (PDMS) Base
Silicone Elastomer (PDMS) Curing Agent
Weigh boat
Stirring stick
Vacuum Chamber (Kartell)
35 × 10 mm untreated, flat bottom Petri Dishes (Falcon)
uPrint SE Plus 3D Printer (or equivalent)
Fabrication of the PDMS Bioreactors for Lung Organoid Generation
-
Print the mold by uploading the provided .stl file to the 3D printer. The printed mold is specifically compatible with the petri dishes listed above. Most commercially available 3D printers will accept the ‘.stl’ file type. Common printing materials include acrylonitrile butadiene styrene (ABS) and poly(lactic acid) (PLA) and have both shown compatibility when used to mold PDMS. Prior to use, the 3D printed mold should be rinsed with water and dried thoroughly.
.stl is a file format used by CAD software programs interpreted by 3D printing platforms. Weigh out 15 grams of silicone elastomer (PDMS) base in the weight boat and combine with 1.5 grams of silicone elastomer (PDMS) curing agent for a ratio of 10:1. Decreasing this ratio increases the stiffness of the vessel. The two components are viscous liquids which solidify after 24 hours of curing.
-
Thoroughly mix the base and curing agent in the weight boat, forming bubbles. Place the mixture in the vacuum chamber and turn on the vacuum. Leave the mixture in the vacuum chamber until all the bubbles have dissipated.
House vacuum is sufficient for this step. Vacuum is not strictly necessary but helpful for removing bubbles that accumulate from mixing the PDMS reagents.
Insert the 3D printed mold into the petri dish.
Pipet the liquid PDMS into the empty space in the petri dish (approximately 10 mL) until it slightly overflows.
Cover this and let it cure overnight.
The next day, remove the 3D printed mold. Weigh out and mix more PDMS base and PDMS curing agent at the same ratio as the first day, and pipet the additional liquid PDMS on top of the rim of solidified PDMS. Let this cure overnight. The secondary addition of PDMS is necessary to form a convex PDMS rim that acts as a gasket and allows easy vessel sealing.
Ensure that petri dish lid seals tightly over the raised, solidified PDMS rim. This process creates a cavity within the PDMS-cast petri dish with a volume of 2 mL.
ALGINATE BEAD SYNTHESIS BY ELECTROSTATIC DROPLET GENERATION
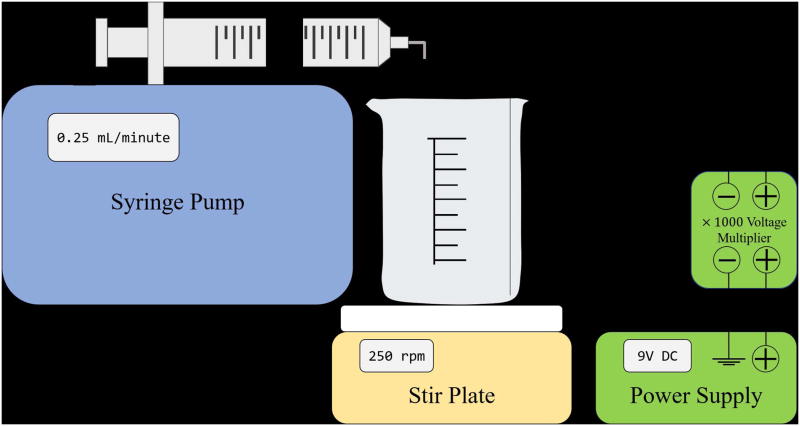
This protocol is used to synthesize alginate beads using an electrostatic droplet generator (Figure 2). This device may be purchased outright or assembled from other standard lab equipment as detailed below. Beads are generated when an alginate solution is pumped through a small, 27-gauge needle in the presence of a high electric field. The electric field acts to break up the alginate droplets wherein the resulting droplet size is directly related to the strength of the applied electrical potential. The larger the potential the smaller the resulting alginate droplets. These droplets fall into a bath of 100mM barium chloride crosslinking with the ionic barium and retaining a spherical geometry. The beads are then stored for future functionalization.
Figure 2.
Schematic for the assembly of the electrostatic droplet generator.
The lung organoid scaffold is comprised of an alginate-based hydrogel bead functionalized with an adlayer of collagen I/poly(dopamine). Alginate is an anionic polysaccharide composed of linear chains of D-mannuronate and L-guluronate residues and is commonly used in bioengineering applications due to its biocompatibility(Shamis et al., 2013). In addition, alginate may be crosslinked with addition of divalent cation including calcium, barium, and strontium(Bajpai and Sharma, 2004). The alginate beads are produced using an electrostatic droplet generator, a device that allows for control over the bead size distribution(Bugarski et al., 1994). The bead generation parameters are optimized for producing beads of a size distribution that is commensurate with the average alveolar sac diameter of the human lung.
Materials
Power supply (Heath DC 2762)
Voltmeter (AMPROBE DM9C)
Transformer (EMCO model F121 mfg code 1955C AD)
Syringe pump (KD Scientific 78C212V)
Magnetic stirring bars (Fisher Scientific 14-513-59SIX)
250 mL beaker (Pyrex USA)
Barium chloride dihydrate (Sigma Aldrich B0750-500G)
3% alginate (Sigma, PCode 1002281382, alginic acid sodium salt from brown algae) sterile filtered
Syringe Filter 0.45um (Puradisc, GE Healthcare)
20 mL syringe (BD Luer-Lok tip REF 302830, sterile)
27 gauge needle, (LS27S Luer Stubs INSTECH)
Sterile 50 mL centrifuge tube (BioPioneer Inc)
Synthesize alginate beads by electrostatic droplet generation
Fold ground wire into a circle and fit into the bottom of a 250 mL beaker. Add 200 mL of 100 mM barium chloride into the beaker.
Place a magnetic stir bar inside the beaker, cover, then set the beaker onto a magnetic stirrer. Initiate stirring at a rate of 250 rpm.
Fill syringe with 15mL alginate solution, affix the 27-gauge needle, and place in syringe pump. Bend the needle to a 90° angle such that the needle dispenses directly into the barium chloride bath. Set the pump rate to 0.25 mL/minute. The syringe pump should be placed above the barium chloride bath such that there is a distance of 3 cm between the tip of the needle and the bath.
Allow the solution to drip out of the syringe until a constant drip rate is reached, then stop the pump. Dispose of the waste that was pumped out.
-
Connect the circuit as shown in (Figure 2) and set the power supply voltage to 9V DC using a voltmeter. Turn off the voltmeter, and attach the power supply to the syringe needle.
Remember to carefully inspect the circuit for any potential shorts and make sure that the needle is at least 3 cm away from the barium bath before powering on the power supply. Remove the cover over the beaker, turn on the power supply, and turn on the syringe pump.
After the syringe empties, cover the beaker, remove the ground wire and stir bar from the beaker, and allow the alginate beads to settle. Remove excess barium chloride solution.
Store sterile alginate beads in a 50 mL tube at 4°C. The beads are densely packed together and immersed in residual barium chloride. Beads can be stored for four weeks before use.
ALGINATE BEAD FUNCTIONALIZATION BY COLLAGEN I/POLY(DOPAMINE) COATING
This protocol is used to coat alginate beads in collagen I and then in poly(dopamine) to begin the process of creating 3D lung organoids. This also prepares the alginate beads for cell culture. Alginate beads are covered in collagen I and 7 days later are submerged in poly(dopamine). All excess poly(dopamine) solution is removed and then beads are put into DMEM/F-12 Media where they remain until the assembly of 3D lung organoids begins. Beads can be stored in this solution at 4°C for three months.
The alginate beads require the addition of a cell-adhesive adlayer as alginate alone does not offer any cell binding modalities. This is accomplished by implementing a two-step process of extracellular matrix (ECM) precipitation followed by dopamine polymerization, a procedure inspired by the method that mussels use for adhering to a wide variety of wet surfaces(Lee et al., 2007). After functionalization, the beads are then soaked in relevant, serum-free media to minimize osmotic shock when cells are introduced to the bead surface.
Materials
50 mL tubes with alginate beads synthesized in protocol 1 (BioPioneer)
15 mL tubes (BioPioneer)
200 μL pipette
2 mL, 5 mL, 15 mL serological pipette
Collagen Type I Rat Tail High Concentration 8.34 mg/mL (Corning)
Vortex
4° C fridge
Dopamine hydrochloride powder (Sigma)
50 mM Tris Buffer pH 8.5
20 mL syringe (BD)
25mm 0.2 μm syringe filter (Puradisc)
Scale
Rotator
DMEM/F-12 (1:1) (1×) Media
Ice Bucket
Collagen Coating of alginate Beads
Add alginate beads, made in previous protocol, to a 15mL tube with 15mL pipette until the sedimented volume of the alginate beads equals 2.5mL.
Remove excess BaCl2 solution using a 2 mL pipette and then a 200 μL pipette until no BaCl2 solution is present.
Add 1 mL of rat tail collagen I concentration 8.34 mg/mL to each 15 mL tube of beads using a 5mL pipette. Vortex vigorously to coat all beads with the collagen I solution.
Place aliquots back into the 4 ° refrigerator and wait seven days.
Poly (dopamine) coating of Collagen 1 alginate beads
Weigh 0.1g of dopamine powder and place into a 50mL tube.
-
Retrieve 15 mL tubes containing alginate bead samples from 4° fridge and put them on ice in ice bucket.
The following steps are to be done in a sterile tissue culture hood/room unless stated otherwise. Carefully pipette all excess Collagen I using 200uL pipette. Once all excess Collagen I is removed, place the beads back on ice. Begin preparing poly (dopamine) solution by taking the 50mL tube with the dopamine powder and pipette in 50 mL of Tris Buffer. Pipette until all powder is dissolved.
Take a new 0.2 μm syringe filter and put it on a new 20mL syringe. Pipette 25 mL of dopamine solution into the syringe. Push the dopamine solution through the syringe filter and evenly distribute the solution into the bead tubes until the plunger is completely depressed.
Place the bead tubes into a 15 mL tube rotator and set at 16 rpm in order to evenly distribute the dopamine solution. Rotate for one hour.
-
Remove beads from the rotator and pipette out excess poly(dopamine) solution. Wash the beads 3 times with 50 mM Tris buffer.
To wash, add 10 mL of Tris buffer to the poly (dopamine) soaked beads and shake until Tris Buffer is evenly distributed. This will allow the removal of any excess poly(dopamine) left over. Repeat three 3 times. Remove all excess solutions from the beads by pipetting beads with 200 μL pipette using the same technique used to remove the excess Collagen I.
Add 15 mL of DMEM/F-12 Media to the beads then vortex to avoid beads clumping near the bottom. Place beads back into the 4 ° refrigerator for a maximum of three months.
LUNG ORGANOID GENERATION PROTOCOL
This protocol is used to generate the final lung organoid product, consisting of the previously mentioned functionalized alginate beads and cultured cells. The cells used can be of any type, but at least 33% of the overall cell seeding concentration must be fibroblasts. The organoids are cultured in a 96 well plate, with media changes every 24 hours. They can be removed from the plate after 72 hours of culture. The following protocol assumes a 2 mL bioreactor chamber volume. Use 106cells per mL of bioreactor volume and 0.25 mL of functionalized beads per mL of bioreactor volume.
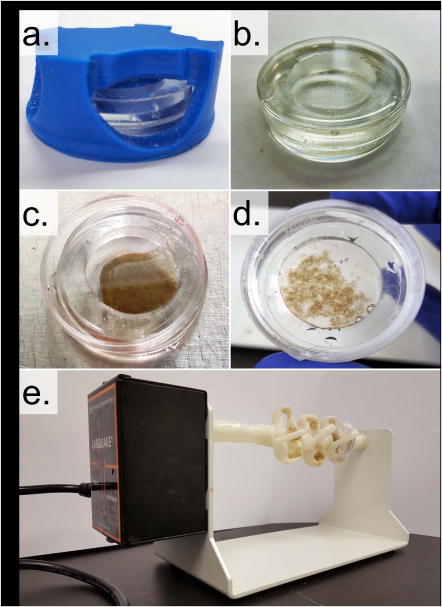
Cell adhesion to the functionalized alginate bead surface is achieved by rotating cells and beads in a high aspect ratio vessel (HARV) bioreactor. When rotated at the appropriate speed, the HARV system provides a flow condition that optimizes cell-bead interactions therefore facilitating cell adhesion to the bead surface(Wilkinson et al., 2016). The HARV chamber is comprised of a 35mm petri dish inset with a poly(dimethylsiloxane) chamber. It is fabricated using a custom, 3D-printed mold that sits atop the petri dish allowing for PDMS precursor to be added and set into the desired geometry. Chamber rotation is enabled by mounting the HARV in a custom, 3D-printed bracket that is affixed onto a lab rotisserie (Figure 3). HARV chamber design and fabrication are specifically geared toward rapid prototyping and ease of entry as 3D printing and PDMS casting are methods that have become widely available and affordable.
Figure 3.
Cell adhesion to the functionalized alginate beads is enabled by a high aspect ratio rotational bioreactor. a) The bioreactor vessel is a PDMS well cast into a standard 35×10mm petri dish using a custom designed 3D mold (blue). b) The completed bioreactor vessel. c) The bioreactor vessel with 0.25mL of sedimented, functionalized alginate beads. d) Bioreactor vessel after 1hr of incubation with 2 million fetal lung fibroblasts. NOTE: the beads have clumped together indicating successful cellular adhesion. e) Image of the loaded bioreactor vessel in the rotational bioreactor comprised of a lab rotisserie and a custom built bioreactor vessel mount.
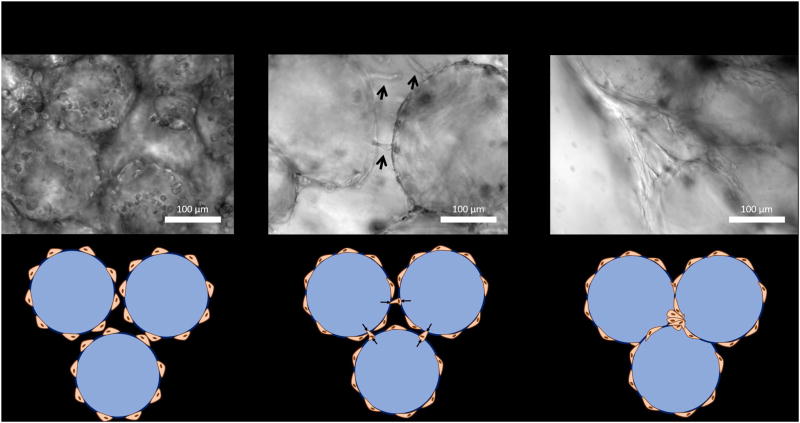
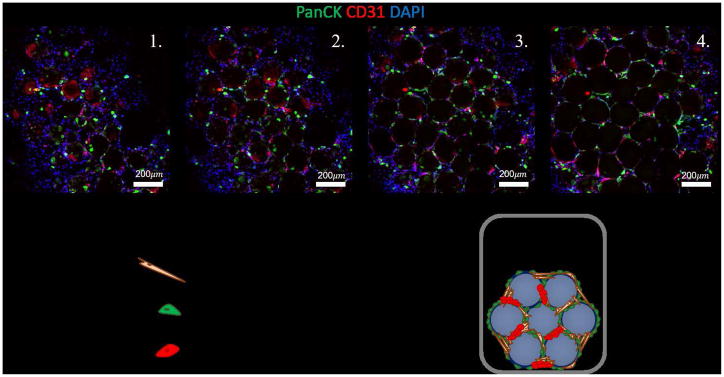
Organoid formation occurs when individual cell-coated beads are combined in the bottom of a tissue culture well plate. Organoid condensation, the process of individual cell-coated beads becoming a single, coherent piece of tissue, can be described as a self-assembly process driven by the fibroblasts that have been included at the cell seeding stage. Fibroblasts will, over the course of several days, form bead-bead bridges providing the tension that results in structural contraction and cohesion (Figure 4). Other cell types (Figure 5) may be added while still allowing for successful organoid formation, although these cells will not likely take part in the active process of bead-bead cellular bridge formation and contraction needed to produce a cohesive piece of tissue.
Figure 4.
Fibroblast-driven organoid formation mechanism. After 1 hour in the rotational bioreactor vessel, fibroblasts are observed to adhere to the bead surface but have yet begun to spread. After ~24hrs fibroblasts form bead-bead bridges and establish the tension necessary to pull the beads together and form a cohesive organoid. After ~48hrs the fibroblasts have successfully pulled the beads together completing the organoid formation process.
Figure 5.
Characterization of multicellular lung organoid. The multicellular lung organoid contains small airway epithelial cells stained for pancytokeratin (PanCK), human umbilical vein endothelial cells stained for CD31, and fetal lung fibroblasts. Included are various z-stack, confocal images, taken at 50μm heights, of an intact, multicellular organoid.
Materials
Cells cultured in relevant media
15 mL tube containing alginate beads from previous protocol
2 mL custom built PDMS-cast petri dish (see later protocol)
Parafilm (Bemis)
Rotisserie with custom-built bioreactor mount (Thermo Scientific)
Plastic 96 well plate (Olympus)
15 mL conical tube – empty
Vortex Mixer (Fisher Scientific)
Allegra X-15R Centrifuge (Beckman Coulter)
1000-μL Rainin pipette
Portable pipet-aid (Drummond)
Generate Lung Organoids from Functionalized Alginate Beads
The following steps are to be done in a sterile tissue culture hood/room unless stated otherwise.
Briefly vortex the 15 mL tube of functionalized beads to break up any sedimentation and/or bead aggregates. Let the beads sediment to the bottom of the tube
Sterilize 2 mL PDMS-cast petri dish made in the first protocol by soaking it in a 10% bleach solution for 5 minutes. The cavity formed by the PDMS laid within the petri dish is 2 mL in volume.
Pipette 0.5 mL of the bead sediment into the 2 mL PDMS-cast petri dish.
-
Collect, de-adhere, and concentrate a solution of cells in relevant media at 1.33 × 10⁶ cells/mL. Transfer 1.5 mL of this cell solution to the bioreactor chamber.
In order to best capture the distal lung microenvironment a combination of epithelial, endothelial, and mesenchymal cells may be seeded during this step. A combination of small airway epithelial cells (Lonza), human umbilical vein endothelial cells (Lonza), and fetal lung fibroblasts (FLFs) were chosen for this purpose. Cells obtained from Lonza were cultured to the manufacturer’s specifications and media formulations. FLFs are cultured in HLF media.
When combining cells for organoid formation a combination of epithelial cell media (SAGM) and endothelial cell (EGM) should be used at a ratio of 1:1.
Place the lid on the PDMS-cast petri dish and wrap the perimeter in parafilm to make a watertight seal, making sure to minimize bubble formation within the chamber.
Place the PDMS-cast petri dish in the rotisserie mount and place in cell culture incubator at 37° and 5% CO2. Set the rotisserie to 16.5 rpm for 1 hour.
Pipette PDMS-cast petri dish contents into a 15 mL conical tube and allow the cell-coated beads to sediment.
Using a 1000 μl pipette with the end of the pipette tip cut off, aspirate 100 uL aliquots of cell coated beads into individual wells in a 96 well plate.
Add an additional 150 μL of media into each well.
Centrifuge the 96 well plate at 1000g for 5 minutes to further sediment and pack the beads.
Culture organoids in cell incubator, exchanging the media every 24 hours.
REAGENTS AND SOLUTIONS
HLF medium
500 mL DMEM F12 50/50 1X (Corning)
50 mL HI Fetal Bovine Serum (Life Technologies)
5 mL GlutaMAX 100X (Life Technologies)
5 mL MEM Non-Essential Amino Acid Solution 10 mM (StemCell Technologies)
1 mL primocin 50 mg/mL (Invivo Gen)
-
HUVEC medium
EGM (Lonza)
-
Small Airway Epithelial Cell Medium
SAGM (Lonza)
Commentary
Background Information
The development and generation of human organoids promises new insight into disease pathophysiology and organ function at an unprecedented level. This is primarily due to the fact that cell function and phenotype is heavily dependent on a myriad of microenvironmental cues including soluble molecules, extracellular matrix adhesions, neighboring cell types, and mechanical perturbation(Birgersdotter et al., 2005). Most of these cues are lost upon traditional 2D cell culture resulting in differences in gene expression thereby limiting their scientific usefulness. Organoid systems attempt to ameliorate the limitations of 2D tissue culture by providing a 3D, multicellular organ mimic. Despite the fact that organoids have been available for many years, there is no strict definition of the term as there has been varied success in producing 3D mimics of different organs in years past. The common thread for all organoid technologies is to generate tissues that contain the correct cell types resident in the organ of interest and demonstrate that the resulting tissue shows signs of organ level functionality.
Currently, there are two distinct paradigms of organoid generation differing primarily in how the organoid architecture is achieved. The first method relies on the differentiation of stem cells down the lineage necessary to achieve the cell type(s) present in the desired organ(Mondrinos et al., 2014). These techniques are usually performed by embedding primitive cells in a hydrogel and then driving differentiation by supplementing the cell culture media with a cocktail of growth factors. The second method, which relates to this protocol, seeks to template organoid architecture by seeding cells onto a biocompatible scaffold material(Lee et al., 2008). Here the scaffold itself provides the structure for cellular adhesion and growth allowing for further differentiated and primary cells to be used directly. The variety and number of methodologies that have been developed allow for a range of applications.
The most promising of organoid technologies arises when organoid formation techniques are combined with induced pluripotent stem cells (iPSCs). There are a large number of poorly understood, fatal diseases whose heterogeneity and multifactorial origins have so far resisted efforts to accurately model and treat these conditions(Lee et al., 2014). iPSCs may provide a new route toward generating patient-specific disease models allowing for virtual clinical trials wherein a patient’s own disease in a dish is used for high throughput drug screening(Ebert and Svendsen, 2010). This is possible due to the fact that iPSCs are derived from and contain the patient’s own DNA and are certainly more likely to reflect the patient’s specific disease phenotype. By differentiating these cells and generating organoids it may be possible to gain unique insight into disease initiation and phenotypic progression thereby granting the ability for clinicians to discover novel therapies that show high likelihood of effectiveness.
To achieve the promises of personalized medicine, the lung organoid has been designed to allow for scalable generation of patient-specific lung mimics, which will enable disease modeling and drug discovery. Scalability is achieved by implementing methods that are cheap, reproducible and easily modifiable. Specifically, as long as the parameters of cellular adhesion to the hydrogel bead scaffold and cellular bead-bead bridge formation are achieved, successful organoid formation is likely to be agnostic towards the specific hydrogel bead material and bead size distribution used.
Critical Parameters and Troubleshooting
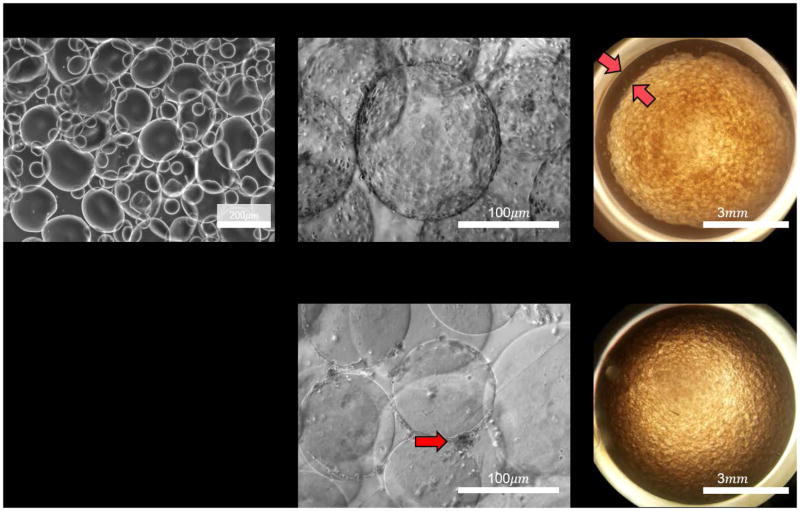
The 3 most critical factors of organoid formation include: 1) achieving a uniform, coherent layer of collagen I/poly(dopamine) on the alginate bead surface, 2) achieving an even coating of cells adhered to the bead surface, 3) compacting the cell-coated beads in order to allow cellular bead-bead bridge formation. Each of these steps must be verified using phase contrast microscopy (Figure 6) prior to moving onto the next step in the process. Observation of cell adhesion to the bead surface is the most important functional test of collagen I coating and indicates high probability of successful organoid formation. (Table 1) includes the various steps, potential pitfalls, and possible solutions for commonly occurring problems. Bead-bead contact and organoid formation will occur upon bead sedimentation in any size of tissue culture well plate given that enough cell-coated beads are used. While centrifugation is strictly not necessary for organoid formation its implementation results in increased organoid uniformity, and therefore, better reproducibility. The final test for successful organoid formation is the observation of organoid contraction, the formation of a gap between the edge of the organoid and the wall of the containing well.
Figure 6.
Validation of organoid formation steps can be achieved using phase contrast microscopy. The main failure modes occur when cells fail to adhere to the bead surface or the organoid fails to contract away for the wall of the tissue culture well.
Table 1.
Troubleshooting guide for diagnosing and solving common problems with the lung organoid formation process.
| Organoid Formation Step | Potential Pitfalls | Possible Solutions |
|---|---|---|
| Alginate Bead Generation |
|
|
| Collagen I/poly(dopamine) Coating Application | Cells fail to adhere to the bead surface. | Increase the number of fibroblasts included in the seeding. |
| Organoid formation by bead aggregation | Organoid fails to contract after bead aggregation. | Increase the number of fibroblasts included in the seeding. |
Anticipated Results and Time Considerations
Organoid formation occurs over the course of several days depending heavily on the initial seeding conditions and the included cell types. Fibroblast only organoids seeded at a high ratio of cells to beads (>4 × 10⁶ cells/mL beads) may only require 24 hours to form whereas a multicellular organoid may require up to 7 days to fully mature. Successful organoid formation may be confirmed by observing organoid contraction, and the pulling away of the beads from the edges of the well plate in which they were seeded.
SIGNIFICANCE STATEMENT.
Lung diseases are complex and we have no therapies for many of them, despite multiple clinical trials with compounds that have been found to be effective in animal models. The lack of development of effective therapies for lung diseases could be explained by the paucity of truly representative in vitro and in vivo disease models. The development of human 3-D model systems that recapitulate the interactions between the multiple cell types of the lung in its 3-D architecture is likely to more closely resemble lung diseases and provide a more relevant platform for drug screening.
Acknowledgments
D.C.W. was supported by a National Science Foundation Graduate Fellowship. B.D. acknowledges the support of the UCLA Eli and Edythe Broad Stem Cell Research Center. B.N.G. is supported by R01 GM114259-01 and R01CA208303-01 and also acknowledges the support of the UCLA Eli and Edythe Broad Stem Cell Research Center and the Dave Steffy Stem Cell Research Fund for Idiopathic Pulmonary Fibrosis. We appreciate the UCLA Eli and Edythe Broad Stem Cell Research Center Microscopy Core and the Translational Pathology Core Laboratory in the UCLA Department of Pathology and Laboratory Medicine and Jonsson Comprehensive Cancer Center.
Footnotes
CONFLICTS OF INTEREST
B.N.G is a co-founder, stock holder and consultant to InSpira LLC.
Literature Cited
- Bajpai SK, Sharma S. Investigation of swelling/degradation behaviour of alginate beads crosslinked with Ca2+ and Ba2+ ions. [Accessed July 22, 2014];Reactive and Functional Polymers. 2004 59:129–140. Available at: http://linkinghub.elsevier.com/retrieve/pii/S1381514804000161. [Google Scholar]
- Birgersdotter A, Sandberg R, Ernberg I. Gene expression perturbation in vitro--a growing case for three-dimensional (3D) culture systems. [Accessed August 17, 2014];Seminars in cancer biology. 2005 15:405–12. doi: 10.1016/j.semcancer.2005.06.009. Available at: http://www.ncbi.nlm.nih.gov/pubmed/16055341. [DOI] [PubMed] [Google Scholar]
- Bugarski B, Li Q, Goosen MFa, Poncelet D, Neufeld RJ, Vunjak G. Electrostatic droplet generation: Mechanism of polymer droplet formation. AIChE Journal. 1994;40:1026–1031. Available at: http://doi.wiley.com/10.1002/aic.690400613. [Google Scholar]
- Ebert AD, Svendsen CN. Human stem cells and drug screening: opportunities and challenges. Nature Reviews. Drug Discovery. 2010:9. doi: 10.1038/nrd3000. Available at: [DOI] [PubMed]
- Lee AS, Mira-Avendano I, Ryu JH, Daniels CE. The burden of idiopathic pulmonary fibrosis: An unmet public health need. Respiratory Medicine. 2014;108:955–967. doi: 10.1016/j.rmed.2014.03.015. Available at: [DOI] [PubMed] [Google Scholar]
- Lee H, Dellatore SM, Miller WM, Messersmith PB. Mussel-inspired surface chemistry for multifunctional coatings. [Accessed July 11, 2014];Science. 2007 318:426–430. doi: 10.1126/science.1147241. Available at: http://www.pubmedcentral.nih.gov/articlerender.fcgi?artid=2601629&tool=pmcentrez&rendertype=abstract. [DOI] [PMC free article] [PubMed] [Google Scholar]
- Lee J, Cuddihy MJ, Kotov Na. Three-dimensional cell culture matrices: state of the art. [Accessed July 11, 2014];Tissue engineering. Part B, Reviews. 2008 14:61–86. doi: 10.1089/teb.2007.0150. Available at: http://www.ncbi.nlm.nih.gov/pubmed/18454635. [DOI] [PubMed] [Google Scholar]
- Mondrinos MJ, Jones PL, Finck CM, Lelkes PI. Engineering De Novo Assembly of Fetal Pulmonary Organoids. Tissue Engineering Part A. 2014;20:2892–2907. doi: 10.1089/ten.tea.2014.0085. Available at: http://online.liebertpub.com/doi/abs/10.1089/ten.tea.2014.0085. [DOI] [PMC free article] [PubMed] [Google Scholar]
- Shamis Y, Silva EA, Hewitt KJ, Brudno Y, Levenberg S, Mooney DJ, Garlick JA. Fibroblasts derived from human pluripotent stem cells activate angiogenic responses in vitro and in vivo. PLoS ONE. 2013;8:1–13. doi: 10.1371/journal.pone.0083755. [DOI] [PMC free article] [PubMed] [Google Scholar]
- Wilkinson DC, Alva-Ornelas JA, Sucre JMS, Vijayaraj P, Durra A, Richardson W, Jonas SJ, Paul MK, Karumbayaram S, Dunn B, et al. Development of a Three-Dimensional Bioengineering Technology to Generate Lung Tissue for Personalized Disease Modeling. Stem Cells Translational Medicine. 2016;1:1–12. doi: 10.5966/sctm.2016-0192. [DOI] [PMC free article] [PubMed] [Google Scholar]


