Overview
Introduction
The anterolateral thigh (ALT) flap allows for healthy, reliable, vascularized, soft-tissue coverage of extremity or axial defects of traumatic or acquired deformities.
Indications & Contraindications
Step 1: Positioning and Markings
Place the patient in the supine position, which allows for flap harvest and typically does not require any position changes (Fig. 1), and then mark the septum between the vastus lateralis and rectus femoris, which facilitates harvest of this flap (Video 1).
Step 2: Perforator Dissection
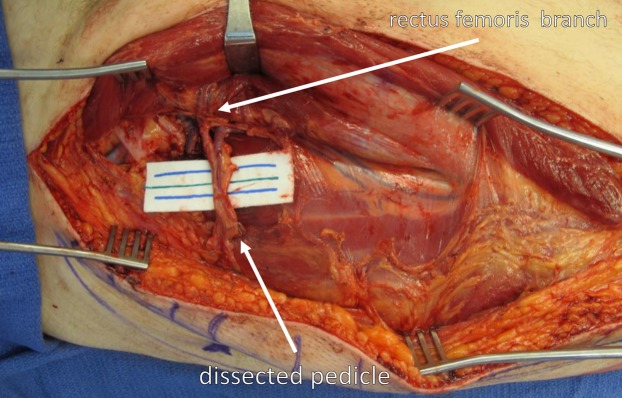
Dissect this flap, which is relatively straightforward and rapid after identifying the perforating vessels (Video 2, Fig. 4).
Step 3: Pedicle Dissection
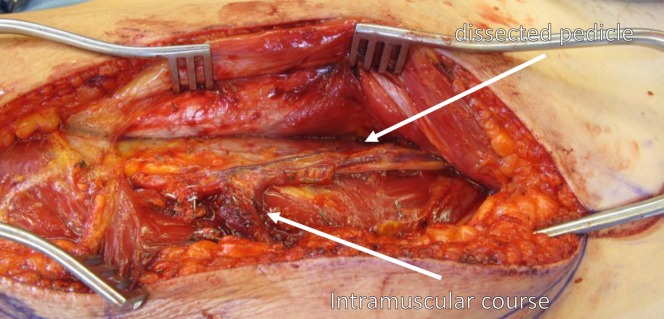
Trace the course of the descending branch of the lateral femoral circumflex proximally and determine the maximum pedicle length and vessel diameter for microvascular anastomoses (Figs. 5 and 6).
Step 4: Flap Harvest and Recipient Vessels
Confirm the dimensions of the flap prior to final harvest of the flap, and pay special attention to the recipient arterial inflow and venous outflow to ensure success.
Step 5: Microvascular Anastomoses
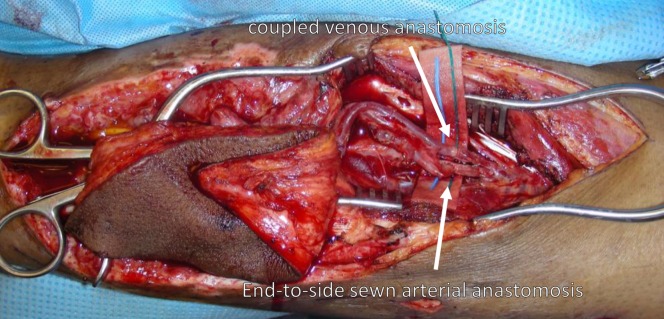
When performing this flap as a microvascular free flap, identify and prepare suitable vessels for tissue transfer (Fig. 13).
Step 6: Flap Inset
Pay special attention to the flap inset to ensure that there is no mechanical obstruction to the pedicle and that the inset allows for the anticipated postoperative edema (Figs. 14 and 15).
Step 7: Donor Site Closure
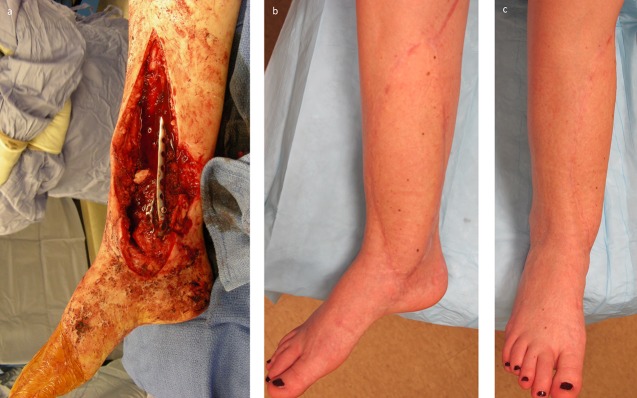
Close the donor site for this flap, which is well tolerated and easily concealed (Fig. 16).
Step 8: Flap Monitoring and Postoperative Care
Postoperative monitoring is critical to identify any potential vascular compromise early and maximize successful outcomes4.
Results
The ALT is a highly successful and reliable flap that has become a workhorse of reconstructive microsurgery5.
Pitfalls & Challenges
Introduction
The anterolateral thigh (ALT) flap allows for healthy, reliable, vascularized, soft-tissue coverage of extremity or axial defects of traumatic or acquired deformities.
The ALT flap is a fasciocutaneous flap described by Song et al.1 that is based on perforators emanating from the descending branch of the lateral femoral circumflex artery. This flap can be small or large (up to 15 × 40 cm) and utilized as a pedicled or free flap. It can also be taken as a neurosensory flap2, or with components of underlying vastus lateralis or rectus femoris muscle in a chimeric fashion3, depending on the particular indication.
Flap harvest is facilitated with the use of the supine position, with reliable perforators extending to the anterolateral aspect of the thigh from the descending branch of the lateral femoral circumflex artery with a septocutaneous or musculocutaneous course. Perforators are marked preoperatively on the basis of landmarks and/or cutaneous Doppler flow signal. The perforators are rapidly identified after making the incision and a brief subfascial dissection. The ALT flap is then raised with proximal dissection of the perforators, and the pedicle length is extended as needed for transfer. This sometimes requires an intramuscular dissection through the vastus lateralis. The flap can be primarily thinned above the level of the fascia if desired, taking care to protect perforators. The flap is then either rotated in a pedicled fashion, or harvested and transferred to a distant location as a free flap. Free-flap vascular anastomosis is typically performed in an end-to-side fashion to the appropriate recipient vessels for soft-tissue coverage of defects in extremity reconstruction. The donor site is typically closed primarily in layers over closed suction drainage, or skin grafted if the donor site is of sufficient size and not able to be closed primarily.
Indications & Contraindications
Indications
Reconstruction after oncologic resection
Coverage of open fractures and nonunions
Coverage for salvage of compromised joint replacements
Coverage following amputation or to preserve limb length
Soft-tissue coverage of exposed bone, tendon, implants, or vital structures
Soft-tissue coverage of osteomyelitis or treated infection
Contraindications
Unsuitable donor site
Inadequately debrided wounds or unstable wound bed
Morbid obesity
Dysvascular limb
Prohibitive medical comorbidities
Unwillingness to accept donor site
Step 1: Positioning and Markings
Place the patient in the supine position, which allows for flap harvest and typically does not require any position changes (Fig. 1), and then mark the septum between the vastus lateralis and rectus femoris, which facilitates harvest of this flap (Video 1).
Place the patient in the supine position on the operating-room table.
Prepare and drape both lower extremities circumferentially to the level of the anterior superior iliac spine (ASIS).
Place the limb in a neutral position without external rotation.
Draw a straight line from the ASIS to the superolateral aspect of the patella.
The midway point of this line is identified as the presumptive central perforating vessel between the vastus lateralis and the rectus femoris. This will serve as the anteroposterior line.
Mark points 5 cm superior and inferior along the same line, which are identified as the presumptive superior and inferior perforators, respectively.
Measure the estimated size of the defect and position a template of this defect over the previously marked perforators (Figs. 2 and 3).
Do not perform the final skin incisions until certain that the flap is centered over the chosen perforators.
Fig. 1.
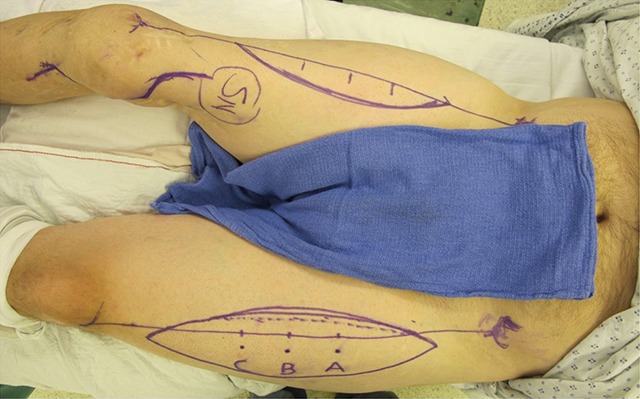
Supine positioning allows access for unilateral, or in this patient, bilateral, ALT flap harvest.
Fig. 2.
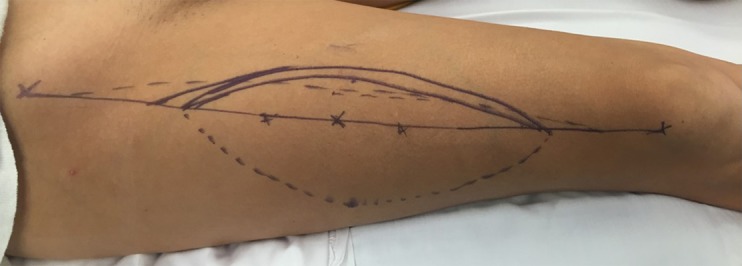
A straight line is drawn from the ASIS to the superolateral border of the patella, and the A, B, and C perforators are marked using standardized measurement. The incision is initially made medially to allow for perforator identification and pedicle dissection.
Fig. 3.
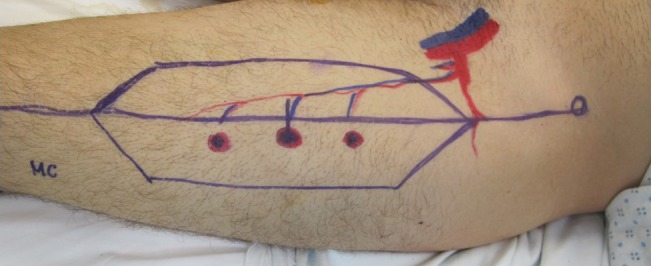
Perforators can also be identified by Doppler signal and CT imaging. These markings illustrate the perforators coursing from the descending branch of the lateral femoral circumflex vessels.
Video 1.
Consistent anatomical markings allow for reliable flap harvest.
Step 2: Perforator Dissection
Dissect this flap, which is relatively straightforward and rapid after identifying the perforating vessels (Video 2, Fig. 4).
Make an incision along the medial marked border of the flap, which is also medial to the anteroposterior line of the thigh, as marked above.
Carry the incision down through the deep fascia of the thigh.
Perform a subfascial dissection until the fat stripe separating the rectus femoris and the vastus lateralis is identified.
This fat plane marks the septum between the vastus lateralis and rectus femoris and is the location that the perforators will emanate from if they are septocutaneous in origin.
If perforators are not identified in this plane, continue subfascial dissection laterally until perforators can be visualized emanating from the substance of the vastus lateralis muscle.
Identify and assess all perforators for size, flow, and ability to support the cutaneous needs of the reconstruction.
Choose perforator(s) as necessary. Typically, only 1 perforator is needed to ensure adequate perfusion even for very large flaps.
Open the septum between the vastus lateralis and rectus femoris and identify the descending branch of the lateral circumflex.
Then dissect the perforators through either their septocutaneous or musculocutaneous course and trace back to the descending branch of the lateral circumflex vessels. It is important to dissect from perforator to source vessel to ensure that no inadvertent perforator injuries occur. A septocutaneous dissection is typically quite rapid, but a musculocutaneous perforator may require a more tedious dissection.
Fig. 4.
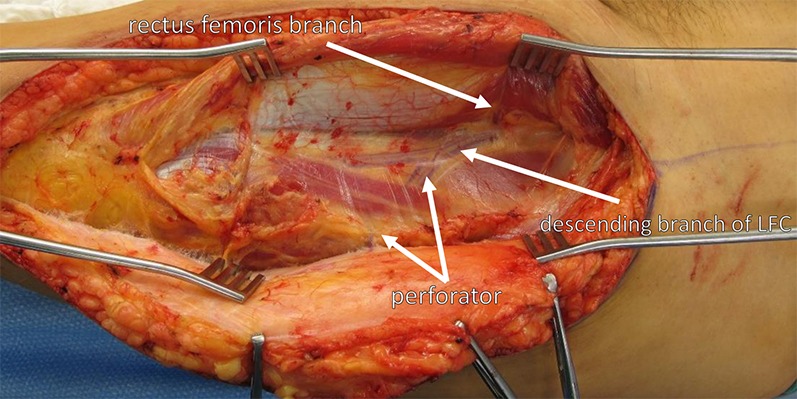
Wide exposure and self-retaining retractors facilitate a safe and clear view of the perforators and the pedicle, including the rectus femoris branch, all of the way to the source vessels. LFC = lateral femoral circumflex artery.
Video 2.
Flap dissection and perforator identification are performed to supply a healthy and well-perfused flap.
Step 3: Pedicle Dissection
Trace the course of the descending branch of the lateral femoral circumflex proximally and determine the maximum pedicle length and vessel diameter for microvascular anastomoses (Figs. 5 and 6).
Identify the rectus femoris branch. Depending on the reconstructive needs, the rectus femoris muscle can be included, and the flap can be harvested in a chimeric fashion.
If pedicle length is adequate without dissection of the rectus femoris branch, conclude the dissection at this time.
If greater pedicle length is required, divide the branch to the rectus femoris and dissect the descending branch of the lateral femoral circumflex vessels to their origin from the profunda femoris vessels. The viability of the rectus femoris is ensured through its collateral circulation. This will achieve maximum pedicle length and vessel diameter for microvascular anastomoses.
Fig. 5.
Perforators can be dissected through a septocutaneous course and traced back to the descending branch of the lateral circumflex vessels, as seen here.
Fig. 6.
Sometimes perforators have a musculocutaneous course through the vastus lateralis, requiring intramuscular dissection of the pedicle to the source vessels.
Step 4: Flap Harvest and Recipient Vessels
Confirm the dimensions of the flap prior to final harvest of the flap, and pay special attention to the recipient arterial inflow and venous outflow to ensure success.
After ensuring that the flap is healthy and viable on the existing pedicle, isolate the descending branch of the lateral circumflex artery and the corresponding venae comitantes at the appropriate level necessary for pedicle length.
Prior to division of the pedicle, confirm the final markings of the flap and make the lateral incision of the flap (Fig. 7). This incision islands the flap on the basis of the perforating vessels (Fig. 8). Then confirm perfusion of the flap, either by dermal bleeding of the flap or indocyanine green (ICG) angiography, depending on surgeon preference.
Ligate the proximal extent of the pedicle with automatic clip appliers and harvest the flap if it is to be used as a microvascular free-tissue transfer (Figs. 9 and 10).
If there is a traumatic injury or an abnormal pulse on examination, obtain a preoperative computed tomography (CT) angiogram to determine arterial inflow and venous outflow.
Then choose recipient vessels within proximity to the defect and dissect and prepare them for microvascular anastomoses to confirm patency.
Ensure wide exposure of the vessels to allow for ease of microvascular anastomoses (Figs. 11 and 12).
Fig. 7.
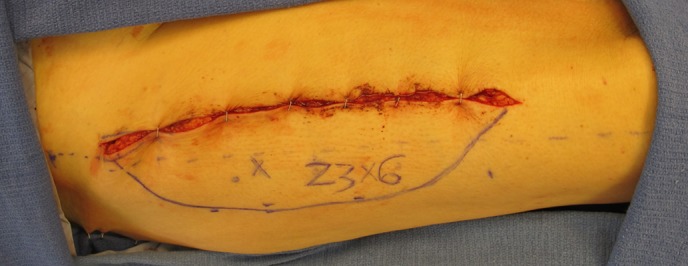
After pedicle dissection has been completed, the dimensions of the flap are confirmed and the lateral incision is made.
Fig. 8.
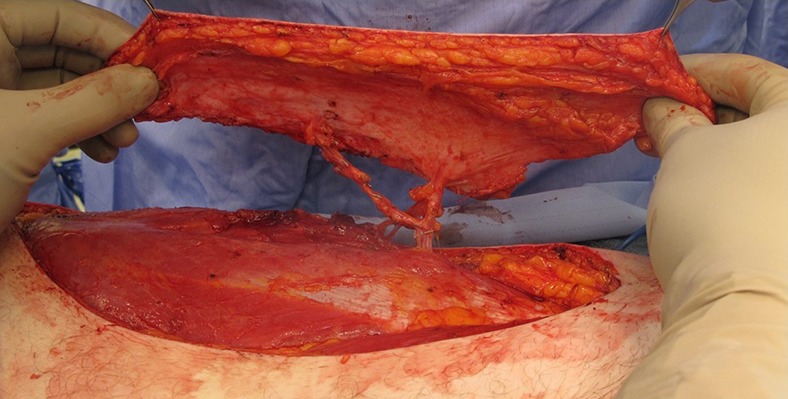
Following lateral incision and dissection, the flap is islanded on the perforating vessels.
Fig. 9.
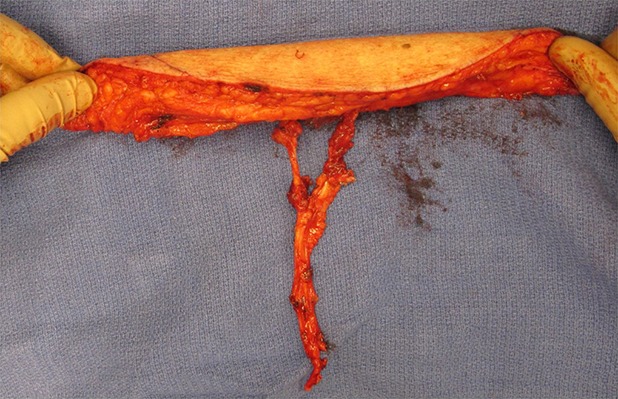
The proximal extent of the pedicle is ligated, and the flap is harvested for microvascular free-tissue transfer.
Fig. 10.
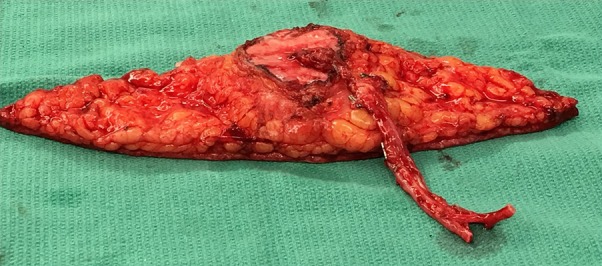
The flap can be thinned primarily, to diminish excess bulk, as seen here. Note that there is a preserved fascial cuff around the location of the perforators to prevent any inadvertent injury to the pedicle and compromise to the flap.
Fig. 11.
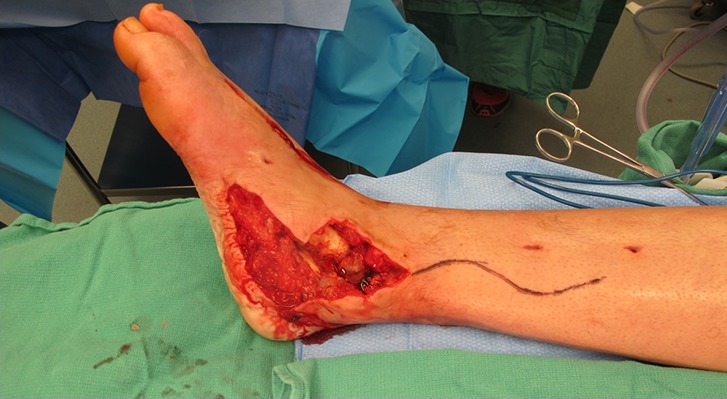
Wide exposure at the recipient site is essential for appropriate identification of the recipient vessels as well as proper flap inset. Extended incisions are routinely utilized to gain better access.
Fig. 12.
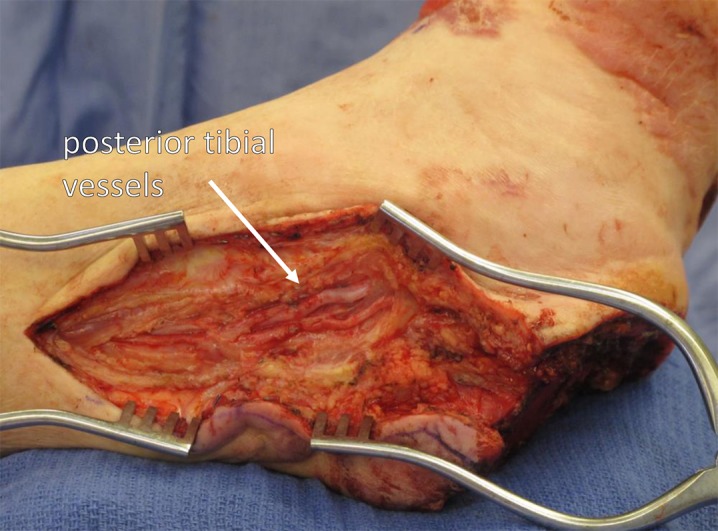
Recipient vessels, the posterior tibial vessels in this example, are exposed widely. This provides optimal circumstances for success with microvascular anastomosis.
Step 5: Microvascular Anastomoses
When performing this flap as a microvascular free flap, identify and prepare suitable vessels for tissue transfer (Fig. 13).
Provisionally fix the flap to the extremity to facilitate microvascular anastomoses.
Confirm patency of the recipient vessels.
Perform the microvascular anastomoses.
Perform the venous anastomosis first in an end-to-end manner with the GEM Microvascular Anastomotic Coupler Device (Synovis Micro).
Perform arterial anastomosis in an end-to-side manner to the recipient artery with interrupted 8-0 nylon sutures.
Remove the vascular clamps and again confirm flap perfusion.
Fig. 13.
Microvascular anastomosis is performed under loupe magnification. The venous anastomosis is routinely performed first with a Synovis coupler device of the appropriate size. The arterial anastomosis is typically performed in an end-to-side fashion using 8-0 nylon suture.
Step 6: Flap Inset
Pay special attention to the flap inset to ensure that there is no mechanical obstruction to the pedicle and that the inset allows for the anticipated postoperative edema (Figs. 14 and 15).
Inset the flap with simple monofilament sutures without a deep layer over closed suction drainage. This allows skin-to-skin closure and a sealed soft-tissue envelope.
Place a marking stitch over the perforator to allow for postoperative cutaneous Doppler flap monitoring.
This simple skin-only closure allows for slight edema and swelling that is common to perforator flaps in the immediate postoperative period.
Place a splint as needed with a window to allow for flap monitoring.
Avoid any tight circumferential dressings.
Fig. 14.
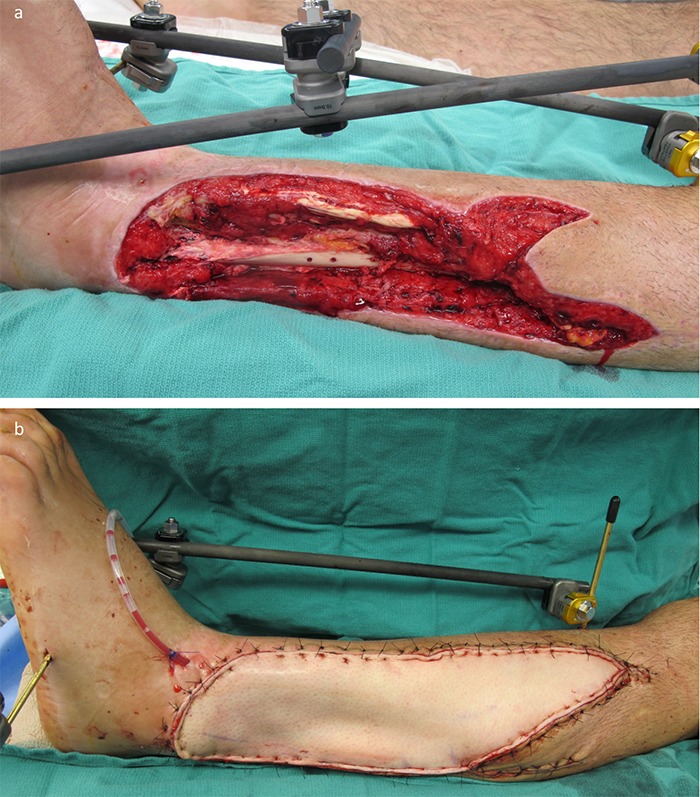
Figs. 14-A and 14-B A patient who was managed with an ALT flap for left lower-extremity reconstruction. Fig. 14-A Defect of the lateral aspect of the leg shown after orthopaedic fixation and serial irrigation and debridement. Fig. 14-B Microvascular transfer of an ALT flap for soft-tissue coverage. Inset and closure was performed using single-layer monofilament suture with vertical mattress technique. The flap was not inset tightly to allow for expected postoperative edema.
Fig. 15.
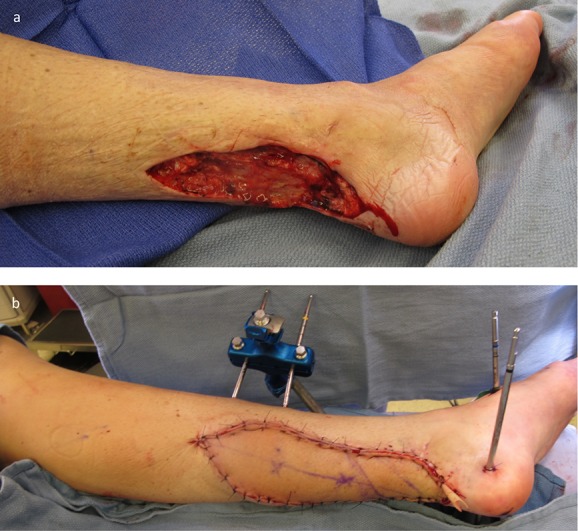
Figs. 15-A and 15-B A patient who was managed with an ALT flap for right lower-extremity reconstruction. Fig. 15-A The defect of the posterior aspect of the right leg with exposed bone following serial irrigation and debridement. Fig. 15-B Microvascular transfer of an ALT flap for soft-tissue coverage. Inset and closure is again performed using single-layer monofilament suture. A Penrose drain is also routinely left in place to allow for egress of serous fluid and prevention of a seroma.
Step 7: Donor Site Closure
Close the donor site for this flap, which is well tolerated and easily concealed (Fig. 16).
Close the donor site in layers with absorbable suture over closed suction drains.
Do not close the fascia.
If the donor site is not able to be closed primarily, imbricate the underlying muscle and place a skin graft over the muscle.
Use a wound vacuum-assisted closure (VAC) device as a bolster to ensure incorporation of the skin graft.
Fig. 16.
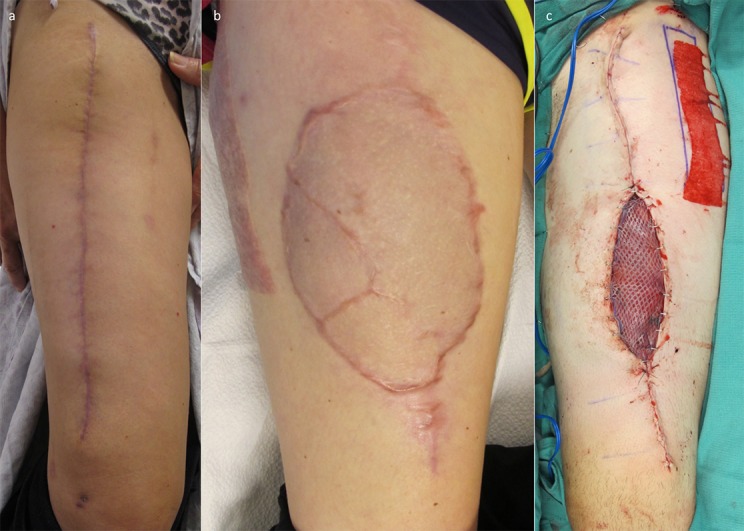
Figs. 16-A, 16-B, and 16-C Donor sites for these flaps can be managed in a variety of ways. They can most often be closed primarily (Fig. 16-A), but sometimes split-thickness skin grafting is required (Figs. 16-B and 16-C).
Step 8: Flap Monitoring and Postoperative Care
Postoperative monitoring is critical to identify any potential vascular compromise early and maximize successful outcomes4.
Monitor the flap postoperatively with surface Doppler checks every hour for 48 hours, then every 2 hours for 48 to 96 hours, and then every 4 hours thereafter (Video 3).
Ensure that the limb is strictly elevated except for brief transfers.
Remove the postoperative dressings on postoperative day 5 and make a custom orthoplastic splint as needed.
Maintain the patient on a full-strength (325-mg) aspirin and standard prophylaxis against deep vein thrombosis.
At any sign of vascular compromise of the flap, emergently return the patient to the operating room for exploration and revision (Fig. 17).
Fig. 17.
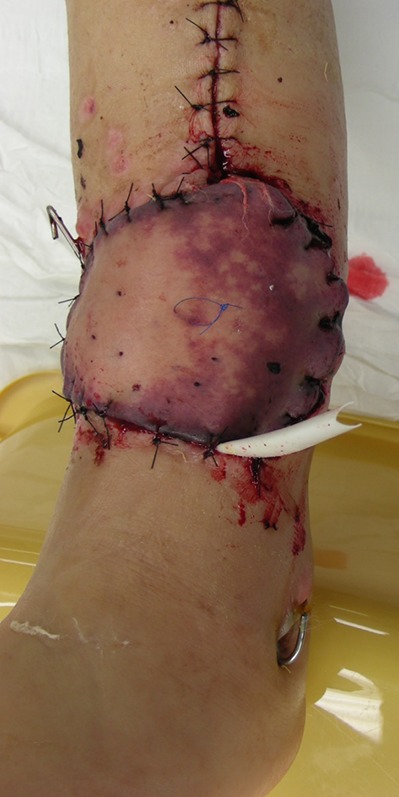
Postoperative monitoring is critical, with hourly flap checks for the first 48 hours. Venous congestion, as seen in this patient, requires urgent return to the operating room.
Video 3.
Doppler signals assist in postoperative monitoring of the flap.
Results
The ALT is a highly successful and reliable flap that has become a workhorse of reconstructive microsurgery5. In our study of 100 patients who underwent free-tissue reconstruction for soft-tissue traumatic defects of the lower extremity, 49 patients had an ALT flap and 51 had reconstruction with a different soft-tissue flap5. Analysis between these 2 cohorts revealed that patients undergoing reconstruction with an ALT flap had a lower rate of blood transfusion (1 patient in the ALT group and 8 patients in the non-ALT group; p = 0.07), despite having a significantly longer procedure (mean, 510 compared with 463 min; p = 0.03). Flap loss rates were lower for patients who underwent an ALT procedure (2% compared with 5.8%; p = 0.62). Patients who underwent an ALT procedure were less likely to require a second flap, develop a hematoma or seroma, have a postoperative infection, or develop a persistent nonunion, but none of these differences were noted to be significant.
The ALT flap provides reliable, durable soft-tissue coverage. It is particularly useful when the soft-tissue envelope must be entered to permit orthopaedic revisions. It is quite easy to reelevate, and the skin-to-skin closure is ideal. It may be thinned as part of a planned second stage to allow for bone-grafting or removal of hardware. There is no limit to the number of times that it may be reelevated (Figs. 18, 19, and 20).
Fig. 18.
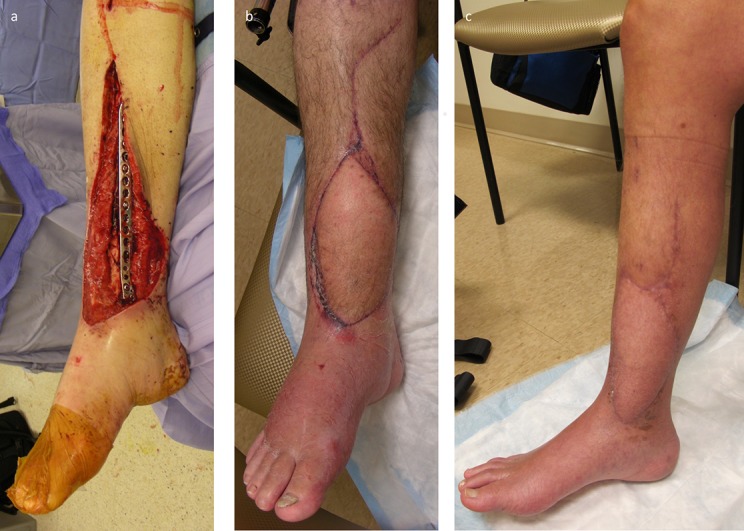
Figs. 18-A, 18-B, and 18-C A patient managed with an ALT flap, showing that long-term cosmetic outcome can be very good even without revision. This patient presented following substantial lower-extremity trauma (Fig. 18-A) and had an excellent cosmetic outcome at short-term (Fig. 18-B) and long-term (Fig. 18-C) follow-up, without any subsequent revisions.
Fig. 19.
Figs. 19-A, 19-B, and 19-C A patient who was managed with suction lipectomy to recontour a bulky graft. Options for revision include sharp lipectomy, recontouring, and suction lipectomy. Fig. 19-A The patient presented with a substantial soft-tissue loss and orthopaedic injury requiring free-tissue transfer. Figs. 19-B and 19-C The flap was originally a little bulky in size, so the patient underwent suction lipectomy for contouring, with a good long-term cosmetic result.
Fig. 20.
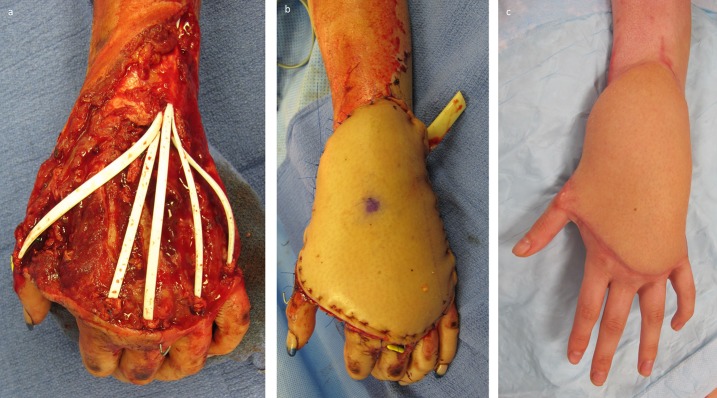
Figs. 20-A, 20-B, and 20-C A patient who had a soft-tissue injury to the dorsal aspect of the left hand that also traumatically resected the extensor mechanisms. Fig. 20-A Hunter rods were placed following serial washout and debridement. Fig. 20-B The hand is shown after soft-tissue coverage with a microvascular transfer of an ALT flap. Fig. 20-C At short-term follow-up, the hand is at an intermediate stage with improved contour. The patient will undergo further contouring procedures until she is satisfied with the appearance of the hand.
Pitfalls & Challenges
Larger skin paddles may preclude primary closure and require skin grafting and an additional donor site (Fig. 16-B).
Venous dependence requires a carefully monitored dangling protocol in lower extremity reconstruction.
The perforator anatomy can be variable, requiring careful identification and confirmation of the perforators prior to committing to them.
Numbness in the distribution of the lateral femoral cutaneous nerve may occur if it is sacrificed.
The flap may be bulky, particularly for reconstruction of foot and ankle defects that require secondary revision to allow for wearing appropriate footwear and cosmesis6.
Footnotes
Published outcomes of this procedure can be found at: J Orthop Trauma. 2015 Dec;29(12):563-8.
Disclosure: The authors indicated that no external funding was received for any aspect of this work. The Disclosure of Potential Conflicts of Interest forms are provided with the online version of the article.
References
- 1. Song YG, Chen GZ, Song YL. The free thigh flap: a new free flap concept based on the septocutaneous artery. Br J Plast Surg. 1984. April;37(2):149-59. [DOI] [PubMed] [Google Scholar]
- 2. Yildirim S, Avci G, Aköz T. Soft-tissue reconstruction using a free anterolateral thigh flap: experience with 28 patients. Ann Plast Surg. 2003. July;51(1):37-44. [DOI] [PubMed] [Google Scholar]
- 3. Cordova A, D’Arpa S, Di Lorenzo S, Toia F, Campisi G, Moschella F. Prophylactic chimera anterolateral thigh/vastus lateralis flap: preventing complications in high-risk head and neck reconstruction. J Oral Maxillofac Surg. 2014. May;72(5):1013-22. Epub 2013 Nov 21. [DOI] [PubMed] [Google Scholar]
- 4. Mirzabeigi MN, Wang T, Kovach SJ, Taylor JA, Serletti JM, Wu LC. Free flap take-back following postoperative microvascular compromise: predicting salvage versus failure. Plast Reconstr Surg. 2012. September;130(3):579-89. [DOI] [PubMed] [Google Scholar]
- 5. Bibbo C, Nelson J, Fischer JP, Wu LC, Low DW, Mehta S, Kovach SJ, Levin LS. Lower extremity limb salvage after trauma: versatility of the anterolateral thigh free flap. J Orthop Trauma. 2015. December;29(12):563-8. [DOI] [PubMed] [Google Scholar]
- 6. Nelson JA, Fischer JP, Haddock NT, Mackay D, Wink JD, Newman AS, Levin LS, Kovach SJ. Striving for normalcy after lower extremity reconstruction with free tissue: the role of secondary esthetic refinements. J Reconstr Microsurg. 2016. February;32(2):101-8. Epub 2015 Aug 10. [DOI] [PubMed] [Google Scholar]


