

Overview
Introduction
A tibial tubercle osteotomy can provide reliable and safe exposure during revision total knee arthroplasty with a high union rate, low complication rate, and predictable outcomes.
Indications & Contraindications
Step 1: Preoperative Planning (Figs. 1-A through 2-B)
Determine the need for an extensile approach on the basis of the preoperative knee range of motion; position of the patella; bone quality; medical comorbidities; and cement mantle, tibial keel or stem, and thickness of the anterior tibial cortex.
Step 2: Incision and Arthrotomy
Create full-thickness subcutaneous flaps and perform a medial parapatellar arthrotomy with complete synovectomy and careful excision of scar tissue from the medial and lateral gutters.
Step 3: Incision Extension and Preparation for Tibial Tubercle Osteotomy (Figs. 3 and 4; Videos 1, 2, and 3)
Extend the skin and subcutaneous dissection distal to the tibial tubercle and mark the chevron osteotomy using electrocautery.
Step 4: Tibial Tubercle Osteotomy (Fig. 5; Videos 4 and 5)
Perform the osseous cut for the tibial tubercle osteotomy with a thin saw blade in a medial-to-lateral direction, such that the fragment hinges on the lateral soft tissue and musculature.
Step 5: Revision Total Knee Arthroplasty (Videos 6 and 7)
With the knee maximally flexed and lateral subluxation of the extensor mechanism, for full visualization of the femoral and tibial components, remove the components and perform the knee revision.
Step 6: Preparation for Insertion of Tibial Component
The final tibial component should have a diaphyseal stem long enough to bypass the distal extent of the tibial tubercle osteotomy by at least 2 cortical diameters.
Step 7: Trialing and Insertion of Final Tibial Component (Figs. 6 and 7; Videos, 8, 9, and 10)
When cementing the final tibial component, take care to remove cement anterior to the tibial stem that would otherwise impede complete reduction of the osteotomy fragment and interfere with osseous union at the osteotomy site.
Step 8: Reduction of Tibial Tubercle Osteotomy Fragment (Figs. 8 and 9; Videos 11, 12, and 13)
Manually position the osteotomized bone fragment over the tibia and obtain an anatomic reduction either freehand or using bone clamps, depending on the soft-tissue tension.
Step 9: Fixation of Tibial Tubercle Osteotomy Fragment (Video 14)
Obtain rigid fixation with a 6.5-mm screw proximally and 2 sets of doubled-over 18-gauge wires distally.
Step 10: Stressing the Osteotomy Site and Wound Closure (Figs. 10, 11, and 12; Videos 15 and 16)
Stress the osteotomy site by flexing the knee 90°, deflate the tourniquet, place a drain if needed, and close.
Step 11: Postoperative Restrictions and Protocol (Figs. 13-A and 13-B)
Allow weight-bearing as tolerated and a 0° to 90° range of motion in a hinged knee brace.
Results
Tibial tubercle osteotomy to aid in exposure during revision total knee arthroplasty has been reported to yield favorable outcomes in the orthopaedic literature7-18.
Pitfalls & Challenges
Introduction
A tibial tubercle osteotomy can provide reliable and safe exposure during revision total knee arthroplasty with a high union rate, low complication rate, and predictable outcomes.
The initial challenge and possibly the most important step in revision total knee arthroplasty is obtaining adequate exposure for removal and reimplantation of the tibial and femoral components. A medial parapatellar arthrotomy with synovectomy and scar tissue excision allows mobilization of the extensor mechanism and adequate exposure in the majority of cases1. However, certain cases, in particular those with arthrofibrosis and patella baja, require a more extensive exposure to safely mobilize the extensor mechanism for visualization. This can be done proximally through soft-tissue release of the extensor mechanism, via either a quadriceps turndown or quadriceps snip, or distally through a tibial tubercle osteotomy2.
The quadriceps turndown allows excellent exposure but has been found to be associated with complications such as postoperative extensor lag, quadriceps weakness, and patellar osteonecrosis3-5. In order to the protect the quadriceps repair and limit postoperative extensor lag, this technique may require altering postoperative rehabilitation protocols for the first several weeks, including restricting active extension3,4, limiting knee flexion3,4, partial weight-bearing4, and using a knee immobilizer at night4. For all of these reasons, this technique is performed less often than other arthroplasty techniques. A quadriceps snip, which is a tenotomy of the quadriceps tendon from a medial-to-lateral direction, allows increased exposure and has been shown to have better postoperative outcomes in terms of range of motion and functional scores5,6. Additionally, there is minimal postoperative morbidity or alteration in the postoperative rehabilitation protocol5,6.
The technique to improve exposure distally is a tibial tubercle osteotomy. With this technique, described by Dolin in 19837 and later modified by Whiteside and Ohl8, a long thick tibial tubercle osteotomy fragment is hinged on the lateral periosteum and anterior compartment musculature. This allows preservation of muscular soft-tissue attachments to the osteotomized bone fragment, a well-vascularized osseous surface to promote union, and a large bone fragment available for fixation8,9. Studies have shown that, compared with alternative methods, tibial tubercle osteotomy is associated with an improved postoperative range of motion and functional outcome scores8-18, often with minimal-to-no changes in the postoperative rehabilitation protocol8-10.
The decision regarding which technique to use, as mentioned below in Step 1, is based on the patient’s bone quality, presence or absence of osteoporosis, thickness of the anterior tibial cortex as seen on the lateral radiograph, medical comorbidities that may impede osteotomy site healing, and whether patella baja is present.
Below we describe our preferred method for performing a tibial tubercle osteotomy to aid with exposure during revision total knee arthroplasty.
Indications & Contraindications
Indications
Difficult knee exposure during revision (or primary) total knee arthroplasty. The tibial tubercle osteotomy is most commonly needed in cases of arthrofibrosis or patella baja.
A long tibial stem, cemented or press-fit, that cannot be removed via access to only the tibial plateau-baseplate interface but instead requires access to the tibial stem in the medullary canal to break up the ingrowth and/or cement fixation.
The patient must have good bone quality as assessed on radiographs.
There must be sufficient thickness of bone stock along the anterior aspect of the tibia (a minimum of 1.5 cm from the anterior tibial tubercle to the deepest part of the osteotomy) after taking into account the existing cement mantle and tibial keel or stem.
Contraindications
Known osteoporosis (T of score −2.5 or below according to the World Health Organization [WHO] criteria for diagnosis of osteoporosis).
Poor bone quality as assessed on radiographs.
Insufficient bone stock along the anterior aspect of the tibia.
Bone loss requiring reconstruction with a tibial cone, which will restrict fixation of the osteotomized bone fragment.
Comorbidities that may impede healing of the osteotomy fragment, such as tobacco use, diabetes, rheumatoid arthritis, and chronic steroid use.
Step 1: Preoperative Planning (Figs. 1-A through 2-B)
Figs. 1-A and 1-B Anteroposterior (Fig. 1-A) and lateral (Fig. 1-B) radiographs of a 64-year-old woman who developed instability after revision total knee arthroplasty, demonstrating partially cemented tibial and femoral diaphyseal-length stems. Bone stock anterior to the tibial stem, seen on the lateral view, appears sufficient for the performance of a tibial tubercle osteotomy.
Fig. 1-A.

Fig. 1-B.

Fig. 2-A.

Lateral radiograph used to plan the osteotomy. A chevron-shaped osteotomy with the apex at the level of the tibial tubercle to achieve a maximum fragment thickness of 1.5 to 2.0 cm is illustrated by the yellow lines.
Fig. 2-B.
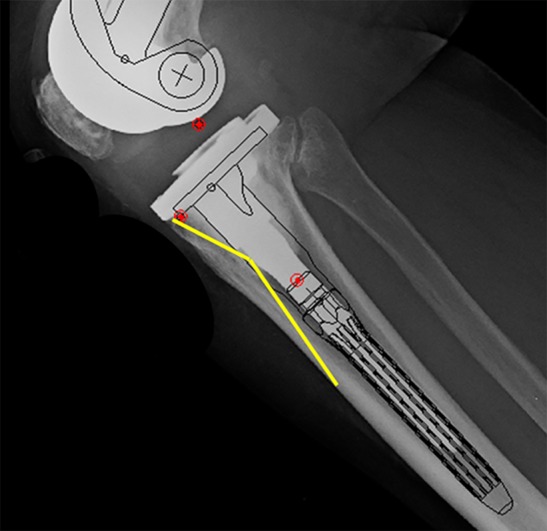
The revision stem length is then templated to bypass the osteotomy site by at least 2 cortical diameters.
Determine the need for an extensile approach on the basis of the preoperative knee range of motion; position of the patella; bone quality; medical comorbidities; and cement mantle, tibial keel or stem, and thickness of the anterior tibial cortex.
Do a thorough work-up of the patient in the clinic to determine the need for a revision total knee arthroplasty (Figs. 1-A and 1-B). Determine the possibility of a difficult knee exposure (following the medial parapatellar arthrotomy) due to limited knee flexion, a lack of patellar mobilization, and patella baja as seen on a lateral knee radiograph. If those factors are present, be prepared to attain adequate exposure via a proximal soft-tissue extension by means of a quadriceps snip or a tibial tubercle osteotomy.
Consider a tibial tubercle osteotomy if the patient has good bone quality as assessed on radiographs and there is a sufficient thickness of bone stock along the anterior aspect of the tibia (a minimum of 1.5 cm from the anterior tibial tubercle to the deepest part of the osteotomy) after taking into account the existing cement mantle, tibial keel, or tibial stem. However, also consider comorbidities that may impede healing of the osteotomy fragment, such as tobacco use, diabetes, rheumatoid arthritis, and chronic steroid use.
Patellar baja seen on the lateral knee radiograph is another reason for performing a tibial tubercle osteotomy. It is better than a quadriceps snip in terms of aiding visualization because slight proximal repositioning of the osteotomized bone fragment can raise the patellar height relative to the joint line.
It may not be possible to remove a long tibial stem, either press-fit or cemented, if the surgeon has access only to the tibial plateau-baseplate interface. An additional reason for a tibial tubercle osteotomy is to afford access to the tibial stem more distally in the medullary canal to break up the ingrowth and/or cement fixation.
If the patient does not have good bone quality (i.e., if <1 cm of bone stock is available at the anterior tibial cortex), and there is normal patellar height, a quadriceps snip is a better option than a tibial tubercle osteotomy for increasing exposure during the revision surgery.
If a tibial tubercle osteotomy is chosen, template the position and length of the osteotomy and the tibial component (Figs. 2-A and 2-B).
-
The equipment needed for the tibial tubercle osteotomy includes:
-
◦
4.5-mm and 2.5-mm straight drill-bits
-
◦
oscillating saw with a fine (0.4-mm-thick) blade to make the osteotomy cuts
-
◦
wide flat osteotomes to elevate the osteotomy fragment
-
◦
Freer elevator to remove excess cement
-
◦
four 18-gauge wires
-
◦
6.5-mm screw
-
◦
Step 2: Incision and Arthrotomy
Create full-thickness subcutaneous flaps and perform a medial parapatellar arthrotomy with complete synovectomy and careful excision of scar tissue from the medial and lateral gutters.
After induction of general or neuraxial anesthesia, position the patient supine on the operating room table, prepare and drape the leg in the standard fashion, and inflate the tourniquet.
Make a midline incision over the knee in the line of the previous scar. Carry it deep to the level of the fascia overlying the extensor mechanism, and raise full-thickness medial and lateral subcutaneous skin flaps to preserve vascularity to the skin flaps.
Perform a medial parapatellar arthrotomy, followed by medial subperiosteal elevation of the proximal tibial soft tissues. Subperiosteal dissection of the proximal-medial soft-tissue sleeve is helpful to externally rotate the tibia and permit relative lateralization of the extensor mechanism.
Often adequate exposure can be obtained after a complete synovectomy and scar-tissue excision, particularly in the lateral gutter, lateral retinaculum, and deep to the patellar tendon.
Gently flex the knee with the patella and extensor mechanism subluxated laterally to gain access for removal of the femoral and tibial components.
If the tibial polyethylene bearing is modular, remove it, as this will help in attaining additional knee flexion as well as allowing more scar tissue to be excised from the lateral gutter and lateral side of the patella.
Flex the knee further with the patella and extensor mechanism subluxated laterally, to further expose the femoral and tibial components.
If too much lateral retraction on the patella poses a risk of patellar tendon avulsion, a decision should be made to extend the exposure. This decision is made intraoperatively, although the choice between a distal extension with a tibial tubercle osteotomy and a proximal extension with a quadriceps snip, should such an extension be needed, should be determined preoperatively.
Step 3: Incision Extension and Preparation for Tibial Tubercle Osteotomy (Figs. 3 and 4; Videos 1, 2, and 3)
Fig. 3.
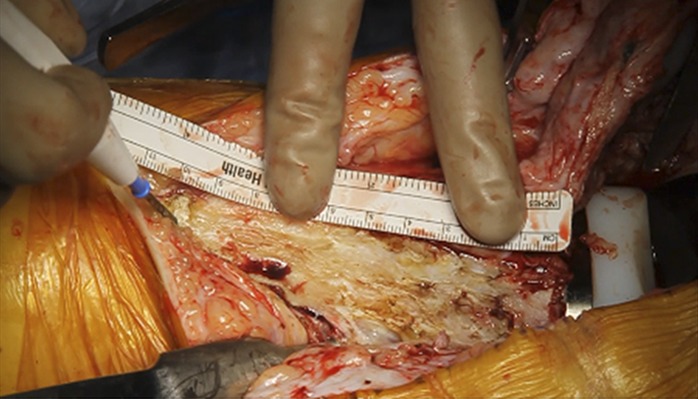
A ruler is placed along the proximal-medial aspect of the tibia to measure the length of the osteotomy, which should be 8 to 10 cm.
Fig. 4.

The apex of the chevron should result in a fragment thickness of 1.5 to 2.0 cm at the level of the tibial tubercle.
Extend the skin and subcutaneous dissection distal to the tibial tubercle and mark the chevron osteotomy using electrocautery.
Extend the distal aspect of the skin incision approximately 8 cm distal to the tibial tubercle. This includes distal extension of the medial subperiosteal release through the underlying soft tissue along the anteromedial tibial border, with attempts to take this as one large full-thickness flap for later repair.
Reflect the soft tissue posteriorly so that the anterior one-third of the anteromedial aspect of the tibia is exposed (Video 1).
-
Mark the planned cut for the tibial tubercle osteotomy with either Bovie cautery or a marking pen in a chevron fashion along the anteromedial aspect of the tibia (Video 2).
-
◦
The total length of the osteotomy should be between 8 and 10 cm to decrease the risk of iatrogenic fracture and increase the surface area for osseous healing (Fig. 3).
-
◦
The apex of the chevron should be at the level of the tibial tubercle, and the bone below the apex should be between 1.5 and 2.0 cm thick (Fig. 4).
-
◦
The distal osteotomy should be tapered to minimize the presence of a stress riser at the distal end of the osteotomy, which could increase the risk of tibial fracture.
-
◦
The osteotomy should start at the anterior tibial cortex just under the tibial baseplate; be directed posteriorly, aiming for a thickness of 1.5 to 2.0 cm at the level of the tibial tubercle; and be angled in a chevron fashion by extending the cut distally back toward the anterior tibial cortex 8 to 10 cm distal to the tibial baseplate. The width of the osteotomy cannot be accurately determined prior to making the bone cut since the lateral cortex of the tibia is covered with anterior compartment musculature and not directly visible. The tibia is relatively triangular in cross section so it is helpful to make the cut obliquely at approximately 20° of external rotation relative to the coronal plane, which generally results in a medial-lateral width of the osteotomized bone fragment of 3 to 4 cm at the level of the tibial tubercle (Video 3).
-
◦
Video 1.
The proximal-medial tibial bone surface is exposed by subperiosteal elevation of the medial soft-tissue sleeve. The medial soft-tissue sleeve should be dissected to the midcoronal plane and maintained in continuity with the medial collateral ligament insertion and pes anserinus tendons.
Video 2.
The planned chevron osteotomy is measured using a ruler and marked along the medial aspect of the proximal part of the tibia with Bovie cautery. The osteotomy should be 8 to 10 cm long. The apex of the chevron should allow a fragment thickness of 1.5 to 2.0 cm at the level of the tibial tubercle. The distal osteotomy cut should taper from the apex of the chevron to the distal-anterior tibial cortex in a straight line. The proximal osteotomy cut should taper from the apex of the chevron to the anterior tibial baseplate in a straight line.
Video 3.
The line of the osteotomy, shown with a Bovie cautery tip, should correspond to the templated osteotomy on the preoperative lateral radiograph.
Step 4: Tibial Tubercle Osteotomy (Fig. 5; Videos 4 and 5)
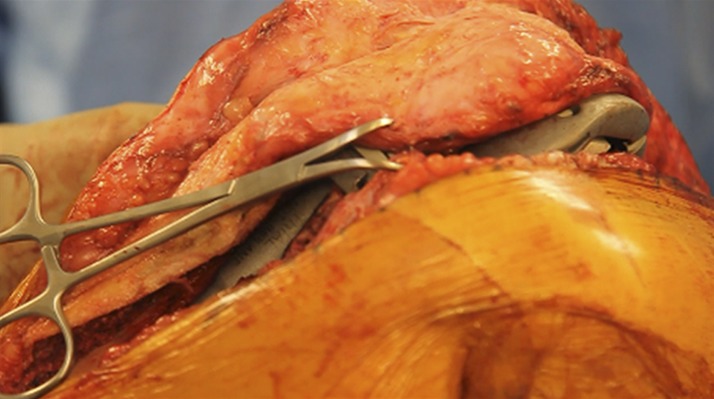
Fig. 5.

The osteotomized bone fragment is hinged laterally and maintained in continuity with the anterior compartment muscles.
Perform the osseous cut for the tibial tubercle osteotomy with a thin saw blade in a medial-to-lateral direction, such that the fragment hinges on the lateral soft tissue and musculature.
Make the initial bone cut for the osteotomy unicortically, starting at the anteromedial tibial cortex, with a thin 0.4-mm oscillating saw blade to prevent iatrogenic bone loss (Video 4). Carry the cut along the previously marked osteotomy line.
Then take the thin oscillating saw blade back through the previous unicortical cut and, in a bicortical fashion, go across the lateral tibial cortex in the proximal and center sections of the osteotomy. Complete the distal osteotomy with an osteotome.
Gently mallet a 1-in (2.5-cm) straight osteotome into and along the entire path of the osteotomy along the medial tibial cortex (Video 5).
Once the osteotomy fragment is mostly free, elevate it, hinged on the anterolateral tibial periosteum and musculature (Video 5). Maintaining the integrity of the anterior compartment muscle attachment to the osteotomized bone fragment will help to preserve the vascularity to the fragment (Fig. 5).
Video 4.
The osteotomy is made with a thin (0.4-mm-thick) oscillating saw blade to minimize bone loss. A medial tibial unicortical bone cut is made for both the proximal and the distal limb of the chevron. The saw blade should be inserted at least halfway across the tibia toward the lateral cortex.
Video 5.
A 1-in (2.5-cm) straight osteotome is used to complete the proximal and distal limbs of the chevron osteotomy through the lateral tibial cortex. The osteotomized bone fragment, which is maintained in continuity with the anterior compartment muscles, is elevated in a medial-to-lateral direction.
Step 5: Revision Total Knee Arthroplasty (Videos 6 and 7)
With the knee maximally flexed and lateral subluxation of the extensor mechanism, for full visualization of the femoral and tibial components, remove the components and perform the knee revision.
You should now be able to flex the knee beyond 90° and laterally retract the patella and extensor mechanism (Video 6). This will fully expose the femoral and tibial components to aid in their removal and subsequent revision (Video 6).
You now have access to the tibial keel (and stem if a stemmed tibial component was used) in the medullary canal to aid in component removal.
In addition to breaking up the interface at the tibial plateau-baseplate surface, you can now free up the tibial keel and/or stem from the bone or cement with the use of a microsagittal saw, osteotomes, or burr (Video 7).
Once both the femoral and the tibial components have been removed, carry out the knee revision as previously indicated.
Video 6.
The knee is flexed while the osteotomy fragment and the extensor mechanism are held everted to provide wide exposure of the knee.
Video 7.
The tibial baseplate-cement interface is divided circumferentially with a thin oscillating saw blade. The intramedullary stem-cement interface can be divided through the open osteotomy with an oscillating saw. The posterior baseplate-cement interface is divided with a curved osteotome. Once the implant-cement interface has been sufficiently disrupted, the tibial component can be removed with a bone tamp and mallet.
Step 6: Preparation for Insertion of Tibial Component
The final tibial component should have a diaphyseal stem long enough to bypass the distal extent of the tibial tubercle osteotomy by at least 2 cortical diameters.
Perform the reaming process for the revision tibial component with reamers to prepare for a revision component with a diaphyseal tibial stem that bypasses the distal extent of the osteotomy. The stem is typically 150 mm in length or longer.
The size and length of the tibial stem should closely match your preoperative template.
We prefer press-fit fixation of the tibial stem and would thus increase reamer sizes at this 150-mm mark until cortical contact is obtained.
Since the tibial tubercle cannot be used as a reference for tibial component rotation, align the center of the trial tibial component with the distal tibial crest. Then extend the knee and manually reduce the osteotomy fragment and extensor mechanism to assess the patellar position in the femoral trochlear groove. Adjust the tibial component rotation as needed to optimize congruity between the patella and the trochlear groove.
Step 7: Trialing and Insertion of Final Tibial Component (Figs. 6 and 7; Videos, 8, 9, and 10)
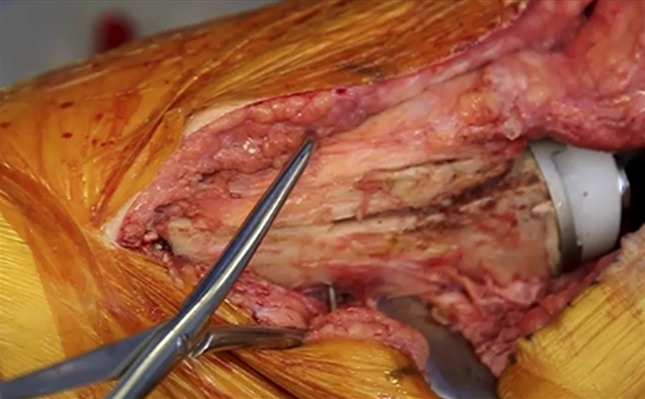
Fig. 6.
A trial reduction should be performed with the trial components in place. The osteotomy site can be reduced during knee flexion while a towel clip is used to hold the medial retinacular arthrotomy site closed.
Fig. 7.

The tibial component is cemented in place. Cement anterior to the exposed stem should be removed as anterior cement does not contribute to tibial component fixation and may impede anatomic reduction of the osteotomy fragment.
When cementing the final tibial component, take care to remove cement anterior to the tibial stem that would otherwise impede complete reduction of the osteotomy fragment and interfere with osseous union at the osteotomy site.
Prior to final component implantation, insert the trial components and bring the knee through a range of motion to check for stability, range of motion, and patellar tracking (Video 8).
Lateral patellar subluxation with knee flexion is common due to the effect of the tibial tubercle osteotomy on the extensor mechanism, but it can be compensated for by rechecking patellar tracking with a towel clip across the medial retinaculum (Fig. 6; Video 9).
When cementing in the final tibial component, we tend to place cement on the top of the tibial plateau surface, the undersurface of the tibial baseplate, and up to the modular junction of the stem offset coupler-baseplate interface.
Impact the stem in appropriate external rotation, which should be determined using trial components, at the medial one-third of the tibial tubercle (Video 10).
We use a Freer elevator and remove not only overhanging cement at the tibial baseplate-bone interface but also cement anterior to the tibial stem that protrudes out of the osteotomy site (Video 10). This cement visible in the osteotomy site anterior to the tibial stem does not help component fixation and may impede union of the osteotomy site and the ability to obtain an anatomic reduction of the tibial tubercle (Fig. 7).
Video 8.
After trial components have been placed, the extensor mechanism and the osteotomy fragment are reduced. The knee is flexed to assess tension in the extensor mechanism, patellar tracking, joint line position, and rotational orientation of the trial components.
Video 9.
Tension in the lateral retinaculum during knee flexion may cause lateral displacement of the osteotomy fragment. A towel clip used to close the medial retinaculum can be helpful to maintain reduction of the extensor mechanism and the osteotomy fragment.
Video 10.
The tibial component is cemented in the same rotational orientation as the trial component. Excess cement is removed from the edges of the baseplate. Cement at the anterior aspect of the tibial stem that is exposed through the osteotomy site should also be removed as anterior cement will not contribute to tibial component fixation and may impede anatomic reduction of the osteotomy fragment.
Step 8: Reduction of Tibial Tubercle Osteotomy Fragment (Figs. 8 and 9; Videos 11, 12, and 13)
Fig. 8.

The osteotomy fragment is reduced with the knee in extension. Bone along the deep surface of the osteotomized bone fragment may impinge on the anterior edge of the baseplate or tibial stem and prevent anatomic reduction.
Fig. 9.
The osteotomy fragment is compressed and stabilized with bone forceps or a clamp.
Manually position the osteotomized bone fragment over the tibia and obtain an anatomic reduction either freehand or using bone clamps, depending on the soft-tissue tension.
Once the final components have been cemented into place, and the final polyethylene has been inserted, reduce and fix the osteotomy site.
Bring the knee into nearly full extension to lessen tension on the soft tissues.
Manually position the osteotomized bone fragment over the tibia and attempt to achieve an anatomic reduction freehand. Often the soft-tissue tension is low enough for the osteotomy fragment to be anatomically reduced and held in place by hand (Video 11).
Carefully assess the reduction (Fig. 8). Often a small amount of bone must be removed from the undersurface of the osteotomized tubercle bone fragment to allow anatomic reduction against the new tibial baseplate and tibial stem (Video 12). This is best done with either a burr or rongeur.
If there is too much lateral soft-tissue tension to permit freehand reduction, the fragment can be reduced with pointed reduction forceps or a lobster claw. When using reduction forceps, take care to clamp down on the thickest portion of the osteotomized bone fragment to prevent iatrogenic fracture or comminution (Video 13).
If fracture of the osteotomy fragment occurs, consider using additional cerclage cable fixation of the tibia. Carefully pass the cable passer deep to the posterior soft tissues in a lateral-to-medial direction to minimize risk of neurovascular injury.
It is important to obtain as close an anatomic reduction as possible for the best chance of obtaining union at the osteotomy site (Fig. 9).
Video 11.
The osteotomy fragment is reduced manually with the knee in extension. The accuracy of reduction can be assessed by visualizing the relative osseous apposition between the medial aspect of the tibia and the osteotomized bone fragment. Anatomic reduction may be prevented by bone along the undersurface of the osteotomy fragment that impinges on the anterior aspect of the baseplate or intramedullary stem.
Video 12.
Impinging bone is removed from the deep surface of the osteotomized bone fragment with a high-speed burr to allow anatomic reduction of the fragment. Bone often impinges on the anterior aspect of the baseplate and can be removed with a rongeur.
Video 13.
Bone forceps or a clamp can be used to stabilize and compress the osteotomy fragment in a reduced position.
Step 9: Fixation of Tibial Tubercle Osteotomy Fragment (Video 14)
Obtain rigid fixation with a 6.5-mm screw proximally and 2 sets of doubled-over 18-gauge wires distally.
Use a straight 4.5-mm drill-bit to drill the hole for the proximal 6.5-mm screw, starting approximately 2 to 3 cm distal to the tibial baseplate (typically at the level of the tibial tubercle) just lateral to the midline of the osteotomized bone fragment (to lessen the risk of iatrogenic comminution from the drill-bit), aiming at the posteromedial corner of the tibia (to avoid the stem and tibial keel). This hole should be bicortical.
A depth gauge is used to verify length, but a 50-mm-long screw is often used. We use a 6.5-mm titanium acetabular cup fixation screw because of its thickness and strength.
Use electrocautery to reflect the periosteum and soft tissue off the anteromedial aspect of the tibia to the level of the posteromedial tibial corner at the points where 18-gauge wires will be inserted. This exposure is needed to be able to pass and grasp the 18-gauge wires.
With a straight 2.5-mm drill-bit, make 2 drill-holes for the 18-gauge wires. Make the first hole approximately 2 to 3 cm distal to the screw and the second hole 2 to 3 cm distal to the first hole.
Place a Hohmann retractor around the posteromedial aspect of the tibia to protect soft tissues from possible plunging of the drill-bit.
Start the drill-bit on the anterior aspect of the osteotomy fragment just lateral to the apex of the tibial crest and aim it at the posteromedial tibial corner.
Pass 2 sets of 18-gauge wires through each set of holes. Use a tonsil or needle driver to grab the ends of the wires where they are exposed just beyond the posteromedial aspect of the tibia.
Bring the ends of the wires together, twist and tension them, cut them, and tamp them down as far posteromedially as possible to lessen the risk of them causing irritation.
Large metaphyseal cones limit access for proximal screw fixation and should be considered a relative contraindication to the osteotomy. Offset stems may also restrict access for screw fixation. If proximal screw fixation is not feasible, then a proximal-medial 18-gauge wire should be used as an alternative.
Video 14.
The reduced osteotomy fragment is fixed with a 6.5-mm proximal screw and 2 distal double 18-gauge wires. A 4.5-mm drill-bit is used for the proximal screw. The drill is inserted through the anterior aspect of the tibial osteotomy fragment and directed toward the posteromedial tibial cortex to avoid impingement on the keel or stem of the tibial component. A 2.5-mm drill-bit is used for each double 18-gauge wire loop. One drill-hole is made in the midsection of the osteotomy fragment, and 1 drill-hole is made in the distal part of the osteotomy fragment. A Hohmann retractor is placed behind the posteromedial aspect of the tibia to expose the double wires that were passed through each drill-hole. The wire loops are crossed over the posterior aspect of the osteotomy fragment and twisted until tight. The excess wire is removed with a wire cutter. The twisted wire ends are bent and tamped against the outer bone cortex to minimize the risk of soft-tissue irritation.
Step 10: Stressing the Osteotomy Site and Wound Closure (Figs. 10, 11, and 12; Videos 15 and 16)
Fig. 10.

The osteotomy fragment is fixed with 1 proximal 6.5-mm screw and 2 medial double 18-gauge wire loops. The knee should be flexed to assess the integrity of the osteotomy site reduction and fixation.
Fig. 11.

The medial soft-tissue sleeve is closed to the periosteum along the anterior osteotomy site to cover the exposed wires.
Fig. 12.

The medial retinacular arthrotomy site is closed, and the knee is flexed to assess the integrity of the retinacular repair.
Stress the osteotomy site by flexing the knee 90°, deflate the tourniquet, place a drain if needed, and close.
It is important to verify the rigidity of the osteotomy fixation prior to leaving the operating room. We do this by flexing the knee to tension the extensor mechanism to 90° and ensuring that the osteotomy fragment maintains its anatomic reduction without liftoff (Fig. 10; Video 15).
After tourniquet deflation, carefully obtain hemostasis.
A medium-size surgical drain is often placed to prevent a hematoma from forming.
Perform a standard closure of the arthrotomy site, with an attempt to close the tibial periosteal flap to cover the osteotomy site and wires (Figs. 11 and 12; Video 16).
Close the subcutaneous tissues and skin.
Consider using an incisional skin vacuum (negative pressure device) to help wound-healing and decrease the risk of a postoperative hematoma.
Video 15.
The knee is flexed to assess the integrity of the osteotomy fragment reduction and fixation and to determine whether knee range of motion should be restricted after surgery.
Video 16.
The medial tibial soft-tissue sleeve is closed to the periosteum along the anterior osteotomy site to cover the exposed wires with soft tissue.
Step 11: Postoperative Restrictions and Protocol (Figs. 13-A and 13-B)
Figs. 13-A and 13-B Anteroposterior (Fig. 13-A) and lateral (Fig. 13-B) postoperative radiographs illustrating the position and alignment of the components after a revision total knee arthroplasty with a tibial tubercle osteotomy.
Fig. 13-A.

Fig. 13-B.

Allow weight-bearing as tolerated and a 0° to 90° range of motion in a hinged knee brace.
In the operating room, apply a hinged knee brace with the range of motion set for 0° to 90°, or whatever range is determined to be safe from the intraoperative stress test of the tibial tubercle osteotomy site. Motion with the hinged knee brace is restricted to 90° for 3 weeks and increased as tolerated to 120°. At 6 weeks, use of the brace is discontinued.
We allow immediate weight-bearing as tolerated.
Patients should use a walker postoperatively and be safely mobilized with the guidance of a physical therapist. A walker or 2 crutches are used for 6 weeks, and then a cane is used as needed for ambulatory activities.
Results
Tibial tubercle osteotomy to aid in exposure during revision total knee arthroplasty has been reported to yield favorable outcomes in the orthopaedic literature7-18. Whiteside standardized the tibial tubercle osteotomy in difficult primary and revision total knee arthroplasty with good and reproducible outcomes8,10. His retrospective study of 136 tibial tubercle osteotomies (110 of which were for revision total knee arthroplasty)10 demonstrated a 100% osteotomy union rate with an average postoperative range of motion of 94°. Complications included 2 cases of extensor lag, 2 partial patellar tendon avulsion fractures, 3 cases of implant removal, and 3 postoperative tibial fractures.
Numerous reports published since the article by Whiteside10 all confirmed the success of the tibial tubercle osteotomy with regard to osseous union5,9,11-18. Similarly, this osteotomy has led to a favorable postoperative range of motion5,9,11-18, improvement in knee functional outcome scores5,12,13,15-18, and minimal postoperative extensor lag5,14-17. The osteotomy fragment is fixed with cerclage wires or screws, or both. However, biomechanical testing has shown that screw fixation is far superior to wire fixation alone19,20.
The tibial tubercle osteotomy fragment is typically reduced back to its anatomic position. However, with this technique, proximal or medial recession of the osteotomy fragment has been described to improve patellar tracking, patellar baja, and knee flexion, and to restore appropriate quadriceps tension7,9,13,14,17. We are not aware of any study in which outcomes or complications were stratified to compare anatomic restoration of the tibial tubercle with proximal or medial recession.
Tibial tubercle osteotomy is not without complications, which have been reported in 0% to 37% of cases5,7-18. The most common serious complications include nonunion of the osteotomy fragment and excessive proximal migration of the fragment. Nonunion is typically treated with repeat open reduction, bone-grafting, and repeat screw fixation. A small amount of proximal migration can occur without affecting the clinical outcome, but excessive migration can lead to postoperative extensor lag. Other common complications include symptomatic fixation devices that must be removed, delayed wound-healing over the osteotomy site, and local tenderness. There have been rare reports of postoperative tibial fracture after a tibial tubercle osteotomy9.
Pitfalls & Challenges
Osteotomy fragment length: The osteotomy fragment should be a minimum of 6 cm long, but we prefer a length between 8 and 10 cm. Shorter osteotomies have been shown to have a higher rate of complications, including loss of fixation and extensor lag. A longer osteotomy provides a larger surface area for osseous ingrowth and fixation.
Hinging the osteotomy fragment on the lateral periosteum and soft tissues: This maintains the lateral geniculate blood supply and helps to prevent devascularization of the tibial tubercle. This will aid in osteotomy site healing.
Anatomic reduction and rigid fixation: After the tibial component is placed, excess cement protruding out of the osteotomy site should be removed as it can impede union and prevent an anatomic reduction. The osteotomy fragment should be anatomically reduced and rigidly fixed with a combination of a screw and wires. Often a burr or rongeur is needed to remove a small amount of bone from the undersurface of the osteotomy fragment to allow anatomic reduction against the tibial baseplate and tibial stem.
Irritation by fixation devices: This is a known complication of the procedure. It imperative to bring the ends of the 18-gauge wires as far posterior as possible, so that they are not left prominent along the anteromedial tibial cortex. They should be tamped down so that they lie flat against the posteromedial tibial bone. Similarly, the proximal screw should not be left proud.
Clinical Comments
Using this technique for a revision total knee arthroplasty has excellent and reproducible results with regard to union, range of motion, and functional outcome scores. It allows a wide exposure for removal and reimplantation of the femoral and tibial components. When anatomic and rigid fixation has been obtained, the patient can be allowed to bear weight as tolerated and a range of knee flexion of 90° in a hinged knee brace immediately postoperatively.
It is important to assess bone quality before performing this method of exposure to prevent complications such as nonunion and/or proximal migration.
Other known risks to discuss with patients include delayed wound-healing over the osteotomy site, postoperative soft-tissue swelling over the osteotomy site, irritation by fixation devices and the possible need for removal, and local tenderness.
Footnotes
Published outcomes of this procedure can be found at: J Arthroplasty. 1996 Dec;11(8):964-7.
Investigation performed at the Tahoe Fracture and Orthopaedic Clinic, Carson City, Nevada
Disclosure: The authors indicated that no external funding was received for any aspect of this work. On the Disclosure of Potential Conflicts of Interest forms, which are provided with the online version of the article, one or more of the authors checked “yes” to indicate that the author had a relevant financial relationship in the biomedical arena outside the submitted work.
References
- 1. Della Valle CJ, Berger RA, Rosenberg AG. Surgical exposures in revision total knee arthroplasty. Clin Orthop Relat Res. 2006. May;446:59-68. [DOI] [PubMed] [Google Scholar]
- 2. Kelly MA, Clarke HD. Stiffness and ankylosis in primary total knee arthroplasty. Clin Orthop Relat Res. 2003. November;416:68-73. [DOI] [PubMed] [Google Scholar]
- 3. Smith PN, Parker DA, Gelinas J, Rorabeck CH, Bourne RB. Radiographic changes in the patella following quadriceps turndown for revision total knee arthroplasty. J Arthroplasty. 2004. September;19(6):714-9. [DOI] [PubMed] [Google Scholar]
- 4. Trousdale RT, Hanssen AD, Rand JA, Cahalan TD. V-Y quadricepsplasty in total knee arthroplasty. Clin Orthop Relat Res. 1993. January;286:48-55. [PubMed] [Google Scholar]
- 5. Barrack RL, Smith P, Munn B, Engh G, Rorabeck C. The Ranawat Award. Comparison of surgical approaches in total knee arthroplasty. Clin Orthop Relat Res. 1998. November;356:16-21. [DOI] [PubMed] [Google Scholar]
- 6. Garvin KL, Scuderi G, Insall JN. Evolution of the quadriceps snip. Clin Orthop Relat Res. 1995. December;321:131-7. [PubMed] [Google Scholar]
- 7. Dolin MG. Osteotomy of the tibial tubercle in total knee replacement. A technical note. J Bone Joint Surg Am. 1983. June;65(5):704-6. [PubMed] [Google Scholar]
- 8. Whiteside LA, Ohl MD. Tibial tubercle osteotomy for exposure of the difficult total knee arthroplasty. Clin Orthop Relat Res. 1990. November;260:6-9. [PubMed] [Google Scholar]
- 9. Ries MD, Richman JA. Extended tibial tubercle osteotomy in total knee arthroplasty. J Arthroplasty. 1996. December;11(8):964-7. [DOI] [PubMed] [Google Scholar]
- 10. Whiteside LA. Exposure in difficult total knee arthroplasty using tibial tubercle osteotomy. Clin Orthop Relat Res. 1995. December;321:32-5. [PubMed] [Google Scholar]
- 11. Wolff AM, Hungerford DS, Krackow KA, Jacobs MA. Osteotomy of the tibial tubercle in total knee replacement: a report of 26 cases. J Bone Joint Surg Am. 1989;71(6):848-52. [PubMed] [Google Scholar]
- 12. van den Broek CM, van Hellemondt GG, Jacobs WCH, Wymenga AB. Step-cut tibial tubercle osteotomy for access in revision total knee replacement. Knee. 2006. December;13(6):430-4. Epub 2006 Sep 7. [DOI] [PubMed] [Google Scholar]
- 13. Tabutin J, Morin-Salvo N, Torga-Spak R, Cambas PM, Vogt F. Tibial tubercule osteotomy during medial approach to difficult knee arthroplasties. Orthop Traumatol Surg Res. 2011. May;97(3):276-86. Epub 2011 Apr 12. [DOI] [PubMed] [Google Scholar]
- 14. Chalidis BE, Ries MD. Does repeat tibial tubercle osteotomy or intramedullary extension affect the union rate in revision total knee arthroplasty? A retrospective study of 74 patients. Acta Orthop. 2009. August;80(4):426-31. [DOI] [PMC free article] [PubMed] [Google Scholar]
- 15. Piedade SR, Pinaroli A, Servien E, Neyret P. Tibial tubercle osteotomy in primary total knee arthroplasty: a safe procedure or not? Knee. 2008. December;15(6):439-46. Epub 2008 Sep 4. [DOI] [PubMed] [Google Scholar]
- 16. Chinzei N, Ishida K, Kuroda R, Matsumoto T, Kubo S, Iguchi T, Chin T, Akisue T, Nishida K, Kurosaka M, Tsumura N. Tibial tubercle osteotomy with screw fixation for total knee arthroplasty. Orthopedics. 2014. April;37(4):e367-73. [DOI] [PubMed] [Google Scholar]
- 17. Mendes MW, Caldwell P, Jiranek WA. The results of tibial tubercle osteotomy for revision total knee arthroplasty. J Arthroplasty. 2004. February;19(2):167-74. [DOI] [PubMed] [Google Scholar]
- 18. Young CF, Bourne RB, Rorabeck CH. Tibial tubercle osteotomy in total knee arthroplasty surgery. J Arthroplasty. 2008. April;23(3):371-5. Epub 2007 Nov 26. [DOI] [PubMed] [Google Scholar]
- 19. Davis K, Caldwell P, Wayne J, Jiranek WA. Mechanical comparison of fixation techniques for the tibial tubercle osteotomy. Clin Orthop Relat Res. 2000. November;380:241-9. [DOI] [PubMed] [Google Scholar]
- 20. Caldwell PE, Bohlen BA, Owen JR, Brown MH, Harris B, Wayne JS, Jiranek WA. Dynamic confirmation of fixation techniques of the tibial tubercle osteotomy. Clin Orthop Relat Res. 2004. July;424:173-9. [DOI] [PubMed] [Google Scholar]