

Overview
Introduction
Trochleoplasty as a solitary treatment for recurrent patellofemoral dislocations results in good clinical outcomes in patients with trochlear dysplasia if they do not have severe torsional and axial malalignment.
Indications & Contraindications
Step 1: Positioning of Patient and Incision
With the patient supine, and without a tourniquet, incise the skin, split the iliotibial band, and incise the joint capsule.
Step 2: Detach Periosteum
Cut the periosteum surrounding the trochlear cartilage.
Step 3: Osteochondral Layer
Elevate and peel an osteochondral layer from the lateral edge of the lateral condyle and extend it into the intercondylar notch.
Step 4: Triangular Bone Block
Create a triangular bone block to be used later to lengthen the lateral condyle.
Step 5: Create New Groove
Create a new groove and mold the osteochondral layer into it.
Step 6: Reattach Cartilage
Reattach the cartilage with Vicryl bands.
Step 7: Lengthen Lateral Condyle
It is important to lengthen the lateral condyle with a bone block in cases of patella alta; without patella alta, this step can be omitted.
Step 8: Reattach Periosteum
Cover the bone with the periosteum and resuture it.
Step 9: Postoperative Care
Bracing and partial weight-bearing are continued for 6 weeks, and a return to sports is permitted after 6 months.
Results
Trochleoplasty as a solitary treatment for recurrent patellofemoral dislocations provides good clinical outcomes in patients with trochlear dysplasia.
Pitfalls & Challenges
Abstract
Background:
Solitary trochleoplasty for recurrent patellar dislocation offers a unique benefit in that it addresses the most important factor in patellar instability: the trochlear dysplasia.
Description:
The trochlea is visualized through a lateral arthrotomy of the knee joint. An osteochondral layer is peeled off with curved chisels and extended into the intercondylar notch. A triangular bone block is removed from the subchondral bone to form the new groove. A new groove is begun with a chisel and smoothed with a high-speed burr. Also, the osteochondral layer is thinned out and fixed back transosseously in the new groove with 2 Vicryl (polyglactin) bands. The bone block is used to lengthen the lateral condyle by placing it under the osteochondral layer at the proximal extension of the lateral femoral condyle with an overlap of 1 cm.
Alternatives:
Nonsurgical alternatives include a knee or patellar brace, taping of the patella, and physiotherapy for strengthening of the vastus medialis obliquus of the quadriceps muscle. Surgical alternatives include reconstruction of the medial patellofemoral ligament; several femoral and tibial osteotomies, such as rotational osteotomies of the femur and tibia or medialization of the tibial tuberosity; and several soft-tissue interventions, such as medial reefing, relocation of the patellar tendon as described by Goldthwait1, and proximal realignments according to the method described by Insall et al.2 or Green et al.3.
Rationale:
Most patients with recurrent patellar dislocation have a dysplastic trochlea4, which is considered to be the primary reason for a recurrence. While interventions such as reconstruction of the medial patellofemoral ligament or femoral and tibial osteotomies also provide stability of the patella, they do not change the most essential factor of the instability—the trochlear dysplasia. The trochleoplasty addresses this underlying condition and reshapes the trochlea.
Introductory Statement
Trochleoplasty as a solitary treatment for recurrent patellofemoral dislocations results in good clinical outcomes in patients with trochlear dysplasia if they do not have severe torsional and axial malalignment.
Indications & Contraindications
Indications
Recurrent patellar dislocations.
Failed nonoperative treatment.
Dysplasia classified as at least type B according to the system described by Dejour and Saggin5.
Closed or closing physes.
Contraindications
Absolute Contraindications
Permanent dislocation of the patella.
Patellofemoral arthritis.
Type-A dysplasia according to the system described by Dejour and Saggin5.
Open physis.
Relative Contraindications for a Solitary Trochleoplasty (However, Can Still Be Considered in Combination with Other Interventions Such as Osteotomies)
Abnormal femoral torsion of >30°.
Valgus or varus of the knee.
Abnormal tibial torsion of >25°.
Patella alta (Caton-Deschamps index of >1.6).
Step-by-Step Description of Procedure
The steps of the operation are according to Camathias et al.6 and a modified technique popularized by Bereiter and Gautier7 (Video 1).
Video 1.
The entire procedure performed in an 18-year-old woman with recurrent patellar dislocations and type-C trochlear dysplasia according to the system described by Dejour and Saggin5.
Step 1: Positioning of Patient and Incision
With the patient supine, and without a tourniquet, incise the skin, split the iliotibial band, and incise the joint capsule.
Position the patient supine on a straight table, without elevating the hip.
Do not apply a tourniquet at any time during the operation, as a tourniquet would interfere with the use of the curved chisels or osteotomes.
Incise the skin dorsal, lateral, and proximal to the patella for approximately 6 to 10 cm. Start the incision above the patella and end it approximately 1 cm proximal to the lateral joint line. Make the incision parallel to the quadriceps tendon and patellar tendon. In the case of severe patella alta, orient the incision more distally.
Split the iliotibial band toward Gerdy’s tubercle and as far proximally as possible without cutting the underlying joint capsule.
Incise the joint capsule lateral to the patella, along with the lateral edge of the patellar tendon to the border of the lateral meniscus. The trochlea is now exposed. Splitting the iliotibial band and the joint capsule separately prevents cutting the anterior horn of the lateral meniscus accidentally.
Mobilize the vastus lateralis from the femur with a finger to release tension on the muscle.
Insert a Hohmann retractor at the area of the medial epicondyle to displace the patella medially.
Place the leg—i.e., the back of the knee, which is in 60° of flexion—on a knee supporter/holder (Fig. 1).
Place 2 Kirschner wires (2.0 mm) medial to the trochlear groove around the Hohmann retractor to hold it in place.
To visualize the mechanical axis of the lower limb, draw a virtual line from the notch to the anterior superior iliac spine. The new trochlear groove will be aligned to the mechanical axis.
Mark the entry of the new groove with a third Kirschner wire 2 cm proximal to the cartilage.
Keep the cartilage continuously wet with saline solution (Figs. 1 and 2).
Fig. 1.

The leg is placed on a leg holder with the knee flexed 60°. No tourniquet is applied. The photograph is a lateral view of a left knee.
Fig. 2.

A bump is visible at the entrance of the trochlea, indicating type-B dysplasia according to the system described by Dejour and Saggin5. Two Kirschner wires help to visualize the trochlear area. The third Kirschner wire marks the entry of the new groove (asterisk). The photograph is a lateral view of a left knee.
Step 2: Detach Periosteum
Cut the periosteum surrounding the trochlear cartilage.
Cut the periosteum surrounding the trochlear cartilage, leaving approximately 1 cm of the periosteum.
Leave a larger periosteal flap on the lateral part of the trochlea.
Detach the periosteum with a sharp elevator. The flap provides a good structure with which to reattach the periosteum and the underlying bone block, as will be described (Fig. 3).
Fig. 3.
The periosteum around the cartilage is detached. The lateral edges of the trochlea are elevated with a small chisel.
Step 3: Osteochondral Layer
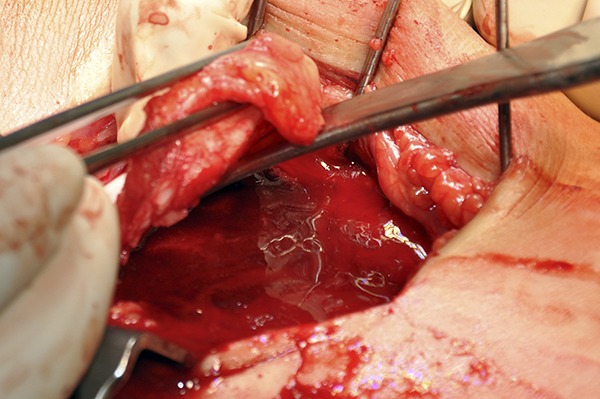
Elevate and peel an osteochondral layer from the lateral edge of the lateral condyle and extend it into the intercondylar notch.
Elevate the cartilage on the lateral edge of the lateral condyle with an 8-mm curved chisel (Fig. 3).
Use a 15-mm curved chisel or osteotome to peel off an osteochondral layer (Fig. 4-A).
Extend the osteochondral layer into the intercondylar notch (Fig. 4-B).
Figs. 4-A and 4-B The osteochondral layer is peeled off with a larger chisel.
Fig. 4-A.

Fig. 4-B.
Step 4: Triangular Bone Block
Create a triangular bone block to be used later to lengthen the lateral condyle.
Use two 35 to 40-mm straight chisels or osteotomes to remove a triangular bone block of about 2 to 3 cm in length.
Align the osteotomes along the planned virtual line in the center of the dysplastic trochlea directed toward the third Kirschner wire.
The bone block will be used later for lengthening of the lateral condyle.
Step 5: Create New Groove
Create a new groove and mold the osteochondral layer into it.
Create a preliminary new groove with a small chisel. Collect small bone flakes to elevate the lateral condyle later.
With a high-speed burr, smooth out the subchondral groove. The entrance of the new groove is always directed to the third Kirschner wire.
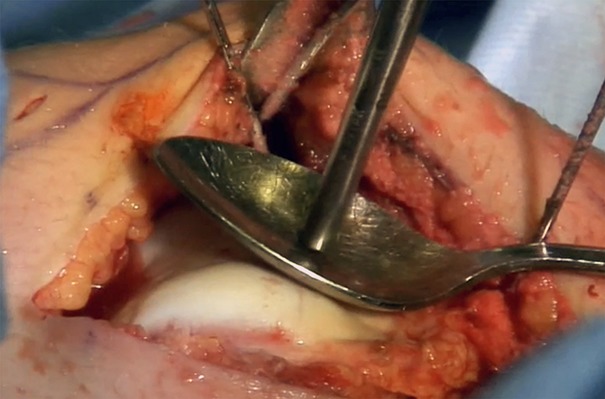
Thin out the osteochondral layer with the high-speed burr until the layer is flexible (Fig. 5).
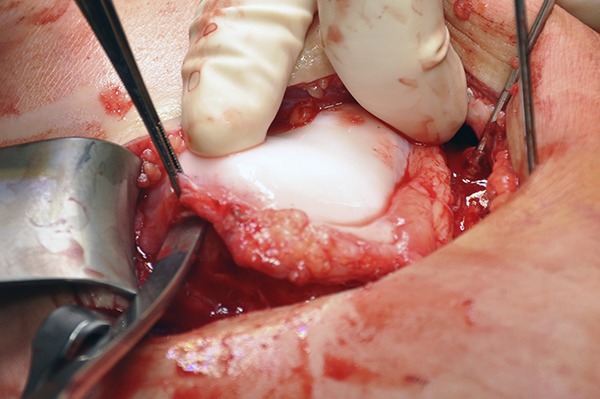
Mold the osteochondral layer into the new groove with an ordinary spoon. At this point, a concave trochlear groove is already established (Fig. 6).
Fig. 5.

A high-speed burr is used to thin out the layer until it is flexible.
Fig. 6.
The osteochondral layer can be molded into the new groove with a spoon.
Step 6: Reattach Cartilage
Reattach the cartilage with Vicryl bands.
Drill 2 holes with a 3.2-mm drill-bit through the cartilage and 1 right at the entrance of the trochlear groove. All holes should line up with the new trochlear groove (Fig. 7).
Tunnel the holes from the lateral direction.
Place two 3-mm Vicryl (polyglactin) bands (Ethicon, Johnson & Johnson) from the lateral direction into these holes (Fig. 8).
Through the most proximal hole, place 2 additional Vicryl-2 sutures for fixing the bone block later.
Fix the cartilage transosseously on the lateral side of the femur with the Vicryl bands.
Fig. 7.

Two holes are drilled through the cartilage, and 1 is drilled right at the entrance of the trochlear groove.
Fig. 8.
Two Vicryl bands are placed through the holes to reattach the cartilage.
Step 7: Lengthen Lateral Condyle
It is important to lengthen the lateral condyle with a bone block in cases of patella alta; without patella alta, this step can be omitted.
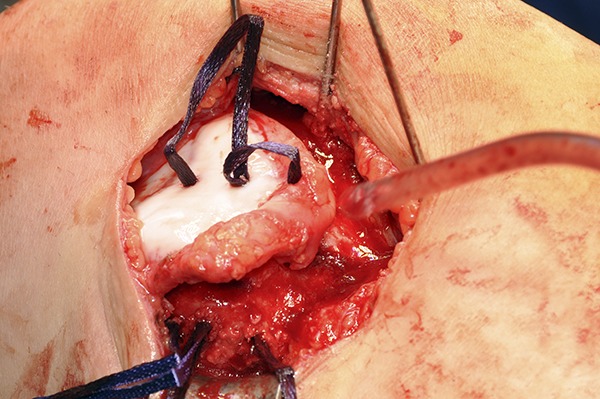
Place the bone block under the osteochondral layer at the proximal extension of the lateral femoral condyle. The bone block and the cartilage should overlap approximately 1 cm.
Secure the bone block with the 2 Vicryl-2 sutures (Fig. 9). The bone block will lengthen the lateral condyle.
Place bone flakes under the lateral condyle. This step will elevate the lateral condyle minimally. Now you see the result of the trochleoplasty (Fig. 10).
Fig. 9.

A bone block is placed under the osteochondral layer at the proximal extension of the lateral femoral condyle and secured with the 2 sutures.
Fig. 10.

The new groove (axial view from distal).
Step 8: Reattach Periosteum
Cover the bone with the periosteum and resuture it.
Cover the bone with the periosteum and resuture it with a Vicryl-2-0 suture.
Suture the knee capsule and the lateral retinaculum separately with Vicryl-2-0 and Vicryl-2 sutures, respectively.
Step 9: Postoperative Care
Bracing and partial weight-bearing are continued for 6 weeks, and a return to sports is permitted after 6 months.
Apply a knee brace allowing flexion up to 60°. The patient wears the brace for 6 weeks.
Allow physical therapy with active and passive range of motion of the knee immediately after the operation.
Partial weight-bearing with 50% body weight on the operatively treated side is maintained for 6 weeks and then gradually increased.
A return to all types of sports is permitted after 6 months.
Results
Trochleoplasty as a solitary treatment for recurrent patellofemoral dislocations provides good clinical outcomes in patients with trochlear dysplasia. We used this operation, and performed follow-up, on 50 knees in 44 patients6 All clinical and radiographic variables improved postoperatively compared with preoperatively. One patella redislocated at 38 months postoperatively. In addition, 4 patients underwent revision due to scar tissue and a reduced range of motion.
Although lateral lengthening of the trochlea allows stabilization of patella alta (a Caton-Deschamps index of >1.3), our results with high-riding patellae with a Caton-Deschamps index of >1.6 were less favorable. Therefore, we always consider additional distalization of the patella in those patients.
Pitfalls & Challenges
The solitary trochleoplasty provides good stability if there are no other abnormal conditions. In cases of varus or valgus deformation of the knee, or patella alta, consider appropriate osteotomies.
In patients who have had several dislocations, the cartilage becomes stiffer. Therefore, more caution has to be applied when detaching the cartilage. Otherwise, the cartilage can crack and tear off. In these cases, we recommend detaching a thicker osteochondral layer. With the high-speed burr, the layer can be thinned without risking a crack.
If you fracture the osteochondral layer, fix the layer with additional 3-mm Vicryl bands.
The lateral structures of the patella should always be reconstructed when closing the operation site. Not suturing the lateral retinaculum can create tilting of the patella. If suturing is not possible, consider lengthening the lateral structures. Do not overtighten the lateral structures. Aim to have a patella that can move 1 to 2 quadrants on the lateral side.
Footnotes
Published outcomes of this procedure can be found at: Am J Sports Med. 2016 Nov;44(11):2855-63.
Disclosure: The authors indicated that no external funding was received for any aspect of this work. The Disclosure of Potential Conflicts of Interest forms are provided with the online version of the article (http://links.lww.com/JBJSEST/A210).
References
- 1.Goldthwait JE. Slipping or recurrent dislocation of the patella: with the report of eleven cases. Am J Orthop Surg. 1903;1:293-308. [PubMed] [Google Scholar]
- 2.Insall J, Bullough PG, Burstein AH. Proximal “tube” realignment of the patella for chondromalacia patellae. Clin Orthop Relat Res. 1979. October;(144):63-9. [PubMed] [Google Scholar]
- 3.Green JP, Waugh W, Wood H. Congenital lateral dislocation of the patella. J Bone Joint Surg Br. 1968. May;50(2):285-9. [PubMed] [Google Scholar]
- 4.Dejour H, Walch G, Nove-Josserand L, Guier C. Factors of patellar instability: an anatomic radiographic study. Knee Surg Sports Traumatol Arthrosc. 1994;2(1):19-26. [DOI] [PubMed] [Google Scholar]
- 5.Dejour D, Saggin P. The sulcus deepening trochleoplasty-the Lyon’s procedure. Int Orthop. 2010. February;34(2):311-6. Epub 2010 Jan 9. [DOI] [PMC free article] [PubMed] [Google Scholar]
- 6.Camathias C, Studer K, Kiapour A, Rutz E, Vavken P. Trochleoplasty as a solitary treatment for recurrent patellar dislocation results in good clinical outcome in adolescents. Am J Sports Med. 2016. November;44(11):2855-63. Epub 2016 Jul 19. [DOI] [PubMed] [Google Scholar]
- 7.Bereiter H, Gautier E. Die trochleaplastik als chirurgische therapie der rezidivierenden patellaluxation bei trochleadysplasie des femurs. arthroskopie. 1994;7:281-6. [Google Scholar]