

Overview
Introduction
An isolated subtalar arthrodesis through a sinus tarsi approach with cannulated screw fixation is safe, reproducible, and effective for specific hindfoot pathology in adults.
Indications & Contraindications
Step 1: Preoperative Planning
Perform a comprehensive clinical and radiographic assessment.
Step 2: Patient Positioning
Position the patient supine on the operating table with a bump under the ipsilateral hip, to internally rotate the involved leg.
Step 3: Incision
Mark a longitudinal incision from just inferior to the tip of the lateral malleolus and extending toward the base of the 4th metatarsal.
Step 4: Approach
Expose the subtalar joint by reflecting the extensor digitorum brevis and protecting the peroneal tendons.
Step 5: Joint Preparation
Meticulously prepare the subtalar joint using osteotomes and curets down to healthy bleeding subchondral bone.
Step 6: Reduction and Fixation
Reduce the subtalar joint into 5° of valgus and fix it with cannulated screws.
Step 7: Wound Closure
Meticulously close the wound in layers and place the lower leg in a well-padded plaster back slab with the ankle in a neutral position.
Step 8: Postoperative Care
The operatively treated leg is kept immobilized and non-weight-bearing for the first 6 weeks.
Results
Numerous retrospective articles have reported high fusion rates and good functional outcomes after isolated subtalar arthrodesis, for all indications.
Pitfalls & Challenges
Introduction
An isolated subtalar arthrodesis through a sinus tarsi approach with cannulated screw fixation is safe, reproducible, and effective for specific hindfoot pathology in adults.
Subtalar arthrodesis performed for the correct indication is an effective procedure for alleviating symptoms, correcting malalignment, and improving function1,2. It is not as technically demanding as a triple arthrodesis and has the benefit of retaining some hindfoot function3. The most common indication for the procedure is isolated subtalar arthritis, whether primary, posttraumatic, or inflammatory. A thorough clinical examination, with a good understanding of the surface anatomy, is required to diagnose isolated subtalar joint pathology. Clinical findings include lateral hindfoot swelling, a painful subtalar range of motion, and sinus tarsi tenderness4. The diagnosis is confirmed by additional special investigations. Weight-bearing radiographs of the foot are crucial. These include routine anteroposterior, oblique, and lateral views. Additional views that may be of benefit include a Broden view (good for visualization of the posterior facet to assess the extent of arthritis), Harris axial view (useful to check for heel widening causing subfibular impingement, as occurs after calcaneal fractures), and a Saltzman view (to objectively assess alignment of the calcaneus relative to the tibia). Radiographic measurements help to identify malalignment of the hindfoot that needs to be addressed at the time of surgery5. In addition to hindfoot malalignment, it is important to look for loss of calcaneal height and a change in the talar inclination6. A decreased talar declination angle causes anterior ankle impingement, which will ultimately result in ankle arthritis7. With posttraumatic arthritis and severe deformities, a CT (computed tomography) scan is often required to better define the pathology.
Numerous techniques, approaches, and fixation options have been described for isolated subtalar arthrodesis. The arthrodesis can be performed as an open or arthroscopic-assisted procedure. The arthroscopic technique is limited to cases without major malalignment of the subtalar joint or massive bone loss. Approaches to the subtalar joint include medial, Ollier lateral, posterolateral (lateral extensile), and sinus tarsi incisions7. The medial approach is used in cases with extreme valgus malalignment of the heel, which would compromise the lateral wound once corrected. The posterolateral approach is preferred for distraction arthrodesis of the subtalar joint and subfibular impingement decompression, commonly seen in malunited calcaneal fractures7,8. We find the sinus tarsi approach to be effective and safe for the majority of isolated subtalar arthrodeses. Yuan et al. found the sinus tarsi approach superior to the posterolateral approach with regard to exposure time, intraoperative bleeding, and operative complications9.
Fixation options include large cannulated screws, staples, and even subtalar-arthrodesis-specific implants10. Large cannulated screws are most commonly described for fixation. There is a debate regarding the optimal number of screws (1, 2, or 3), screw orientation (parallel or divergent), and type of screws (head or headless, fully threaded or partially threaded) for stabilizing the arthrodesis site. We use 2 cannulated 7.5-mm fully threaded conical headless compression screws inserted from the non-weight-bearing area of the posterior aspect of the heel. Hintermann et al. showed superior compression using a headless compression screw11. That being said, any large-diameter (≥6.5-mm) compression screw is effective in stabilizing the fusion site. The screws are inserted in a divergent pattern, one into the body and the other into the neck of the talus. Eichinger et al. found divergent screws to be superior to parallel screws with regard to stability12.
The procedure is performed with the patient supine and under general anesthesia with a regional (popliteal) nerve block. There are 2 crucial components of the procedure that dictate a successful outcome. The 1st is the preparation of the joint surfaces for the arthrodesis. It is important to spend time meticulously preparing the joint surfaces with sharp osteotomes and curets under direct vision. Make sure to remove all cartilage and sclerotic bone down to healthy bleeding subchondral bone. No type of fixation or duration of immobilization can compensate for a poorly prepared joint. Use bone graft to fill any bone defects or voids. If good-quality allograft is not available, autogenous bone graft13 is readily available from the calcaneus and distal or proximal part of the tibia. The second critical step is proper alignment of the joint. A malaligned joint will alter the normal biomechanics, causing abnormal stress to the surrounding tendons, ligaments, and joints. For example, varus malalignment will shift the weight onto the lateral border of the foot, placing abnormal stress on the lateral structures (leading to stress fractures at the base of the 5th metatarsal, peroneal tendinitis, and lateral ligament instability of the ankle). Valgus malalignment can result in subfibular impingement and abnormal stress on the spring and deltoid ligaments. This results in chronic pain, dysfunction, and even arthritis of the ankle7,8. The ideal alignment of the hindfoot is 5° to 10° of valgus, as confirmed by the biomechanical study by Jastifer et al.14. The operatively treated leg is immobilized in a non-weight-bearing cast for 6 weeks. Thereafter, it is protected in a pneumatic immobilizer boot for up to 6 weeks with progressive weight-bearing. Adequate osseous fusion can take between 12 to 16 weeks. It is advisable to assess and correct any vitamin-D deficiency preoperatively and postoperatively. Advise the patient that it can take 6 to 9 months for all symptoms to resolve and there is a return to normal function.
The surgical technique for isolated subtalar arthrodesis is shown in Video 1.
Video 1.
Surgical technique for isolated subtalar arthrodesis.
Indications & Contraindications
Indications
Primary subtalar arthritis
Posttraumatic arthritis (after talar or calcaneal fracture)
Primary management of severely comminuted calcaneal fracture
Inflammatory arthritis
Subtalar dislocation
Talocalcaneal coalition
Posterior tibial tendon dysfunction15
Contraindications
Active infection
Vascular compromise
Poor soft-tissue envelope
Medical comorbidities
Multiple joint involvement, which requires the surgeon to address all involved joints
Step 1: Preoperative Planning
Perform a comprehensive clinical and radiographic assessment.
A comprehensive clinical examination of the foot, with a good understanding of the surface anatomy, is required.
While the patient is standing, look from behind for malalignment of the hindfoot, either varus or valgus (Fig. 1). This is very important as such malalignment must be corrected intraoperatively.
Look for obvious swelling around the subtalar joint.
Tenderness is usually limited to the lateral aspect of the hindfoot, which corresponds to the posterior facet of the subtalar joint.
Range of motion of the hindfoot is often painful, limited, and associated with crepitus. If there is any malalignment, check whether it can be passively corrected.
Document any sensory deficits, especially in posttraumatic cases.
Anteroposterior, oblique, and lateral weight-bearing radiographs of the foot are needed to make the diagnosis of subtalar arthritis (Fig. 2).
Broden views are helpful to assess the extent of degeneration of the posterior facet of the subtalar joint, especially if the lateral view is not conclusive regarding involvement of the subtalar joint.
In the presence of malalignment, a Saltzman view can be used to quantify the deformity (Fig. 3).
In complex cases (e.g., tarsal coalition, fractures, or large cysts), CT is helpful in surgical planning.
Fig. 1.

Hindfoot valgus malalignment of the left foot as seen from behind the patient.
Fig. 2.

Weight-bearing oblique (Fig. 2-A), weight-bearing anteroposterior (Fig. 2-B), and weight-bearing lateral (Fig. 2-C) radiographs of a patient with isolated subtalar arthritis.
Fig. 3.

Saltzman view for measuring hindfoot alignment relative to the tibia as described by Donovan and Rosenberg28.
Step 2: Patient Positioning
Position the patient supine on the operating table with a bump under the ipsilateral hip, to internally rotate the involved leg.
Position the patient supine on the operating table with the soles of the feet at the edge of the table. This facilitates implant insertion through the posterior aspect of the heel (Fig. 4).
The procedure is performed with general anesthesia together with a popliteal nerve block for postoperative analgesia.
Place a silicone bump under the ipsilateral hip to internally rotate the involved leg and provide easy access to the lateral aspect of the hindfoot.
Apply a pneumatic tourniquet to the thigh and inflate it to 100 mm Hg above the patient’s systolic blood pressure, after elevating the leg for 5 minutes for exsanguination. If available, an Esmarch bandage or a Rhys-Davies exsanguinator is very convenient to exsanguinate the leg.
Prepare and drape the leg according to a standard technique. Drape above the knee as bone graft harvesting from the proximal part of the tibia may be required.
Place two rolled-up towels under the heel to elevate the foot off the surgical table. This makes surgical access more comfortable for the surgeon (Fig. 5).
Fig. 4.

The patient is positioned supine with the feet at the edge of the table and a bump under the ipsilateral hip.
Fig. 5.

Two rolled towels are placed under the heel to lift the foot off the table, making surgical access easier.
Step 3: Incision
Mark a longitudinal incision from just inferior to the tip of the lateral malleolus and extending toward the base of the 4th metatarsal.
Mark the lateral malleolus, base of the 4th metatarsal, superficial peroneal nerve, and sural nerve using a Codman marker.
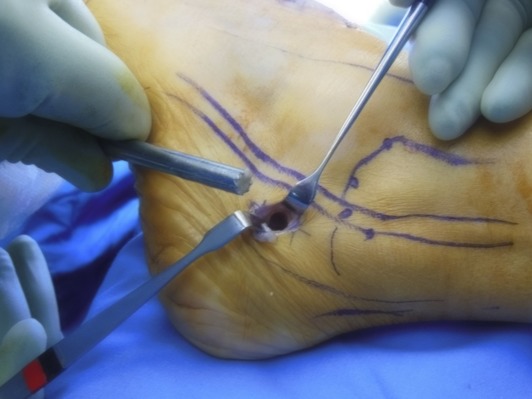
Mark the incision from just inferior to the tip of the lateral malleolus and extending toward the base of the 4th metatarsal (Fig. 6).
Start the incision at the tip of the lateral malleolus and extend it distally. The incision does not need to extend all of the way to the base of the 4th metatarsal for an isolated subtalar arthrodesis. It can always be extended as needed during the procedure.
The incision edges must never be under excessive tension with retraction during the procedure. This can lead to postoperative wound breakdown at the edges. Extend the incision if needed.
Fig. 6.

The surgical incision is drawn from below the tip of the lateral malleolus to the base of the 4th metatarsal. The superficial peroneal and sural nerves are drawn as dotted lines.
Step 4: Approach
Expose the subtalar joint by reflecting the extensor digitorum brevis and protecting the peroneal tendons.
Carefully incise the subcutaneous tissue in line with the skin incision to form thick flaps, which help to prevent postoperative wound complications.
With a correctly placed incision, the superficial peroneal and sural nerves should be on either side of the incision and out of harm’s way.
There is often a leash of veins around the sinus tarsi area. It is advisable to achieve hemostasis of these vessels using electrocautery.
Expose the muscle belly of the extensor digitorum brevis. Identify the origin of this muscle and elevate it off the bone.
Dissect the muscle out distally as a flap, exposing the sinus tarsi. Then secure the muscle flap to the skin, distal to the incision, using a Vicryl (polyglactin) 2-0 suture (Fig. 7). In an elderly patient, this muscle is often atrophied and it is easier to split the muscle belly longitudinally.
Remove the sinus tarsi fat pad and cervical ligaments with sharp dissection and using a rongeur. The posterior facet of the subtalar joint now becomes visible.
It is important to identify the peroneal tendons at the proximal edge of the incision to avoid damaging them. Insert a Hohmann retractor deep to the calcaneofibular ligament around the posterior aspect of the subtalar joint (Fig. 8). This protects the peroneal tendons and calcaneofibular ligament.
Open the capsule of the posterior facet, exposing the joint.
Debride all remaining fatty and ligamentous tissue using a rongeur to optimize exposure.
Fig. 7.

The origin of the extensor digitorum brevis is identified and released. The muscle belly is dissected out distally and sutured to the distal skin.
Fig. 8.

A Hohmann retractor is placed deep to the calcaneofibular ligament around the posterior aspect of the subtalar joint, improving exposure and protecting the peroneal tendons.
Step 5: Joint Preparation
Meticulously prepare the subtalar joint using osteotomes and curets down to healthy bleeding subchondral bone.
Use a sharp osteotome to denude the lateral aspect of the posterior facet of its cartilage. Remove the loose cartilage debris using a small spine curet.
When identification of the subtalar joint is difficult, as it is in patients with severe posttraumatic arthritis and coalition, use an osteotome under fluoroscopic guidance to identify the joint.
Removing the lateral part of the cartilage makes room to insert a lamina spreader. First insert the lamina spreader in the anterior half of the posterior facet (Fig. 9). This allows good visualization of and access to the posterior half of the facet.
Use the osteotomes to remove the cartilage along the posterior aspect of the facet on both the talar and calcaneal surfaces. Be careful with the osteotome along the posteromedial edge of the joint, as the flexor hallucis longus tendon runs in this area. Visualization of the flexor hallucis longus indicates good debridement of the joint surfaces (Fig. 10).
Change the lamina spreader into the posterior half of the posterior facet. This exposes the remaining surface of the posterior facet as well as the middle and anterior facets.
Once again, use osteotomes and curets to remove all cartilage from the subtalar joint, including the middle and anterior facets. Make sure to debride down to healthy, bleeding subchondral bone.
Irrigate the joint with copious amounts of saline solution to remove all debris.
If bone cysts are present, curet them out and apply bone graft. Depending on the amount of graft needed, bone can be harvested from either the distal or the proximal part of the tibia using a bone trephine. If available, allograft can also be used.
Distal tibial bone graft is taken 2 cm proximal to the tip of the medial malleolus through a 1-cm incision. Carefully dissect down to the bone, being careful not to injure the saphenous nerve. Use an 8-mm bone trephine to harvest cylinders of cancellous bone. Aim the trephine in various directions to maximize the quantity of graft harvested. Do not breach the opposite cortex (Figs. 11-A, 11-B, and 11-C).
Use a 2.5-mm drill-bit to perforate all of the denuded facets with multiple holes to form channels that allow marrow elements access to the fusion site. The benefit of using a drill-bit is that the flutes bring cancellous bone graft into the fusion site.
When the subchondral plate is hard, use a small osteotome to scale the fusion surfaces, increasing the area for fusion.
Fig. 9.
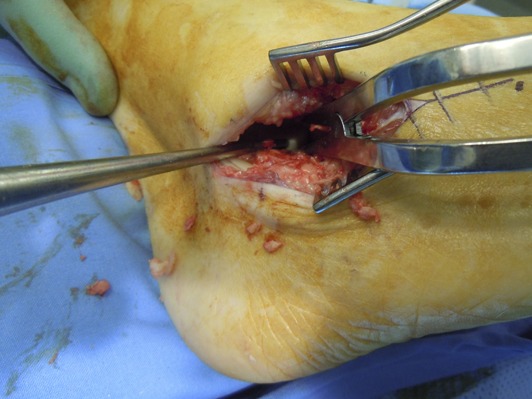
A lamina spreader is used to open the joint, making access for debridement easier.
Fig. 10.

The flexor hallucis longus tendon is identified in the posteromedial aspect of the subtalar joint. It is important not to damage the tendon with osteotomes during debridement.
Fig. 11-A.
Autogenous bone graft being taken from the calcaneus.
Fig. 11-B.

Autogenous bone graft being taken from the distal part of the tibia. The incision is made 2 cm proximal to the tip of the medial malleolus.
Fig. 11-C.

Autogenous bone graft from the distal part of the tibia.
Step 6: Reduction and Fixation
Reduce the subtalar joint into 5° of valgus and fix it with cannulated screws.
Make a transverse incision over the posterior aspect of the heel, about 1 cm proximal to the weight-bearing surface (Fig. 12), and carefully dissect down to bone.
Reinsert the lamina spreader and distract the subtalar joint.
Fixation is performed using cannulated 6.5 or 7.5-mm screws. We prefer using 2 fully threaded conical headless compression screws (Fig. 13). When screws are headless, there is less chance of them irritating the back of the heel. The benefit of the conical fully threaded screws is that, unlike conventional partially threaded compression screws, the threads do not need to fully cross the joint to achieve compression.
Insert the first guidewire in the lateral half of the calcaneus, directed toward the body of the talus. Insert the second guidewire in the medial half of the calcaneus, directed toward the neck of the talus (Fig. 14).
Advance the guidewires through the calcaneus while visualizing where they exit the posterior facet through the distracted joint. The first wire should exit in the midsubstance of the posterior facet, while the second should exit approximately 1 cm anterior to the first (Video 1). The use of an ACL (anterior cruciate ligament) Kirschner wire guide can aid in inserting the wires accurately.
Once appropriate placement is achieved in the calcaneus, withdraw the wires to just below the subchondral bone.
Reduce the subtalar joint, taking special care to align the hindfoot into about 5° of valgus. Avoid varus angulation.
In cases with excessive bone loss, such as calcaneal fractures, contoured bone blocks are necessary to correct height and alignment (Figs. 15-A and 15-B). These procedures are best performed through a posterolateral incision.
Once the hindfoot is accurately aligned, advance the guidewires into the talus.
It is prudent to use intraoperative fluoroscopy to confirm reduction of the subtalar joint and appropriate positioning of the guidewires. On the lateral view, check that the wires are divergent, crossing the subtalar joint, and not penetrating the ankle joint. Obtain an anteroposterior view of the ankle and confirm that the wires are within the talar body (Figs. 16-A and 16-B).
Insert screws of the correct length through the heel. Retract the second guidewire into the calcaneus while inserting the first screw to obtain maximal compression. Check the reduction and fixation under fluoroscopy (Fig. 17).
If any voids or gaps are visible after fixation, these can be filled with leftover autogenous bone graft, which was harvested earlier.
Fig. 12.

The incision marked on the posterior aspect of the heel, off the weight-bearing surface of the foot, for insertion of the screws.
Fig. 13.

Fully threaded conical headless compression screws.
Fig. 14.

The guidewires are inserted through the heel into the talus while the joint is reduced.
Fig. 15-A.
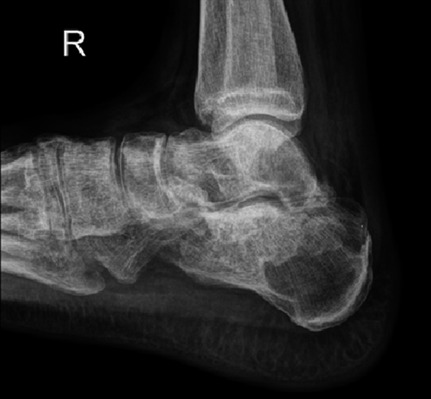
Posttraumatic subtalar arthritis with loss of calcaneal height and decreased talar declination.
Fig. 15-B.

Subtalar bone-block distraction arthrodesis with restored calcaneal height and talar declination.
Fig. 16-A.

Lateral fluoroscopic view to confirm that the guidewires were inserted in a divergent pattern and crossing the subtalar joint.
Fig. 16-B.

Anteroposterior fluoroscopic view of the ankle confirming that the guidewires are within the talus.
Fig. 17.

Intraoperative fluoroscopy confirming correct screw length and placement.
Step 7: Wound Closure
Meticulously close the wound in layers and place the lower leg in a well-padded plaster back slab with the ankle in a neutral position.
Irrigate the wound with copious amounts of normal saline solution.
Suture the extensor digitorum brevis muscle back to its origin. Carefully close the wound in layers using absorbable Vicryl sutures (Fig. 18).
We prefer to close the skin with a self-locking Monocryl (poliglecaprone) suture and Steri-Strips (3M).
Do not forget the wound at the back of the heel (created for the screw insertion) or the bone-graft harvest site; close them with 3-0 nylon.
Apply a bulky dressing, and place the lower leg in a plaster back slab with the ankle in a neutral position. The back slab consists of one plaster splint placed in a U-shape around the heel and up along the medial and lateral aspects of the leg and a second plaster splint running from the base of the toes along the sole of the foot and up the back of the calf. Secure the slab with bandages (Figs. 19-A and 19-B)
Fig. 18.

The extensor digitorum brevis muscle is sutured back to its origin.
Fig. 19-A.

A back slab is applied using 2 plaster splints over a bulky dressing.
Fig. 19-B.
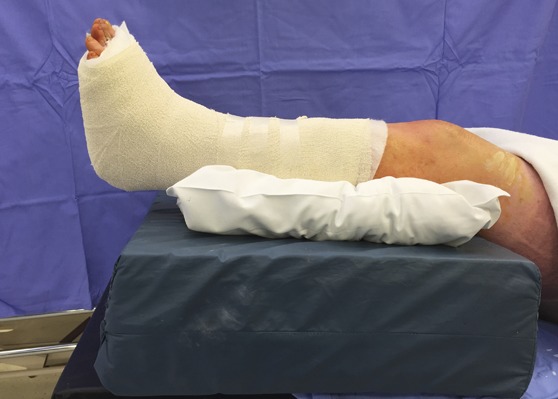
The operatively treated leg immobilized in the below-the-knee plaster slab, with the ankle in a neutral position, and elevated.
Step 8: Postoperative Care
The operatively treated leg is kept immobilized and non-weight-bearing for the first 6 weeks.
Instruct the patient to elevate the leg above heart level, which is most easily done in the supine position, for the first 2 weeks postoperatively. This prevents excessive swelling, which can lead to wound complications. In the first 2 weeks, we limit our patients to getting up only to go to the toilet or to have a meal.
It is advisable to check the patient’s vitamin-D level and supplement it accordingly.
Consider chemical venous thromboprophylaxis in high-risk patients16.
At 2 weeks, remove the back slab to check the wounds and remove the nylon sutures.
If the swelling has subsided and the wounds have healed appropriately, place the leg in a below-the-knee circular cast with the ankle in a neutral position.
Instruct the patient to remain non-weight-bearing for another 4 weeks, so that the total time of immobilization and non-weight-bearing is 6 weeks.
At 6 weeks, remove the cast. Have radiographs of the foot made to assess progression of the osseous fusion.
Place the leg in a pneumatic immobilizer boot, and tell the patient to start progressive weight-bearing, with full weight-bearing achieved at 10 to 12 weeks.
The patient is referred to physiotherapy to start a rehabilitation program after the cast is removed.
Repeat radiographs of the foot at 10 weeks. If osseous fusion is still questionable obtain the radiographs again at 16 weeks (Fig. 20). Once osseous fusion is evident clinically and on radiographs, the patient can start transitioning into supportive shoes.
Impact activities should be limited until the patient is symptom-free and functional rehabilitation has been completed.
Fig. 20.

Radiograph made at 16 weeks confirming subtalar fusion.
Results
Numerous retrospective articles have reported high fusion rates and good functional outcomes after isolated subtalar arthrodesis, for all indications. Easley et al. reported an 84% rate of successful fusion and an average postoperative increase in the average American Orthopaedic Foot & Ankle Society (AOFAS) score of 46 points after 184 consecutive isolated subtalar fusions8. Flemister et al. found a 96% fusion rate with an average AOFAS score of 75 points in 86 patients17. Mann et al. reviewed the results of 48 isolated subtalar arthrodeses and reported a 100% fusion rate with an average AOFAS score of 89 points18. They also noted 36% and 41% rates of progressive arthrosis in the ankle and midfoot joints, respectively. Davies and colleagues reported a 94% successful fusion rate and advocated the use of a CT scan to confirm fusion19. Mirmiran and colleagues found the average period to fusion to be 16 weeks with an 80% fusion rate20. In a large study of 101 patients, Haskell et al. noted the average interval to union to be 12 weeks with a 98% successful fusion rate21.
Risk factors for developing a nonunion of the subtalar arthrodesis site are smoking, osteonecrosis, ipsilateral ankle fusion, and revision surgery7,8,19,22,23. The rate for implant removal has been reported to be 13% to 27%8,21,24. Progressive ankle and midfoot arthritis after subtalar arthrodesis has been documented but has not been found to be clinically relevant25. Faraj and Loveday found good functional outcomes in terms of daily and sports activities26. Romeo et al. reported that only 66% of their patients were active in recreational sports before their isolated subtalar fusion; this increased to 73% postoperatively, with high overall patient satisfaction27.
Pitfalls & Challenges
Good preoperative planning with appropriate radiographic measurements is important.
Handle the soft tissue with care.
A lamina spreader is useful in exposing the joint.
Meticulous joint preparation is the key to success.
Correction of alignment, including calcaneal height and talar inclination, is important.
Distraction arthrodesis is best done through a posterolateral incision.
Bone-grafting improves the fusion rate.
Intraoperative fluoroscopy is essential.
Stable fixation using 2 divergent large cannulated compression screws is recommended.
Progressive weight-bearing should be commenced once early signs of osseous union are visible on radiographs.
Weight-bearing activities can be progressed according to clinical improvement.
The subtalar fusion is considered to be successful on the basis of both positive radiographic findings and clinical improvement.
A CT scan is required to objectively confirm the subtalar fusion.
Footnotes
Published outcomes of this procedure can be found at: J Bone Joint Surg Am. 2000 May;82(5):613-24 and Foot Ankle Clin. 2015 Jun;20(2):293-310.
Disclosure: The authors indicated that no external funding was received for any aspect of this work. The Disclosure of Potential Conflicts of Interest forms are provided with the online version of the article.
References
- 1.Greisberg J, Sangeorzan B. Hindfoot arthrodesis. J Am Acad Orthop Surg. 2007. January;15(1):65-71. [DOI] [PubMed] [Google Scholar]
- 2.Mann RA. Arthrodesis of the foot and ankle. In: Coughlin MJ, Mann RA, Saltzman CL, editors. Surgery of the foot and ankle. 8th ed Philadelphia: Elsevier Health; 2007. p 1087-123. [Google Scholar]
- 3.Astion DJ, Deland JT, Otis JC, Kenneally S. Motion of the hindfoot after simulated arthrodesis. J Bone Joint Surg Am. 1997. February;79(2):241-6. [DOI] [PubMed] [Google Scholar]
- 4.Roster B, Kreulen C, Giza E. Subtalar joint arthrodesis: open and arthroscopic indications and surgical techniques. Foot Ankle Clin. 2015. June;20(2):319-34. Epub 2015 Apr 11. [DOI] [PubMed] [Google Scholar]
- 5.Hentges MJ, Gesheff MG, Lamm BM. Realignment subtalar joint arthrodesis. J Foot Ankle Surg. 2016. Jan-Feb;55(1):16-21. Epub 2015 May 28. [DOI] [PubMed] [Google Scholar]
- 6.Xu X, Yang C, Zhu Y, Liu J, Wei B. A retrospective clinical study on 37 subtalar arthrodesis patients of nine years follow-up. J Am Podiatr Med Assoc. 2015. August 4 Epub 2015 Aug 4. [DOI] [PubMed] [Google Scholar]
- 7.Vulcano E, Ellington JK, Myerson MS. The spectrum of indications for subtalar joint arthrodesis. Foot Ankle Clin. 2015. June;20(2):293-310. Epub 2015 Apr 11. [DOI] [PubMed] [Google Scholar]
- 8.Easley ME, Trnka HJ, Schon LC, Myerson MS. Isolated subtalar arthrodesis. J Bone Joint Surg Am. 2000. May;82(5):613-24. [DOI] [PubMed] [Google Scholar]
- 9.Yuan CS, Tan XK, Zhou BH, Liu JP, Tao X, Tang K. Differential efficacy of subtalar fusion with 3 operative approaches. J Orthop Surg. 2014. November 19;9:115. [DOI] [PMC free article] [PubMed] [Google Scholar]
- 10.Herrera-Pérez M, Andarcia-Bañuelos C, Barg A, Wiewiorski M, Valderrabano V, Kapron AL, De Bergua-Domingo JM, Pais-Brito JL. Comparison of cannulated screws versus compression staples for subtalar arthrodesis fixation. Foot Ankle Int. 2015. February;36(2):203-10. Epub 2014 Sep 23. [DOI] [PubMed] [Google Scholar]
- 11.Hintermann B, Valderrabano V, Nigg B. Influence of screw type on obtained contact area and contact force in a cadaveric subtalar arthrodesis model. Foot Ankle Int. 2002. November;23(11):986-91. [DOI] [PubMed] [Google Scholar]
- 12.Eichinger M, Schmölz W, Brunner A, Mayr R, Bölderl A. Subtalar arthrodesis stabilisation with screws in an angulated configuration is superior to the parallel disposition: a biomechanical study. Int Orthop. 2015. November;39(11):2275-80. Epub 2015 Aug 8. [DOI] [PubMed] [Google Scholar]
- 13.Floyd T, Ohnmeiss D. A meta-analysis of autograft versus allograft in anterior cervical fusion. Eur Spine J. 2000. October;9(5):398-403. [DOI] [PMC free article] [PubMed] [Google Scholar]
- 14.Jastifer JR, Gustafson PA, Gorman RR. Subtalar arthrodesis alignment: the effect on ankle biomechanics. Foot Ankle Int. 2013. February;34(2):244-50. Epub 2013 Jan 10. [DOI] [PubMed] [Google Scholar]
- 15.Kitaoka HB, Patzer GL. Subtalar arthrodesis for posterior tibial tendon dysfunction and pes planus. Clin Orthop Relat Res. 1997. December;345:187-94. [PubMed] [Google Scholar]
- 16.Saragas NP, Ferrao PN, Saragas E, Jacobson BF. The impact of risk assessment on the implementation of venous thromboembolism prophylaxis in foot and ankle surgery. Foot Ankle Surg. 2014. June;20(2):85-9. Epub 2013 Nov 14. [DOI] [PubMed] [Google Scholar]
- 17.Flemister AS, Jr, Infante AF, Sanders RW, Walling AK. Subtalar arthrodesis for complications of intra-articular calcaneal fractures. Foot Ankle Int. 2000. May;21(5):392-9. [DOI] [PubMed] [Google Scholar]
- 18.Mann RA, Beaman DN, Horton GA. Isolated subtalar arthrodesis. Foot Ankle Int. 1998. August;19(8):511-9. [DOI] [PubMed] [Google Scholar]
- 19.Davies MB, Rosenfeld PF, Stavrou P, Saxby TS. A comprehensive review of subtalar arthrodesis. Foot Ankle Int. 2007. March;28(3):295-7. [DOI] [PubMed] [Google Scholar]
- 20.Mirmiran R, Wilde B, Nielsen M. Retrospective analysis of the rate and interval to union for joint arthrodesis of the foot and ankle. J Foot Ankle Surg. 2014. Jul-Aug;53(4):420-5. Epub 2014 Feb 28. [DOI] [PubMed] [Google Scholar]
- 21.Haskell A, Pfeiff C, Mann R. Subtalar joint arthrodesis using a single lag screw. Foot Ankle Int. 2004. November;25(11):774-7. [DOI] [PubMed] [Google Scholar]
- 22.Zanolli DH, Nunley JA, 2nd, Easley ME. Subtalar fusion rate in patients with previous ipsilateral ankle arthrodesis. Foot Ankle Int. 2015. September;36(9):1025-8. [DOI] [PubMed] [Google Scholar]
- 23.Ishikawa SN, Murphy GA, Richardson EG. The effect of cigarette smoking on hindfoot fusions. Foot Ankle Int. 2002. November;23(11):996-8. [DOI] [PubMed] [Google Scholar]
- 24.Diezi C, Favre P, Vienne P. Primary isolated subtalar arthrodesis: outcome after 2 to 5 years followup. Foot Ankle Int. 2008. December;29(12):1195-202. [DOI] [PubMed] [Google Scholar]
- 25.Yavuz U, Sökücü S, Demir B, Özer D, Özcan C, Kabukçuoğlu YS. Isolated subtalar fusion for neglected painful intra-articular calcaneal fractures. Acta Orthop Traumatol Turc. 2014;48(5):541-5. [DOI] [PubMed] [Google Scholar]
- 26.Faraj AA, Loveday DT. Functional outcome following an ankle or subtalar arthrodesis in adults. Acta Orthop Belg. 2014. June;80(2):276-9. [PubMed] [Google Scholar]
- 27.Romeo G, Martinelli N, Bonifacini C, Bianchi A, Sartorelli E, Malerba F. Recreational sports activities after calcaneal fractures and subsequent subtalar joint arthrodesis. J Foot Ankle Surg. 2015. Nov-Dec;54(6):1057-61. Epub 2015 Jul 23. [DOI] [PubMed] [Google Scholar]
- 28.Donovan A, Rosenberg ZS. Extraarticular lateral hindfoot impingement with posterior tibial tendon tear: MRI correlation. AJR Am J Roentgenol. 2009. September;193(3):672-8. [DOI] [PubMed] [Google Scholar]