Overview
Introduction
The minimally invasive posterior cervical foraminotomy, a motion-preserving procedure, is an excellent treatment for patients with unilateral radiculopathy secondary to a laterally located herniated disc or foraminal stenosis.
Indications & Contraindications
Step 1: Position the Patient (Video 1)
Place the patient in a prone position on a Jackson table with 6 posts and with the head resting comfortably on a soft facial pillow, and tape the shoulders down to provide traction to the skin and help with fluoroscopic visualization of the lower cervical levels.
Step 2: Perform the Skin Incision
Make the skin incision adjacent to the spinous process on the side of the abnormality over the operative level.
Step 3: Use Tubular Dilators to Make a Working Portal
Use sequential dilators to create a working portal and secure the working tube overlying the lamina-facet junction of the operative level.
Step 4: Perform the Laminoforaminotomy (Video 2)
Perform the laminoforaminotomy with the use of a high-speed drill and a Kerrison rongeur to create a working window into the foramen.
Step 5: Perform the Foraminal Decompression (Video 3)
Use a nerve hook to superiorly retract the nerve root, and perform a discectomy and decompression.
Step 6: Wound Closure and Postoperative Care
Obtain hemostasis with electrocautery or hemostatic foam and close the wound with a standard layered closure.
Results
A systematic review and meta-analysis of studies on open or minimally invasive surgical (MIS) techniques for posterior cervical foraminotomy showed a pooled clinical success rate of 92.7% for the 509 patients managed with the open technique and 94.9% for the 208 patients who had the MIS technique; the difference was not significant (p = 0.418)2.
Pitfalls & Challenges
Introduction
The minimally invasive posterior cervical foraminotomy, a motion-preserving procedure, is an excellent treatment for patients with unilateral radiculopathy secondary to a laterally located herniated disc or foraminal stenosis. While anterior cervical discectomy and arthrodesis remains the gold standard for the surgical treatment of cervical radiculopathy, motion-preserving procedures such as this one have become popular alternatives when nonoperative measures have failed to provide adequate relief.
While open posterior cervical foraminotomy has been a well-accepted technique since it was first described, as far as we know, in the early 1940s1, today it can be performed using minimally invasive techniques that result in a reduction in blood loss, a shorter hospital stay, and a decreased need for the use of medication postoperatively.
Appropriate surgical candidates for this procedure include those with a soft disc herniation lateral to the spinal cord, causing nerve root compression, or those with foraminal osteophytes secondary to disc degeneration or facet joint arthritis.
We prefer not to perform this procedure in patients who have purely axial neck pain without neurologic symptoms or who have evidence of cervical instability, central disc herniation, ossification of the posterior longitudinal ligament, or cervical kyphotic deformity.
After induction of anesthesia, the patient is placed in a prone position on a Jackson table with 6 posts and with the head placed on a soft facial pillow. The target level is localized by placing a needle lateral to the midline over the target level and confirming with lateral fluoroscopy. An incision is made over the target level. A blunt dilator is then advanced down the lateral mass of the operative level. Once confirmed with fluoroscopy, the deep cervical fascia is released. A series of larger dilators are placed over the initial dilator, and then the tubular retractor is secured into place after the last dilator. It is our preference to use a 14-mm-diameter tube.
Any remaining muscle or soft tissue is removed from the lateral lamina and medial aspect of the facet. The laminoforaminotomy is then performed using a high-speed drill to remove the outer cortical bone and cancellous bone. The foraminotomy is continued laterally until the lateral margin of the pedicle begins to fall away. A nerve hook can be used to retract the nerve root to allow access to the disc space. Loose fragments can be easily removed with a micro-pituitary rongeur. Contained fragments can then be removed by incising the posterior longitudinal ligament with the use of reverse angled curets and a micro-pituitary rongeur.
Indications & Contraindications
Indications
Cervical radiculopathy resulting from nerve root compression within the neural foramen.
Failure to improve after an appropriate trial of conservative care for a minimum of 6 weeks or patient has progressive weakness or atrophy.
The pattern of radiculopathy correlates with findings on advanced imaging (computed tomography [CT], magnetic resonance imaging, or CT myelogram).
Contraindications
Segmental kyphosis.
Vertebral body pathology.
Segmental instability.
Mid-central disc herniation.
Evidence of spinal cord compression or myelomalacia.
Symptoms of cervical myelopathy.
Symptoms not concordant with findings on imaging studies.
Step 1: Position the Patient (Video 1)
Place the patient in a prone position on a Jackson table with 6 posts and with the head resting comfortably on a soft facial pillow, and tape the shoulders down to provide traction to the skin and help with fluoroscopic visualization of the lower cervical levels.
Place the patient prone on a radiolucent Jackson or Allen table that has the ability to rotate (Fig. 1).
Two posts are used to support the chest, 2 are at the iliac crest, and 2 are over the proximal part of the thighs.
Place the head comfortably on a soft facial pillow. We use a padded Mizuho ProneView protective helmet.
Alternatively, use Mayfield skull traction or a horseshoe head holder to position the head.
Place the head of the patient in gentle flexion to decrease the cervical lordosis. Flexion is achieved by maintaining the chest pads low on the chest to allow for natural flexion of the neck.
Place the bed in a reverse Trendelenburg position to help with intraoperative bleeding.
Use surgical tape to lower the shoulders and facilitate imaging of lower cervical levels (Fig. 2).
Make a lateral cervical radiograph with a metallic marker used to confirm the correct operative level (Fig. 3).
For the lower cervical levels, visualization on a true lateral radiograph can sometimes be difficult. An off-axis lateral radiograph can be used to help identify the correct level when a true lateral radiograph is inconclusive.
Fig. 1.
Photograph demonstrating typical bed setup. We typically use a Jackson frame with 6-poster support and a padded face pillow such as the ProneView protective helmet.
Fig. 2.
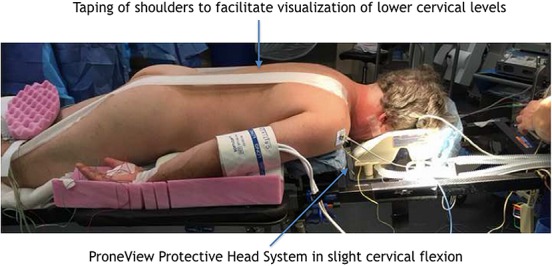
Intraoperative photograph with the patient in the prone position and the shoulders taped to facilitate exposure.
Fig. 3.
Intraoperative photograph demonstrating the patient in reverse Trendelenburg position with the C-arm in the operative field to facilitate localization imaging.
Video 1.
The tubular retractor docked over the lamina-facet junction at the operative level. After soft tissue is removed with a pituitary rongeur, a high-speed burr is used to start the laminoforaminotomy. A low-profile angled burr is used to help with visualization under the microscope and inside of the tubular retractor.
Step 2: Perform the Skin Incision
Make the skin incision adjacent to the spinous process on the side of the abnormality over the operative level.
Make a longitudinal 14-mm incision adjacent to the spinous process on the side of the pathological condition. This incision is immediately adjacent to the spinous process and is generally within 2 mm of the lateral aspect of the spinous process.
Introduce the initial dilator through the skin incision and advance to the inferomedial edge of the rostral lateral mass at the operative level.
Use lateral fluoroscopy to confirm the level.
Release the deep cervical fascia with a knife or Bovie electrocautery to enable passage of the tubular dilators.
Step 3: Use Tubular Dilators to Make a Working Portal
Use sequential dilators to create a working portal and secure the working tube overlying the lamina-facet junction of the operative level.
Use sequential dilators to create a working portal within the soft tissues.
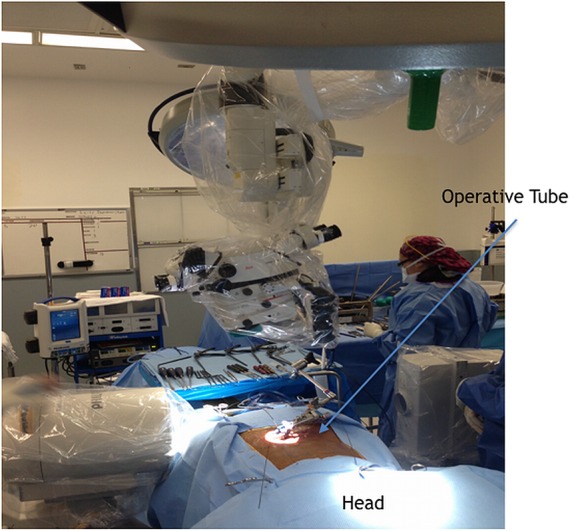
Center the final working tube over the lateral aspect of the lamina and medial facet joint of the appropriate operative level (Fig. 4). It is our preference to use a 14-mm-diameter tube.
Secure the working tube to a sterile arm that is attached to the bed.
Use lateral fluoroscopy to confirm the level (Fig. 5).
Fig. 4.
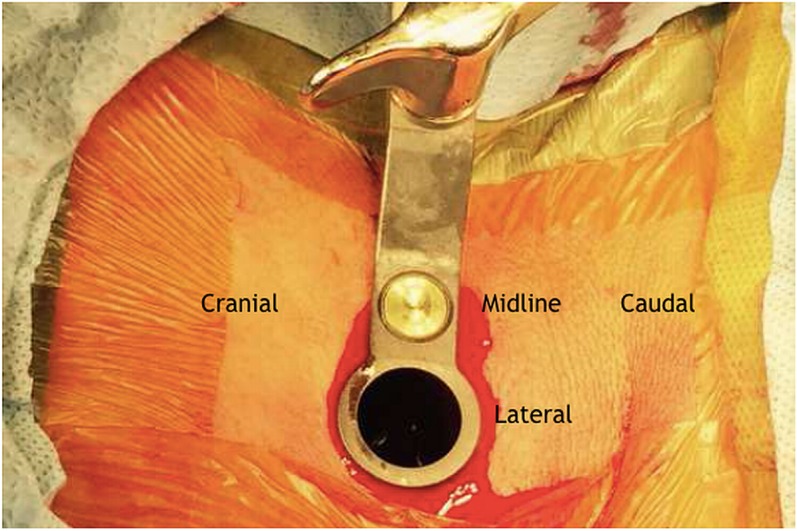
Final operative tube that is placed through a 14-mm incision and secured to the table with a sterile arm.
Fig. 5.
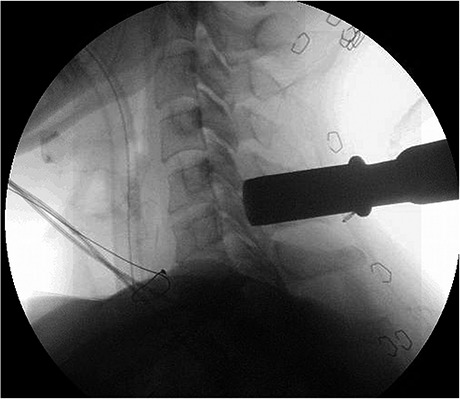
Intraoperative lateral cervical radiograph demonstrating placement of the operative tube over the C5-C6 disc space for the treatment of a C6 radiculopathy.
Step 4: Perform the Laminoforaminotomy (Video 2)
Perform the laminoforaminotomy with the use of a high-speed drill and a Kerrison rongeur to create a working window into the foramen.
Remove any remaining muscle overlying the bone with a pituitary rongeur (Fig. 6).
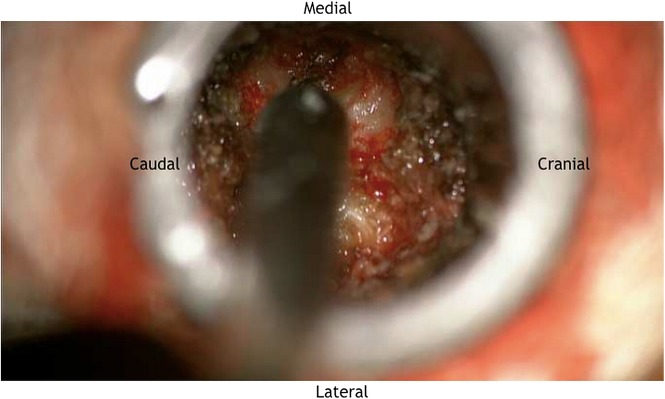
Start the laminoforaminotomy under microscopic visualization using a high-speed burr. We prefer a side-cutting matchstick burr tip so that we can aggressively remove bone without placing the neurologic structures at increased risk (Fig. 7).
The assistant surgeon provides irrigation while the primary surgeon is burring.
Begin at the junction of the lamina and facet with an even amount of the cranial and caudal lamina removed, starting medially and working laterally toward the facet joints.
Identify the medial and cephalad margins of the pedicle to orient with respect to the neural foramen.
Continue the foraminotomy until the lateral margin of the pedicle begins to fall away, at which point approximately one-third to one-half of the medial facet should have been removed.
A small laminotomy in the caudal lamina can be used to improve visualization of the nerve root.
Address epidural bleeding, which is generally encountered, with either powdered Gelfoam (Pfizer) with thrombin or bipolar cautery. Bipolar cautery can be used with readily identifiable and discrete bleeders. Care should be taken to avoid cautery directly on the neural structures.
Fig. 6.
After the soft tissue has been removed, the cranial and caudal laminae are observed. Additionally, the medial aspect of the lateral mass can be appreciated.
Fig. 7.
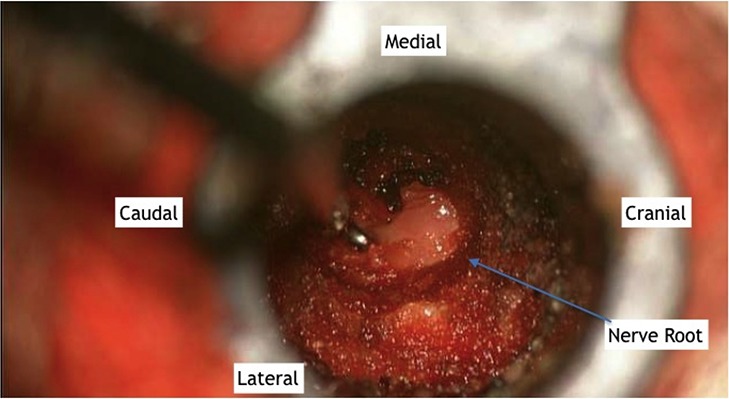
Intraoperative photograph showing the high-speed drill being used to remove the cephalad aspect of the lamina.
Video 2.
Once the high-speed burr has been used to thin the lamina and the epidural space is accessible, a Kerrison punch is used to continue the osseous resection from medial to lateral. The goal is to decompress the entire width of the pedicle of the caudal level, thus allowing for complete decompression of the nerve root.
Step 5: Perform the Foraminal Decompression (Video 3)
Use a nerve hook to superiorly retract the nerve root, and perform a discectomy and decompression.
Use a curet or nerve hook to identify the proximal border of the caudal pedicle. In order to perform a complete foraminal decompression, the nerve must be decompressed fully from the medial to lateral border of the caudal pedicle (Video 4).
Once the top of the pedicle is identified, use a nerve hook to assess how “tight” the foramen is.
Use a 2-mm Kerrison punch to remove bone until the amount of osseous resection and the room available to the nerve are satisfactory (Fig. 8).
Gently retract the nerve superiorly with a nerve hook to identify any disc fragments (Fig. 9).
Remove any visible, loose disc fragments with a micro-pituitary rongeur.
Contained disc fragments require incision of the posterior longitudinal ligament.
Use reverse-angled curets and angled micro-pituitary rongeurs, also known as down-going pituitaries, to facilitate removal of the disc herniation.
Remove foraminal osteophytes with the use of a Kerrison rongeur.
Control bleeding with powdered Gelfoam and bipolar cautery.
Fig. 8.
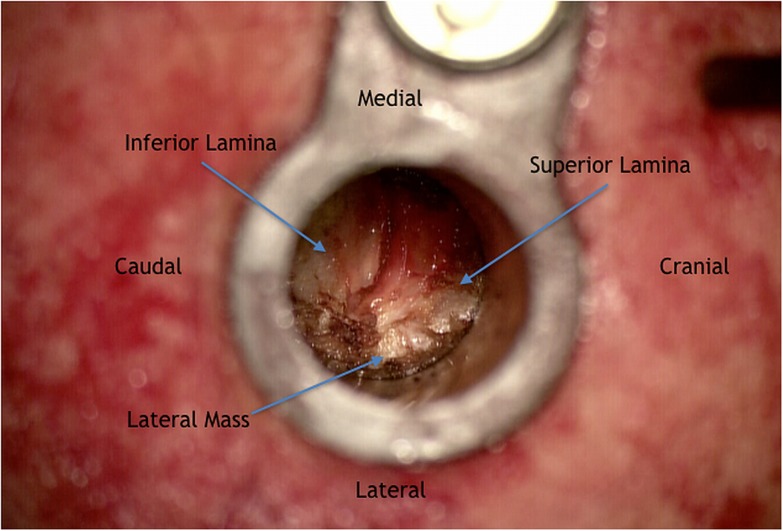
Intraoperative image demonstrating the C6 nerve root after removal of a portion of the cephalad lamina and medial aspect of the facet joint.
Fig. 9.
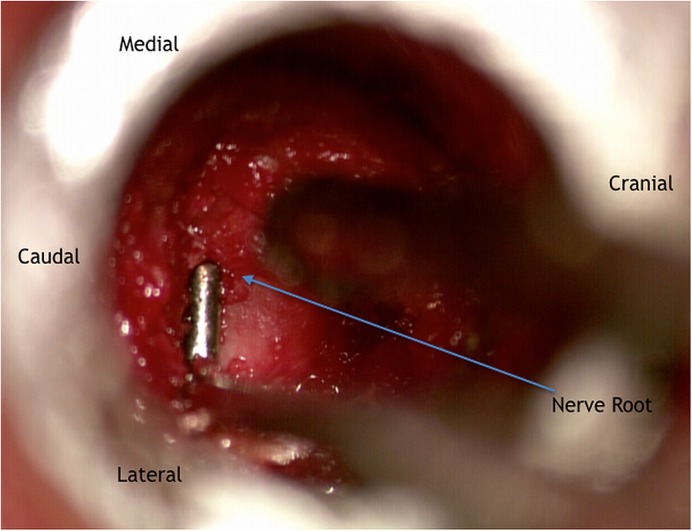
After the laminotomy has been completed, a nerve hook can be used to gently retract the nerve root in a cephalad direction to inspect for any disc fragments.
Video 3.
The laminotomy has been completed. The nerve root can now be visualized running from medial to lateral in its foramen.
Video 4.
The foraminal decompression is now complete. The curet is placed on the superior edge of the pedicle, showing nerve root decompression from the medial to lateral borders of the pedicle.
Step 6: Wound Closure and Postoperative Care
Obtain hemostasis with electrocautery or hemostatic foam and close the wound with a standard layered closure.
Copiously irrigate the wound with normal saline solution.
Obtain hemostasis with electrocautery or hemostatic foam.
Reapproximate the deep cervical fascia. We place 1 stitch using a UR-6 needle and 1 Vicryl suture so as to not overtighten the muscle.
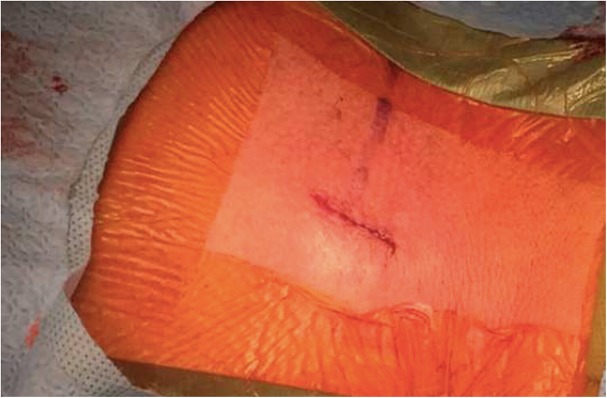
Close the wound with a subcuticular 4-0 Vicryl suture (Ethicon). Dermabond (Ethicon) can then be applied to the wound (Fig. 10).
Apply a sterile dressing.
We do not routinely manage patients with a soft collar postoperatively.
Patients are encouraged to perform normal range of motion without restriction.
Patients are seen in the office six weeks from their date of surgery and, if they are doing well, are released to full activity at that time.
Fig. 10.
Postoperative image showing the final incision, which has been closed in a standard layered fashion and sealed with Dermabond.
Results
A systematic review and meta-analysis of studies on open or minimally invasive surgical (MIS) techniques for posterior cervical foraminotomy showed a pooled clinical success rate of 92.7% for the 509 patients managed with the open technique and 94.9% for the 208 patients who had the MIS technique; the difference was not significant (p = 0.418)2. There was moderate heterogeneity observed between the included studies in the meta-analysis. The MIS approach for posterior cervical foraminotomy represents a well-established approach to treating cervical radiculopathy resulting from compression of the nerve root within the neural foramen. The MIS technique was developed as an alternative to the traditional open approach to deal with the most common complaints of postoperative neck pain and spasms as a result of the muscular disruption associated with the open approach. Multiple studies have shown a shorter length of stay, faster recovery times, and decreased blood loss with the MIS technique3-5.
Kim and Kim performed the only prospective randomized study directly comparing the results of open and MIS posterior cervical foraminotomy6. Nineteen patients were treated with an open approach and 22, with an MIS approach. At 24 months, clinical success was achieved in 16 (84.2%) of 19 patients in the open cohort and 19 (86.4%) of 22 patients in the MIS cohort; the difference was not significant. Skovrlj et al. recently performed a retrospective review of a prospective cohort of patients treated with MIS foraminotomy with and without microdiscectomy7. Of the 70 patients (95 cervical levels), 3 (4.3%) had a complication but none required a secondary operative intervention. Five patients needed an anterior cervical discectomy and arthrodesis (a total of 8 levels were arthrodesed) at a mean of 44.4 months after the index surgery. Of those arthrodeses, 5 (5.3%) were at the index level and 3 (2.1%) were at adjacent levels. Overall, those authors found a low rate of arthrodesis needed at the index level (1.1% per index level per year) and a very low rate of adjacent-level disease requiring surgery (0.9% per adjacent level per year).
Pitfalls & Challenges
In some patients, fluoroscopic visualization of the lower cervical levels can be challenging. Taping the shoulders down can be helpful, as can coning down the x-ray beam (i.e., using an “off-axis” x-ray beam) if a lateral radiograph does not provide a clear image. We use 10° to 15° of angulation of the beam to allow for visualization of lower cervical levels.
It is important to make the skin incision directly adjacent to the spinous process to avoid having the incision too lateral when docking the tube. An anteroposterior radiograph can be made with the tube overlying the facet joint to confirm where to place the incision off the midline.
Identifying the lamina-lateral mass junction is critical as this is the best starting point for the laminotomy.
Intraoperative bleeding from the epidural vessels should be controlled with bipolar cautery or hemostatic agents, which should be removed prior to wound closure.
A high-speed so-called matchstick burr should be used to remove the lamina.
Care should be taken when using the burr to remove the superior articular process. Durotomy and nerve sleeve injury can be difficult to manage through a tube and may require conversion to an open procedure. A diamond burr can also be used instead of a cutting burr as they are less prone to damaging the neural soft tissues.
Once the epidural space is accessible, the pedicle should be identified.
Foraminotomy is complete when the nerve root is decompressed from the medial to lateral border of the pedicle.
If disc fragment(s) need to be removed, the nerve should be gently retracted superiorly with a nerve hook.
Prior to wound closure, ensure that there is no active bleeding from the cervical paraspinal muscles.
Fascial closure and the closure of subcutaneous tissue are important.
Footnotes
Published outcomes of this procedure can be found at Spine J. 2015 May 1;15(5):849-56.
Disclosure: The authors indicated that no external funding was received for any aspect of this work. The Disclosure of Potential Conflicts of Interest forms are provided with the online version of the article.
References
- 1.Mixter WJ. Rupture of the intervertebral disk; a short history of this evolution as a syndrome of importance to the surgeon. J Am Med Assoc. 1949. May 21;140(3):278-82. [DOI] [PubMed] [Google Scholar]
- 2.McAnany SJ, Kim JS, Overley SC, Baird EO, Anderson PA, Qureshi SA. A meta-analysis of cervical foraminotomy: open versus minimally-invasive techniques. Spine J. 2015. May 1;15(5):849-56. Epub 2015 Jan 24. [DOI] [PubMed] [Google Scholar]
- 3.Fessler RG, Khoo LT. Minimally invasive cervical microendoscopic foraminotomy: an initial clinical experience. Neurosurgery. 2002. November;51(5)(Suppl):S37-45. [PubMed] [Google Scholar]
- 4.Coric D, Adamson T. Minimally invasive cervical microendoscopic laminoforaminotomy. Neurosurg Focus. 2008;25(2):E2. [DOI] [PubMed] [Google Scholar]
- 5.Adamson TE. Microendoscopic posterior cervical laminoforaminotomy for unilateral radiculopathy: results of a new technique in 100 cases. J Neurosurg. 2001. July;95(1)(Suppl):51-7. [DOI] [PubMed] [Google Scholar]
- 6.Kim KT, Kim YB. Comparison between open procedure and tubular retractor assisted procedure for cervical radiculopathy: results of a randomized controlled study. J Korean Med Sci. 2009. August;24(4):649-53. Epub 2009 Jul 29. [DOI] [PMC free article] [PubMed] [Google Scholar]
- 7.Skovrlj B, Gologorsky Y, Haque R, Fessler RG, Qureshi SA. Complications, outcomes, and need for fusion after minimally invasive posterior cervical foraminotomy and microdiscectomy. Spine J. 2014. October 1;14(10):2405-11. Epub 2014 Jan 30. [DOI] [PubMed] [Google Scholar]


