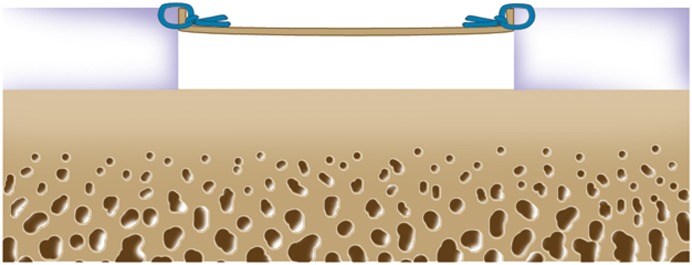
Overview
Introduction
Autologous chondrocyte implantation (ACI) for the treatment of articular cartilage lesions of the knee joint provides successful and durable long-term outcomes.
Indications & Contraindications
Step 1: Preoperative Planning (Video 1)
Obtain standing radiographs and magnetic resonance imaging (MRI) scans to identify all associated abnormalities (background factors).
Step 2: Arthroscopic Assessment and Cartilage Biopsy (Video 2)
Evaluate the knee joint systematically and harvest cartilage tissue from the non-weight-bearing area.
Step 3: Make the Incision for the Arthrotomy (Video 3)
Use a medial or lateral parapatellar arthrotomy and expose the lesion adequately.
Step 4: Prepare the Defect (Video 4)
Debride all fissured and unstable articular cartilage surrounding the full-thickness chondral injury down to healthy contained cartilage.
Step 5: Address Associated Abnormalities
Address associated abnormalities (predisposing background factors) to optimize recovery and a successful outcome.
Step 6: Prepare and Fix the Collagen Membrane(s) (Video 5)
Orient the membrane patch with the rough surface to the subchondral bone and the smooth surface toward the articular surface; then sew it, tying the sutures knots on the membrane and not the cartilage, to tension it adequately throughout the entire defect.
Step 7: Chondrocyte Implantation (Video 6)
Gently deliver the cells and fill the defect.
Step 8: Postoperative Care
(1) Initiate range-of-motion exercises to enhance chondrocyte regeneration and decrease the likelihood of intra-articular adhesion, (2) protect the graft from loading for 6 to 12 weeks after surgery to prevent graft overload and central degeneration or delamination of the graft, and (3) initiate isometric muscle exercises to regain muscle tone and prevent atrophy.
Results
ACI provided durable outcomes in 210 patients followed prospectively for 10 to 17 years after treatment with the first-generation ACI-periosteum technique6.
Pitfalls & Challenges
Introduction
Autologous chondrocyte implantation (ACI) for the treatment of articular cartilage lesions of the knee joint provides successful and durable long-term outcomes.
The treatment of symptomatic cartilage defects is a challenging problem as injuries of the articular cartilage do not heal spontaneously. To address this, ACI was first performed in Gothenburg, Sweden, in 1987 by Lars Peterson, and his first cohort of cases with second-look biopsies was reported in 19941. The first-generation ACIs were performed with an autologous periosteal flap from the tibia or femur to cover the defect and seal in the cultured autologous chondrocytes. Second-generation ACI involved the use of a bioabsorbable scaffold carrier for the cells. These scaffolds include a hyaluronan weave (Hyalograft C; Fidia Advanced Biopolymers)2, collagen scaffolds (MACI; Genzyme Biosurgery)3,4, and gels derived from collagen (CaReS; Arthro Kinetics)5.
We present the surgical technique for ACI with use of a type-I/III collagen membrane (Bio-Gide; Geistlich Pharma) to cover the defect, which has been an off-label use in the United States since May 2007. ACI introduces end-differentiated chondrocytes into the prepared defect, resulting in the formation of a hyaline-like repair tissue. ACI is a two-stage procedure, beginning with arthroscopic assessment of the chondral injury and biopsy to harvest approximately 200 to 300 mg of cartilage, followed by a commercial enzymatic digestion and cell expansion in monolayer culture with cryopreservation of the cells. The cryopreserved cells are thawed and expanded to the cell population needed for the second-stage open ACI technique. During this second stage, a biological reconstruction is performed to repair the articular cartilage defect(s) as well as to address associated abnormalities (predisposing background factors) to optimize recovery and a successful outcome.
Indications & Contraindications
Indications
Symptomatic focal chondral and osteochondral defects
Outerbridge grade-III or IV defect of >2 cm2 on the femur, trochlea, or patella
Age of 13 to 55 years, although older patients with localized damage have been treated with ACI
Patient’s willingness and ability to comply with postoperative rehabilitation
Defects for which other treatments have failed
Contraindications
More than 50% loss of cartilage thickness (joint space narrowing)
Inflammatory joint disease
Unresolved septic arthritis or treatment of septic arthritis within the previous 12 months.
Metabolic or crystal disorder
Deficient soft-tissue coverage
Patient currently smoking
Obesity (body mass index ≥35 kg/m2)
Chronic narcotic use
Noncompliant patient
Age >55 years (relative contraindication)
Allergy to collagen
Step 1: Preoperative Planning (Video 1)
Obtain standing radiographs and magnetic resonance imaging (MRI) scans to identify all associated abnormalities (background factors).
Obtain a thorough history to identify causal factors and identify the pain pattern and functional disability.
Perform a complete physical examination.
Obtain standing long alignment radiographs that include the hip, knee, and ankle; standing anteroposterior, 45° bent posteroanterior (Rosenberg), skyline, and lateral radiographs; and MRI of the knee. Use these images to identify all associated abnormalities, such as malalignment, ligamentous instability, meniscal deficiency, and subchondral cysts (especially after prior marrow stimulation techniques [drilling, microfracture, and abrasion arthroplasty]).
Video 1.
Preoperative planning. The radiographs show bone alignment, and the MRIs demonstrate evidence of patellar and trochlear defects with subchondral bone marrow edema.
Step 2: Arthroscopic Assessment and Cartilage Biopsy (Video 2)
Evaluate the knee joint systematically and harvest cartilage tissue from the non-weight-bearing area.
Position the patient supine.
Evaluate ligamentous joint stability after induction of anesthesia.
Assess the knee joint compartment surfaces and meniscal tissues systematically with an arthroscopic probe.
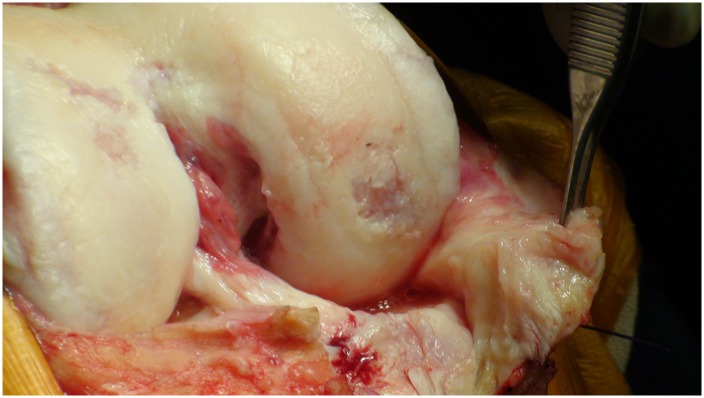
Determine the extent of Outerbridge grade-III and IV chondral defect(s) (Fig. 1).
Harvest approximately 200 to 300 mg of articular cartilage from the non-weight-bearing area, usually from the superior to the lateral aspect of the intercondylar notch (Figs. 2-A and 2-B).
Cryopreserve the cartilage biopsy specimen and plan to perform the second-stage open implantation following in vitro expansion of the cells for 3 to 5 weeks (Fig. 3).
Fig. 1.
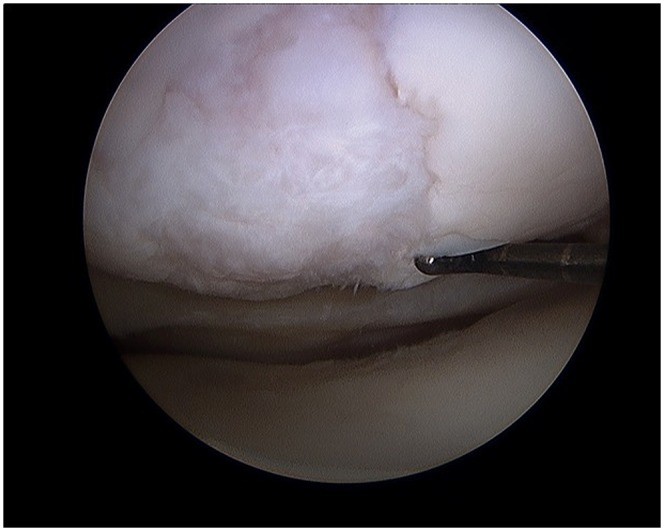
Arthroscopic evaluation of this knee joint identified a focal area of cartilage damage on the lateral femoral condyle. (Reproduced, with permission of Elsevier, from: Minas T. A primer in cartilage repair and joint preservation of the knee. Expert consult. Philadelphia: Elsevier Saunders; 2011.)
Figs. 2-A and 2-B Surgical technique for harvesting articular cartilage from the intercondylar notch. (Reproduced, with permission of Elsevier, from: Minas T. A primer in cartilage repair and joint preservation of the knee. Expert consult. Philadelphia: Elsevier Saunders; 2011.).
Fig. 2-A.
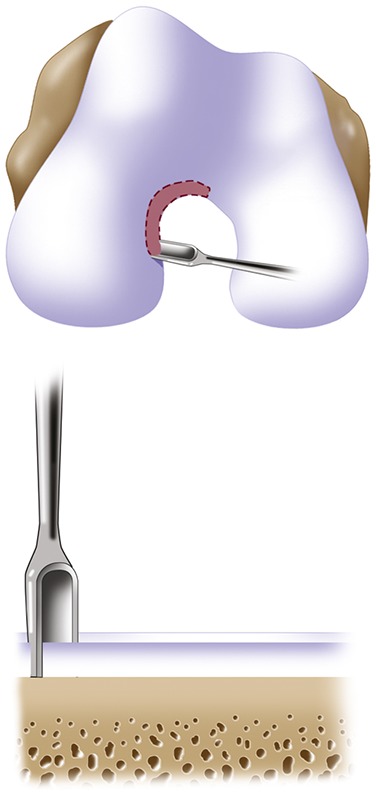
A sharp small gouge is used to score the articular cartilage from the superior part of the intercondylar notch to the sulcus terminalis on the lateral wall.
Fig. 2-B.
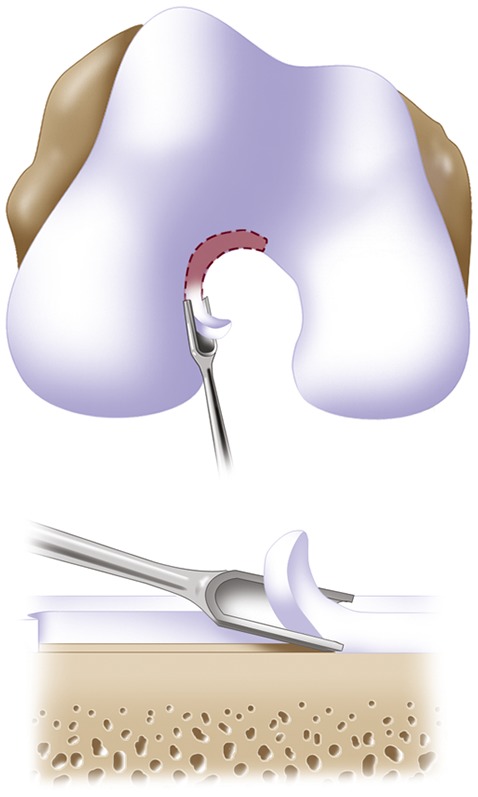
All layers of cartilage down to bone are harvested to obtain representative articular cartilage layers using a side-to-side whittling motion.
Fig. 3.
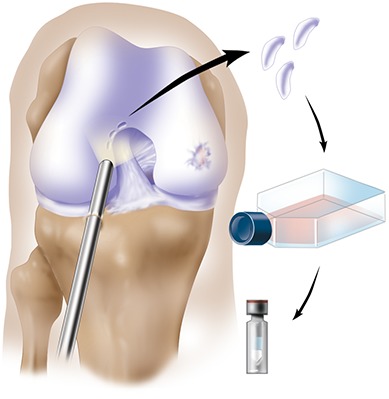
Arthroscopic evaluation of the knee joint and identification of full-thickness damage on the medial femoral condyle. A cartilage specimen is biopsied from the superior part of the intercondylar notch, digested, and cultured. ACI is performed after the cells have reached a volume that can fill the articular cartilage defect. (Reproduced, with permission of Elsevier, from: Minas T. A primer in cartilage repair and joint preservation of the knee. Expert consult. Philadelphia: Elsevier Saunders; 2011.)
Video 2.
Arthroscopic assessment and cartilage biopsy.
Step 3: Make the Incision for the Arthrotomy (Video 3)
Use a medial or lateral parapatellar arthrotomy and expose the lesion adequately.
Position the patient supine on a standard operating room table with the leg resting on a foot support at 90° of flexion.
Apply a thigh tourniquet and use a thigh post at this level so that the knee is well supported and stable during the membrane microsuturing.
Make a midline skin incision or a longitudinal parapatellar incision.
Perform a medial or lateral parapatellar arthrotomy.
In cases in which the defect extends posteriorly on the femoral condyle, facilitate the exposure by detaching the anterior horn of the meniscus, starting at the intermeniscal ligament and extending along the coronary meniscal ligament as far posteriorly as necessary for exposure with a subperiosteal flap to gain better access for posterior suture placement on the chondral defect (Fig. 4).
Fig. 4.
Exposure of the posterior, weight-bearing portion of the condyles and tibial plateau. Medial parapatellar arthrotomy is performed with patellar eversion, and the surgeon incises the intermeniscal ligament followed by the coronary ligament attachment to the tibial plateau with a medial subperiosteal peel off the tibia in a posterior direction.
Video 3.
Incision and exposure for arthrotomy.
Step 4: Prepare the Defect (Video 4)
Debride all fissured and unstable articular cartilage surrounding the full-thickness chondral injury down to healthy contained cartilage.
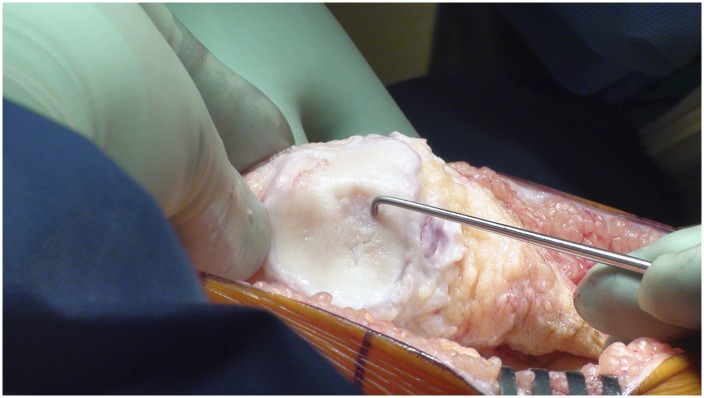
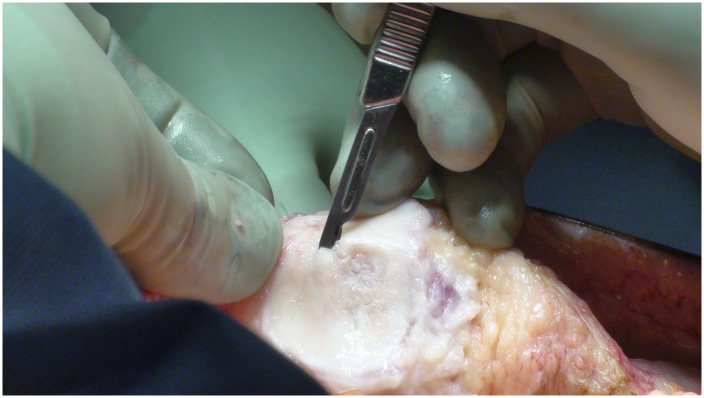
Make oval or curvilinear incisions using a number-15 blade in the articular cartilage, vertically down to the subchondral bone plate without penetrating the bone (Figs. 5-A and 5-B).
Debride the degenerated articular cartilage back to healthy host cartilage using small ring or closed curets (6 or 8-mm diameter) and periosteal elevators (Fig. 6).
If there is any subchondral thickening, sclerosis, or intralesional osteophyte formation at the base of the chondral defect as a result of a prior marrow stimulation procedure (drilling, abrasion, or microfracture), debride further down to the level of native subchondral bone using a ring curet or a high-speed burr (usually 5 mm in diameter) under continuous irrigation (Figs. 7-A and 7-B). After the tourniquet is deflated, subchondral bone bleeding is addressed with a combination of thrombin and epinephrine soaked onto a neuro patty prior to the sandwich technique and sealing of the subchondral bone from the surface with a collagen membrane attached to the bone with fibrin glue.
Measure the length and width of the defect.
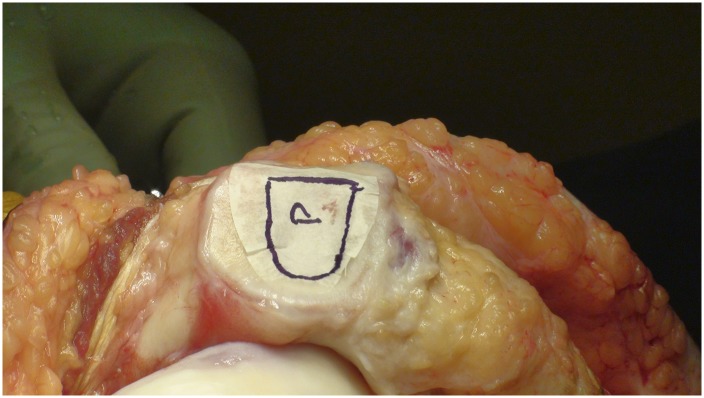
Make a template of the defect using sterile tracing paper (sterile glove-packaging paper works well) and a sterile marker (Fig. 8).
Fig. 5-A.
Close-up view of a patellar defect.
Fig. 5-B.
Incision of articular cartilage vertically down to the subchondral bone plate.
Fig. 6.
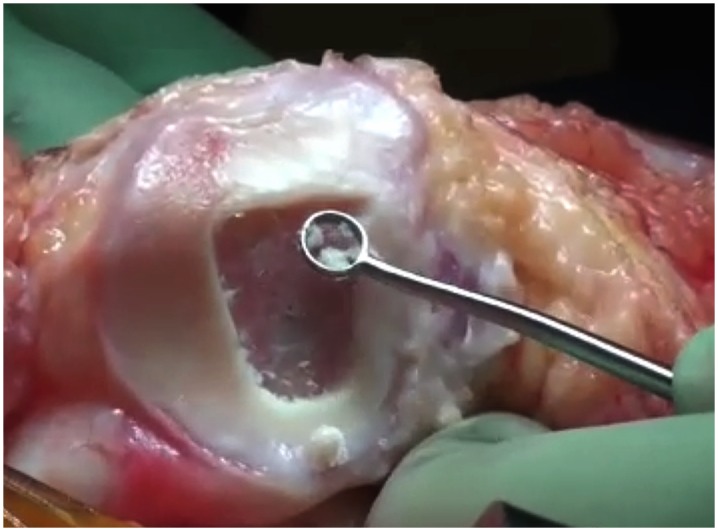
Debridement of the degenerated articular cartilage back to healthy host cartilage using small ring or closed curets (6 or 8-mm diameter) and periosteal elevators.
Figs. 7-A and 7-B Removal of sclerotic bone/intralesional osteophytes. (Reproduced, with permission of Elsevier, from: Minas T. A primer in cartilage repair and joint preservation of the knee. Expert consult. Philadelphia: Elsevier Saunders; 2011.).
Fig. 7-A.
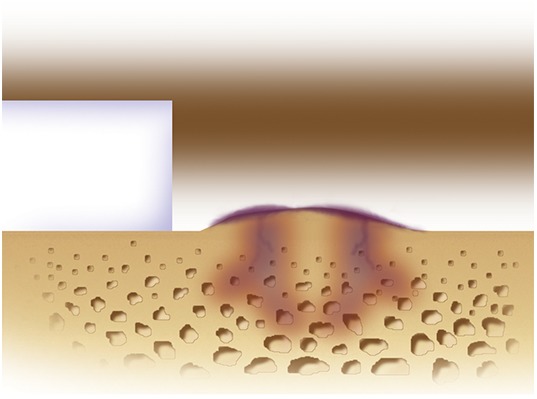
Intralesional osteophytes may form after use of a marrow stimulation procedure (abrasion, drilling, or microfracture) as well as from idiopathic osteoarthritis.
Fig. 7-B.
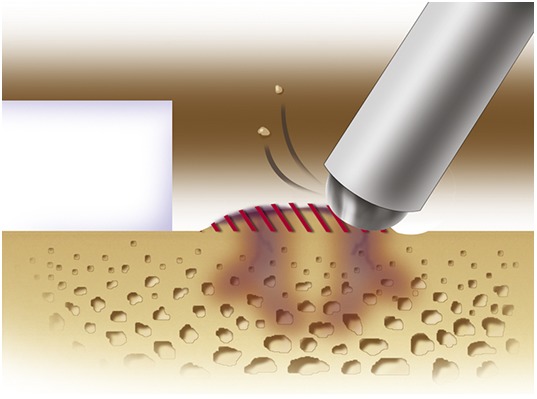
A 5-mm high-speed burr is used gently, under irrigation, to remove sclerotic cortical-type bone to the level of the adjacent native subchondral bone.
Fig. 8.
A template of the defect made using sterile tracing paper and a sterile marker.
Video 4.
Preparation of the defect.
Step 5: Address Associated Abnormalities
Address associated abnormalities (predisposing background factors) to optimize recovery and a successful outcome.
Overall, concomitant procedures addressing the background factors are performed prior to chondrocyte implantation.
Correct tibiofemoral malalignment of more than 2° to 3° from the neutral mechanical axis into the involved compartment with concomitant osteotomy such as distal femoral osteotomy or high tibial osteotomy to restore a normal mechanical environment.
Address patellofemoral maltracking with a tibial tubercle osteotomy to centralize patellar tracking.
Address ligamentous instability with ligament reconstruction.
Address meniscal deficiency with meniscal allograft transplantation.
Step 6: Prepare and Fix the Collagen Membrane(s) (Video 5)
Orient the membrane patch with the rough surface to the subchondral bone and the smooth surface toward the articular surface; then sew it, tying the sutures knots on the membrane and not the cartilage, to tension it adequately throughout the entire defect.
Place the paper template on the collagen type-I/III bilayer membrane (Bio-Gide).
Cut the membrane precisely using scissors.
Place the membrane on the defect with the rough side facing the bone.
Secure the membrane with 6-0 Vicryl (polyglactin 910; Ethicon) sutures on a P-1 cutting needle (Ethicon) (Figs. 9-A through 10-C) that has been immersed in sterile mineral oil or glycerin to allow easy passage through the cartilage without bunching of the membrane.
Place sutures through the membrane and then the articular cartilage at intervals of approximately 3 to 5 mm, tying the knots on the side of the membrane so that they remain below the level of the adjacent cartilage (Figs. 11-A, 11-B, and 11-C).
In some uncontained defects, small wires are used to drill holes in adjacent bone and sutures are passed through these holes to anchor the membrane.
Tension the membrane adequately throughout the entire defect and leave the most superior aspect of the membrane open to inject cells underneath it.
Waterproof the suture line with fibrin glue (TISSEEL; Baxter Biosurgery).
Fig. 9-A.
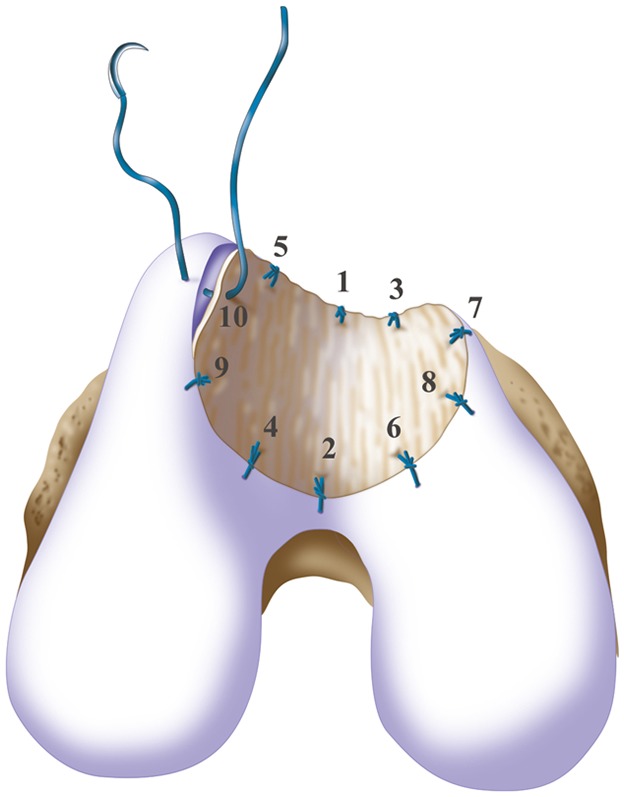
Microsuturing should start at the central portion of the sulcus proximally and distally in an alternating medial and lateral pattern to restore the concavity to the trochlea, as shown by the numbers indicating the sequence of the sutures. (Reproduced, with permission of Elsevier, from: Minas T. A primer in cartilage repair and joint preservation of the knee. Expert consult. Philadelphia: Elsevier Saunders; 2011.)
Fig. 9-B.
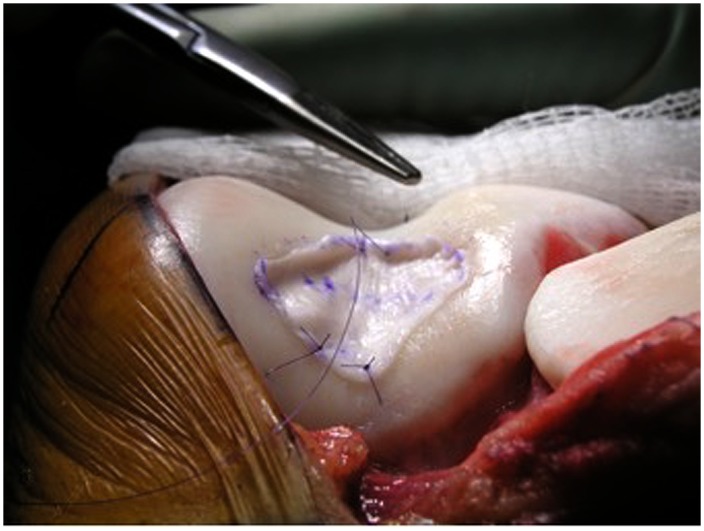
When microsuturing the membrane over a large trochlear defect across the midline sulcus, it is important to oversize the membrane in a medial-to-lateral direction. Suturing in a proximal-to-distal direction starting at the midline of the sulcus and working laterally and medially allows restoration of the concavity of the sulcus without undue tension on the membrane and an even depth throughout the entirety of the cartilage defect. (Reproduced, with permission of Elsevier, from: Minas T. A primer in cartilage repair and joint preservation of the knee. Expert consult. Philadelphia: Elsevier Saunders; 2011.)
Figs. 10-A, 10-B, and 10-C Microsuturing techniques for patellar defects. (Reproduced, with permission of Elsevier, from: Minas T. A primer in cartilage repair and joint preservation of the knee. Expert consult. Philadelphia: Elsevier Saunders; 2011.).
Fig. 10-A.
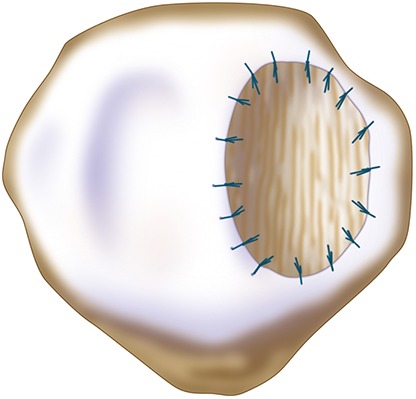
An isolated medial or lateral patellar facet is a flat surface and it is easy to microsuture the membrane flush with the articular surface.
Fig. 10-B.
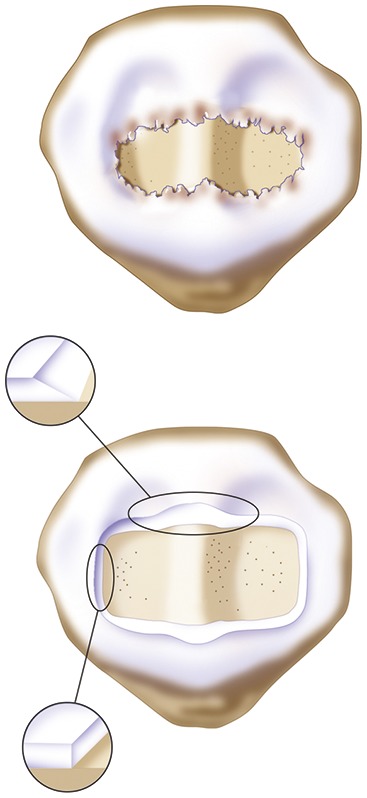
When the defect is large, like this Fulkerson12 type-IV patellar chondral defect (pan-patellar), a good result depends on good debridement technique as well as microsuturing. If the cartilage is thick, the bleeding and trailing edge should be slightly beveled to allow easy tracking in the proximal-to-distal direction and vertically on the medial and lateral margins to allow maximal membrane stability.
Fig. 10-C.
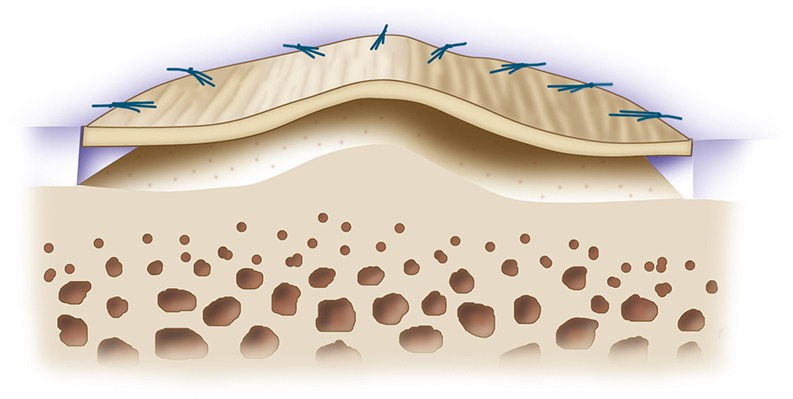
As in the trochlea, microsuturing should start at the apex or median ridge of the patella in order to “pitch the tent.” It then should alternate medially and laterally in a proximal-to-distal fashion to restore the articular topography of the patella. This technique will maintain a uniform cavity deep to the membrane so that articular cartilage grows evenly to the limiting membrane.
Figs. 11-A, 11-B, and 11-C Suturing techniques for large femoral condylar defects. (Reproduced, with permission of Elsevier, from: Minas T. A primer in cartilage repair and joint preservation of the knee. Expert consult. Philadelphia: Elsevier Saunders; 2011.).
Fig. 11-A.
The suture is placed through the membrane and then the cartilage to obtain good purchase of both tissues. The knot is tied on the side of the membrane to evert the membrane flush to the cartilage side wall and make it watertight, acting like a washer.
Fig. 11-B.
For femoral condylar defects that are long in an anterior-to-posterior direction, it is important for the suturing technique to maintain a uniform cavity throughout the length of the defect. If medial-to-lateral suturing is not performed through the length of the defect from anterior to posterior, the membrane may bottom out on the center aspect of the length of the curve. This site is more likely to undergo premature breakdown.
Fig. 11-C.
If the collagen membrane is oversized in the anterior-to-posterior direction, suturing is started at the center of the defect in a medial-to-lateral direction, and then anterior to posterior. The chamber cavity will maintain a uniform depth and will more likely undergo full, even cartilage filling for the length of the defect.
Video 5.
Preparation and fixation of the collagen membrane(s).
Step 7: Chondrocyte Implantation (Video 6)
Gently deliver the cells and fill the defect.
Using sterile technique, aspirate the chondrocyte suspension in a tuberculin syringe through an 18-gauge or larger needle (a diameter smaller than 18 gauge will damage the cells).
Switch to a flexible 18-gauge 2-in (5-cm) intravenous catheter.
Deliver the cells very gently through the superior opening of the membrane defect margin down to the base of the defect (Fig. 12).
At the onset of the surgery, if there are >12 million cells (one vial) per defect of ≤7 cm2, seed the membrane prior to microsuturing. Do this by suspending cells and seeding them on the rough side of the membrane (not on the smooth side). Keep the rest of the cells for implantation into the defect; the goal is for all of the surfaces, bone cartilage, and membrane to be covered with cells at completion.
After the defect is filled, close the cell insertion site with several sutures and seal with fibrin glue. Antifibrinolytic compounds are added to the fibrin glue to slow fibrinolysis at the site of application.
If needed, drains should be used without suction away from the transplanted compartment (e.g., the lateral gutter drain for a medial ACI and vice-versa).
Close the wound in layers and apply a soft dressing to the knee.
Fig. 12.
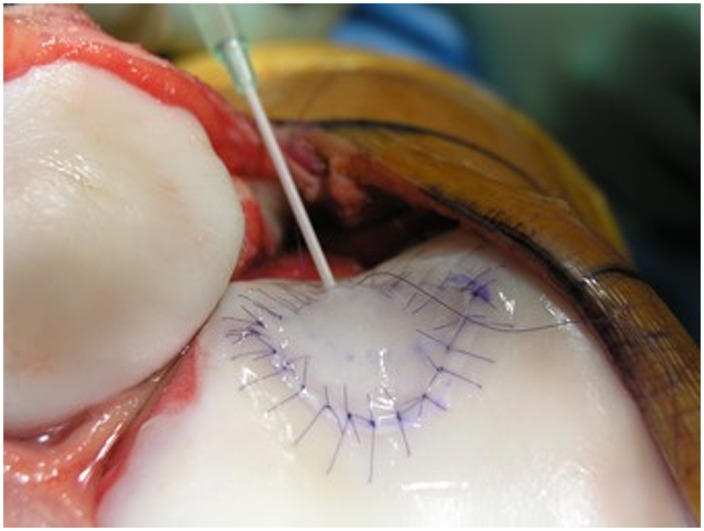
The autologous chondrocyte suspension is injected underneath the opening, which is closed after the defect is filled. (Reproduced, with permission of Elsevier, from: Minas T. A primer in cartilage repair and joint preservation of the knee. Expert consult. Philadelphia: Elsevier Saunders; 2011.)
Video 6.
Chondrocyte implantation and periarticular anesthetic block placement.
Step 8: Postoperative Care
(1) Initiate range-of-motion exercises to enhance chondrocyte regeneration and decrease the likelihood of intra-articular adhesion, (2) protect the graft from loading for 6 to 12 weeks after surgery to prevent graft overload and central degeneration or delamination of the graft, and (3) initiate isometric muscle exercises to regain muscle tone and prevent atrophy.
Apply a continuous passive motion machine 6 to 8 hours daily in divided increments for 6 weeks.
At 2 to 3 weeks, start stationary cycling with no resistance for up to 30 minutes twice daily.
Limit weight-bearing to “foot-flat” touch-down weight-bearing with crutches for 6 weeks postoperatively.
Increase weight-bearing to full body weight by 10 to 12 weeks postoperatively, using pain at the transplant site as a guide to limiting and advancing the weaning off crutches.
Starting at 3 to 4 months after surgery, encourage nonimpact functional activities, including the use of the stationary bicycle, treadmill walking, and progression to the elliptical trainer and swimming.
Functional nonimpact activities in the first year after the transplant include long-distance walking, cycling, swimming, rollerblading, hiking, and cross-country skiing. In most cases, encourage the patient to start these functional nonimpact activities at around 6 months and recommend that the patient limit him/herself to these activities until 12 months after surgery.
After 12 months, if there is no swelling or pain and the patient has regained muscle tone, equilibrium, and balance, an MRI is performed to assess isotonicity of the cartilage signal and a lack of bone marrow edema. Inline jogging is allowed if it does not cause pain or swelling.
Pivoting activities such as racquet sports, soccer, and golfing are allowed at 14 to 18 months postoperatively. If a return to sport-specific rehabilitation has been approved by a physician, then these activities, including impact loading, may be pursued.
Results
ACI provided durable outcomes in 210 patients followed prospectively for 10 to 17 years after treatment with the first-generation ACI-periosteum technique6. Overall, the survivorship was 71% at 10 years, and 75% of the patients with symptomatic cartilage defects of the knee had improved function at a minimum of 10 years after surgery. Long-term outcomes were best when the ACI had been used with osteotomy but without prior marrow stimulation (15-year survivorship of 90%), and the next best outcomes followed treatment of complex defects without marrow stimulation (15-year survivorship of 80%). The worst outcomes were in salvage cases and in patients who had had marrow stimulation prior to the ACI (15-year survivorship of 60%).
ACI has been reported to have reliable outcomes in adolescents, with 96% rating their result as good or excellent at a mean of 47 months after surgery7.
In one study, 83% of competitive soccer players returned to playing soccer at a mean of 14.2 months postoperatively, with 80% returning to the same level of play8.
In another paper9, ACI after use of marrow stimulation techniques had >3 times the failure rate of ACI for a primary chondral defect (26% versus 8%).
In yet another study, 72% of patients ≥45 years old rated the knee as good or excellent at a mean of 4.7 years postoperatively10. When patients with a Workers’ Compensation claim and those treated previously with a marrow stimulation technique were removed from that analysis, the ACI success rate was 92%, which was the same as the success rate for patients <45 years old. There was no difference in the success rate between patients treated before the age of 45 years and those treated when they were older.
In a multicenter study of cartilage defects in the patella treated with ACI, 92% of the patients stated that they would undergo the procedure again under the same circumstances and 84% rated the knee as improved at a mean of 7.5 years postoperatively11.
Pitfalls & Challenges
ACI provides durable hyaline repair tissue when patients are carefully chosen, background factors responsible for the chondral injury are addressed surgically at the time of the ACI, and a careful surgical technique and rehabilitation are performed.
The knots are tied on the side of the membrane. In this way, they will not unravel with motion and evert the periosteal edge; rather, they act as a washer seal on the edge of the vertical articular cartilage defect.
Marrow stimulation as well as the treatment of very large defects is associated with an increased risk of failure.
Maintaining an intact subchondral bone plate without subchondral bone bleeding is crucial. Do not perforate the subchondral bone plate so that a mixed marrow cell population does not populate the chondral defect in addition to the end-differentiated chondrocytes that have been grown in vitro.
Early use of a continuous passive motion machine is recommended to promote cartilage repair. However, early weight-bearing can cause graft delamination. If weight-bearing causes discomfort, catching, locking, or swelling of the knee, the weight-bearing status and activity level should be decreased to a level that can be tolerated by the patient. To prevent muscle atrophy, patient rehabilitation includes such modalities as electrical stimulation, straight leg raising with light weights, and use of a stationary bicycle at 4 weeks postoperatively with no resistance.
Footnotes
Published outcomes of this procedure can be found at Clin Orthop Relat Res. 2014 Jan;472(1):41-51.
Disclosure: The authors indicated that no external funding was received for any aspect of this work. On the Disclosure of Potential Conflicts of Interest forms, which are provided with the online version of the article, one or more of the authors checked “yes” to indicate that the author had a relevant financial relationship in the biomedical arena outside the submitted work.
References
- 1.Brittberg M, Lindahl A, Nilsson A, Ohlsson C, Isaksson O, Peterson L. Treatment of deep cartilage defects in the knee with autologous chondrocyte transplantation. N Engl J Med. 1994. October 6;331(14):889-95. [DOI] [PubMed] [Google Scholar]
- 2.Pavesio A, Abatangelo G, Borrione A, Brocchetta D, Hollander AP, Kon E, Torasso F, Zanasi S, Marcacci M. Hyaluronan-based scaffolds (Hyalograft C) in the treatment of knee cartilage defects: preliminary clinical findings. Novartis Found Symp. 2003;249:203-17; discussion 229-33, 234-8, 239-41. [PubMed] [Google Scholar]
- 3.Bartlett W, Skinner JA, Gooding CR, Carrington RW, Flanagan AM, Briggs TW, Bentley G. Autologous chondrocyte implantation versus matrix-induced autologous chondrocyte implantation for osteochondral defects of the knee: a prospective, randomised study. J Bone Joint Surg Br. 2005. May;87(5):640-5. [DOI] [PubMed] [Google Scholar]
- 4.Behrens P, Bitter T, Kurz B, Russlies M. Matrix-associated autologous chondrocyte transplantation/implantation (MACT/MACI)—5-year follow-up. Knee. 2006. June;13(3):194-202. Epub 2006 Apr 24. [DOI] [PubMed] [Google Scholar]
- 5.Schneider U, Rackwitz L, Andereya S, Siebenlist S, Fensky F, Reichert J, Löer I, Barthel T, Rudert M, Nöth U. A prospective multicenter study on the outcome of type I collagen hydrogel-based autologous chondrocyte implantation (CaReS) for the repair of articular cartilage defects in the knee. Am J Sports Med. 2011. December;39(12):2558-65. Epub 2011 Oct 7. [DOI] [PubMed] [Google Scholar]
- 6.Minas T, Von Keudell A, Bryant T, Gomoll AH. The John Insall Award: A minimum 10-year outcome study of autologous chondrocyte implantation. Clin Orthop Relat Res. 2014. January;472(1):41-51. [DOI] [PMC free article] [PubMed] [Google Scholar]
- 7.Mithöfer K, Minas T, Peterson L, Yeon H, Micheli LJ. Functional outcome of knee articular cartilage repair in adolescent athletes. Am J Sports Med. 2005. August;33(8):1147-53. Epub 2005 Jul6. [DOI] [PubMed] [Google Scholar]
- 8.Mithöfer K, Peterson L, Mandelbaum BR, Minas T. Articular cartilage repair in soccer players with autologous chondrocyte transplantation: functional outcome and return to competition. Am J Sports Med. 2005. November;33(11):1639-46. Epub 2005 Aug 10. [DOI] [PubMed] [Google Scholar]
- 9.Minas T, Gomoll AH, Rosenberger R, Royce RO, Bryant T. Increased failure rate of autologous chondrocyte implantation after previous treatment with marrow stimulation techniques. Am J Sports Med. 2009. May;37(5):902-8. Epub 2009 Mar 4. [DOI] [PubMed] [Google Scholar]
- 10.Rosenberger RE, Gomoll AH, Bryant T, Minas T. Repair of large chondral defects of the knee with autologous chondrocyte implantation in patients 45 years or older. Am J Sports Med. 2008. December;36(12):2336-44. Epub 2008 Aug 25. [DOI] [PubMed] [Google Scholar]
- 11.Gomoll AH, Gillogly SD, Cole BJ, Farr J, Arnold R, Hussey K, Minas T. Autologous chondrocyte implantation in the patella: a multicenter experience. Am J Sports Med. 2014. May;42(5):1074-81. Epub 2014 Mar 4. [DOI] [PubMed] [Google Scholar]
- 12.Pidoriano AJ, Weinstein RN, Buuck DA, Fulkerson JP. Correlation of patellar articular lesions with results from anteromedial tibial tubercle transfer. Am J Sports Med. 1997. Jul-Aug;25(4):533-7. [DOI] [PubMed] [Google Scholar]


