Overview
Introduction
Arthrodesis of the first metatarsophalangeal joint is the most reliable surgical option, with a low complication rate, for hallux rigidus from end-stage osteoarthritis.
Step 1: Surgical Approach
Make a medial approach, following the mid-axis of the joint.
Step 2: Joint Preparation
Using a cup-cone configuration provides excellent bone exposure, construct stability, and metatarsophalangeal joint congruity.
Step 3: Positioning of Arthrodesis
Fix the toe in 5° to 10° of valgus and elevated 5 mm from the floor to achieve desired dorsiflexion.
Step 4: Application of Implants
Achieve a stable construct with a crossed lag screw and a dorsal locking plate (a hybrid construct).
Step 5: Closure
Perform a standard soft-tissue closure.
Step 6: Postoperative Care
Allow weight-bearing as tolerated after two weeks and impact exercises only after bone healing has been shown on radiographs, which can take up to ten weeks.
Results
Arthrodesis of the metatarsophalangeal joint in the hallux provides good results in terms of patient satisfaction and function, as demonstrated in many studies, most of them retrospective.
Introduction (Video 1)
Arthrodesis of the first metatarsophalangeal joint is the most reliable surgical option, with a low complication rate, for hallux rigidus from end-stage osteoarthritis.
Video 1.
Introduction.
Arthrodesis of the first metatarsophalangeal joint can be performed in many different ways—e.g., with use of wires, staples, sutures, crossed screws, parallel screws, intramedullary screws, screw(s) combined with plates, plates alone in various positions (medial or dorsal), different kinds of plates (nonlocking, hybrid, or locking), and external fixation. Biomechanical studies have shown that the most stable construct is a dorsal locking plate and a lag screw, followed by a lag screw and a nonlocking plate, screws alone, and a plate alone1,2. However, the clinical results do not necessarily agree with these biomechanical findings. In general, an extremely stable construct could be associated with a greater nonunion risk. Hunt et al.3 showed a higher nonunion risk with locking plates than with nonlocking plates. As there may be the same risk with an extremely unstable construct, a balance must be found between stability and bone healing. In a recent prospective case series, Doty et al.4 found that use of a hybrid construct (locking and nonlocking screws) provided good results and was associated with a low nonunion rate (2%).
Our ideal construct for arthrodesis of the first metatarsophalangeal joint in a patient who does not have diabetes or rheumatoid arthritis is a hybrid consisting of a lag screw and a dorsal plate with locking and nonlocking screws. Use of a lag screw plus a locking construct for patients with osteoporotic bone, uncontrolled diabetes, rheumatoid arthritis, or obesity is currently under discussion in the literature1,3.
Arthrodesis of the first metatarsophalangeal joint with the hybrid construct (locking and nonlocking screws) is performed with the following steps (Videos 2 and 3).
Video 2.
Procedure overview.
Video 3.
Preoperative planning.
Step 1: Surgical Approach (Video 4)
Make a medial approach, following the mid-axis of the joint.
Position the patient supine in order to work over the medial aspect of the foot from the contralateral side.
Make a medial approach, from 4 cm proximal to the joint to 3 cm distal to the joint.
Incise the capsule longitudinally. Using Hohmann retractors, expose the joint on each side of the metatarsal. Plantar flex the joint to achieve a satisfactory joint exposure.
Remove joint osteophytes with a rongeur. Be careful to remove them from the metatarsal and from the phalanx.
Make sure that the exposure allows the proximal phalanx of the toe to become completely dislocated. This will assist thorough joint preparation. If complete dislocation is not possible, increase the release of the lateral aspect of the joint.
Video 4.
Positioning and surgical exposure.
Step 2: Joint Preparation (Video 5)
Using a cup-cone configuration provides excellent bone exposure, construct stability, and metatarsophalangeal joint congruity.
Confirm that all osteophytes have been removed.
Perform plantar flexion and lateral deviation of the toe to achieve good exposure of the metatarsal head.
Place a 1.25-mm Kirschner wire in the center of the metatarsal head.
With a dome-shaped reamer, ream until cartilage and subchondral sclerotic bone are removed. Take great care not to damage the proximal phalanx; make sure to dislocate it plantarly to prevent this.
Remove the Kirschner wire, and place it in the center of the proximal phalanx.
Using an opposite dome-shaped reamer, ream until cartilage and subchondral sclerotic bone are removed. Take great care not to damage the proximal phalanx and metatarsal head or to shorten the metatarsal bone.
Use of a cup-cone reamer may not be ideal for joint preparation in patients with osteopenia, bone defects, or malunion. It may result in excessive shortening of the first ray in patients with osteopenic bone unless extreme care is taken. It is normally not necessary for those with bone defects as bone graft has to be used to fill the defect. When there is a malunion, a straight cut is easier and more accurate to correct the deformity.
Remove the Kirschner wire, and confirm good apposition of both bone ends.
Video 5.
Joint preparation.
Step 3: Positioning of Arthrodesis (Video 6)
Fix the toe in 5° to 10° of valgus and elevated 5 mm from the floor to achieve desired dorsiflexion.
Position the toe in 5° to 10° of valgus, which equals a slight clinical valgus deviation.
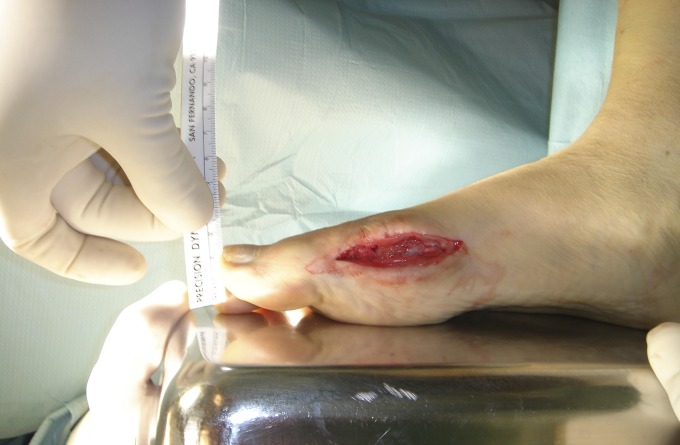
Theoretically, the optimal toe position is 15° of dorsiflexion, but attempting to achieve this by measuring degrees of dorsiflexion is not practical. An easier method is measuring the toe-floor distance. To do this, place a hard surface (e.g., a tray lid) on the sole of the foot, simulating weight-bearing (Fig. 1). The ideal hallux position is resting 5 mm above this surface, which equals approximately 15° of dorsiflexion. Another advantage of this method is that it is independent of the metatarsal declination angle and thus is more accurate for determining dorsiflexion in a foot with metatarsus elevatus, a cavus foot, or a planus foot. For example, in a cavus foot, 15° of metatarsophalangeal joint dorsiflexion could be insufficient to achieve a good toe-floor clearance.
A higher dorsiflexion angle (a 1-cm floor-toe distance) can be used for patients who desire to wear high heels often for social or job-related reasons.
Place a Kirschner wire from the metatarsal metaphysis to the phalanx (proximal-medial to lateral-distal) or axially from distal to proximal to fix the joint temporarily.
Fig. 1.
After preparation of the joint surfaces, the joint position is temporarily fixed and the dorsiflexion position is checked by placing the foot on a hard surface and measuring the distance between the toe and the surface.
Video 6.
Positioning of the arthrodesis.
Step 4: Application of Implants (Video 7)
Achieve a stable construct with a crossed lag screw and a dorsal locking plate (a hybrid construct).
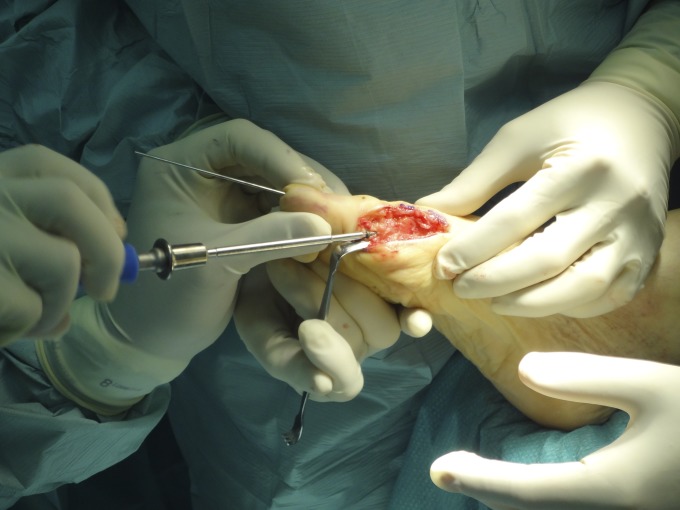
Place a guidewire for a cannulated lag screw from distal-medial (on the plantar-medial surface of the proximal phalanx) to proximal-lateral (exiting through the distal-lateral cortex of the first metatarsal) (Fig. 2).
Place the dorsal plate on the dorsal bone surface.
The optimal fusion position is 5° to 10° of hallux valgus and 15° of dorsiflexion.
Normally a bend in the dorsal plate is not necessary to achieve toe dorsiflexion because of the metatarsal and phalangeal anatomy. The proximal phalanx has a cone shape, which suggests that a straight plate will provide approximately 15° of phalangeal dorsiflexion. Sometimes a slight plate bend can be added as necessary (e.g., if there is steep metatarsal declination angle).
Fix the plate distally to the proximal phalanx using two locked screws.
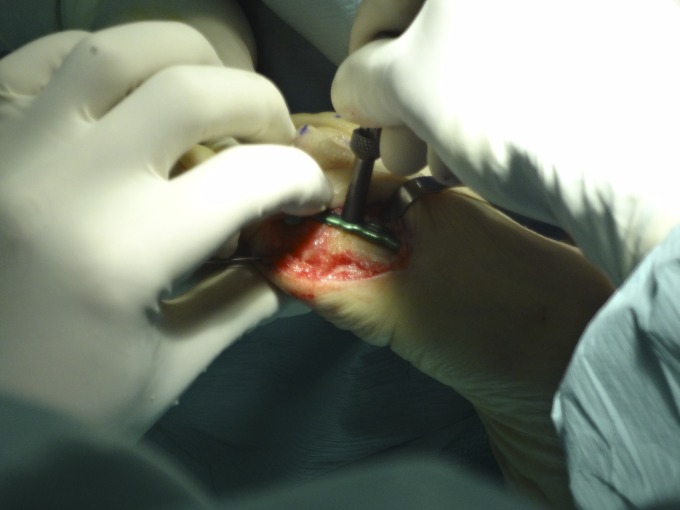
Then place one proximal screw in a slotted hole (at its proximal end) at the metatarsal. Do not overtighten this screw (Fig. 3).
Use a cannulated drill over the previously positioned Kirschner wire.
Place a cannulated lag screw (double pitch or partially threaded) to achieve compression through the joint. Before finally tightening the lag screw, unscrew the proximal screw in the plate one turn to allow compression through the lag screw.
Finish tightening the lag screw.
Finish tightening the proximal screw in the plate.
Before placing the last two proximal screws, confirm the toe position using the foot plate as already explained.
Place two more bicortical nonlocking screws proximally in the plate.
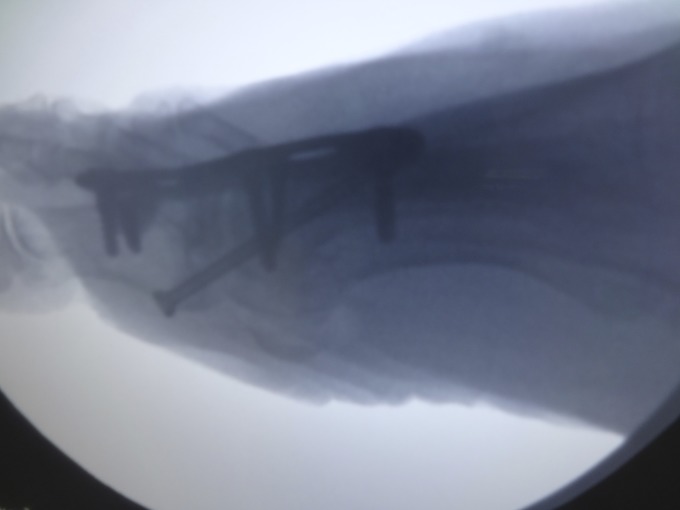
Confirm that the positioning of the implants is adequate under fluoroscopy (Figs. 4 and 5).
Fig. 2.
After temporarily fixing the joint with an axial Kirschner wire, the surgeon inserts a lag screw distal to the proximal screw, before definitely fixing the plate.
Fig. 3.
Proximal fixation of the plate. In this patient, a smoker, a locked proximal configuration was used.
Fig. 4.
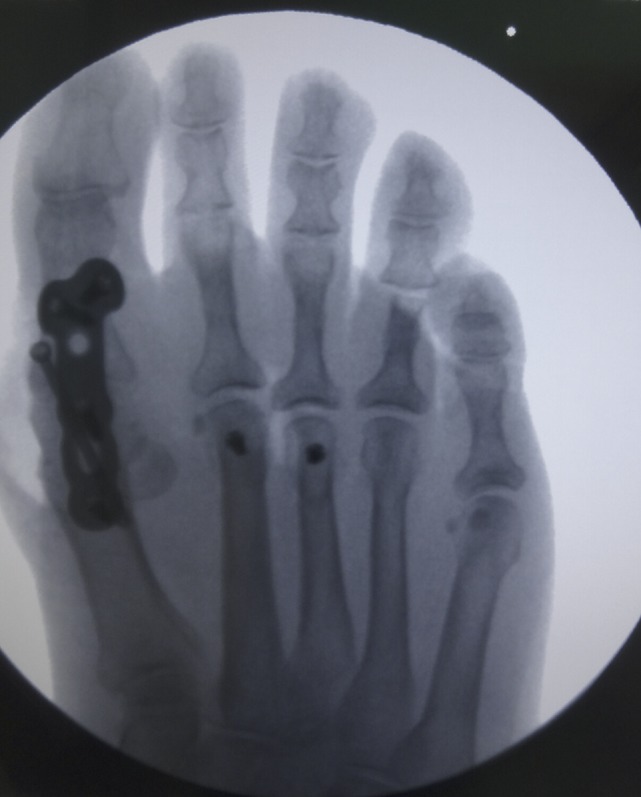
Intraoperative fluoroscopy is used to check the final position of the plate and joint with correct alignment.
Fig. 5.
Intraoperative fluoroscopy in a lateral view to check the final position of the lag screw from plantar-distal to dorsal-proximal. No additional dorsal bend was applied to the plate as adequate dorsiflexion was achieved as a result of the proximal phalangeal anatomy.
Video 7.
Application of the implants.
Step 5: Closure (Video 8)
Perform a standard soft-tissue closure.
Close the subcutaneous tissue with resorbable sutures to cover the implants.
Close the skin using resorbable subdermic or nylon stitches.
Video 8.
Closure.
Step 6: Postoperative Care (Video 9)
Allow weight-bearing as tolerated after two weeks and impact exercises only after bone healing has been shown on radiographs, which can take up to ten weeks.
The wound is kept dry and protected with sterile gauze and an elastic bandage.
Remove the stitches after fourteen days.
Allow weight-bearing as tolerated after two weeks, instructing the patient to take care to avoid pain when walking. Allow impact exercises only after bone healing has been shown on radiographs, which can take up to ten weeks.
Stiff-sole shoes are preferred for the first three months.
Video 9.
Postoperative care.
Results (Video 10)
Arthrodesis of the metatarsophalangeal joint in the hallux provides good results in terms of patient satisfaction and function, as demonstrated in many studies, most of them retrospective4-8. Goucher and Coughlin7, in 2006, and Doty et al.4, in 2013, reported good and excellent results in 89% to 96% of patients in their prospective case series. Doty et al.4 and van Doeselaar et al.8 showed good functional results using the American Orthopaedic Foot & Ankle Society (AOFAS) and Foot Function Index (FFI) scores, respectively. The nonunion rate in patients without rheumatoid arthritis who received appropriate fixation has ranged from 2% to 10% in different studies3,4,7. Most of the patients with nonunion rated the result of the surgery as good (probably because of a fibrous union). Patients with osteoporosis and those with rheumatoid arthritis have higher nonunion rates3. A stiffer configuration with a locking dorsal plate has been proposed to try to decrease the nonunion rate in these populations, but Hunt et al.3 showed, in 2011, that patients with rheumatoid arthritis have higher nonunion rates regardless of the plate type (locking or nonlocking).
Video 10.
Results.
What to Watch For
Indications
End-stage arthritis
Extreme hallux valgus
Revision hallux valgus procedures
Contraindications
Mild arthritis
Mild motion limitation
Isolated plantar pain (sesamoiditis)
Pitfalls & Challenges (Video 11)
Malunion in valgus
Malunion in dorsiflexion
Achieving a stable construct with compression screw and plate fixation
Excessive shortening of the first ray
Implant-related irritation
Malunion in plantar flexion
Diabetes mellitus
Rheumatoid arthritis
In patients with associated hallux valgus, it is important to monitor the toe vascularity during angular correction given the soft-tissue stretching. A method to prevent vascular compromise is to slowly correct the deformity and not fix it immediately.
Performing this operation in a patient with hallux valgus interphalangeus is challenging. You have to slightly overcorrect the metatarsophalangeal position to obtain 5° to 10° of valgus of the toe.
Video 11.
Complications.
Clinical Comments
Why do you prefer a medial approach over a dorsal one?
We believe that a medial approach reduces the risk of soft-tissue complications such as implant-related pain, does not endanger the extensor hallucis longus tendon or dorsal hallucal nerve, and has a better cosmetic result than a dorsal approach.
What technique tips have you found to be effective in achieving a satisfactory hallux position?
We leave the hallux in very slight valgus deviation—between 5° and 10°, which is less than what is currently recommended. The clinical aspect is the most important parameter used to adjust the final valgus positioning of the toe, besides ensuring an adequate dorsiflexion position of the toe.
What is the best fixation method?
Always use a compression screw. According to biomechanical studies, it is the most important isolated factor that increases the construct stability1,2. In addition, we recommend a locking plate as part of a hybrid construct (locking screws distally and cortical screws proximally) as described previously in this article. We believe that a locking construct is not necessary in most cases and a hybrid or nonlocking construct can be used with excellent results. The indications for a fully locked construct are rheumatoid arthritis, uncontrolled diabetes, osteoporosis, obesity, heavy smoking, bone defects, and when no purchase can be obtained with the lag screw.
Should bone graft or tendon lengthening or shortening be used?
Bone graft can be used in specific situations, such as in bone defects, smokers, or revision surgery. Lengthening or shortening the extensor hallucis longus tendon is seldom necessary.
Footnotes
Disclosure: None of the authors received payments or services, either directly or indirectly (i.e., via his or her institution), from a third party in support of any aspect of this work. None of the authors, or their institution(s), have had any financial relationship, in the thirty-six months prior to submission of this work, with any entity in the biomedical arena that could be perceived to influence or have the potential to influence what is written in this work. Also, no author has had any other relationships, or has engaged in any other activities, that could be perceived to influence or have the potential to influence what is written in this work. The complete Disclosures of Potential Conflicts of Interest submitted by authors are always provided with the online version of the article.
References
- 1.Hunt KJ, Barr CR, Lindsey DP, Chou LB. Locked versus nonlocked plate fixation for first metatarsophalangeal arthrodesis: a biomechanical investigation. Foot Ankle Int. 2012. November;33(11):984-90. [DOI] [PubMed] [Google Scholar]
- 2.Politi J, John H, Njus G, Bennett GL, Kay DB. First metatarsal-phalangeal joint arthrodesis: a biomechanical assessment of stability. Foot Ankle Int. 2003. April;24(4):332-7. [DOI] [PubMed] [Google Scholar]
- 3.Hunt KJ, Ellington JK, Anderson RB, Cohen BE, Davis WH, Jones CP. Locked versus nonlocked plate fixation for hallux MTP arthrodesis. Foot Ankle Int. 2011. July;32(7):704-9. [DOI] [PubMed] [Google Scholar]
- 4.Doty J, Coughlin M, Hirose C, Kemp T. Hallux metatarsophalangeal joint arthrodesis with a hybrid locking plate and a plantar neutralization screw: a prospective study. Foot Ankle Int. 2013. November;34(11):1535-40. Epub 2013 Jun 26. [DOI] [PubMed] [Google Scholar]
- 5.Brodsky JW, Passmore RN, Pollo FE, Shabat S. Functional outcome of arthrodesis of the first metatarsophalangeal joint using parallel screw fixation. Foot Ankle Int. 2005. February;26(2):140-6. [DOI] [PubMed] [Google Scholar]
- 6.Coughlin MJ, Grebing BR, Jones CP. Arthrodesis of the first metatarsophalangeal joint for idiopathic hallux valgus: intermediate results. Foot Ankle Int. 2005. October;26(10):783-92. [DOI] [PubMed] [Google Scholar]
- 7.Goucher NR, Coughlin MJ. Hallux metatarsophalangeal joint arthrodesis using dome-shaped reamers and dorsal plate fixation: a prospective study. Foot Ankle Int. 2006. November;27(11):869-76. [DOI] [PubMed] [Google Scholar]
- 8.van Doeselaar DJ, Heesterbeek PJ, Louwerens JW, Swierstra BA. Foot function after fusion of the first metatarsophalangeal joint. Foot Ankle Int. 2010. August;31(8):670-5. [DOI] [PubMed] [Google Scholar]


