Overview
Introduction
Compartment syndrome of the leg is an orthopaedic emergency and can be treated with single or dual-incision fasciotomy, allowing for necessary decompression of all four compartments.
Step 1 (Single-Incision Technique): Position the Patient
Place the patient supine with a bump underneath the ipsilateral buttock.
Step 2 (Single-Incision Technique): Make the Skin Incision
An incision centered over the posterolateral aspect of the leg provides access to all four compartments of the leg.
Step 3 (Single-Incision Technique): Decompress the Superficial Posterior, Lateral, and Anterior Compartments
Make longitudinal fascial incisions, approximately the length of the skin incision, in the superficial posterior, lateral, and then anterior compartments.
Step 4 (Single-Incision Technique): Decompress the Deep Posterior Compartment
Using the lateral intermuscular septum as a guide to reach the posterolateral aspect of the fibula, release the fascial attachment of the deep posterior compartment from the fibula.
Step 5 (Single-Incision Technique): Postoperative Protocol
After appropriate operative fixation and/or debridement of nonviable tissue, dress the wounds with a VAC device.
Step 1 (Dual-Incision Technique): Position the Patient
Position the patient, administer antibiotics, and prepare and drape the limb as described in Step 1 for the single-incision technique.
Step 2 (Dual-Incision Technique): Make the Anterolateral Skin Incision
Make an incision centered over the anterolateral aspect of the leg to provide access to the anterior and lateral compartments of the leg.
Step 3 (Dual-Incision Technique): Decompress the Anterior and Lateral Compartments
Make a longitudinal fascial incision in the anterior compartment anterior to the intermuscular septum and a separate longitudinal incision for decompression of the lateral compartment posterior to the intermuscular septum.
Step 4 (Dual-Incision Technique): Make the Posteromedial Skin Incision
Make an incision centered over the posteromedial aspect of the leg to provide access to the superficial and deep posterior compartments of the leg.
Step 5 (Dual-Incision Technique): Decompress the Superficial and Deep Posterior Compartments
Through the posteromedial skin incision, identify both the deep and the superficial posterior compartments and incise their fascia longitudinally for adequate decompression.
Step 6 (Dual-Incision Technique): Postoperative Protocol
Follow the same postoperative protocol as outlined in Step 5 for the single-incision technique.
Results
Both the single and the dual-incision techniques are effective for relieving elevated intracompartmental pressures to prevent myonecrosis.
Introduction
Compartment syndrome of the leg is an orthopaedic emergency and can be treated with single or dual-incision fasciotomy, allowing for necessary decompression of all four compartments. The choice of surgical incisions should be based on surgeon preference and experience as there is no significant difference with regard to complications between the two approaches1.
The single-incision technique involves a longitudinal skin incision along the posterolateral aspect of the leg in line with the fibula2. Full-thickness soft-tissue flaps are elevated, and a longitudinal incision is made in the fascia of the superficial posterior, lateral, and then anterior compartments. Through the lateral compartment, the fascial attachment of the lateral intermuscular septum is traced to its origin along the fibula and incised, providing decompression of the deep posterior compartment. After appropriate decompression and debridement of nonviable tissues, the wound may be managed with a vacuum-assisted closure (VAC) device or moistened dressings. Patients return to the operating room in two to four days for additional wound management.
The dual-incision technique involves a longitudinal skin incision in the anterolateral aspect of the leg, approximately 2 cm anterior to the fibula, and a posteromedial skin incision, approximately 2 cm posterior to the tibia3. Full-thickness soft-tissue flaps are elevated. The anterolateral skin incision allows for visualization of the anterior intermuscular septum. A longitudinal fascial incision is made in the anterior compartment fascia anterior to the intermuscular septum, and a separate longitudinal incision is made for decompression of the lateral compartment posterior to the intermuscular septum. Through the medial skin incision, the fascia is incised longitudinally along the posterior border of the tibia, allowing for decompression of the deep posterior compartment. A separate, parallel fascial incision is made, allowing for decompression of the superficial posterior compartment. Wound management is similar to that outlined for a single-incision fasciotomy (Video 1).
Video 1.
Single and dual-incision fasciotomy of the lower leg.
The steps of the two techniques are described below.
Step 1 (Single-Incision Technique): Position the Patient
Place the patient supine with a bump underneath the ipsilateral buttock.
Place the patient supine with a bump underneath the ipsilateral buttock to internally rotate the leg, thereby providing adequate access to the lateral aspect of the leg.
Verify appropriate positioning with the patella directed toward the ceiling when the patient’s leg is relaxed.
Administer a dose of prophylactic antibiotics within one hour prior to the start of the procedure.
Prepare and drape the affected limb above the knee.
Step 2 (Single-Incision Technique): Make the Skin Incision
An incision centered over the posterolateral aspect of the leg provides access to all four compartments of the leg.
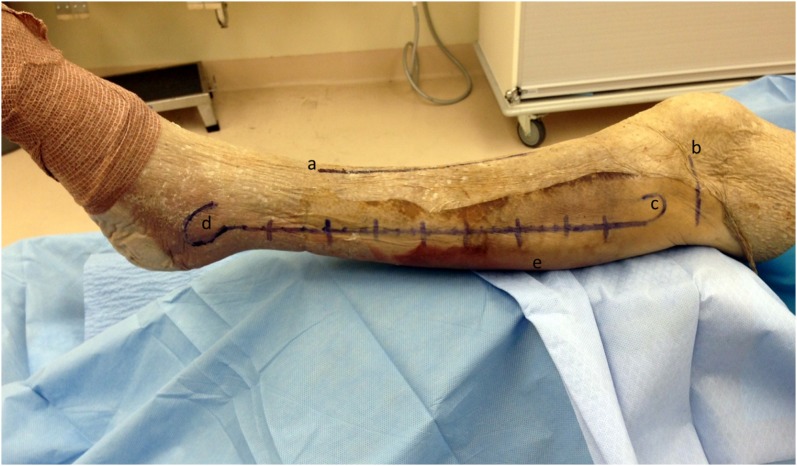
Make a longitudinal incision in the posterolateral aspect of the leg in line with the fibula, beginning 4 to 7 cm distal to the fibular head and ending approximately 5 cm proximal to the lateral malleolus (Fig. 1).
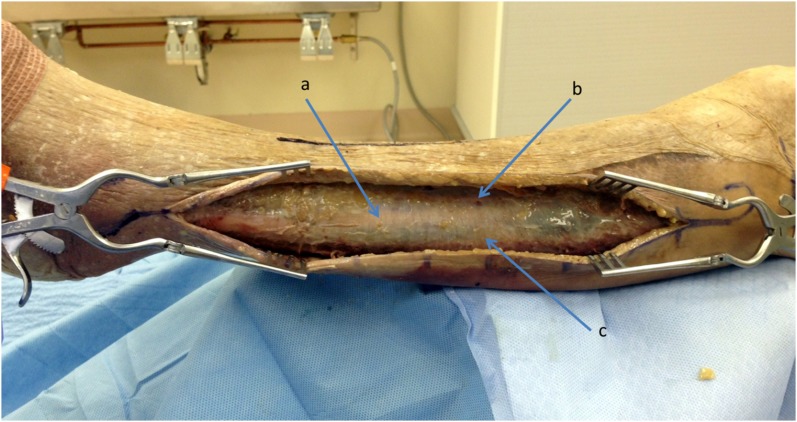
Create full-thickness skin flaps in the anterior and posterior directions until the anterior, lateral, and superficial posterior compartments are visible. Visualization of the anterior and lateral intermuscular septa aids in the identification of the compartments (Fig. 2).
Application of traction with a sponge can help develop a plane between the skin and subcutaneous tissue and the underlying fascia.
Use electrocautery to ligate perforating vessels that radiate from the underlying fascia.
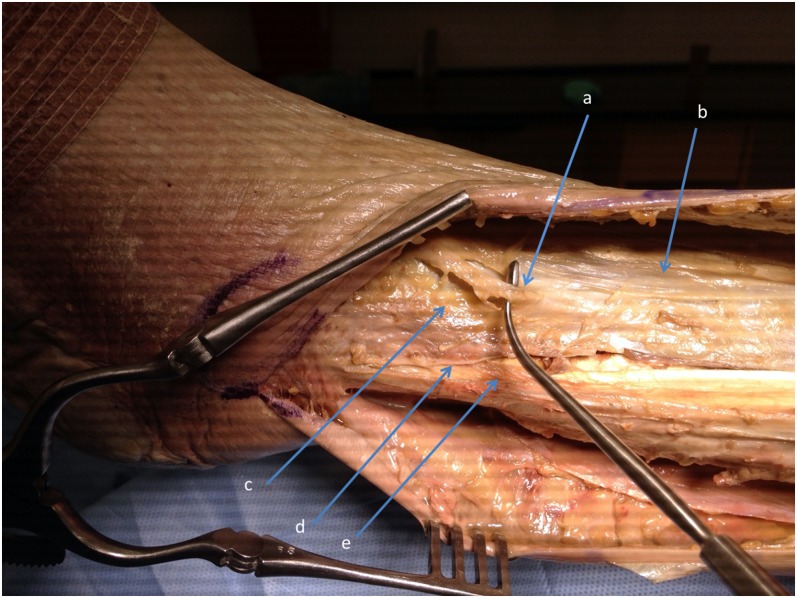
When dissecting in the distal third portion of the leg, identify and preserve the superficial peroneal nerve, which exits from the lateral compartment fascia and traverses the soft tissues directed anteriorly (Fig. 3).
Fig. 1.
Single-incision fasciotomy landmarks. a = anterior tibial crest, b = lateral knee joint line, c = fibular head, d = lateral malleolus, and e = gastrocnemius muscle body.
Fig. 2.
Full-thickness skin flaps with visualization of anterior and lateral compartments. a = peroneus longus tendon under lateral compartment fascia, b = anterior intermuscular septum, and c = lateral intermuscular septum.
Fig. 3.
Location of superficial peroneal nerve. a = superficial peroneal nerve, b = anterior compartment fascia, c = lateral compartment fascia, d = fibula, and e = peroneus brevis muscle body.
Step 3 (Single-Incision Technique): Decompress the Superficial Posterior, Lateral, and Anterior Compartments
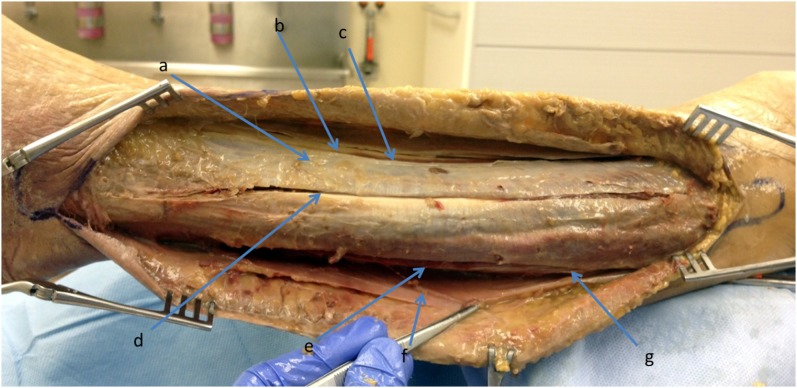
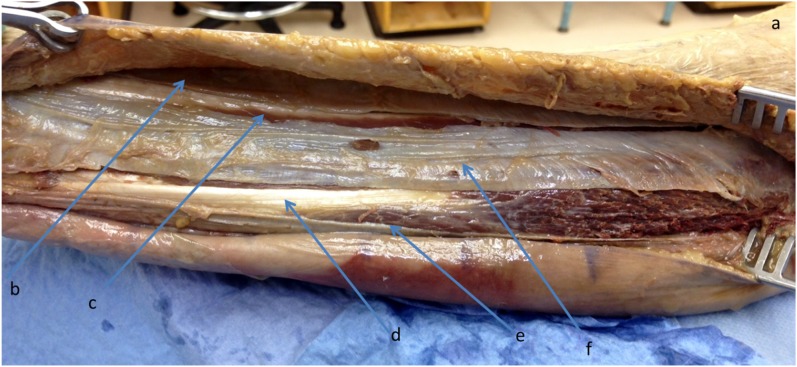
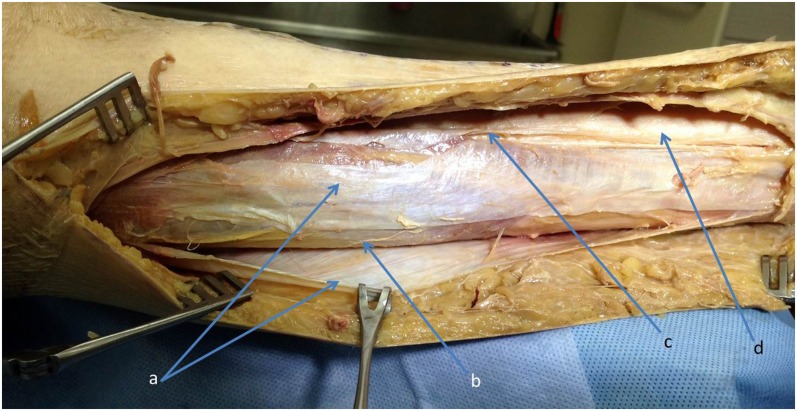
Make longitudinal fascial incisions, approximately the length of the skin incision, in the superficial posterior, lateral, and then anterior compartments (Fig. 4).
Dorsiflex the ankle, invert the foot, and plantar flex the ankle to aid in verifying the superficial posterior, lateral, and anterior compartment musculature, respectively.
Limit the fascial incision depth to avoid bleeding and muscular trauma.
Work from posterior to anterior to avoid impairment of visualization from bleeding.
Fig. 4.
Fascial incisions to decompress superficial posterior, lateral, and then anterior compartments. a = lateral compartment fascia, b = anterior tibialis tendon, c = anterior compartment incision, d = lateral compartment incision, e = superficial posterior compartment incision, f = superficial posterior compartment fascia, and g = gastrocnemius muscle body.
Step 4 (Single-Incision Technique): Decompress the Deep Posterior Compartment
Using the lateral intermuscular septum as a guide to reach the posterolateral aspect of the fibula, release the fascial attachment of the deep posterior compartment from the fibula.
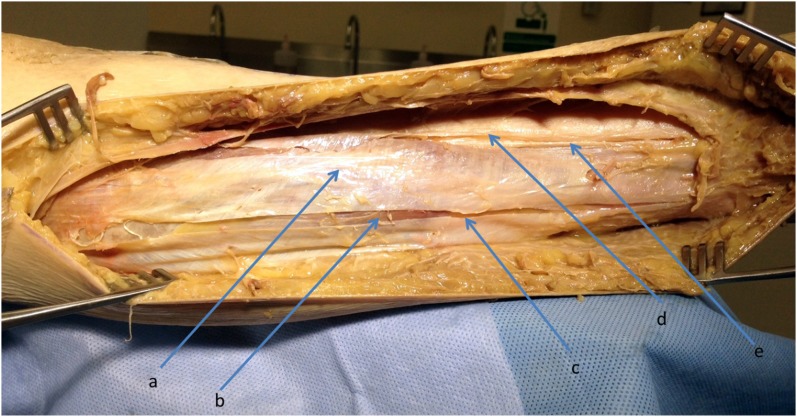
Bluntly elevate the lateral compartment musculature off the anterior aspect of the lateral intermuscular septum (Fig. 5).
Maintaining gentle laterally directed tension on the lateral intermuscular septum will aid in hemostasis. To do this, grab the lateral intermuscular septum with a pair of Allis clamps.
Trace the lateral intermuscular septum to its attachment along the posterolateral aspect of the fibula.
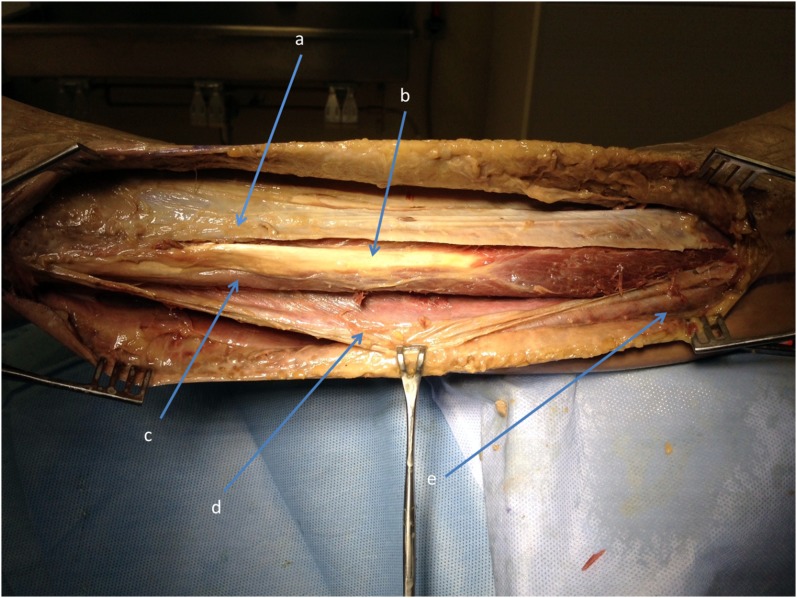
From the proximal extent of the surgical incision site, use a knife or electrocautery to detach the lateral intermuscular septum from the fibula, exposing the deep posterior compartment (Fig. 6). Be mindful of the common peroneal nerve crossing behind the fibular neck near the proximal extent of the incision.
To prevent unnecessary bleeding, directly detach the intermuscular septum along the fibula, thereby avoiding inadvertent injury to surrounding peroneal vessels.
Verify entrance into the deep posterior compartment by dorsiflexion of the hallux metatarsophalangeal joint, thereby identifying the flexor hallucis longus muscle.
Continue releasing muscle attachments along the posterior aspect of the fibula, thereby releasing and freeing the fascial attachment of the posterior tibial muscle.
To ensure adequate release of the pressure on the tibial nerve in the deep posterior compartment, release the soleus muscle attachment to the proximal part of the fibula.
Fig. 5.
Identifying the lateral intermuscular septum. a = lateral compartment fascia, b = peroneus longus tendon, c = peroneus brevis muscle body, d = lateral intermuscular septum, and e = gastrocnemius muscle body.
Fig. 6.
Entrance to deep posterior compartment. a = posterior border of fibula and site of longitudinal incision, b = lateral intermuscular septum, c = flexor hallucis longus muscle body, d = peroneus longus muscle body, and e = fascia overlying lateral compartment.
Step 5 (Single-Incision Technique): Postoperative Protocol
After appropriate operative fixation and/or debridement of nonviable tissue, dress the wounds with a VAC device.
Perform the necessary debridement of nonviable muscle, as dictated by the four Cs: color, contractility, capacity to bleed, and consistency.
Place an appropriately sized VAC sponge, taking care to avoid overlap onto the skin. To prevent excessive skin retraction, use as narrow a VAC sponge as possible, and staple the skin edges to it.
Apply the occlusive plastic adhesive dressing in strips, working from anterior to posterior, and maintain continuous suction on the dependent portion of the sponge to prevent fluid accumulation and interference with the adhesive.
Connect and maintain continuous suction at 125 mm Hg while assessing for potential leaks. Reinforce as necessary, and confirm a seal with the VAC machine prior to leaving the operating room.
Have the patient return to the operating room in two to four days for repeat evaluation and additional wound management.
Step 1 (Dual-Incision Technique): Position the Patient
Position the patient, administer antibiotics, and prepare and drape the limb as described in Step 1 for the single-incision technique.
Step 2 (Dual-Incision Technique): Make the Anterolateral Skin Incision
Make an incision centered over the anterolateral aspect of the leg to provide access to the anterior and lateral compartments of the leg.
Make a longitudinal skin incision, approximately 15 cm in length, centered over the anterolateral aspect of the leg, approximately 2 cm anterior to the fibula (Fig. 7).
Application of traction with a sponge can help develop a plane between the skin and subcutaneous tissue and the underlying fascia.
Use electrocautery to ligate perforating vessels that radiate from the underlying fascia.
Identify the anterior intermuscular septum in the anterolateral incision and elevate full-thickness skin flaps 2 to 3 cm in both the anterior and the posterior direction.
Fig. 7.
Landmarks for anterolateral skin incision in dual-incision fasciotomy. a = anterior tibial crest, b = anterolateral skin incision, c = fibular head, d = lateral knee joint line, and e = tibiotalar joint.
Step 3 (Dual-Incision Technique): Decompress the Anterior and Lateral Compartments
Make a longitudinal fascial incision in the anterior compartment anterior to the intermuscular septum and a separate longitudinal incision for decompression of the lateral compartment posterior to the intermuscular septum.
Limit the fascial incision depth to avoid bleeding and muscular trauma.
With a knife or with blunt-pointed scissors longitudinally incise the fascia of the anterior compartment approximately 1 cm anterior to the intermuscular septum and identify the tibialis anterior muscle with ankle plantar flexion.
Decompress the lateral compartment by making a separate longitudinal fascial incision, parallel to the previous incision directly over the fibula, approximately 1 cm posterior to the anterior intermuscular septum (Fig. 8).
Identify the peroneal musculature and verify appropriate compartment decompression by inverting the foot.
Fig. 8.
Fascial incisions to decompress lateral and anterior compartments. a = anteroinferior border of patella, b = fascial incision in anterior compartment, c = tibialis anterior tendon, d = peroneus longus tendon, e = fascial incision in lateral compartment, and f = anterior intermuscular septum.
Step 4 (Dual-Incision Technique): Make the Posteromedial Skin Incision
Make an incision centered over the posteromedial aspect of the leg to provide access to the superficial and deep posterior compartments of the leg.
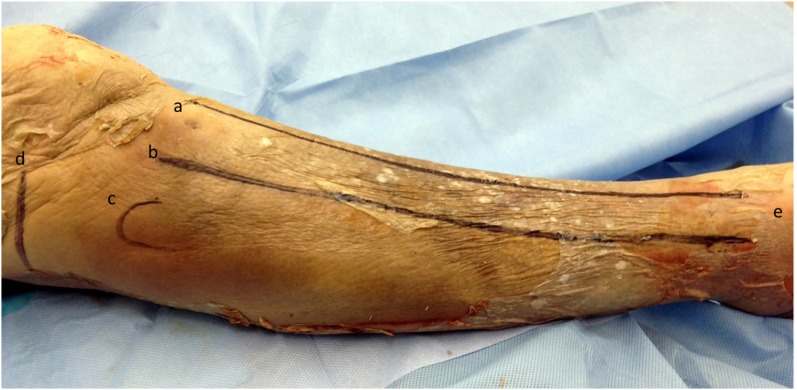
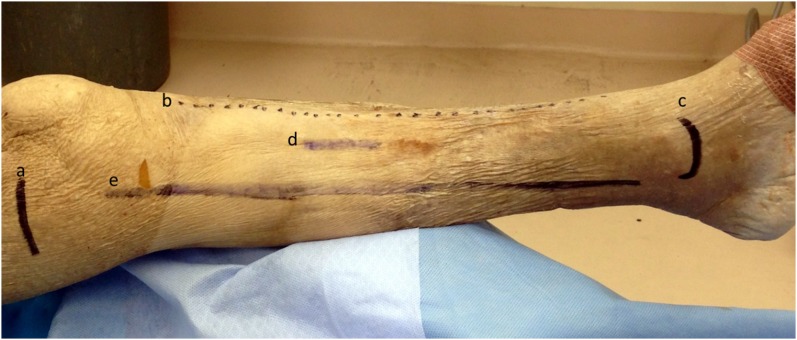
Make a longitudinal skin incision, approximately 15 cm in length and approximately 2 cm posterior to the tibia (Fig. 9).
Application of traction with a sponge can help develop a plane between the skin and subcutaneous tissue and the underlying fascia.
Use electrocautery to ligate perforating vessels that radiate from the underlying fascia.
Fig. 9.
Landmarks for medial skin incision in dual-incision fasciotomy. a = medial knee joint line, b = anterior tibial crest, c = medial malleolus, d = posterior border of tibia, and e = incision mark.
Step 5 (Dual-Incision Technique): Decompress the Superficial and Deep Posterior Compartments
Through the posteromedial skin incision, identify both the deep and the superficial posterior compartments and incise their fascia longitudinally for adequate decompression.
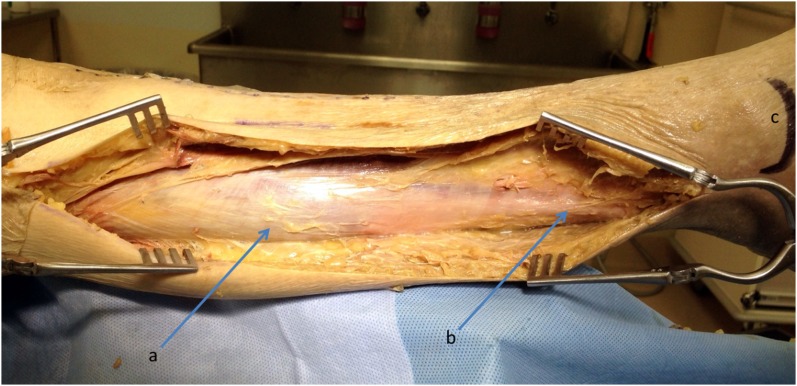
In the distal third of the leg, identify the deep posterior compartment; it is superficial and beneath the soleus muscle (Fig. 10).
Incise the fascia longitudinally along the posterior border of the tibia to allow for decompression of the deep posterior compartment (Fig. 11).
Identify and release the soleus origin from the tibia to provide adequate decompression of the deep posterior compartment (Fig. 12).
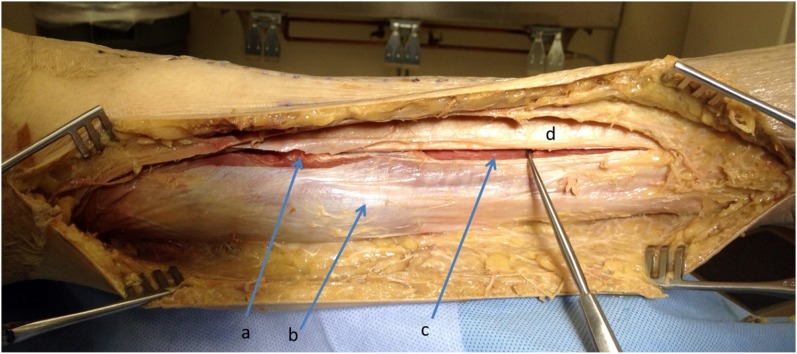
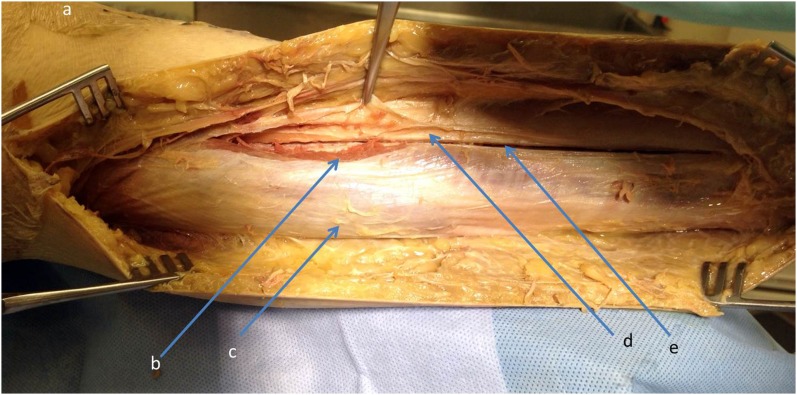
Make a separate incision approximately 2 cm posterior to the incision for the deep posterior compartment, thereby entering and releasing the superficial posterior compartment (Figs. 13 and 14).
Fig. 10.
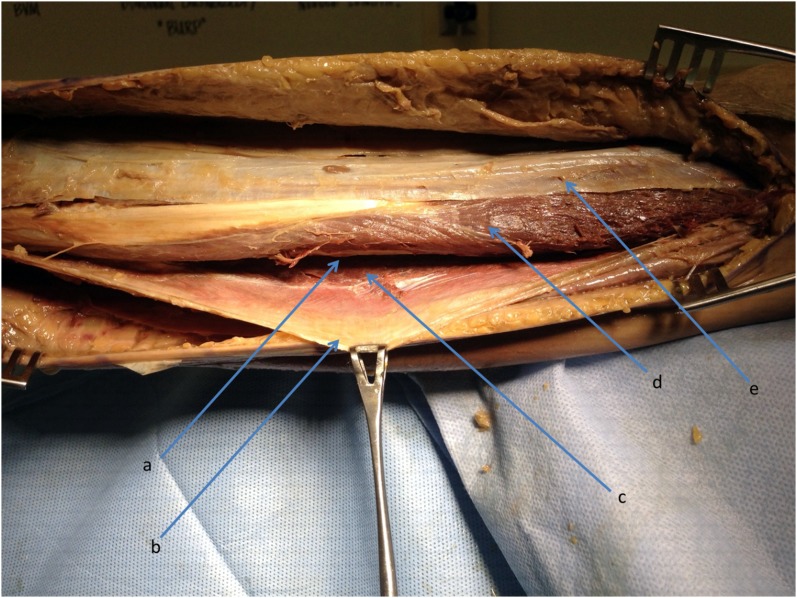
Approach to superficial and deep posterior compartments through medial incision. a = gastrocnemius muscle body under superficial posterior compartment fascia, b = Achilles tendon, and c = medial malleolus.
Fig. 11.
Decompression of deep posterior compartment. a = soleus muscle attachment to posterior part of tibia, b = superficial posterior compartment fascia over gastrocnemius muscle body, c = soleus muscle as seen through longitudinal incision that provides access into deep posterior compartment, and d = tibia.
Fig. 12.
Release of soleus bridge. a = inferomedial border of patella, b = soleus muscle body origin after release from posteromedial aspect of tibia, c = fascia over gastrocnemius muscle, d = posteromedial border of tibia, and e = incision to access deep posterior compartment.
Fig. 13.
Decompression of superficial posterior compartment. a = fascia overlying gastrocnemius muscle body, b = gastrocnemius muscle, c = incision for access into superficial posterior compartment, d = incision for access into deep posterior compartment, and e = posteromedial border of tibia.
Fig. 14.
Decompressed superficial and deep posterior compartments. a = fascia overlying superficial posterior compartment, b = gastrocnemius muscle body, c = fascial incision along soleus muscle body for access to deep posterior compartment, and d = posteromedial aspect of tibia.
Step 6 (Dual-Incision Technique): Postoperative Protocol
Follow the same postoperative protocol as outlined in Step 5 for the single-incision technique.
Results
Both the single and the dual-incision techniques are effective for relieving elevated intracompartmental pressures to prevent myonecrosis. In a comparison of single and dual-incision fasciotomies for acute compartment syndromes associated with tibial fractures, there was no significant difference with respect to infection or tibial nonunion rates after operative fixation1. The need for skin grafting was also similar between the two groups. An Orthopaedic Trauma Association (OTA) poster presentation from 2010 showed no significant difference in the number of debridements, time until wound closure, or rates of skin grafting between the two techniques4. The choice of fasciotomy technique should be based on surgeon experience.
What to Watch For
Indications
Compartment syndrome.
Contraindications
Compartment syndrome diagnosed more than forty-eight hours after onset because it was initially missed.
The dual-incision technique should not be performed in the setting of substantially traumatized anteromedial skin and soft tissues.
Pitfalls & Challenges
Superficial peroneal nerve injury. Pay careful attention when dissecting in the anterolateral aspect of the distal third of the leg and avoid blind dissection.
Saphenous vein and nerve injury. When approaching the posteromedial aspect of the tibia, the skin incision and flap should be sufficiently posterior to avoid iatrogenic injury.
Incomplete release. All four compartments must be released, and incisions should be at least three-quarters of the length of the fibula.
Wound closure and/or skin grafting. The timing and priority of wound closure and skin grafting vary depending on the clinical scenario. Careful planning should occur at the initial and subsequent procedures to avoid complications.
Definitive osseous fixation. Surgical approaches, and the timing of osseous stabilization, vary depending on the clinical scenario. Careful planning should occur at the initial and subsequent procedures to avoid complications.
Footnotes
Published outcomes of this procedure can be found at: J Orthop Trauma. 2013 Nov;27(11):607-11.
Disclosure: None of the authors received payments or services, either directly or indirectly (i.e., via his or her institution), from a third party in support of any aspect of this work. One or more of the authors, or his or her institution, has had a financial relationship, in the thirty-six months prior to submission of this work, with an entity in the biomedical arena that could be perceived to influence or have the potential to influence what is written in this work. No author has had any other relationships, or has engaged in any other activities, that could be perceived to influence or have the potential to influence what is written in this work. The complete Disclosures of Potential Conflicts of Interest submitted by authors are always provided with the online version of the article.
References
- 1.Bible JE, McClure DJ, Mir HR. Analysis of single-incision versus dual-incision fasciotomy for tibial fractures with acute compartment syndrome. J Orthop Trauma. 2013. November;27(11):607-11. [DOI] [PubMed] [Google Scholar]
- 2.Maheshwari R, Taitsman LA, Barei DP. Single-incision fasciotomy for compartmental syndrome of the leg in patients with diaphyseal tibial fractures. J Orthop Trauma. 2008. Nov-Dec;22(10):723-30. [DOI] [PubMed] [Google Scholar]
- 3.Mubarak SJ, Owen CA. Double-incision fasciotomy of the leg for decompression in compartment syndromes. J Bone Joint Surg Am. 1977. March;59(2):184-7. [PubMed] [Google Scholar]
- 4.Zehnder SW, Berry MR, Watson JT. Single-incision versus dual-incision fasciotomy for tibial compartment syndrome. Presented as a poster exhibit at the 2010 Orthopaedic Trauma Association Annual Meeting; 2010 Oct 13-16; Baltimore, MD. Poster no. 91.


