

Abstract
Research in the area of in vivo olfactory physiology benefits from having direct access to the nasal airways through which odorants can be presented. Ordinarily, the passage of odorants through the airways is controlled by respiratory rhythm. This fact makes it difficult to control the timing and strength of an olfactory stimulus, since animals must breathe regularly, and the act of breathing itself also controls odorant presentation. However, using an artificial inhalation preparation allows us to decouple breathing from olfaction. With this technique we present oxygen and anesthetic (if desired) to the lungs directly and independently control odorant access to the nasal passages. This technique allows for direct control of odorant presentation in vivo, enabling more precise control of parameters of stimulation when investigating olfactory processing. This technique may have additional applications, for example in aerosolized drug delivery.
Keywords: Inhalation, Olfaction, Nasopharynx, Respiration, Tracheotomy
Background
Olfaction, aerosolized drug delivery, and many facets of airway humidification and homeostasis are governed by active respiration through the nasal passages. Basic research into these areas benefits from being able to actively control respiration in an anesthetized preparation. Our lab focuses in part on how active respiration controls olfactory coding in the olfactory bulb, which is the site of the first synapse in the neurobiology of odor perception. To address questions along this front in anesthetized mice, we employ an artificial respiration strategy that decouples airflow through the nasal passages from gas exchange with the lungs. This type of preparation allows experimentally manipulating nasal airflow while simultaneously delivering oxygenated air (usually incorporating a dilute aerosolized general anesthetic) to the lungs, thus producing a stable in vivo preparation that can last for eight hours or more.
This protocol is modified from an earlier form that has been briefly outlined in previous publications (Wachowiak and Cohen, 2001; Vučinić et al., 2006 ). Our lab and others have used this or a similar technique to investigate odor processing in the olfactory bulb of anesthetized rodents for several years (e.g., Sobel and Tank, 1993; Wachowiak and Cohen, 2001; Spors et al., 2006 ; Bathellier et al., 2008 ; Wachowiak et al., 2013 ; Rothermel et al., 2014 ; Economo et al., 2016 ). Here, we provide a detailed protocol for this method with the goal making it more easily adopted, and we expect that it may even find uses outside of the community working on olfactory physiology in rodents.
Materials and Reagents
Surgical thread, 6-0 Silk Suture Thread (Surgical Specialities, LOOKTM, catalog number: SP102)
Micro swabs (Absorbent Points #501) (Henry Schein, catalog number: 9004693)
Razor blade (Exel Surgical Blades) (Exel International, model: #11, catalog number: 29502)
Trachea Tubing, 0.034” x 0.050” x 0.008” (A-M systems, catalog number: 801900)
Sniff Tubing, 0.045” x 0.062” x 0.0085” (A-M systems, catalog number: 802500)
Sniff Connector, 0.04” ID, 0.085” OD (Dow Corning, SilasticTM, catalog number: 508-005)
T-junction tubing connector (about ¼ ” diameter), connected to flexible tubing (Tygon)
Y-connector (Grainger), 1/16” (for connecting and then splitting the sniff tubing)
Adult M or F mice (we use C57/Bl6, but any strain should work) of healthy weight (~20-40 g)
Super Glue (Henkel, Loctite, catalog number: LOCTITE 404)
0.5% bupivacaine (Marcaine, Hospira Inc.)
Ketamine/xylazine cocktail
Isoflurane (VetONE Fluriso)
Nair (Church and Dwight Co.)
Denture/Dental Cement (Teets Cold Cure, Co-Oral-Ite Dental Mfg Co.)
Equipment
Isoflurane vaporizer (VetEquip)
3-way solenoid valve (Cole-Parmer, catalog number: EW-01540-11)
Soldering iron
A vacuum line or other way of generating vacuum
-
Custom-cut steel headbar
Note: We use one that is roughly omega-shaped, but many shapes would suffice. Should be roughly 0.5 mm thick.
Heating pad
Two flow meters (Aalborg) (one of which is capable of 500 ml/min, the other of which is capable of 1 L/min or more)
Pressure sensor (Honeywell, catalog number: ASCX01DN or similar), mounted to circuit board and connected to Sniff Tubing via Y-connector
Tank of Compressed Oxygen Gas
Very fine surgical scissors (Roboz Surgical Instrument, catalog number: RS-5610)
Fine Forceps (Fine Science Tools, model: Dumont #5)
8” x 8” breadboard (ThorLabs)
Procedure
-
Preparation of materials
Cut two pieces of “Trachea Tubing” one of which will be 1.0” long, the other approx. 1.5” long. Using a soldering iron, shape the two pieces by bringing the tip of the iron within about 2-3 cm of the tubing; the heat from this distance will cause the pieces to bend slowly. Shape the 1.0” piece so that it has two 60-degree bends in it, angled so that it is not recurved, but rather shaped as in Figure 1A. The longer, 1.5” piece should be shaped into a recurved “open check-mark” (Figure 1B).
Cut a piece of “sniff tubing” (item #4 in Materials and Reagents section) to a length which is just long enough to reach between the sniff tube (in the trachea) and the valve when the animal is in a stable position. For our experiments, this is about 30 cm long, but in some applications significantly shorter could be appropriate. The idea is to have the sniff tubing as short as possible to minimize the delay between the electronic sniff pulse and the actual pressure transient. Affix a piece of sniff connector tubing (1 cm) to the end of the sniff tubing itself–this will eventually be the piece that connects to the trachea tubing.
-
Trachea surgery (Please adhere to all relevant ethical standards during surgery.)
Anesthetize the mouse, for example by using pentobarbital or a ketamine/xylazine cocktail. This initial anesthesia only needs to last for the duration of the surgery (~30-60 min), after which point the animal can be switched to isoflurane, which is more efficacious in the long-term.
Flip the mouse onto its back, and spread the forelimbs of the mouse and affix to your working surface with tape.
Shave/depilate the hair covering the neck (Figure 2A).
Inject 0.05 ml bupivacaine (0.5%) superficially to the neck (subcutaneous), then wait 5 min prior to surgical cutting.
Using fine scissors, cut from the base of the intersection of the chin and neck caudally to the leading edge of the upper chest, a distance of approximately inch (Figure 2B).
Using #5/#55 forceps, carefully pull apart and deflect fatty tissue immediately deep to the just separated skin (Figure 2C). Be careful to not move too far laterally within the neck when using the forceps, as you can easily sever one of the major blood vessels (e.g., external jugular vein).
Once the fatty tissue has been pulled away, you should be able to see longitudinally-oriented neck muscles (M. sternohyoideus), which overly the trachea (Figure 2C). Carefully bisect and reflect these muscles using fine forceps.
Carefully clear the area around and beneath the trachea of tissue using fine forceps, being careful not to pull or cut any vasculature or to severe the vagus nerve, which is easily damaged owing to its close proximity to the trachea. As part of this process, delicately grab one of the tracheal cartilage rings to gently lift the trachea, and pull away the connective tissue connecting the trachea and esophagus below.
Once clear of surrounding tissue, carefully lift the trachea and thread a ~1 inch piece of surgical thread underneath the trachea. Easiest is to make a loop and double up the thread, and then pass the loop under the trachea, pulling half of the doubled thread underneath. Then, carefully cut the loop, leaving two pieces of roughly inch length under the trachea.
Pull one of the two pieces of thread as far down (towards the sternum) as possible, aiming especially to catch it on the furthest ring of tracheal cartilage as possible. Afterwards, using very fine scissors, cut a fine slit immediately anterior to the tracheal cartilage which is anchoring the thread (Figure 2D). This hole should just be large enough for the tracheal tube to fit in.
Gently insert the longer tracheal tube (Figure 1A) approximately 3-4 mm posteriorly in to the trachea, being careful not to let the inserted portion penetrate too deeply, as it disrupts breathing when too deep. The animal will usually immediately start gasping if the tube has been inserted too far. Afterward correctly inserting the tube, tie it off using the thread, making sure to tie it over the tracheal cartilage which provides support for the knot.
Repeat Steps 9-10, this time pulling the thread as far rostrally as possible. After making the small incision into the trachea, this time clear out the trachea of mucus with small rolled swabs. There should be no blood within the trachea itself. The tube (Figure 1B) should be inserted rostrally so that it does not come forward too far; the goal is to have it lying in the posterior portion of the nasopharynx. Tie off the tubing, leaving a final setup as shown in Figure 2E. Trim the thread in preparation for re-sealing the skin.
-
Seal the skin using a small drop of Vetbond (Figure 2F). Take care to not glue the two lengths of tubing to the skin, as this prevents free movement of the tubing which may be needed later for proper positioning.
Note: At this point, the surgery has been completed.
Prior to flipping over the mouse onto its stomach, make sure to have the oxygen turned on, and the isoflurane set at ~0.5%. Position the oxygen and vacuum T-connector so that they will be in correct position when the mouse is right-side up. You will also need to have a method for holding the mouse in place for the duration of the experiment: a stereotaxic apparatus or steel headbar-holder are commonly used for this purpose. Ensure the headbar holder/stereotaxic arms are in the proper position to easily receive mouse.
Now flip over the mouse, taking care to keep the body from contorting into an unnatural position and the tracheal tubes from getting dislodged, caught on the heating pad, etc. Quickly affix the head of the mouse in place using whatever method you choose, and then position the breathing tube into the T-junction tubing connector that is connected to the oxygen delivery apparatus (Figure 2G). The respiration tube must stretch further than the junction where the vacuum contacts the main oxygen line; if it does not, the oxygen (and isoflurane) will be vacuumed away (Figure 2H). Once the tube is far enough in, make sure the flow rate for the vacuum is higher than for the oxygen carrier stream, so that isoflurane does not slowly leak into the airspace around the animal.
Next connect the trachea sniff tube (i.e., the anterior trachea tube) to the sniff connector tubing (which itself is already connected to the longer piece of sniff tubing). Then connect the other end of the sniff tubing to the Y-connector, with the other ends attaching to two short pieces of Tygon tubing with I.D. of 1/16”. Connect one of these split-pieces to the NC (Normally Closed) port of a three way Cole-Parmer solenoid valve. Then connect the COMM (Common) port of the valve to the vacuum line. The other piece split off from the Y-connector will connect to the pressure sensor. See Figure 3A for a schematic of these connections. Connect the sniff vacuum to a flow meter, set to allow for 300 ml/min flow rate (or half that if one naris is blocked).
Once all parts have been connected and the animal is stable, it is time to test and troubleshoot the connections. An electronic control system (pulse generator or computer control system) should be used to control inhalation timing, and an oscilloscope or data acquisition system used to monitor pressure transients. The system should be able to drive the 3-way valve at frequencies of 8 Hz or more, and with varying duration of inhalations. We typically use inhalations of 125-150 msec. When the sniff trachea tubing is in place and working correctly, the traces should roughly correspond to that seen at the top of Figure 3B. The upwardly-deflected curve depicts the pressure transient when activated, followed by a near-instantaneous release of the pressure. However, when the trachea tube is clogged or otherwise poorly positioned, the trace will look something like the bottom part of Figure 3B. This shows a connection that does not correctly draw in and release pressure. Often, simply shifting the position of the trachea tube slightly while the mouse is in situ will be enough to correct this problem. In rare circumstances, the mouse will need to be flipped over, and the tube readjusted in a brief corrective surgery.
Once troubleshooting has been completed and everything is in working order, the experiment can begin. At a maintenance of 0.25-0.5% isoflurane, the mouse should be stable for 8-10 h or more in this preparation.
Figure 1. Example trachea tubes.
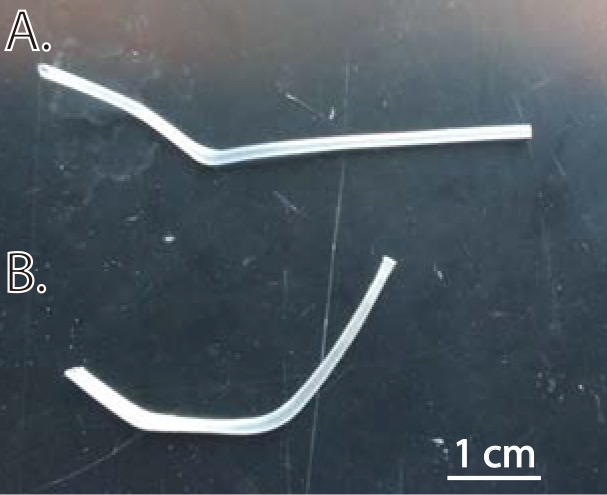
A. Breathing tube. The portion that inserts into the trachea (towards the left of the image) is slightly off-axis from the distal portion of the tubing; this ensures that the tubing apparatus that delivers oxygen is not sitting directly in front of the rostrum of the mouse, which is an inconvenient location. B. Sniff tube. The portion inserted into the trachea (towards the left of the image) is < 1 cm long, preventing it from reaching too far into the pharyngeal cavity.
Figure 2. Important steps in the surgical procedure.

Anterior is towards the top of the image in (A) through (E). A. Mouse on its back with hair completely removed from the throat and sternum region. B. Trachea cut from base of chin to top of sternum, approximately inch. C. Superficial fatty tissue deflected to either side, exposing the longitudinally-oriented throat musculature that immediately overlies the trachea. This exposed musculature must be carefully bisected with fine forceps. D. Exposed trachea with threads in place and incision made for the breathing tube. Note how the thread is below (posterior to) the tracheal cartilage that bounds the incision–once the breathing tube has been inserted, the knot can be tied so that this cartilage ring anchors the knot and keeps the tube in place. E. Neck region showing both trachea tubes in place and fasten securely in place with tight knots in the surgical thread. F. Completed surgery; the mouse is ready to be flipped onto its stomach. The previously-separated skin has been joined together using a small drop of Vetbond. G. Mouse right-side-up and freely breathing through the oxygen and isoflurane tubing apparatus. H. Detail of the oxygen delivery T-tubing. The breathing tube of the mouse inserts far enough into the T-connector to bypass the junction itself, which is where the vacuum line inserts.
Figure 3. Artificial sniff apparatus and example sniff traces.

A. Connections for the artificial sniff apparatus. The trachea and sniff pressure sensor are connected, via a Y-connector, to the NC port of a 3-way solenoid. The vacuum line is connected to the COMM port. Control software is used to drive the switching of the solenoid such that each sniff signal opens the NC port, making a temporary connection with the vacuum line and creating the negative pressure “sniff.” B. Schematics of sniff traces. A suitable sniff trace is shown at top, while a poor trace (showing a clog) is represented on the bottom.
Acknowledgments
We thank members of the Wachowiak laboratory, past and present, for improving on this technique over the years and for continuing to use it in many applications. We acknowledge funding support from several grants from the NIH, most recently R01DC006441 and R01DC013076 to MW and F32DC015389 to TPE.
Competing interests
We declare no conflict of interest or competing interests.
Ethics
All procedures have been approved by the Institutional Animal Care and Use Committee (IACUC) at the University of Utah (most recent IACUC approval #16-06018).
Citation
Readers should cite both the Bio-protocol article and the original research article where this protocol was used.
References
- 1. Bathellier B., Buhl D. L., Accolla R. and Carleton A.(2008). Dynamic ensemble odor coding in the mammalian olfactory bulb: sensory information at different timescales. Neuron 57(4): 586-598. [DOI] [PubMed] [Google Scholar]
- 2. Economo M. N., Hansen K. R. and Wachowiak M.(2016). Control of mitral/tufted cell output by selective inhibition among olfactory bulb glomeruli. Neuron 91(2): 397-411. [DOI] [PMC free article] [PubMed] [Google Scholar]
- 3. Rothermel M., Carey R. M., Puche A., Shipley M. T. and Wachowiak M.(2014). Cholinergic inputs from basal forebrain add an excitatory bias to odor coding in the olfactory bulb. J Neurosci 34(13): 4654-4664. [DOI] [PMC free article] [PubMed] [Google Scholar]
- 4. Sobel E. C. and Tank D. W.(1993). Timing of odor stimulation does not alter patterning of olfactory bulb unit activity in freely breathing rats. J Neurophysiol 69(4): 1331-1337. [DOI] [PubMed] [Google Scholar]
- 5. Spors H., Wachowiak M., Cohen L. B. and Friedrich R. W.(2006). Temporal dynamics and latency patterns of receptor neuron input to the olfactory bulb. J Neurosci 26(4): 1247-1259. [DOI] [PMC free article] [PubMed] [Google Scholar]
- 6. Vučinić D., Cohen L. B. and Kosmidis E. K.(2006). Interglomerular center-surround inhibition shapes odorant-evoked input to the mouse olfactory bulb in vivo . J Neurophysiol 95(3): 1881-1887. [DOI] [PubMed] [Google Scholar]
- 7. Wachowiak M. and Cohen L. B.(2001). Representation of odorants by receptor neuron input to the mouse olfactory bulb. Neuron 32(4): 723-735. [DOI] [PubMed] [Google Scholar]
- 8. Wachowiak M., Economo M. N., Diaz-Quesada M., Brunert D., Wesson D. W., White J. A. and Rothermel M.(2013). Optical dissection of odor information processing in vivo using GCaMPs expressed in specified cell types of the olfactory bulb . J Neurosci 33(12): 5285-5300. [DOI] [PMC free article] [PubMed] [Google Scholar]