Overview
Introduction
A relapsed idiopathic clubfoot can be effectively treated with transfer of the entire tibialis anterior tendon to the mid-dorsum of the foot following repeated manipulations and serial casts.
Step 1: Preoperative Planning
Ensure that the foot has been adequately corrected for tendon transfer by performing both clinical and radiographic evaluation.
Step 2: Prepare the Patient
Position the patient supine, induce general anesthesia, and perform a caudal block for postoperative pain management.
Step 3: Identify and Release the Tibialis Anterior Tendon from Its Insertion
Identify the tibialis anterior tendon and release its insertion on the medial cuneiform and first metatarsal bones.
Step 4: Prepare the Tendon and Surrounding Tissues for Transfer
Release obstructing tissues and prepare the freed tendon for lateral transfer to the mid-dorsum of the foot.
Step 5: Prepare the Lateral Cuneiform for Tendon Transfer and Fixation
Identify the lateral cuneiform with fluoroscopy and prepare it for transfer of the tibialis anterior tendon.
Step 6: Transfer and Secure the Tendon
Make a subcutaneous path, transfer the tendon, and secure it in the osseous tunnel of the lateral cuneiform.
Step 7: Postoperative Care
We apply a long leg cast and restrict patients to non-weight-bearing for six weeks.
Results
The tibialis anterior tendon transfer has been used to treat relapsing idiopathic clubfoot with great success for more than fifty years.
Introduction
A relapsed idiopathic clubfoot can be effectively treated with transfer of the entire tibialis anterior tendon to the mid-dorsum of the foot following repeated manipulations and serial casts.
It has been reported that 7% to 56% of patients have a relapse of the deformity after initial treatment of idiopathic clubfoot with the Ponseti method of serial manipulations and casts1,2. Relapse is identified by a dynamic supination deformity during walking and progressive heel varus malalignment. In a patient with a relapsed idiopathic clubfoot, the correction obtained by repeated manipulation and serial casts is effectively maintained by transfer of the entire tibialis anterior tendon to the mid-dorsum of the foot as originally described by Garceau in 1940 and later modified by Ponseti1,3,4. This procedure is effectively performed in children between the ages of two and six years (the age range in which relapse typically occurs) and adequately corrects the muscle imbalance of the foot to prevent another relapse of deformity5,6.
The entire tibialis anterior tendon is transferred from its native insertion on the medial cuneiform and first metatarsal to the lateral cuneiform through a two-incision approach. The inferior extensor retinaculum is typically left intact as the tendon is passed beneath it in order to prevent bowstringing. After preparation with a Bunnell-type stitch7 using nonabsorbable suture, the tendon is passed through an osseous tunnel drilled through the lateral cuneiform. The tendon is secured to the mid-dorsum of the foot by tying the suture over a foam square and plastic button on the plantar aspect of the foot. The foot should be held in dorsiflexion during tensioning and tying of the tendon into place. The tendon transfer is protected with a long leg cast for six weeks postoperatively (Video 1).
Video 1.
Tibialis anterior tendon transfer.
Step 1: Preoperative Planning
Ensure that the foot has been adequately corrected for tendon transfer by performing both clinical and radiographic evaluation.
Treatment with serial manipulations and casts is essential to correct forefoot adduction, supination, cavovarus, and hindfoot equinus deformities preoperatively.
Consider obtaining preoperative standing anteroposterior and lateral radiographs to confirm the presence of a lateral cuneiform ossific nucleus. This is typically present by the age of 2.5 years.
Ensure that forefoot adduction is corrected on an anteroposterior radiograph and that cavovarus and hindfoot equinus deformities are corrected on a lateral radiograph.
The foot must be corrected and flexible prior to tendon transfer as even a few degrees of rigid equinus may result in a failed operation. In the case of resistant residual equinus, Achilles tenotomy or lengthening at the time of the tibialis anterior tendon transfer may be of paramount importance.
Step 2: Prepare the Patient
Position the patient supine, induce general anesthesia, and perform a caudal block for postoperative pain management.
Position the patient supine on a radiolucent table, and have the anesthesia team induce general anesthesia. Our preference is to also perform a caudal block for postoperative pain management.
Place a tourniquet on the thigh, clean the involved leg, and prepare it to the mid-thigh level.
Step 3: Identify and Release the Tibialis Anterior Tendon from Its Insertion
Identify the tibialis anterior tendon and release its insertion on the medial cuneiform and first metatarsal bones.
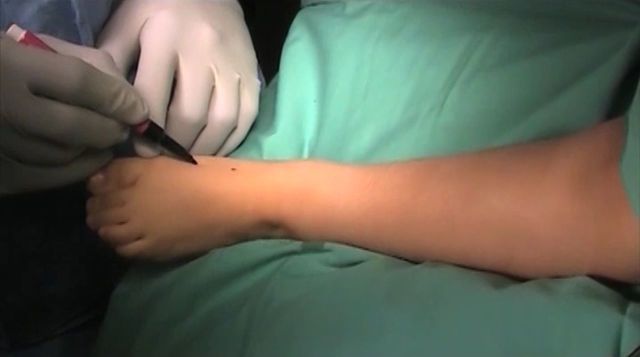
Palpate the tibialis anterior tendon on the dorsum of the foot, and make a 2-cm longitudinal incision slightly distal to where the tendon can be palpated (Fig. 1).
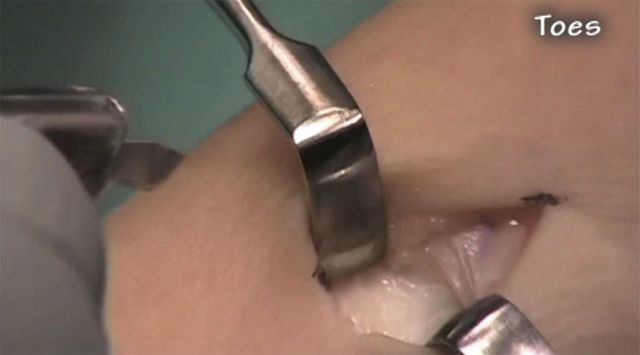
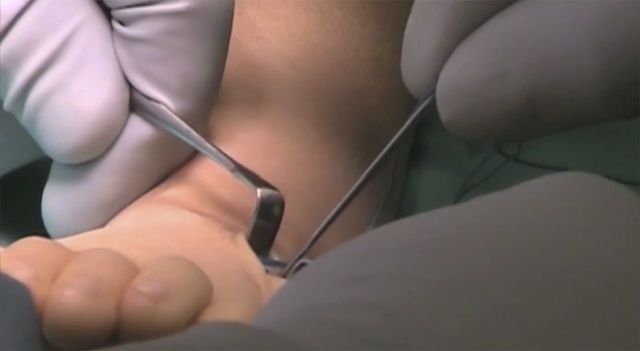
Carry the dissection sharply through the skin and subcutaneous tissue. Typically, a moderately sized vein is encountered in the subcutaneous tissue near the distal aspect of the incision. Retract and preserve this vein throughout the dissection (Fig. 2).
Once you identify the tibialis anterior tendon sheath, incise it in line with the tendon fibers.
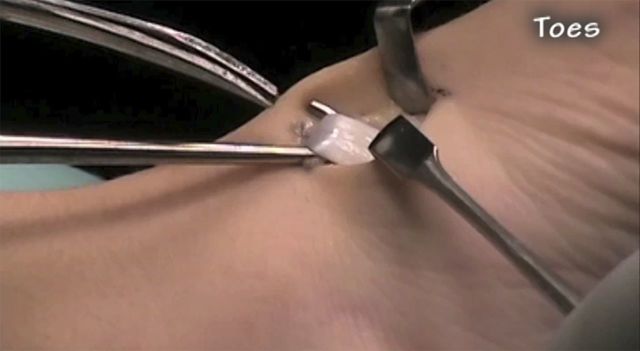
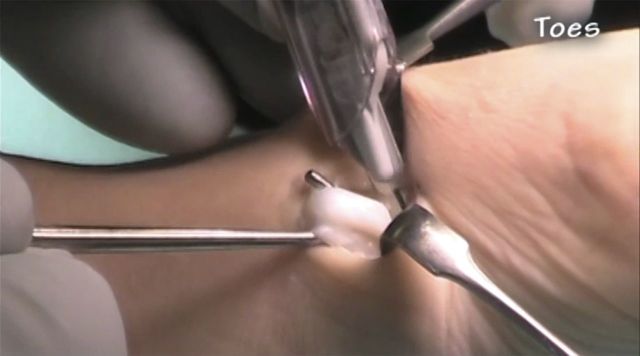
Circumferentially dissect the tendon and isolate it with a Graham hook (Fig. 3). While maintaining tension with the Graham hook, elevate the tendon with a number-15-blade scalpel, releasing the tendon from proximal to distal (Fig. 4). Take care to preserve as much tendon length as possible to aid in transfer without causing unnecessary damage to the underlying periosteum, cartilage, or bone, which may lead to later deformity (Fig. 5).
Maintain the scalpel in a position nearly parallel with the periosteal and bone surface while releasing the tendon from its deep surface, working from proximal to distal. This will prevent you from cutting deeply into the cartilage and bone and outside the zone of the tendon insertion. Additional tendon length can be obtained by releasing the tendon as it extends around the medial border and even slightly onto the plantar surface of the foot.
Fig. 1.
Photograph demonstrating the typical incision overlying the tibialis anterior tendon insertion.
Fig. 2.
Photograph showing the vein commonly encountered during exposure of the tibialis anterior tendon.
Fig. 3.
Photograph demonstrating 360° isolation of the tibialis anterior tendon with a Graham hook.
Fig. 4.
Photograph showing sharp release of the tibialis anterior tendon at its insertion, without damaging the associated periosteum and underlying cartilage or bone.
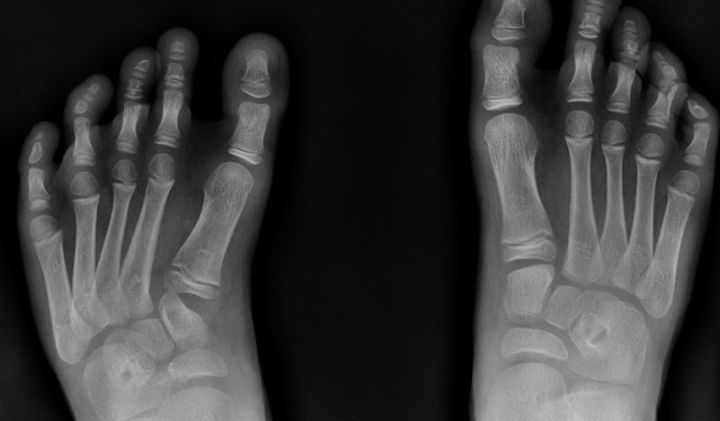
Fig. 5.
Radiographs made after bilateral tibialis anterior tendon transfer. The radiograph on the left demonstrates deformity of the medial cuneiform, which is believed to be the result of damage to the periosteum and/or bone at the time of tendon harvest.
Step 4: Prepare the Tendon and Surrounding Tissues for Transfer
Release obstructing tissues and prepare the freed tendon for lateral transfer to the mid-dorsum of the foot.
Use tenotomy scissors to free the tendon and release the vincula found at the proximal aspect of the tendon.
Although not typically required, cautious release of 1 to 2 mm of the distalmost edge of the inferior extensor retinaculum may be performed to help prevent kinking of the tendon as it exits the retinaculum during lateral mobilization. Do not completely release the retinaculum as this will lead to bowstringing of the tendon after transfer.
We prepare the tendon using a strong nonresorbable suture, Keith needles, and a Bunnell-type stitch to weave through the distal 2 to 3 cm7. In this way, the suture can be removed without difficulty at the time of button removal. Others routinely use an absorbable suture and Krackow-type stitch, which may help to prevent bunching of the tendon’s end as it is passed through the drill-hole. These sutures do not require removal.
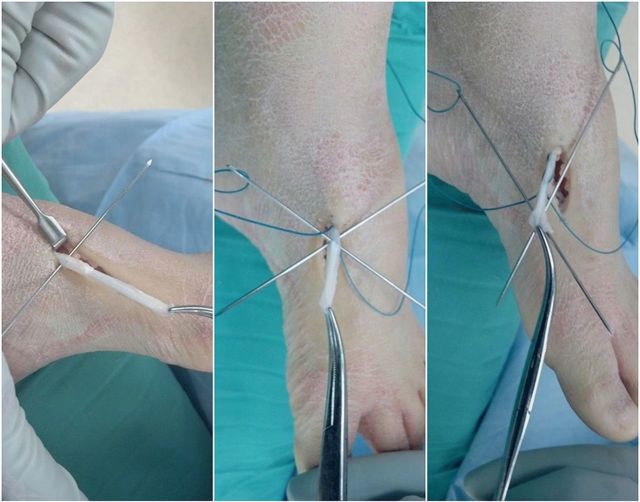
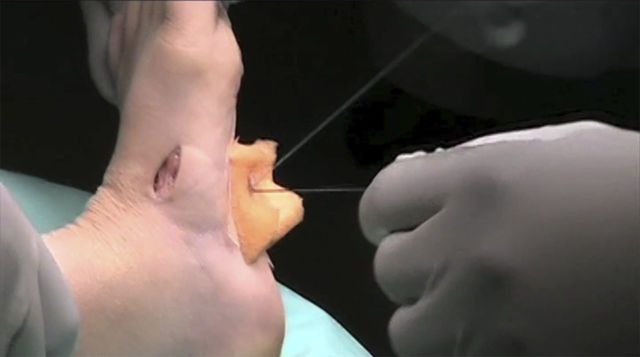
Take care to pass both needles concurrently before pulling the sutures through to prevent cutting the previously passed suture inadvertently with the needle’s tip (Fig. 6).
Fig. 6.
Photographs illustrating the Bunnell-type stitch of the released tendon. Note the use of two needles simultaneously to prevent the tip of the needle from cutting the previously placed stitch.
Step 5: Prepare the Lateral Cuneiform for Tendon Transfer and Fixation
Identify the lateral cuneiform with fluoroscopy and prepare it for transfer of the tibialis anterior tendon.
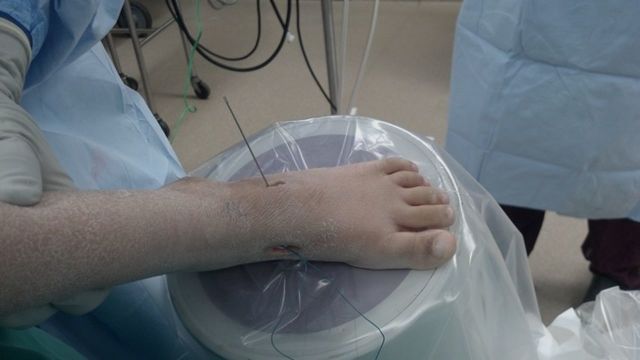
Using fluoroscopy, identify the center of the lateral cuneiform (Fig. 7), which is typically in line with the third metatarsal (Fig. 8). Use of fluoroscopy to confirm appropriate positioning may allow for a smaller incision, less soft-tissue dissection, and greater confidence in tunnel positioning.
Make a 1-cm incision in the skin overlying the dorsal aspect of the lateral cuneiform.
Retract the extensor digitorum longus tendons and extensor digitorum brevis muscle bellies medially and carry the exposure down to the periosteum of the lateral cuneiform.
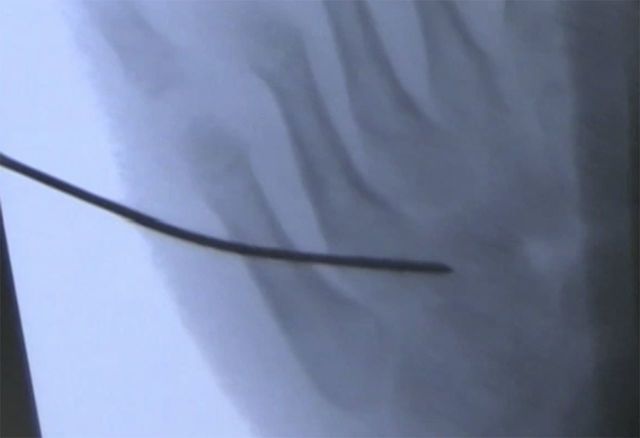
Once adequate exposure is completed, place a Keith needle in the center of the cuneiform and confirm its position with fluoroscopy (Fig. 9).
Make a drill-hole in the center of the lateral cuneiform, ensuring that the drill-hole does not violate any of the surrounding joints. We use a 4.8-mm handheld drill to improve the tactile sense of penetrating the cartilaginous bone and periosteum of the plantar cortex in young children (Fig. 10). This helps to prevent undue damage to the plantar nerves. Aim the tunnel trajectory at the middle of the plantar aspect of the foot to minimize the potential for injury to plantar nerves8. A power drill may also be used to create the osseous tunnel as some surgeons believe that this is more precise and allows better control of the trajectory. In either case, use caution to ensure that the plantar soft tissues are not violated to avoid plantar nerve injury.
Remove loose bone and cartilage with a curet. Make a cruciate-type incision in the surrounding periosteum and remove loose periosteum to aid in the passage of the tendon.
Alternatively, a distally-based perichondral flap can be made and sewn to the transferred tendon as an additional anchoring stitch.
Fig. 7.
Photograph showing intraoperative use of fluoroscopy to confirm the location of the lateral cuneiform.
Fig. 8.
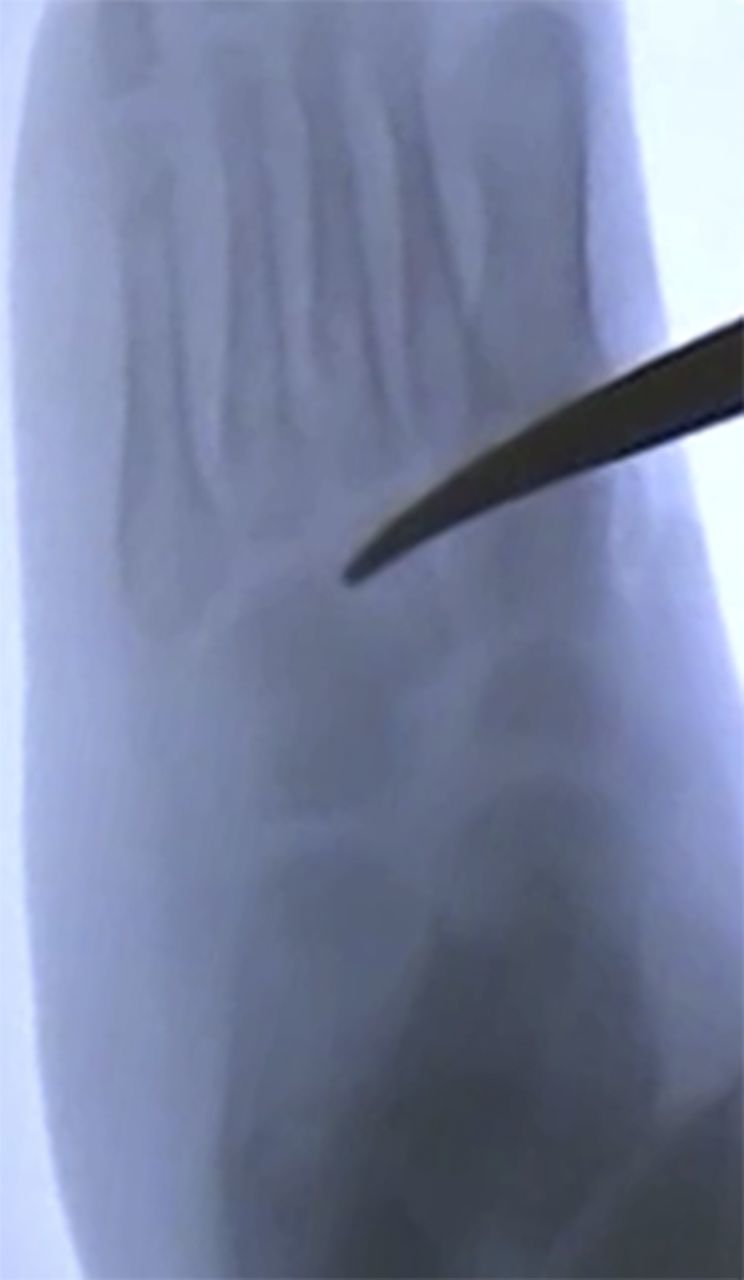
Intraoperative fluoroscopic image confirming the position of the lateral cuneiform.
Fig. 9.
Intraoperative fluoroscopic image confirming the position of the Keith needle in the lateral cuneiform prior to drilling of the osseous tunnel.
Fig. 10.
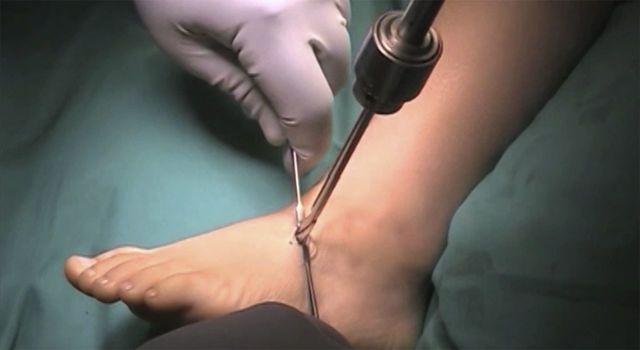
Photograph demonstrating use of a handheld drill to create the osseous tunnel in the lateral cuneiform.
Step 6: Transfer and Secure the Tendon
Make a subcutaneous path, transfer the tendon, and secure it in the osseous tunnel of the lateral cuneiform.
Use a blunt hemostat to create a subcutaneous path from the lateral incision to the medial wound. Retrieve the sutures of the prepared tibialis anterior tendon and pull them through to the lateral aspect of the foot. Take care to ensure that the tendon follows a smooth straight path across the ankle and is not tethered as it exits the inferior retinaculum. Tethering vincula and other tissues can be carefully released.
Thread the suture ends back onto Keith needles and then pass them through the osseous tunnel of the lateral cuneiform and partially out the plantar surface of the foot, aiming toward the middle of the plantar aspect of the foot to avoid injury to the plantar nerves (Fig. 11).
Pass a piece of non-stick gauze, a small foam square cut from a prep sponge, and a plastic button over the two needles. Then pull the needles and suture completely through the skin and the button (Fig. 12).
With the foot held in maximal abduction and moderate dorsiflexion, tension the suture and tie it over the button. We find that using a foam square instead of another, less bulky padding (e.g., 2 × 2-in gauze pad, felt pad, etc.) helps to prevent excessive tension and subsequent skin necrosis.
If <10° of dorsiflexion is obtained, perform a percutaneous Achilles tenotomy prior to suture tensioning.
Alternative fixation options, including use of a bioabsorbable interference screw as a single fixation method or in combination with a button, have been reported9-11.
Fig. 11.
Photograph illustrating the passing of the sutures and tendon through the osseous tunnel and out the plantar aspect of the foot with Keith needles.
Fig. 12.
Photograph demonstrating the tendon fixation technique with sutures tied over non-stick gauze, foam, and a button on the plantar aspect of the foot. The foot and ankle are held in maximal abduction and moderate dorsiflexion during suture tensioning.
Step 7: Postoperative Care
We apply a long leg cast and restrict patients to non-weight-bearing for six weeks.
We apply a long leg cast and instruct patients to remain non-weight-bearing for six weeks postoperatively. After this immobilization period, the cast, suture, and button are removed and the patients are allowed to advance their activity as tolerated without additional bracing or restriction.
Other providers have found acceptable results using a short leg cast and allowing weight-bearing in the immediate postoperative period without evidence of tendon pullout or suture breakage.
Results
The tibialis anterior tendon transfer has been used to treat relapsing idiopathic clubfoot with great success for more than fifty years1,3,4. It effectively maintains the positioning obtained with repeated manipulations and casts and prevents the dynamic supination deformity commonly seen in relapsing clubfoot. Typically, the foot remains plantigrade, painless, and well aligned with good mobility into the fifth decade of life6. The tendon transfer and concomitant percutaneous Achilles tendon lengthening are characteristically the only operative procedures required for relapsing idiopathic clubfoot. Patients in whom this procedure is performed can expect to have a well-functioning foot with no more pain, difficulty with walking, or medication use than patients who do not undergo a tendon transfer.
Although clinical and biomechanical studies have suggested that performing a split tendon transfer beneath the retinaculum or moving the transferred tendon (full or split) over the retinaculum may provide similar functional effectiveness12,13, we prefer to transfer the entire tendon in its native position beneath the retinaculum. Very good functional and cosmetic results have been repeatedly demonstrated with that technique. Proponents of a split tendon transfer cite overcorrection as a possible negative outcome after full tendon transfer12,13, but we did not find this in patients with up to fifty years of follow-up6.
What to Watch For
Indications
Relapsed idiopathic clubfoot deformity, most commonly involving a relapse of dynamic supination during walking and progressive heel varus malalignment. Tendon transfer should be performed at the time of relapse, which is most commonly seen in children two to six years of age.
The function of the tendon transfer is to restore muscle balance to the foot as the tibialis anterior muscle in idiopathic clubfeet is typically normal while the peroneal muscles are weak. Transferring the tibialis anterior to the mid-dorsum of the foot restores balance and prevents dynamic supination produced by its native medial insertion13.
Contraindications
The function of the tendon transfer is not to provide correction; rather, it is to maintain correction that has been previously obtained. Thus, ensure that the clubfoot deformity has been fully corrected with repeated manipulations and casts prior to tendon transfer. This can be confirmed with clinical examination and standing anteroposterior and lateral radiographs.
Patients with neuromuscular disease or other causes of tibialis anterior muscle weakness should not be considered for the procedure in isolation. For these patients, procedures including plantar fasciotomy, peroneus longus-to-brevis transfer, tibialis posterior tendon transfer, or bone osteotomies should be considered with or without an associated tibialis anterior tendon transfer14. In the uncommon setting of joint contractures or osseous deformity, isolated tibialis anterior tendon transfer with associated Achilles tenotomy/lengthening are often inadequate and should be performed in conjunction with additional procedures aimed at correcting the concomitant deformities.
Pitfalls & Challenges
Ensure that the tendon is released at its distalmost insertion without involving the associated periosteum and underlying cartilage and bone.
Excessive release of the inferior extensor retinaculum can result in bowstringing of the tendon after transfer.
While preparing the bone tunnel of the lateral cuneiform, aim the drill and subsequent needle passage toward the middle of the plantar aspect of the foot to avoid unnecessary injury to the plantar nerves. Use of blunt needles has also been recommended to prevent neurovascular injury8.
Transferring the tendon to the cuboid or base of the fifth metatarsal often results in overcorrection and should be avoided3,15.
Clinical Comments
We believe that transfer of the tibialis anterior tendon to the lateral cuneiform provides an appropriate balance of dorsiflexion and foot eversion postoperatively. This is supported by the biomechanical studies by Hui et al., who concluded that the ideal insertion site of a complete tibialis anterior tendon transfer is the third metatarsal axis13.
We have found that using a handheld drill provides improved tactile sense and limits undesirable injury to surrounding soft tissues, including plantar nerves.
Clinical and radiographic examination typically provides adequate assessment of muscle strength and function and deformity correction prior to tendon transfer. However, in cases of more severe muscle imbalance or questionable neuromuscular etiology, gait analysis and dynamic electrophysiologic testing may be helpful in detecting muscle or nerve dysfunction.
Footnotes
Based on an original article: J Bone Joint Surg Am. 2015 Jan 7;97(1):47-55.
Disclosure: None of the authors received payments or services, either directly or indirectly (i.e., via his or her institution), from a third party in support of any aspect of this work. None of the authors, or their institution(s), have had any financial relationship, in the thirty-six months prior to submission of this work, with any entity in the biomedical arena that could be perceived to influence or have the potential to influence what is written in this work. Also, no author has had any other relationships, or has engaged in any other activities, that could be perceived to influence or have the potential to influence what is written in this work. The complete Disclosures of Potential Conflicts of Interest submitted by authors are always provided with the online version of the article.
References
- 1.Ponseti IV, Smoley EN. Congenital club foot: the results of treatment. J Bone Joint Surg Am. 1963;45(2):261-5. [Google Scholar]
- 2.Dobbs MB, Rudzki JR, Purcell DB, Walton T, Porter KR, Gurnett CA. Factors predictive of outcome after use of the Ponseti method for the treatment of idiopathic clubfeet. J Bone Joint Surg Am. 2004. January;86-A(1):22-7. [DOI] [PubMed] [Google Scholar]
- 3.Garceau GJ. Anterior tibial tendon transposition in recurrent congenital club-foot. J Bone Joint Surg Am. 1940;22:932-6. [PubMed] [Google Scholar]
- 4.Ponseti IV. Congenital clubfoot: fundamentals of treatment. New York, NY: Oxford University Press; 1996. p 84. [Google Scholar]
- 5.Ezra E, Hayek S, Gilai AN, Khermosh O, Wientroub S. Tibialis anterior tendon transfer for residual dynamic supination deformity in treated club feet. J Pediatr Orthop B. 2000. June;9(3):207-11. [DOI] [PubMed] [Google Scholar]
- 6.Holt JB, Oji DE, Yack HJ, Morcuende JA. Long-term results of tibialis anterior tendon transfer for relapsed idiopathic clubfoot treated with the Ponseti method: a follow-up of thirty-seven to fifty-five years. J Bone Joint Surg Am. 2015. January 7;97(1):47-55. [DOI] [PubMed] [Google Scholar]
- 7.Bunnell S. Repair of tendons in the fingers and description of two new instruments. Gynecol Obstet (Paris). 1918;26:103-10. [Google Scholar]
- 8.Radler C, Gourdine-Shaw MC, Herzenberg JE. Nerve structures at risk in the plantar side of the foot during anterior tibial tendon transfer: a cadaver study. J Bone Joint Surg Am. 2012. February 15;94(4):349-55. [DOI] [PubMed] [Google Scholar]
- 9.Fuller DA, McCarthy JJ, Keenan MA. The use of the absorbable interference screw for a split anterior tibial tendon (SPLATT) transfer procedure. Orthopedics. 2004. April;27(4):372-4. [DOI] [PubMed] [Google Scholar]
- 10.Wu KW, Huang SC, Kuo KN, Wang TM. The use of bioabsorbable screw in a split anterior tibial tendon transfer: a preliminary result. J Pediatr Orthop B. 2009. March;18(2):69-72. [DOI] [PubMed] [Google Scholar]
- 11.Jindal G, Lamm BM, Herzenberg JE. Tibialis anterior tendon transfer for relapsed clubfoot after treatment with Ponseti method. In: Agrawal RA, Pandey S, editors. Step by step management of clubfoot by Ponseti technique. 5th ed New Delhi, India: Jaypee Brothers Medical Publishers; 2007. p 154-72. [Google Scholar]
- 12.Kuo KN, Hennigan SP, Hastings ME. Anterior tibial tendon transfer in residual dynamic clubfoot deformity. J Pediatr Orthop. 2001. Jan-Feb;21(1):35-41. [DOI] [PubMed] [Google Scholar]
- 13.Hui JH, Goh JC, Lee EH. Biomechanical study of tibialis anterior tendon transfer. Clin Orthop Relat Res. 1998. April;(349):249-55. [DOI] [PubMed] [Google Scholar]
- 14.Lovell ME, Morcuende JA. Neuromuscular disease as the cause of late clubfoot relapses: report of 4 cases. Iowa Orthop J. 2007;27:82-4. [PMC free article] [PubMed] [Google Scholar]
- 15.Feldbrin Z, Gilai AN, Ezra E, Khermosh O, Kramer U, Wientroub S. Muscle imbalance in the aetiology of idiopathic club foot. An electromyographic study. J Bone Joint Surg Br. 1995. July;77(4):596-601. [PubMed] [Google Scholar]


