Abstract
Rapid development of 3D printing techniques has led to the design of navigation templates to assist with accurate insertion of pedicle screws in last decades. However, there are still without the precise step-by-step methods to design 3D navigation templates from computed tomography (CT) images. Our present article provides a detailed protocol to allow the readers or researchers to obtain the 3D navigation template easily, and assist with pedicle screw insertion in their future research and surgery. Using 3D navigation template-assisted pedicle screw fixation in spine surgery is low cost and can decrease the radiation exposure to both patients and surgeons.
Keywords: Navigation template, three-dimensional print (3D print), radiation exposure
Introduction
Pedicle screw fixation is the common internal fixation method in spine surgery because of its excellent biomechanical properties (1-3). Some surgeons use free hand to choose the entry point and trajectory of the pedicle screw. However, complications due to screw misplacement, such as nerve root injury, dural sac injury, and spine cord injury, are still reported, especial in cervical and upper thoracic spine (4,5).
To achieve an optimal screw trajectory, multiple intra-operative X-ray images have been used to guide screw trajectory, which will increase the radiation exposure of both surgeons and patients and prolong the operation time (6,7). In recent years, the development of 3D printing technique allows us to design the navigation templates to assist with accurate insertion of pedicle screws (8,9). The design of navigation template is dependent on the surface that is extracted from the posterior features of the osseous spine.
However, there are still limited reports regarding the introduction of step-by-step protocol that to guide researchers or surgeons to design such 3D navigation templates. In this study, we provide a detailed protocol to allow the readers or researchers to design 3D navigation template, which help them to obtain the accurate insertion of pedicle screws.
Step-by-step approach of the target spine model
Firstly, the research should be approved by researchers’ institutional ethics review board (IRB) and a written informed consent should be obtained from participants. The data from thin-layer CT scans of the target spine is saved in format of DICOM. It is necessary to install Mimics and 3-Matic software on your computer;
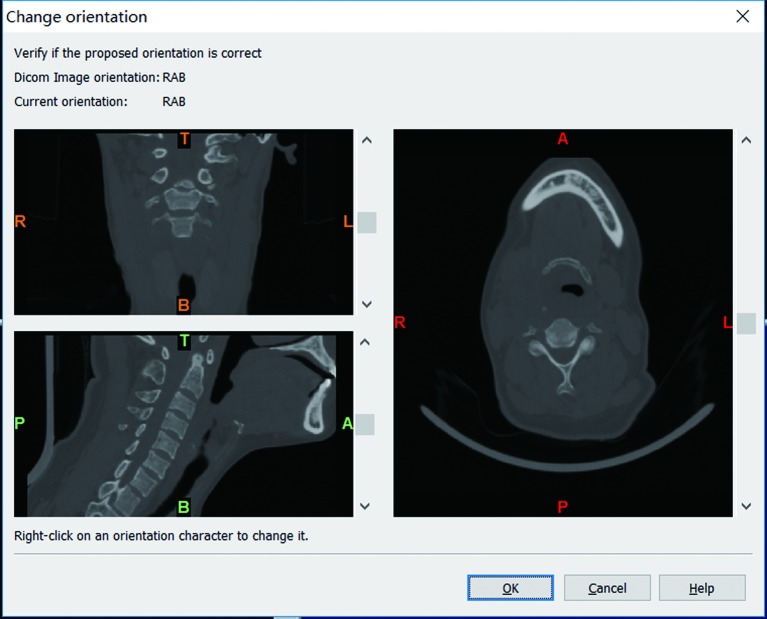
The steps of obtain 3D reconstruction of spine model is similar to our previous article (10). Firstly, open the software of Mimics. Click the left upper corner button: “File”, and choose the “New project wizard”, then, select the DICOM data which you want to use for 3D reconstruction, click the “Next”, the data will be imported into the software, click “Convert” at this time, the DICOM data software will be converted to the Figure 1;
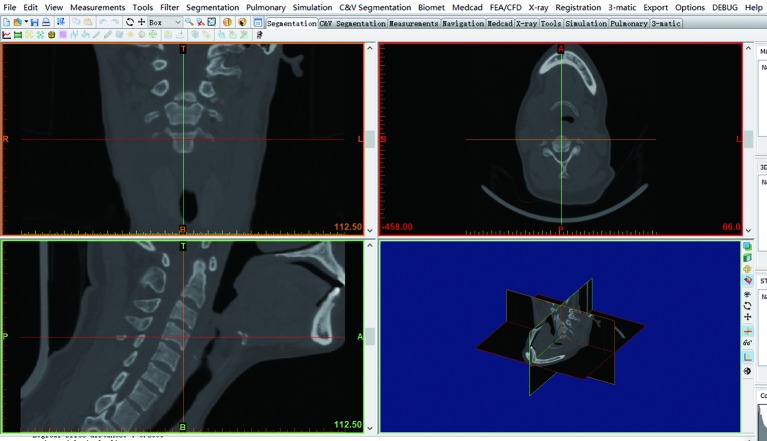
Then, your need to confirm the orientation character, T, B, A, P, L and R represents to top, bottom, anterior, posterior, left, and right, respectively, click the button “OK”, it will go to the interface as Figure 2;
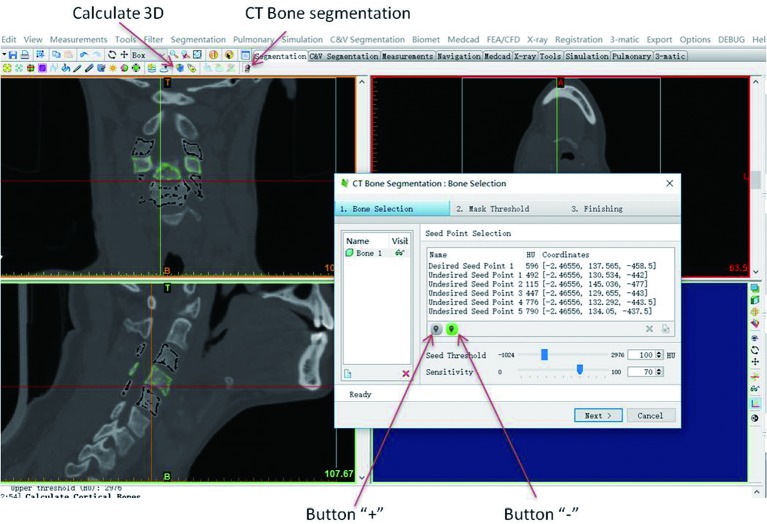
Click the button “CT Bone segmentation”, the dialog box of Figure 3 will be displayed Click button “+” to choose the target segment and click the button “−” to choose adjacent segments. The target “New Mask” will be marked in green (Figure 3). Then, click the “Calculate 3D” button. The “Calculate 3D” dialog box displayed at this time. We can select the “Green” Mask and “Optimal” (one of the quality levels). And click on the “Calculate”, the software will calculate the 3D image automatically now (Figure 3), and after the 3D image reconstructed, the file can be saved in your local computer.
Figure 1.
DICOM data imported into Mimics software. T, B, A, P, L and R represent top, bottom, anterior, posterior, left, and right, respectively.
Figure 2.
Work interface of Mimics software after the DICOM data converted.
Figure 3.
Work interface of Mimics software that separate the C4 from original data by “CT bone segmentation”.
Step-by-step approach of uniting the screw trajectory and vertebrae
The above or previous saved 3D digital objects can be used at this stage. If a previous reconstructed 3D spine is chosen, firstly, open the Mimics software, then, click “File” (left upper corner), choose the “Open project” and find your previous reconstructed 3D spine, click “Open” to open it.
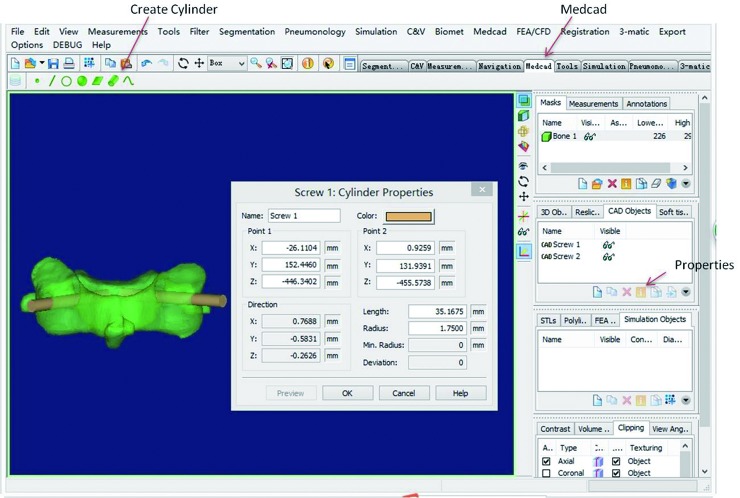
Then, we create two trajectories of pedicle screw on the target segment of 3D cervical object. And we choose “Create Cylinder” in the “Medcad” module (Figure 4), and move the cursor to a point of 3D object and click the left button of the mouse, this point is one of the ends of screw trajectory, then move the cursor to another point of 3D object and click the left button of the mouse, this point is the other the end of screw trajectory, the distance between above two points is the length of screw trajectory, to determine the radius, move the cursor to the side of the second point, and click the left button, the whole cylinder (screw trajectory) will be generated. Do it at other side again, and two screw trajectories will be created. You can drag one end of the trajectory adjust the screw trajectory;
To modify the properties of screw, select the created “cylinder”, then, click the “Properties” to display the “Cylinder properties” dialog box (Figure 4), the length, radius, and color can be changed. At present sample, we use the radius =1.75 mm. Confirm your parameter, and click “Ok”.
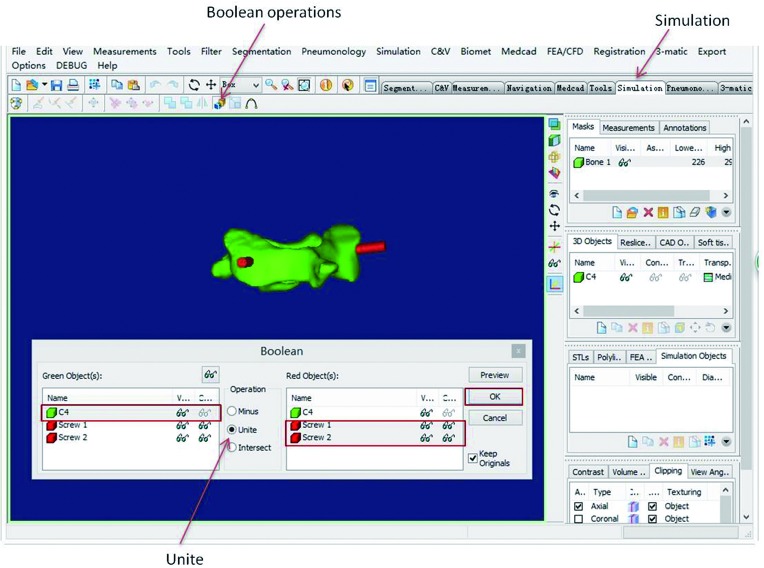
We choose the “simulation” module, select the “Boolean operations”. The dialog box will display (Figure 5), you can click “unite”, meanwhile, click cylinder in left interface and 3D object in right interface—at this time the united object of screw trajectories and vertebrae is created. You can export the “STL” format of the united object on your local computer.
Figure 4.
Cylinders were created to simulate the C4 pedicle screw trajectory.
Figure 5.
Using the Boolean operation to unite the C4 vertebrae and two pedicle screw trajectories.
Step-by-step approach of the spinal surgery template
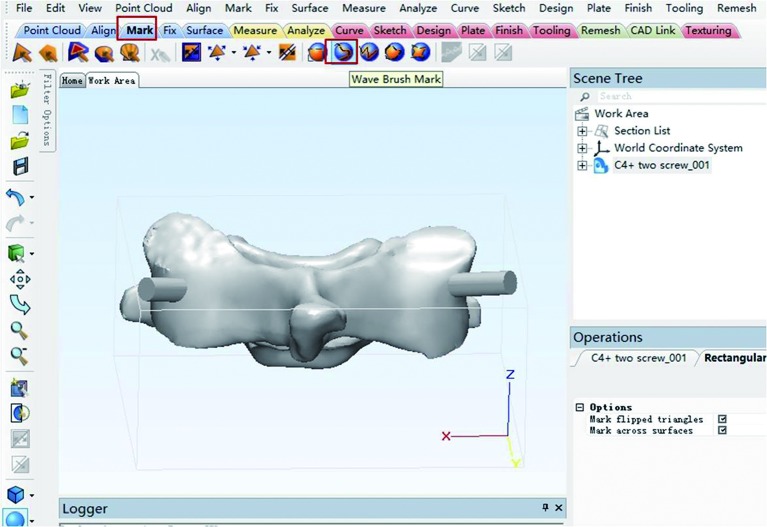
Open the 3-Matic software. Click the upper left corner button: File, import part, select your previous saved STL object (your object saved route), Next, Ok—the software will convert the STL data to Figure 6;
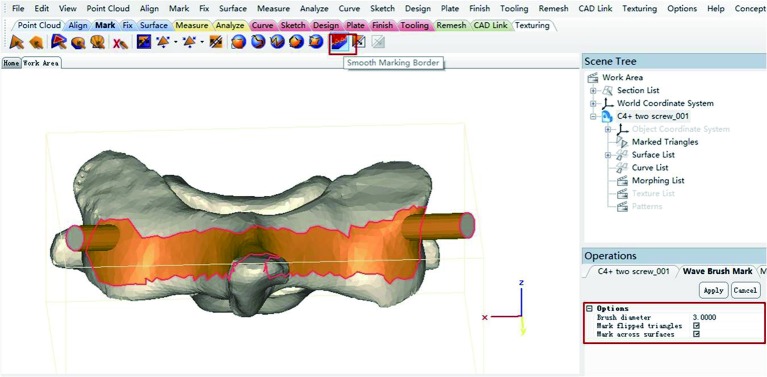
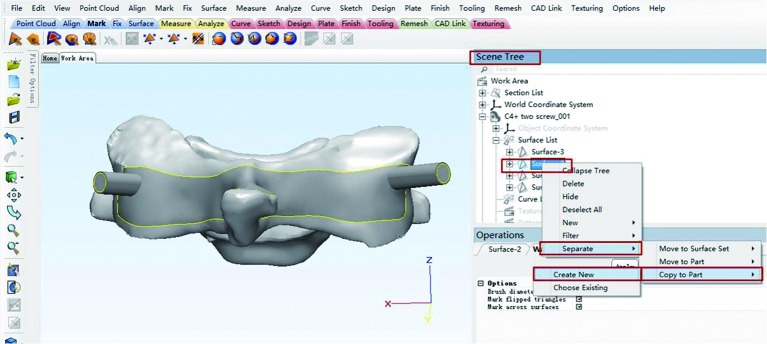
Next, we want to extract the posterior surface to create the navigation template. We click “Mark” module (Figure 6), select the “wave brush mark” to draw posterior surface to create the navigation template. The dialog box of “Operations” is located at the lower right corner (Figure 7), you can change the brush diameter according to your needs—if you want to reverse selection, “Ctrl + left click on your mouse” should be taken, then click “Smooth marking border” (Figure 7), the interfaces were generated. All of the surfaces were listed at the dialog box of “Scene Tree”, which is located at the top right corner, right click the “Surface-2” [here, the “surface-2”—at the “surface list” in “C4 + two screw_001 (the name of the object we labeled)”—is the posterior surface we will use to create the navigation template], select the “separate”, click “copy to part”, “create new” (Figure 8);
The new object will be listed at the “Scene tree”, and auto named as “C4 + two screw_001_001” (Figure 9). Now, we hide the primary object “C4 + two screw_001” (right click, and choose “hide”), and only show the new object of “C4 + two screw_001_001” (Figure 9);
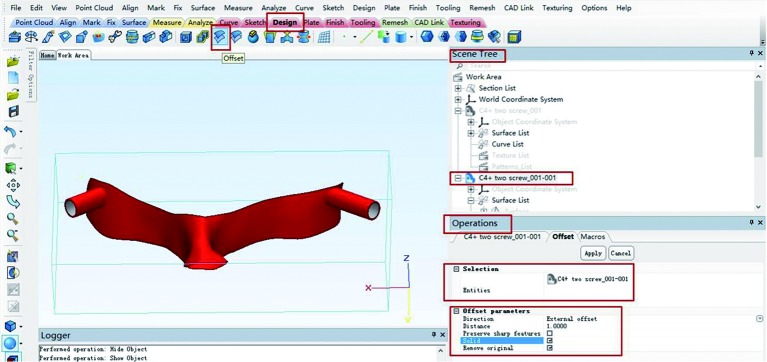
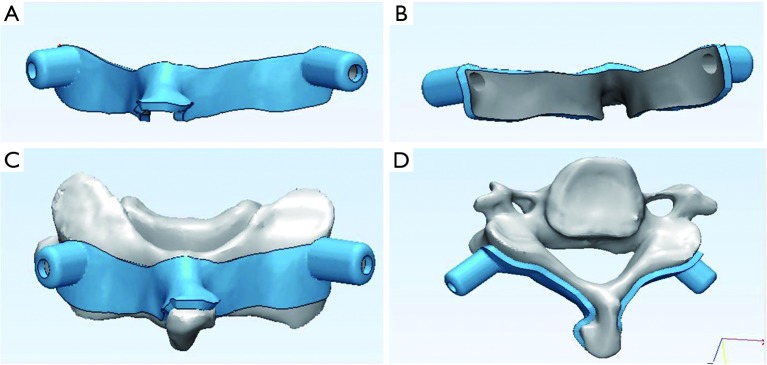
We click “Design” module (Figure 9), select the “Offset”, the dialog box of “Operations” is located at the lower right corner. Select the object of “C4 + two screw_001_001 in the “Entities”, select the “Solid” and “Remove original” buttons—you can input the thickness of your navigation template at the “distance” (here, we input the thickness =1 mm)—then click “Apply” to create a navigation template (Figure 10);
After creating the satisfactory navigation template, you can export it in format of STL, by choose the object, and click the left upper corner “File”, Choose “Export”, STL, the STL format of your aimed object will be saved at your local computer. Then, you can use it to print a 3D printing navigation template to guide the screw trajectory intra-operatively.
Figure 6.
The united object of the C4 vertebrae and two pedicle screw trajectories imported into 3-Matic to design the navigation template.
Figure 7.
The target posterior surface was marked in 3-Matic software.
Figure 8.
The target posterior surface was separated to create new object.
Figure 9.
The new object of target posterior surface was created and “Offset” function will be used to generate the navigation template.
Figure 10.
The final navigation template was generated and viewed at different vision.
Discussion
Pedicle screw-based spinal internal fixations are widely used in spine surgery (1,3,11). However, the complication of pedicle screw misplacement is concerning with the free-hand approach, especially in thoracic and cervical spine region. Winder et al. reported that a misplacement rate of thoracic pedicle screws is 14.67% (12). Amiot et al. reported that 7/100 patients in conventional pedicle screw installation technique group had postoperative neurologic deficits need reoperation, and computer-assisted can decrease the incidence of incorrectly positioned pedicle screws (13).
Although screw placement accuracy can be improved with computer-assisted navigation, this system is expensive and not widely available to all hospitals. The computer-assisted navigation system also has disadvantages of complex operation and inability to obtain the 3D image data and real-time computer reconstruction data (14,15).
In recent years, with the development of rapid prototyping technology, individualized 3D printing navigation templates for pedicle screw fixation have been designed and used in the spinal surgery (16), as well as the 3D custom printed implants (17).
The technique of navigation template for spine surgery was firstly introduced in 1998. They were fabricated by the milling machine and made of polycarbonate materials (18,19). Then, Lu et al. used Mimics and UG Imageware to rapid prototyping drill template for lumbar and cervical pedicle screw fixation (16,20). The designed templates accurately matched the posterior surface of lumbar vertebrae, and as a result, high accuracy of screw trajectory was achieved. This research was successfully performed on the thoracic vertebrae of cadavers (21) and scoliosis (22). All of the above studies showed navigation template provides the accuracy of screws placement.
The software used in the above studies may vary. Here, we provide a protocol which will allow readers easily and reliably to design the 3D navigation template. The software of Mimics and 3-Matic software were used to design a navigation template in present article. The procedure of 3D reconstruction of the target segmental spine and pedicle screw trajectory simulation is similar to the Chen et al. (10), and we use the forth cervical vertebrae in present article. The Mimics and 3-Matic is in one software suite and worldwide used amongst researchers, because of it can help them convenient obtain the 3D reconstructions and surgically-oriented design.
After follow the step-by-step approach in this article, one can easily obtain the 3D printed navigation template. It is not only used in pedicle screw fixation, this technique may also be used in cortical bone trajectory fixation (23,24), sacral screw fixation, sacral iliac screw fixation (25) and other special fixation (26,27) approaches too. There are also other alternative methods to achieve navigation templates. The reasons of us to provide this protocol are because of its simplicity, convenience, reliability and convenience in designing the 3D navigation template.
Acknowledgements
Funding: This work was supported by the National Natural Science Foundation of China (No. 81501933, 81572168, 81501905), Zhejiang Provincial Medical Technology Foundation of China (No. 2018KY129), Wenzhou Municipal Science and Technology Bureau (No. Y20170389), and Wenzhou Leading Talent Innovative Project (No. RX2016004).
Footnotes
Conflicts of Interest: The authors have no conflicts of interest to declare.
References
- 1.Suk SI, Kim JH, Kim SS, et al. Pedicle screw instrumentation in adolescent idiopathic scoliosis (AIS). Eur Spine J 2012;21:13-22. 10.1007/s00586-011-1986-0 [DOI] [PMC free article] [PubMed] [Google Scholar]
- 2.Schmidt R, Wilke HJ, Claes L, et al. Pedicle screws enhance primary stability in multilevel cervical corpectomies: biomechanical in vitro comparison of different implants including constrained and nonconstrained posterior instumentations. Spine 2003;28:1821-8. 10.1097/01.BRS.0000083287.23521.48 [DOI] [PubMed] [Google Scholar]
- 3.Chi YL, Hong RK, Xu HZ. A new design of internal fixation for scoliosis and its preliminary clinical application. Chin Med J (Engl) 1992;105:433-7. [PubMed] [Google Scholar]
- 4.Yoshihara H, Passias PG, Errico TJ. Screw-related complications in the subaxial cervical spine with the use of lateral mass versus cervical pedicle screws: a systematic review. Journal of Neurosurgery: Spine 2013;19:614-23. 10.3171/2013.8.SPINE13136 [DOI] [PubMed] [Google Scholar]
- 5.Yeom JS, Buchowski JM, Kim HJ, et al. Risk of vertebral artery injury: comparison between C1-C2 transarticular and C2 pedicle screws. Spine J 2013;13:775-85. 10.1016/j.spinee.2013.04.005 [DOI] [PubMed] [Google Scholar]
- 6.Rampersaud YR, Foley KT, Shen AC, et al. Radiation exposure to the spine surgeon during fluoroscopically assisted pedicle screw insertion. Spine 2000;25:2637-45. 10.1097/00007632-200010150-00016 [DOI] [PubMed] [Google Scholar]
- 7.Haque MU, Shufflebarger HL, O’Brien M, et al. Radiation exposure during pedicle screw placement in adolescent idiopathic scoliosis: is fluoroscopy safe? Spine 2006;31:2516-20. 10.1097/01.brs.0000238675.91612.2f [DOI] [PubMed] [Google Scholar]
- 8.Wilcox B, Mobbs RJ, Wu AM, et al. Systematic review of 3D printing in spinal surgery: the current state of play. J Spine Surg 2017;3:433-43. 10.21037/jss.2017.09.01 [DOI] [PMC free article] [PubMed] [Google Scholar]
- 9.Wu AM, Shao ZX, Wang JS, et al. The accuracy of a method for printing three-dimensional spinal models. PLoS One 2015;10:e0124291. 10.1371/journal.pone.0124291 [DOI] [PMC free article] [PubMed] [Google Scholar]
- 10.Chen D, Chen CH, Tang L, et al. Three-dimensional reconstructions in spine and screw trajectory simulation on 3D digital images: a step by step approach by using Mimics software. J Spine Surg 2017;3:650-6. 10.21037/jss.2017.10.09 [DOI] [PMC free article] [PubMed] [Google Scholar]
- 11.Ludwig SC, Kramer DL, Vaccaro AR, et al. Transpedicle screw fixation of the cervical spine. Clin Orthop Relat Res 1999:77-88. 10.1097/00003086-199902000-00009 [DOI] [PubMed] [Google Scholar]
- 12.Winder MJ, Gilhooly PM. Accuracy of minimally invasive percutaneous thoracolumbar pedicle screws using 2D fluoroscopy: a retrospective review through 3D CT analysis. J Spine Surg 2017;3:193-203. 10.21037/jss.2017.06.05 [DOI] [PMC free article] [PubMed] [Google Scholar]
- 13.Amiot LP, Lang K, Putzier M, et al. Comparative results between conventional and computer-assisted pedicle screw installation in the thoracic, lumbar, and sacral spine. Spine (Phila Pa 1976) 2000;25:606-14. 10.1097/00007632-200003010-00012 [DOI] [PubMed] [Google Scholar]
- 14.Hecht N, Kamphuis M, Czabanka M, et al. Accuracy and workflow of navigated spinal instrumentation with the mobile AIRO(®) CT scanner. Eur Spine J 2016;25:716-23. 10.1007/s00586-015-3814-4 [DOI] [PubMed] [Google Scholar]
- 15.Kovanda TJ, Ansari SF, Qaiser R, et al. Feasibility of CT-based intraoperative 3D stereotactic image-guided navigation in the upper cervical spine of children 10 years of age or younger: initial experience. J Neurosurg Pediatr 2015;16:590-8. 10.3171/2015.2.PEDS14556 [DOI] [PubMed] [Google Scholar]
- 16.Lu S, Xu YQ, Chen GP, et al. Efficacy and accuracy of a novel rapid prototyping drill template for cervical pedicle screw placement. Comput Aided Surg 2011;16:240-8. 10.3109/10929088.2011.605173 [DOI] [PubMed] [Google Scholar]
- 17.Phan K, Sgro A, Maharaj MM, et al. Application of a 3D custom printed patient specific spinal implant for C1/2 arthrodesis. J Spine Surg 2016;2:314-8. 10.21037/jss.2016.12.06 [DOI] [PMC free article] [PubMed] [Google Scholar]
- 18.Birnbaum K, Schkommodau E, Decker N, et al. Computer-assisted orthopedic surgery with individual templates and comparison to conventional operation method. Spine (Phila Pa 1976) 2001;26:365-70. 10.1097/00007632-200102150-00012 [DOI] [PubMed] [Google Scholar]
- 19.Radermacher K, Portheine F, Anton M, et al. Computer assisted orthopaedic surgery with image based individual templates. Clin Orthop Relat Res 1998:28-38. 10.1097/00003086-199809000-00005 [DOI] [PubMed] [Google Scholar]
- 20.Lu S, Xu YQ, Zhang YZ, et al. A novel computer-assisted drill guide template for lumbar pedicle screw placement: a cadaveric and clinical study. Int J Med Robot 2009;5:184-91. 10.1002/rcs.249 [DOI] [PubMed] [Google Scholar]
- 21.Ma T, Xu YQ, Cheng YB, et al. A novel computer-assisted drill guide template for thoracic pedicle screw placement: a cadaveric study. Arch Orthop Trauma Surg 2012;132:65-72. 10.1007/s00402-011-1383-5 [DOI] [PubMed] [Google Scholar]
- 22.Lu S, Zhang YZ, Wang Z, et al. Accuracy and efficacy of thoracic pedicle screws in scoliosis with patient-specific drill template. Med Biol Eng Comput 2012;50:751-8. 10.1007/s11517-012-0900-1 [DOI] [PubMed] [Google Scholar]
- 23.Chen D, Ni WF, Lin Y, et al. The Feasibility of cortical bone trajectory screw fixation for lower thoracic spine. AME Med J 2017;2:123 10.21037/amj.2017.08.09 [DOI] [Google Scholar]
- 24.Phan K, Ramachandran V, Tran TM, et al. Systematic review of cortical bone trajectory versus pedicle screw techniques for lumbosacral spine fusion. J Spine Surg 2017;3:679-88. 10.21037/jss.2017.11.03 [DOI] [PMC free article] [PubMed] [Google Scholar]
- 25.Wu AM, Chi YL, Ni WF, et al. The feasibility and radiological features of sacral alar iliac fixation in an adult population: a 3D imaging study. PeerJ 2016;4:e1587. 10.7717/peerj.1587 [DOI] [PMC free article] [PubMed] [Google Scholar]
- 26.Wu AM, Tian NF, Wu LJ, et al. A radiological and cadaveric study of oblique lumbar interbody fixation in patients with normal spinal anatomy. Bone Joint J 2013;95-B:977-82. 10.1302/0301-620X.95B7.31393 [DOI] [PubMed] [Google Scholar]
- 27.Shao ZX, Wang JS, Lin ZK, et al. Improving the trajectory of transpedicular transdiscal lumbar screw fixation with a computer-assisted 3D-printed custom drill guide. PeerJ 2017;5:e3564. 10.7717/peerj.3564 [DOI] [PMC free article] [PubMed] [Google Scholar]


