Overview
Introduction
The arthroscopic all-inside anterior talofibular ligament (ATFL) repair allows an anatomical repair of the ligament while addressing concomitant intra-articular pathology through the same arthroscopic approaches.
Indications & Contraindications
Step 1: Preparation of the Operating Room and the Patient
Set up the operating room to position the patient supine with the affected extremity on a thigh-holder located under the knee prior to sterile draping.
Step 2: Arthroscopic Approach to the Ankle
Create the arthroscopic anteromedial and anterolateral portals, introduce the arthroscope, perform synovectomy as necessary, and identify the lateral ligament tear (Fig. 1).
Step 3: Arthroscopic Approach to the Ligament Tear
Evaluate the ligament remnant, debride the fibular footprint, and pierce the ligament remnant.
Step 4: Arthroscopic Ligament Reattachment
Reattach the ligament remnant with a knotless suture anchor.
Step 5: Closure of the Skin Incisions and Immobilization with a Removable Walking Boot
Close the portals, apply a postoperative dressing, deflate the tourniquet, and immobilize the ankle with a removable walking boot.
Step 6: Postoperative Protocol
Maintain the removable boot for 4 weeks, and then refer the patient to physical therapy.
Results
The outcomes of this procedure were reported in a study of 16 patients followed from 12 to 35 months (mean, 22.3 months)6.
Pitfalls & Challenges
Abstract
Background:
Ankle instability is a common consequence of ankle sprains. Injury of the anterior talofibular ligament (ATFL) is the most common cause of ankle instability1. Arthroscopic treatment of ankle instability is an emerging field attracting increased interest among surgeons2-10. The arthroscopic all-inside ATFL repair allows the surgeon to explore the ankle joint, treat concomitant pathology when encountered, and reattach the injured ATFL to its fibular anatomical location. The aim of this article is to describe the arthroscopic all-inside ATFL repair through a 3-portal no-ankle-distraction technique.
Description:
After patient positioning, anteromedial and anterolateral portals are created. An accessory anterolateral portal is created just anterior to the fibula and about 1 cm proximal to the tip of the lateral malleolus. The arthroscope is introduced through the anteromedial portal, and the instruments are introduced through the anterolateral portal. Recognition of the ligament and evaluation of the ligament tear with a probe are required. The footprint for the fibular attachment of the ATFL is debrided. The ligament is penetrated with a suture passer. A nitinol loop is pushed and then is pulled out through the accessory portal. The nitinol wire is replaced by a double high-resistance suture. The limbs of the suture located in the accessory portal are passed through the anterolateral portal. Next, one or both limbs of the suture are passed through the loop suture. Pulling of the suture limbs introduces the loop into the joint and the ligament is grasped by the suture. The tunnel for the anchor is drilled. The knotless anchor is loaded with the suture, and the anchor and suture are introduced with the ankle in dorsiflexion and valgus. Postoperatively, the ankle is immobilized with a removable walking boot for 4 weeks. Once use of the walking boot is discontinued, physical therapy is started.
Alternatives:
Nonoperative treatment with physiotherapy or sports restriction can be an alternative for patients with surgical contraindications or as a first step of treatment. Open techniques (repair or reconstruction) or other arthroscopic-assisted techniques (arthroscopic introduction of anchors and percutaneous passage of sutures, or arthroscopic-assisted reconstruction) are possible surgical alternatives to the described technique to treat ankle instability.
Rationale:
The described technique has the advantage of being done with a minimally invasive approach and providing an anatomical repair of the ligament. Concomitant intra-articular pathology can be addressed during the procedure through the same arthroscopic approaches. Early rehabilitation and the lack of intra-articular knots are additional benefits of the technique.
Introductory Statement
The arthroscopic all-inside anterior talofibular ligament (ATFL) repair allows an anatomical repair of the ligament while addressing concomitant intra-articular pathology through the same arthroscopic approaches.
Indications & Contraindications
Indications
Chronic ankle instability (partial or complete ATFL tear) refractory to nonoperative measures for 3 to 6 months. Although the technique is a possible treatment for acute ATFL disruption, we consider nonoperative therapy to be the best option for acute injuries.
Contraindications
Absence of, or frayed, ligament remnant.
Poor ligament tissue remnant that hinders its manipulation.
Recurrent ankle ligament instability after surgical repair.
Extensive surgical comorbidities.
A concomitant calcaneofibular ligament (CFL) tear is not a contraindication for the technique. When the CFL is injured, the ATFL has a complete tear. Treating only the ATFL has demonstrated excellent results in cases of ATFL combined with CFL.
Step-by-Step Description of Procedure (Video 1)
Step 1: Preparation of the Operating Room and the Patient
Set up the operating room to position the patient supine with the affected extremity on a thigh-holder located under the knee prior to sterile draping.
Review preoperative magnetic resonance imaging (MRI) scans, if available, to assess concomitant intra-articular injuries. This information is helpful to determine which lesions require treatment before the ligament repair.
Identify the patient properly in the preoperative holding area and confirm that the correct extremity has been marked.
Consider examining the affected ankle with the patient under spinal anesthesia to assess the degree of instability to confirm the diagnosis.
The arthroscopic instruments required for the technique include a 4.0-mm 30° arthroscope, an arthroscopic 3.5-mm motorized shaver, a standard radiofrequency ablation device, and other standard arthroscopic instruments (probe, arthroscopic suture retriever or grasper, and arthroscopic scissors). Small-joint arthroscopic instruments, and a 2.7-mm 30° arthroscope, can be used, but larger ones are recommended for better visualization. An arthroscopic pump can be used at the surgeon’s discretion.
Perform preoperative “time-out” safety checklist procedures.
Have the patient brought into the operating room and position him or her supine on the operating table.
Anesthesia and prophylactic antibiotics are administered. Spinal anesthesia is most commonly used.
Place the patient supine on the operating table with the affected extremity held on a thigh-holder located under the knee. Both the hip and the knee are flexed approximately 45°, allowing the leg to remain parallel to the floor. Make sure that the ankle can be plantar flexed and dorsiflexed easily.
Place a sterile pneumatic tourniquet on the upper portion of the lower extremity and inflate it to 250 to 300 mm Hg after exsanguination of the extremity with an Esmarch bandage.
Stabilize the lower extremity to the holder and carefully pad all appropriate prominences adequately, especially in the popliteal region and at the location of the peroneal nerve at the fibular head.
Prepare the lower extremity from the toes up to 20 cm proximal to the ankle joint in the usual sterile fashion and drape it, leaving the foot and ankle free in the air. The toes can be draped over if preferred.
Video 1.
Video showing the sequential steps of the arthroscopic all-inside ATFL repair through a 3-portal technique.
Step 2: Arthroscopic Approach to the Ankle
Create the arthroscopic anteromedial and anterolateral portals, introduce the arthroscope, perform synovectomy as necessary, and identify the lateral ligament tear (Fig. 1).
Mark cutaneous landmarks on the anterior aspect of the ankle with a pen.
Identify the superficial peroneal nerve by placing the ankle in forced inversion and flexing the fourth toe.
With the help of a hypodermic needle, identify the correct placement of the anteromedial portal. The ankle is plantar flexed, and the needle is introduced into the intra-articular space just medial to the anterior tibial tendon.
Incise the skin using a number-11 surgical blade longitudinally for about 0.5 cm.
Perform blunt dissection down to the capsule with a mosquito clamp. Then place the ankle joint in maximum dorsiflexion and penetrate and open the joint capsule with the mosquito clamp.
Without changing the ankle position, introduce the arthroscope shaft with a blunt obturator through the anteromedial portal (visualization portal) following the same direction and path opened by the mosquito clamp. First direct the arthroscope shaft toward the joint and, after passing the joint capsule, change the direction into the lateral region of the ankle. The cannula and obturator should end up in the anterior compartment of the joint. The blunt obturator is then replaced by the arthroscope.
Fluid is introduced via the inflow cannula, and the anterior compartment at the lateral area of the ankle can be visualized.
With the ankle dorsiflexed, then create the anterolateral portal (working portal). Lateral to the extensor tendons and medial to the superficial peroneal nerve, the portal is located about 0.5 cm distal to the tibiotalar joint line. The exact placement of the portal is controlled under direct arthroscopic visualization. Introduce a hypodermic needle and direct it to the lateral gutter (Fig. 2). The correct placement of the portal is confirmed when you see the needle easily reaching the ligament remnant and the fibular footprint.
Without changing the ankle position, incise the skin with a number-11 surgical blade in a longitudinal direction for a length of about 0.5 cm, and after blunt dissection open the capsule with a mosquito clamp. The mosquito clamp is visualized arthroscopically in order to avoid cartilage damage.
Introduce a PassPort Button cannula (6 mm [internal diameter] × 2 cm; Arthrex) through the anterolateral portal to protect the superficial peroneal nerve and for ease of passage of instruments and sutures through the portal.
Introduce a 3.5 to 4-mm motorized shaver through the anterolateral portal, and remove any elements of synovitis or intra-articular scar tissue. Avoid aggressive soft-tissue debridement of the lateral gutter that may injure the joint capsule, the ATFL, or its remnant. A radiofrequency ablation device can also be used for soft-tissue debridement.
Recognition of the ligament tear is required.
Perform any other arthroscopic procedures, such as chondral debridement and microfracture or removal of osteophytes, before the ligament repair.
Fig. 1.
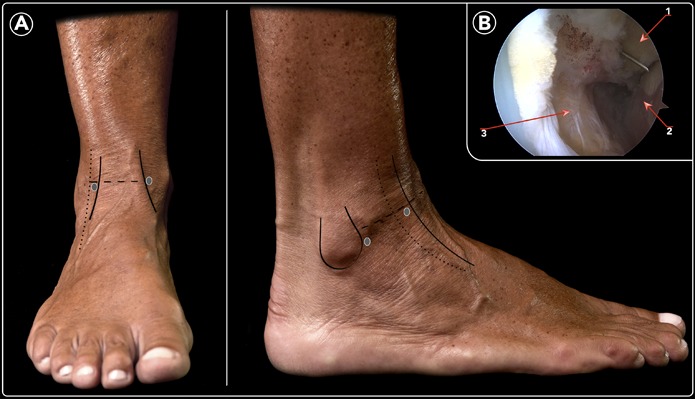
Anatomical landmarks and location of arthroscopic portals. Fig. 1-A Anterior and lateral views. See Video 1 for descriptions of landmarks. Fig. 1-B Arthroscopic view of the lateral gutter. A needle is introduced through the accessory anterolateral portal and observed at the lateral gutter. 1 = distal aspect of the lateral malleolus, 2 = lateral wall of the talus, and 3 = ATFL detached from the fibula.
Fig. 2.
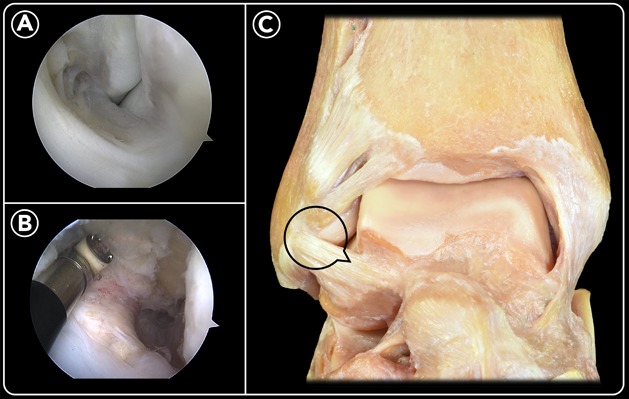
Arthroscopic views of a normal lateral gutter (Fig. 2-A) and an ATFL tear located on the floor of the lateral gutter (Fig. 2-B). The anterior view of the ankle shows the anatomical structures of the lateral gutter (Fig. 2-C).
Step 3: Arthroscopic Approach to the Ligament Tear
Evaluate the ligament remnant, debride the fibular footprint, and pierce the ligament remnant.
Use a probe to evaluate the ligament remnant and the fibular region adjacent to the ligament attachment. Introduce the probe through the anterolateral portal. Exploration is performed with the ankle in maximum dorsiflexion. Absence of the ligament or poor ligament tissue quality (a hypoplastic ligament with poorly defined margins and friability of the ligament that makes it difficult to grasp) are contraindications to the technique.
Under arthroscopic visualization, create an accessory anterolateral portal just anterior to the fibula and about 1 cm proximal to the tip of the lateral malleolus. The portal lies just proximal to the ligament remnant, and care should be taken not to injure it. A needle is helpful to locate the accessory portal.
Debride the footprint for the fibular ATFL attachment with a shaver introduced through the anterolateral portal (Fig. 3).
Introduce a suture passer (Micro SutureLasso, curved 70°; Arthrex) through the anterolateral portal, and under direct arthroscopic visualization penetrate the ligament from lateral to medial. Push a nitinol loop, which should be visualized in the lateral gutter. If required, a needle is helpful to move the nitinol loop to a more accessible anterior location (Fig. 4).
Pull the nitinol loop wire out through the accessory portal with the help of an arthroscopic grasper.
A number-0 high-resistance nonabsorbable suture (FiberWire; Arthrex) is doubled over and inserted into the loop to be pulled back. The double suture runs from the accessory portal through the ligament and to the anterolateral portal. The 2 ends of the suture are located in the accessory portal while the loop of the suture is in the anterolateral portal (Figs. 5 and 6).
With the help of an arthroscopic grasper, pass the limbs of the suture located in the accessory portal through the anterolateral portal (Fig. 6).
Next, pass one or both limbs of the suture through the loop suture. Pulling the suture limbs introduces the loop into the joint, and the ligament is grasped by the suture.
Fig. 3.
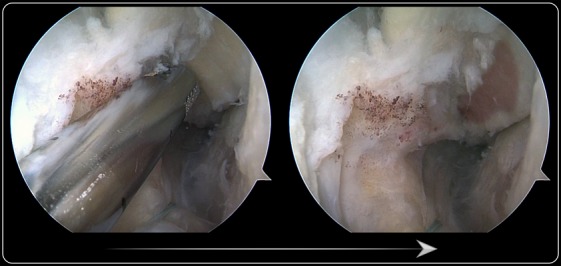
The footprint is debrided with the arthroscopic shaver introduced through the anterolateral portal.
Fig. 4.
Arthroscopic views showing the suture passer grasping the ligament. The arthroscope is introduced through the anteromedial portal and directed to the lateral gutter. The suture passer is introduced through the anterolateral portal.
Fig. 5.
Arthroscopic views showing the change of the nitinol wire for the suture. The wire is pulled out through the accessory portal and replaced by a double suture.
Fig. 6.
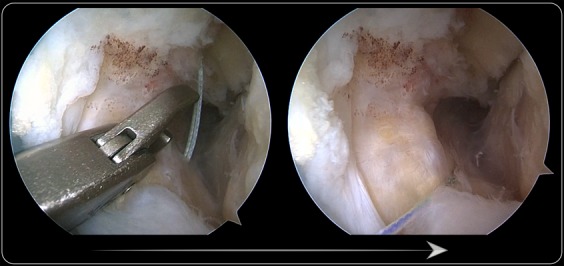
Arthroscopic views showing the passage of the suture limbs from the accessory portal to the anterolateral portal. One or both suture limbs are passed through the loop, the loop is introduced into the joint, and the ligament is grasped by the suture.
Step 4: Arthroscopic Ligament Reattachment
Reattach the ligament remnant with a knotless suture anchor.
Identify the correct location for the placement of the bone anchor. It should be located anteriorly on the lateral malleolus just distal to, and in contact with, the fibular insertion of the distal fascicle of the ATFL, which serves as a landmark (Fig. 7).
Introduce the drill guide through the anterolateral portal and direct it to the lateral gutter. It is centered over the location described above.
Introduce the drill through the drill guide and direct it from anterior to posterior, parallel to the plantar plane as well as the plane of the talar lateral wall. Then drill the tunnel for the anchor.
In order to minimize the risk of misidentifying the entrance of the tunnel, debridement of bone detritus with the shaver is helpful to clearly visualize the osseous tunnel.
The knotless anchor (PushLock, 2.9 × 15 mm; Arthrex) is loaded with the suture. Both suture limbs are introduced through the eyelet of the anchor.
Pass the knotless anchor with the sutures through the anterolateral portal. With the ankle in dorsiflexion and valgus, tighten the sutures before introducing the anchor.
Once the correct tension of the suture and ligament is obtained, introduce the anchor into the osseous tunnel by impaction (Fig. 8). The tension of the suture cannot be modified after the anchor is introduced. The correct amount of suture tension is critical for a successful repair. Not enough tension may lead to a residual instability. Too much tension may lead to a plantar flexion contracture.
Once the anchor is introduced, test the repaired ligament with the probe. If the tension of the ligament is correct, as checked with the arthroscope probe, cut the remnants of the suture and remove the PassPort Button cannula.
Fig. 7.
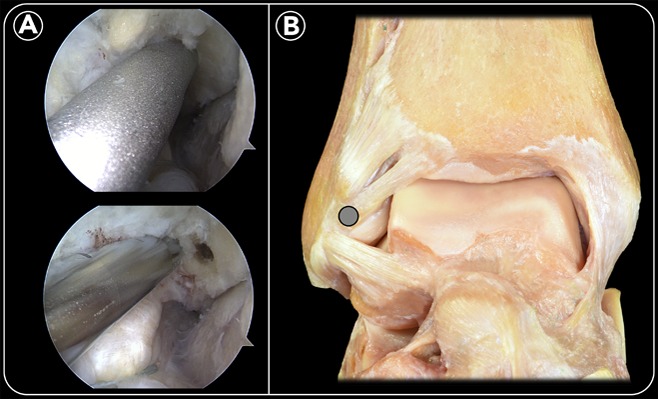
Arthroscopic location for the bone anchor on the anterior aspect of the lateral malleolus, just distal to the distal fascicle of the fibular insertion of the ATFL. The drill with its guide is introduced through the anterolateral portal (Fig. 7-A). An anatomical ankle specimen shows the location for the bone anchor (circle) (Fig. 7-B).
Fig. 8.
The bone anchor with the suture is introduced into the hole by impaction, and the ATFL is reattached.
Step 5: Closure of the Skin Incisions and Immobilization with a Removable Walking Boot
Close the portals, apply a postoperative dressing, deflate the tourniquet, and immobilize the ankle with a removable walking boot.
Keep the ankle in a neutral position during skin closure and bandaging.
Close the incisions with a 3-0 nylon suture. No suction drain is used.
Attention is required when suturing the anterolateral portal because the superficial peroneal nerve can be in the vicinity of the portal and there is a potential for entrapment of the nerve with the sutures. If in doubt, close the portal only with sterile strips.
Apply a soft bandage. Cover the skin incisions with sterile gauze pads and apply a below-the-knee soft dressing.
Deflate the tourniquet after the bandage is applied. If there is bleeding soaking through the bandage, apply manual pressure for 2 to 3 minutes and change the dressing with a fresh one.
A removable walking boot locked at 90° of ankle flexion is used.
Step 6: Postoperative Protocol
Maintain the removable boot for 4 weeks, and then refer the patient to physical therapy.
Antithrombotic prophylaxis is used for 10 to 15 days. Opioids and nonsteroidal anti-inflammatory drugs are recommended to control pain or swelling. A peptic ulcer prophylactic medication can be indicated on an individual basis.
The immediate postoperative bandage can be debulked 2 or 3 days later and changed for strips over the portals. Surgical incisions should be kept clean. The patient must be instructed to perform the cleaning of the incisions by herself or himself.
Suture stitches are removed 7 to 10 days after surgery.
Partial weight-bearing as tolerated with the aid of crutches is recommended from the day following surgery.
The patient should keep the limb elevated when sitting or lying down for 4 weeks.
For the first 4 weeks, the removable walking boot is worn at all times except when the patient removes it to clean the lower extremity. Plantar flexion of the ankle should be avoided during the cleaning process; ankle dorsiflexion is allowed.
Once the patient stops using the walking boot, physical therapy is started. The progressive return to daily activities and physical therapy will guide the return to sports.
Physical therapy begins with range-of-motion exercises and gait training. Two weeks later, strengthening and balance exercises are initiated. Noncontact sports (swimming or bicycling) are allowed 2 months postoperatively, and unrestricted sports, including contact sports, are allowed 3 months postoperatively depending on muscle conditioning.
Results
The outcomes of this procedure were reported in a study of 16 patients followed from 12 to 35 months (mean, 22.3 months)6. At the time of follow-up, all patients reported subjective improvement in ankle stability and had returned to their daily activities without difficulties. Patients who had engaged in sports returned to their preinjury activity without limitations. The mean American Orthopaedic Foot & Ankle Society (AOFAS) score increased from 67 (range, 59 to 77) preoperatively to 97 (range, 95 to 100) at the time of final follow-up.
Six patients had an additional procedure performed on the ankle at the time of the arthroscopic lateral ligament repair, including debridement and drilling of an osteochondral talar lesion (2 patients), debridement of impinging anterolateral soft tissue (2), and tendoscopy of the peroneal tendons (2).
Three patients had a residual positive tilt test after surgery but were doing well with subjectively improved stability. Six patients presented signs of a plantar flexion deficit of the ankle compared with the contralateral side; the deficit was >10° in 2 of them and from 5° to 10° in 4. No patient required ankle revision due to recurrence of ankle instability.
No major complications were reported, and only 2 minor wound problems (1 superficial infection and 1 case of delayed wound-healing) were observed.
Pitfalls & Challenges
A potential for superficial peroneal nerve injury leading to chronic neuropathic pain.
Inadequate placement of the anchor can lead to nonanatomical ligament reattachment.
Anchor loosening. Special attention must be paid when drilling and introducing the anchor into the fibular tunnel. The direction of the tunnel (and therefore of the anchor) should be parallel to the lateral wall of the talus, and parallel to the plantar sole with the foot and ankle in neutral position.
Anchor protruding posteriorly into the peroneal tendon synovial sheath. If required, a smaller anchor can be used.
Inadequate tension of the suture anchor can result in unsuccessful ankle stabilization. The proper amount of tension is at the surgeon’s discretion as there is no way to quantify the ideal amount.
Poor ligament-tissue quality can be a limitation of the repair technique and reconstruction should be considered in these cases7-9.
Potential deficit of ankle range of motion. A deficit of plantar flexion is an expected consequence of the surgery itself. Decreased dorsiflexion should be considered a complication, and the patient should be encouraged to work to improve ankle dorsiflexion.
Peroneal tendon symptoms are a common problem in patients with chronic ankle instability. Thorough clinical exploration and imaging studies are mandatory. When a patient reports peroneal tendon pain and imaging studies show an evident tear, either open or arthroscopic surgery to address the tendons should be recommended before arthroscopic ankle stabilization. Patients with chronic subluxation of the peroneal tendons will also benefit from surgical treatment. Patients with intra-sheath subluxation of the peroneal tendons usually experience relief of symptoms after ankle stabilization without surgical treatment of the tendons.
Patients can experience medial ankle pain located just anterior to the medial malleolus. When questioned during preoperative examination, some patients report medial symptoms, generally without apparent pathological findings on MRI. Arthroscopic exploration of the deltoid ligament is mandatory to identify a possible open-book injury of the anterior aspect of the deltoid ligament and make the diagnosis of rotational ankle instability11.
Footnotes
Published outcomes of this procedure can be found at: Foot Ankle Int. 2013 Dec;34(12):1701-9.
Disclosure: The authors indicated that no external funding was received for any aspect of this work. The Disclosure of Potential Conflicts of Interest forms are provided with the online version of the article (http://links.lww.com/JBJSEST/A224).
References
- 1.Broström L. Sprained ankles. VI. Surgical treatment of “chronic” ligament ruptures. Acta Chir Scand. 1966. November;132(5):551-65. [PubMed] [Google Scholar]
- 2.Corte-Real NM, Moreira RM. Arthroscopic repair of chronic lateral ankle instability. Foot Ankle Int. 2009. March;30(3):213-7. [DOI] [PubMed] [Google Scholar]
- 3.Kim ES, Lee KT, Park JS, Lee YK. Arthroscopic anterior talofibular ligament repair for chronic ankle instability with a suture anchor technique. Orthopedics. 2011. April 11;34(4):1-5. [DOI] [PubMed] [Google Scholar]
- 4.Acevedo JI, Mangone PG. Arthroscopic lateral ankle ligament reconstruction. Tech Foot Ankle Surg. 2011. September;10(3):111-6. [Google Scholar]
- 5.Nery C, Raduan F, Del Buono A, Asaumi ID, Cohen M, Maffulli N. Arthroscopic-assisted Broström-Gould for chronic ankle instability: a long-term follow-up. Am J Sports Med. 2011. November;39(11):2381-8. Epub 2011 Jul 29. [DOI] [PubMed] [Google Scholar]
- 6.Vega J, Golanó P, Pellegrino A, Rabat E, Peña F. All-inside arthroscopic lateral collateral ligament repair for ankle instability with a knotless suture anchor technique. Foot Ankle Int. 2013. December;34(12):1701-9. Epub 2013 Aug 26. [DOI] [PubMed] [Google Scholar]
- 7.Guillo S, Archbold P, Perera A, Bauer T, Sonnery-Cottet B. Arthroscopic anatomic reconstruction of the lateral ligaments of the ankle with gracilis autograft. Arthrosc Tech. 2014. September 22;3(5):e593-8. [DOI] [PMC free article] [PubMed] [Google Scholar]
- 8.Takao M, Glazebrook M, Stone J, Guillo S; ESSKA-AFAS Ankle Instability Group. Ankle arthroscopic reconstruction of lateral ligaments (ankle anti-ROLL). Arthrosc Tech. 2015. October 23;4(5):e595-600. [DOI] [PMC free article] [PubMed] [Google Scholar]
- 9.Matsui K, Takao M, Miyamoto W, Innami K, Matsushita T. Arthroscopic Broström repair with Gould augmentation via an accessory anterolateral port for lateral instability of the ankle. Arch Orthop Trauma Surg. 2014. October;134(10):1461-7. Epub 2014 Jul 12. [DOI] [PubMed] [Google Scholar]
- 10.Pereira H, Vuurberg G, Gomes N, Oliveira JM, Ripoll PL, Reis RL, Espregueira-Mendes J, Niek van Dijk C. Arthroscopic repair of ankle instability with all-soft knotless anchors. Arthrosc Tech. 2016. February 1;5(1):e99-107. [DOI] [PMC free article] [PubMed] [Google Scholar]
- 11.Vega J, Allmendinger J, Malagelada F, Guelfi M, Dalmau-Pastor M. Combined arthroscopic all-inside repair of lateral and medial ankle ligaments is an effective treatment for rotational ankle instability. Knee Surg Sports Traumatol Arthrosc. 2017. October 5 [Epub ahead of print]. [DOI] [PubMed] [Google Scholar]


