Overview
Introduction
Hip arthroscopic surgery is a rapidly evolving, minimally invasive procedure for patients with intra-articular and peritrochanteric space disorders.
Indications & Contraindications
Step 1: Room Preparation
Organize the operating room prior to the patient’s entrance.
Step 2: Patient Positioning
Once the patient is intubated and sedated, begin positioning the patient on the operating room table.
Step 3: Identify and Mark Landmarks
Identify and mark osseous landmarks and locations of stab incisions for the hip arthroscopy.
Step 4: Establish Anterolateral and Mid-Anterior Portals
Use image guidance to establish the anterolateral portal for entry into the hip joint to aid in mid-anterior portal placement.
Step 5: Capsulotomy and Central Compartment Assessment
Use a capsulotomy to gain access to the hip joint for inspection.
Step 6: Acetabuloplasty
Elevate the capsule and labrum from the acetabulum to access and shape the acetabular rim.
Step 7: Labral Repair
Repair the labrum back to the acetabular rim by sequentially placing anchors to secure detached labral tissue.
Step 8: Peripheral Compartment Assessment and Femoroplasty
Address femoral cam lesions peripherally without traction.
Step 9: Closure and Postoperative Rehabilitation
Determine a recovery protocol that controls inflammation, restores hip motion, and protects repaired tissues.
Results
Meta-analyses and systematic reviews have shown that the management of FAI via hip arthroscopy is successful and safe5.
Pitfalls & Challenges
Abstract
Background:
The first recorded attempt at arthroscopic visualization of the hip can be attributed to Dr. Michael Burman in 1931. Since then, hip arthroscopy has become widely used for the management of femoroacetabular impingement (FAI) because of its clear benefits, including a low complication rate and limited patient morbidity as compared with traditional open approaches.
Description:
Arthroscopic management of FAI begins with arthroscopy of the central compartment, where the intra-articular damage is identified. Standard portal placement provides optimal access for surveying and accessing intra-articular injury. The pathological findings identified preoperatively and confirmed during diagnostic arthroscopy dictate the necessary arthroscopic procedures. Correction of acetabular overcoverage and repair of the labrum to the acetabular rim can correct pincer lesions. Femoral-sided cam lesions require removal of traction and application of hip flexion in order to perform a femoral osteoplasty to recreate a normal anatomic femoral head-neck offset. Finally, capsular management is performed as clinically indicated.
Alternatives:
Appropriate management of FAI typically begins with nonoperative care consisting of rest, nonsteroidal anti-inflammatory drugs (NSAIDs), activity modification, and physical therapy1. Intra-articular corticosteroid injections can also provide relief2. Open procedures involving surgical hip dislocation can be utilized to address pathological conditions not accessible arthroscopically. Additionally, a “mini-open” procedure in which intra-articular disorders are treated arthroscopically and cam lesions are resected via a small anterior exposure can be employed3,4.
Rationale:
Hip arthroscopy offers a minimally invasive technique that can be effective for treating intra-articular hip disorders and is usually favored over open surgical dislocation. Hip arthroscopy has been shown to result in higher functional outcome scores than open procedures, with lower rates of complications5. Hip arthroscopy is playing an increasingly important role as an adjunct diagnostic and therapeutic tool in conjunction with open femoral and/or periacetabular osteotomy for complex hip deformities.
Introductory Statement
Hip arthroscopic surgery is a rapidly evolving, minimally invasive procedure for patients with intra-articular and peritrochanteric space disorders.
Indications & Contraindications
Indications
Symptomatic femoroacetabular impingement (FAI) syndrome.
Acetabular labral tear.
Pigmented villonodular synovitis and other synovial-based disorders.
Loose intra-articular bodies.
Chondral injury.
Joint infection.
Ligamentum teres rupture.
Psoas tendon impingement.
Disorders of the peritrochanteric space.
External snapping hip (coxa saltans).
Contraindications
Ipsilateral acetabular fracture.
Hip fusion.
Advanced arthritis.
Open wounds or cellulitis.
Obesity.
Femoral neck stress fracture.
Severe dysplasia.
Ligamentous laxity.
Step-by-Step Description of Procedure
The following steps are illustrated by Videos 1 through 4. Video 1 provides an overview of patient positioning and room setup. Videos 2, 3, and 4 demonstrate all aspects of hip arthroscopy necessary to treat FAI, including appropriate portal placement, acetabuloplasty, labral repair, microfracture, and finally femoroplasty.
Video 1.
Room preparation and patient positioning. Strategic room preparation is carried out before the patient is brought into the operating room for a hip arthroscopy. Once the patient arrives, patient positioning is critical for the success of the procedure. Adequate padding and traction are imperative for every hip arthroscopy procedure.
Video 2.
Landmarks, portals, and central compartment assessment. Osseous landmarks are identified and marked to aid in proper portal placement. Once the anterolateral portal is established under fluoroscopic guidance, the mid-anterior portal can be placed under arthroscopic guidance. A transverse interportal capsulotomy is then utilized to gain access to the central compartment.
Video 3.
Acetabuloplasty and labral repair. The capsule and labrum are elevated from the acetabulum to access and shape the acetabular rim. This is accomplished using a combination of a shaver and burr under fluoroscopic guidance. Once the pincer lesion is adequately modified, the labrum is repaired back to the acetabular rim by sequentially placing anchors to secure detached labral tissue. DALA = distal anterolateral.
Video 4.
Peripheral compartment assessment and femoroplasty. Femoral-sided cam lesions are addressed without traction. The hip joint is flexed to relax the anterior aspect of the capsule and access the peripheral compartment. The lesion is resected with use of a burr while the hip is taken through a range of internal and external rotation. A routine capsular closure is performed on the basis of the clinical evaluation of capsular laxity. FFWB = flat-foot weight-bearing.
Step 1: Room Preparation
Organize the operating room prior to the patient’s entrance.
Place the patient supine on a standard fracture table or a Jackson table with a traction attachment.
When using a Jackson table, attach the 4 black rail clamps onto the foot of the bed (2 on each side of the table). When using a Hana table, the black rail clamps are not necessary.
Attach a supine pelvis rest to the foot of the table.
Once you have tightened the clamps, make sure that the pelvis rest pad is appropriately positioned. For example, for a right hip arthroscopy, the opening on the pad should be placed on the right side to allow for placement of the perineal post (Fig. 1).
Place the leg extender distal to the supine pelvis rest.
Attach the bilateral leg holders and lock them into position.
Prepare the padded foot holders by trimming any excess material in order to aid placement of the boot as well as to prevent skin necrosis.
-
Have the following accessory setup pieces ready prior to the patient entering the operating room:
-
○
Pole and foam for the perineal post.
-
○
Lower-extremity sequential compression device for the uninvolved leg.
-
○
Foam padding for the ipsilateral arm to rest on.
-
○
Two-inch (5.1-cm) cloth tape.
-
○
Three clear adhesive polyethylene plastic drapes.
-
○
Protective lead aprons for the surgical team.
-
○
Discuss with the anesthesia team the goals and needs (systolic blood pressure of <100 mm Hg, mean arterial pressure of 50 to 60 mm Hg, and muscle relaxation drugs for the beginning of the procedure) and nursing team (epinephrine in the bags, 0.1% concentration).
Ensure that fluoroscopy equipment is present in the operating room, on the contralateral side.
Fig. 1.
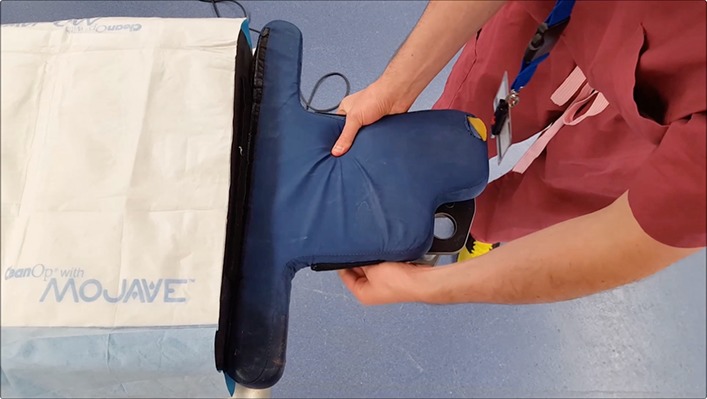
Appropriate positioning of the pelvis rest pad for a right hip.
Step 2: Patient Positioning
Once the patient is intubated and sedated, begin positioning the patient on the operating room table.
Place a lower-extremity sequential compression device on the contralateral calf with the tubing directed toward the head of the patient, so as not to prevent proper fitting of the foot into the padded boot.
Insert each foot into a padded boot. Strap the hook-and-loop fastener (e.g., Velcro) padding over the heel first, followed by the proximal and distal straps of the padded boot. Ensure that the heel is well-seated in the padded boot.
Prior to moving the patient, place a perineal post in the appropriate position on the operating table.
Confirm with the anesthesia team that the patient is ready to be moved distally on the operating room table.
Transfer the patient distally on the table while an assistant guides the legs. Be sure that the groin is well seated in the padded perineal post and that the genitalia are not incarcerated.
Temporarily tuck the arm on the operative side against the body.
Remove the leg extender.
Place both feet into the boots by flexing the hip and knee (about 45° each).
-
Be sure to fully seat the heels in the boots.
-
○
Attach the middle strap first to lock the heel in by alternating between the medial and lateral straps to ensure an even distribution of pressure on the foot.
-
○
Tighten the top and bottom straps and again check that the heel is properly seated in the boot.
-
○
Pull both lower extremities out straight. The contralateral lower extremity should be placed in 40° to 45° of abduction, neutral rotation, and neutral flexion.
Place the arm on the operative side across the patient’s body over an ulnar nerve pillow in the 90°/90° position and secure it with the patient’s gown and 2 strips of cloth tape.
Position the fluoroscopic c-arm so that an anteroposterior view of the hip can be obtained and maneuver the fluoroscopy monitor screens so that the surgeon’s view is not obstructed.
Place countertraction on the contralateral lower limb in 40° to 45° of abduction, neutral rotation, and neutral flexion to seat the groin well into the padded perineal post.
Bring the lower limb on the side of the operation into neutral abduction, neutral rotation (patella toward the ceiling, and slight internal rotation based on the patient’s anteversion), and 10° to 15° of flexion (Fig. 2).
-
Apply gross, manual traction on the ipsilateral lower limb and use fluoroscopy to check if adequate joint distraction has been attained. The goal is 10 to 12 mm of distraction (Fig. 3-A).
-
○
If gross traction is not adequate to reach that goal, consider adding fine-tune traction to reach the goal.
-
○
Once appropriate traction has been applied, place a small piece of tape at the location of the fine traction end point for easy reference during the operation.
Release the fine traction during skin preparation and draping of the operative field to limit traction time. The ideal traction time is <2 hours.
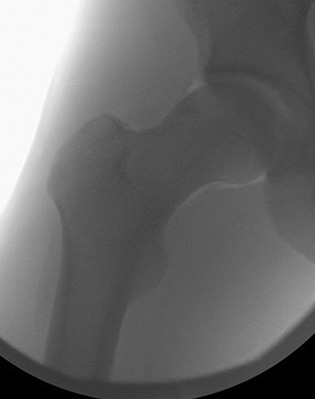
Obtain a fluoroscopic image to confirm that the hip joint has been reduced after traction is released (Fig. 3-B).
We prefer to prepare the skin from the proximal part of the flank, along the involved hip, to just proximal to the knee.
Fig. 2.
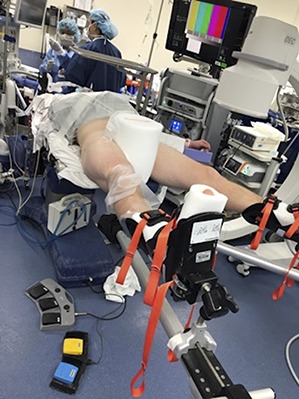
Final patient position.
Figs. 3-A and 3-B Fluoroscopic images made after application (Fig. 3-A) and release (Fig. 3-B) of traction.
Fig. 3-A.
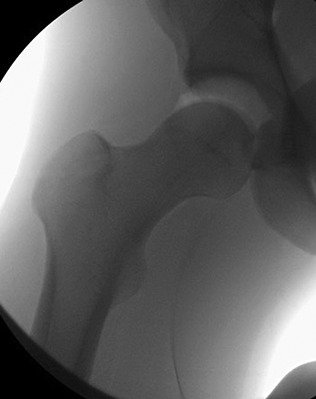
Fig. 3-B.
Step 3: Identify and Mark Landmarks
Identify and mark osseous landmarks and locations of stab incisions for the hip arthroscopy.
Mark the greater trochanter along with the anterior and posterior aspects of the trochanter.
Mark the anterior superior iliac spine with a vertical line straight down to show that this is the “no-fly zone” medially to avoid the femoral artery, nerve, and vein.
Once all of the equipment is prepared and the fluoroscopy c-arm is appropriately positioned, have the assistant apply fine traction on the hip joint to the previously marked line. Confirm this with a fluoroscopic image, and note the time when the traction was placed on the hip joint.
Establish the anterolateral portal under direct visualization with image guidance.
Step 4: Establish Anterolateral and Mid-Anterior Portals
Use image guidance to establish the anterolateral portal for entry into the hip joint to aid in mid-anterior portal placement.
Use a 17-gauge spinal needle to place the anterolateral portal. Place the needle at about a 10° angle posteriorly, and about two-thirds away from the acetabulum and one-third from the femoral head.
Once resistance is felt at the capsule, pierce through the capsule.
Once the needle is in place, remove the stylet to perform an air arthrogram to ensure negative pressure has been broken. Confirm with fluoroscopy (Fig. 4).
Inject approximately 30 to 40 mL of normal saline solution into the hip joint through the established spinal needle to create separation between the labrum and capsule. Backflow of fluid at this point confirms that the needle is intra-articular.
Insert a Nitinol (nickel and titanium) wire through the spinal needle, and confirm with fluoroscopy that it is directed toward the fovea.
Make a small incision on either side of the Nitinol wire with a size-11 blade, and make sure that there are no skin bridges.
Place a 4.5-mm metal cannula over the wire through the skin incision up to the hip joint capsule. Confirm the location of the cannula with an image.
Use a twisting motion to help to introduce the cannula into the hip joint.
Remove the handle of the cannula and introduce the 70°-view arthroscopic camera.
Refrain from turning on irrigation fluid inflow at this point until a second portal is established.
View the hip joint both posteriorly and anteriorly to assess the femoral head, acetabulum, labrum, and chondrolabral junction.
-
Establish the mid-anterior portal in relation to the anterolateral viewing portal.
-
○
The mid-anterior portal is typically 3 cm anterior and 4 to 5 cm distal to the anterolateral portal.
-
○
Adjust the angle of the portal entry for very small or large patients.
-
○
-
Use a 17-gauge spinal needle to place the portal under direct visualization and at an insertion angle of approximately 35° cephalad and 25° posterior.
-
○
The needle should enter the joint in the middle of the intra-articular triangle made up of the femoral head, labrum, and iliofemoral ligament/capsule.
-
○
Again, use a Nitinol wire, and place a cannula over the wire to establish entry into the joint.
At this point, inflow can be turned on.
Move the camera to the mid-anterior portal.
Viewing laterally through the mid-anterior portal, critique the anterolateral portal entry and confirm that the anterolateral portal is not through the labrum.
Also view medially, and inspect the inferior aspect of the anterior labrum.
Fig. 4.
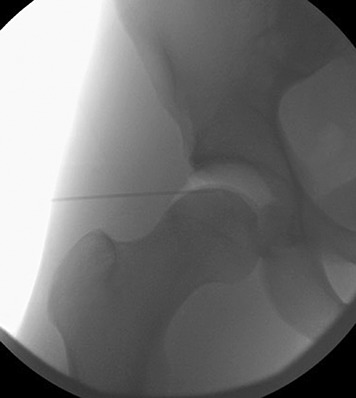
Fluoroscopic image of air arthrogram.
Step 5: Capsulotomy and Central Compartment Assessment
Use a capsulotomy to gain access to the hip joint for inspection.
-
Viewing from the mid-anterior portal, place a single-piece-construction arthroscopic knife through the anterolateral portal cannula and remove the cannula.
-
○
Start a transverse interportal capsulotomy about 5 mm from the labrum with a 5-mm cut posteriorly. Then return the capsulotomy cut toward the mid-anterior portal.
-
○
Place the cannula back over the knife and insert a temperature-controlled flexible radiofrequency ablation device through the anterolateral portal to achieve hemostasis; perform a partial synovectomy to improve visualization and use a flexible probe to assess labral and cartilage damage.
-
○
Switch the arthroscopic camera back to the anterolateral portal, and place the arthroscopic knife through the mid-anterior portal. Remove the cannula to complete the capsulotomy toward the anterolateral portal.
Place the cannula back into the anterolateral portal and introduce the radiofrequency device to continue hemostasis.
Place the arthroscope in the anterolateral portal to visualize the anterior acetabular wall, followed by the posterior acetabular wall.
Assess the ligamentum teres by internal and external rotation of the foot under mild traction.
Make sure to inspect and probe the anterior-superior acetabular chondrolabral junction for fraying and tears.
Step 6: Acetabuloplasty
Elevate the capsule and labrum from the acetabulum to access and shape the acetabular rim.
Use electrocautery through the mid-anterior portal while viewing from the anterolateral portal to separate the capsule from the acetabulum/labrum.
Use a 4.5-mm shaver to debride capsule from the acetabular side to help with exposure.
Use a 5.5-mm burr, on high-speed forward mode to avoid disruption of the adjacent labrum and/or chondrolabral junction, for correction of acetabular overcoverage.
Utilize judicious fluoroscopy to assess osseous correction.
Step 7: Labral Repair
Repair the labrum back to the acetabular rim by sequentially placing anchors to secure detached labral tissue.
Place a switching stick in the mid-anterior portal, and place a large green 8.5 × 110-mm cannula over the switching stick.
-
Create a distal anterolateral portal approximately 4 cm distal to the anterolateral portal.
-
○
Make a small incision; then place a drill guide through the incision and visualize as it enters the hip joint toward the acetabular rim.
-
○
-
Determine the position for the first 1.8-mm all-suture anchor adjacent to the labrum/acetabular edge.
-
○
Check the positioning under image guidance to assess the location on the acetabulum.
-
○
Have the assistant drill the preparatory hole for the suture anchor while the camera is operated by the primary surgeon to avoid bubbling or perforation of articular cartilage.
-
○
Once the suture is unloaded, shuttle it from the distal anterolateral portal to the mid-anterior portal.
-
○
Then pass the suture behind the labrum in a simple suture formation and bring it out through the mid-anterior portal.
-
○
The suture limb in the acetabulum serves as the post, and knots are then tied away from the articular surface.
-
○
Repeat this process for the desired number of anchors.
Step 8: Peripheral Compartment Assessment and Femoroplasty
Address femoral cam lesions peripherally without traction.
Release the traction on the hip joint with a goal of traction time of <120 minutes.
Flex the hip joint to 35° to 40° to relax the anterior aspect of the capsule and access the peripheral compartment.
Introduce the arthroscopic camera through the anterolateral portal and use a switching stick through the mid-anterior portal to improve visualization by pushing the capsule away from the femoral neck.
Create a trough with a 5.5-mm burr through the anterolateral portal, and taper the femoroplasty away from the joint as dictated by the lesion.
-
Change the degree of external rotation to access the anterior aspect of the femur, and use internal rotation to move more superiorly along the femur.
-
○
In the case of an osteochondral lesion of the femoral head, microfracture begins at the periphery and ends at the center of the lesion, with perforations placed 3 to 4 mm apart.
-
○
Microfracture with a drill or Kirschner wire can be performed if an appropriate angle can be achieved in an attempt to reach the deeper vascular bone.
-
○
A 90° microfracture awl can be used to perform microfracture.
-
○
A more distal and lateral accessory anterior portal can be established with a spinal needle, which will allow for a better angle for microfracture.
-
○
Check the fluid seal and perform a dynamic examination to ensure appropriate osseous resection.
Step 9: Closure and Postoperative Rehabilitation
Determine a recovery protocol that controls inflammation, restores hip motion, and protects repaired tissues.
Irrigate the joint copiously to remove any bone shavings.
Perform a routine capsular closure or plication on the basis of clinical evaluation of capsular laxity.
Close the portals with the suture selection of your choice.
Therapy usually begins the morning of postoperative day 1.
A postoperative hip brace is used to limit abduction and axial rotation. It is typically worn for about 4 weeks.
Weight-bearing is usually restricted to flat-foot weight-bearing with crutches for about 3 to 4 weeks postoperatively.
Results
Meta-analyses and systematic reviews have shown that the management of FAI via hip arthroscopy is successful and safe5. A recent meta-analysis of 29 clinical studies investigating almost 2,000 hips revealed a complication rate of 1.7% and a reoperation rate of 5.5%6. In this systematic review, Matsuda et al. found that, when arthroscopic management was performed by an experienced surgeon, the outcomes were equivalent or superior to those of other surgical approaches (open dislocation and mini-open). Arthroscopic surgery also had a lower rate of major complications—0% to 5% compared with 0% to 20% and 0% to 17% after open dislocation and mini-open surgery, respectively. The major complications included osteonecrosis, femoral head-neck fracture, loss of fixation requiring a reoperation, trochanteric nonunion, failure of labral refixation, inadequate osteochondroplasty requiring surgical revision, deep infection, and symptomatic or clinically important limitation of hip motion from heterotopic ossification5. In addition, Byrd and Jones found that one of the most frequently reported radiographic parameters, the alpha angle, consistently showed a significant decrease postoperatively7.
In addition, reports have demonstrated improvement in patient-reported outcome measures (PROMs) following hip arthroscopy for the management of FAI5,8. For example, in a 10-year follow-up study of a cohort of 145 patients with FAI who underwent hip arthroscopy with labral debridement or repair, the majority had significant improvements in PROMs and satisfaction. Byrd and Jones found significant improvements in the modified Harris hip score (mHHS) at 3, 12, 24, 60, and 120 months in a series of patients followed for a minimum of 2 years7. Meta-analyses have shown that the PROM with the greatest improvement after hip arthroscopy was the Hip Outcome Score (HOS) sports scale, which increased 41.7 points (95% confidence interval [CI], 34.1 to 49.4; p < 0.001), representing a 100.7% improvement. This was followed by the mHHS, which increased by 24.4 points (95% CI, 19.6 to 29.3; p < 0.001), and the HOS activities of daily living scale, which increased by 23.7 points (95% CI, 18.5 to 28.8). The Nonarthritic Hip Score (NAHS) and Western Ontario and McMaster Universities Osteoarthritis Index (WOMAC) exhibited a similar and significant improvement, 22.0 and 13.0 points, respectively (p < 0.001)6,9,10. The clinical efficacy of arthroscopic FAI management is further supported by a high return-to-play rate of 80% to 88% among athletes, at a mean of approximately 7 months after surgery7,11. Despite a high overall rate of return to play and improvement in PROMs after hip arthroscopy, the majority of rehabilitation protocols are not evidence-based and rely on expert opinion.
Although the above results are encouraging, it should be cautioned that patient selection remains an important prerequisite for hip arthroscopy. Joint parameters such as preoperative osteoarthritis, joint space narrowing, and Tönnis grade have been associated with failure of hip arthroscopy for FAI12. Considerable arthritic changes or <2 mm of acetabular joint space are associated with poor surgical outcomes7. Menge et al. reported that 50 (34%) of 145 patients treated with hip arthroscopy underwent total hip arthroplasty (THA) within 10 years after the arthroscopy13. Higher rates of THA were seen in older patients, patients treated with acetabular microfracture, and hips with ≤2 mm of joint space preoperatively, regardless of labral treatment. Additionally, care should be used in patients with mild acetabular dysplasia. These patients tend to be highly dependent on the labrum for hip stability, and minimal acetabular resection, capsular plication, or labral repair is critical to maximize surgical improvement14.
Pitfalls & Challenges
-
The increasing use of hip arthroscopy has revealed complications and reasons for poor outcomes. The pitfalls and challenges related to hip arthroscopy can be divided into 3 main categories:
-
○
Preoperative.
-
▪
Hip dysplasia.
-
▪
Preexisting osteoarthritis.
-
▪
Obesity.
-
▪
-
○
Intraoperative.
-
▪
Time constraints on applying traction while using the arthroscope in the central compartment15.
-
▪
Difficulty triangulating due to the depth of the joint.
-
▪
Correct anatomic location of accessory portals, proper portal placement avoiding wire breakage, and prevention of iatrogenic labral and chondral injuries are important.
-
▪
Iatrogenic instability.
-
▪
Inadequate correction/residual femoroacetabular impingement.
-
▪
-
○
Postoperative.
-
▪
Heterotopic ossification.
-
▪
Rehabilitation-related injuries.
-
▪
-
○
Footnotes
Published outcomes of this procedure can be found at: Am J Sports Med. 2018 Jan 1:363546517749475. [Epub ahead of print].
Disclosure: The authors indicated that no external funding was received for any aspect of this work. On the Disclosure of Potential Conflicts of Interest forms, which are provided with the online version of the article, one or more of the authors checked “yes” to indicate that the author had a relevant financial relationship in the biomedical arena outside the submitted work (http://links.lww.com/JBJSEST/A222).
References
- 1.Lynch TS, Bedi A, Larson CM. Athletic hip injuries. J Am Acad Orthop Surg. 2017. April;25(4):269-79. [DOI] [PubMed] [Google Scholar]
- 2.Tranovich MJ, Salzler MJ, Enseki KR, Wright VJ. A review of femoroacetabular impingement and hip arthroscopy in the athlete. Phys Sportsmed. 2014. February;42(1):75-87. [DOI] [PubMed] [Google Scholar]
- 3.Fujii M, Nakashima Y, Noguchi Y, Yamamoto T, Mawatari T, Motomura G, Iwamoto Y. Effect of intra-articular lesions on the outcome of periacetabular osteotomy in patients with symptomatic hip dysplasia. J Bone Joint Surg Br. 2011. November;93(11):1449-56. [DOI] [PubMed] [Google Scholar]
- 4.Kim KI, Cho YJ, Ramteke AA, Yoo MC. Peri-acetabular rotational osteotomy with concomitant hip arthroscopy for treatment of hip dysplasia. J Bone Joint Surg Br. 2011. June;93(6):732-7. [DOI] [PubMed] [Google Scholar]
- 5.Matsuda DK, Carlisle JC, Arthurs SC, Wierks CH, Philippon MJ. Comparative systematic review of the open dislocation, mini-open, and arthroscopic surgeries for femoroacetabular impingement. Arthroscopy. 2011. February;27(2):252-69. [DOI] [PubMed] [Google Scholar]
- 6.Minkara AA, Westermann RW, Rosneck J, Lynch TS. Systematic review and meta-analysis of outcomes after hip arthroscopy in femoroacetabular impingement. Am J Sports Med. 2018. January 1:363546517749475 [Epub ahead of print]. [DOI] [PubMed] [Google Scholar]
- 7.Byrd JW, Jones KS. Arthroscopic management of femoroacetabular impingement: minimum 2-year follow-up. Arthroscopy. 2011. October;27(10):1379-88. Epub 2011 Aug 20. [DOI] [PubMed] [Google Scholar]
- 8.Lynch TS, Terry MA, Bedi A, Kelly BT. Hip arthroscopic surgery: patient evaluation, current indications, and outcomes. Am J Sports Med. 2013. May;41(5):1174-89. Epub 2013 Feb 28. [DOI] [PubMed] [Google Scholar]
- 9.Clohisy JC, St John LC, Schutz AL. Surgical treatment of femoroacetabular impingement: a systematic review of the literature. Clin Orthop Relat Res. 2010. February;468(2):555-64. [DOI] [PMC free article] [PubMed] [Google Scholar]
- 10.Harris JD, Erickson BJ, Bush-Joseph CA, Nho SJ. Treatment of femoroacetabular impingement: a systematic review. Curr Rev Musculoskelet Med. 2013. September;6(3):207-18. [DOI] [PMC free article] [PubMed] [Google Scholar]
- 11.O’Connor M, Minkara AA, Westermann RW, Rosneck J, Lynch TS. Return to play after hip arthroscopy: a systematic review and meta-analysis. Am J Sports Med. 2018. March 1:363546518759731 [Epub ahead of print]. [DOI] [PubMed] [Google Scholar]
- 12.Philippon M, Schenker M, Briggs K, Kuppersmith D. Femoroacetabular impingement in 45 professional athletes: associated pathologies and return to sport following arthroscopic decompression. Knee Surg Sports Traumatol Arthrosc. 2007. July;15(7):908-14. Epub 2007 May 4. [DOI] [PMC free article] [PubMed] [Google Scholar]
- 13.Menge TJ, Briggs KK, Dornan GJ, McNamara SC, Philippon MJ. Survivorship and outcomes 10 years following hip arthroscopy for femoroacetabular impingement: labral debridement compared with labral repair. J Bone Joint Surg Am. 2017. June 21;99(12):997-1004. [DOI] [PubMed] [Google Scholar]
- 14.Byrd JWT. Operative hip arthroscopy. 3rd edition New York: Springer; 2013. [Google Scholar]
- 15.Casp A, Gwathmey FW. Hip arthroscopy: common problems and solutions. Clin Sports Med. 2018. April;37(2):245-63. [DOI] [PubMed] [Google Scholar]


