Overview
Introduction
The modified transtibial technique with quadriceps tendon autograft allows anatomic anterior cruciate ligament (ACL) reconstruction without tunnel widening and results in a stable and functional knee with a satisfactory clinical outcome.
Step 1: Prepare the Patient
Prepare the patient under spinal anesthesia with the usual arthroscopic setting.
Step 2: Arthroscopic Examination
Perform arthroscopic examination to confirm the ACL rupture and other intra-articular lesions.
Step 3: Harvest the Quadriceps Tendon
Harvest the central one-third of the quadriceps tendon strip with a proximal patellar bone block.
Step 4: Prepare the Quadriceps Tendon Graft
Prepare the quadriceps tendon graft to pass smoothly through the tunnels.
Step 5: Set the Tibial Tunnel Entry Point
Make a 3-cm longitudinal skin incision at the anteromedial aspect of the proximal part of the tibia.
Step 6: Create the Tibial Tunnel
Drill a 10-mm tibial tunnel.
Step 7: Target the Femoral Tunnel Starting Point
Aim the guide at the lateral bifurcate ridge on the medial wall of the lateral femoral condyle with the modified transtibial technique.
Step 8: Create the Femoral Tunnel
Drill a 10-mm femoral tunnel.
Step 9: Fix the Graft
Fix the graft with adequate tension.
Step 10: Postoperative Rehabilitation
Rehabilitate the patient step by step.
Results
In a study that compared fifty-two patients managed with a modified transtibial technique and another fifty-two patients managed with an anteromedial transportal technique, there were no significant differences in the clinical results in terms of manual laxity, arthrometric analysis, and subjective outcome.
Introduction
The modified transtibial technique with quadriceps tendon autograft allows anatomic anterior cruciate ligament (ACL) reconstruction without tunnel widening and results in a stable and functional knee with a satisfactory clinical outcome.
Anatomic positioning of the tunnels in ACL reconstruction has proved to be better in terms of knee stability and graft function compared with isometric and vertical positioning of the tunnels. The transtibial technique was considered the standard technique for femoral tunnel creation. However, there were concerns regarding the ability to place the tunnels in anatomic positions because the femoral tunnel position is constrained by the tibial tunnel. To improve tunnel positioning, there have been several efforts to modify the technique, such as making the starting point of the tibial tunnel more medial and proximal for oblique trajectory of the femoral tunnel. However, there were also other problems like a shorter tibial tunnel and widening of the intra-articular aperture of the tibial tunnel with these modifications.
We developed a modified transtibial technique that consists of simple maneuvers during the femoral tunnel guide insertion that enable anatomic positioning of the tunnels. The technique also allows sufficient tunnel length to be obtained for fixation, and the tunnel widening is minimal. The technique consists of the following steps.
Step 1: Prepare the Patient
Prepare the patient under spinal anesthesia with the usual arthroscopic setting.
Give the patient spinal anesthesia.
Place the patient in the supine position with the thigh on the involved side tied to the leg holder and the leg dangled down.
Prepare and drape the patient for arthroscopy (Fig. 1).
Fig. 1.
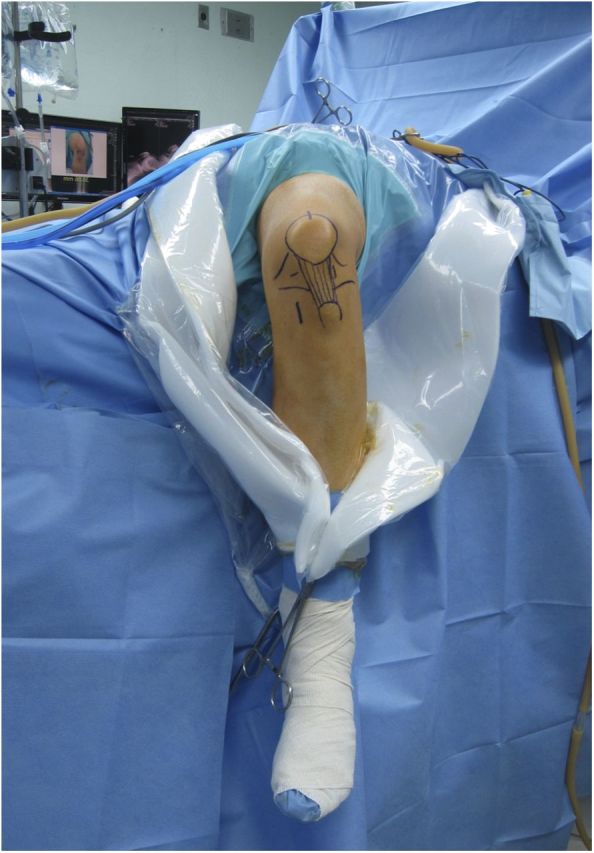
The usual patient setting for ACL reconstruction in the operating room. The patient is in the supine position with the thigh on the involved side tied to the leg holder, with the leg dangled down.
Step 2: Arthroscopic Examination
Perform arthroscopic examination to confirm the ACL rupture and other intra-articular lesions.
Make standard anteromedial and anterolateral portals (Fig. 2).
Confirm the ACL rupture with a probe.
Debride the remnant ACL.
Identify meniscal lesions.
Resect or repair all meniscal lesions if there are any.
Fig. 2.
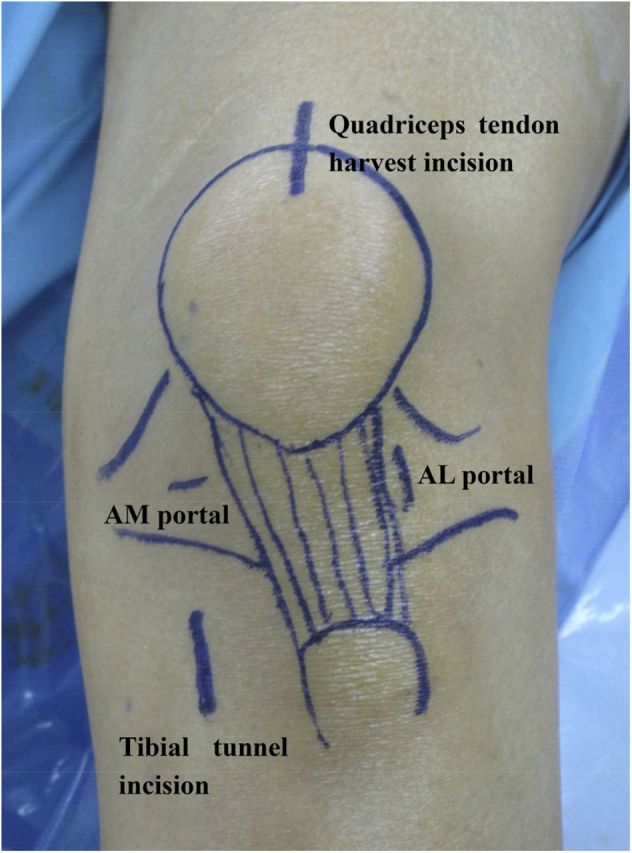
The standard portals for ACL reconstruction, the incision for quadriceps tendon harvest, and the incision for the tibial tunnel starting point are marked on the skin. AM = anteromedial, and AL = anterolateral.
Step 3: Harvest the Quadriceps Tendon
Harvest the central one-third of the quadriceps tendon strip with a proximal patellar bone block (Video 1).
Place the patient’s knee at an approximately 80° bent position.
Make a 4 to 5-cm midline incision centered over the proximal border of the patella (Fig. 2).
Expose the anterior aspect of the quadriceps tendon and proximal part of the patella.
Make parallel proximal cuts in the quadriceps tendon spaced 10 mm apart for a 7-cm length using a 10-mm graft harvester (Fig. 3).
Divide the undersurface of the graft by careful spreading at the depth of the vastus intermedius overlying the suprapatellar pouch.
Obtain a 10-mm-wide, 20-mm-long, 7-mm-thick trapezoidal bone block from the proximal patellar base using an oscillating saw (Fig. 4).
Excise the quadriceps tendon strip from the distal portion in continuity with the patellar bone block with Metzenbaum scissors.
Be careful not to enter the suprapatellar pouch by saving part of the vastus intermedius tendon.
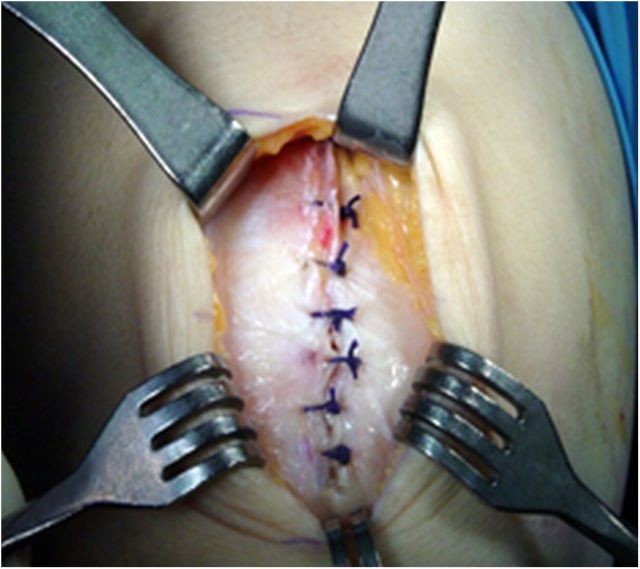
Close the superficial layers of the cut surface of the tendon with absorbable coapting sutures (Fig. 5).
Fig. 3.
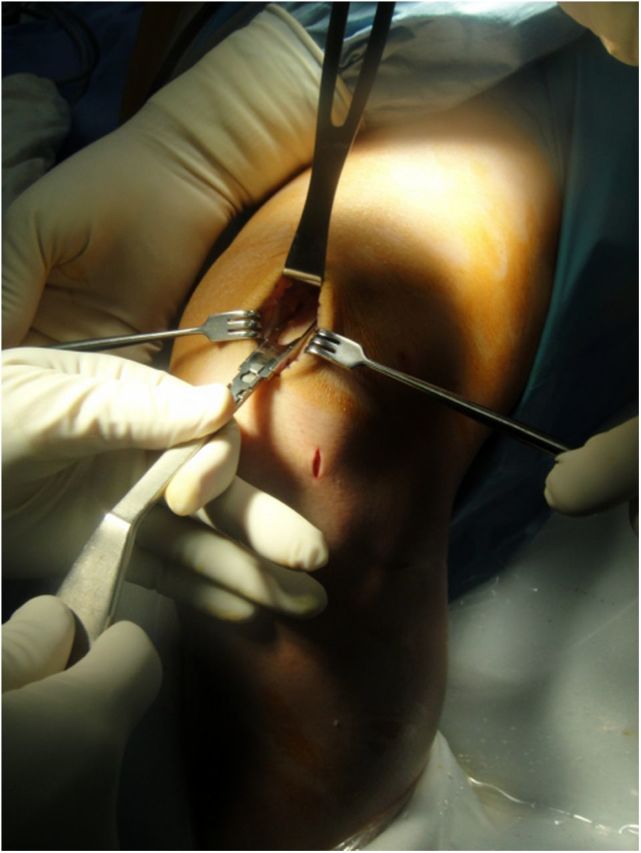
A quadriceps tendon graft is excised with a graft harvester from the distal portion of the tendon in continuity with the patellar bone block.
Fig. 4.
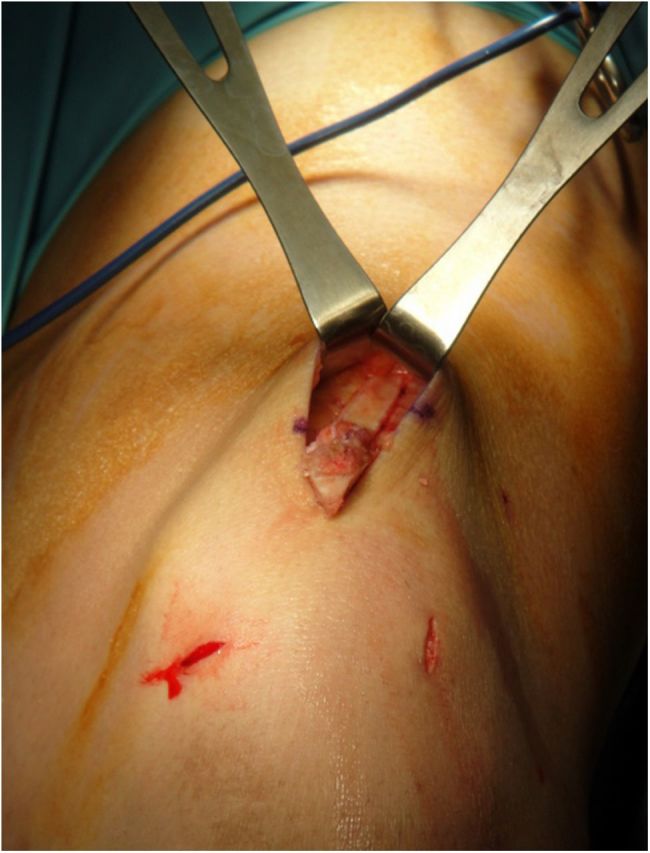
Trapezoidal bone block is obtained from the patellar base.
Fig. 5.
The superficial layer of the cut surface of the quadriceps tendon is closed with absorbable coapting sutures.
Video 1.
Quadriceps tendon graft harvest and the closure of the tendon donor site.
Step 4: Prepare the Quadriceps Tendon Graft
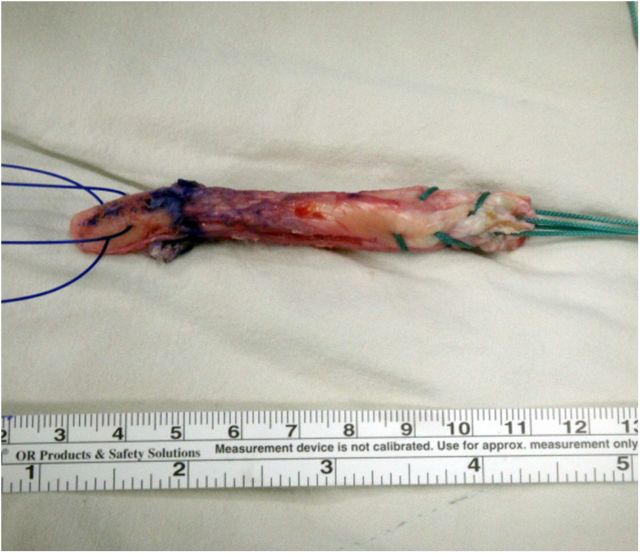
Prepare the quadriceps tendon graft to pass smoothly through the tunnels (Fig. 6, Video 2).
Trim the bone plug to a bullet shape using a saw and a rongeur.
Trim the tendinous portion with scissors.
Perforate the bone block transversely with drill holes and pass two PDS (polydioxanone) sutures.
Secure the tendinous portion of the graft with two number-5 Ethibond sutures (Ethicon) using Krackow-type stitches with an extension of approximately 3 cm.
Make sure that the prepared graft passes through a 10-mm-diameter tunnel smoothly.
Fig. 6.
Prepared quadriceps tendon graft. The bone block is perforated transversely with drill holes and passed with two PDS sutures. The tendinous portion is secured with two number-5 Ethibond sutures using Krackow-type stitches.
Video 2.
Preparation of the harvested quadriceps tendon as an autograft for ACL reconstruction.
Step 5: Set the Tibial Tunnel Entry Point
Make a 3-cm longitudinal skin incision at the anteromedial aspect of the proximal part of the tibia (Fig. 7).
Set the entry point 4 to 5 cm distal to the joint line.
Place it 2 to 3 cm posteromedial to the tibial tuberosity.
Position it 1 cm superior to the attachment site of the pes anserinus.
Ensure that it is just anterior to the medial collateral ligament.
Fig. 7.
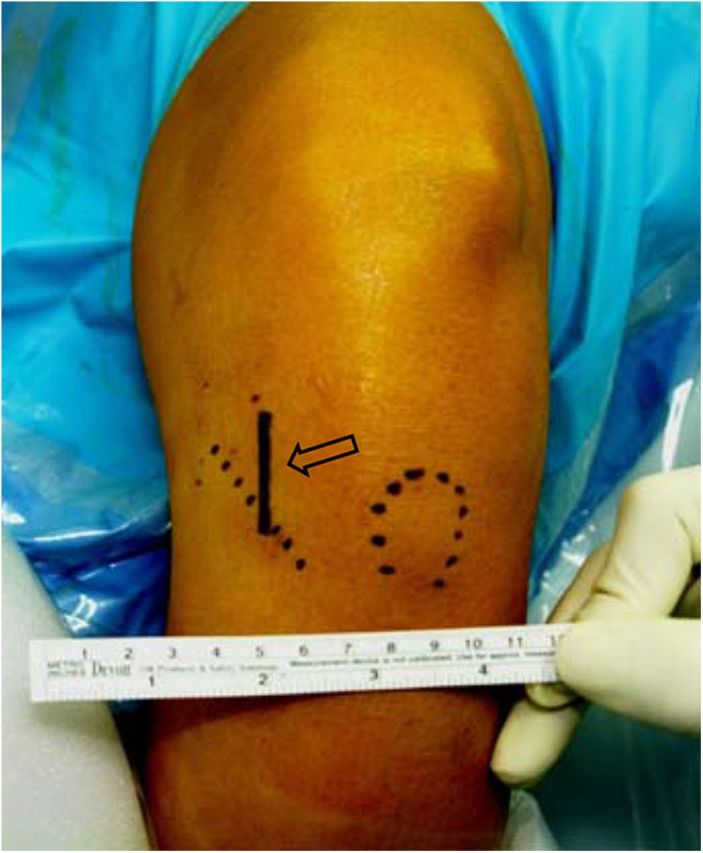
The skin incision (arrow) for tibial tunnel creation is placed 4 to 5 cm distal to the joint line, 2 to 3 cm posteromedial to the tibial tuberosity, 1 cm superior to the attachment site of the pes anserinus, and just anterior to the medial collateral ligament.
Step 6: Create the Tibial Tunnel
Drill a 10-mm tibial tunnel (Video 3).
Mark the area where the tibial tunnel guide pin would exit in the articular surface, which is at the center between the ACL footprints of the anteromedial and posterolateral bundles.
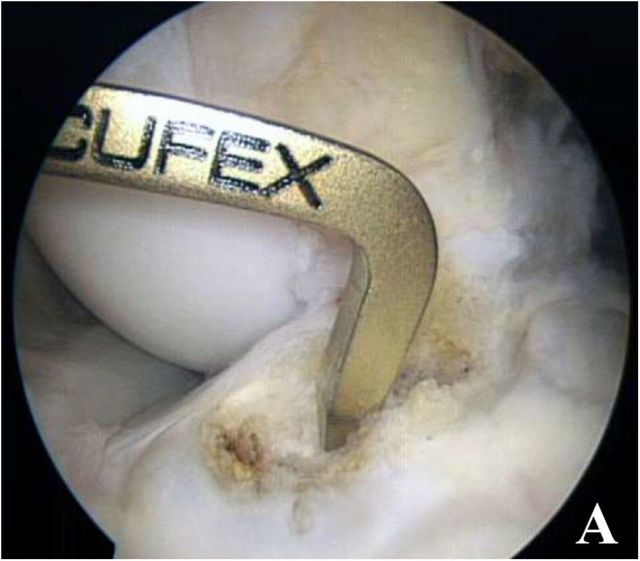
Insert a guide pin at an angle of 60° to the tibial plateau with use of a tibial drill guide (Fig. 8-A).
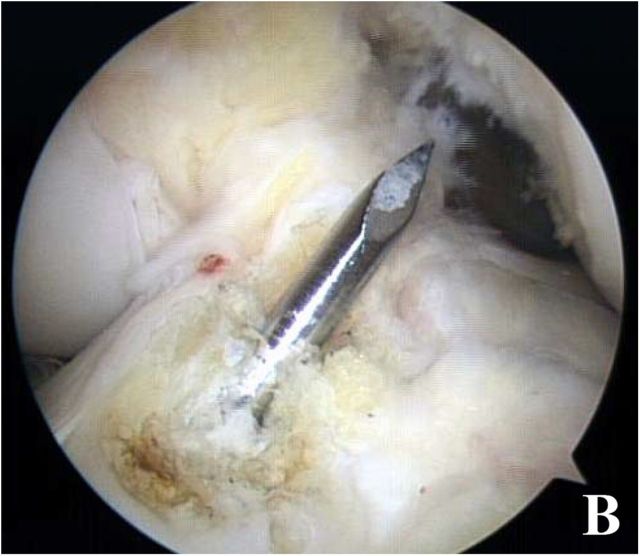
Pass the guide pin 1 to 2 cm into the joint at the center between the ACL footprints of the anteromedial and posterolateral bundles and check its position of entry (Fig. 8-B).
Drill a 10-mm tibial tunnel along the guide pin using the cannulated reamer.
Video 3.
Arthroscopic video of the tibial tunnel creation (the anterolateral portal is used for viewing, and the anteromedial portal is used for working).
Fig. 8-A Fig. 8-B Arthroscopic views of the tibial tunnel guide.
Fig. 8-A.
Fig. 8-A The tibial tunnel guide pointing at the center between the ACL footprints of the anteromedial and posterolateral bundles.
Fig. 8-B.
Fig. 8-B View after the tibial tunnel guide pin is inserted.
Step 7: Target the Femoral Tunnel Starting Point
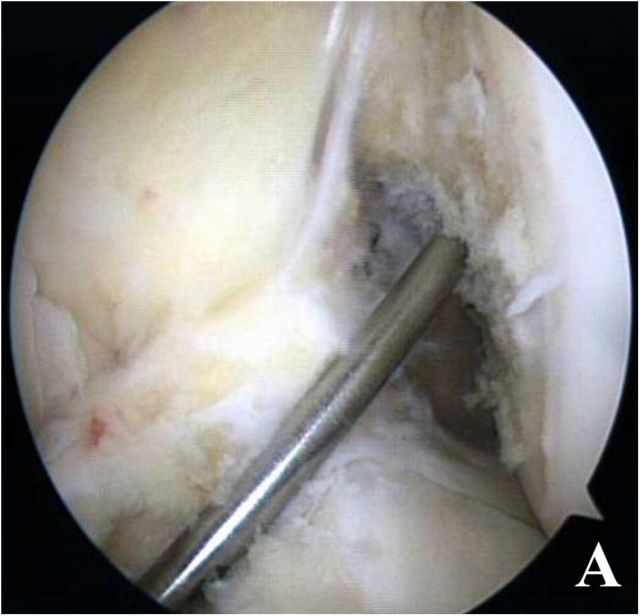
Aim the guide at the lateral bifurcate ridge on the medial wall of the lateral femoral condyle with the modified transtibial technique (Fig. 9, Videos 4-A and 4-B).
Hold the knee in a 90° flexed position.
Insert a 7-mm offset femoral drill guide through the tibial tunnel.
Apply an anterior drawer force to the proximal part of the tibia.
Apply an additional varus force to the proximal part of the tibia.
Apply an additional external rotation force to the proximal part of the tibia, and externally rotate the guide.
Aim the drill guide at the lateral bifurcate ridge on the medial wall of the lateral femoral condyle (Video 5).
Fig. 9.
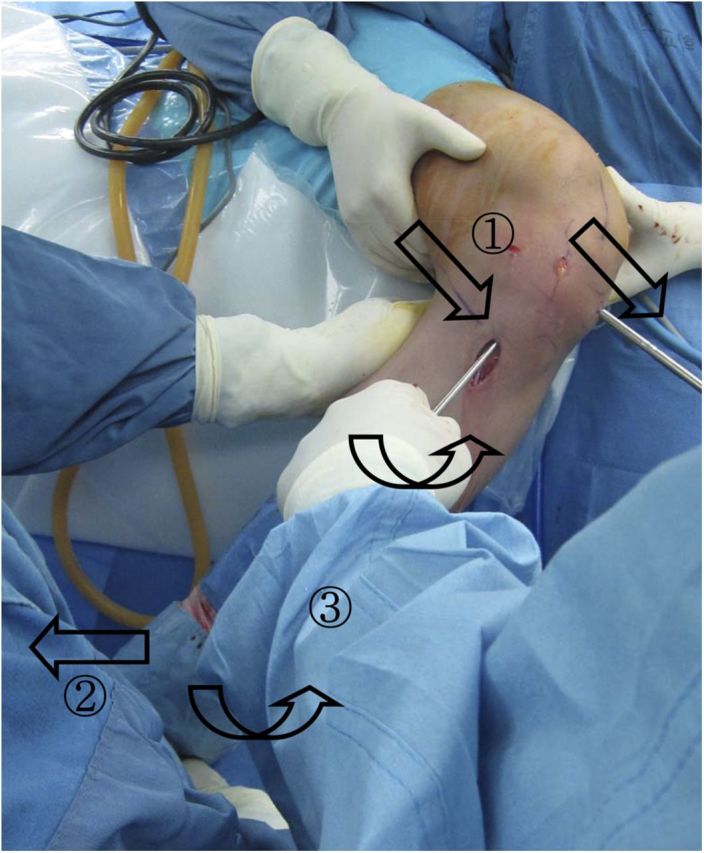
The modified transtibial technique maneuver. (1) An anterior drawer force is applied to the proximal part of the tibia, (2) an additional varus force is applied to the proximal part of the tibia, and (3) an additional external rotation force is applied to the proximal part of the tibia, and the guide is externally rotated.
Video 4-A.
Overhead view of the maneuver of the modified transtibial technique during the targeting of the femoral tunnel starting point.
Video 4-B.
Lateral view of the maneuver of the modified transtibial technique during the targeting of the femoral tunnel starting point.
Video 5.
Arthroscopic video of the femoral guide aiming at the lateral bifurcate ridge on the medial wall of the lateral femoral condyle (the anterolateral portal is used for viewing, and the anteromedial portal is used for working).
Step 8: Create the Femoral Tunnel
Drill a 10-mm femoral tunnel (Video 6).
Insert the guide pin through the drill guide (Fig. 10-A).
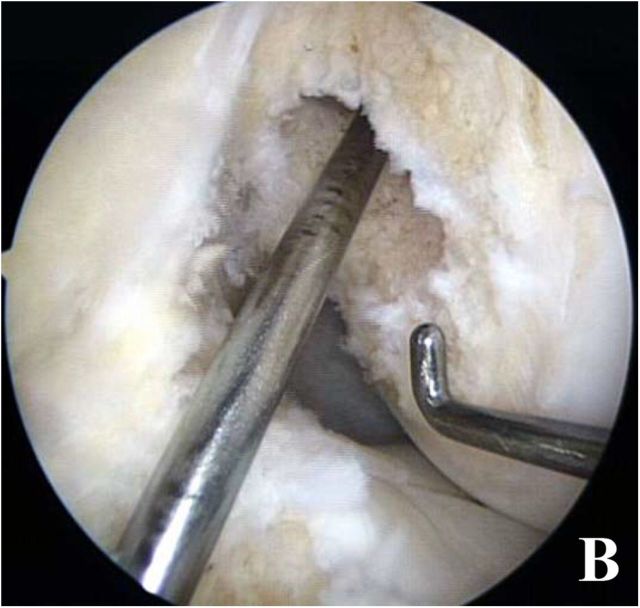
Drill a 10-mm femoral tunnel along the guide pin through the tibial tunnel using the cannulated reamer (Fig. 10-B).
Set the tunnel depth to just over 20 mm.
Make the slot for the screw guide pin on the anterior aspect of the tunnel.
Video 6.
Arthroscopic video of the femoral tunnel creation (the anterolateral portal is used for viewing, and the anteromedial portal is used for working).
Fig. 10-A Fig. 10-B Arthroscopic views of the inserted femoral guide pin.
Fig. 10-A.
Fig. 10-A The femoral guide pin aiming at the lateral bifurcate ridge on the medial wall of the lateral femoral condyle.
Fig. 10-B.
Fig. 10-B View of the femoral tunnel after its creation.
Step 9: Fix the Graft
Fix the graft with adequate tension.
Place a Beath pin via the tibial tunnel, through the femoral tunnel, and out of the skin on the lateral aspect of the knee.
Tie a long looped suture through the eyelet of the Beath pin, which is pulled intra-articularly and grasped out of the tibial tunnel with a retriever.
Place the two PDS sutures of the graft bone block within the long looped suture attached to the Beath pin, and pull it through the tibial and femoral tunnels.
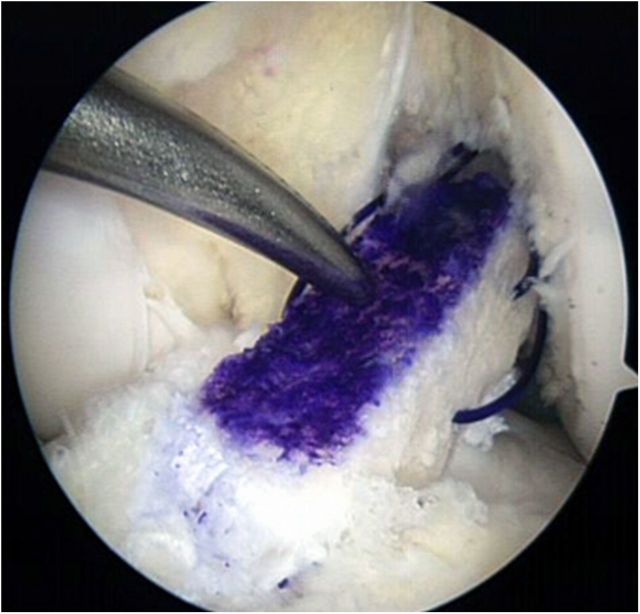
Pass the bone plug portion of the graft first through the tibial tunnel and then to the femoral tunnel (Fig. 11, Video 7)
Insert the screw guidewire between the femoral tunnel wall and the cancellous portion of the graft bone plug.
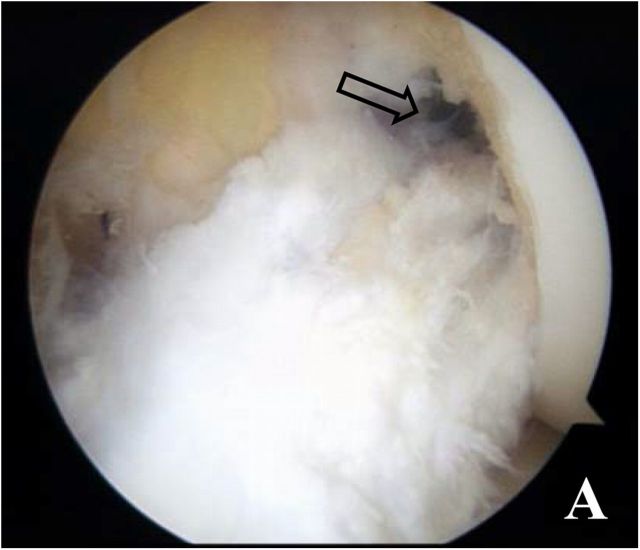
Fix the bone plug of the graft on the femoral tunnel with a metal interference screw along the guidewire (Fig. 12-A, Video 8).
Insert the screw guidewire between the tibial tunnel wall and the graft.
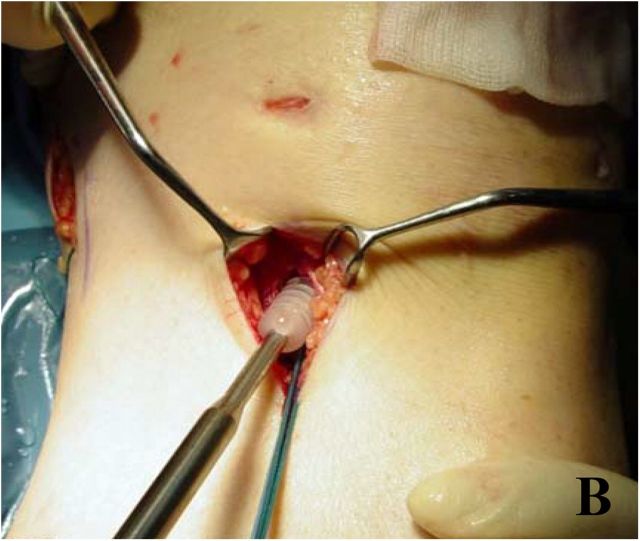
Fix the tendinous portion of the graft on the tibial tunnel with a bioabsorbable screw along the guidewire (Fig. 12-B).
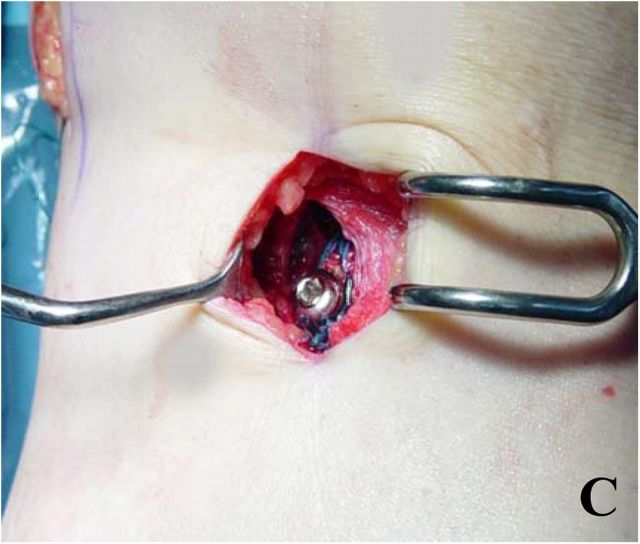
Augment the fixation by tying the suture over the bicortical screw, which was inserted at 1 cm inferior to the tibial tunnel (Fig. 12-C).
Fig. 11.
Arthroscopic view of the quadriceps tendon graft passage through the tunnels.
Video 7.
Arthroscopic video of the graft passage into the femoral tunnel (the anterolateral portal is used for viewing, and the anteromedial portal is used for working).
Video 8.
Arthroscopic video of the fixation of the graft bone plug on the femoral tunnel with a metal interference screw (the anterolateral portal is used for viewing, and the anteromedial portal is used for working).
Figs. 12-A, 12-B, and 12-C Fixation of the graft..
Fig. 12-A.
Fig. 12-A Arthroscopic view of the bone block of graft fixed on the femoral tunnel with a metal interference screw (arrow).
Fig. 12-B.
Fig. 12-B The tendinous portion of the graft is fixed on the tibial tunnel with a bioabsorbable screw.
Fig. 12-C.
Fig. 12-C Augmentation of the fixation by tying a suture over the bicortical screw, which was inserted at 1 cm inferior to the tibial tunnel.
Step 10: Postoperative Rehabilitation
Rehabilitate the patient step by step.
Have the patient obtain full extension immediately after surgery and full flexion in six weeks.
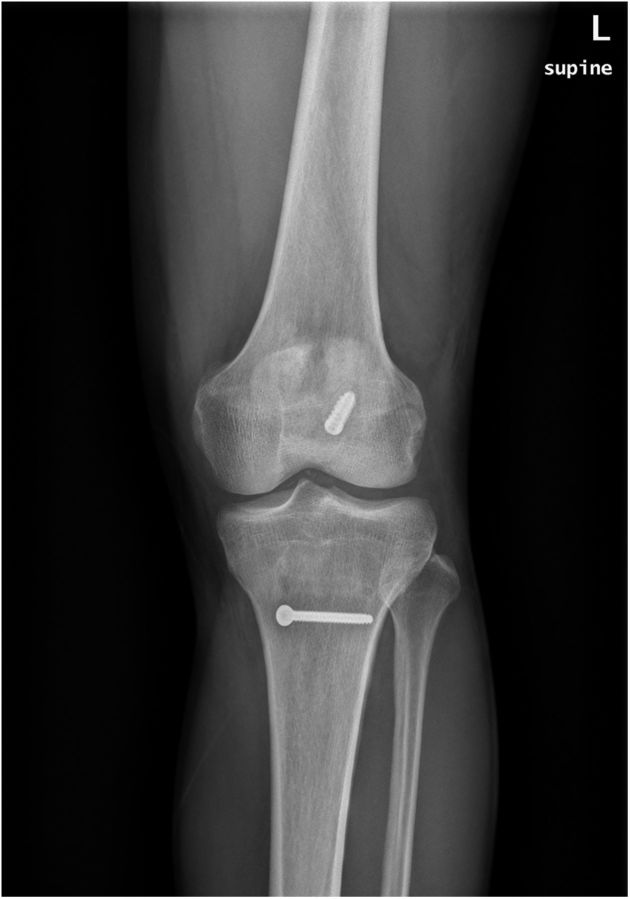
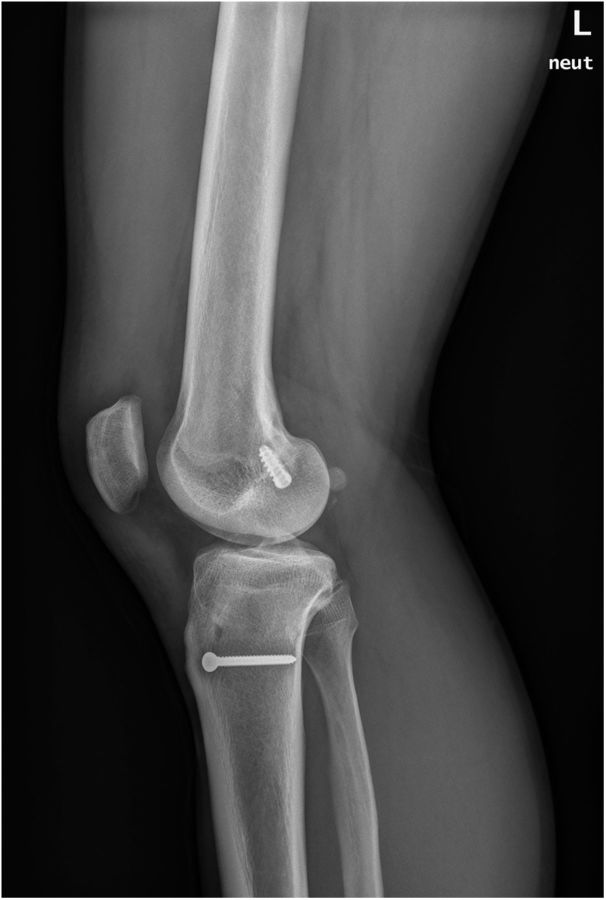
Start continuous passive motion within two days after surgery and continue for one to two days while the patient is hospitalized (Figs. 13-A and 13-B).
Instruct the patient to wear a motion-controlled brace set at 0° to 90° for four weeks.
Instruct the patient to wear the brace set at 0° to full flexion for an additional two weeks.
Limit the patient to partial weight-bearing for four to six weeks, and then allow the patient to progress to full weight-bearing as tolerated.
Allow full activity after six months postoperatively, confirming recovery of quadriceps strength.
Figs. 13-A and 13-B Postoperative anteroposterior (Fig. 13-A) and lateral (Fig. 13-B) radiographs of the knee.
Fig. 13-A.
Fig. 13-B.
Results
In a study that compared fifty-two patients managed with a modified transtibial technique and another fifty-two patients managed with an anteromedial transportal technique, there were no significant differences in the clinical results in terms of manual laxity, arthrometric analysis, and subjective outcome1. Both groups had significant improvement with regard to all of those results. There also was no significant difference between the groups with respect to the occurrence or type of complications. The patellar fractures were treated surgically by open reduction and internal fixation with a tension-band wiring technique. Patients who had transient loss of motion had resolution of the complication after intensive physiotherapy. The femoral tunnel was placed at a slightly inferior and anterior position with the modified transtibial technique compared with the anteromedial transportal technique, but the difference between the groups was not significant. Femoral tunnel length was significantly longer and tibial tunnel length was shorter with use of the modified transtibial technique than with use of the anteromedial transportal technique; however, the lengths were sufficient to allow for adequate fixation.
What to Watch For
Indications
ACL tear with knee instability.
Contraindications
Patients who cannot follow the postoperative protocol or who do not have a caregiver.
Patients who have a medical comorbidity that is severe enough to preclude surgical intervention.
Pitfalls & Challenges
Two assistants, one who applies the anterior drawer, varus, and external rotation force to the proximal part of the tibia and one who inserts the femoral guide pin through the guide, are required.
Great care not to perforate the knee joint must be taken during the harvest of the quadriceps tendon autograft.
Clinical Comments
Is it possible to place tunnels at anatomical positions with just simple modification to the transtibial technique2-7?
Is it possible to obtain sufficient tibial tunnel length with the modified transtibial technique8,9?
Are there any complications to harvesting a quadriceps tendon10?
Were the clinical results satisfactory both subjectively and objectively?
We believe that the modified transtibial technique with quadriceps tendon autograft enabled anatomic positioning of the tunnels and secured sufficient tibial tunnel length for fixation, while resulting in satisfactory clinical results without critical complications.
Footnotes
Based on an original article: J Bone Joint Surg Am. 2014 Apr 16;96(8):664-72.
Disclosure: None of the authors received payments or services, either directly or indirectly (i.e., via his or her institution), from a third party in support of any aspect of this work. None of the authors, or their institution(s), have had any financial relationship, in the thirty-six months prior to submission of this work, with any entity in the biomedical arena that could be perceived to influence or have the potential to influence what is written in this work. Also, no author has had any other relationships, or has engaged in any other activities, that could be perceived to influence or have the potential to influence what is written in this work. The complete Disclosures of Potential Conflicts of Interest submitted by authors are always provided with the online version of the article.
References
- 1.Lee JK, Lee S, Seong SC, Lee MC. Anatomic single-bundle ACL reconstruction is possible with use of the modified transtibial technique: a comparison with the anteromedial transportal technique. J Bone Joint Surg Am. 2014. April 16;96(8):664-72. [DOI] [PubMed] [Google Scholar]
- 2.Kopf S, Forsythe B, Wong AK, Tashman S, Anderst W, Irrgang JJ, Fu FH. Nonanatomic tunnel position in traditional transtibial single-bundle anterior cruciate ligament reconstruction evaluated by three-dimensional computed tomography. J Bone Joint Surg Am. 2010. June;92(6):1427-31. [DOI] [PMC free article] [PubMed] [Google Scholar]
- 3.Kaseta MK, DeFrate LE, Charnock BL, Sullivan RT, Garrett WE., Jr Reconstruction technique affects femoral tunnel placement in ACL reconstruction. Clin Orthop Relat Res. 2008. June;466(6):1467-74. Epub 2008 Apr 11. [DOI] [PMC free article] [PubMed] [Google Scholar]
- 4.Strauss EJ, Barker JU, McGill K, Cole BJ, Bach BR, Jr, Verma NN. Can anatomic femoral tunnel placement be achieved using a transtibial technique for hamstring anterior cruciate ligament reconstruction? Am J Sports Med. 2011. June;39(6):1263-9. Epub 2011 Feb 18. [DOI] [PubMed] [Google Scholar]
- 5.Gavriilidis I, Motsis EK, Pakos EE, Georgoulis AD, Mitsionis G, Xenakis TA. Transtibial versus anteromedial portal of the femoral tunnel in ACL reconstruction: a cadaveric study. Knee. 2008. October;15(5):364-7. Epub 2008 Jun 25. [DOI] [PubMed] [Google Scholar]
- 6.Harner CD, Honkamp NJ, Ranawat AS. Anteromedial portal technique for creating the anterior cruciate ligament femoral tunnel. Arthroscopy. 2008. January;24(1):113-5. [DOI] [PubMed] [Google Scholar]
- 7.Piasecki DP, Bach BR, Jr, Espinoza Orias AA, Verma NN. Anterior cruciate ligament reconstruction: can anatomic femoral placement be achieved with a transtibial technique? Am J Sports Med. 2011. June;39(6):1306-15. Epub 2011 Feb 18. [DOI] [PubMed] [Google Scholar]
- 8.Heming JF, Rand J, Steiner ME. Anatomical limitations of transtibial drilling in anterior cruciate ligament reconstruction. Am J Sports Med. 2007. October;35(10):1708-15. Epub 2007 Jul 30. [DOI] [PubMed] [Google Scholar]
- 9.Bedi A, Musahl V, Steuber V, Kendoff D, Choi D, Allen AA, Pearle AD, Altchek DW. Transtibial versus anteromedial portal reaming in anterior cruciate ligament reconstruction: an anatomic and biomechanical evaluation of surgical technique. Arthroscopy. 2011. March;27(3):380-90. Epub 2010 Oct 29. [DOI] [PubMed] [Google Scholar]
- 10.Lee S, Seong SC, Jo CH, Han HS, An JH, Lee MC. Anterior cruciate ligament reconstruction with use of autologous quadriceps tendon graft. J Bone Joint Surg Am. 2007. October;89(Suppl 3):116-26. [DOI] [PubMed] [Google Scholar]


