Abstract
Recipient area is the canvas in a hair transplant surgery, where the surgeon can truly display his artistic creativity and deliver an aesthetic masterpiece, after all hair transplantation is as much about art as science. There are four main steps in dealing with the recipient area. Marking the hairline and estimation of grafts is the most important steps to give a natural look. There are multiple anatomical markers that need to be addressed while drawing a hairline. The second step is the anesthesia and it should be as painless as possible. This is followed by implantation, which can be achieved by various techniques. There are multiple technicalities to be considered while implanting, such as density, angle, and direction. Once implantation is done, the final step is appropriate postoperative care. Each of these steps has been discussed in detail in this chapter.
Keywords: Hair transplant, hairline design, implantation of grafts, recipient area
INTRODUCTION
The science of hair transplant is still evolving and it gives enough space to the operating surgeon to flaunt his skills and deliver an aesthetic masterpiece. Best hair transplant is the one that looks the most natural. This can be performed only by having full knowledge of the anatomy and regression of the hairline. Mimicking this natural hairline with our limited supply of grafts is the goal of a hair transplant surgery. Hence, it is important to study all the aspects of the recipient area. This chapter will focus on the different aspects in context of the recipient area. These are as follows:
Marking of hairline and estimation of grafts
Anesthesia
Implantation
Postoperative care
MARKING THE HAIRLINE AND ESTIMATION OF GRAFTS
This is the most important step in a hair transplant surgery. It should be designed in a way so that it not only fulfils present demand to make the patient happy but also adapts to the changing facial architecture of the patient in future as aging advances.[1] Patients racial characteristics also influence the hairline shape. Hairlines in Caucasians is “M”-shaped and this can be achieved with a sharp “V” hairline (this suits an elliptical face) or a blunt “U” hairline (suits a round face), whereas in Afro-Americans, the hairline is more flatter and in a straight line.[2] Indian patients in general favor a more rounded hairline, often demanding a low hairline. The hairline is first drawn during the consultation to give an estimate about the number of grafts required and finally it is redrawn preoperatively on the day of surgery, with markings for the density and indication where the single hair or multiple hair grafts need to be planted. We also recommend that the hairlines be documented on photography and also recorded in the consent form that hairlines drawn have been seen and approved by the patient.
Drawing the different anatomical points of the hairline has been explained in Table 1 and Figure 1. The hairline should never be placed too low, even if the patient demands it. This will give an unnatural look with advancing age and also deplete the donor area, as it requires higher number of grafts.
Table 1.
Anatomical points of the recipient area[3]
| Anterior frontal point (AFP) | 7–10 cm above the glabella, depending on grade of baldness |
| Frontotemporal angle (FTA) | Higher than the AFP, in line with the lateral epicanthus |
| Lateral hump (LH) | In advance grades of baldness, the hairline is so far behind that the AFP cannot connect to it, hence it is uplifted in the area above the ears to get acute FTA and also decrease the graft requirement |
| Transition zone | Frontal 0.5–1 cm hairline with micro- and macro-irregularities filled with single hair grafts |
| Frontal tuft | Central area behind hairline filled with maximum density |
| Temporal triangle | Triangular protrusion of the temple beyond the line extending from anterior side burn border |
| Vertex transition point | Anterior most point of the vertex and is the point where sagittal plane of the skull transitions from being mostly horizontal to vertical |
Figure 1.
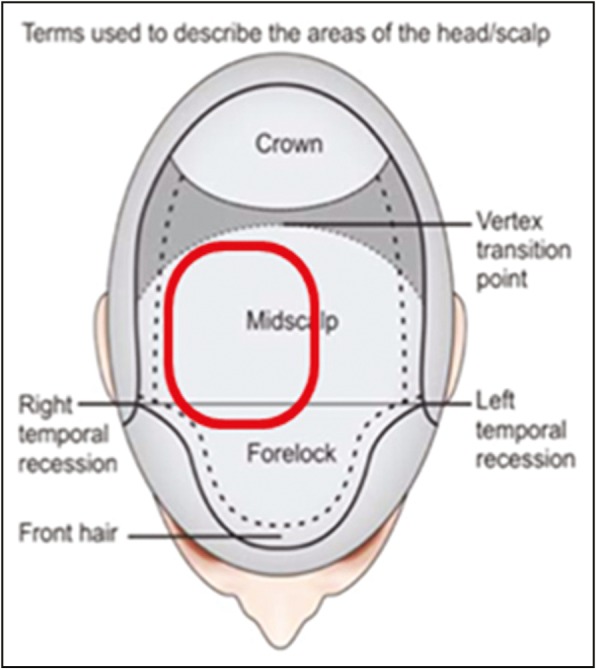
Anatomical zones of the scalp
Estimation of grafts: This can be carried out by calculating the area (per sq. cm) and multiplying by 35, 35 units/cm2 is the optimal density required to give an acceptable result in Asian patients.[4] However, this number is relative. If a patient has a donor area where most of the follicular units comprise 1–2 hair follicles only, then a higher density will be required to give a dense look. Another method to measure the density is using a graph paper, tracing paper, and a gel marker pen. The area to be transplanted is marked with the gel pen and then a transparent paper or butter crepe paper is kept on the marking. This duplicates the marking by making an impression on it. This tracing paper with marking is kept on the graph paper, which helps in counting how many grafts will be required in each area. As we transplant different densities in each area, this method helps to get a more accurate measure. Trichoscopy is also a good method to give an estimate about donor area availability and recipient area requirement [Figure 2].
Figure 2.
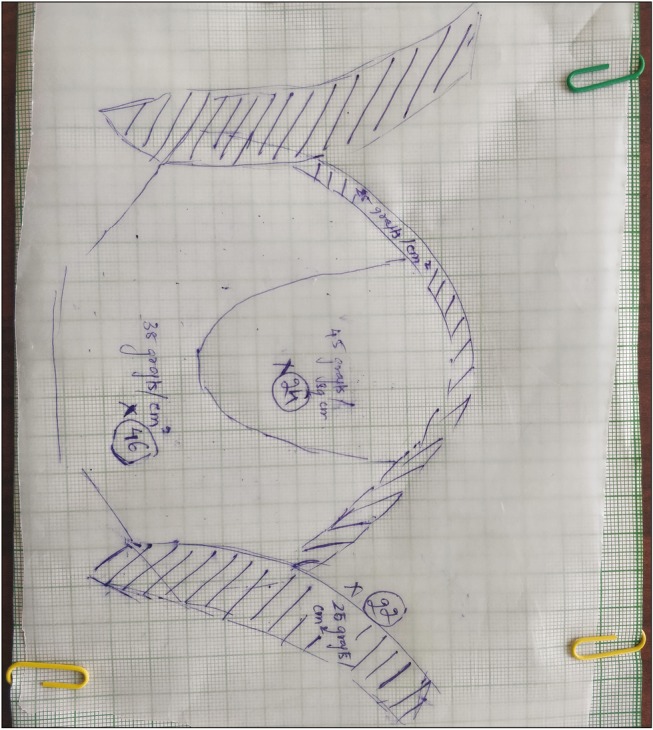
Estimation of grafts. A tracing paper is kept on the scalp to get the impression of the recipient area and then placed over a graph paper. The transition zone and lateral tuft area (desired density, 25 grafts/cm2), central tuft (desired density, 45 grafts/cm2), and the entire frontal zone (desired density, 35 grafts/cm2) are marked. Then the total number of grafts is calculated by multiplying the area (cm2) of each zone with the desired density. For example: central tuft (45×24 = 1080), for transition zone (25×22 = 550), and for the rest (35×46 = 1610), so the total grafts required is (1080+550+1610), that is, 3240
ANESTHESIA OF RECIPIENT AREA
This can be performed with or without nerve blocks, followed by ring block and infiltration.
Nerve blocks such as supraorbital and supratrochlear blocks [Figure 3] given with 2% lignocaine with adrenaline
Ring block along the periphery of the recipient area given with 2% lignocaine with adrenaline
Tumescent anesthesia is given after ring block in the recipient area. Tumescent anesthesia is made with triamcinolone (40mg) + xylocaine (2%) + epinephrine, 1:1000 (1mL) + normal saline (100mL)
Figure 3.
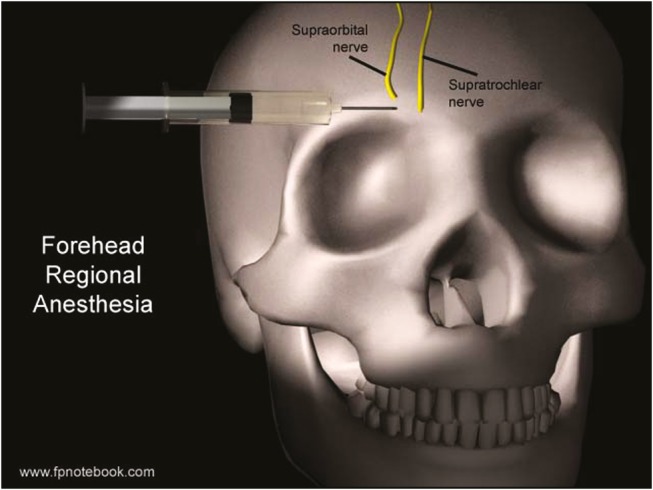
Site of injecting for supratrochlear and supraorbital nerve block (Source: www.fpnotebook.com)
IMPLANTATION
Before discussing the various techniques of implantation, it is important to know the general principles of implantation.
Principles of implantation
The three principles to be considered are density, distribution and arrangement, and angulation and direction of hairs.
-
Density is the most important principle/rule while implanting. On an average, the central tuft should have a density of 40–45 grafts/cm2 and the frontal transition zone should have a density of 25 grafts/cm2 [Figure 4]. Giving a very high density of more than 60 grafts/cm2 can hamper the dermal vasculature and create an environment of ischemia, leading to less graft survival. It also causes premature depletion of the donor area; however, the recent availability of body hair has made larger number of donor hair available and removed this limit, at least in some patients.
It is also important to analyze all the factors for optimum results, not just density, which contribute to appearance. These include the thickness of the hair, number of follicular units of different types, the color, direction, frizziness, and so on.[5,6,7] It is vital to consider patient’s requirements also.
Another principle to note is the arrangement of the grafts. Only single follicle graft should be in the frontal transition zone and they should be implanted into smaller slits, made with 19G needle or smaller blades (less than 0.9mm). The transition zone should have a density of 20–30 grafts/cm2 and on an average 600–900 grafts are required to fulfil this. Higher volume grafts with 3–5 hairs should be implanted in the central tuft or on the lateral crease (area of parting where patient normally parts hair while styling). Also the grafts should never be implanted in symmetrical rows and columns, there should be a random arrangement to give a natural look.[8,9]
To achieve natural results, two other aspects that need detailed discussion are angle of implantation and direction. The angle of implanting the graft should be 45degrees or less and even further acute in the temporal triangles. Giving a higher angle makes the hair stand up or difficult to comb. The direction of the slits can be done in a radial pattern extending outward or following the natural angle of the hair. In case of vertex implantation, the direction is in a whorl pattern using the concept of crosshatching to give illusion of higher density.[10]
Figure 4.
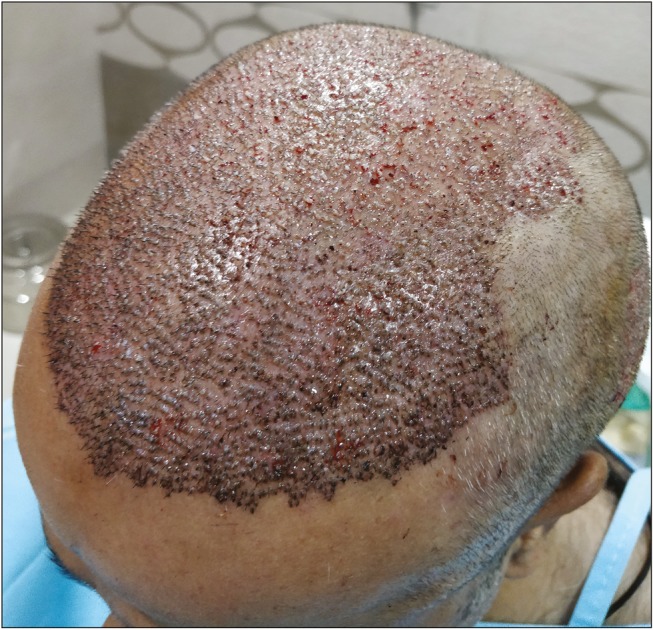
Recipient area after implantation
Although in most patients, the follicular unit grafts are adequate, in some situations, particularly patients with thin hair and 1–2 hair grafts, larger grafts are needed to create density. In such instances, larger grafts containing multiple follicle units (4–6 hairs) or coupled follicular units can be used. However, they should be placed only in the center of the bald area as they are not aesthetically pleasing.
Methods of implantation
There are multiple methods of implantation of grafts with variable combinations. The two main types are slit and forceps implantation and implantation with implanters.
Slit and forceps implantation
As the name suggests, this method uses forceps to insert grafts into slits or holes. The slits can be premade, all in one go followed by insertion called premade slit and forceps method. Alternately, a slit can be made followed immediately by grafts insertion called the stick and place method (simultaneously making slits and placing grafts). The slits can be made either perpendicular to direction of hair called coronal slits or can be made parallel to direction of hair called sagittal slits. Each of these types of slits has their own merits and demerits and one must chose the method that suits them the best. The slits can made either with blades or with needles. Instruments needed are shown in Table 2.
Table 2.
List of instruments needed for slit creation and implantation
| For slit creation | For insertion |
|---|---|
| 18,19,20 gauge needles. | Angled jewellers forceps in dominant hand |
| Nokor needles have been used in earlier days[11,12] | 18, 19, 20 gauge needle in non-dominant hand |
| Designer blades of various size | Angled jewellers forceps can also be in both hands |
| Self-made blades from razor blades inserted on a slit blade holder or needle holder | Self-made inserter can be created by separating the implantation forceps at its bend and using one of its arms in the non-dominant hand |
Technique
Premade slits method: For making the slits, the surgeon sits at the head end of the patient. The instrument of choice, for making the slits, is held in the dominant hand between the thumb and the index finger and supported with the middle finger, with the sharp end facing the surgeon. Keeping an acute angle and as per the predecided design of hairline, slits are made. The depth of the slit should be 1mm less than the graft length, if it is deeper it can cause deeper implantation, causing folliculitis and if it is too shallow, it can cause popping of grafts. After making the slits, they are stained with methylene blue or gentian violet to help identify them during implantation.[13]
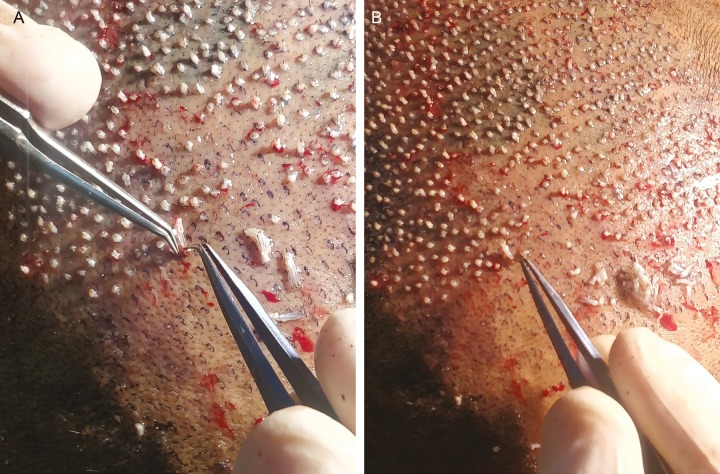
Implantation into slits is carried out with an angled forceps and can be done with one or two forceps. In the two-forceps method, one forceps splits the slit wide to assist the placing of the grafts with the second forceps [Figure 5A and B]. The graft is held just above the bulge area, with care taken not to damage it. We also use a newer method, where two forceps are used, and during implantation, the second forceps holds the grafts at the hair shaft above the epidermis to avoid damage to the graft. The major advantage of premade slits and forceps methods is that it allows the surgeon to plan, in one go, the entire area, paying attention to the different aforementioned factors. The disadvantage is that this method needs an experienced team, which can dissect in time the required number of grafts and then place them quickly in the sites.
Figure 5.
(A) Implantation with 2 forceps. (B) Implantation with a single forceps
Stick and place method: In this method, an 18G needle is held in the non-dominant hand for making the slits and simultaneously, a forceps in the dominant hand is used to implant the graft. When the needle is inserted till the desired depth, the graft is pushed into the beveled gap of the needle, now as the needle is pulled up, the graft is pushed further down into the slit. Reverse implantation can also be carried out by this technique by holding the graft at the shaft above the epidermis and using the beveled hollow of the needle to insert the grafts.[14] The major advantage of this method is that putting the grafts inside immediately minimizes bleeding, it is very suitable while inserting in hairy areas and is entirely under the control of the surgeon. The disadvantages are that the method is time-consuming.
Innovations in making slits are as follows:
There are specialized blade holders available now to make slits that can count the number of slits made simultaneously.
Stamp technique: Stamps can be purchased or made with premarkings of density (40/50/60 dots/cm2), these help in being certain of the density being given rather than an approximation by the surgeon.
The newer version of the ARTAS robotic hair transplant device can now implant too.
Problems encountered during implantation are as follows:
-
Popping of grafts[15,16]: Excessive maneuvering to place a graft might dislodge an adjacent graft. This can be extremely frustrating and is commonly referred to as popping. Causes of popping are listed as follows:
- Chubby grafts
- Small slits
- Shallow slits
- Intersecting direction of slits in the hairline
- Excessive bleeding
- Too much density
- Improper technique of insertion
- Increased elasticity of skin
To avoid popping, the following tips may help:
- One method is to place grafts in every alternate slit initially, and then come back and cover the remaining slits once the grafts are a little more stable because of hemostasis
- Ensure proper hemostasis
- Implanting from back to front
- Slide the graft along the direction of the slit
- Using traction with the nondominant hand. This is usually carried out only in the frontal direction on the forehead but can be given in the posterior direction by the thumb of the nondominant in case of excessive popping or by another technician
Excessive bleeding: This may occur in any cases, not necessarily in a patient on blood thinners or alcoholic only. High blood pressure can also lead to more bleeding. Using tumescent anesthesia with adrenaline is most helpful in these cases. Also, it is important to wait 5min after injecting tumescent anesthesia, to let the adrenaline start acting. Using ear buds to apply pressure on the individual bleeding slits has been tried by few surgeons too.[15]
Desiccation of grafts: To avoid desiccation of grafts during implantation, it is important to give irrigation to the grafts during all steps. Limmer[16] performed an in vivo study using chilled normal saline as the holding solution. The results are shown in Table 3.
Table 3.
Relation between out of body time and survival of grafts as studied in vivo by Limmer et al
| Time-out of body for grafts | Percentage of survived grafts |
|---|---|
| 2 h | 95% |
| 4 h | 90% |
| 6 h | 86% |
| 8 h | 88% |
| 24 h | 79% |
| 48 h | 54% |
Limmer[16] related a good “rule of thumb,” stating that the loss was roughly 1% per hour. From the time the grafts are removed from the holding solution till the end of the surgery, it is the technician’s responsibility to maintain the hydration of the grafts. A designated technician is given this task. We prefer using a 10-mL syringe with a 26G needle attached for this purpose. Alternately a spray bottle can be used to keep the grafts hydrated. To decrease the pressure of water, the 26G needle is broken and then attached. Irrigation also helps in maintaining a bloodless and clean field for surgery by washing off the excess clots.
Implantation with implanters
Implanters were designed to automate the process of implantation and make it easier. This device was first invented in the 1990s by Yung Chul Chou of the Kyungpook National University, who designed the device to reduce the amount of labor involved during hair transplants as well as to reduce the amount of direct physical contact with the recipient’s scalp. By minimizing the amount of direct physical contact, the scalp experiences less trauma during the procedure and can heal more quickly. An implanter pen also shortens the amount of time that the follicular unit spends outside of the body, which in turn increases its odds of survivability. Some of the various implanters designed include the Boudjema implanter pen, Lion implanter, Rassman implanter, Choi implanter, SAVA implanter, and the NeoGraft implantation device.[17] Of these, only the Choi implanter gained popularity and underwent several modifications.
Choi implanter[18]
It consists of a needle with a bevel where the graft is placed, a body, and a plunger, which pushes the graft into the slit.
The hair is placed into the bevel using plain forceps, with the bulb facing the needle. This is performed by an assistant who then hands over the implanter to the surgeon. The implanter is held steady and located on the skin at the appropriate angle. The implanter is inserted in with the beveled side facing sideways and is rotated inside the skin along with pushing the plunger and inserting the graft inside. A depth control mark is present in most implanters to guide the depth of the graft. The implanter is then removed [Figure 6].
Figure 6.
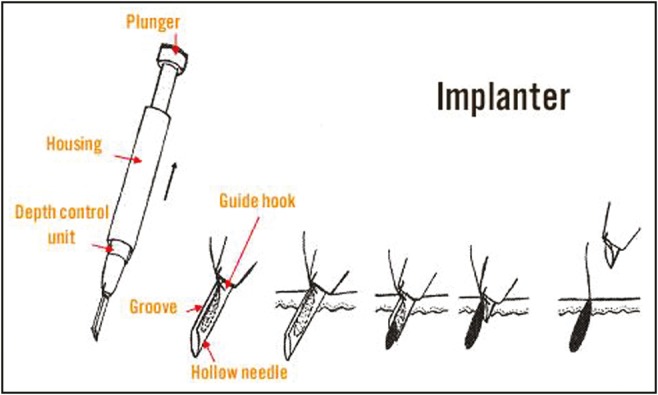
Mechanism of Choi implanter (Source: www.hairtransplantmentor.com)
Four implanters are most commonly used at the same time with an assistant reloading the implanters, so that minimal time is lost in between grafts. They are available in different sizes, such as 0.8, 0.9, and 1mm, and two different sizes are ideally used during surgery for the different types of grafts.
Other implanters—The SAVA implanter: One of the criticisms of the Choi implanter was the fact that it had many moving parts, which could break down and that it was comparatively more expensive. To address these issues, the SAVA implanter was designed in India as a low-cost alternative. Similar to other implanters, the assistant loads the graft into the SAVA implanter before handing it to the surgeon. This implanter comes with an additional device called the introducer. After the graft is placed in the implanter, it is inserted into the skin and then the graft is slid in using the introducer. However, surgeons’ fatigue is more with the SAVA implanter as both the hands are involved during implantation, hence SAVA plus was introduced. It is an upgraded version, which is more similar to the Choi implanter [Figure 7]. Advantages and disadvantages of implanters are listed in–– Table 4.
Figure 7.
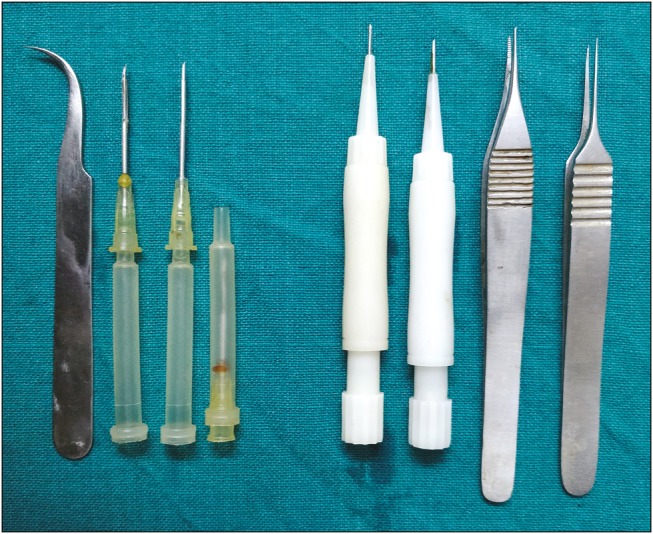
Implantation instruments and implanters (left to right: introducer used with SAVA implanter, SAVA implanters, Choi implanters, and straight forceps used to load the implanters)
Table 4.
Different advantages and disadvantages of implanter technique
| Advantage | Disadvantage |
|---|---|
| Implanters make handling of the graft minimal | Additional cost as they are disposable |
| Dissection needs to be precise as graft needs to be loaded into the slit on the needle of the implanter, this is avoided in FUE | |
| Implantation is quick | |
| It is easy to use in between existing hairs | |
| Implantation in different angles is possible | Loading the implanter with the graft needs training and additional staff |
| Depth control is possible | |
| Popping can be avoided by changing the direction of insertion more tangentially to find the avascular plane | |
| Popping can occur, in which case graft has to be placed by the above other method. Only one surgeon can implant at one time, hence may be time-consuming till the surgeon gains experience |
Overview: It is important to recognize that all the different methods of implantation have their own pros and cons. A surgeon should be familiar with all methods.
Greatest advantage of premade slits and forceps methods is that it reduces the surgeon’s involvement. But it can lead to errors between the dissecting time and the implanting time, as it needs proper coordination. Hence, it is a method suitable for an experienced surgeon with a good team.
The greatest advantage of stick and place method is its ease, accuracy, and control. However, it is time-consuming. It is a good method for beginners and is also necessary to know for combining with other methods when needed.
The greatest advantage of the implanters is its ease and easy-learning curve; however, it can be more expensive.
Ultimately, it is necessary to have all the arrows in one’s quiver to choose the appropriate one for each scenario [Table 5].
Table 5.
Comparison of all the implantation techniques
| Features | Preformed slit | Stick and place | Implanters |
|---|---|---|---|
| Methodology | All slits are made in one go, followed by placing of grafts by the assistants | After every slit, graft is placed in it, one at a time | Slit and placement in one step using an implanter |
| Speed | Fast | Slow | Fast |
| Staff | 2–3 assistants can implant at one time | Only one at a time | Only one at a time |
| Accuracy in counting | Assistants may skip slits in between and lead to error in calculations | Accurate | Accurate |
| Bleeding | Occurs only during first step while making slits | Bleeding while making slits leads to popping | Bleeding while implanting leads to popping |
| Identification of slits | Marking ink is required in dark skinned patients | Easy | Easy |
| Grafting between existing hair | Difficult | Easy | Easy |
| Accuracy in angle and direction | May vary since carried out by assistants | Accurate | Accurate |
| Cost | Cheap | Cheap | Consumable cost of implanters |
| Surgeon dependency | Less surgeon dependent | Surgeon dependent | Surgeon dependent |
Holding solutions: During the entire surgery, there is always a chance of damaging the grafts via different mechanisms, such as dehydration, transection, in-process blunt trauma, and ischemia reperfusion injury.[19] A review of the entire surgery in detail, highlights the fact that at every step, the grafts can get potentially damaged. Maintaining a short duration of time between extraction and implantation is very crucial to increase the graft survival as shown by Limmer.[16] Hence, using a good storage solution during this crucial time helps in balancing the altered cellular hemostasis occurring in the graft once it is removed from the scalp. Normal saline, ringer lactate, HypoThermosol A, ATP-activated solutions, and most platelet-rich plasma are some of the most commonly used holding solutions currently. Intracellular solutions are better at maintain graft viability than extracellular solutions. Table 6 gives a brief overview of the different holding solutions.[20,21]
Table 6.
Overview of different holding solutions[20]
| Medium | pH | Osmolarity | Buffer | Comments |
|---|---|---|---|---|
| Human Serum | 7.4 | 289 | Bicarbonate | Bicarbonate is a suboptimal pH buffer for cold storage solutions |
| Normal Saline | 5.0 | 308 | None | Extracellular balance |
| Ringer Lactate | 6.5 | 273 | Lactate | Extracellular balance |
| Plasma-lyte A | 7.4 | 294 | Acetate gluconate | Extracellular Balance |
| Hypothermosol- FRS | 7.6 | 360 | HEPES | Intracellular-like balance |
| Sterile water | 5.5 | 0 | None | If used will kill all grafts |
Another important aspect of grafts survival is temperature of holding solutions. Two studies have shown that chilled normal saline (1–4°C) compared to normal saline can increase graft survival out of body compared to storage at room temperature. This effect of cold temperature is remarkable after 5h of out of body time.[22,23]
Recently, platelet-rich plasma and alone plasma as well have been used as a holding solution. This aspect is discussed in greater detail in another article in this symposium.
Natural course of events after hair transplantation
The grafts when transplanted, because of displacement and time spent out of body, undergo a shift from anagen phase to telogen phase. Hence, a natural loss of hairs is noticed from the second week to the fourth week. The growth then occurs after a lag phase of about 3 months. The hairs then grow 1–1.25cm a month, which is the natural pattern of scalp hair. However, as each hair has its own cycle, it is not necessary that all hair may fall. Early use of minoxidil may decrease this hair fall. It is also important to differentiate this hair fall from shock loss, which denotes loss of existing hairs after surgery and is particularly common over the donor area adjacent to suture area and also over recipient area, when grafting is done amid preexisting hairs.
POSTOPERATIVE CARE
Postoperative care after hair transplant surgery is important both from the view of current surgery and also from the view of possible future surgeries. Postoperative pain, edema, healing, and so on, all affect patient comfort, particularly in strip technique. Patient education is therefore particularly important.
Postoperative wound care
A detailed postoperative instruction sheet needs to be provided so that above events do not come as a surprise to the patient. It is in fact preferable to hand over this sheet before surgery so that the patient is prepared to face the issues.
Bandaging: This mainly depends on the surgeon’s preference. However, bandaging is preferred by us as it prevents postoperative bleeding, graft displacement, and may also help in providing a moist environment to the grafts. Some surgeons prefer to cover only donor strip wound but not the recipient area. We prefer to provide a bandage to both recipient and donor areas. It is further recommended that a bandage be mandatorily used in excessive intraoperative bleeding, patients who have had popping, agitated patient, patients who have had multifollicular grafts (which are more likely to be displaced), and if in the opinion of surgeon, a risk of bleeding is anticipated. Paraffin-coated gauze should ideally be the first layer of the dressing, followed by roller bandage on the recipient area.
Bath and shampooing: Many surgeons prefer to shampoo the recipient area at the end of surgery. Others prefer to do it the next day. Regular shampooing with rubbing off the crusts can be started from 7 to 10 days after surgery.
Several solutions have been promoted for facilitating postoperative wound care, such as the following:
Platelet-rich plasma injected intraoperatively and postoperatively every month till 3 months[24]
Solutions containing copper peptides and ATP
Solutions containing growth factors such as platelet-derived growth factors
Evidence is lacking for these and hence, it is a matter of individual preference.
Bathing: Use of a mild shampoo (we prefer a baby shampoo) is usually preferred at 7–10 days after surgery. Tepid water, which is allowed to trickle on to grafts, is advised than a forceful shower. Frequent wetting with saline helps avoid crusts. Most patients are afraid to touch either donor or the recipient area and need adequate counseling. It is not unusual to see patients return a week later with greenish dust settled on the grafts.
Postoperative edema: This can be a major concern for patients, particularly those who need to travel or return to work early. It is important, therefore, to factor in the possibility of forehead and eyelid edema occurring on 4th or 5th day and often persisting for 3–5 days. In our experience, this edema is more common in elderly patients, perhaps because of the lax skin. Several measures, such as use of a head band, injection of steroid triamcinolone into frontal scalp, oral steroid for 3–5 days, mixing steroid in tumescent solution (Abbassi solution), and lying down for prolonged periods to avoid effect of gravity, have all been advocated.[2] Once it occurs, it persists for 3–5 days and in our experience, masterly inactivity, frequent counseling, and watchful expectancy are all that is needed. Cold compresses are usually advised and though their efficacy is doubtful, they at least help in keeping the patients engaged.
Minoxidil use: Early minoxidil is advocated as it may prevent postoperative telogen effluvium and promote growth by enhancing blood supply. However, evidence for such beliefs is debatable.[18] Minoxidil frequently causes itching and hence may lead to dislodgement of grafts. It is therefore our practice to start the application after 5 days.[25,26,27,28]
COMPLICATIONS OF RECIPIENT SITE IN HAIR TRANSPLANTATION
There are complications that can occur intraoperatively and postoperatively. Intraoperative issues can be excessive bleeding and pain, whereas the ones that are troublesome to deal are the postoperative ones. These include poor growth, recurrent folliculitis, cobblestoning, shock loss, necrosis, and so on. These have been explained in detail in a separate article.
CONCLUSION
Hair transplantation is usually associated with an uneventful and predictable recovery period. Detailed counseling will ensure such a smooth recovery. The surgeon should be available on phone/SMS/e-mail at all times to clear any doubts and issues that arise.
Declaration of patient consent
The authors certify that they have obtained all appropriate patient consent forms. In the form the patient(s) has/have given his/her/their consent for his/her/their images and other clinical information to be reported in the journal. The patients understand that their names and initials will not be published and due efforts will be made to conceal their identity, but anonymity cannot be guaranteed.
Financial support and sponsorship
Nil.
Conflicts of interest
There are no conflicts of interest.
REFERENCES
- 1.Rose PT, Parsley WM. The science of hairline design. In: Haber RS, Stough DB, editors. Procedures in cosmetic dermatology. Hair transplantation. Philadelphia, PA: Elsevier Saunders; 2006. pp. 55–72. [Google Scholar]
- 2.Shapiro R. Creating a natural hairline in one session using a systemic approach and modern principles of hairline design. Int J Cosm Surg Aesthetic Dermatol. 2001;3:89–99. [Google Scholar]
- 3.Unger W. Chapter 6A. Hairline zone. In: Unger W, Shapiro R, editors. Hair transplantation. 5th ed. New York: Informa; 2011. pp. 133–40. [Google Scholar]
- 4.Chang SC. Estimation of number of grafts and donor area. Hair Transplant Forum Int. 2001;11:101–3. [Google Scholar]
- 5.Unger WP. Density issue in hair transplantation. Dermatol Surg. 1998;24:297. [PubMed] [Google Scholar]
- 6.Marritt EE. The death of the density debate. Dermatol Surg. 1999;25:654–60. doi: 10.1046/j.1524-4725.1999.99067.x. [DOI] [PubMed] [Google Scholar]
- 7.Farjo B, Farjo N. Dense packing: surgical indications and technical considerations. Facial Plast Surg Clin North Am. 2013;21:431–6. doi: 10.1016/j.fsc.2013.06.004. [DOI] [PubMed] [Google Scholar]
- 8.Unger W. Different grafts for different purposes. Dermatol Surg. 1997;14:83. [Google Scholar]
- 9.Brandy DA. The art of mixing follicular units and follicular grouping in hair restoration. Dermatol Surg. 2002;28:320–8. doi: 10.1111/j.1524-4725.2004.30252.x. [DOI] [PubMed] [Google Scholar]
- 10.Haddab AM, Kohn T, Sidloi M. Effect of graft size, angle, and intergraft distance on dense packing in hair transplants. Dermatol Surg. 2004;30:846–56. doi: 10.1111/j.1524-4725.2005.31606. [DOI] [PubMed] [Google Scholar]
- 11.Brandy DA, Meshkin M. Utilization of No-Kor vented needles for slit-micrografts. J Dermatol Surg Onc. 1994;20:336–9. doi: 10.1111/j.1524-4725.1994.tb01634.x. [DOI] [PubMed] [Google Scholar]
- 12.Arnold J. Mini-blades and a mini-blade handle for hair transplantation. Am J Cosm Surg. 1997;14:195–200. [Google Scholar]
- 13.Speranzini M. The use of methylene blue to enhance site visualization and definition of areas by number of hairs per graft. Hair Transplant Forum Int. 2008;18:59. [Google Scholar]
- 14.Zontos G. The physics of follicular unit extraction. In: Lam S, Williams K, editors. Hair transplant 360–follicular unit extraction (FUE) New Delhi, India: Jaypee Press; 2015. pp. 45–68. [Google Scholar]
- 15.Dua A, Dua K. Follicular unit extraction hair transplant. J Cutan Aesthet Surg. 2010;3:76–81. doi: 10.4103/0974-2077.69015. [DOI] [PMC free article] [PubMed] [Google Scholar]
- 16.Limmer R. Micrograft survival. In: Stough D, Haber R, editors. Hair replacement. St. Louis, MO: Mosby; 1996. pp. 147–9. [Google Scholar]
- 17. [Last accessed on October 10, 2018]. Available from: www.neograft.com .
- 18.Choi YC, Kim JC. Single hair transplantation using the Choi hair transplanter. j Dermatol Surg Oncol. 1992;18:945–8. doi: 10.1111/j.1524-4725.1992.tb02765.x. [DOI] [PubMed] [Google Scholar]
- 19.Kim JC. Graft implanters. In: Unger W, Shapiro R, editors. Hair transplantation. 5th ed. New York: Informa; 2011. pp. 404–6. [Google Scholar]
- 20.Cooley J. Ischemia-reperfusion injury and graft storage solutions. Hair Transplant Forum Int. 2004;14:121, 127, 130. [Google Scholar]
- 21.Parsley WM, Perez-Meza D. Review of factors affecting the growth and survival of follicular grafts. J Cutan Aesthet Surg. 2010;3:69–75. doi: 10.4103/0974-2077.69014. [DOI] [PMC free article] [PubMed] [Google Scholar]
- 22.Raposio E, Cella A, Panarese P, Mantero S, Nordström RE, Santi P. Effects of cooling micrografts in hair transplantation surgery. Dermatol Surg. 1999;25:705–7. doi: 10.1046/j.1524-4725.1999.98287.x. [DOI] [PubMed] [Google Scholar]
- 23.Hwang SJ. The effects of dehydration, preservation temperature and time on the hair grafts. Ann Dermatol. 2002;14:149–52. [Google Scholar]
- 24.Garg S. Outcome of intra-operative injected platelet-rich plasma therapy during follicular unit extraction hair transplant: a prospective randomised study in forty patients. J Cutan Aesthet Surg. 2016;9:157–64. doi: 10.4103/0974-2077.191657. [DOI] [PMC free article] [PubMed] [Google Scholar]
- 25.Hitzig GS. Enhanced healing and growth in hair transplantations using copper peptides. Cosm Dermatol. 2000;13:18–22. [Google Scholar]
- 26.Hwang S. Gravity position to prevent facial edema in hair transplantation. Hair Transplant Forum Int. 2009;19:80. [Google Scholar]
- 27.Abbasi G. Hair transplantation without post-operative edema. Hair Transplant Forum Int. 2005;15:157. [Google Scholar]
- 28.Nordstrom RE, Nordstrom RM. The effect of corticosterioids on post-operative edema. In: Unger W, Nordstrom R, editors. Hair transplantation. New York: Marcel Dekker; 1988. pp. 391–4. [Google Scholar]


