

Abstract
Despite many advancements in brain cancer therapeutics, brain cancer remains one of the most elusive diseases with high migratory capacity and a dismal prognosis. It is well established that tumor stem cells utilize the same available migratory machinery that normal cells employ. Some of the major determinants of brain tumor stem cell migration are their cytoskeletal rearrangements and adhesion dynamics. This phenomenon allows brain tumor stem cells to perpetually migrate, invade, and repopulate in a vicious cycle leading to tumor expansion and invasion at tumor boundaries. In order to dissect the enabling factors that allow for this process to be hijacked, we have identified relevant assays to enable measurements of neoplastic migration such as Boyden Chamber, 3D chemogradient chamber, Nanopattern, and wound healing assays. Our purpose is to report the complex experimental platforms seen in the literature today and provide an optimal platform to kick off your studies in this field.
Keywords: BTICs migration, Transwell, Boyden chamber, Chemogradient chamber, Nanopattern, Wound healing assay
1. Introduction
Despite vigorous treatment combinations of surgery, chemotherapy, and radiation, there is almost a universal recurrence rate due to a small subset of cells known as brain tumor initiating cells (BTICs). BTICs can move as singular cells or move in clusters to infiltrate delicate matrices in various ways [1]. Their invasive capacity is enabled through the decisive manipulation of their shape, size, stiffness, and volume as well as expressing the pro-migratory signals that facilitate their motility. In order to delineate the precise factors responsible for your cells’ motile capacity, we have highlighted some laboratory assays that have been widely used in the field. Migration is defined as the movement of cells through a substrate or a porous membrane in a predictable fashion with speed, directionality, and persistence. Cancer initiating cell migration has been a significant interest in the field of brain tumor biology and substantial efforts have been put forth to identify the distinct molecular players underlying this hi-jacked process leading to eventual cancer metastasis [2]. BTICs can migrate “singularly” or “collectively” in a cohort establishing organized motile tumor masses that invade secondary organs [1, 3]. Most solid tumors use “collective migration” defined by a single cell via cadherins and other adhesion receptors to bind to the direct adjacent cell, while cell-cell communication manifests via gap-junctions [4]. Glioblastoma, a grade IV glioma for instance, travels through what is termed “mesenchymal migration” that is dependent on integrin associated adhesion dynamics and frictional forces navigating the leading and lagging edges mediating directional migration [4–6]. We have laid out a foundation of experimental assays that will resolve your curiosity of the mechanical capability of brain tumor initiating cell migration collectively and down to the single cell; it is essential to understand the engines involved in propelling cancer cells forward and how to stifle these very engines that took so many lives.
2. Materials
2.1. Boyden Chamber
Standard 24-well plate.
Transwell unit: predetermine pore size—8.0 μm polycarbonate membrane—6.5 mm TC-treated with lid, sterile.
BTIC Base media: 500 mL DMEM/F-12 1% antibiotic (5 mL antibiotic) add Neuroplex.
10 mL Neuroplex without vitamin A serum-free supplement
Complete BTIC media: 50 mL basal media with 20 ng/mL each of EGF and FGF.
Q-tips.
Cotton swabs.
PBS without calcium and magnesium.
4% paraformaldehyde.
Triton.
PBS with calcium and magnesium.
Fetal bovine serum.
VECTASHEILD mounting medium with DAPI.
Sterile pipette tips.
Sterile forceps.
Cell of interest to be seeded on top.
Charged white glass microscope slides.
Microscope cover slips.
AccuSharp disposable ophthalmic knives.
Chemoattractant: could consist of conditioned media, drug, serum, adherent cells at the bottom etc.
Trypsin.
15 mL conical tubes.
Cell counter.
Nail polish.
2.2. 3D Chemogradient Chamber
μ-Slide Chemotaxis, ibiTreat: #1.5 polymer coverslip, tissue culture treated, sterilized.
Matrigel suitable for cell culture.
Cells of interest.
Chemoattractant of interest.
A humid chamber to decrease evaporation (a petri dish with wet tissue can be used).
Inverted microscope with a 5 × objective and 10 × phase contrast.
Camera for time lapse movies and software for video processing.
Motorized stage for parallel data acquisition with auto focus.
CO2 Incubation system.
Graduated pipettes from 10–200 μL.
Beveled pipette tips from 10–200 μL (Greiner bio-one).
2.3. Nanopattern
Multi-well nanopattern with parallel ridges 350 nm wide, 500 nm high, and spaced 1.5 μm apart.
70% ethanol.
100% ethanol.
Poly-d-lysine (10 μg/mL).
Mouse laminin 1 μL/cm2.
Basement membrane (BBM) component.
Cell media.
Inverted microscope.
Temperature and gas controlled microscope chamber.
MATLAB script or your preferred software to allow manual tracking and measurement of cells frame by frame.
Phosphate-buffered saline (PBS) 1×.
Alconox.
Contact solution.
Windex.
Petri dish.
2.4. Wound Healing
Vi Cell counter machine.
12-well plates culture dish.
Native or transfected cells.
DMEM X12
Accutase.
Phosphate-buffered saline (PBS) 1×.
Bovine serum albumin (BSA).
Mouse laminin.
Sterile 200 μL micropipette tip.
Serum-free DMEM.
Stage incubator.
CO2 supply.
Digital camera connected to the inverted microscope
A software to analyze the captured image of your choice.
3. Methods
3.1. Boyden Chamber (Fig. 1)
Fig. 1.
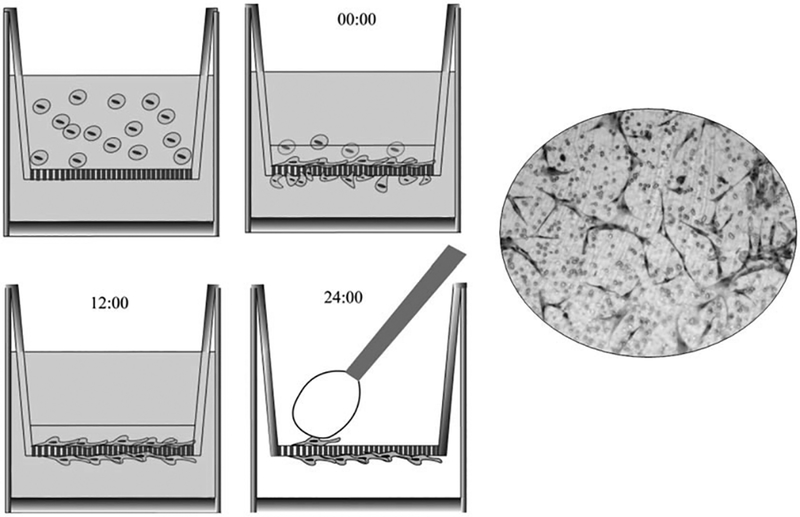
Boyden Chamber: The cells are placed in a well divide by a membrane with pores of different sizes. The upper chamber is filled with the treated or conditioned media with cells and the bottom chamber with a chemo gradient component. The cells in the upper chamber will migrate vertically to cross the membrane toward the bottom chamber. Adapted with permission from: Brief Report: Robo1 Regulates the Migration of Human Subventricular Zone Neural Progenitor Cells During Development. Guerrero-Cazares H, Lavell E, Chen L, Schiapparelli P, Lara-Velazquez M, Capilla-Gonzalez V, Clements AC, Drummond G, Noiman L, Thaler K, Burke A, Quiñones-Hinojosa A. Stem Cells. 2017 Jul;35(7):1860–1865. doi: 10.1002/stem.2628. Epub 2017 Apr 24
Pre-warm media of interest that will be tested. This media will include both your native media of your tested cells as well as the chemoattractant media.
Harvest migratory cell of interest by washing cells to be studied (BTICs) from flask with PBS and shake flask back and forth to remove cell debris.
Aspirate PBS from flask.
Add trypsin or cell dissociation reagent and incubate for 5–10 min or until cells detach and floating in flask.
Collected floated cells.
Place collected cell in 15 mL conical tube.
Spin cells at 200 × g from 5 min.
Aspirate the supernatant and resuspend pellet in 1 mL.
Count cell pellet to acquire final cell concentration in 1 mL.
Prepare desired concentration of chemoattractant +2% serum at 500–600 μL/well.
Assemble transwell inserts in your 24-well plate. Insert should be hanging above your 500–600 μL chemoattractant.
Add 2 × 10⁴ migratory cells (BTICs) inside transwell insert +0.5% serum (FBS or FCS) for a final volume of 200 μL per insert.
Incubate in 37 °C and leave overnight for migration (recommended 22–24 h).
When cells are ready to be counted, remove the transwell insert from each well and follow the steps as follows, sequentially:
Migratory cell counting for boyden chamber:
Use a new 24-well plate.
- Each row add.
- Row 1: 500 μL PBS across all wells.
- Row 2: 500 μL 4% PFA across all wells.
- Row 3: 500 μL PBS/0.1% Triton across all wells.
- Row 4: 500 μL PBS 1×.
Take out your 24-well plate with the migratory cells from incubator and remove each transwell.
Flip transwell over to remove all cells that have not migrated from the top (the inside of the transwell—at this point, all cells that have migrated are on the other side of the membrane facing the chemoattractant). All other cells that have not migrated are on the top of the membrane and inside the transwell where you first seeded them and need to be removed with a cotton swab.
Place a sterile cotton swab inside the transwell and gently scrape the membrane to remove all un-migrated cells making sure to get all corners.
Place transwell in row 1 to wash in PBS.
Remove transwell from the well in row 1 and clean inside with the cotton swab to remove any residual cells.
Place transwell in row 2 in 4% PFA for 5 min to fix cells.
Remove transwell from row 2, swab the top of the membrane with cotton swab again to remove any cells.
Place transwell in row 3 dipped in PBS/0.1% triton to permeabilize the cells for DAPI staining for quantification later in the protocol.
Remove transwell from row 3 and wipe inside to remove any residual non-migratory cells.
Place transwell in row 4 well in last step of PBS wash and swab.
Remove the transwell from row 4 and swab inside to remove any residual cells.
Take the AccuSharp disposable ophthalmic knives and cut the membrane making sure to visualize the side where the migratory cells are found (the bottom of the membrane).
Place the cut membrane with migrated cell side facing up, on a charged white glass microscope slides.
Place a drop of VECTASHEILD mounting medium with DAPI on the top of the membrane and allow drop to spread across the membrane making sure not to allow bubbles.
Place a microscope cover-slip on the top of the membrane slowly.
Seal coverslip on microscope slide using nail polish around the edges.
Visualize and count cells under an inverted microscope against controls.
3.2. 3D Chemogradient Chamber (Fig. 2)
Fig. 2.
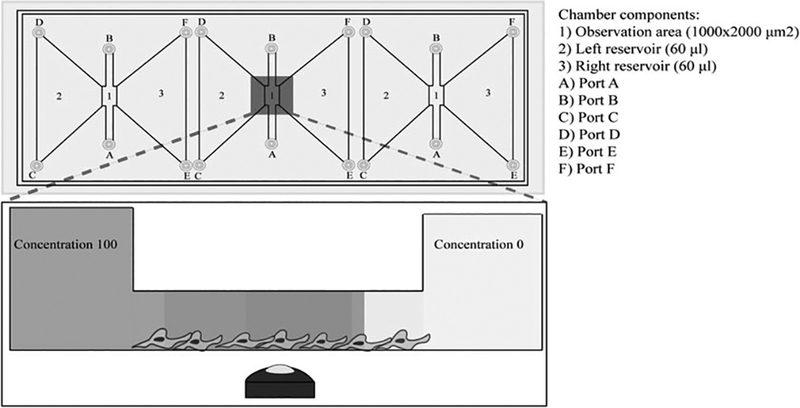
3D Chemogradient Assay: Chemogradient chamber enables the study of cellular migratory responses to chemical cues. The platform is subdivided into chambers where the observational chamber is coated to allow for cell attachment. A chemoattractant or a chemorepellent is put into one chamber and allowed to diffuse toward the other chamber on the opposite end. The chamber separation causes a chemo-gradient in a linear fashion whereby the chemo-factor concentration progressively decreases as you move further away from the chamber where the chemo-factor is added. This assay allows for the identification of chemotactic or chemorepellent activity of your agent of interest and the parallel assessment of volumetric contribution of your soluble factor to brain tumor migration in a dose-dependent manner
Unpack the μ-Slide Chemotaxis and put it into a humid chamber (a petri dish with a wet tissue inside)
-
1
Prepare cell suspension.
-
2
Resuspend a cell concentration of 3 × 10⁶ cells in 200 μL of culture media.
-
3
Mix the cell suspension with 100 μL of Matrigel® (see Note 1).
-
4
Close filling ports C, D, E, and F with the plugs. Handle the plugs with tweezers.
-
5
Use a 20 μL precooled pipet and apply 6 μL of the suspension to the top of filling port A, leaving space between the tip and the port (see Note 2).
-
6
With a 6 μL pipet aspirate air from the opposite filling port B. Press the pipet tip directly into the port until the suspension reaches the pipet tip.
-
7
Leave both filling ports A and B filled with gel.
-
8
Gently remove all plugs from filling ports C, D, E, and F. Close filling ports A and B with plugs.
-
9
Incubate at 37 °C the slide inside the petri dish to minimize evaporation until the gel is formed (approximately 30 min).
-
10
Control the cell morphology with a microscope during and after gelation.
-
11
Gently close filling ports C and D with plugs (chemoattractant side).
-
12
Fill the first reservoir by injecting 65 μL of the chemoattractant-free medium through filling port E. Keep in mind that filling ports E and F must be completely filled, but not overfilled.
-
13
Transfer the two plugs from the filling ports C and D to the filling ports E and F. This will close the chemoattractant-free side.
-
14
Fill the empty reservoir by injecting 65 μL of chemoattractant-free medium through filling port C.
-
15
Now the chamber is completely filled with chemoattractant-free medium and cells will only grow inside the gel in the observation area. Control your cells under the phase contrast microscope.
-
16
Use a 20 μL pipet (e.g., Gilson P-20) and apply 15 μL chemoattractant to the top of filling port C. Do not inject directly.
-
17
Aspirate 15 μL liquid from the opposite filling port D. Press the pipet tip directly into filling port D. The chemoattractant on the top of filling port C will be flushed inside and fill the reservoir.
-
18
Repeat the two mentioned steps again to load 30 μL of chemoattractant.
-
19
Gently close all filling ports.
Time-lapse
-
20
After selected incubation period, place the slide in an inverted microscope stage.
-
21
Set up a time-lapse experiment according to the selected conditions.
-
22
Export your images for analysis.
3.3. Nanopattern (Fig. 3)
Fig. 3.
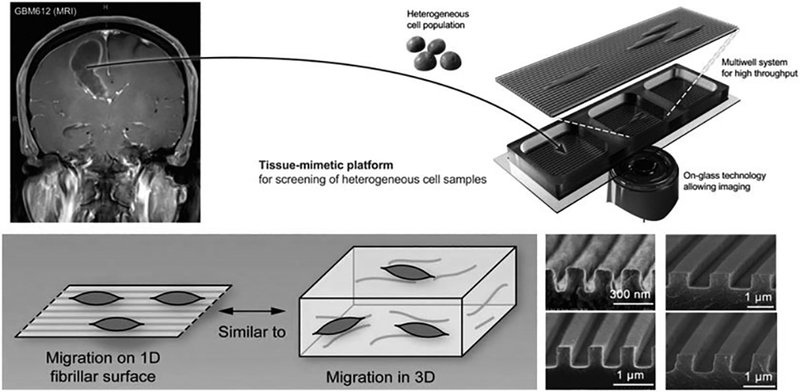
Nanopattern assay. Cancer cells with heterogeneous phenotypes are isolated from a patient’s tumor and placed in a smooth or patterned surface for a period of time. Imaging of migration and morphology with single-cell resolution can be capture to study the migratory behavior of the cancer cells. Adapted with permission from: Migration Phenotype of Brain-Cancer Cells Predicts Patient Outcomes. Chris L.Smith, OnurKilic, PaulaSchiapparelli2, HugoGuerrero-Cazares, Deok-HoKim, Neda I.Sedora-Roman, SakshamGupta, ThomasO’Donnell, Kaisorn L.Chaichana, Fausto J.Rodriguez, SaraAbbadi, JinSeokPark, AlfredoQuiñones-Hinojosa, AndreLevchenko. Cell Reports. 15(12),21. June 2016.Pages: 2616–2624
Cleaning nanopattern before experiment
Use sterile fluids for all steps.
Wash nanopattern wells with 500 μL PBS.
Pipette up and down to rinse pattern.
Aspirate PBS from the corners taking care not to scratch the well.
Add 500 μL alconox, pipette up and down and incubate for 15–30 min.
Wash with 500 μL sterile water, pipette up and down then aspirate.
Add 500 μL of sterile contact solution, pipette up and down then aspirate.
Incubate at room temperature overnight.
Next day, aspirate sterile contact solution and wash with water, then aspirate.
Wash with 500 μL Windex. Pipette up and down and aspirate.
Wash with 500 μL of 70% ethanol, pipette up and down and aspirate.
Let air dry for a few minutes.
Store in petri dish until later use.
Nanopattern preparation
Coat 8-well nanopattern plate with poly-D-lysine and incubate at room temperature for 15 min (use 400 μL per well).
Aspirate and coat with laminin solution at 400 μL/well.
Incubate laminin at room temperature for 1 h.
Aspirate laminin and put 400 μL of PBS per well until ready.
Seed cells to be tested at 4–5 × 10⁴/well in a 400 μL volume.
Nanopattern imaging software
Choose imaging software and preferred time-lapse parameters.
- Time points suggested.
- Time point: 60.
- Duration: 10 h.
- Interval: 10 min.
Count 100 cells per condition.
3.4. Wound Healing (Fig. 4)
Fig. 4.
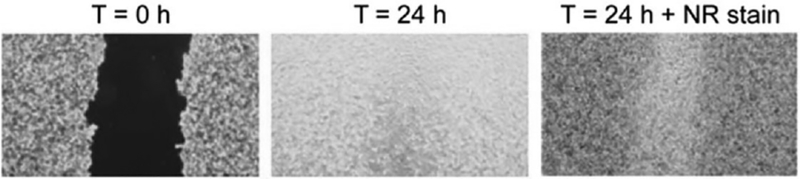
Wound Healing Assay: The wound healing assay allows the study of cellular migration through a scrape in a cellular culture monolayer. The cells on the edges of the scrape will migrate to close the wound, re-establishing cell to cell connections. (Modified from: The agar diffusion scratch assay - A novel method to assess the bioactive and cytotoxic potential of new materials and compounds. Mascha Pusnik, Minire Imeri, Grégoire Deppierraz, Arie Bruinink, and Manfred Zinn. Sci Rep. 2016; 6: 20854)
Coat the cell culture dishes with laminin/PBS 1 × dilution (20 μg/mL) to cover all the work surface, incubate the dishes at +37 °C, 5% CO2 for 2 h if a quick coating is needed or overnight for a slow coating (see Note 3).
Aspirate the laminin with a glass pipette, without disturbing the coated surface and refill the dishes with 3–5 mL of pre-warmed media before seeding the cells. If there is interest in a specific compound, this should be added into the media before seeding of cells as well (see Note 4).
Seed the required number of cells into the prepared dish.
Place the dish in incubation at +37 °C, 5% CO2. Depending on the nature of the cell line, 1 or 2 days would be needed to have a confluent monolayer.
With a 200 pipet tip scrap the center of the cell monolayer in a straight line to create a “scratch” (see Note 5).
Gently wash the cells once with 1 mL of the medium to remove the debris, then, replace with 3–5 mL of medium specific for the in vitro wound healing assay.
Determine the time period to monitor the scratch area (usually 0–48 h) (see Note 6).
Place the dish in a tissue culture incubator at 37 °C under a phase-contrast microscope and set the monitor session determining the reference points and the time frame in the microscope software (see Note 7).
Take the first picture and align the photographed region acquired in step 6 and acquire a second image.
Monitor migration distance of cells in each well using Meta-Morph software, version: 6.1. (Carl Zeiss, Germany).
Analyze and compare the images from time 0 to the last time point.
4. Notes
To decrease Matrigel density, tweezers, pipet tips, and the matrigel itself need to be maintained cold (on ice).
Do not inject the suspension (matrigel and cells) with the pipet placed directly into the port to avoid bubble formation.
The coated plates need to be placed in a flat surface without shaking, to ensure a uniform coating of the surface.
Culture medium solutions should be pre-warmed in a bath tank at +37 °C, 5% CO2 before use.
The width and height of the scratches in the monolayers cultures need to be approximately of similar size between groups (the assessed cells and control cells) to minimize variation.
To obtain the same field during the image acquisition, set the reference points close to the scratch. After selection of the reference points, place the dish under a phase-contrast microscope and acquire the first image of the scratch.
To select a time frame of incubation, migratory capabilities of the cells and the input of the tested conditions must be considered to achieve a complete closure of the scratch.
It is recommended to measure at least 100 cells.
Acknowledgments
AQH was supported by the Mayo Clinic Professorship and a Clinician Investigator award as well as the NIH (R43CA221490, R01CA200399, R01CA183827, R01CA195503, R01CA216855). MLV was supported by CONACYT and PECEM from the National Autonomous University of Mexico. We would like to thank Hugo Guerrero-Cazares for his contribution to figures in this chapter.
References
- 1.Smith CL, Kilic O, Schiapparelli P, Guerrero-Cazares H, Kim DH, Sedora-Roman NI et al. (2016) Migration phenotype of brain-Cancer cells predicts patient outcomes. Cell Rep 15(12):2616–2624 [DOI] [PMC free article] [PubMed] [Google Scholar]
- 2.van Zijl F, Krupitza G, Mikulits W (2011) Initial steps of metastasis: cell invasion and endothelial transmigration. Mutat Res 728(1–2):23–34 [DOI] [PMC free article] [PubMed] [Google Scholar]
- 3.Friedl P, Wolf K (2010) Plasticity of cell migration: a multiscale tuning model. J Cell Biol 188(1):11–19 [DOI] [PMC free article] [PubMed] [Google Scholar]
- 4.Petrie RJ, Yamada KM (2012) At the leading edge of three-dimensional cell migration. J Cell Sci 125(Pt 24):5917–5926 [DOI] [PMC free article] [PubMed] [Google Scholar]
- 5.Nina Kramera AW, Ungera C, Rosnera M, Krupitzab G, Hengstschl€agera M, Dolznig H (2012) In vitro cell migration and invasion assays. Mutat Res 752:10–24 ElSevier [DOI] [PubMed] [Google Scholar]
- 6.Tilghman J, Schiapparelli P, Lal B, Ying M, Quinones-Hinojosa A, Xia S et al. (2016) Regulation of Glioblastoma tumor-propagating cells by the integrin partner Tetraspanin CD151. Neoplasia 18(3):185–198 [DOI] [PMC free article] [PubMed] [Google Scholar]