Abstract
Background/purpose
To evaluate the reproducibility of the marginal and internal gaps of metal copings fabricated using dental micro-stereolithography (μ-SLA), which is an additive manufacturing system.
Materials and methods
A study cast of abutment tooth 46 was made from type-IV dental stone and was scanned to create a standard triangulation language file. Arrays of one (ORM), three (TRM), and six (SRM) resin copings were then fabricated on the μ-SLA build platform using investment, burnout, and casting (n = 12). The marginal and internal gaps of these metal copings were measured using a silicone-replica technique with a digital microscope (×160). The data obtained were analyzed using a non-parametric Kruskal–Wallis H test, a post-hoc Mann–Whitney U test, and a Bonferroni correction.
Results
The mean and standard deviation of the marginal gap for each group were measured and found to be 81.1 and 53.2 μm, 68.3 and 44.8 μm, and 90.3 and 57.7 μm for ORM, TRM, and SRM, respectively. There were no statistical differences in the marginal gaps of the three groups (p > 0.05).
Conclusion
The marginal and internal gap of ORM, TRM and SRM groups were considered clinically acceptable.
Keywords: CAD/CAM, marginal gap, micro-stereolithography, Ni–Cr
Introduction
Porcelain-fused-to-metal (PFM) crowns with substructures that consist primarily of a metal coping produced by the lost-wax technique are widely used in dentistry for fixed aesthetic restorations.1, 2, 3 The process of making PFM crowns involves carving the shape of the entire lost tooth on a prepared abutment with an appropriate coping thickness of 0.3–0.5 mm, which is then followed by spruing, investing, burnout, and casting.4, 5, 6, 7 The disadvantages of this approach include the time requirements for carving the wax and the reliance on a skilled dental technician, which makes it difficult to maintain a consistent quality level.
The need for an automated manufacturing system prompted the introduction of dental computer-aided design/manufacturing (CAD/CAM) in the 1970s, which made the fabrication of a dental prosthesis much faster and more accurate.8 These dental CAD/CAM systems can be classified as either subtractive manufacturing, in which a solid block is milled, or additive manufacturing, in which the material is built up layer by layer.8 Subtractive manufacturing can be applied to different materials and, by using different milling tools, it is possible to maintain high accuracy and achieve a very smooth surface. However, it is difficult to form a complex model with this method, and a large amount of material is wasted.8 In contrast, additive manufacturing allows complex shapes to be fabricated with less material wastage.8, 9, 10, 11
A micro-stereolithography (μ-SLA) system, which is an additive manufacturing technology, can provide the micrometer-scale resolution required for dentistry; it allows prostheses to be manufactured more quickly.12 This method is based on the use of an ultraviolet (UV) light source to cure a photopolymer resin in two dimensions and to control the shape in three dimensions, making it possible to manufacture various forms. Furthermore, by using a light-emitting diode as the UV source, light energy is transmitted to the target object more efficiently than it is with conventional digital light-processing systems used in the manufacturing of resin copings. In the case of dental μ-SLA, the process of fabricating a substructure for a PFM crown begins with the UV irradiation of a photopolymer to produce a resin coping, which is then used in place of a wax carving for metal casting. Park et al.13 reported The multi-jet modeling system (MJM) had a molar marginal gap of 83.2 μm. The μ-SLA was 69.3 μm. The μ-SLA showed a marginal gap results are excellent. This is capable of fabricating one or more resin copings on a single build platform. To date, no guidelines have been issued regarding the effect on the marginal and internal gaps of manufacturing several copings simultaneously. However, the marginal gap is the most important element of any metal coping because it determines the marginal fit of that coping. Furthermore, an incorrect marginal gap can lead to leakage, retention of subgingival plaque, and distribution of microflora,14, 15, 16 all of which can lead to the failure of the prosthesis as a result of hypersensitivity and secondary caries.17, 18 To date, there have been no studies on the accuracy of the μ-SLA technique in relation to the quantity of resin coping on the build platform.
The purpose of the present study is to evaluate the reproducibility of repeating one, three, and six metal copings fabricated using a μ-SLA system and to assess their clinical acceptability. The null hypothesis is that the marginal and internal gaps between the metal copings fabricated by a μ-SLA system are equivalent to each other.
Materials and methods
Master die
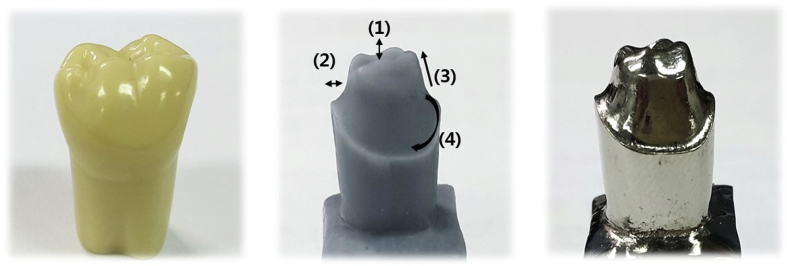
The master die selected for this study was a plastic mandibular right first molar (ANA-4; Frasaco GmbH, Tettnang, Germany) (Fig. 1), onto which an occlusal surface for an abutment was formed by uniformly removing 2 mm from the internal edges and 1.5–2 mm from the axial wall using a chamfer margin of 360° and an axis milling angle of 6° (Cruise 440; Silfradent, Sofia, Italy). This plastic master die was then replicated in silicone (Deguform; Degudent GmbH, Hanau-Wolfgang, Germany) and injected with molten wax (Geo Wax; Renfert GmbH, Hilzingen, Germany). The resulting wax die was then used to cast a nickel–chromium alloy (VeraBond 2V; Aalba Dent Inc., Fairfield, CA, USA) master die (Fig. 2).
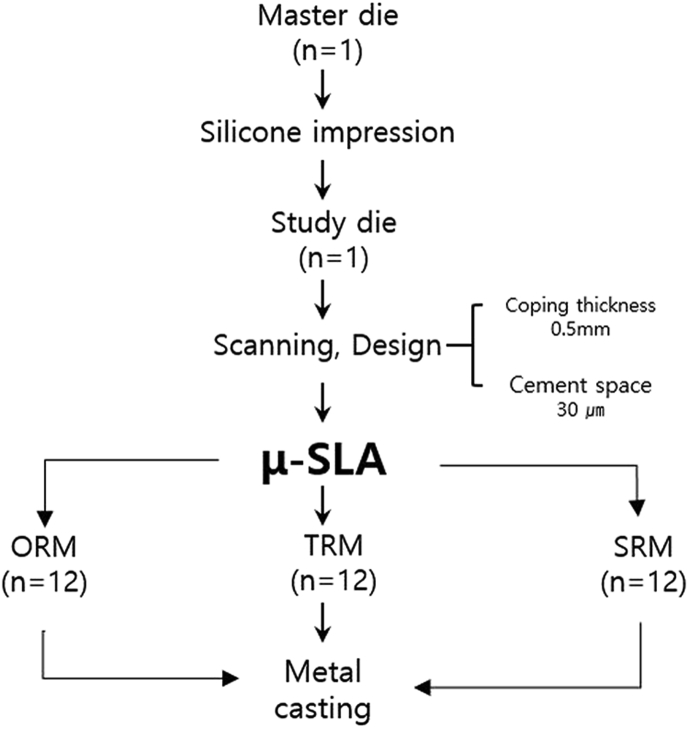
Figure 1.
Study design.
Figure 2.
Master die of cast nickel–chromium alloy: (1) 2.0-mm occlusal area, (2) 1.5–2-mm axial wall, (3) 6° taper angle, and (4) 360° chamfer margin.
Study die
By replicating the master die through a silicone impression (Aquasil Ultra XLV and Aquasil Ultra Rigid; Densply DeTrey GmbH, Konstanz, Germany), a study die was subsequently obtained by injecting plaster (Fujirock EP; GC Corp, Leuven, Belgium) that was mixed according to the manufacturer's recommended water/powder ratio.
Metal coping fabrication
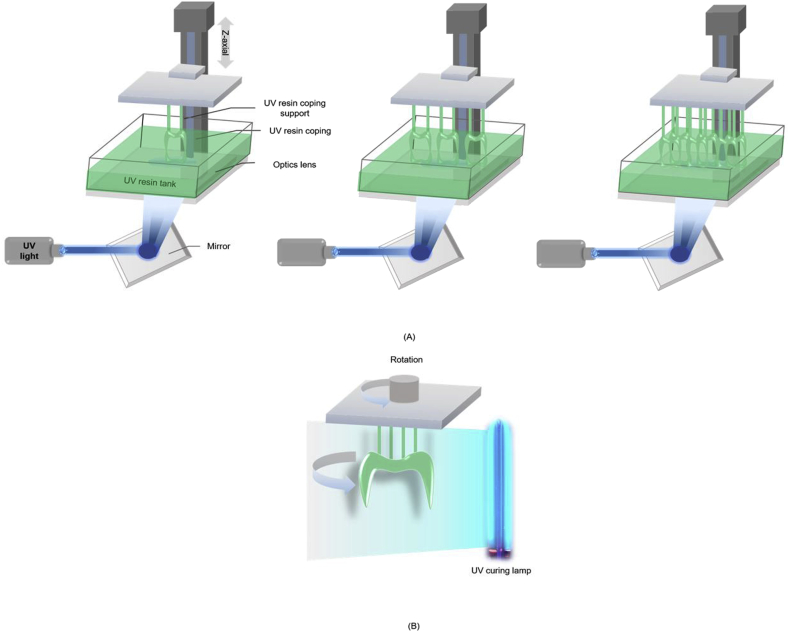
The fabricated study die was scanned using a model scanner (Identica Blue; Medit, Seoul, Korea) to produce a standard triangulation language (STL) file compatible with the DentCAD program (DentCAD; Delcam PLC, Birmingham, UK). The thickness of the coping was set to 0.5 mm, and the internal relief to account for the cement space was set to 30 μm. The STL file was then used with a μ-SLA system (ProJet 1200; 3D Systems, Rock Hill, SC, USA) to produce the coping (VisiJet FTX Green resin; 3D Systems, Rock Hill, SC, USA) using three methods: repeated fabrication of one resin coping 12 times (ORM), three resin copings 4 times (TRM), and six resin copings 2 times (SRM) on a build platform for metal copings (Fig. 3). This produced 36 resin copings that were then cured using a built-in UV lamp for 10 min (Table 1). This was followed by investment (Formula 1; Whip Mix Corp., Louisville, KY) according to the manufacturer's recommended liquid/powder ratio of 22 ml–100 mg, burn-out of the resin coping at 900 °C, and finally casting at 1370–1400 °C using turbulent oxygen–acetylene gas flames that were injected into the spinning metal ring to melt the alloy (VeraBond 2; Alba Dent Inc.).
Figure 3.
Schematic diagram of μ-SLA process: (A) resin coping fabricated for metal coping; (B) post-processing.
Table 1.
Production times for resin coping for each group (n = 12).
| Group | Arrangement build platform | Once produced (min) | Repetitions (number) | Post-UV processing (min) | Total time (min) |
|---|---|---|---|---|---|
| ORM group | 1 | 49 | 12 | 120 | 708 |
| TRM group | 3 | 49 | 4 | 40 | 236 |
| SRM group | 6 | 49 | 2 | 20 | 118 |
Measurement using silicone-replica technique with digital microscope
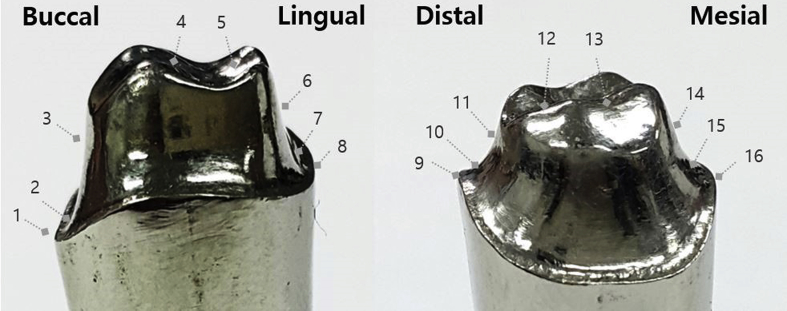
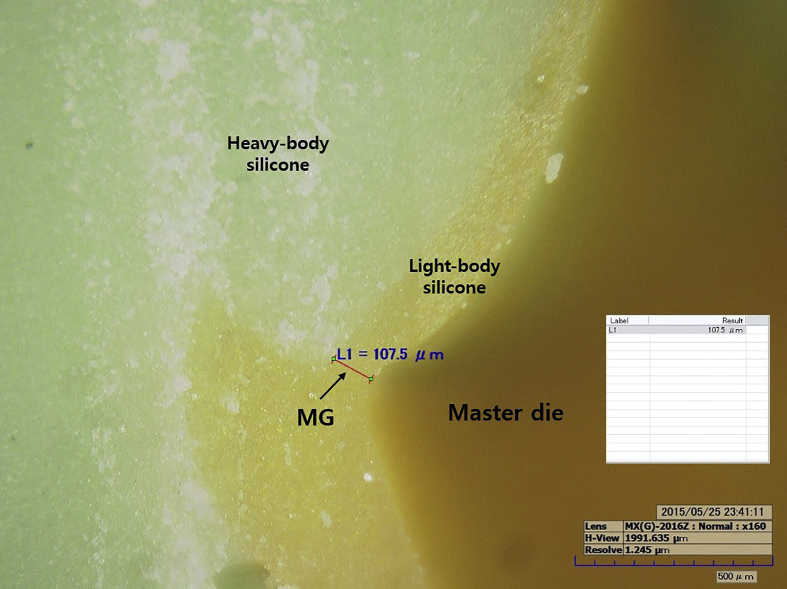
To measure the gap, a light-body silicone (Aquasil Ultra XLV; Densply DeTrey GmbH, Konstanz, Germany) was injected into the metal coping and held for 10 min under a force of 50 N (Instron 3345; Canton, MA, USA). After curing, the light-body silicone was separated from the metal coping and reinforced with a heavy-body material (Aquasil Ultra Rigid; Densply DeTrey GmbH, Konstanz, Germany) to form a stable film layer. The silicone replica was cut along the buccolingual and mesiodistal lines into four distinct parts: the marginal gap (MG), chamfer gap (CG), axial wall gap (AG), and occlusal gap (OG) (Fig. 4). The marginal and internal gaps in each of these parts were then measured using a digital microscope (HK-7700; HIROX, Tokyo, Japan) (Fig. 5).
Figure 4.
Measuring positions for marginal and internal gaps: MG (1, 8, 9, and 16), CG (2, 7, 10, and 15), AG (3, 6, 11, and 14), and OG (4, 5, 12, and 13).
Figure 5.
Measurement of marginal and internal gaps using digital microscope (×160).
Statistical analysis
In order to estimate the appropriate sample size, the efficacy of the test was examined in consideration of an effect size of 0.55, a type-Ⅰ error of 0.05, and a type-Ⅱ error of 0.8. Three experimental groups were selected. As a result, a total of 36 specimens were required and 12 specimens were determined for each group. Kolmogorov–Smirnov and Shapiro–Wilk tests were conducted to assess the non-normality, and a non-parametric Kruskal–Wallis test was performed with a type-I error level of 0.05. For post-testing, a Mann–Whitney U test and Bonferroni correction were used (p = 0.017). All of the statistical analyses were performed using statistical software (IBM SPSS 22.0; SPSS Inc., Chicago, IL, USA).
Results
Table 2 lists that ORM, TRM, and SRM had mean marginal gaps and standard deviations of 81.1 and 53.2 μm, 68.3 and 44.8 μm, and 90.3 and 57.7 μm, respectively. The AG had the lowest internal gap value. There were statistically significant differences between the AG and OG (p < 0.05). For each group, the overall measurements of the total gaps showed that ORM had the largest value (109.8 μm) but did not show statistically significant differences when compared to the other groups (p > 0.05).
Table 2.
Mean and standard deviation (SD) of marginal and internal gaps (μm) for each group (n = 12).
| Gapd | ORM |
TRM |
SRM |
Pc | |||
|---|---|---|---|---|---|---|---|
| Mean | SD | Mean | SD | Mean | SD | ||
| MG | 81.1 | 53.2 | 68.3 | 44.8 | 90.3 | 57.7 | 0.101 |
| CG | 100.0 | 60.3 | 83.1 | 53.3 | 101.8 | 64.2 | 0.218 |
| AG | 84.9a | 48.1 | 96.9b | 53.3 | 89.1ab | 45.5 | 0.023 |
| OG | 173.3a | 49.7 | 122.8b | 42.0 | 135.3b | 53.7 | <0.001 |
| Total | 109.8 | 64.6 | 92.8 | 47.5 | 104.1 | 58.3 | 0.131 |
a.b Different letters indicate a significant difference between the three groups based on the Bonferroni-corrected Mann–Whitney U test.
c Analyzed by the nonparametric Kruskal–Wallis H test.
dMG = marginal gap; CG = chamfer gap; AG = axial wall gap; OG = occlusal gap.
Discussion
In the field of dentistry, when producing metal copings, nickel–chromium (Ni–Cr) or cobalt–chromium (Co–Cr) alloy is typically used as the base metal, with the latter being more biocompatible than the former.19 An Ni–Cr coping was used in the present study because it is frequently used in clinical applications. Measurements of the marginal and internal gaps in previous studies were typically achieved using either the cement technique20 or the silicone-replica technique.21, 22 The former involves measuring the cross section by cutting the silicone replica, whereas the latter entails encasing the coping and master die inside light-body silicone under a force of 50 N.20, 23 Once the silicone replica has formed, it is carefully removed from the coping, wrapped in heavy-body silicone, and cut along the buccolingual and mesiodistal lines. A microscope was then used to measure the light-body layer. This technique was selected for this study because it is simpler and less destructive than the analogous cement technique.
The most important area for margin measurements in this study was the MG area. Previous studies have reported a clinically acceptable marginal gap of 50–300 μm.21, 24, 25, 26, 27, 28, 29, 30 However, others have suggested a maximum of 120 μm.30 In the present study, the marginal gap in TRM was lower than that in both ORM and SRM; however, these differences were not statistically significant (p < 0.05), and all of the values were below the 120 μm limit. There was a difference in marginal gap on resin coping in the existing literature, but there was no significant difference in this study.31 This part is considered to have a positive effect by giving 30 μm cement space values to the metal coping inside.
The literature recommends an internal gap of less than 70 μm to reduce the fracture-strength symptoms of the crown.26, 27 However, the present study suggests that this value is greater than 70 μm. In addition, the internal gap was the highest in the OG area in each of the samples, which was a statistically significant difference (p < 0.05). A similar outcome has been reported in conventional subtractive manufacturing, which suggests that the same phenomenon is involved.28 Moreover, according to the report by Colpani et al.26 relating to the relief of the angle area, variations in the scanning process can greatly limit the ability of CAD/CAM systems.
The total gap with the best fit was observed in TRM. Moreover, ORM and SRM showed a misfit when compared to TRM. This finding confirmed that the energy of the coping-dependent UV light source was affected by the fit of the coping. In this study, all three clinical groups could be considered acceptable because the marginal gap value is more important than the internal gap, although the internal gap requires further research.
The overall marginal and internal gaps were both highly acceptable, and the greater standard deviations are believed to be due to the accumulation of optical diffraction,12 investment expansion processes, shrinkage of the metal coping in the casting process, or human error in the fabrication process.32, 33
Compared to multilayer additive manufacturing using UV photopolymer processing methods in the field of dentistry, μ-SLA produces excellent results with respect to the marginal gap. However, studies are yet to be performed regarding the accuracy with different quantities of resin copings on the build platform.
A limitation of the present study is the marginal and internal gap of resin copings was not measured in this study. Marginal and internal gap was measured only in metal coping. The reason for not evaluating the conformity on resin coping is that resin is weak against external force and there is possibility of deformation due to resin shrinkage. Therefore, the gap was evaluated on the metal copping without measuring the fit on the resin copping. Therefore, there is a limit to the accuracy of the resin coping in this study. In addition, a metal–ceramic crown is not the only metal coping in clinical use.
The present study has shown that the reproducibility of the marginal and internal gaps of a metal coping fabricated by a μ-SLA system for all the groups tested was within the limits of clinical acceptability, although the TRM had the best fit.
Conflict of interest
The authors have no conflicts of interest relevant to this article.
Acknowledgments
This study was supported by a Korea University Grant (k1716861).
References
- 1.Kim K.B., Kim W.C., Kim H.Y., Kim J.H. An evaluation of marginal fit of three-unit fixed dental prostheses fabricated by direct metal laser sintering system. Dent Mater. 2013;29:91–96. doi: 10.1016/j.dental.2013.04.007. [DOI] [PubMed] [Google Scholar]
- 2.Pettenò D., Schierano G., Bassi F., Bresciano M.E., Carossa S. Comparison of marginal fit of 3 different metal-ceramic systems: an in vitro study. Int J Prosthodont. 1999;13:405–408. [PubMed] [Google Scholar]
- 3.Xu D., Xiang N., Wei B. The marginal fit of selective laser melting–fabricated metal crowns: an in vitro study. J Prosthet Dent. 2014;112:1437–1440. doi: 10.1016/j.prosdent.2014.05.018. [DOI] [PubMed] [Google Scholar]
- 4.Tourah A., Moshaverinia A., Chee W.W. Effects of setting under air pressure on the number of surface pores and irregularities of dental investment materials. J Prosthet Dent. 2014;111:150–153. doi: 10.1016/j.prosdent.2013.06.014. [DOI] [PubMed] [Google Scholar]
- 5.Anusavice K., Hojjatie B., Dehoff P. Influence of metal thickness on stress distribution in metal-ceramic crowns. J Dent Res. 1986;65:1173–1178. doi: 10.1177/00220345860650091201. [DOI] [PubMed] [Google Scholar]
- 6.Holmes J.R., Pilcher E.S., Rivers J.A., Stewart R.M. Marginal fit of electroformed ceramometal crowns. J Prosthodont. 1996;5:111–114. doi: 10.1111/j.1532-849x.1996.tb00284.x. [DOI] [PubMed] [Google Scholar]
- 7.Gomaa M., Fahmy A. The relationship between the marginal integrity, surface adaptation of cast base metal crown and storage time & conditions of investing. J Am Sci. 2012;8:76–82. [Google Scholar]
- 8.Van Noort R. The future of dental devices is digital. Dent Mater. 2012;28:3–12. doi: 10.1016/j.dental.2011.10.014. [DOI] [PubMed] [Google Scholar]
- 9.Beuer F., Schweiger J., Edelhoff D. Digital dentistry: an overview of recent developments for CAD/CAM generated restorations. Br Dent J. 2008;204:505–511. doi: 10.1038/sj.bdj.2008.350. [DOI] [PubMed] [Google Scholar]
- 10.Luthardt R., Weber A., Rudolph H., Schöne C., Quaas S., Walter M. Design and production of dental prosthetic restorations: basic research on dental CAD/CAM technology. Int J Comput Dent. 2001;5:165–176. [PubMed] [Google Scholar]
- 11.Pradíes G., Zarauz C., Valverde A., Ferreiroa A., Martínez-Rus F. Clinical evaluation comparing the fit of all-ceramic crowns obtained from silicone and digital intraoral impressions based on wavefront sampling technology. J Dent. 2015;43:201–208. doi: 10.1016/j.jdent.2014.12.007. [DOI] [PubMed] [Google Scholar]
- 12.Berger U. Aspects of accuracy and precision in the additive manufacturing of plastic gears. Virtual Phys Prototyp. 2015;10:1–9. [Google Scholar]
- 13.Park J.Y., Kim H.Y., Kim J.H., Kim J.H., Kim W.C. Comparison of prosthetic models produced by traditional and additive manufacturing methods. J Adv Prosthodont. 2015;7:294–302. doi: 10.4047/jap.2015.7.4.294. [DOI] [PMC free article] [PubMed] [Google Scholar]
- 14.Heling I., Gorfil C., Slutzky H., Kopolovic K., Zalkind M., Slutzky-Goldberg I. Endodontic failure caused by inadequate restorative procedures: review and treatment recommendations. J Prosthet Dent. 2002;87:674–678. doi: 10.1067/mpr.2002.124453. [DOI] [PubMed] [Google Scholar]
- 15.Sailer I., Fehér A., Filser F., Gauckler L.J., Luthy H., Hammerle C.H.F. Five-year clinical results of zirconia frameworks for posterior fixed partial dentures. Int J Prosthodont. 2007;20:383–388. [PubMed] [Google Scholar]
- 16.Vagkopoulou T. Zirconia in dentistry: part 2. Evidence-based clinical breakthrough. Eur J Esthet Dent. 2009;4:348–380. [PubMed] [Google Scholar]
- 17.Wilson P.R. Effect of increasing cement space on cementation of artificial crowns. J Prosthet. 1994;71:560–564. doi: 10.1016/0022-3913(94)90437-5. [DOI] [PubMed] [Google Scholar]
- 18.Sundar M.K., Chikmagalur S.B., Pasha F. Marginal fit and microleakage of cast and metal laser sintered copings – an in vitro study. J Prosthodont Res. 2014;58:252–258. doi: 10.1016/j.jpor.2014.07.002. [DOI] [PubMed] [Google Scholar]
- 19.Ameer M., Khamis E., Al-Motlaq M. Electrochemical behaviour of recasting Ni–Cr and Co–Cr non-precious dental alloys. Corros Sci. 2004;46:2825–2836. [Google Scholar]
- 20.Behr M., Rosentritt M., Regnet T., Lang R., Handel G. Marginal adaptation in dentin of a self-adhesive universal resin cement compared with well-tried systems. Dent Mater. 2004;20:191–197. doi: 10.1016/s0109-5641(03)00091-5. [DOI] [PubMed] [Google Scholar]
- 21.Tinschert J., Natt G., Mautsch W., Spiekermann H., Anusavice K. Marginal fit of alumina- and zirconia-based fixed partial dentures produced by a CAD/CAM system. Oper Dent. 2001;26:367–374. [PubMed] [Google Scholar]
- 22.Molin M., Karlsson S. The fit of gold inlays and three ceramic inlay systems: a clinical and in vitro study. Acta Odontol Scand. 1993;51:201–206. doi: 10.3109/00016359309040568. [DOI] [PubMed] [Google Scholar]
- 23.Behr M., Rosentritt M., Leibrock A., Schneider-Feyrer S., Handel G. In-vitro study of fracture strength and marginal adaption of fibre-reinforced adhesive fixed partial inlay dentures. J Dent. 1999;27:163–168. doi: 10.1016/s0300-5712(98)00036-0. [DOI] [PubMed] [Google Scholar]
- 24.Kohorst P., Brinkmann H., Li J., Borchers L., Stiesch M. Marginal accuracy of four-unit zirconia fixed dental prostheses fabricated using different computer-aided design/computer-aided manufacturing systems. Eur J Oral Sci. 2009;117:319–325. doi: 10.1111/j.1600-0722.2009.00622.x. [DOI] [PubMed] [Google Scholar]
- 25.Tuntiprawon M., Wilson P.R. The effect of cement thickness on the fracture strength of all-ceramic crowns. Aust Dent J. 1995;40:17–21. doi: 10.1111/j.1834-7819.1995.tb05607.x. [DOI] [PubMed] [Google Scholar]
- 26.Colpani J.T., Borba M., Della Bona Á. Evaluation of marginal and internal fit of ceramic crown copings. Dent Mater. 2013;29:174–180. doi: 10.1016/j.dental.2012.10.012. [DOI] [PubMed] [Google Scholar]
- 27.Kokubo Y., Ohkubo C., Tsumita M., Miyashita A., Vult von Steyern P., Fukushima S. Clinical marginal and internal gaps of Procera AllCeram crowns. J Oral Rehabil. 2005;32:526–530. doi: 10.1111/j.1365-2842.2005.01458.x. [DOI] [PubMed] [Google Scholar]
- 28.Kokubo Y., Tsumita M., Kano T., Sakurai S., Fukushima S. Clinical marginal and internal gaps of zirconia all-ceramic crowns. J Prosthodont Res. 2011;55:40–43. doi: 10.1016/j.jpor.2010.09.001. [DOI] [PubMed] [Google Scholar]
- 29.Grenade C., Mainjot A., Vanheusden A. Fit of single tooth zirconia copings: comparison between various manufacturing processes. J Prosthet Dent. 2011;105:249–255. doi: 10.1016/S0022-3913(11)60040-1. [DOI] [PubMed] [Google Scholar]
- 30.McLean J.W., von Fraunhofer J.A. The estimation of cement film thickness by an in vivo technique. Br Dent J. 1971;131:107–111. doi: 10.1038/sj.bdj.4802708. [DOI] [PubMed] [Google Scholar]
- 31.Kim D.Y., Jeon J.H., Kim J.H., Kim H.Y., Kim W.C. Reproducibility of different arrangement of resin copings by dental microstereolithography: evaluating the marginal discrepancy of resin copings. J Prosthet Dent. 2017;117:260–265. doi: 10.1016/j.prosdent.2016.07.007. [DOI] [PubMed] [Google Scholar]
- 32.Euán R., Figueras-Álvarez O., Cabratosa-Termes J., Oliver-Parra R. Marginal adaptation of zirconium dioxide copings: influence of the CAD/CAM system and the finish line design. J Prosthet Dent. 2014;12:155–162. doi: 10.1016/j.prosdent.2013.10.012. [DOI] [PubMed] [Google Scholar]
- 33.Ng J., Ruse D., Wyatt C. A comparison of the marginal fit of crowns fabricated with digital and conventional methods. J Prosthet Dent. 2014;112:555–560. doi: 10.1016/j.prosdent.2013.12.002. [DOI] [PubMed] [Google Scholar]


