

Overview
Introduction
The Salto Talaris total ankle replacement is a fixed-bearing system that integrates a mobile tibial trial component that allows self-alignment on the distal tibial resected surface, as guided by the talar component.
Step 1: Preoperative Planning
A thorough preoperative assessment is crucial.
Step 2: Anterior Approach
Meticulous soft-tissue handling is essential.
Step 3: Tibial Preparation
Use intraoperative fluoroscopy and direct inspection to determine the appropriate alignment, tibial component size, and resection level as guided by the external tibial alignment and cutting guides.

Step 4: Talar Preparation
Use the largest talar component that does not impinge on either malleolus.


Step 5: Implant Trialing
Careful assessment of ankle range of motion and stability in conjunction with selection of an appropriately sized polyethylene insert and consideration of additional soft-tissue balancing procedures are key to implantation of a well-balanced stable ankle replacement.

Step 6: Final Implant Placement and Closure
Completion of a meticulous, layered soft-tissue closure over a drain and placement of a well-padded short leg cast are key to soft-tissue stability and wound-healing.

Step 7: Postoperative Care
Wound and soft-tissue healing drive the initial postoperative management.
Results
Published, prospective studies of the clinical outcomes of modern fixed-bearing total ankle systems are limited in the United States, mainly because FDA approval of these systems is more recent than that of other mobile-bearing options.
What to Watch For
Introduction
The Salto Talaris total ankle replacement is a fixed-bearing system that integrates a mobile tibial trial component that allows self-alignment on the distal tibial resected surface, as guided by the talar component.
Sustained interest in and acceptance of total ankle arthroplasty as a viable surgical option for the treatment of symptomatic end-stage ankle arthritis has been driven by several factors. These include continual refinement of surgical techniques, development of modern implants, and prospective controlled comparative studies and meta-analysis of the data demonstrating pain relief and improvement of functional outcomes equivalent to those with ankle arthrodesis, the classically accepted gold-standard treatment of ankle arthritis1-6.
Modern total ankle replacements are designed as either fixed-bearing or mobile-bearing systems. Fixed-bearing, two-component designs have been more commonly utilized in the United States4. The Salto Talaris total ankle replacement (Tornier U.S., Edina, Minnesota), approved for use by the United States Food and Drug Administration (FDA) in 2006, is one of these implants. It is a fixed-bearing system with a design and instrumentation based on its mobile-bearing predecessor, the Salto total ankle arthroplasty (Tornier SA, Saint Ismier, France)7,8. Although implanted as a fixed-bearing device with the polyethylene insert rigidly fixed to the tibial component, the Salto Talaris system integrates a mobile tibial trial component that allows self-alignment on the distal tibial resected surface, as guided by the talar component.
Total ankle replacement with the Salto Talaris system is accomplished in the following steps (Video 1).
Video 1.
The critical portions of implanting a Salto Talaris total ankle arthroplasty are demonstrated Dr. James A. Nunley and explained by Dr. Mark E. Easley.
Step 1: Preoperative Planning
A thorough preoperative assessment is crucial.
Perform a careful clinical and radiographic evaluation for appropriate preoperative planning, including templating for component sizing, soft-tissue management, and surgical approach. This is especially important for an ankle with a previous operation and prior incisions.
Fundamental to establishing a preoperative plan is the consideration of necessary adjunctive procedures, such as ligament balancing (i.e., deep deltoid release and lateral ankle ligament reconstruction), equinus correction (i.e., gastrocnemius recession and Achilles tendon lengthening), hardware removal, tibiotalar cyst bone-grafting, and other reconstructive procedures (i.e., osteotomies and tendon transfers).
In addition to standard weight-bearing radiographs of the foot and ankle, advanced imaging, including computed tomography (CT) and magnetic resonance imaging (MRI) scans, is sometimes useful for further planning. Weight-bearing hip-to-ankle radiographs are fundamental to preoperative planning for patients with extra-articular deformity.
Perform the surgical procedure with the patient under regional or general anesthesia, with the administration of antibiotics preoperatively. Regional anesthesia includes an indwelling popliteal catheter with a single-shot saphenous nerve block.
Position the patient supine on a radiolucent table with a bump under the ipsilateral hip to prevent external rotation of the extremity. Place a well-padded tourniquet around the proximal part of the thigh. Fluoroscopy is set up perpendicular to the operating table with the fluoroscope positioned on the operative side.
There are particular steps and features unique to using size-0 components. Size-1 and 2 components fit the majority of patients, and patients rarely require a size 0. Refer to the manufacturer’s published guide regarding the details of the size-0 components (http://www.tornierdx.com/products/salto.php).
The following surgical technique is for a congruent and symmetric arthritic ankle with a plantigrade foot without the need for ligamentous balancing or other reconstructive procedures. Details regarding cases with greater deformity are discussed in subsequent sections of this article and are critical to successful balancing and implantation of the Salto Talaris total ankle replacement.
Step 2: Anterior Approach
Meticulous soft-tissue handling is essential.
Complete a standard anterior approach to the ankle with a 10 to 12-cm longitudinal incision, with enough proximal exposure to allow placement of the tibial alignment guide and extending distally onto the talar neck. Avoid using skin retractors during the superficial exposure to minimize the risk of skin necrosis. Identify and protect branches of the superficial peroneal nerve. Highlight the nerve with a skin marker to facilitate identification during the operation.
Incise the extensor retinaculum longitudinally over the extensor hallucis longus tendon sheath, developing the interval between it and the tibialis anterior tendon. Maintaining the tibialis anterior tendon within its sheath allows for improved wound closure and avoidance of postoperative tendon adhesions. Identify and protect the deep neurovascular bundle underlying the extensor hallucis longus muscle belly.
Incise the anterior aspect of the ankle joint capsule, perform a subperiosteal exposure at the level of the ankle, and extend the exposure proximally and distally. Place a deep self-retaining retractor at the level of the ankle joint. Resect anterior osteophytes on the distal part of the tibia and the talar neck with a rongeur or a 0.5-in (12.7-mm) curved osteotome. Use a combination of reciprocating and oscillating saws to carefully expose the apex of the tibial plafond, which is the point from which the measured tibial resection is made.
Step 3: Tibial Preparation
Use intraoperative fluoroscopy and direct inspection to determine the appropriate alignment, tibial component size, and resection level as guided by the external tibial alignment and cutting guides.
Place a half-pin in the tibial tubercle parallel to the ankle joint in the coronal and sagittal planes. Attach the tibial alignment guide to this pin and align it parallel to the tibial mechanical axis in all planes and in neutral rotation relative to the ankle joint. The guide should rest flush on the tibia distally and about two fingerbreadths above the tibial shaft at the tubercle pin. Then use a half-pin to stabilize the guide in the distal medial hole.
Set the rotation, alignment, and tibial resection level, confirming proper position by both direct inspection and biplanar fluoroscopic imaging. Tighten the set screws on the guide to hold this position. Place the tibial alignment jig on the guide. Typically, the guide is set to perform a 9-mm distal tibial resection, which represents the composite thickness of the tibial base plate and the polyethylene fixed-bearing insert. Use an 8-mm resection in patients with ligamentous laxity.
Adjust the final mediolateral position and rotation using the jig. Gauge final rotation by placing a half-pin in the articulating pin-holder as a guide. Determine tibial component size by trialing half-pins through the respective holes (sizes 0 to 3) in the jig. Use the largest size that does not threaten either malleolus as assessed with direct inspection and fluoroscopy.
Remove the jig and size the talus with the specific sizing gauges. The talar component can match the tibial component size or be one size smaller. This feature allows for some modularity in the system and optimization of component fit. The talar component size should match the width of the unresected talar dome.
Place the appropriate tibial cutting guide onto the tibial alignment guide. Again confirm the size by direct inspection, but also by using fluoroscopy to compare the medial and lateral vertical drill holes relative to the distal part of the tibia on an anteroposterior view (Figs. 1-A, 1-B, and 1-C). When you are satisfied, drill all six holes in the guide and place a half-pin in each of the proximal medial and lateral holes to protect either malleolus. Use an oscillating saw to complete the resection, carefully avoiding penetration beyond the posterior tibial cortex. Remove the cutting guide and connect the vertical holes with a reciprocating saw or straight osteotome.
Remove the distal tibial segment. Use a reciprocating saw to remove this bone in piecemeal fashion, realizing that the most posterior resected bone can be removed later once the posterior talar chamfer cut has been completed.
Fig. 1-A.

Making fine adjustments to the tibial external alignment guide, including the mediolateral position, level of resection, and rotation, prior to checking the position under fluoroscopy.
Fig. 1-B.

Anteroposterior fluoroscopic view used to assess the overall position of the tibial alignment and cutting guides prior to completion of the distal tibial osteotomy.
Fig. 1-C.

A free saw blade inserted in the distal tibial cutting slot under lateral fluoroscopy demonstrates the projected distal tibial resection level and the degree of sagittal slope or posterior angulation. We prefer to reduce the built-in posterior angulation of 7° by a few degrees by maintaining the cutting guide flush with the distal part of the tibia and raising the tibial alignment guide by two fingerbreadths off the proximal part of the tibia.
Step 4: Talar Preparation
Use the largest talar component that does not impinge on either malleolus.
Place the talar pin setting guide onto the tibial alignment guide. Hold the ankle in neutral dorsiflexion with the hindfoot maintained in 5° of valgus and place a half-pin through the talar guide into the talar neck. Remove the talar guide and the entire tibial alignment guide.
Place the appropriate talar posterior chamfer resection guide (i.e., either a size-0 or a size-1/2/3 guide) over the talar pin. The talar component must be the same size or one size smaller than the selected tibial component. Ensure that the paddles are flush with the talar articular surface. Use paddle augments in the presence of talar defects and stabilize the guide with joint distractors (Figs. 2-A, 2-B, and 2-C). Confirm the guide position with a lateral fluoroscopic view, then drill and place four pins (using the proximal holes for a size-0 talar component and the distal holes for size 1, 2, or 3). Again, check a lateral fluoroscopic view to confirm that all pins exit at the posterior articular margin of the talar dome.
Place ribbon retractors to protect the malleoli and use a wide saw blade to perform the posterior talar resection, making sure to keep the blade directly on top of the pins (i.e., using pins as the cutting surface) (Fig. 2-D). Remove the talar guide, pins, and posterior talar dome. Complete the removal of the posterior distal tibial resection with a rongeur, curet, or narrow curved osteotome. Inspect the resected surfaces, especially the medial corner of the talus, to be sure that they are square along their length in the anteroposterior dimension (Fig. 2-E).
Ensure complete removal of any osteophytes on the talar neck and then place the anterior talar chamfer guide with spacer in the oblong window. With the ankle held in neutral dorsiflexion, the anterior distal tibial cortex should be collinear with the calibration line on the spacer and the guide should align with the second metatarsal axis (Fig. 3-A). Check a lateral fluoroscopic view with the anterior talar chamfer guide in place to confirm that it is appropriately positioned. If the guide is resting too far anteriorly relative to the anterior tibial cortex, then judiciously remove more of the prominence on the dorsal talar neck. Pin the guide in place once it is appropriately aligned.
Remove the talar spacer and insert the reaming guide in its place. Ream each side of the anterior chamfer by flipping the guide 180° (Fig. 3-B). Remove the guide and use a rongeur to finish the anterior talar chamfer surface. It is essential to have a clearly defined talar apex that is created by the intersection of the anterior and posterior chamfer cuts (Fig. 3-C).
In preparation for final talar component positioning, apply the correct-sided lateral chamfer guide (Fig. 4-A) with the mediolateral position gauge such that the wing faces laterally. Align the guide’s wing on the apex created by the anterior and posterior chamfer cuts with its tip set flush with the lateral aspect of the talus for establishing proper mediolateral orientation. Secure the guide with a short pin and joint distractors. Remove the mediolateral position gauge, drill for the talar plug with the bell saw, and then carefully insert the fixation plug to secure the guide position.
After protecting the lateral malleolus with a ribbon retractor, complete the lateral chamfer resection with an oscillating saw (Fig. 4-B). Remove the fixation plug and guide and then inspect and finalize the talar surface preparation.
Fig. 2-A.

Placement of a modular talar augment laterally on the posterior talar resection guide in the presence of an asymmetric, lateral talar defect allows for a symmetric and balanced resection.
Fig. 2-B.

Insertion of the posterior talar resection guide over the talar pin.
Fig. 2-C.

The symmetric and balanced resection is demonstrated by a thinner intended resection laterally and relatively thicker resection medially.
Fig. 2-D.

The posterior talar chamfer resection is then completed with a wide oscillating saw resting directly on the four talar pins. Obtain a lateral fluoroscopic view prior to resection to confirm that the talar guide paddles are sitting flush on the talar surface and that the talar pins exit at the posterior articular margin of the talar dome.
Fig. 2-E.

A balanced resection gap results.
Fig. 3-A.

The calibration line on the oblong window spacer for the anterior talar chamfer guide is the transition point between the anterior and posterior talar chamfer cuts. When properly positioned with the ankle held in neutral dorsiflexion, it should be collinear with the anterior distal tibial cortex.
Fig. 3-B.

The anterior chamfer resection is completed with a reamer.
Fig. 3-C.

The anterior chamfer resection is finalized with a rongeur to create a well-defined talar apex.
Fig. 4-A.

The well-defined talar apex should bisect the hole for the talar plug, which ultimately sets the final position of the talar component.
Fig. 4-B.

Completion of the lateral talar chamfer resection with a narrow oscillating saw follows the creation of the talar plug with the bell saw. It is important to note that the distance from the lateral facet to the center of the talar plug is constant for talar component sizes 1, 2, and 3, but is different and not interchangeable for size 0.
Step 5: Implant Trialing
Careful assessment of ankle range of motion and stability in conjunction with selection of an appropriately sized polyethylene insert and consideration of additional soft-tissue balancing procedures are key to implantation of a well-balanced stable ankle replacement.
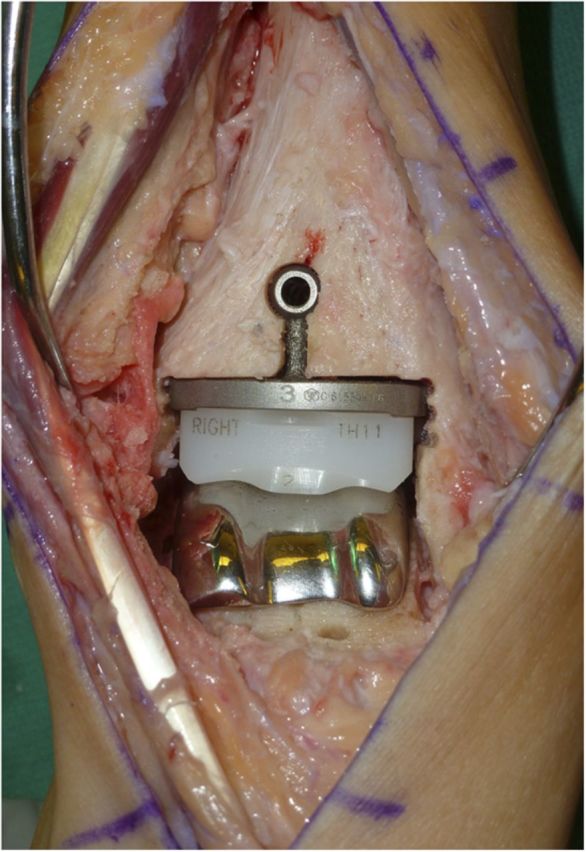
Thoroughly irrigate the ankle joint and remove any debris. Impact the appropriate talar trial into position. Note that talar trial sizes 1, 2, and 3 can be interchanged without the need for additional talar surface modifications.
Place the mobile-bearing tibial trial, which has a composite thickness equal to that of the selected tibial tray and polyethylene insert sizes. Plastic insert size options include 8 through 11 mm. The mobile-bearing tibial-insert trial has a highly polished metal surface that allows for “self-correction” of any subtle rotational or translational malalignment with a gentle ankle range of motion (Fig. 4-C).
Note the final resting position of the tibial trial base. The line on the superior surface of the base trial aligns with the anterior tibial cortex. A lateral fluoroscopic view demonstrates congruity between the tibial base and the distal part of the tibia (Figs. 4-D and 4-E). Assess ankle stability and determine the need for any alteration in the plastic insert trial thickness or the use of carefully selected soft-tissue releases (i.e., deep deltoid ligament release, lateral ankle ligament reconstruction, Achilles tendon lengthening, or gastrocnemius recession).
Drill the holes for the keel fin and place a pin in the distal hole to secure the trial. Drill for the keel plug with the 7.9-mm drill bit (Fig. 4-F). Remove all trial implants. Complete final keel preparations using a fine reciprocating saw to connect the keel fin holes, and check the appropriate keel thickness and depth with the graduated osteotome. Finally, use the rasp to bevel the distal portion of the anterior groove so that the final tibial component rests flush on the distal tibial resection.
Fig. 4-C.

Trial components in place. The ankle should be taken through a range of motion to allow the mobile-bearing tibial-insert trial to “self-correct” any subtle rotational or translational malalignment. (Note that the patient seen in this image is different from the one shown in the previous images.)
Fig. 4-D.

Anteroposterior fluoroscopic view of the tibial, talar, and plastic liner trials in place, demonstrating appropriate positioning and alignment prior to tibial component completion with the stem and keel setting and implantation of the final components.
Fig. 4-E.

Lateral fluoroscopic view of the tibial, talar, and plastic liner trials in place, demonstrating appropriate positioning and alignment prior to tibial component completion with the stem and keel setting and implantation of the final components.
Fig. 4-F.

Drilling the keel plug through the tibial trial to finalize the position of the tibial component.
Step 6: Final Implant Placement and Closure
Completion of a meticulous, layered soft-tissue closure over a drain and placement of a well-padded short leg cast are key to soft-tissue stability and wound-healing.
After thorough irrigation of the joint and selection of the final implants, impact the talar component into its final position as assessed with direct inspection and fluoroscopy.
Assemble the tibial base component to the polyethylene insert with the assembly clamp. Under lateral fluoroscopy, impact the tibial base-polyethylene insert into its final position, ensuring complete congruity between the distal tibial resection surface and the tibial component base (Figs. 5-A and 5-B). Use the handle to carefully drive the tibial component up against the distal part of the tibia during impaction, to avoid creating posterior tibial component lift-off, which can lead to early component loosening and failure.
Graft the keel plug and slot with morselized local bone from the tibial or talar resections.
Check final fluoroscopic views of the components. Reassess ankle motion and stability and determine the need for any additional procedures as listed above.
Once you are satisfied, place a deep closed suction drain and perform a layered closure of the joint capsule, extensor retinaculum, subcutaneous tissues, and skin. If you have not already done so, remove the tibial tubercle pin and close the skin with a simple stitch. As throughout the entire procedure, take care to identify and protect the deep neurovascular bundle and superficial peroneal nerve during closure.
Apply a well-padded short leg cast with the ankle in a neutral position.
Fig. 5-A.

Lateral fluoroscopy is used during implantation of the final tibial component to ensure congruency between the base plate and the distal tibial resection surface. A steady, upward force is directed through the insertion handle without levering to avoid any bone-prosthesis gapping, which could lead to asymmetric wear or early loosening.
Fig. 5-B.
Intraoperative image demonstrating implantation of the final components prior to bone-grafting of the tibial keel and stem.
Step 7: Postoperative Care
Wound and soft-tissue healing drive the initial postoperative management.
Patients are kept non-weight-bearing for six weeks with the ankle immobilized in a short leg cast or a combination of a cast and removable boot, depending on wound-healing.
Patients stay in the hospital overnight for observation and pain control. The drain is removed on postoperative day one. Patients are mobilized with physical therapy and instructed in non-weight-bearing precautions for the operatively treated limb. Most patients are discharged home on postoperative day one with an indwelling popliteal catheter and instructions for its removal up to seventy-two hours after surgery.
Patients return to the clinic in three weeks for cast removal, a wound check, and suture removal. At this appointment, another short leg cast is applied or the patient is fitted with a removable controlled-ankle-motion boot to be worn for an additional three weeks of non-weight-bearing. Patients work on self-directed ankle range-of-motion exercises from six weeks to three months postoperatively with advancement to full weight-bearing and transitioning into a comfortable shoe. This general algorithm is modified on a patient-specific basis, depending on soft-tissue healing and the concomitant procedures performed at the time of the ankle replacement.
Radiographs are routinely obtained at six weeks postoperatively.
Results
Published, prospective studies of the clinical outcomes of modern fixed-bearing total ankle systems are limited in the United States, mainly because FDA approval of these systems is more recent than that of other mobile-bearing options3,4. Our prospective clinical study on the Salto Talaris total ankle system is, to our knowledge, the first published study of its kind focusing on a modern fixed-bearing design9.
We prospectively followed sixty-seven patients who had had a Salto Talaris total ankle replacement for a minimum of two years9. At a mean of 2.8 years, the implant survival rate was 96%, with any metallic component revision, removal, or impending failure as the end point. Three patients developed aseptic loosening, all involving the tibial component. There were no deep infections.
With the exception of one Short Form-36 (SF-36) Health Survey subscore, patients showed significant improvement (p < 0.05) through two years postoperatively compared with their preoperative condition in the following outcomes and functional measures: pain visual analog scales, the SF-36 Health Survey total score and subscores (except as noted above for the general health subscore), the Short Musculoskeletal Function Assessment indices, the American Orthopaedic Foot & Ankle Society hindfoot scale total score and subscores, the sit-to-stand test, the timed-up-and-go test, the walking speed test, and the Foot and Ankle Disability Index.
Two-thirds (forty-five) of the sixty-seven patients underwent at least one additional procedure at the time of the index ankle replacement. The most commonly performed procedures were deep deltoid ligament release (n = 21), removal of hardware (n = 16), and gastrocnemius recession (n = 11). Of note, prophylactic fixation of the medial malleolus to avoid potential fracture was utilized in six patients deemed to have a narrow residual medial malleolus, and two intraoperative malleolar fractures occurred; both were treated with internal fixation. Eight patients underwent a reoperation following their index surgery, most commonly for exostectomy and debridement because of impingement.
In conclusion, our early clinical results indicate that the Salto Talaris total ankle arthroplasty system provides improvement in pain, quality of life, and basic function in patients with end-stage ankle arthritis9.
What to Watch For
Indications
General indications for total ankle replacement include symptomatic end-stage ankle arthritis (i.e., posttraumatic, osteoarthritis, or inflammatory) for which conservative treatment has failed.
Specific indications for the use of the Salto Talaris total ankle replacement in preference to other prostheses have yet to be defined. When considering ankle replacement versus arthrodesis, factors such as patient age, adjacent joint arthritis, activity level, and patient preference all play a role in the decision-making process. Interestingly, there is literature supporting the conversion of a painful ankle arthrodesis to a total ankle arthroplasty, albeit with a mobile-bearing European design10.
Contraindications
Generally accepted contraindications for total ankle replacement include active infection, a poor soft-tissue envelope, inadequate bone stock, osteonecrosis of the tibia or talus, severe peripheral vascular disease, uncontrolled diabetes mellitus, and high-activity patients.
Although there are no absolute criteria for the maximal degree of deformity appropriate for ankle replacement, we generally do not consider Salto Talaris ankle replacement9 for coronal plane deformities of >20°.
Pitfalls & Challenges
Prudent patient selection is key to a successful outcome with total ankle replacement and avoidance of complications, including infection, early wear, and prosthetic loosening, among others. Older, low-activity patients with symptomatic end-stage ankle arthritis in the absence of the above-listed contraindications are ideal candidates for total ankle replacement.
Obtaining proper rotational alignment intraoperatively is crucial, since the external tibial alignment guide links both the tibial and the initial talar resection. Use of the second metatarsal axis to gauge proper rotation can lead to malrotation in cases of substantial midfoot and forefoot deformity. Component rotation should be aligned with the bisector of the talus in the coronal plane, which parallels the talus through a complete range of motion. Component malrotation leads to poor ankle joint kinematics, malleolar impingement, and edge-loading.
Careful preoperative planning is essential to addressing both intra-articular and extra-articular deformity about the ankle. Most intra-articular deformities can be corrected successfully with soft-tissue balancing procedures. Mild-to-moderate varus malalignment typically can be balanced with a deep deltoid release without the need for ligamentous balancing on the convexity of the deformity (i.e., lateral ankle ligament reconstruction). However, more severe deformity may require lateral ligament reconstruction or extra-articular osteotomy, such as a supramalleolar or calcaneal osteotomy. Hindfoot deformity in the presence of arthritis may necessitate a subtalar or triple arthrodesis. Reconstructive procedures and arthrodeses can be completed in a staged fashion or performed concurrently, depending on the extent of deformity. Failure to account for intra-articular and extra-articular deformity can lead to a poorly balanced ankle replacement and early failure.
Proper talar preparation requires at least 90° of dorsiflexion (i.e., neutral). Setting the talar pin, based on the external tibial alignment guide, with the ankle in plantar flexion will place the talar component in relative extension. On the other hand, setting the talar pin with the ankle dorsiflexed above neutral leads to an anteriorly biased and flexed talar position.
Clinical Comments
Should severe deformity requiring osteotomies be managed in a staged or concurrent fashion?
What factors are important in the selection of patients for a fixed-bearing versus a mobile-bearing prosthesis?
Based on an original article: J Bone Joint Surg Am. 2013 Jun 5;95(11):1002-11
Disclosure: One or more of the authors received payments or services, either directly or indirectly (i.e., via his or her institution), from a third party in support of an aspect of this work. In addition, one or more of the authors, or his or her institution, has had a financial relationship, in the thirty-six months prior to submission of this work, with an entity in the biomedical arena that could be perceived to influence or have the potential to influence what is written in this work. No author has had any other relationships, or has engaged in any other activities, that could be perceived to influence or have the potential to influence what is written in this work. The complete Disclosures of Potential Conflicts of Interest submitted by authors are always provided with the online version of the article.
References
- 1. Saltzman CL Mann RA Ahrens JE Amendola A Anderson RB Berlet GC Brodsky JW Chou LB Clanton TO Deland JT Deorio JK Horton GA Lee TH Mann JA Nunley JA Thordarson DB Walling AK Wapner KL Coughlin MJ. Prospective controlled trial of STAR total ankle replacement versus ankle fusion: initial results. Foot Ankle Int. 2009 Jul;30(7):579-96. [DOI] [PubMed] [Google Scholar]
- 2. Haddad SL Coetzee JC Estok R Fahrbach K Banel D Nalysnyk L. Intermediate and long-term outcomes of total ankle arthroplasty and ankle arthrodesis. A systematic review of the literature. J Bone Joint Surg Am. 2007 Sep;89(9):1899-905. [DOI] [PubMed] [Google Scholar]
- 3. Easley ME Adams SB Jr Hembree WC DeOrio JK. Results of total ankle arthroplasty. J Bone Joint Surg Am. 2011 Aug 3;93(15):1455-68. [DOI] [PubMed] [Google Scholar]
- 4. Cracchiolo A 3rd Deorio JK. Design features of current total ankle replacements: implants and instrumentation. J Am Acad Orthop Surg. 2008 Sep;16(9):530-40. [PubMed] [Google Scholar]
- 5. Gougoulias N Khanna A Maffulli N. How successful are current ankle replacements?: a systematic review of the literature. Clin Orthop Relat Res. 2010 Jan;468(1):199-208. Epub 2009 Jul 18. [DOI] [PMC free article] [PubMed] [Google Scholar]
- 6. Piriou P Culpan P Mullins M Cardon JN Pozzi D Judet T. Ankle replacement versus arthrodesis: a comparative gait analysis study. Foot Ankle Int. 2008 Jan;29(1):3-9. [DOI] [PubMed] [Google Scholar]
- 7. Bonnin M Judet T Colombier JA Buscayret F Graveleau N Piriou P. Midterm results of the Salto Total Ankle Prosthesis. Clin Orthop Relat Res. 2004 Jul;(424):6-18. [DOI] [PubMed] [Google Scholar]
- 8. Bonnin M Gaudot F Laurent JR Ellis S Colombier JA Judet T. The Salto total ankle arthroplasty: survivorship and analysis of failures at 7 to 11 years. Clin Orthop Relat Res. 2011 Jan;469(1):225-36. Epub 2010 Jul 01. [DOI] [PMC free article] [PubMed] [Google Scholar]
- 9. Schweitzer KM Jr Adams SB Jr Viens NA Queen RM Easley ME DeOrio JK Nunley JA II. Early prospective clinical results of a modern fixed-bearing total ankle arthroplasty. J Bone Joint Surg Am. 2013 Jun 5;95(11):1002-11. [DOI] [PubMed] [Google Scholar]
- 10. Hintermann B Barg A Knupp M Valderrabano V. Conversion of painful ankle arthrodesis to total ankle arthroplasty. J Bone Joint Surg Am. 2009 Apr;91(4):850-8. [DOI] [PubMed] [Google Scholar]