Overview
Introduction
Arthroscopic osteocapsular arthroplasty of the elbow is a procedure involving three-dimensional reshaping of the bones, removal of any loose bodies, and capsulectomy to restore motion and function as well as to reduce or eliminate pain.
Step 1: Get in and Establish a View
Visualize identifiable articular structures and confirm their anatomic orientation.
Step 2: Create a Space in Which to Work
Remove debris and loose bodies, as well as excise the fat pad and perform a synovectomy as necessary, so that you can see clearly.
Step 3: Bone Removal
Remove osteophytes and restore the olecranon to its normal shape.
Step 4: Capsulectomy
Release the capsule according to the severity of the flexion loss.
Step 1 (Anterior Compartment): Get in and Establish a View
As with the posterior compartment, the first step in the anterior compartment is to visualize the joint structures and to be sure of their anatomic orientation.
Step 2 (Anterior Compartment): Create a Space in Which to Work
The stripping of the capsule is usually extremely effective for improving or creating the space in which to work in the anterior joint compartment.
Step 3 (Anterior Compartment): Bone Removal
Remove osteophytes and reshape the coronoid and coronoid fossa to their normal shape.
Step 4 (Anterior Compartment): Capsulectomy
Meticulously excise the anterior aspect of the capsule following four consistent steps.
Closure
Close the wounds after drains have been placed anteriorly (through the arthroscope sheath into the proximal anterolateral portal) and posteriorly (through the posterolateral portal into the olecranon fossa, exiting proximally through a separate skin puncture).
Postoperative Regimen
Postoperatively, check the nerve function before performing a regional block and commencing continuous passive motion.
Results
A retrospective review of a consecutive series of 502 arthroscopic elbow contracture releases (including 388 osteocapsular arthroplasties) in 464 patients revealed twenty-four cases (4.8%) of transient nerve injury7.
What to Watch For
Introduction
Arthroscopic osteocapsular arthroplasty of the elbow is a procedure involving three-dimensional reshaping of the bones, removal of any loose bodies, and capsulectomy to restore motion and function as well as to reduce or eliminate pain1. This technique has become a more common procedure in recent years since it is generally believed to provide results that are at least comparable with those of traditional open procedures but it allows better visualization of intra-articular lesions, a quicker recovery, and better cosmetic results1-3. Although there is little doubt regarding the efficacy of arthroscopic contracture release, the procedure is technically challenging and there are serious concerns about the risk of nerve injury4-6.
The senior author (S.W.D.) believed that contracture releases should be performed arthroscopically only if they could be done so with equal or less risk compared with doing so openly. Consequently, a “safety-driven” technique that was predicated on the need to avoid injuring nerves without compromising surgical efficacy was developed.
This paper and accompanying videos presents the concept of a “safety-driven” technique for arthroscopic osteocapsular arthroplasty and recommendations for the prevention of neurologic injuries (Video 1).
Video 1.
Introduction. The surgical technique of arthroscopic osteocapsular arthroplasty of the elbow, which is also referred to as “OCA.” The video provides two specific surgical examples that are refered to as the “principal case” and the “secondary case.” The “principal case” is used to demonstrate the majority of the surgical technique. The “secondary case” is used to explain optional surgical steps or situations when these steps are better visualized in the “secondary case” than during the “principal case.”
Preoperative Planning (Video 2)
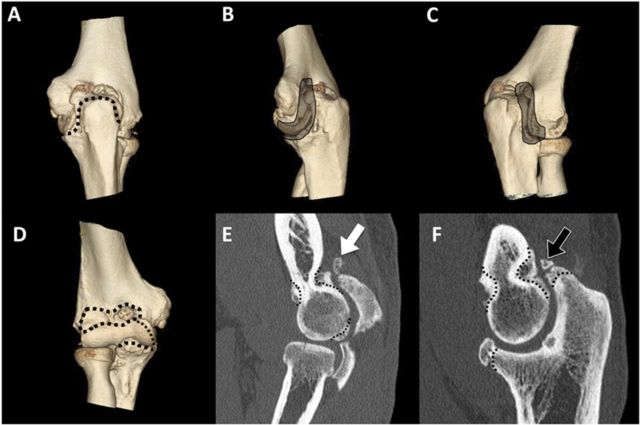
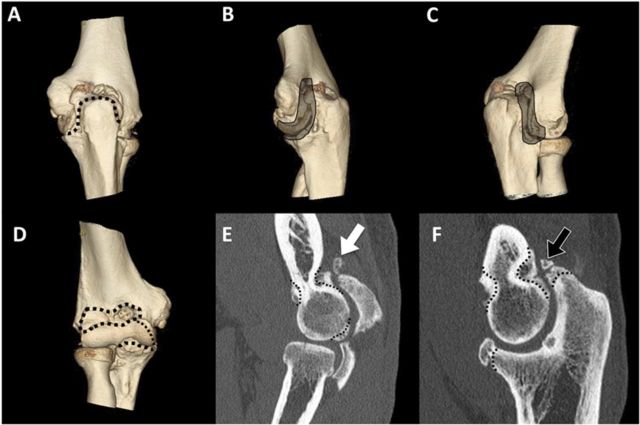
Preoperative imaging should include computed tomographic (CT) scanning with two-dimensional sagittal and coronal reconstruction and three-dimensional surface rendering (Fig. 1). These are important to reveal any loose bodies, broken osteophytes, and osteophytes that are potentially responsible for the lack of motion and pain. Pay particular attention to the osteophytes in the posteromedial corner of the elbow, as they are usually close to the ulnar nerve.
Be similarly aware of the location of the radial and median nerves.
Before commencing the operation, and throughout the entire procedure, it is important to do everything possible to minimize conditions leading to problems. In other words, anything that might distract, frustrate, or impede the surgeon (or team) should be anticipated and prevented.
Fig. 1.
The right elbow of a sixty-four-year-old man with hypertrophic osteoarthritis. Posterior and anterior compartment three-dimensional surface-rendering (A, B, C, and D) and two-dimensional sagittal scans (E and F) showing typical osteophytes and non-united fractured osteophytes (black arrow) on the olecranon and a loose body near the capitellum (white arrow). The dotted lines define the osteophytes to be resected (E and F). Particular attention has to be paid to the proximity of the osteophytes to the major nerves.
Video 2.
Preoperative planning. Use three-dimensional and two-dimensional imaging to review the pathology and plan the details of the surgical procedure.
Patient Position (Video 3)
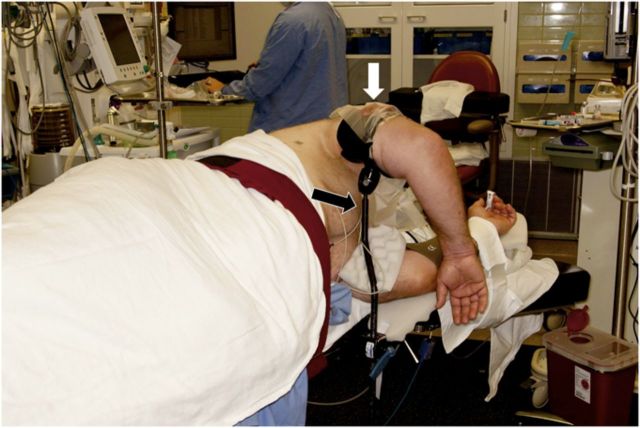
Place the patient in the lateral decubitus position with the arm resting on an arm holder specifically designed for elbow arthroscopy (Fig. 2).
Wrap a tourniquet around the arm such that the tourniquet, rather than the skin, rests on the arm holder.
The shoulder is flexed to between 90° and 100°, and the elbow rests at 90° of flexion. For osteocapsular arthroplasty, patient positioning is critical so that adequate access to the coronoid and coronoid fossa is possible without the working instruments hitting the chest of the patient. Specifically, elevate the shoulder forward at least 90°, and keep the elbow as high as, or higher than, the shoulder.
Fig. 2.
Patient in the lateral decubitus position with the right arm in an arm holder (black arrow) and a nonsterile tourniquet applied (white arrow).
Video 3.
Setup and portals. Patient positioning, portal placement, and ulnar nerve decompression are discussed and demonstra\ ted.
Limited Open Ulnar Nerve Decompression
Prior to osteocapsular arthroplasty or contracture release, perform a limited open ulnar nerve decompression through a small posteromedial skin incision. The reason for decompression is to prevent delayed-onset ulnar neuritis.
Decompress the nerve for 3 to 4 cm proximal and distal to the cubital tunnel (a total of 7 to 8 cm of decompression). The posteromedial aspect of the capsule can be released through this incision, and osteophytes can be removed from the medial aspect of the trochlea and olecranon.
Portals and Fluid Management
Begin work in the posterior compartment with the arthroscope in the posterolateral portal and the working instrument in the posterior portal. Starting posteriorly allows you to address those parts of the elbow that are most challenging if swelling occurs, including the medial and lateral gutters.
Place a custom-made retractor in the proximal posterolateral portal when necessary. If a second retractor is needed, place it in the proximal posterior portal. Switch the portals to complete the work posteriorly, and to prepare to enter the lateral gutter. Access the lateral gutter by the midlateral (“soft spot”) portal.
Three anterior portals are routinely used, and sometimes a fourth. The anterolateral and proximal anteromedial portals are used for the arthroscope and working instruments, and the proximal anterolateral portal is used for a retractor. If a second retractor is needed, the anteromedial portal is used for that.
For fluid management, use a standard 3-L jet lavage system (Simpulse; Davol, Providence, Rhode Island) with the irrigation tubing cut at the handle and attached to standard sterile intravenous tubing for inflow. The surgeon is constantly aware of fluid inflow because of the auditory sound (“putt-putt”); ensuring that fluid going into the elbow has a channel out prevents edema. Leaving the shaver outflow open, and not attached to any suction tubing, permits free egress of fluid and debris. Swelling, which can quickly compromise the view as well as the ease and safety of the surgery, can be prevented. Visualization is enhanced with capsular and soft-tissue retraction rather than fluid distention and pressure.
Step 1: Get in and Establish a View (Video 4)
Visualize identifiable articular structures and confirm their anatomic orientation.
In some elbows with contracture and arthritis, this is the most difficult and intimidating step. Contracted elbows are tight with minimal or no space between the capsule and the cartilage surface. Enter the joint with a pointed switching stick, which is pointed enough to penetrate dense scar tissue and the capsule but blunt enough that injury to the cartilage would be unlikely.
Once the switching stick is in place, insert the sheath into the joint over the switching stick and then insert the arthroscope inside the sheath.
Insert a 4.8-mm shaver (Gator blade; Conmed Linvatec, Largo, Florida) through the posterior portal into the olecranon fossa. The outflow of the shaver unit is kept open and not connected to suction.
After triangulating and getting the shaver tip into the arthroscopic view, recognizable articular structures are identified.
Only when identifiable articular structures are visualized, and their anatomic orientation is confirmed, is Step 2 completed. In other words, you are now unequivocally inside the joint.
Video 4.
Step 1: Get in and establish a view. Visualize identifiable articular structures and confirm their anatomic orienta\ tion.
Step 2: Create a Space in Which to Work (Video 5)
Remove debris and loose bodies, as well as excise the fat pad and perform a synovectomy as necessary, so that you can see clearly.
This critical step can be time-consuming but is a major factor in making arthroscopic capsulectomy or osteocapsular arthroplasty safer and more predictable. Mastery of this step requires most of the skills necessary to perform the rest of the operation.
The use of a retractor (sometimes more than one) can be quite helpful with exposure, especially at the posterolateral and posteromedial corners, and increase safety when you are working near the nerve posteromedially.
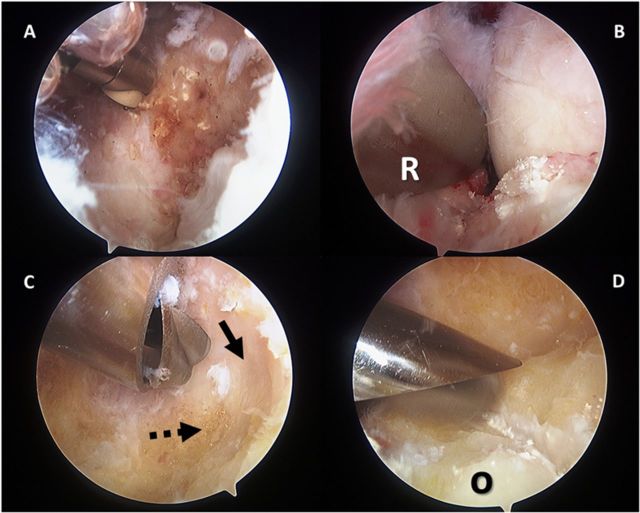
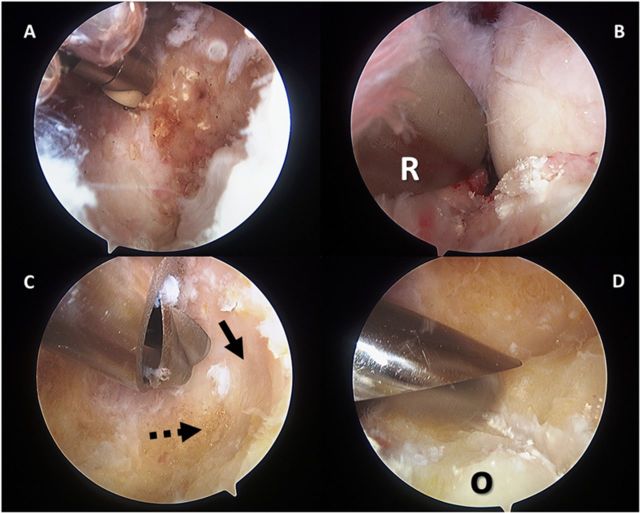
A radiofrequency device is commonly used and is very helpful at this stage (Fig. 3-A).
To avoid heating the fluid, use only brief pulsations with a deliberate pause between pulsations.
In order to be able to move the instruments freely within the joint, and to greatly increase the field of view, strip the capsule off the humerus proximally and along the medial and lateral supracondylar ridges.
Fig. 3.
Posterior joint compartment. Creating a space in which to work in the posterior joint compartment is a crucial step in the osteocapsular arthroplasty of the elbow. It involves synovectomy and removal of debris, scar tissue, and loose bodies. A radiofrequency device is commonly used and is very helpful at this stage (A). Adding a retractor (R) through the proximal posterolateral portal increases the space just as retraction does with open surgery (B). Bone removal is performed with use of a shaver and a burr (C and D). The CT scan will demonstrate the amount of osteophytes to be removed (black dashed arrow) in order to find the original floor of the olecranon fossa (black arrow) (C). D shows the trimming of the olecranon (O). Particular attention should be paid to avoid removing normal olecranon bone, especially in an overhead athlete.
Video 5.
Step 2: Create a space in which to work. Remove debris and loose bodies as well as excise the fat pad and perform a synovectomy as necessary, so that you can see clearly.
Step 3: Bone Removal (Video 6)
Remove osteophytes and restore the olecranon to its normal shape.
Do this before capsulectomy for optimum visualization, to minimize soft-tissue swelling, and to avoid dissemination of bone debris into the muscle.
Osteophytes are universally present in hypertrophic osteoarthritis and are common in posttraumatic arthritis. A retractor is commonly placed through the proximal posterolateral portal to minimize the risk of tissues becoming wrapped up around the burr (Fig. 3-B). This is especially helpful when working around the ulnar nerve.
To recreate the olecranon fossa, identify the original floor of the fossa and remove osteophytes from it and from the surrounding margins (Fig. 3-C). The olecranon is restored to its normal shape by removing osteophytes from the tip and the sides (Fig. 3-D).
To prevent wrapping up the soft tissues and injuring the ulnar nerve on the medial corner of the olecranon, use a shaver blade (a 4.8-mm Gator blade) rather than a burr. Use a shaver blade, rather than a burr, in the medial gutter for the same reason.
Video 6.
Step 3: Bone removal. Remove osteophytes and restore the olecranon and olecranon fossa to their normal shape. Also \ remove osteophytes in the medial and lateral gutters.
Step 4: Capsulectomy (Video 7)
Release the capsule according to the severity of the flexion loss.
If the patient lacks flexion, as is usually the case, the posterior capsulectomy includes not only release along the supracondylar ridges but also posteromedial and posterolateral capsular releases.
The extent of the capsular release in each gutter depends on the severity of the loss of flexion. With severe loss of flexion, continue the release through the posterior bundle of the medial collateral ligament on the medial side and to the radial head on the lateral side. In some contractures, the capsule is scarred to the sides of the joint. If this is the case, remove such adhesions.
If a decompression of the ulnar nerve is performed, the posteromedial capsule release is sometimes performed through that incision (but usually after completion of all of the arthroscopy).
Video 7.
Step 4: Capsulectomy. Release the capsule according to the severity of the flexion loss.
Medial Gutter
Perform the work in the medial gutter with the arthroscope in the posterolateral portal and the shaver in the posterior portal. A retractor can be placed through either the proximal posterolateral portal (Fig. 3-B) or the proximal posterior portal.
Release the posteromedial aspect of the capsule to restore lost flexion. The capsule can be released through a small incision over the cubital tunnel that permits concurrent ulnar nerve decompression. At the same time, remove the medial osteophytes from the trochlea and olecranon.
Alternatively, if the posteromedial aspect of the capsule does not need to be released, you can remove the osteophytes arthroscopically if you have the skill to perform the procedure and are fully knowledgeable about the three-dimensional location of the nerve in this area.
Lateral Gutter
To work in the lateral gutter, begin with the arthroscope in the posterior portal and the shaver in the posterolateral portal. Work around the posterolateral corner is facilitated by the use of a retractor.
Eventually place the arthroscope in the posterolateral portal and the working instruments in the soft spot portal.
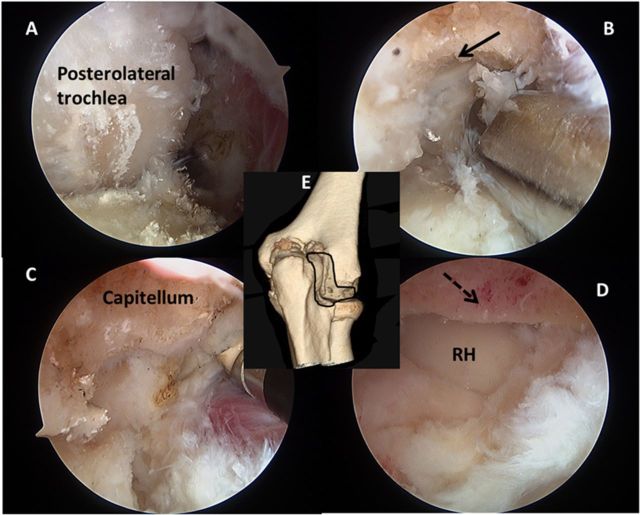
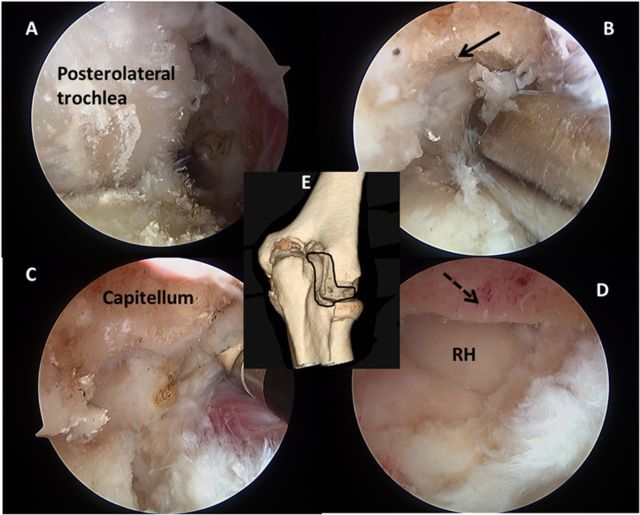
Remove osteophytes from the posterior aspect of the capitellum and the lateral ridges of the trochlea and olecranon (Fig. 4).
Carefully inspect the entire lateral compartment for loose bodies, as this is a typical location in which loose bodies may be nestled.
Fig. 4.
Lateral gutter. Before removing osteophytes, it is necessary to remove soft tissue around the posterolateral corner in order to create a clear space in which to work (A). Osteophytes are removed from the posterior part of the capitellum (black arrow, B). A radiofrequency device is especially useful in this area (C). Once the osteophytes are trimmed from the capitellum (black dashed arrow), the posterior aspect of radial head (RH) is inspected (D). The three-dimensional surface-rendering CT reconstruction (E) is placed here for orientation purposes.
Anterior Joint Compartment (Video 8)
After completing work in the posterior compartment and the medial and lateral gutters, enter the anterior compartment and follow the same four-step sequence.
Video 8.
Anterior joint compartment. After completing work in the posterior compartment and the medial and lateral gutters, \ enter the anterior compartment and follow the same four-step sequence.
Step 1 (Anterior Compartment): Get in and Establish a View (Video 9)
As with the posterior compartment, the first step in the anterior compartment is to visualize the joint structures and to be sure of their anatomic orientation.
Enter the joint via the proximal anteromedial portal with a pointed switching stick.
Once the switching stick is in place, insert the sheath into the joint over the switching stick and then insert the arthroscope inside the sheath. Exercise caution to prevent articular cartilage damage.
To lessen the risk of subsequent nerve injury, do not proceed further until you have established a view, meaning that identifiable articular structures such as the radial head and capitellum, or coronoid and trochlea, are visualized and their correct anatomic orientation is confirmed.
Video 9.
Step 1 (anterior joint compartment): Get in and establish a view.
Step 2 (Anterior Compartment): Create a Space in Which to Work (Video 10)
The stripping of the capsule is usually extremely effective for improving or creating the space in which to work in the anterior joint compartment.
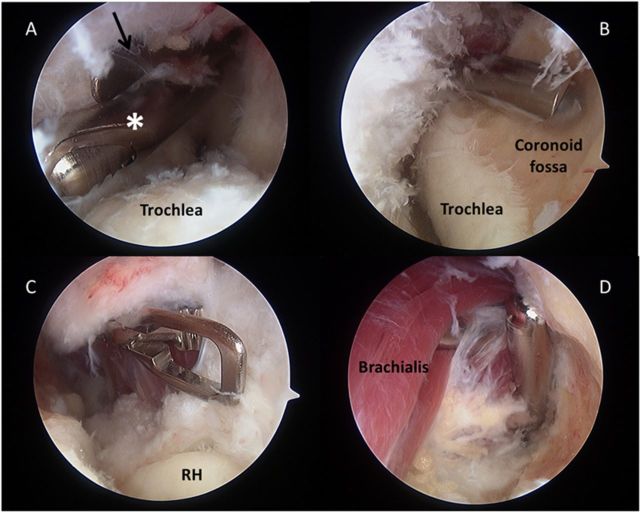
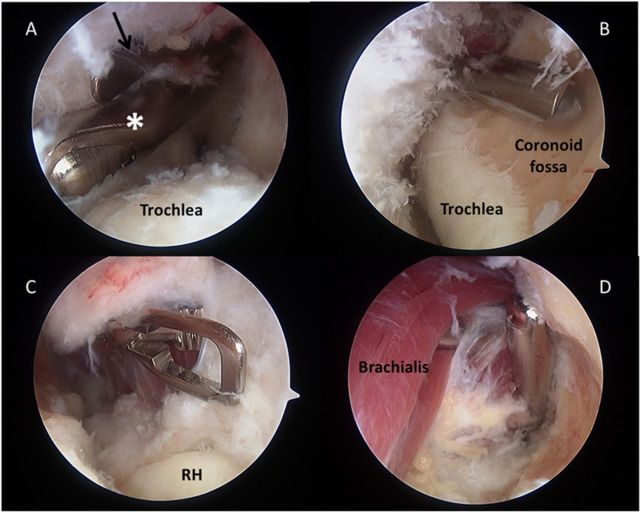
In contracted elbows, the intracapsular space is contracted, sometimes severely. The safety and efficacy of working with arthroscopic instruments in the front of the elbow require sufficient space in which to work. In elbows with contractures, this space has to be created. This step includes removal of debris, scar tissue, and loose bodies as well as stripping the capsule off the humerus (Fig. 5-A).
The capsular attachments along the medial and lateral supracondylar ridges are usually released at this stage so the entire soft-tissue mass (capsule, muscle, scar, and neurovascular structures) can be retracted further anteriorly away from the shaver or burr. If collateral vessels are exposed while you are doing this, cauterize them. A custom-made retractor is routinely placed in the proximal anterolateral portal, greatly facilitating exposure and execution of surgery in the anterior compartment. Sometimes a second retractor is used, coming in from the anteromedial portal.
Fig. 5.
Anterior compartment osteocapsular arthroplasty. The view is established and a working place is created (A). This step includes removal of debris, scar tissue, and loose bodies, and stripping the capsule off the humerus. The shaver (white asterisk) and the retractor (black arrow) are placed in the proximal anterolateral portal and in the anterolateral portals. After a safe working place is created, bone removal is begun (B).The osteophytes in the radial and coronoid fossae are removed by recontouring the distal part of the humerus. The anterior capsulectomy is best performed by starting with a capsulotomy from medial to lateral (C). The remnants of the capsule (D) are removed with use of a shaver. RH = radial head.
Video 10.
Step 2 (anterior joint compartment): Create a space in which to work.
Step 3 (Anterior Compartment): Bone Removal (Video 11)
Remove osteophytes and reshape the coronoid and coronoid fossa to their normal shape.
Remove any osteophytes from the coronoid as well as from the coronoid and radial fossae (Fig. 5-B). Reaching into the coronoid fossa can be difficult. Facilitate this by positioning the arm as explained in the section on patient positioning above.
To improve control and accuracy during use of the burr, shorten your grip on the device. Instead of holding the handle as you normally would, move your hand partially onto the shaft of the burr itself.
Video 11.
Step 3 (anterior joint compartment): Bone removal.
Step 4 (Anterior Compartment): Capsulectomy (Video 12)
Meticulously excise the anterior aspect of the capsule following four consistent steps.
After bone removal is complete, perform an anterior capsulectomy in a consistent stepwise sequence: (1) detachment, (2) preparation, (3) incision, and (4) excision.
First, detach the capsule from the humerus proximally and along the medial and lateral supracondylar ridges if this was not already done to create a space in which to work during Step 3. Doing this may expose collateral vessels; if so, cauterize them.
Second, prepare the anterior aspect of the capsule for removal by cleaning it up and defining it as a structure. This includes synovectomy and removal of loose tissue from its surface.
Third, incise the capsule from medial to lateral with a wide duck-billed punch (Conmed Linvatec). Start the capsulotomy (Fig. 5-C) medially and first extend it down the medial side of the ulnohumeral joint to the common flexor pronator tendon or even to the anterior bundle of the medial collateral ligament. There is a continuous layer of muscle anterior to the capsule medially, but laterally there is a triangular region between the brachialis and the extensor carpi radialis longus in which there is no muscle. For this reason, it is easier to avoid wandering out into the extracapsular tissues medially than laterally. Use a “bite and peel” technique to incise the capsule over to the lateral edge of the brachialis, indicated by a strip of fatty tissue surrounding the radial nerve. The “bite and peel” technique facilitates subsequent removal of the capsule and scar tissue. The capsulotomy is distal, where the interval between brachioradialis and extensor carpi radialis longus is readily identifiable.
As the fourth and final step, excise the capsule with the shaver (disconnected from suction) to the exposed lateral edge of the brachialis (Fig. 5-D). After switching portals, divide the remaining lateral capsule with tenotomy scissors and excise it.
Video 12.
Step 4 (anterior joint compartment): Capsulectomy.
Closure
Close the wounds after drains have been placed anteriorly (through the arthroscope sheath into the proximal anterolateral portal) and posteriorly (through the posterolateral portal into the olecranon fossa, exiting proximally through a separate skin puncture).
Postoperative Regimen
Postoperatively, check the nerve function before performing a regional block and commencing continuous passive motion.
Once normal motor and sensory neurologic function has been confirmed, place an indwelling axillary catheter for a continuous brachial plexus block.
Continuous passive motion (CPM) is begun through a range of motion equal to that achieved in surgery. Instruct the patient to come out of the machine every hour for five minutes to minimize soft-tissue or nerve problems due to continuous pressure or stretching. On and after the third day, the duration of each period out of the machine is determined by how long the patient can be out of the machine without losing some motion or experiencing difficulty regaining that motion as soon as he/she recommences CPM.
Remove the indwelling axillary catheter twelve hours prior to the anticipated time of discharge from the hospital to permit confirmation of recovery of neurologic function.
After discharge, each patient continues to use a CPM machine as part of a home therapy program until motion can be maintained without CPM (approximately four weeks total).
Results
A retrospective review of a consecutive series of 502 arthroscopic elbow contracture releases (including 388 osteocapsular arthroplasties) in 464 patients revealed twenty-four cases (4.8%) of transient nerve injury7. There were no permanent nerve injuries. The transient nerve injuries were variable and seemed to be due to prolonged tourniquet times, cutaneous dysesthesia attributed to open incisions, simultaneous ulnar nerve transposition, or retractor use. All nerve palsies resolved (range, one day to twenty-four months), with one patient lost to follow-up.
What to Watch For (Video 13)
Indications
The procedure is ideally indicated for symptomatic osteoarthritis of the elbow with contracture and pain at the end of motion.
Video 13.
Take-home messages and top-ten tips. Arthroscopic contracture release of the elbow is not without risk of nerve injury even in the hands of expert surgeons. Surgeons must anticipate and try to prevent accidents that can happen due to unpredictable circumstances related to the patient, anatomy, procedure, instruments, or surgical team.
Contraindications
The anterior capsulectomy portion of the osteocapsular arthroplasty may be contraindicated in a patient with prior submuscular transposition of the ulnar nerve. In this scenario the ulnar nerve is at risk of being injured during anterior capsulectomy because it lies on the anterior aspect of the capsule, to which it may be scarred.
A relative contraindication is substantial distortion of anatomy or anatomic landmarks.
Pitfalls & Challenges
Stay below your curve (always keep a margin of safety).
Know where the nerves are.
Use retractors.
Avoid swelling.
Detach the suction tubing from the shaver.
Do not use a burr near the ulnar nerve.
Shorten your grip on the burr for better control.
Use a consistent stepwise strategy.
Have an experienced assistant.
Anticipate and limit adversity.
Clinical Comments
Arthroscopic contracture release of the elbow is not without risk of nerve injury even in the hands of expert surgeons. Surgeons must anticipate and try to prevent accidents that can happen due to unpredictable circumstances related to the patient, anatomy, procedure, instruments, or surgical team. With these concerns in mind, we have found that arthroscopic contracture release of the elbow can be performed with a low risk of nerve injury by adherence to a safety-driven strategy.
Based on an original article: J Bone Joint Surg Am. 2013 Aug 7;95(15):1373-81.
Disclosure: None of the authors received payments or services, either directly or indirectly (i.e., via his or her institution), from a third party in support of any aspect of this work. None of the authors, or their institution(s), have had any financial relationship, in the thirty-six months prior to submission of this work, with any entity in the biomedical arena that could be perceived to influence or have the potential to influence what is written in this work. Also, no author has had any other relationships, or has engaged in any other activities, that could be perceived to influence or have the potential to influence what is written in this work. The complete Disclosures of Potential Conflicts of Interest submitted by authors are always provided with the online version of the article.
References
- 1. O’Driscoll SWM. Arthroscopic osteocapsular arthroplasty. In: Yamaguchi K King GJW McKee MD O’Driscoll SWM, editors. Advanced reconstruction elbow. 1st ed Rosemont: American Academy of Orthopaedic Surgeons; 2007. p 59-68. [Google Scholar]
- 2. Steinmann SP. Elbow arthroscopy: where are we now? Arthroscopy. 2007 Nov;23(11):1231-6. [DOI] [PubMed] [Google Scholar]
- 3. O’Driscoll SWM. Clinical assessment and open and arthroscopic surgical treatment of the stiff elbow. In: Jupiter JB, editor. The stiff elbow. Rosemont: American Academy of Orthopaedic Surgeons; 2006. p 9-19. [Google Scholar]
- 4. Gay DM Raphael BS Weiland AJ. Revision arthroscopic contracture release in the elbow resulting in an ulnar nerve transection: a case report. J Bone Joint Surg Am. 2010 May;92(5):1246-9. [DOI] [PubMed] [Google Scholar]
- 5. Haapaniemi T Berggren M Adolfsson L. Complete transection of the median and radial nerves during arthroscopic release of post-traumatic elbow contracture. Arthroscopy. 1999 Oct;15(7):784-7. [DOI] [PubMed] [Google Scholar]
- 6. Kelly EW Morrey BF O’Driscoll SW. Complications of elbow arthroscopy. J Bone Joint Surg Am. 2001 Jan;83(1):25-34. [DOI] [PubMed] [Google Scholar]
- 7. Blonna D Wolf JM Fitzsimmons JS O’Driscoll SW. Prevention of nerve injury during arthroscopic capsulectomy of the elbow utilizing a safety-driven strategy. J Bone Joint Surg Am. 2013 Aug 7;95(15):1373-81. [DOI] [PubMed] [Google Scholar]


