Abstract
Total abdominal hysterectomy (TAH) is commonly referred to as extrafascial hysterectomy. This article explains the basic surgical procedure of TAH as taught to residents. TAH is an operation to remove the uterus with the outer wall of the uterus, and is a fundamental operation that gynecologists must master. Possible complications during TAH include ureteral injury, intestinal damage, and bladder injury. To avoid operative complications, it is important to follow the correct release layer procedure and ensure that “the uterus has been naturally removed.”
The two most important points of the authors' method to avoid complications are as follows: (1) cut sequentially from the ligament away from the ureter which moves the ureter further away from the cervix with each transection stage; (2) cut the parametrial tissue along the circumference of the cervix in the next three steps:
First step: clamping and cutting the uterine artery and upper part of the cardinal ligament; second step: clamping and cutting the sacrouterine ligament and the posterior half of the cardinal ligament; third step: clamping and cutting the vesicouterine ligament and anterior half of the cardinal ligament.
Keywords: abdominal hysterectomy, basic standard procedure, uterine fibroid
Surgical Steps
1. Laparotomy, development of the visual field
↓
2. Ligate and cut the round ligament
↓
3. Clamp, cut, and ligate the ovarian ligament and Fallopian tube (or the infundibulopelvic ligament)
↓
4. Mobilization of the bladder
↓
5. Clamp, cut, and ligate the uterine artery and vein
↓
6. Push down the cutting stump with gauze
↓
7. Clamp, cut, and ligate the sacrouterine ligament and the posterior half of the cardinal ligament
↓
8. Clamp, cut, and ligate the vesicouterine ligament and the anterior half of the cardinal ligament
↓
9. Clamp the boundary between the portio vaginalis and the vagina
↓
10. Incise the vagina and remove the uterus
↓
11. Disinfect the vagina and close the vaginal cuff
↓
12. Hemostasis
↓
13. Close the retroperitoneum
↓
14. Close the abdominal wall
Preoperative Examination
Check the following items before surgery:
Complete blood count, blood biochemistry, urinalysis, electrocardiogram, chest X-ray examination, and pulmonary function tests.
Cytology.
Ultrasound examination and magnetic resonance imaging(MRI) to detect conditions such as uterine fibroids, adenomyosis, and endometriosis. If endometrial cancer or uterine sarcoma is suspected, contrast-enhanced MRI is performed.
Intravenous pyelography in patients where severe adhesion or retroperitoneal myomas are suspected.
Tumor marker evaluation if endometrial carcinoma or uterine sarcoma is suspected.
D-dimer evaluation: With large uterine fibroids and malignant uterine tumors, the frequency of deep vein thrombosis increases.
Indications and Contraindications
Diseases that are indications for TAH include: (1) uterine fibroids, (2) uterine adenomyosis, (3) cervical cancer (to stage Ia), (4) endometrial cancer, (5) uterine sarcoma, (6) ovarian cancer, (7) choriocarcinoma of uterus, (8) patients in whom postpartum massive bleeding does not stop (e.g., placenta previa, atonic bleeding, uterine rupture).
Contraindications include: (1) cervical cancer (≥ Ib stage) and (2) endometrial cancer stage II. When TAH is contraindicated, semiradical hysterectomy or radical hysterectomy is performed.
Preoperative Preparation
In patients with very large uterine fibroid(s), severe endometriosis, malignant disease, or severe adhesions, a large amount of bleeding is predicted; therefore, autologous blood storage and preserved blood preparation is recommended. In other patients, such as those with intraligamental myoma or large cervical myomas, the risk of ureteral injury increases; therefore, intravenous pyelography or inserting a ureteral stent is recommended. Preoperative informed patient consent of knowledge of the above risks is required.
Explanation of Procedure
The patient is positioned supine on the operation table and general or regional anesthesia may be used. The sites that are most likely to cause ureteral injury when cutting the ligaments are: (1) vesicouterine ligament, (2) cardinal ligament, (3) sacrouterine ligament, (4) infundibulopelvic ligament, and (5) round ligament. The first important point is to begin the ligament transection from a safe ligament far from the ureter, and it is important that the ureter is kept away from the cervix at each transection stage. The second important point is to ligate and cut the parametrial ligaments along the roundness of the uterine cervix as shown in Fig. 1 ; Each step will be explained with an illustration.
Fig. 1.
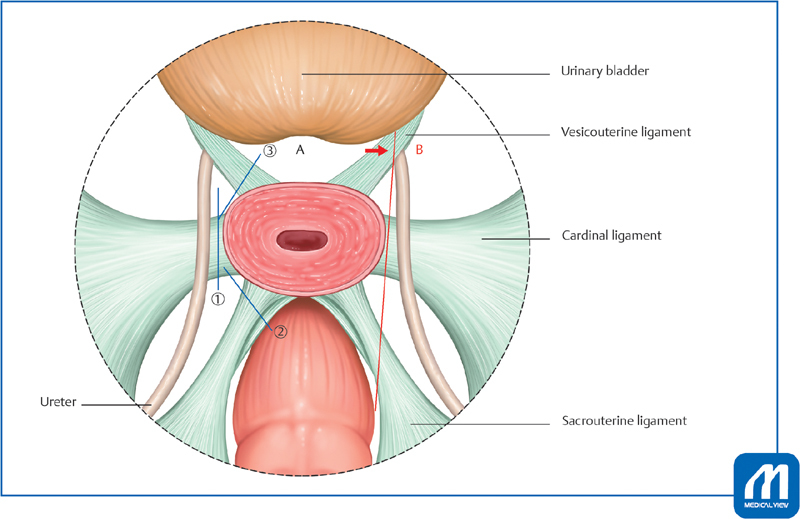
Ligaments cutting method in TAH: For the prevention of ureteral injury, the principle of ligament transection is to begin from a safe ligament far from the ureter, and it is important that the ureter is kept away from the cervix at each transection stage. The second important point is to ligate and cut the parametrial ligaments along the roundness of the uterine cervix (A). If you cut along the same cross section as B without following the roundness of the cervix, ureter damage is likely to occur in the location shown by the arrow. (Reproduced with permission from 1. Hiramatsu Y. Basic Procedure 1. In: Hiramatsu Y, Konishi I, Sakuragi N, Takeda S, eds. Mastering the Essential Surgical Procedures OGS Now, No.2 Total Abdominal Hysterectomy (Japanese). Tokyo: Medical View; 2010: 42–55. Copyright © Medical View).
-
Laparotomy and development of the visual field
The operator is on the patient's left side with the assistant on the patient's right side. If the surgeon is right-handed, standing on the patient's left side makes it easier to manipulate tissues and instruments in the pelvis. The author usually makes a midline abdominal incision for the required length according to the size of the uterus. Next, the intestinal tract is pushed into the upper abdomen with two towels moistened with physiological saline, and a retractor is applied to expand the visual field.
A pair of long, straight Pean's forceps are applied across each uterine cornu, including the Fallopian tube and ovarian ligament. If a myoma is firm and large, use a myoma borer.
-
Ligate and divide the round ligament
Place a ligature in the round ligament using 1-0 absorbable suture approximately 1.5 to 2 cm away from the uterus and hold with a Kocher's forceps. The uterine side is clamped with a Kocher's forceps and the round ligament is cut ( Fig. 2 ). Expand the incision slightly upward and downward, then cut the anterior leaf of the broad ligament across the vesicouterine peritoneal reflection.
-
Clamp, cut, and ligate the ovarian ligament and Fallopian tubes (or infundibulopelvic ligament)
The ovarian ligament and the Fallopian tubes (or infundibulopelvic ligament) are clamped with Heaney's forceps and Kocher's forceps ( Fig. 3 ) and cut. The edge of the pelvic side is ligated again.
Fig. 2.
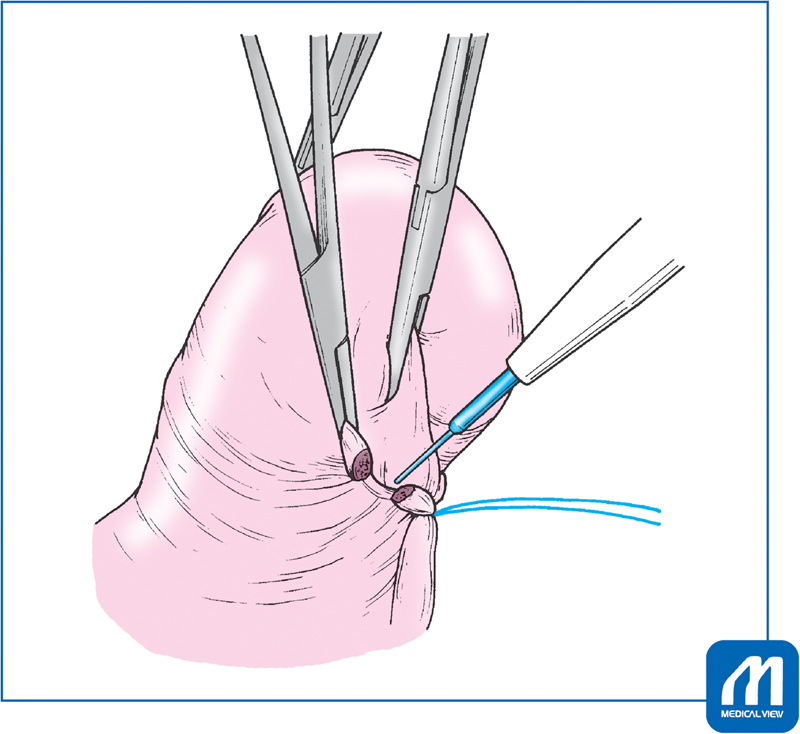
Ligate and cut the round ligament: Place a ligature in the round ligament approximately 1.5–2 cm away from the uterus and the uterine side is clamped with a Kocher's forceps, and the round ligament is cut. (Reproduced with permission from 1. Hiramatsu Y. Basic Procedure 1. In: Hiramatsu Y, Konishi I, Sakuragi N, Takeda S, eds. Mastering the Essential Surgical Procedures OGS Now, No.2 Total Abdominal Hysterectomy (Japanese). Tokyo: Medical View; 2010: 42–55. Copyright © Medical View).
Fig. 3.
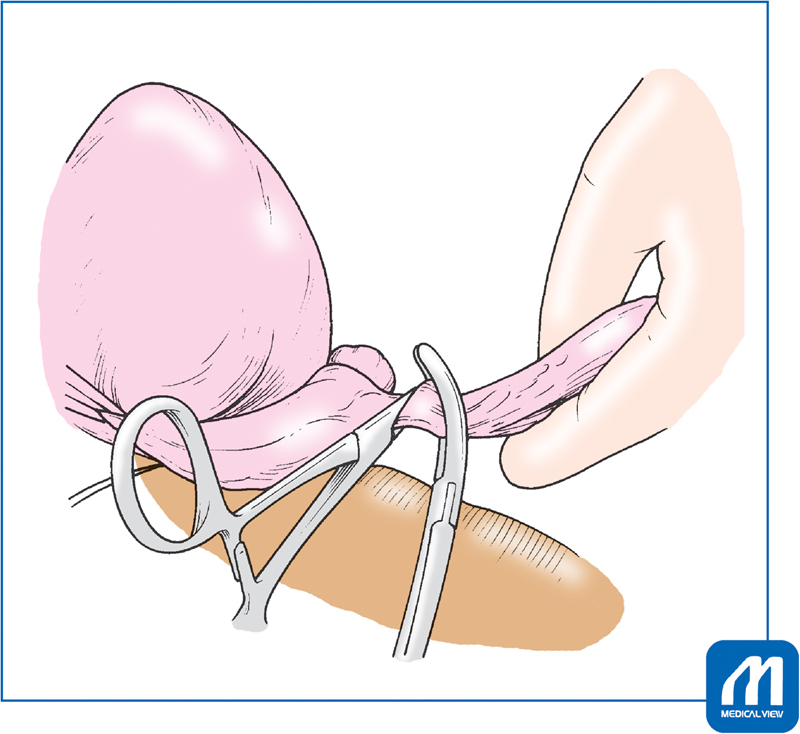
Clamp, cut, and ligate the or infundibulopelvic ligament: The infundibulopelvic ligament is clamped with Heaney's forceps and Kocher's forceps and cut. (Reproduced with permission from 1. Hiramatsu Y. Basic Procedure 1. In: Hiramatsu Y, Konishi I, Sakuragi N, Takeda S, eds. Mastering the Essential Surgical Procedures OGS Now, No.2 Total Abdominal Hysterectomy (Japanese). Tokyo: Medical View; 2010: 42–55. Copyright © Medical View).
Pitfalls
Although there is little chance of damage to the ureter in this part of the procedure, cut the ligaments after confirming that there is no ureteral trapping, with visual inspection and palpation.
4. Procedures 2. and 3. are also performed on the other side .
-
5. Mobilizing the bladder
With strong upward traction on the uterus and lifting the incised bladder peritoneal stump with smooth forceps increasing tension. First, mobilize the bladder with Cooper's scissors at the center of the cervix. Then, proceed with lateral blunt dissection with the Cooper's scissors ( Fig. 4 ) to expose the vesicouterine ligament. It is important to avoid drifting laterally into the bladder pillars, where troublesome bleeding may be encountered. At each stage, small vessels may require hemostasis with a bipolar coagulator. The bladder should be mobilized at approximately 1 cm below the cervicovaginal junction. If there is bleeding, the bleeding point is coagulated with bipolar coagulator.
Fig. 4.
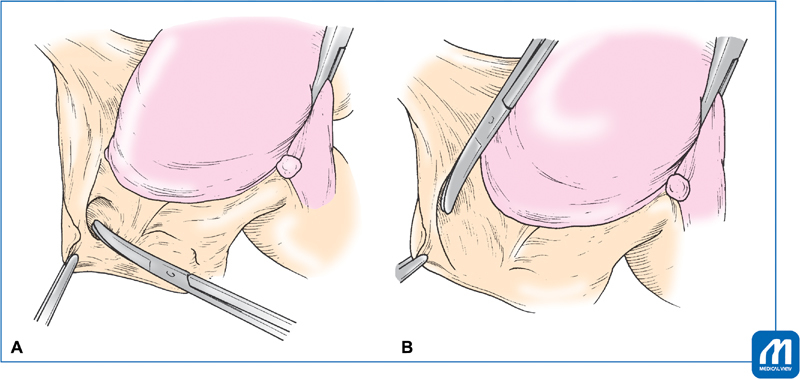
Mobilizing the bladder: The back of the bladder is a site that bleeds easily. To avoid bleeding, it is important to mobilize the bladder at the center of the uterine cervix (A) , then dissect bluntly laterally with convex Cooper's scissors (B) . (Reproduced with permission from 1. Hiramatsu Y. Basic Procedure 1. In: Hiramatsu Y, Konishi I, Sakuragi N, Takeda S, eds. Mastering the Essential Surgical Procedures OGS Now, No.2 Total Abdominal Hysterectomy (Japanese). Tokyo: Medical View; 2010: 42–55. Copyright © Medical View).
-
6. Clamp, cut, and ligate the uterine artery and vein/cardinal ligament (first step of parametrial tissue cutting)
In preparation for this step, grasp the posterior broad ligament with forceps, scrape off the tissues at the back of the posterior broad ligament with Cooper's scissors, and when the posterior broad ligament is thinned ( Fig. 5 ) cut down toward the sacrouterine ligament. This procedure is important to keep the ureter away from the uterine cervix, especially when there is inflammation or endometriotic adhesions near the sacrouterine ligament.
Fig. 5.
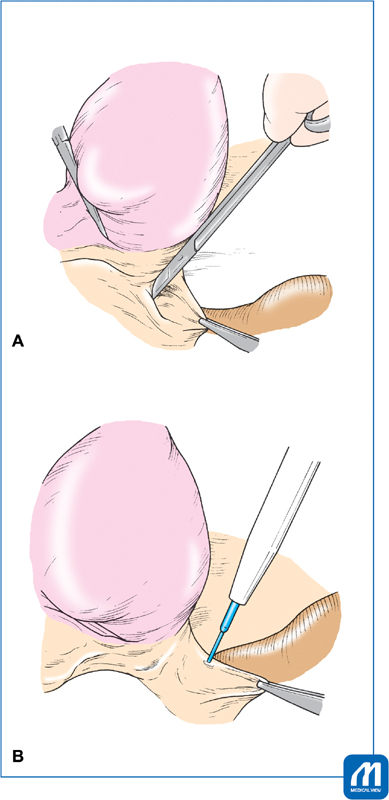
Cut the posterior broad ligament; Grasp the posterior broad ligament with forceps, scrape off the tissues at the back of the posterior broad ligament with Cooper's scissors (A) , and then cut down toward the sacrouterine ligament (B) . This procedure is important to keep the ureter away from the uterine cervix. (Reproduced with permission from 1. Hiramatsu Y. Basic Procedure 1. In: Hiramatsu Y, Konishi I, Sakuragi N, Takeda S, eds. Mastering the Essential Surgical Procedures OGS Now, No.2 Total Abdominal Hysterectomy (Japanese). Tokyo: Medical View; 2010: 42–55. Copyright © Medical View).
Next, the loose connective tissue around the cardinal ligaments is scraped off until the uterine artery can be visualized. Then, clamp the uterine vessels and cardinal ligament slightly below the internal os of the uterus with Heaney's forceps so that the uterine side can be sandwiched with a short Kocher's forceps to control back-bleeding from the uterine side uterine artery, then divide ( Fig. 6 ). A absorbable suture is placed and the ligature is gripped and pulled with a short Kocher's forceps. The transected stump is double-ligated because the uterine artery is included.
Fig. 6.
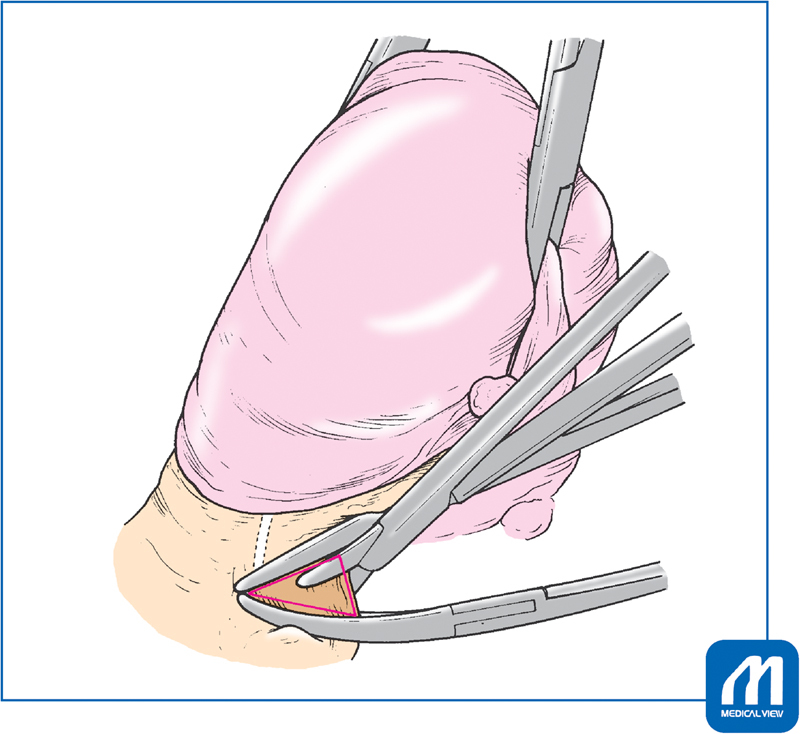
Cut the uterine artery and cardinal ligament (first step of parametrial tissue cutting): The Heaney's forceps should be place as close to 90 degrees as possible and Kocher's forceps are placed in contact with the side wall of the uterus and the tip of the Heaney's forceps so that the space between the forceps makes a triangle. (Reproduced with permission from 1. Hiramatsu Y. Basic Procedure 1. In: Hiramatsu Y, Konishi I, Sakuragi N, Takeda S, eds. Mastering the Essential Surgical Procedures OGS Now, No.2 Total Abdominal Hysterectomy (Japanese). Tokyo: Medical View; 2010: 42–55. Copyright © Medical View).
Fig. 7.
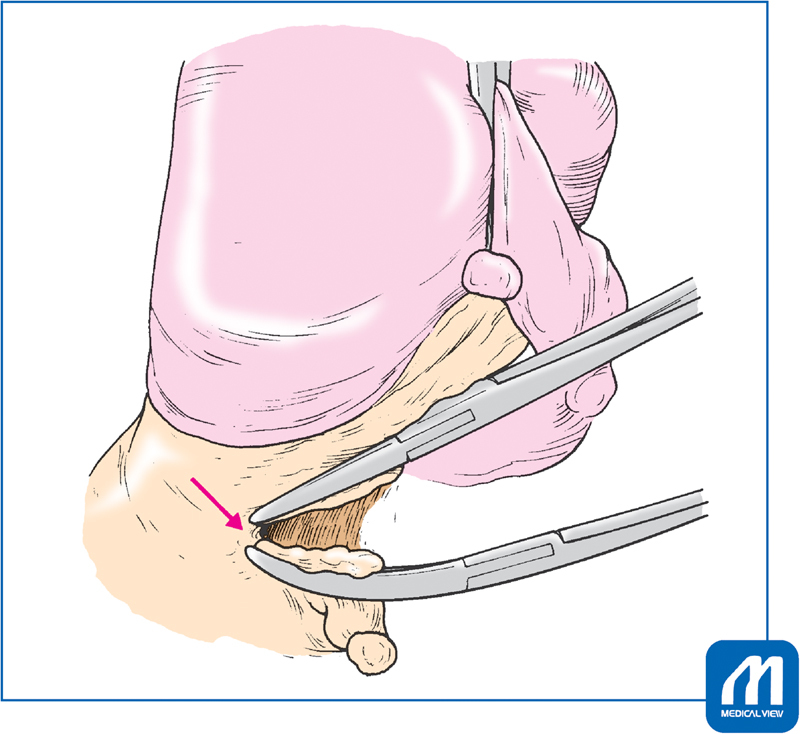
Cut the uterine artery and cardinal ligament (first step of parametrial tissue cutting): Cut at a point slightly beyond the tip of the Heaney's forceps to the point where the Heaney's forceps tip is displaced 2–5 mm downward from the tip of the Kocher's forceps, when cutting (arrow). (Reproduced with permission from 1. Hiramatsu Y. Basic Procedure 1. In: Hiramatsu Y, Konishi I, Sakuragi N, Takeda S, eds. Mastering the Essential Surgical Procedures OGS Now, No.2 Total Abdominal Hysterectomy (Japanese). Tokyo: Medical View; 2010: 42–55. Copyright © Medical View).
-
7. Push down the stump of the uterine artery and upper part of the cardinal ligament
Retract the uterus strongly upwards to the opposite side, compress the cut stump of the cardinal ligament and uterine vessels with gauze as shown in Fig. 8 , and push down slowly 1.5 to 2 cm along the cervix to the level of the sacrouterine ligament and the vesicouterine ligament. Using this method, the ureter is further away from the uterine cervix, and the same effect is obtained when clamping and cutting the 1.5 to 2 cm lower part of the internal os ( Fig. 9 ).
-
8. Clamp, cut, and ligate the sacrouterine ligament and posterior half of the cardinal ligament (second step of parametrial tissue cutting)
When the cardinal ligament stump, the vesicouterine ligament and the sacrouterine ligaments are aligned at the same level using the push-down procedure ( Fig. 8 ), move to manipulating the sacrouterine ligament and posterior half of the cardinal ligament. As shown in Fig. 10 , one arm of the Heaney's forceps is placed inside the sacrouterine ligament, and the other arm is clamped against the posterior half of the cardinal ligament as shown in Fig. 10 . Following the roundness of the uterine cervix, the convex surface of the Heaney's forceps is clamped such that it faces diagonally behind the uterus with the sacrouterine ligament. The sacrouterine ligament is cut and ligated, and the ligature is gripped and retracted.
-
9. Clamp, cut, and ligate the vesicouterine ligament and the anterior half of the cardinal ligament (third step of parametrial tissue cutting)
The remaining ligaments adhering to the uterus are the vesicouterine ligament and anterior half of the cardinal ligament. Place the right hand against the back of the cervix, check the cervicovaginal junction, and if the bladder is not mobilized sufficiently, push down on the bladder again with the left hand and gauze to approximately 1 cm below the cervicovaginal junction. Then, the vesicouterine ligament and anterior part of the cardinal ligament are clamped such that the convex surface of the Heaney's forceps faces diagonally in front of the uterus ( Fig. 11 ). Then, the ligaments are cut and ligated, and the ligature is gripped and retracted.
Fig. 8.
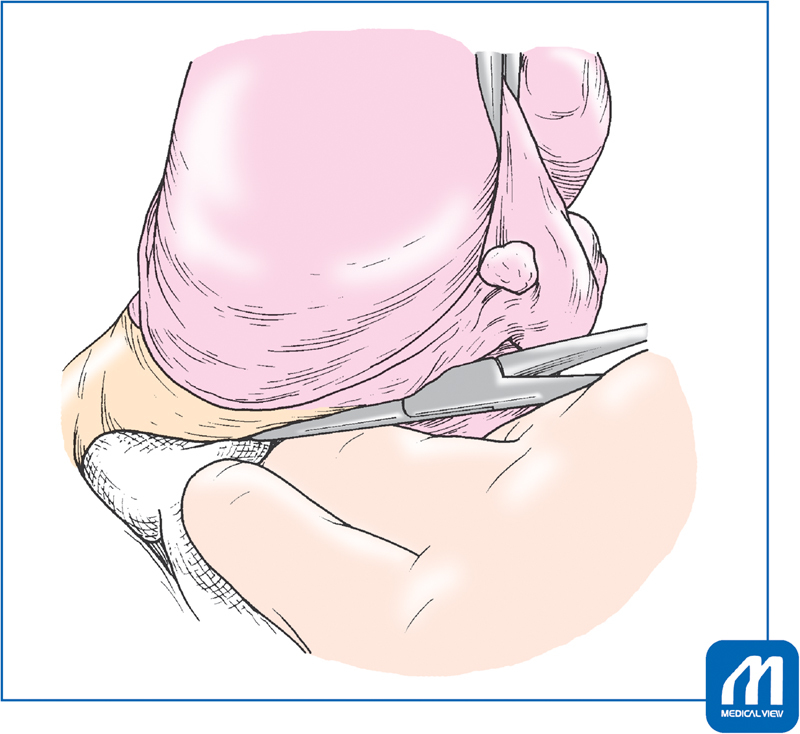
Push down the stump of the uterine artery and the cardinal ligament: (1) Retract the uterus strongly upwards to the opposite side, compress the cut stump of the cardinal ligament and uterine vessels with gauze, and push down slowly 1.5–2 cm along the cervix to the level of the sacrouterine ligament and the vesicouterine ligament. (Reproduced with permission from 1. Hiramatsu Y. Basic Procedure 1. In: Hiramatsu Y, Konishi I, Sakuragi N, Takeda S, eds. Mastering the Essential Surgical Procedures OGS Now, No.2 Total Abdominal Hysterectomy (Japanese). Tokyo: Medical View; 2010: 42–55. Copyright © Medical View).
Fig. 9.
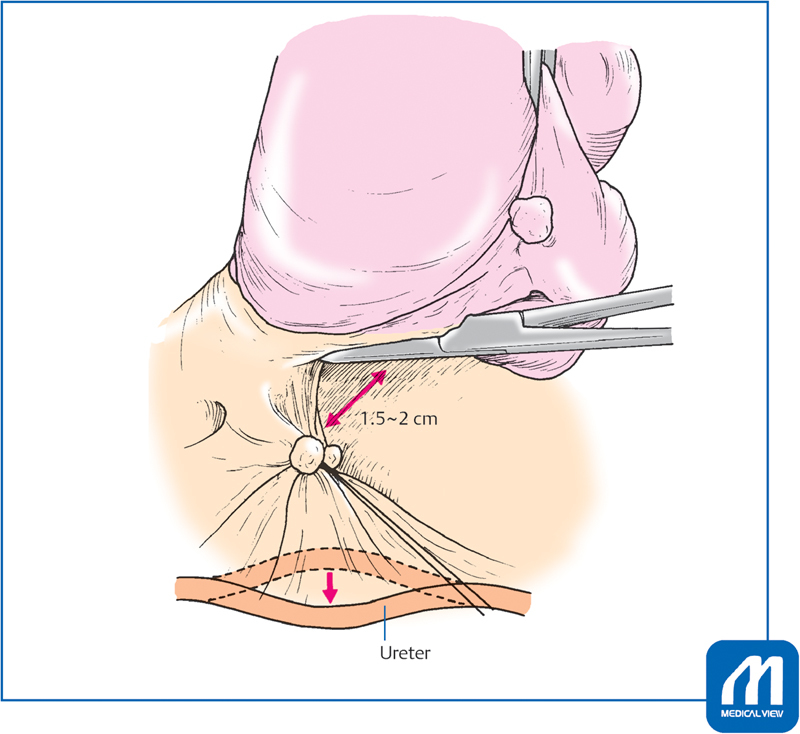
Push down the stump of the uterine artery and the cardinal ligament: (2) The ureter is further away from the uterine cervix, and the same effect is obtained when clamping and cutting the 1.5–2 cm lower part of the internal os. (Reproduced with permission from 1. Hiramatsu Y. Basic Procedure 1. In: Hiramatsu Y, Konishi I, Sakuragi N, Takeda S, eds. Mastering the Essential Surgical Procedures OGS Now, No.2 Total Abdominal Hysterectomy (Japanese). Tokyo: Medical View; 2010: 42–55. Copyright © Medical View).
Fig. 10.
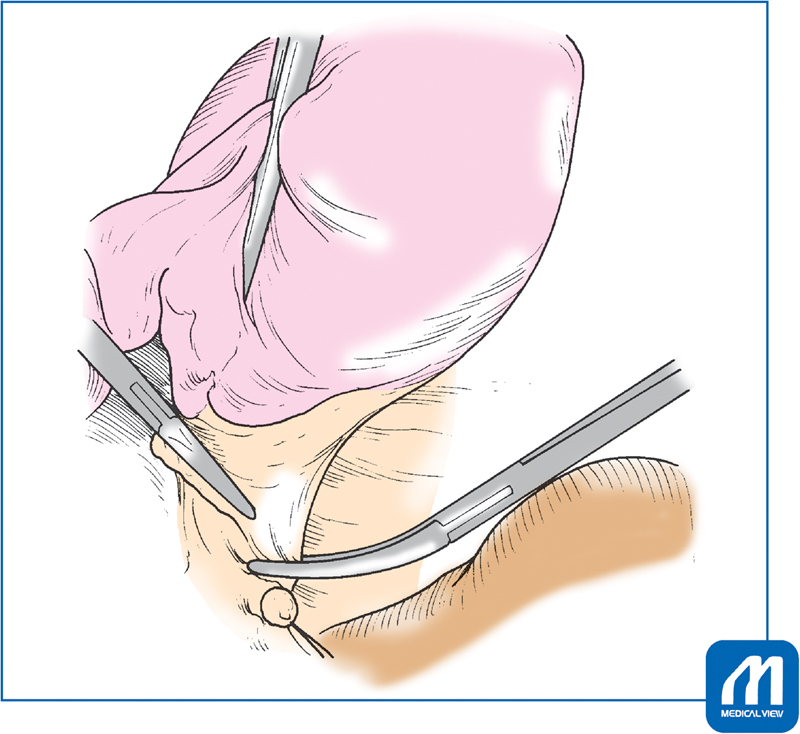
Clamp, cut and ligate the sacrouterine ligament and the cardinal ligament (second step of parametrial tissue cutting): One arm of the Heaney's forceps is placed inside the sacrouterine ligament, and the other arm is clamped against the posterior half of the cardinal ligament. Following the roundness of the uterine cervix, the convex surface of the Heaney's forceps faces diagonally behind the uterus. (Reproduced with permission from 1. Hiramatsu Y. Basic Procedure 1. In: Hiramatsu Y, Konishi I, Sakuragi N, Takeda S, eds. Mastering the Essential Surgical Procedures OGS Now, No.2 Total Abdominal Hysterectomy (Japanese). Tokyo: Medical View; 2010: 42–55. Copyright © Medical View).
Fig. 11.
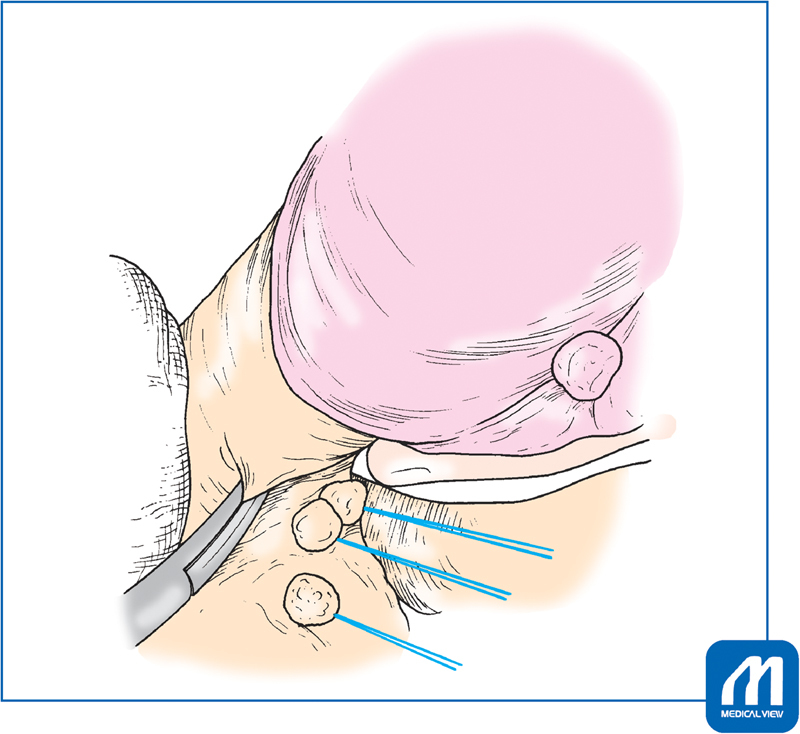
Clamp, cut, and ligate the vesicouterine ligament and of the cardinal ligament (third step of parametrial tissue cutting): The vesicouterine ligament and anterior part of the cardinal ligament are clamped such that the convex surface of the Heaney's forceps faces diagonally in front of the uterus. (Reproduced with permission from 1. Hiramatsu Y. Basic Procedure 1. In: Hiramatsu Y, Konishi I, Sakuragi N, Takeda S, eds. Mastering the Essential Surgical Procedures OGS Now, No.2 Total Abdominal Hysterectomy (Japanese). Tokyo: Medical View; 2010: 42–55. Copyright © Medical View).
If the Heaney's forceps are used correctly, at the end of these three steps, the ligated stumps will line up at the same level to surround the cervix ( Fig. 12 ). If the stumps are arranged this way, the ligaments are cut along the roundness of the uterine cervix, so there is little risk of ureteral damage. However, if the divided stumps are aligned along the longitudinal axis of the uterus, ligament cutting has not been performed along the roundness of the cervix, which avoids the ureter, and as shown in Fig. 1B , results in ureteral injury in a high percentage in the locations shown by the arrow.
Fig. 12.
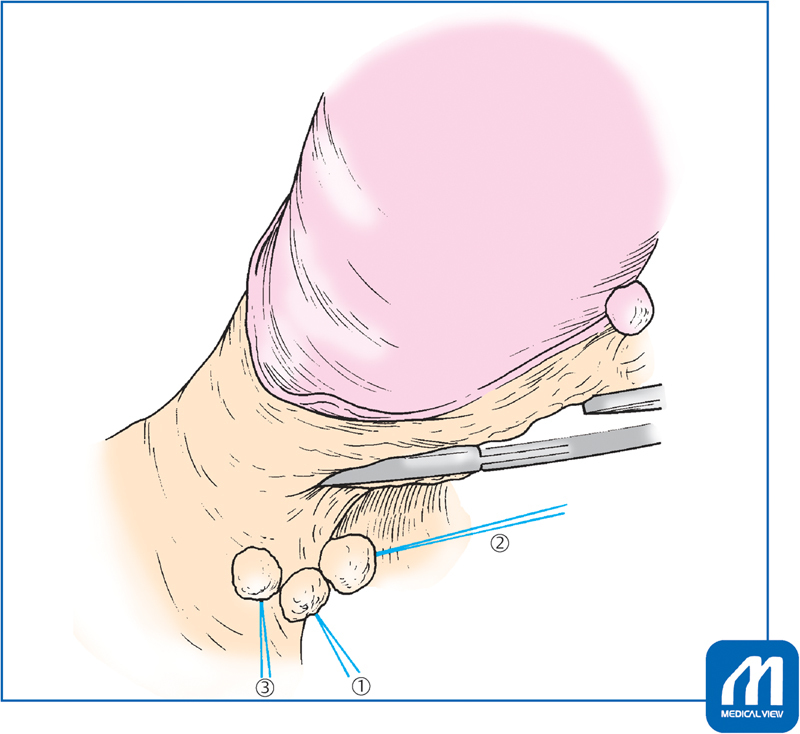
Condition after cutting the ligaments around the cervix: When the Heaney's forceps is used in the correct direction and the parametrial ligaments are cut along the roundness of the uterine cervix, the ligated stumps will line up at the same level to surround the cervix. ① uterine artery & cardinal ligament, ② sacrouterine ligament and posterior half of the cardinal ligament, ③ vesicouterine ligament and the anterior half of the cardinal ligament. (Reproduced with permission from 1. Hiramatsu Y. Basic Procedure 1. In: Hiramatsu Y, Konishi I, Sakuragi N, Takeda S, eds. Mastering the Essential Surgical Procedures OGS Now, No.2 Total Abdominal Hysterectomy (Japanese). Tokyo: Medical View; 2010: 42–55. Copyright © Medical View).
-
10. Clamp the vaginal wall at the cervicovaginal junction
Palpate the uterine cervix again from the front and back to identify the boundary, and clamp the vaginal wall with right-angle forceps or Heaney's forceps ( Fig. 13 ). If the rectum adheres to the posterior wall of the cervix and is raised when the cervix is also raised, incise the adhesion at the border with an electric knife and push down slightly, then clamp the vaginal wall.
-
11. Opening the vagina
Step 10 is repeated on the contralateral side. A large gauze is placed on the posterior side of the uterus, the bladder is elevated with the bladder spatula, and the anterior wall of the cervix is incised with an electric knife ( Fig. 14 ). When the vaginal spase is partially opened, grasp the vaginal wall with a long, straight Kocher's forceps. Use another long, straight Kocher's forceps to grip and retract the uterine cervix, incise the vaginal wall around the entire circumference, and remove the uterus. Hold the vaginal wall with long, straight Kocher's forceps at three to four points, and remove vaginal secretions and disinfect.
-
12. Closing the vaginal vault
First, the bilateral ends of the vaginal stump are sutured with 1–0 absorbable suture, and the remaining part is sutured continuously ( Fig. 15 ). Suturing the vaginal stump must be completed with absorbable suture to prevent postoperative vaginal stump granulation. After confirming hemostasis, the detached end of the bladder, vaginal stump, and Douglas' peritoneum are interruptedly sutured at three points.
-
13. Hemostasis and closing the retroperitoneum
Grip the broad ligament incision end with a Pean's forceps, check the surgical field, and stop bleeding. Suture the pelvic peritoneum with 3–0 synthetic absorbable suture.
Fig. 13.
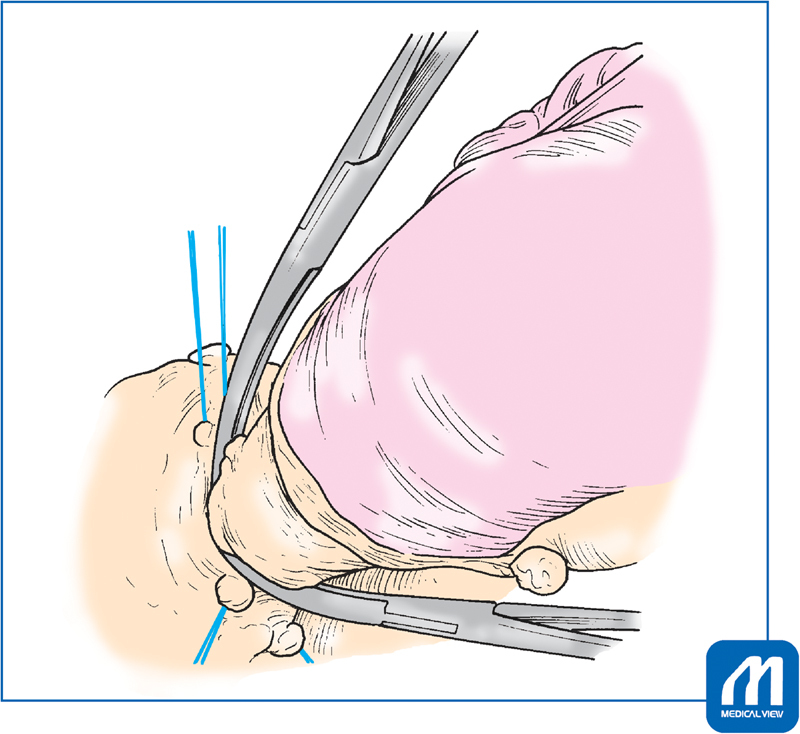
Clamp the vaginal wall: Palpate the uterine cervix again from the front and back to identify the boundary, and clamp the vaginal wall with right-angle forceps or Heaney's forceps. (Reproduced with permission from 1. Hiramatsu Y. Basic Procedure 1. In: Hiramatsu Y, Konishi I, Sakuragi N, Takeda S, eds. Mastering the Essential Surgical Procedures OGS Now, No.2 Total Abdominal Hysterectomy (Japanese). Tokyo: Medical View; 2010: 42–55. Copyright © Medical View).
Fig. 14.
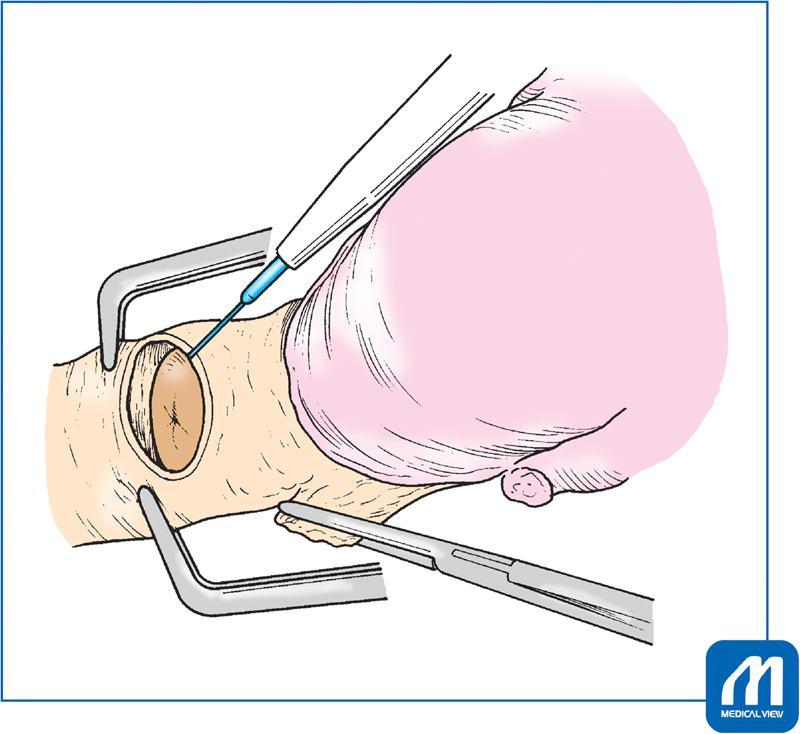
Opening the vagina: A large gauze is placed on the posterior side of the uterus, the bladder is elevated with the bladder spatula, and the anterior wall of the cervix is incised with an electric knife. (Reproduced with permission from 1. Hiramatsu Y. Basic Procedure 1. In: Hiramatsu Y, Konishi I, Sakuragi N, Takeda S, eds. Mastering the Essential Surgical Procedures OGS Now, No.2 Total Abdominal Hysterectomy (Japanese). Tokyo: Medical View; 2010: 42–55. Copyright © Medical View).
Fig. 15.
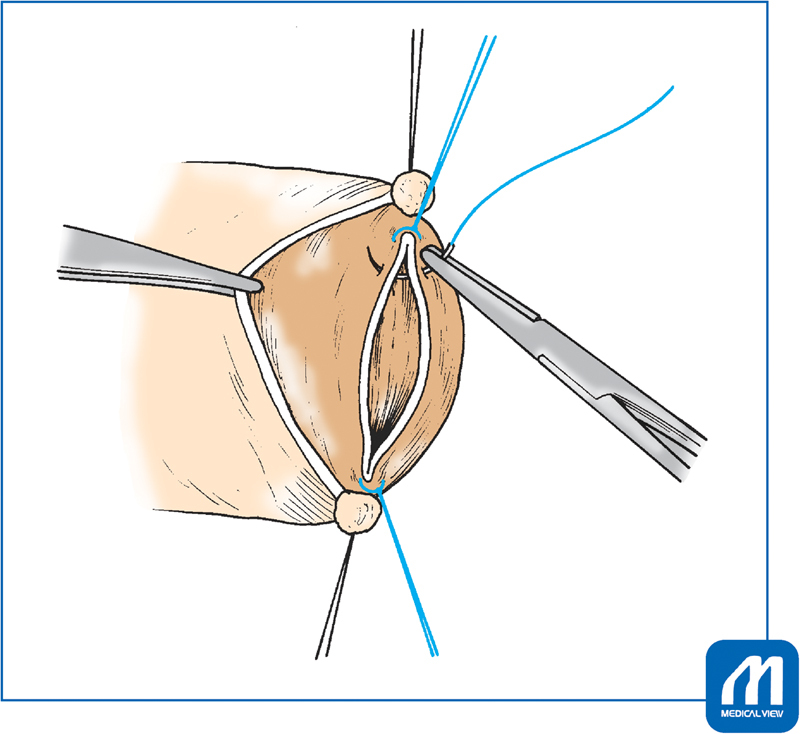
Closing the vaginal vault: First, the bilateral ends of the vaginal stump are sutured with 1–0 absorbable suture, and the remaining part is sutured continuously. (Reproduced with permission from 1. Hiramatsu Y. Basic Procedure 1. In: Hiramatsu Y, Konishi I, Sakuragi N, Takeda S, eds. Mastering the Essential Surgical Procedures OGS Now, No.2 Total Abdominal Hysterectomy (Japanese). Tokyo: Medical View; 2010: 42–55. Copyright © Medical View).
Tips for Hemostasis
When stopping hemorrhage at the parametrial tissue of the uterus, keep in mind that the ureters run very close to the bleeding point. In addition, if it is not possible to stop bleeding by the first operation, it becomes more difficult to stop bleeding, so it is necessary to pay close attention to stop the bleeding by the first operation.
In general, the bleeding point is minimally clamped with a mosquito Kelly's forceps, the bleeding point is grasped with another mosquito Kelly's forceps, and then ligated with 2–0 or 3–0 silk. Where sufficient clamping force is difficult to achieve, Z sutures are placed with 3–0 absorbable suture. In this time, there is a possibility that the ureter and blood vessels are running nearby, so care is necessary to avoid placing the needle deeper than necessary. Depending on the site, bipolar hemostasis can be effective.
-
14. Lavaging the abdominal cavity and closing the abdominal wall
After confirming the physiological gauze count, lavage the abdominal cavity with warm saline, return the intestines to their original position, and close the abdominal wall. After closing, ensure that there is no bleeding from the vaginal stump, using a vaginal speculum. Postoperatively, perform abdominal X-rays and confirm again that there are no gauze remnants.
Notes to Avoid Complications
Bleeding from behind the bladder : suction well and identify the specific bleeding points to be coagulated with the bipolar coagulator. If bleeding does not stop after 2 to 3 attempts, do not repeat coagulation hemostasis; use Z sutures with 3–0 absorbable suture. Repeated coagulation with a bipolar coagulator causes urinary fistula.
Bleeding from the pelvic floor : This is likely to occur, for example, when removing retroperitoneal myomas. Gauze packing is useful for a small amount of bleeding. If the bleeding point is clear, coagulate and stop bleeding using bipolar coagulation. However, if you cannot stop bleeding after 2 to 3 attempts, do not repeat coagulation hemostasis; instead, place Z sutures with 2–0 or 3–0 absorbable suture. If the suture area is close to the vascular plexus of the pelvic floor and dangerous, or with oozing, attach a fibrinogen compound (Tacosil), then apply gauze pressure for 2 to 3 minutes to stop bleeding. In either case, insert a drain if there is concern about postoperative bleeding.
Confirming the location of the ureters : with strong adhesions, cervical fibroids, or retroperitoneal myomas, it is necessary to separate the ureters before performing other surgery. A safe and reliable method for finding the ureters is to expose the common iliac artery by expanding the field of view with your index fingers until the ureter intersects the common iliac artery then tracing the ureter downward ( Fig. 16 ). Bleeding and ureteral damage occur easily when trying to find the ureters near the uterine cervix.
Fig. 16.
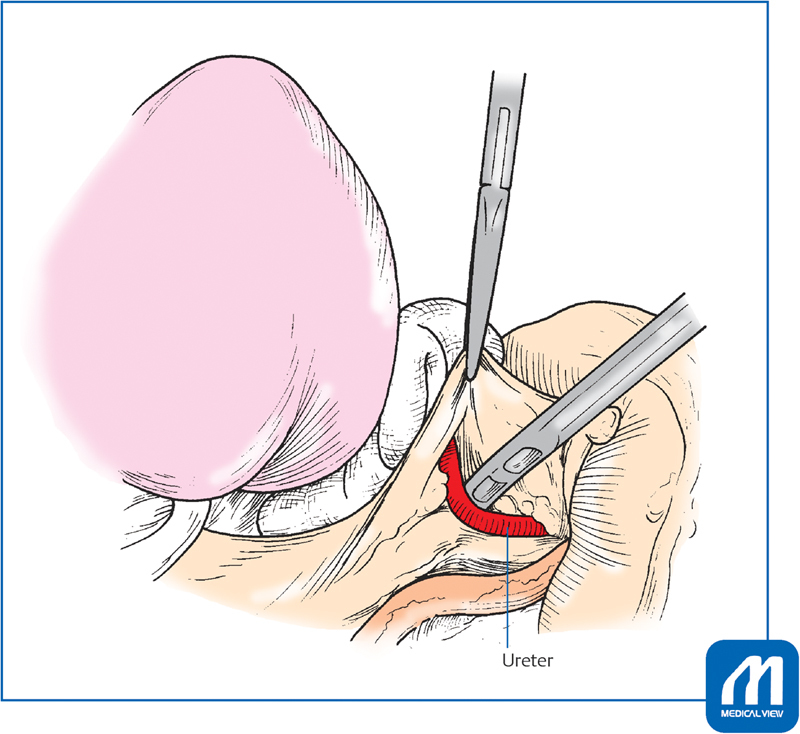
Confirming the location of the ureters: A safe and reliable method for finding the ureters is to expose the common iliac artery by expanding the field of view with your index fingers until the ureter intersects the common iliac artery then tracing the ureter downward. (Reproduced with permission from 1. Hiramatsu Y. Basic Procedure 1. In: Hiramatsu Y, Konishi I, Sakuragi N, Takeda S, eds. Mastering the Essential Surgical Procedures OGS Now, No.2 Total Abdominal Hysterectomy (Japanese). Tokyo: Medical View; 2010: 42–55. Copyright © Medical View).
Acknowledgments
We thank Jane Charbonneau, DVM, from Edanz Group ( www.edanzediting.com/ac ) for editing the draft of this manuscript.
Footnotes
Conflict of Interest None.
Tips and Warnings.
The back of the bladder is a site that bleeds easily. To avoid bleeding, it is important to mobilize the bladder at the center of the uterine cervix, then dissect bluntly laterally with convex Cooper's scissors.
Tips and Warnings.
There are several important points to consider at this stage:
First, open the tips of the Heaney's forceps widely and slide them to trace the cervical surface in contact with the side wall of the cervix and squeeze slightly toward the bladder side. The clamp should be place as close to 90 degrees as possible.
The short, straight Kocher's forceps are placed in contact with the side wall of the uterus and the tip of the Heaney's forceps so that the space between the forceps makes a triangle ( Fig. 6 ).
Cut at a point slightly beyond the tip of the Heaney's forceps to the point where the Heaney's forceps tip is displaced 2 to 5 mm downward from the tip of the Kocher's forceps, when cutting ( Fig. 7 ).
An absorbable suture ligature is placed near the tip of the Heaney's forceps. If the needle is too deep (within the uterine cervix) the next push-down procedure will be impossible. If the needle is too shallow, bleeding will occur when the Heaney's forceps are removed.
Performing any of precautions, 1.to 4., incorrectly interferes with the subsequent operation.
Tips and Warnings.
To confirm the boundary between the portio vaginalis and the vagina, place the right hand against the cervical posterior wall. This makes it easier to recognize the boundary, and enables the necessary minimal bladder mobilization. This step is important because the bladder posterior surface bleeds easily and it is difficult to stop the bleeding.
When the bladder is compressed downward with the bladder spatula and the uterine blood vessel ligature is retracted, the direction of the vesicouterine ligament becomes clear, and it then can be clamped with a Heaney's forceps.
References
- 1.Hiramatsu Y. Tokyo: Medical View; 2010. Basic procedure 1; pp. 42–55. [Google Scholar]
- 2.Sekiba K, Hiramatsu Y. Abdominal simple total hysterectomy - focus on ureteral damage prevention. Obstetrics and Gynecology Therapy. 1990;61:121–127. [Google Scholar]
- 3.Sekiba K, Hiramatsu Y. Abdominal Simple Hysterectomy - extrafascial hysterectomy. Obstet Gynecol Surv. 1994;5:23–31. [Google Scholar]
- 4.Hiramatsu Y, Sekiba K. Tokyo: Nankodo; 1997. Abdominal simple hysterectomy (extrafascial method) pp. 15–43. [Google Scholar]
- 5.Hiramatsu Y. Accidents during laparotomy surgery: mass bleeding, secondary injuries. Obstet Gynecol. 2002;69:1207–1215. [Google Scholar]
- 6.Hiramatsu Y. Obstetrics and Gynecology Surgery Standards, Tokyo: Medical View; 2005. Abdominal total hysterectomy [1] pp. 64–73. [Google Scholar]


