Overview
Introduction
The ream and run is a technically demanding shoulder arthroplasty for the management of glenohumeral arthritis that avoids the risk of failure of the glenoid component that is associated with total shoulder arthroplasty.
Step 1: Surgical Approach
After administration of prophylactic antibiotics and a thorough skin preparation, expose the glenohumeral joint through a long deltopectoral incision, incising the subscapularis tendon from its osseous insertion and the capsule from the anterior-inferior aspect of the humeral neck while carefully protecting all muscle groups and neurovascular structures.
Step 2: Humeral Preparation
Gently expose the proximal part of the humerus, resect the humeral head at 45° to the orthopaedic axis while protecting the rotator cuff, and excise all humeral osteophytes.
Step 3: Glenoid Preparation
After performing an extralabral capsular release, remove any residual cartilage, drill the glenoid centerline, and ream the glenoid to a single concavity.
Step 4: Humeral Prosthesis Selection
Select a humeral prosthesis that fits the medullary canal and that provides the desired mobility and stability of the prosthesis.
Step 5: Humeral Prosthesis Fixation
Fix the humeral component using impaction autografting.
Step 6: Soft-Tissue Balancing
After the definitive humeral prosthesis is in place, ensure the desired balance of mobility and stability. If there is excessive posterior translation, consider a rotator interval plication.
Step 7: Rehabilitation
Achieve and maintain at least 150° of flexion and good external rotation strength.
Results
In our study, comfort and function increased progressively after the ream-and-run procedure, reaching a steady state by approximately twenty months.
What to Watch For
Introduction
The ream and run is a technically demanding shoulder arthroplasty for the management of glenohumeral arthritis that avoids the risk of failure of the glenoid component that is associated with total shoulder arthroplasty.
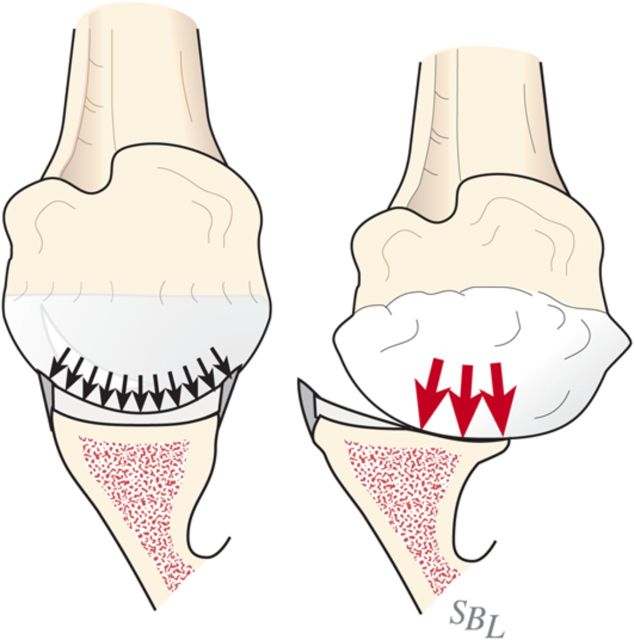
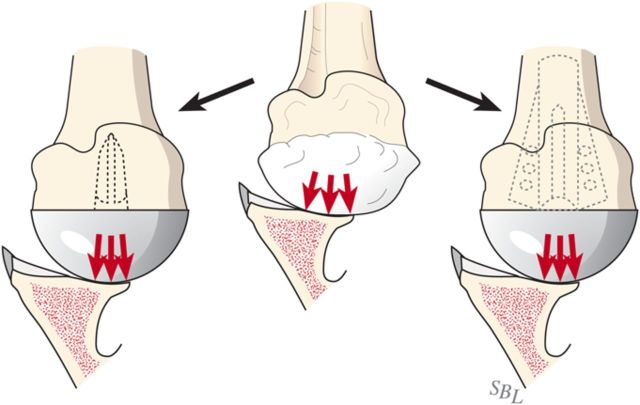
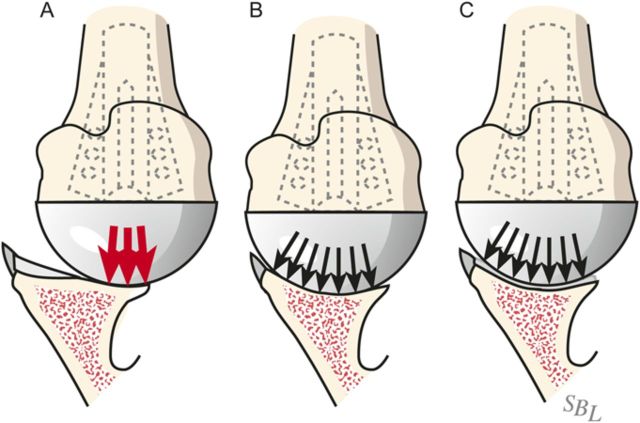
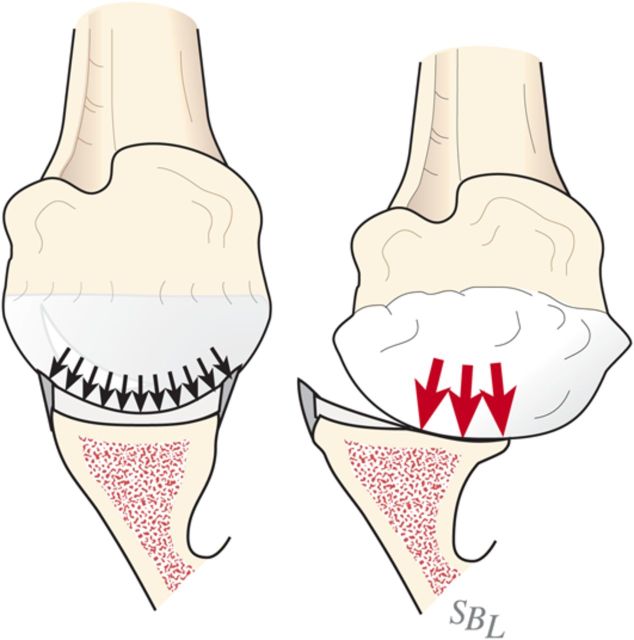
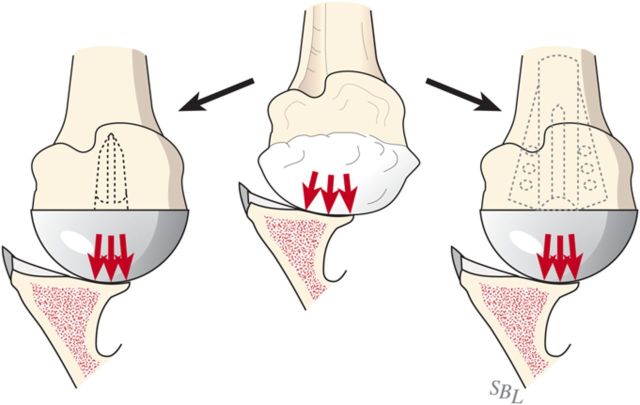
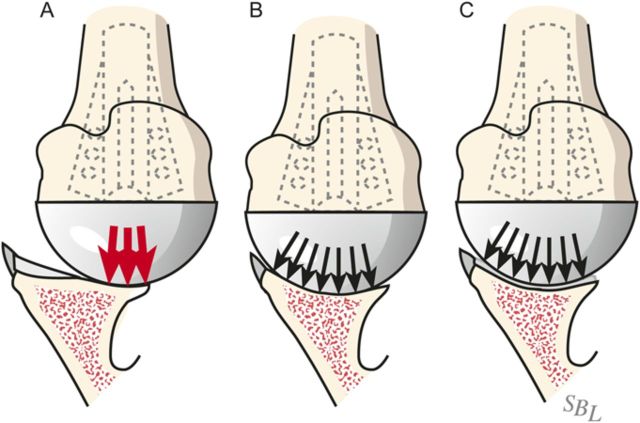
Glenohumeral arthritis is a condition in which the normal articular cartilage is lost from the humeral head and the glenoid and the soft tissues are unbalanced, often leading to posterior displacement (decentering) of the humeral head on the glenoid. The result is increased contact pressure on the posterior aspect of the glenoid leading to progressive wear and increased instability (Fig. 1). If a simple hemiarthroplasty or humeral resurfacing is performed without addressing the glenoid, the abnormally increased contact pressure is not addressed (Fig. 2). The ream-and-run glenohumeral arthroplasty provides an approach to shoulder arthroplasty that enables the patient to avoid the major complication of total shoulder arthroplasty: failure of the prosthetic glenoid component. It specifically addresses the three key elements in reconstruction for glenohumeral arthritis: the soft-tissue balance, the humeral articular surface, and the glenoid articular surface (Fig. 3), enabling fibrocartilage to grow and remodel over the reamed glenoid surface.
Fig. 1.
Contact pressure. Eccentric loading leads to progressive posterior wear, a glenoid biconcavity, and posterior instability. (Reproduced, with permission of Elsevier, from: Matsen FA 3rd, Clinton J, Rockwood CA Jr, Wirth MA Lippitt MA. Glenohumeral arthritis and its management. In: Rockwood CA Jr; Matsen FA 3rd; Wirth MA; Lippitt SB, editors. The shoulder. 4th ed. Philadelphia: Saunders; 2009.)
Fig. 2.
Without glenoid resurfacing. If either a “resurfacing” or a stemmed humeral hemiarthroplasty is performed without resolution of the glenoid biconcavity, the instability and load concentration on the back of the glenoid persists.
Fig. 3.
In the ream-and-run procedure, the irregular arthritic glenoid surface (A) is reamed to a single concavity (B), which is subsequently covered with fibrocartilage (C) so that the glenohumeral contact area is optimized. (Reproduced, with permission of Elsevier, from: Matsen FA 3rd, Clinton J, Rockwood CA Jr, Wirth MA Lippitt MA. Glenohumeral arthritis and its management. In: Rockwood CA Jr; Matsen FA 3rd; Wirth MA; Lippitt SB, editors. The shoulder. 4th ed. Philadelphia: Saunders; 2009.)
While many surgeons favor total shoulder arthroplasty, failure of the polyethylene glenoid component is the most common complication of that procedure1. Concern about glenoid component failure leads surgeons to place long-term activity restrictions on their patients2. In an effort to meet the demands of individuals who desire high levels of physical activity after shoulder arthroplasty without concern about glenoid component failure, we explored the application of non-prosthetic glenoid arthroplasty with humeral hemiarthroplasty—the “ream-and-run” procedure. This procedure requires the vigorous and full participation of the patient during what can be a lengthy rehabilitation process. Material is available online regarding this procedure so that individuals considering it may become well informed about its benefits, risks, and alternatives3.
This procedure is considered for motivated individuals with primary or secondary osteoarthritis or capsulorrhaphy arthropathy. We discourage individuals who have inflammatory arthritis, who smoke, who regularly use narcotic medications, or who are not in excellent overall physical and mental health from considering this procedure.
Informed consent for this procedure begins with a detailed review with the patient of its risks and alternatives as well as the requirement for a concerted rehabilitation effort on the patient’s part. Preoperative planning includes a detailed history and physical examination, assessment of rotator cuff and neurological function, and high-quality radiographs (an anteroposterior view in the plane of the scapula and a true axillary view). Neither computed tomography nor magnetic resonance imaging scans are necessary in the great majority of cases if high-quality radiographs—including a proper axillary view—can be obtained.
The procedure consists of seven steps:
Step 1: Surgical approach
Step 2: Humeral preparation
Step 3: Glenoid preparation
Step 4: Humeral prosthesis selection
Step 5: Humeral prosthesis fixation
Step 6: Soft-tissue balancing
Step 7: Rehabilitation
Step 1: Surgical Approach
After administration of prophylactic antibiotics and a thorough skin preparation, expose the glenohumeral joint through a long deltopectoral incision, incising the subscapularis tendon from its osseous insertion and the capsule from the anterior-inferior aspect of the humeral neck while carefully protecting all muscle groups and neurovascular structures.
Select antibiotic prophylaxis in consideration of the observation that Propionibacterium acnes and coagulase-negative Staphylococcus are the organisms most commonly found in association with failed shoulder arthroplasties. Our infectious disease service currently recommends a combination of ceftriaxone (one dose of 2 g) and vancomycin (1 g every twelve hours, for two doses) for individuals not allergic to cephalosporins and clindamycin for those allergic to cephalosporins.
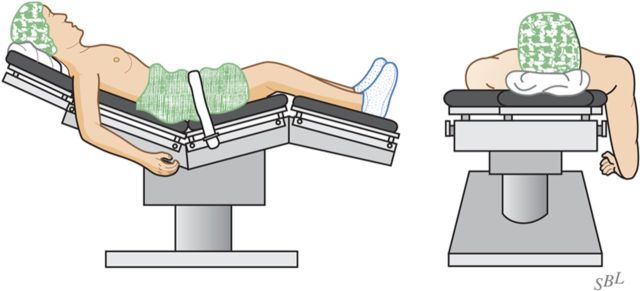
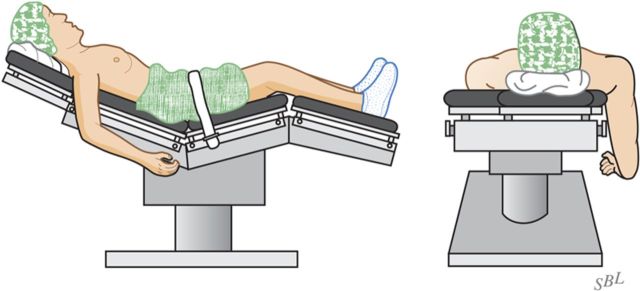
With the patient secure in a comfortable beach-chair position and the arm that is to be surgically treated freely movable, carefully prepare and drape the skin excluding exposed skin from the surgical field (Fig. 4).
Prepare 3 L of saline solution containing 3 g of vancomycin and 3 g of ceftriaxone for irrigation. Use this full volume for irrigation throughout the procedure.
Incise the skin along a 10-cm line from the midpart of the clavicle across the coracoid process.
Using a new blade that has not passed through the skin, split the deltopectoral interval and clavipectoral fascia, preserving the coracoacromial ligament.
Incise the subscapularis tendon from its osseous insertion, maximizing tendon length and carefully preserving the long head of the biceps as well as the transverse humeral ligament.
Incise the capsule from the anterior and inferior aspect of the humerus, carefully protecting the nearby neurovascular structures.
Frequently irrigate the wound using antibiotic-containing saline solution throughout the procedure to reduce the risk of contamination.
Fig. 4.
Patient position. The patient is positioned in a comfortable beach-chair position with the arm free to move. (Reproduced, with permission of Elsevier, from: Matsen FA 3rd, Clinton J, Rockwood CA Jr, Wirth MA Lippitt MA. Glenohumeral arthritis and its management. In: Rockwood CA Jr; Matsen FA 3rd; Wirth MA; Lippitt SB, editors. The shoulder. 4th ed. Philadelphia: Saunders; 2009.)
Step 2: Humeral Preparation
Gently expose the proximal part of the humerus, resect the humeral head at 45° to the orthopaedic axis while protecting the rotator cuff, and excise all humeral osteophytes.
Insert a broad flat (i.e., Darrach) retractor between the humeral head and the glenoid.
Gently (!) dislocate the proximal part of the humerus with a combination of external rotation, extension, and adduction of the humerus.
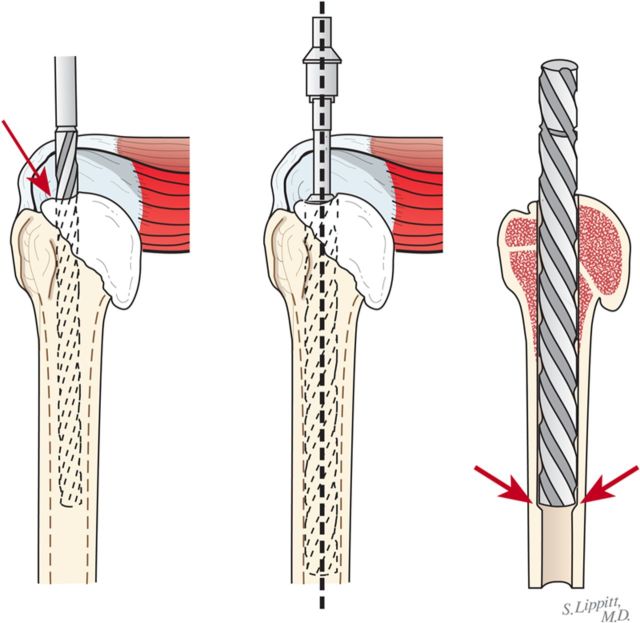
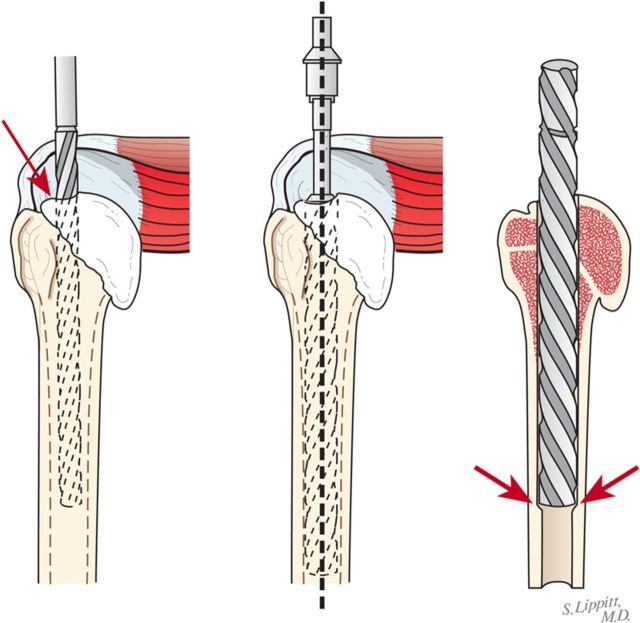
Through a starting point on the humeral articular surface near the center of the supraspinatus insertion, begin reaming the medullary canal with cylindrical reamers of progressively larger diameter, stopping with the size of reamer that just begins to engage the endosteal cortex when it is fully inserted (Fig. 5). Avoid notching the endosteal cortex because doing so weakens the bone, predisposing it to fracture.
Using this reamer as an indication of the intramedullary axis of the humerus, resect the humeral head at a 45° angle to this axis, taking care to protect the rotator cuff; the cut surface should face 30° posterior to the transcondylar axis of the elbow (retroversion). We do not attempt to match the patient’s humeral version if it is other than 30°.
While carefully protecting the neurovascular structures, completely resect the osteophytes from around the humeral neck, anteriorly, inferiorly, and posteriorly.
Preserve all resected bone in a sterile covered container with 1 g of vancomycin in a small volume of saline solution for later use as bone graft.
Fig. 5.
Humeral reaming. A small medullary reamer is introduced medial to the cuff insertion (left). Progressively larger reamers are used until the distal endosteal cortex is engaged (“love at first bite”). Notching of the endosteal cortex is avoided (right).
Step 3: Glenoid Preparation
After performing an extralabral capsular release, remove any residual cartilage, drill the glenoid centerline, and ream the glenoid to a single concavity.
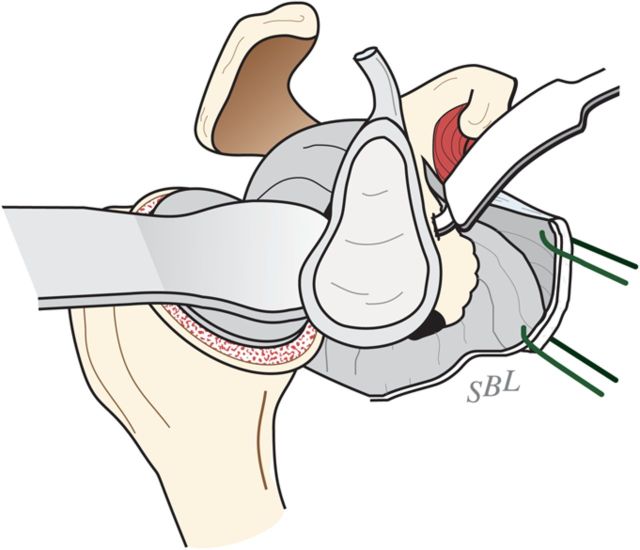
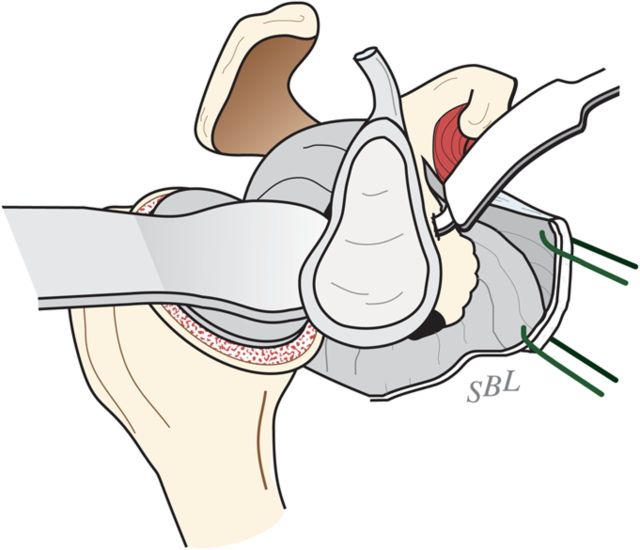
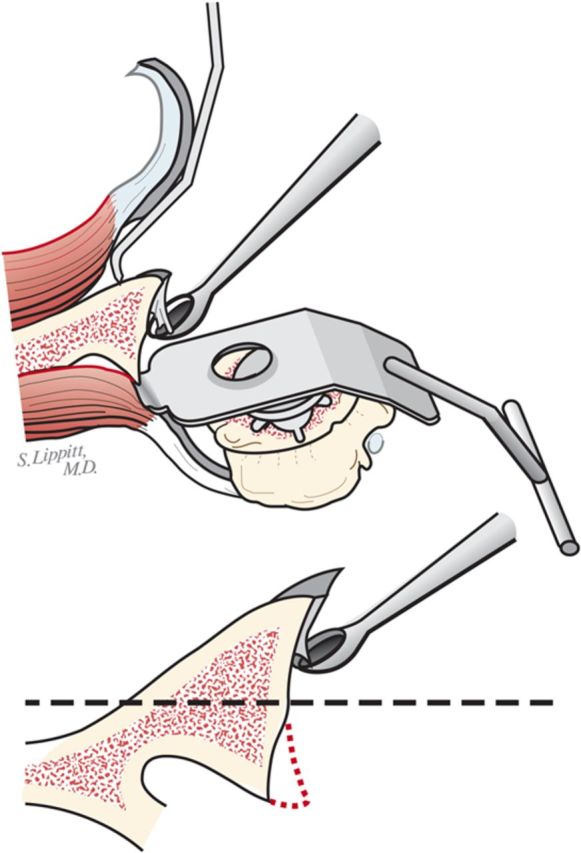
With the upper extremity supported on a padded stand, place a broad retractor behind the glenoid to retract the proximal part of the humerus posteriorly (Fig. 6-A).
Incise the capsule from the labrum, leaving the labrum attached to the glenoid, and retract the capsule with a sharp-tipped retractor placed on the glenoid neck. Release the anterior retractor frequently to relieve pressure on the brachial plexus.
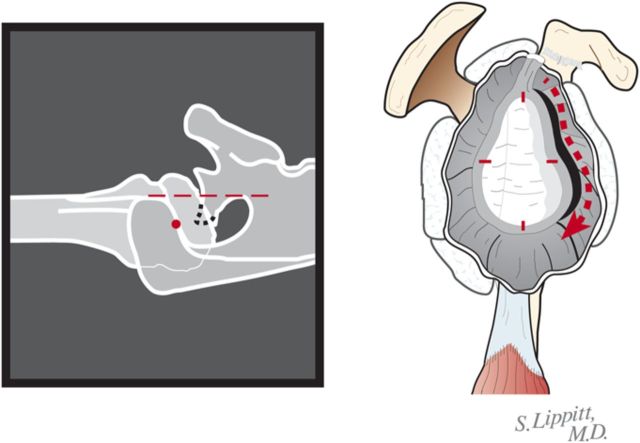
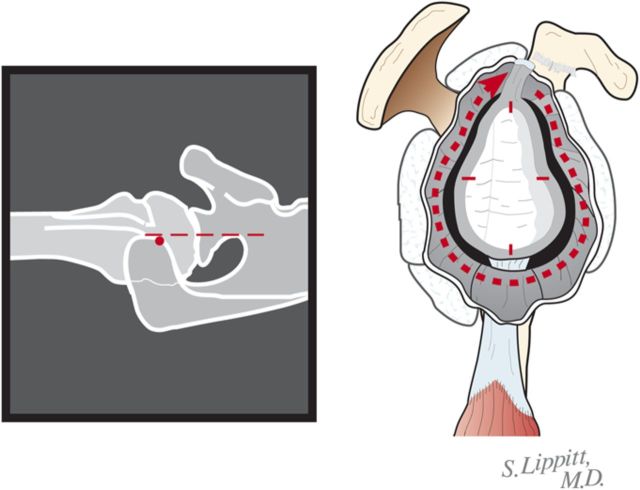
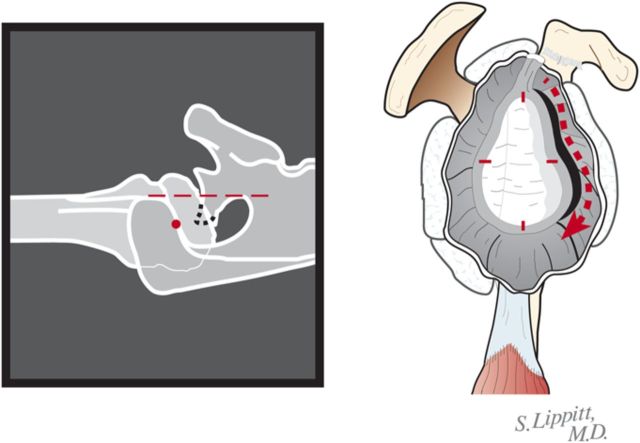
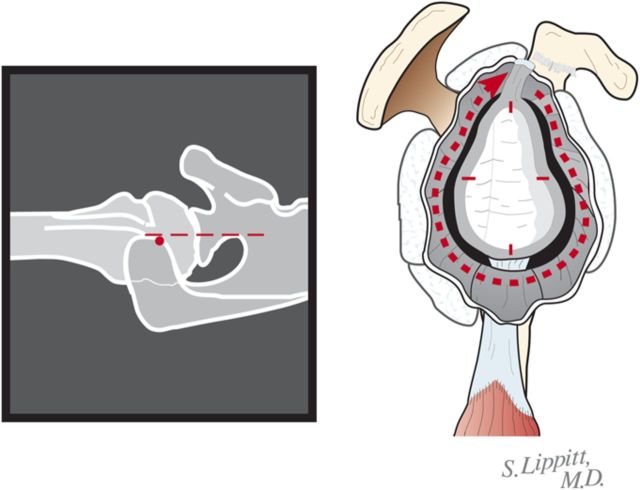
If the preoperative axillary radiograph shows posterior subluxation, stop the capsular release at the inferior aspect of the glenoid (Fig. 6-B). If the shoulder is tight, but not posteriorly subluxated, perform a 360° extralabral periglenoid capsular release (Fig. 6-C).
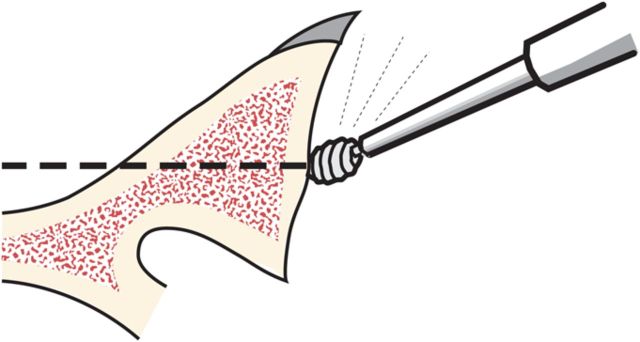
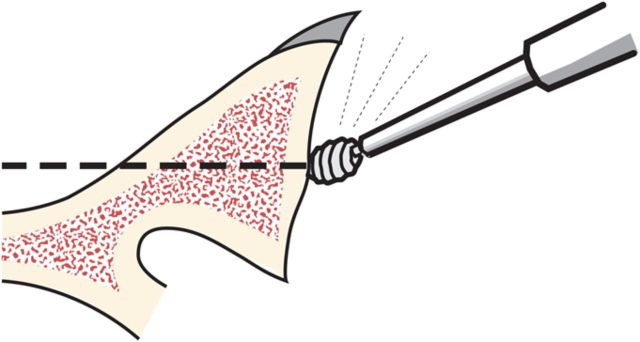
Curet any residual cartilage from the surface of the glenoid (Fig. 6-D). If this exposes a biconcavity, burr down the ridge between the two concavities (Fig. 6-E).
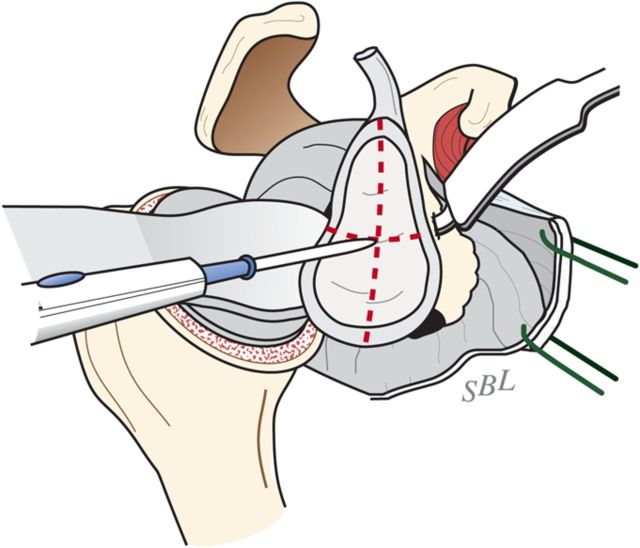
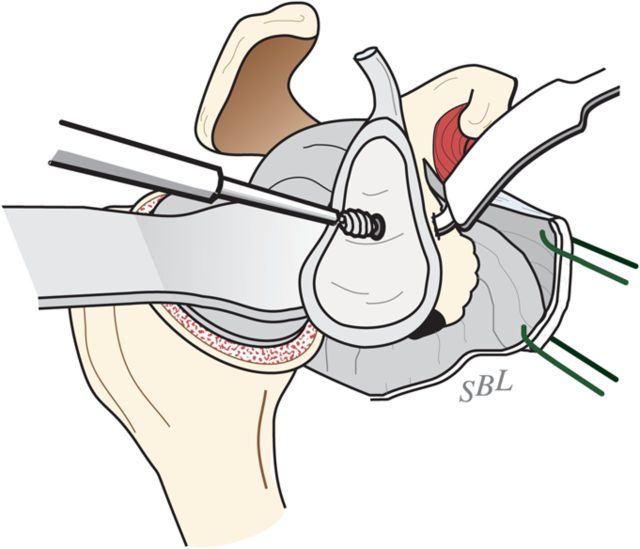
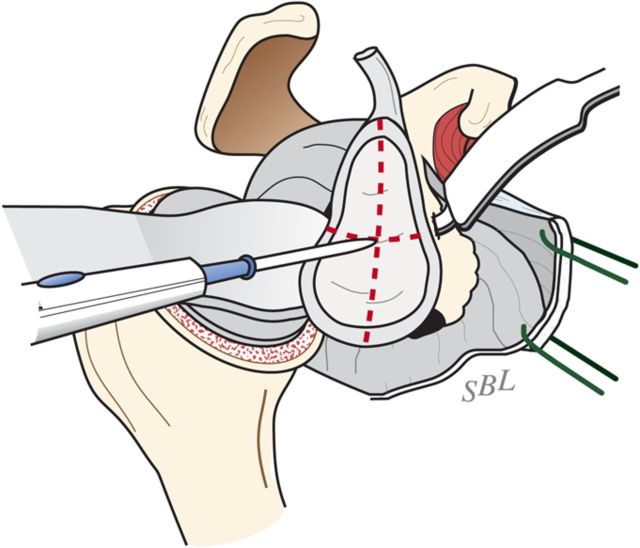
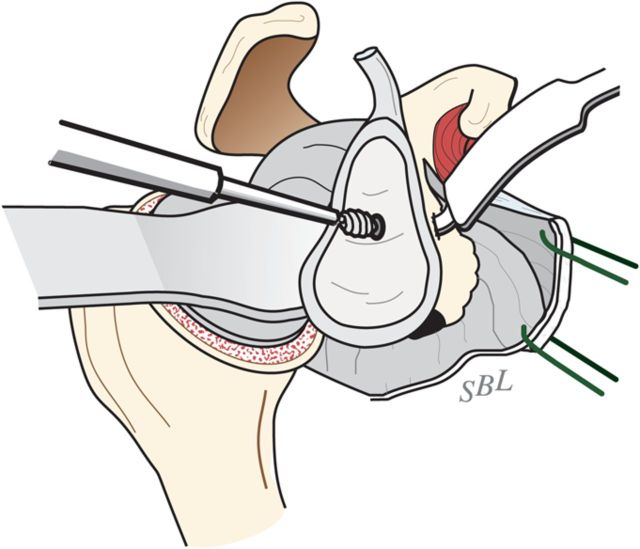
Locate the position of the hole for the nub of the glenoid reamer: midway between the front and the back of the glenoid and slightly above the superior/inferior midpoint (Figs. 6-F and 6-G).
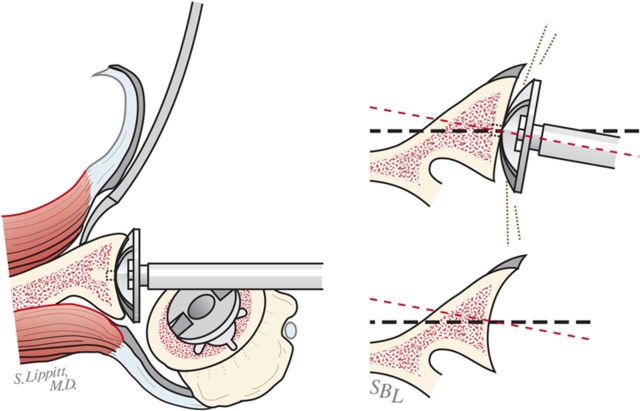
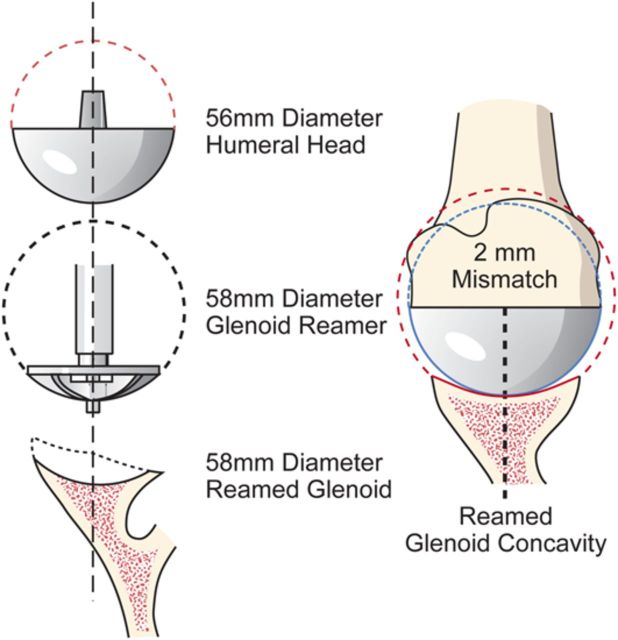
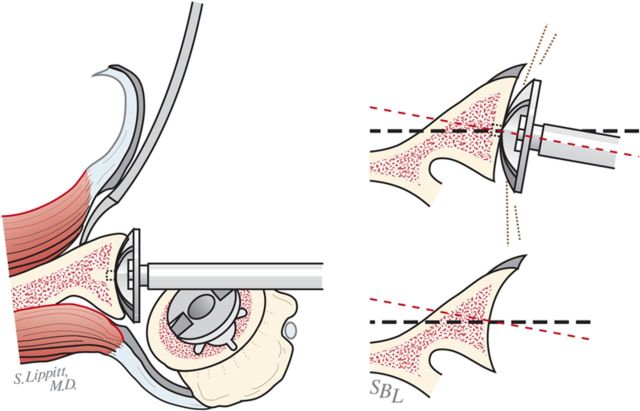
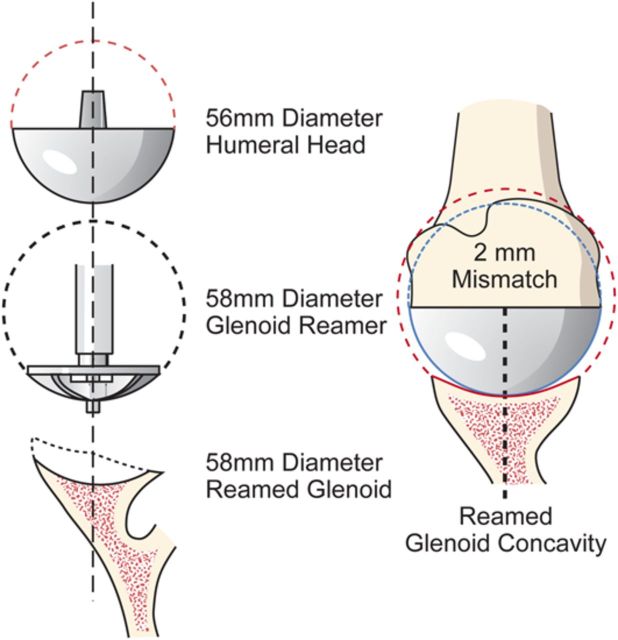
After drilling this hole, ream the glenoid to achieve a single smooth glenoid concavity using a reamer with a diameter of curvature 2 mm greater than that of the humeral head prosthesis (Fig. 6-H). We almost always use a 58-mm-diameter reamer in conjunction with a 56-mm-diameter humeral head (Fig. 6-I). This large diameter of curvature optimizes the surface area for load transfer and the stability of the reconstruction.
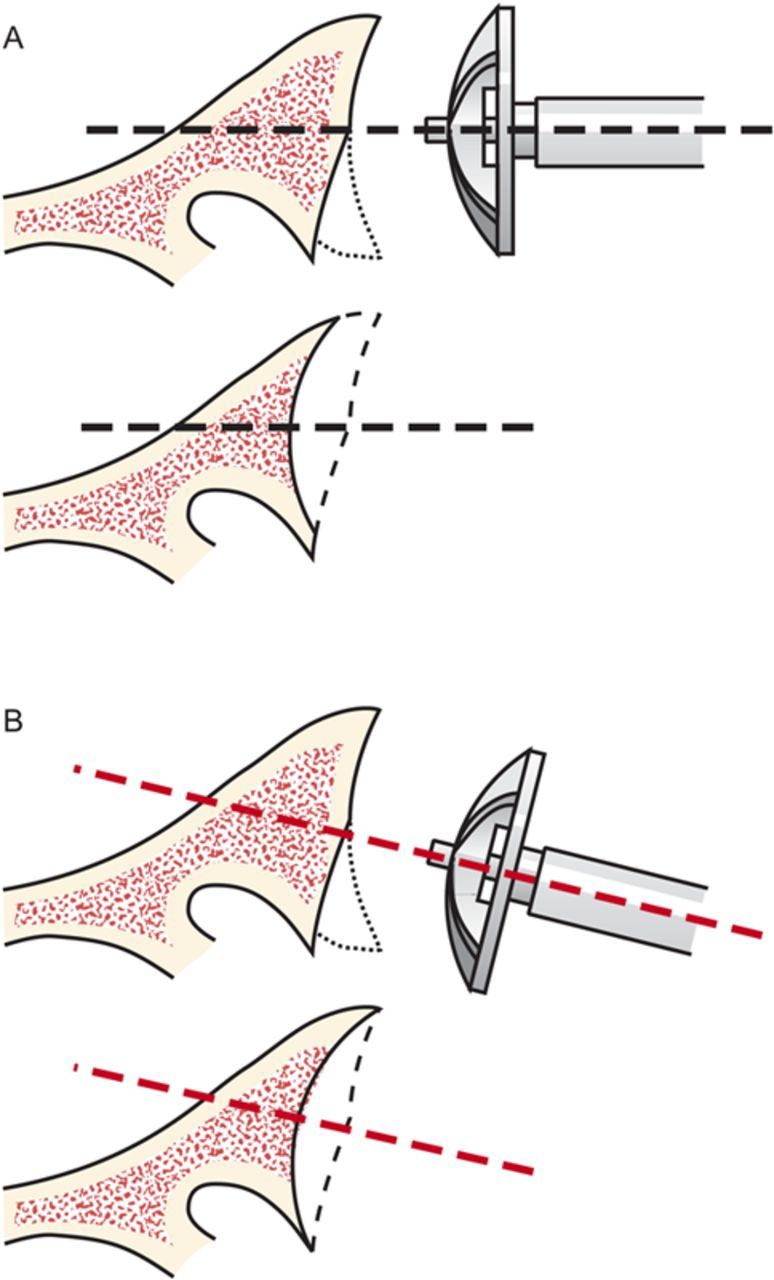
When reaming, prioritize bone preservation (i.e., minimize bone removal) over “normalization” of the glenoid version (Fig. 6-J). We have found that attempting to ream the anterior side to “correct” for glenoid retroversion requires substantial bone removal and does not enhance stability.
Fig. 6-A.
Glenoid exposure. Exposure is achieved with a sharp retractor on the glenoid neck and with the shaft of the reamer pushing the proximal part of the humerus posteriorly. (Reproduced, with permission of Elsevier, from: Matsen FA 3rd, Clinton J, Rockwood CA Jr, Wirth MA Lippitt MA. Glenohumeral arthritis and its management. In: Rockwood CA Jr; Matsen FA 3rd; Wirth MA; Lippitt SB, editors. The shoulder. 4th ed. Philadelphia: Saunders; 2009.)
Fig. 6-B.
Five o’clock capsular release. In the presence of a biconcave glenoid, the extralabral capsular release is continued only to the 5-o’clock position to preserve the inferior glenohumeral sling. (Reproduced, with permission of Elsevier, from: Matsen FA 3rd, Clinton J, Rockwood CA Jr, Wirth MA Lippitt MA. Glenohumeral arthritis and its management. In: Rockwood CA Jr; Matsen FA 3rd; Wirth MA; Lippitt SB, editors. The shoulder. 4th ed. Philadelphia: Saunders; 2009.)
Fig. 6-C.
The 360° capsular release. When the shoulder is tight, but there is no biconcavity, the release can be extended all of the way around the glenoid. (Reproduced, with permission of Elsevier, from: Matsen FA 3rd, Clinton J, Rockwood CA Jr, Wirth MA Lippitt MA. Glenohumeral arthritis and its management. In: Rockwood CA Jr; Matsen FA 3rd; Wirth MA; Lippitt SB, editors. The shoulder. 4th ed. Philadelphia: Saunders; 2009.)
Fig. 6-D.
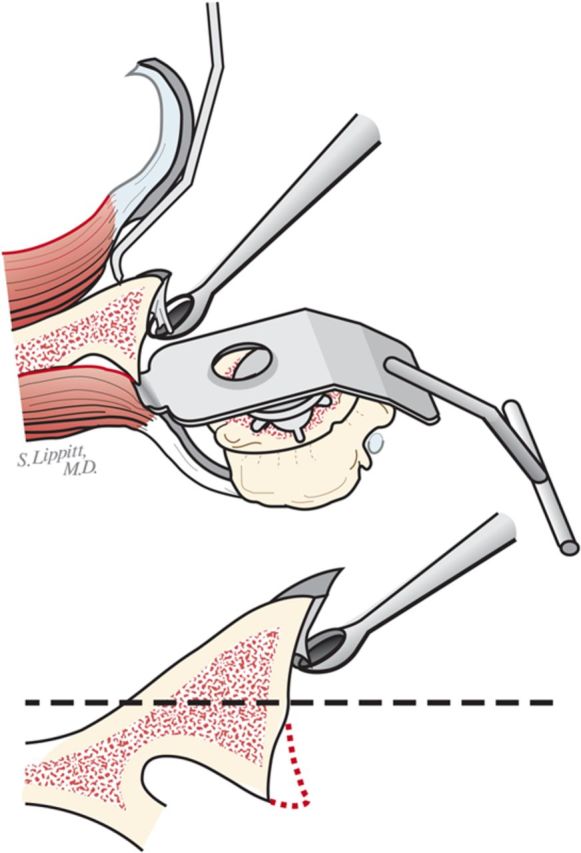
Curettage of the glenoid. The residual articular cartilage is curetted from the glenoid face. (Reproduced, with permission of Elsevier, from: Matsen FA 3rd, Clinton J, Rockwood CA Jr, Wirth MA Lippitt MA. Glenohumeral arthritis and its management. In: Rockwood CA Jr; Matsen FA 3rd; Wirth MA; Lippitt SB, editors. The shoulder. 4th ed. Philadelphia: Saunders; 2009.)
Fig. 6-E.
Preparation of the glenoid. The ridge between the biconcavities is burred. (Reproduced, with permission of Elsevier, from: Matsen FA 3rd, Clinton J, Rockwood CA Jr, Wirth MA Lippitt MA. Glenohumeral arthritis and its management. In: Rockwood CA Jr; Matsen FA 3rd; Wirth MA; Lippitt SB, editors. The shoulder. 4th ed. Philadelphia: Saunders; 2009.)
Fig. 6-F.
Marking the center of the glenoid center with cautery. The point midway between the anterior and posterior aspects of the glenoid and slightly above the superior/inferior midpoint is marked with cautery. (Reproduced, with permission of Elsevier, from: Matsen FA 3rd, Clinton J, Rockwood CA Jr, Wirth MA Lippitt MA. Glenohumeral arthritis and its management. In: Rockwood CA Jr; Matsen FA 3rd; Wirth MA; Lippitt SB, editors. The shoulder. 4th ed. Philadelphia: Saunders; 2009.)
Fig. 6-G.
Burring of the glenoid center. The marked point is burred to serve as the starting point for the drill. (Reproduced, with permission of Elsevier, from: Matsen FA 3rd, Clinton J, Rockwood CA Jr, Wirth MA Lippitt MA. Glenohumeral arthritis and its management. In: Rockwood CA Jr; Matsen FA 3rd; Wirth MA; Lippitt SB, editors. The shoulder. 4th ed. Philadelphia: Saunders; 2009.)
Fig. 6-H.
Reaming of a concentric glenoid. The glenoid is reamed conservatively to form a single concavity. (Reproduced, with permission of Elsevier, from: Matsen FA 3rd, Clinton J, Rockwood CA Jr, Wirth MA Lippitt MA. Glenohumeral arthritis and its management. In: Rockwood CA Jr; Matsen FA 3rd; Wirth MA; Lippitt SB, editors. The shoulder. 4th ed. Philadelphia: Saunders; 2009.)
Fig. 6-I.
Mismatch. The reamed glenoid concavity diameter of curvature is 2 mm greater than that of the humeral head prosthesis, usually 58 and 56 mm, respectively. (Reproduced, with permission of Elsevier, from: Matsen FA 3rd, Clinton J, Rockwood CA Jr, Wirth MA Lippitt MA. Glenohumeral arthritis and its management. In: Rockwood CA Jr; Matsen FA 3rd; Wirth MA; Lippitt SB, editors. The shoulder. 4th ed. Philadelphia: Saunders; 2009.)
Fig. 6-J.
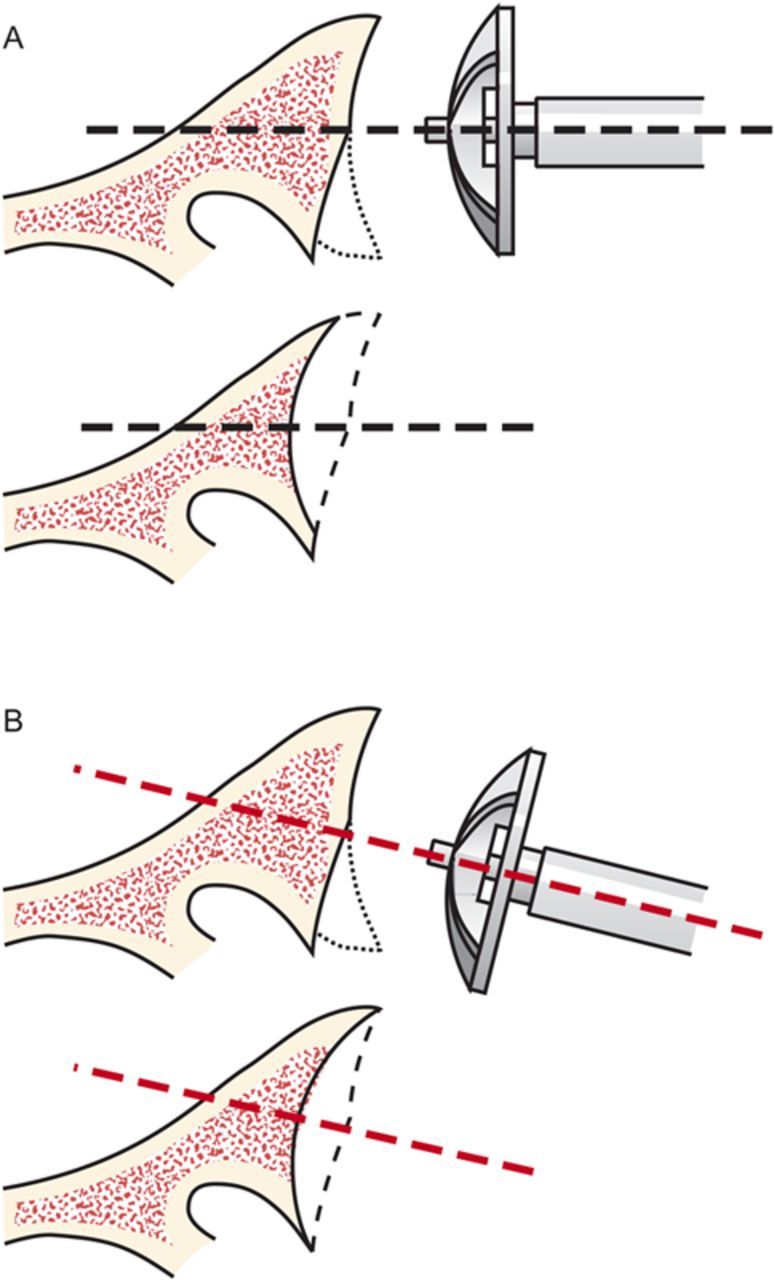
Glenoid reaming. Reaming is used to create a single glenoid concavity. Rather than striving to “normalize” the glenoid version (A), we prefer to preserve glenoid bone stock, even if it means accepting some glenoid retroversion (B). (Reproduced, with modification, from: Matsen FA III, Lippitt SB. Shoulder surgery: principles and procedures. 1st ed. Philadelphia: Saunders; 2004. Principles of glenoid arthroplasty. Reproduced with permission of Elsevier.)
Step 4: Humeral Prosthesis Selection
Select a humeral prosthesis that fits the medullary canal and that provides the desired mobility and stability of the prosthesis.
Using instruments with a stem diameter equal to that of the largest medullary reamer that was fully inserted into the medullary canal, broach the proximal part of the humerus. With some systems, the broach is the same as the trial humeral component.
Select trial humeral heads of a diameter of curvature 2 mm smaller than that to which the glenoid was reamed (56 mm [for the humeral head] in almost all cases).
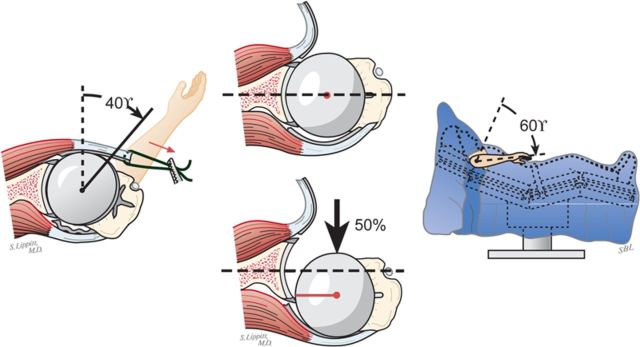
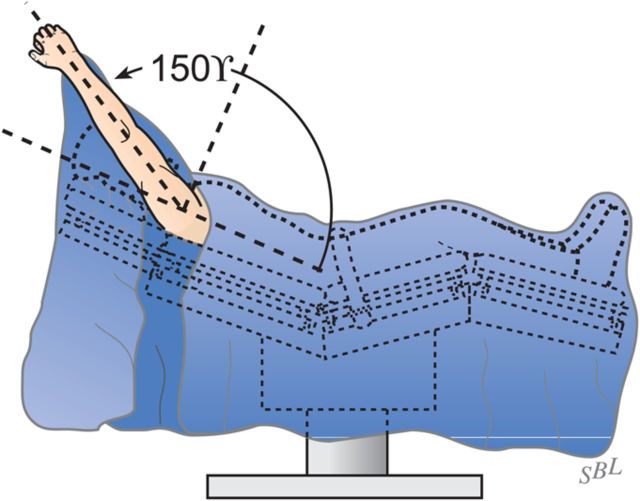
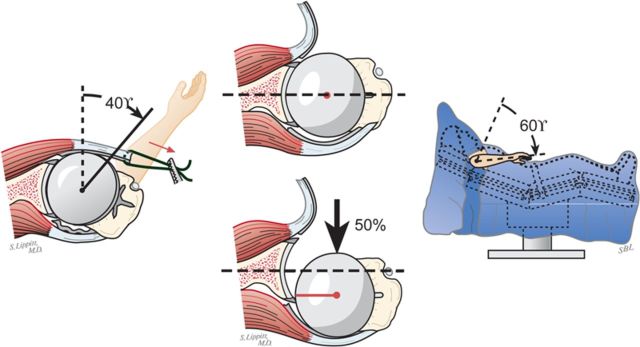
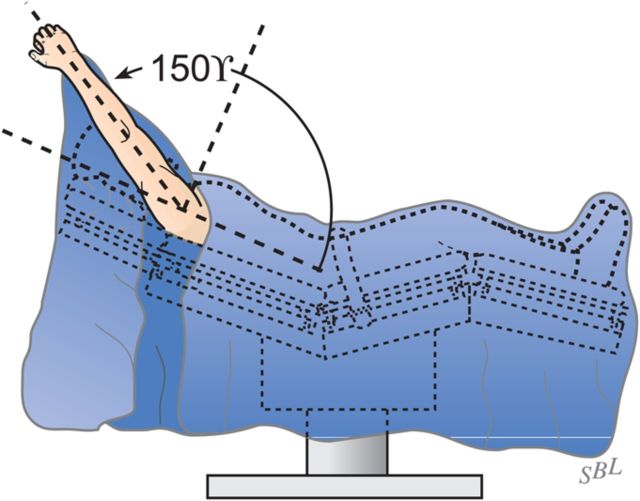
Select the trial humeral head with a height that allows 60° of internal rotation of the arm abducted to 90° and just less than 50% posterior subluxation of the humeral head on the glenoid and 40° of external rotation with the subscapularis approximated (Fig. 7-A) and 150° of forward elevation (Fig. 7-B).
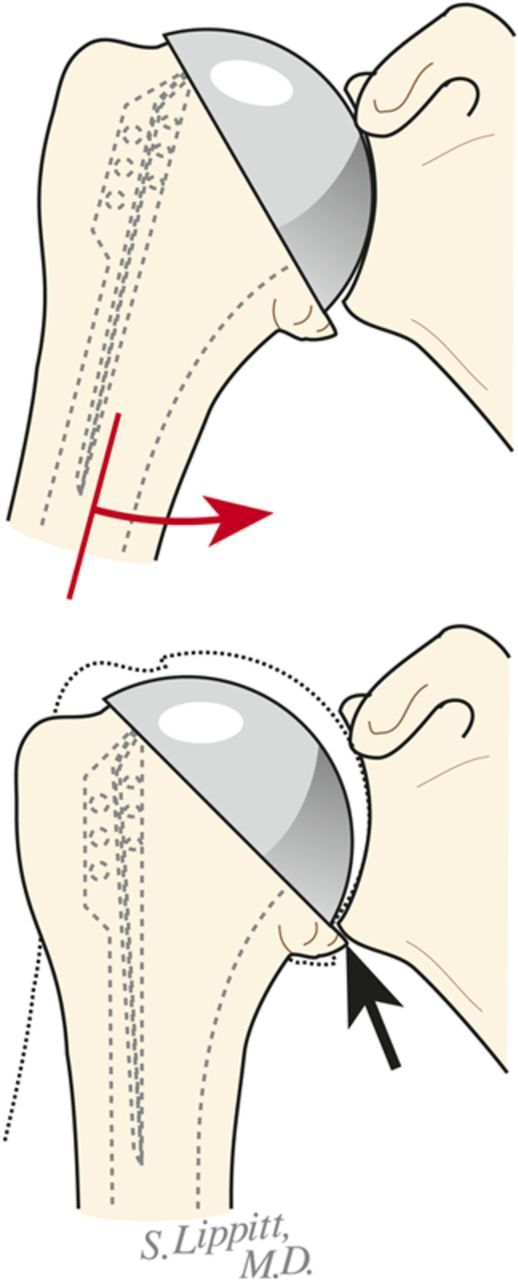
Check to be sure that there is no unwanted contact between bone at the medial (Fig. 7-C) or posterior (Fig. 7-D) aspect of the humerus and the glenoid.
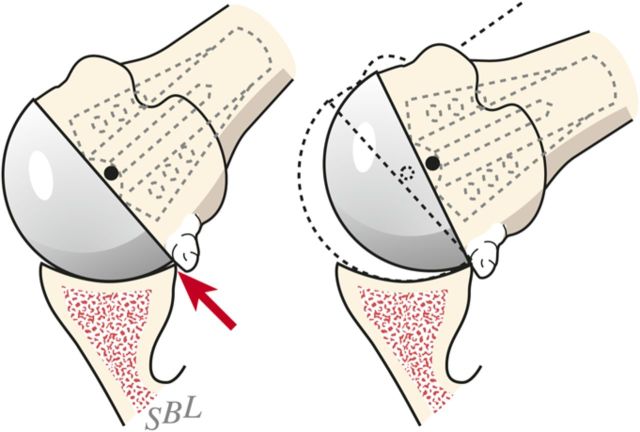
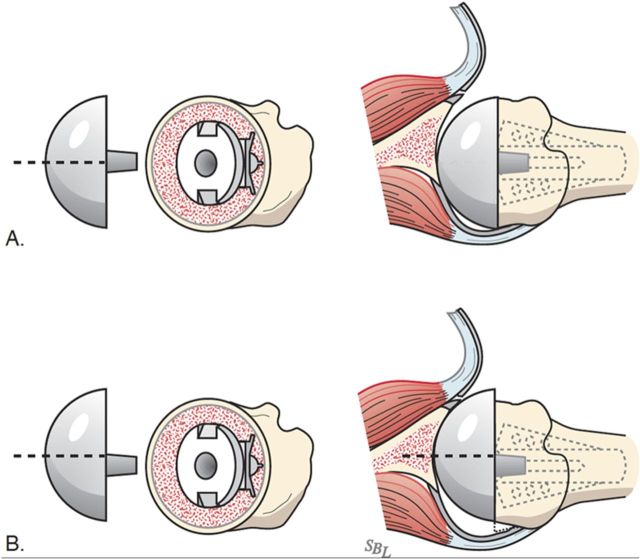
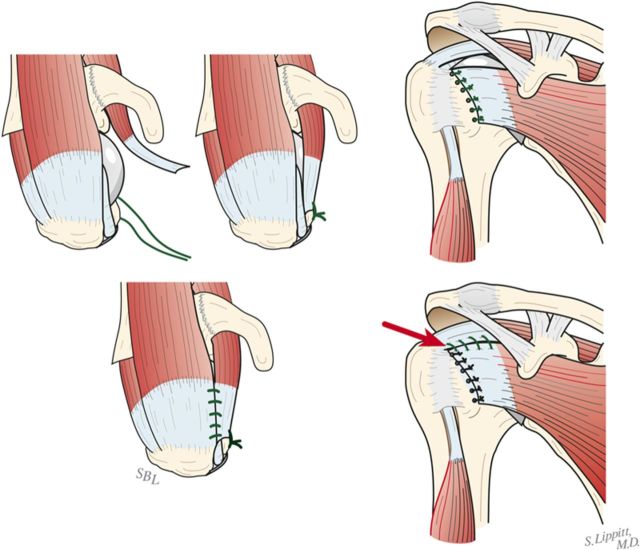
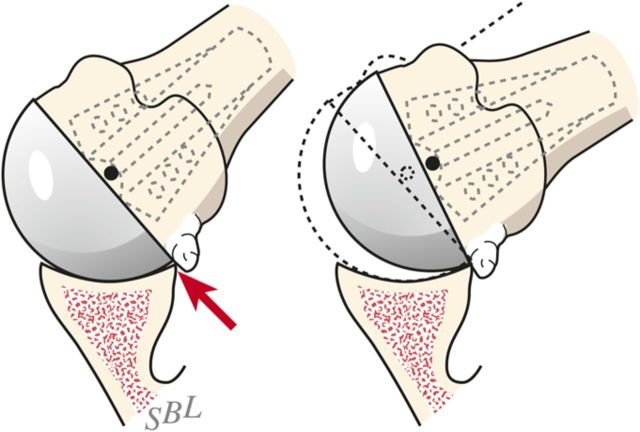
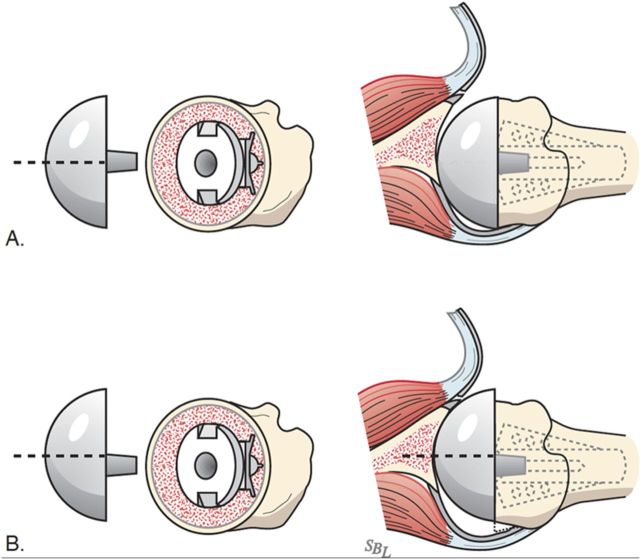
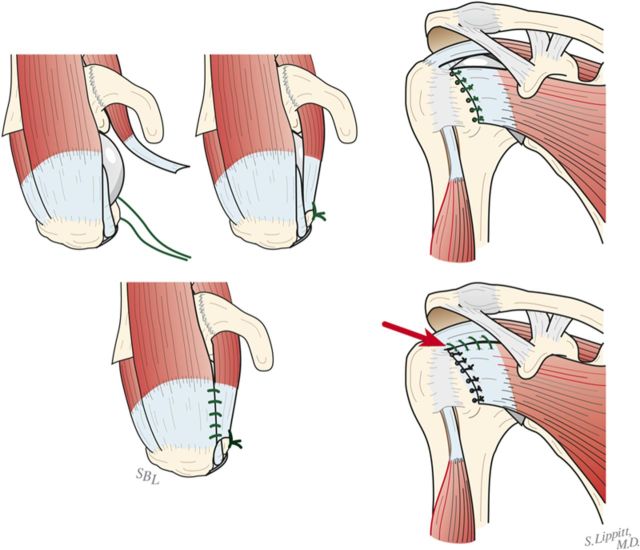
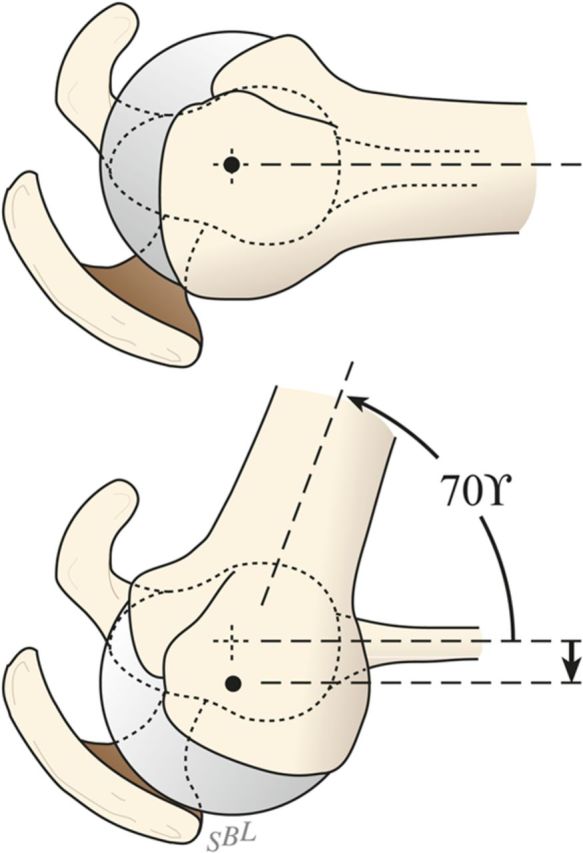
If excessive posterior subluxation occurs when the arm is flexed (Fig. 7-E), consider an offset (eccentric) humeral head prosthesis with the larger aspect anteriorly (Fig. 7-F) and a rotator interval plication (Fig. 7-G). While the placement of the head eccentricity anteriorly may make it slightly prominent, we have not encountered problems with the subscapularis repair when we have used this approach to enhancing stability.
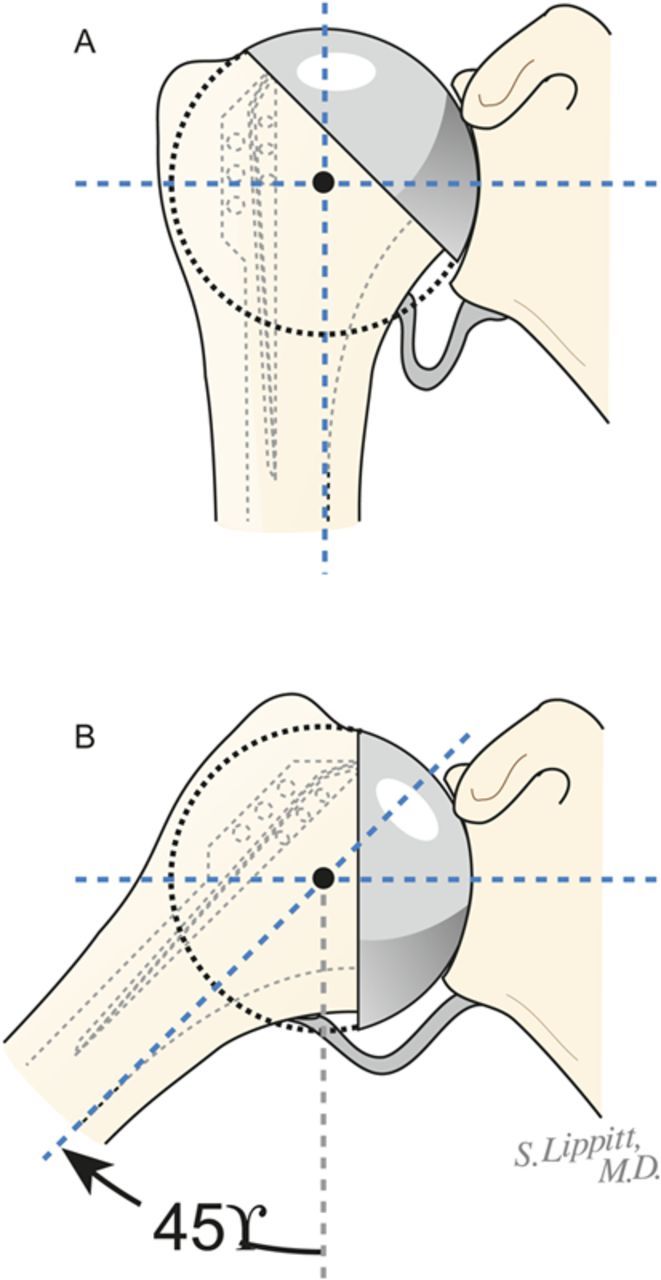
Ensure that the humeral articular surface lines up with the center of the reamed glenoid articular surface in the anteroposterior and superorinferior directions (Fig. 7-H).
Select the final prosthesis on the basis of this trialing and assemble it on the back table using new sterile gloves.
Fig. 7-A.
The 40/50/60 rule. The reconstruction should allow 40° of external rotation with the subscapularis approximated, 50% posterior translation of the head on the glenoid, and 60° of internal rotation of the arm abducted to 90°. (Reproduced, with permission of Elsevier, from: Matsen FA 3rd, Clinton J, Rockwood CA Jr, Wirth MA Lippitt MA. Glenohumeral arthritis and its management. In: Rockwood CA Jr; Matsen FA 3rd; Wirth MA; Lippitt SB, editors. The shoulder. 4th ed. Philadelphia: Saunders; 2009.)
Fig. 7-B.
Forward elevation to 150°. The reconstruction should allow 150° of forward elevation.
Fig. 7-C.
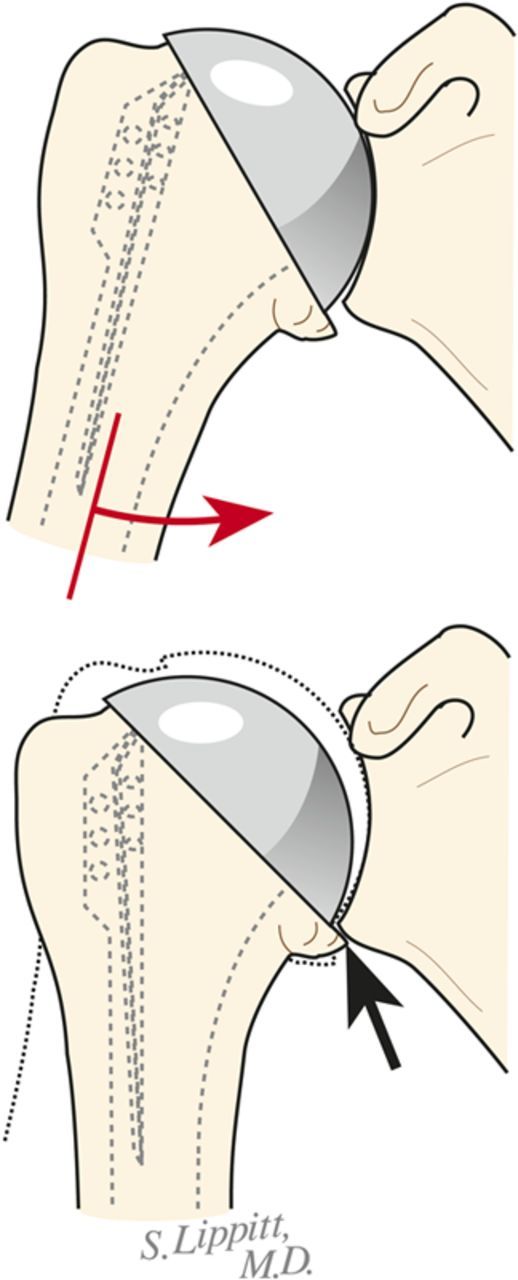
Inferior medial abutment. The inferior aspect of the articulation is carefully checked for unwanted contact between the medial aspect of the humerus and the glenoid. (Reproduced, with modification, from: Clinton J, Warme WJ, Lynch JR, Lippitt SB, Matsen FA. Shoulder hemiarthroplasty with nonprosthetic glenoid arthroplasty: the ream and run. Tech Shoulder & Elbow Surg. 2009 Mar;10[1]:43-52. Reproduced with permission of Wolters Kluwer Health.)
Fig. 7-D.
Posterior abutment. Unwanted posterior contact between humeral osteophytes and the back of the glenoid can cause the joint to hinge open, rotating about the site of posterior contact on external rotation. (Reproduced, with permission of Elsevier, from: Matsen FA 3rd, Clinton J, Rockwood CA Jr, Wirth MA Lippitt MA. Glenohumeral arthritis and its management. In: Rockwood CA Jr; Matsen FA 3rd; Wirth MA; Lippitt SB, editors. The shoulder. 4th ed. Philadelphia: Saunders; 2009.)
Fig. 7-E.
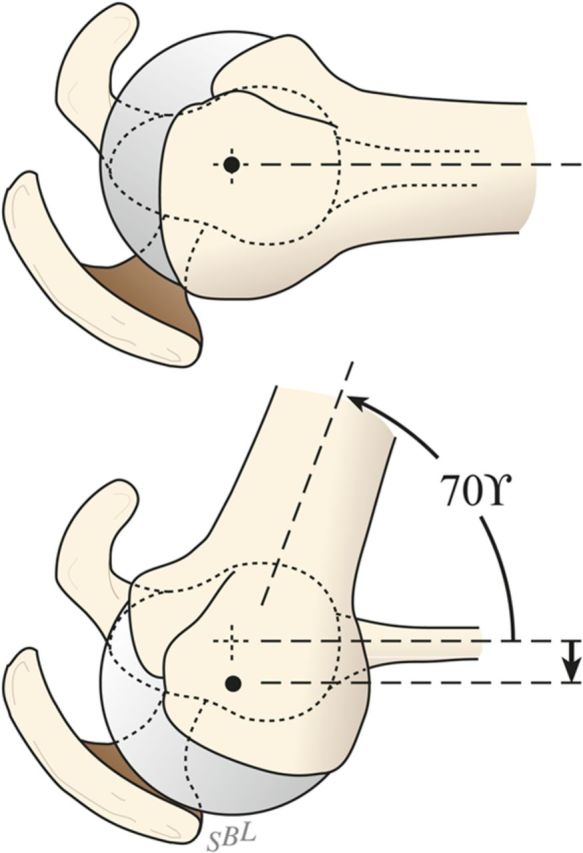
Posterior drop back. If the humeral head drops back out of the glenoid with forward elevation, an eccentric head prosthesis, a thicker head, a rotator interval plication, or a combination of these may be required for stability. (Reproduced, with modification, from: Clinton J, Warme WJ, Lynch JR, Lippitt SB, Matsen FA. Shoulder hemiarthroplasty with nonprosthetic glenoid arthroplasty: the ream and run. Tech Shoulder & Elbow Surg. 2009 Mar;10[1]:43-52. Reproduced with permission of Wolters Kluwer Health.)
Fig. 7-F.
Eccentrically anterior head. If a trial with a concentric head reveals posterior instability (A), stability can often be restored by using an eccentrically anterior humeral head component that allows the tuberosities to sit posteriorly while the head remains reduced in the glenoid (B).
Fig. 7-G.
Rotator interval closure. If the humeral head drops back when the arm is elevated, consider plicating the rotator interval by suturing the upper subscapularis to the anterior supraspinatus. (Left: Reproduced, with permission of Elsevier, from: Matsen FA 3rd, Clinton J, Rockwood CA Jr, Wirth MA Lippitt MA. Glenohumeral arthritis and its management. In: Rockwood CA Jr; Matsen FA 3rd; Wirth MA; Lippitt SB, editors. The shoulder. 4th ed. Philadelphia: Saunders; 2009. Right: Reproduced, with permission of Wolters Kluwer Health, from: Clinton J, Warme WJ, Lynch JR, Lippitt SB, Matsen FA. Shoulder hemiarthroplasty with nonprosthetic glenoid arthroplasty: the ream and run. Tech Shoulder & Elbow Surg. 2009 Mar;10[1]:43-52.)
Fig. 7-H.
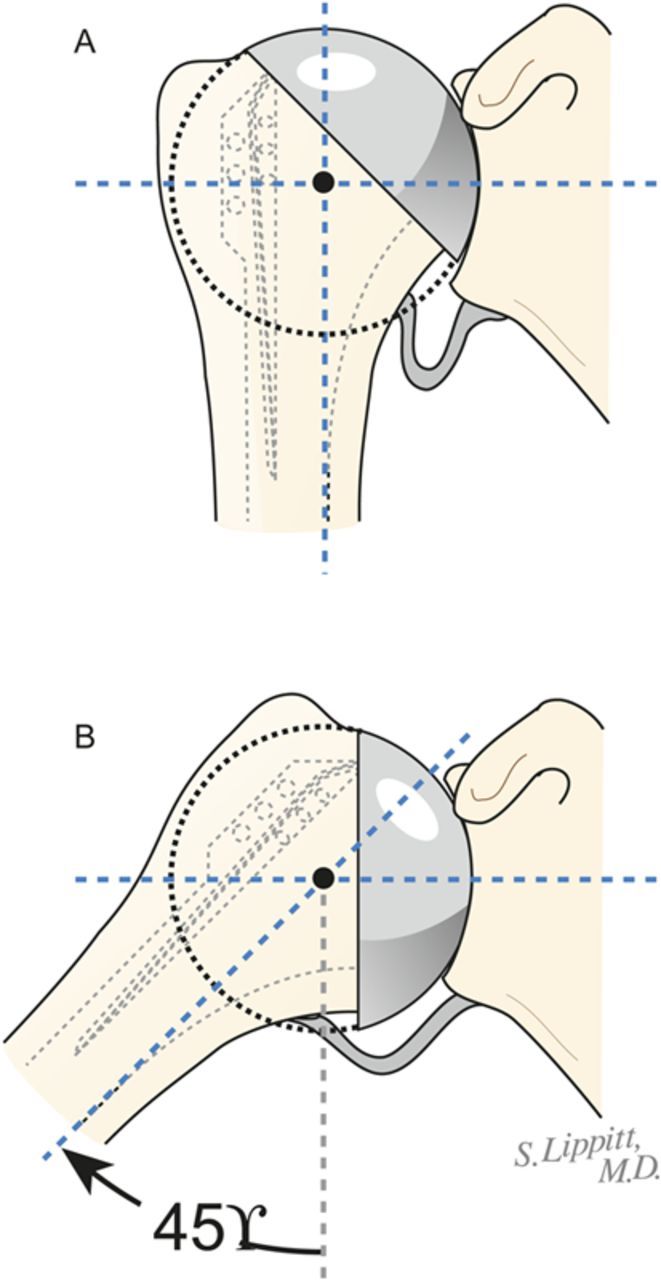
Proper register. The humeral head remains centered in the glenoid socket when the arm is at the side (A) and when it is abducted 45° (B). (Reproduced, with modification, from: Matsen FA 3rd, Lippitt SB. Shoulder surgery: principles and procedures. Philadelphia: Saunders; 2004. Reproduced with permission of Elsevier.)
Step 5: Humeral Prosthesis Fixation
Fix the humeral component using impaction autografting.
Irrigate the medullary canal with antibiotic-containing saline solution.
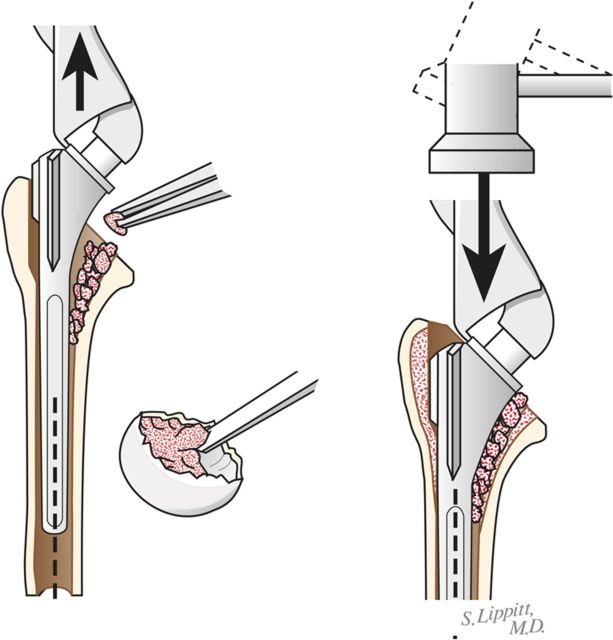
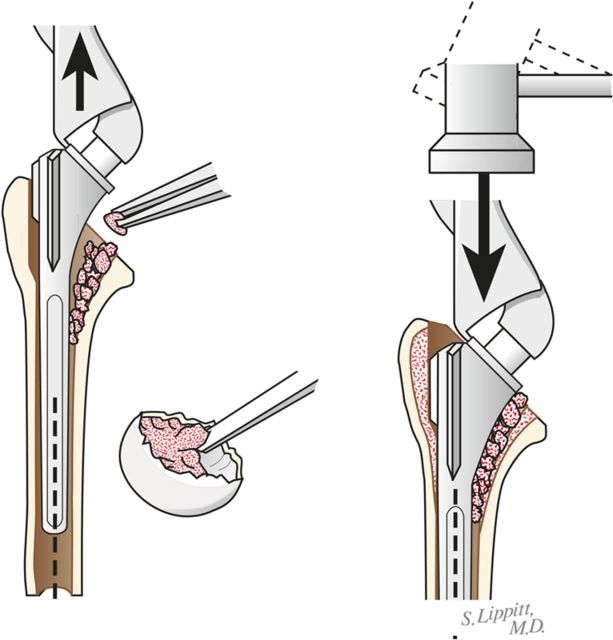
Using morcellized bone harvested from the resected humeral head and osteophytes, impact autograft into the canal utilizing an impactor of the same geometry as the definitive humeral stem (Fig. 8-A). Continue impaction until the impactor becomes snug—i.e., so that it cannot be completely seated by hand. The graft may be placed preferentially medial, lateral, anterior, or posterior to fine-tune the component position in the humerus.
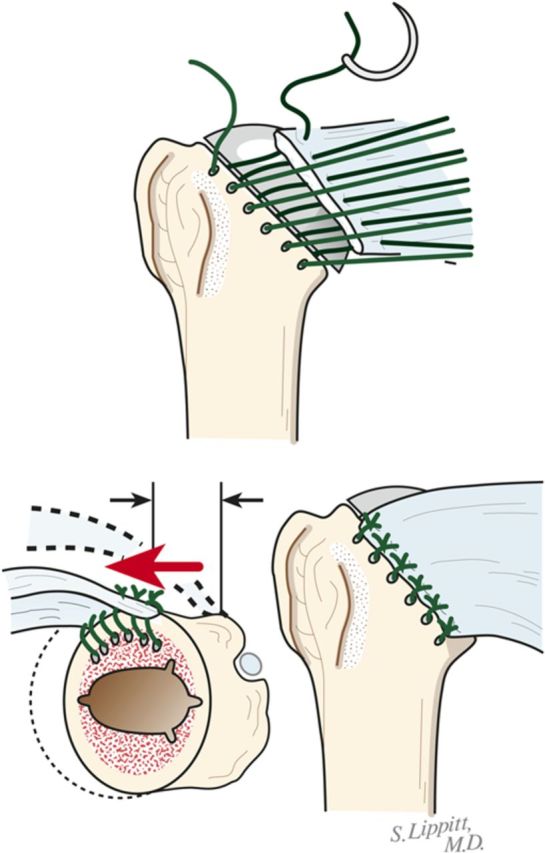
Make six drill holes in the humerus so that they are through solid bone at the margin of the humeral neck cut, beginning at the top of the lesser tuberosity. This is important to avoid “pull-through” of the sutures from the bone.
Pass number-2 nonabsorbable sutures through each of the six holes (Fig. 8-B).
Irrigate the medullary canal with antibiotic-containing saline solution.
Using sterile gloves and insertion tools, seat the definitive prosthesis so that it achieves the desired superoinferior and anteroposterior relationship with the reamed glenoid.
Check again to be sure that there is no unwanted contact between bone of the medial or posterior aspect of the humerus and the glenoid (Figs. 7-C and 7-D).
Fig. 8-A.
Impaction bone graft. A tight prosthetic fit is achieved by using autogenous bone graft impacted in the medullary canal. (Reproduced, with permission of Elsevier, from: Matsen FA 3rd, Clinton J, Rockwood CA Jr, Wirth MA Lippitt MA. Glenohumeral arthritis and its management. In: Rockwood CA Jr; Matsen FA 3rd; Wirth MA; Lippitt SB, editors. The shoulder. 4th ed. Philadelphia: Saunders; 2009.)
Fig. 8-B.
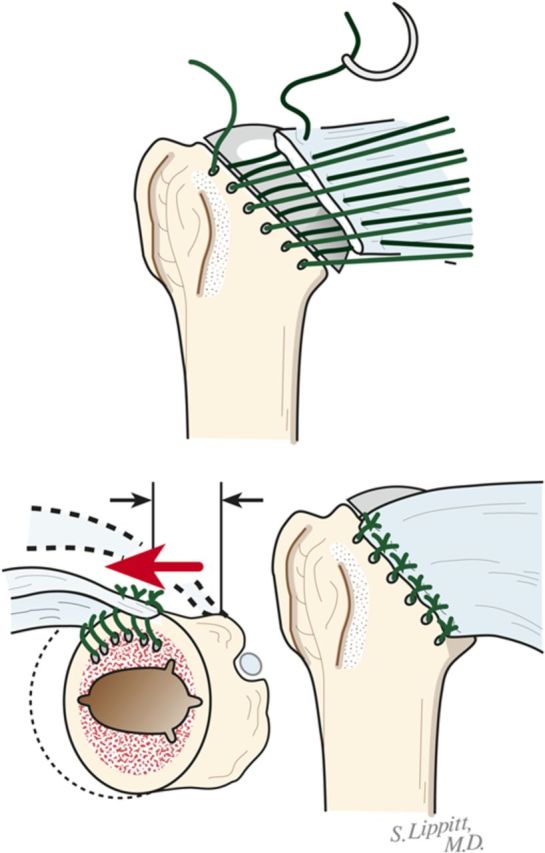
Subscapularis repair. The subscapularis is securely repaired by using six transosseous sutures through the anterior humeral neck cut. (Reproduced, with permission of Elsevier, from: Matsen FA 3rd, Clinton J, Rockwood CA Jr, Wirth MA Lippitt MA. Glenohumeral arthritis and its management. In: Rockwood CA Jr; Matsen FA 3rd; Wirth MA; Lippitt SB, editors. The shoulder. 4th ed. Philadelphia: Saunders; 2009.)
Step 6: Soft-Tissue Balancing
After the definitive humeral prosthesis is in place, ensure the desired balance of mobility and stability. If there is excessive posterior translation, consider a rotator interval plication.
Examine again the range of flexion (ideally it should be 150°), the range of internal rotation of the abducted arm (ideally 60°), and the posterior translation (ideally just less than 50% of the width of the glenoid) (Figs. 7-A and 7-B).
Determine again if the humeral head drops back out of the glenoid center with flexion (Fig. 7-E).
If the shoulder is too tight, consider additional soft-tissue releases or downsizing the humeral head height.
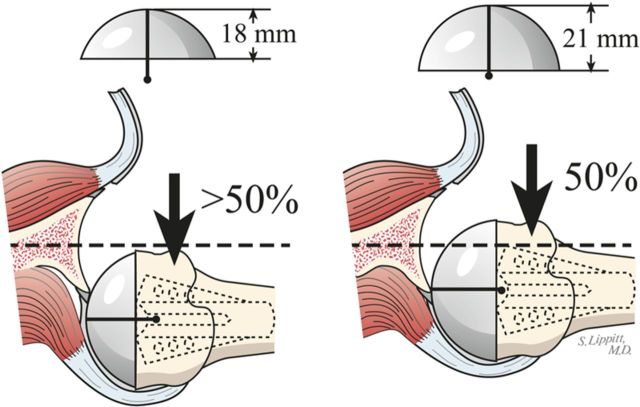
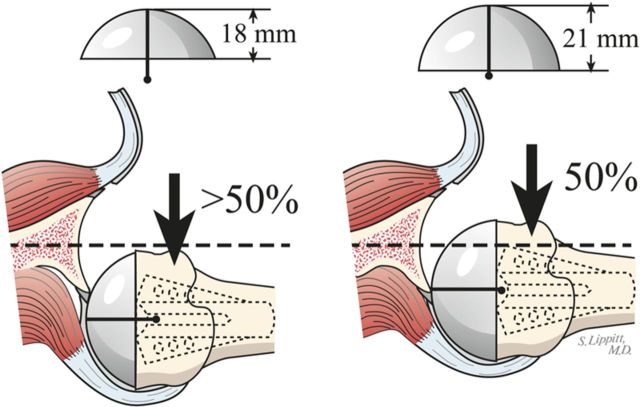
If the shoulder allows too much posterior translation, consider again a humeral head with greater width (Fig. 9) or anterior offset eccentricity (Fig. 7-F).
If the shoulder allows too much posterior translation, consider again a rotator interval plication (Fig. 7-G).
Repair the subscapularis tendon securely using the previously placed six sutures (Fig. 8-B).
Fig. 9.
Increasing head width. If the reconstruction is too loose, the width of the humeral prosthesis is increased.
Step 7: Rehabilitation
Achieve and maintain at least 150° of flexion and good external rotation strength.
Institute self-assisted flexion, with the patient using the contralateral hand while supine, a pulley, and/or forward lean on the day of the surgery or the next day3.
Institute self-assisted external rotation strengthening to support posterior stability.
Follow the patient’s range of motion closely for the first three months; if the range drops below 150° of flexion, consider increasing the vigor of the physical therapy or possibly a gentle manipulation under complete muscle relaxation.
Gently progress strengthening as comfort permits while maintaining the range of motion3.
Results
In our study4, comfort and function increased progressively after the ream-and-run procedure, reaching a steady state by approximately twenty months. One hundred and twenty-four patients with at least two years of follow-up had improvement by a minimal clinically important difference. Sixteen patients with at least two years of follow-up did not have improvement by the minimal clinically important difference. Twenty-two patients had repeat procedures, but only seven had revision to a total shoulder arthroplasty. Fourteen patients did not have either a known revision or two years of follow-up. The best prognosis was for male patients over the age of sixty years who had primary osteoarthritis, no prior surgical procedure, a preoperative Simple Shoulder Test score of ≥5 points, and surgery after 2004. Repeat surgical procedures were more common in patients who had had a greater number of operations before the ream and run.
On the basis of our detailed analysis of this first group of cases, we refined our patient selection, preoperative discussions with prospective patients, surgical technique, and rehabilitation as outlined in this Essential Surgical Techniques article. We have had no additional cases requiring conversion to total shoulder arthroplasty and have observed no subsequent subscapularis ruptures.
The ream-and-run procedure obviates the problem of glenoid component loosening5. While this may seem obvious, since no glenoid component is used, that result is critical. Even in a very recent article on 518 total shoulder arthroplasties performed by expert surgeons1, 166 of the glenoid components had definite radiographic evidence of loosening. Another advantage of the ream and run is that surgeon-imposed activity limitations are unnecessary. A review of surveys of experienced surgeons performing total shoulder arthroplasties2 indicated that those surgeons placed substantial limitations on the activities that they recommended for their patients. In contrast, we impose no activity limitations on the shoulders of patients treated with the ream-and-run arthroplasty after the rehabilitation is complete. Finally, with regard to the question of medial migration, despite the predictions of some, glenoid wear has not been shown to be an issue after the ream-and-run procedure6.
What to Watch For
Indications
A well-motivated, active, informed, and consenting patient who wishes to avoid the potential risks of plastic and cement and who understands the required dedication to rehabilitation, including that it may require more effort to maintain the range of motion during the healing period than that commonly experienced after total shoulder arthroplasty.
A shoulder with noninflammatory arthritis and a reconstructable anatomy. It should be noted that certain conditions—for example, glenoid dysplasia—may preclude reconstruction with the ream-and-run procedure.
A prosthesis instrument system that allows for concentric glenoid reaming, a press-fit humeral stem, and variations in humeral head curvature, height, and offset.
Contraindications
A recent history of smoking, narcotic use, depression, socioeconomic distress, and medicolegal or Workers’ Compensation issues. In our experience, individuals with these characteristics have had a poorer recovery from this procedure.
Poor physical or mental health.
Distortion of humeral or glenoid anatomy to the extent that reconstruction is very difficult.
Rotator cuff, deltoid, or neurological deficits.
A history of shoulder infection or other inflammatory arthropathy. A similar procedure can be used, however, for reimplanting a humeral component after an infection is treated with an antibiotic cement spacer.
Pitfalls & Challenges
Obtaining satisfactory glenoid exposure/preparation. Optimizing humeral head position with respect to the glenoid and soft-tissue balancing.
Failure to align the humeral head with the glenoid concavity.
Failure to remove abutting bone inferiorly or posteriorly.
Failure to adequately stabilize the humeral body by impaction autografting.
Failure to achieve a concentrically reamed glenoid.
Failure to achieve posterior stability through prosthesis selection, positioning, and soft-tissue balancing (including rotator interval plication).
Failure to monitor and ensure the range of motion during recovery. If the shoulder does not exhibit 150° of assisted elevation at four to six weeks after surgery, gentle manipulation under anesthesia and complete muscle relaxation can be considered.
Clinical Comments
What activity limitations should be placed on patients treated with a conventional total shoulder arthroplasty?
What options are available for patients who wish not to have these activity limitations?
What data are available regarding the short, intermediate, and long-term success of these options?
Based on an original article: J Bone Joint Surg Am. 2012 July 18;94(14):e102
Disclosure: None of the authors received payments or services, either directly or indirectly (i.e., via his or her institution), from a third party in support of any aspect of this work. One or more of the authors, or his or her institution, has had a financial relationship, in the thirty-six months prior to submission of this work, with an entity in the biomedical arena that could be perceived to influence or have the potential to influence what is written in this work. No author has had any other relationships, or has engaged in any other activities, that could be perceived to influence or have the potential to influence what is written in this work. The complete Disclosures of Potential Conflicts of Interest submitted by authors are always provided with the online version of the article.
References
- 1. Walch G Young AA Boileau P Loew M Gazielly D Molé D. Patterns of loosening of polyethylene keeled glenoid components after shoulder arthroplasty for primary osteoarthritis: results of a multicenter study with more than five years of follow-up. J Bone Joint Surg Am. 2012 Jan 18;94(2):145-50. [DOI] [PubMed] [Google Scholar]
- 2. Magnussen RA Mallon WJ Willems WJ Moorman CT 3rd. Long-term activity restrictions after shoulder arthroplasty: an international survey of experienced shoulder surgeons. J Shoulder Elbow Surg. 2011 Mar;20(2):281-9. Epub 2010 Nov 4. [DOI] [PubMed] [Google Scholar]
- 3. Matsen FA 3rd. Shoulder arthritis and rotator cuff tears: causes of shoulder pain. Quality information for those concerned with arthritis of the shoulder and rotator cuff pathologies. The ream and run essentials. http://shoulderarthritis.blogspot.com/2012/07/ream-and-run-essentials.html. Accessed 2012 Jul.
- 4. Gilmer BB Comstock BA Jette JL Warme WJ Jackins SE Matsen FA III. The prognosis for improvement in comfort and function after the ream-and-run arthroplasty for glenohumeral arthritis. An analysis of 176 consecutive cases. J Bone Joint Surg Am. 2012 Jul 18;94(14):e102. [DOI] [PubMed] [Google Scholar]
- 5. Matsen FA 3rd Clinton J Lynch J Bertelsen A Richardson ML. http://shoulderarthritis.blogspot.com/2012/07/ream-and-run-essentials.html. Accessed 2012 Jul.
- 6. Mercer DM Gilmer BB Saltzman MD Bertelsen A Warme WJ Matsen FA 3rd. A quantitative method for determining medial migration of the humeral head after shoulder arthroplasty: preliminary results in assessing glenoid wear at a minimum of two years after hemiarthroplasty with concentric glenoid reaming. J Shoulder Elbow Surg. 2011 Mar;20(2):301-7. Epub 2010 Jul 24. [DOI] [PubMed] [Google Scholar]


