Abstract
Two-bottle choice tests are a widely used paradigm in rodents to determine preference between two liquids, with utility for testing animal models of addiction, depression and anhedonia. The following paper describes a 3D-printed, Arduino controlled two-bottle choice test that automatically reads and records drinking behavior in rats to allow for detailed analysis of their drinking microstructure. While commercial products exist use lickometers to measure the microstructure of licking, this design uniquely incorporates hydrostatic depth sensors to allow for real-time volumetric measurements in addition to traditional beam break lick sensing, allowing for licking and drinking microstructure analysis. The goal of this design is to provide a user friendly, affordable apparatus that can study unique, complex behaviors without requiring the purchase of specialized scientific equipment or software. Its applications range from studying alcohol preference in animal models of addiction to sucrose preference in motivational deficits and reward evaluation. This design costs less than $180 CAD to build with decreased cost on each additional device. This design has been successfully tested for accuracy and validated using alcohol preference as an example. The apparatus showed consistency between drinking bouts and volume consumed and is shown to be accurate to ±0.086 ml of the actual volume. This design makes using the two-bottle choice paradigm more accurate, while also making its data more robust and informative while allowing for microstructure analysis of both licking behavior and volume consumed.
Keywords: Preference, Lickometer, Consummatory Behavior, Anhedonia, Addiction
1. Hardware in context
The accurate measuring of ingestive behaviors is important in many fields of study. Appetitive studies looking at caloric intake, drinking behavior in animal models of addiction, and sucrose water consumption in animal models of depression are just a few of the many behavioral paradigms that require the regular, accurate measures of intake, and would benefit from improved methods of data acquisition. Researchers looking to study drinking behavior in rats are faced with the challenge of finding an accurate measure of fluid ingestion. Generally, one will manually measure the volume after a given period at the cost of losing important temporal drinking data. This can be partially solved by using a lickometer – a device that measures the physical act of licking. Commercial lickometers such as the H20–94 from Coulbourn Instruments and the ENV-251L from Med Associates are available. Unfortunately, these products are prohibitively expensive, and require additional proprietary hardware and software to operate. Additionally, licks do not accurately correspond to a consistent volume [1].
The hardware described in this paper provides the same functionality to that of commercially available lickometers with the unique addition of real-time volumetric sensing to correspond to measured licking bouts, thus resolving any issues of lickometer inaccuracy at a fraction of the cost. These measures are combined into a specialized 3D printed housing that is specific to the two-bottle choice test apparatus, of which no similar product is commercially available. While commercial lickometers require additional boxes/arenas, our design is made to be used in home cages where the rats feel more comfortable. This design is a modification of a similar open source two-bottle choice test described by Meaghan Creed in this special issue. It employs similar hardware as outlined in this design to measure drinking preference in mice, however, without the volumetric measurements.
2. Hardware description.
Traditionally, two-bottle choice or preference tests are conducted without any sensors [2], [3], [4], [5]. Each bottle is weighed before and after an animal has been able to drink from them for a given time. Unfortunately, this protocol gives no information on the animal’s drinking microstructure. That is, all information regarding when and how the animal is drinking is lost. This is important information to have when studying drinking behaviors that may change over the course of the day and this coarseness of the protocol has been noted as a problem [6]. Some researchers have made use of lickometers to measure the drinking microstructure that count the number and duration of drinking events by incorporating a photo-interrupter at the base of the bottle [7], [8]. While this gives the researcher a general idea of the drinking behavior, it does not perfectly correspond to volume [1] and, as we have found in our own experiments, is subject to being blocked by other parts of the animal such as the tail and legs. By adding a hydrostatic depth sensor, researchers can measure the volumetric changes in each bottle throughout the experiment, allowing each bout of drinking to correspond to a specific change in volume.
This hardware could be used to improve the quality of data in the following example experiments:
Testing antipsychotic drugs for their ability to modulate reward evaluation or consumption in rodents using sucrose or alcohol [9],[10].
Using sucrose solution preference tests to measure anhedonia and motivational deficits due to chronic social stress [11].
Using ethanol solutions to determine sensitivity to addiction in neurodevelopmental rat models of schizophrenia and co-occurring alcohol use disorder [12].
Measuring carbohydrate taste preferences in rats to test the hypothesis that rats have separate taste receptors for sugar and starch derived polysaccharides [13].
3. Design files
Design Files Summary
| Design file name | File type | Open source license | Location of the file |
|---|---|---|---|
| TwoBottleChoiceHousing.STL | 3D Printer | Creative Commons License | http://dx.doi.org/10.17632/v5fy5dvk8n.1 |
| TwoBottleChoiceHousing.SLDPRT | CAD | Creative Commons License | http://dx.doi.org/10.17632/v5fy5dvk8n.1 |
| BottleCap.STL | 3D Printer | Creative Commons License | http://dx.doi.org/10.17632/v5fy5dvk8n.1 |
| BottleCap.SLDPRT | CAD | Creative Commons License | http://dx.doi.org/10.17632/v5fy5dvk8n.1 |
| TwoBottleChoice.ino | Arduino Code | Creative Commons License | http://dx.doi.org/10.17632/v5fy5dvk8n.1 |
| Calibration.ino | Arduino Code | MIT Open Source License | http://dx.doi.org/10.17632/v5fy5dvk8n.1 |
TwoBottleChoiceHousing.STL – This file contains the 3D printable model of the two-bottle choice test housing. This part contains slots for the water bottles and lickometers as well as channels for wiring.
TwoBottleChoiceHousing.SLDPRT – This is the CAD file for the previous part in case modifications need to be made for a particular application.
BottleCap.STL – This file contains the 3D printable model of the bottle caps used to both keep fluid from evaporating and keep the hydrostatic depth sensors as straight as possible.
BottleCap.SLDPRT – This is the CAD file for the previous part in case modifications need to be made for a particular application.
TwoBottleChoice.ino – This file contains the Arduino code used to operate the two-bottle choice test. It reads from each sensor; calculates volume, number, and duration of licks; and uses the SD shield module to load all the data into a time stamped excel file.
Calibration.ino – This file contains the Arduino code used to calibrate the volume associated with each depth sensor. It must be run for each bottle as each depth sensor is a little different.
4. Bill of Materials
| Designator | Component | Quantity | Cost per unit - currency | Total cost - currency | Source of materials | Material type |
|---|---|---|---|---|---|---|
| A1 | 1K Ohm Resistor | 4 | $0.10 - CAN | $0.40 - CAN | https://www.sparkfun.com/products/14492 | Metal |
| A2 | 240 mL Syringe | 2 | $12.00 -CAN | $24.00 - CAN | https://www.fishersci.ca/shop/products/covidien-monoject-140ml-piston-syringes/22257152#?keyword=140ml+syringe | Polymer |
| A3 | JST Jumper 3 Wire Assembly | 2 | $1.20 – CAN | $2.40 - CAN | https://www.sparkfun.com/products/9915 | Metal, Polymer |
| A4 | Milone Standard eTape (5 Inch) | 2 | $40.00 -CAN | $40.00 -CAN | https://milonetech.com/products/standard-etape | Metal, Polymer |
| A5 | Photo Interrupter - GP1A57HRJ00F | 2 | $2.00 - CAN | $4.00 - CAN | https://www.sparkfun.com/products/9299 | Metal, Polymer, Inorganic |
| A6 | Photo Interrupter Breakout Board | 2 | $1.20 - CAN | $2.40 - CAN | https://www.sparkfun.com/products/9322 | Non-specific |
| A7 | Plastic Valves | 2 | $0.50 - CAN | $1.00 - CAN | https://labproductsinc.com/product/hydropac-alternative-watering-system/ | Polymer |
| A8 | Ribbon Cable | 1 | $4.00 - CAN | $4.00 - CAN | https://www.sparkfun.com/products/10647 | Metal, Polymer |
| A9 | Picture Hanging Strips | 1 | $2.00 - CAN | $2.00 - CAN | https://www.staples.ca/en/Command-Picture-Hanging-Strips-Medium-3-Pack/product_520949_1-CA_1_20001 | Polymer |
| A10 | Adafruit SD Shield | 1 | $14.00 -CAN | $14.00 -CAN | https://www.adafruit.com/product/1141 | Non-Specific |
| A11 | Arduino Power Supply | 1 | $13.00 -CAN | $13.00 -CAN | https://www.amazon.ca/Planet-Waves-9V-Power-Adapter/dp/B00191WVF6/ref=sr_1_3?ie=UTF8&qid=1543262998&sr=8–3&keywords=9v+power+supply | Non-Specific |
| A12 | ATmega2560 Board* | 1 | $22.00 -CAN | $22.00 -CAN | https://www.amazon.ca/LYSB01H4ZDYCE-ELECTRNCSMEGA-ATmega2560-ATMEGA16U2-Compatible-Arduino/dp/B01H4ZDYCE/ref=sr_1_8?ie=UTF8&qid=1543262678&sr=8–8&keywords=arduino+mega | Non-Specific |
| A13 | Epoxy | 1 | $13.00 - CAN | $13.00 - CAN | https://www.amazon.ca/Gorilla-4200602-Epoxy/dp/B00K2N4WO0/ref=sr_1_8?ie=UTF8&qid=1543441978&sr=8–8&keywords=epoxy | Inorganic |
| A14 | Jumper Wires | 1 | $11.00 - CAN | $11.00 - CAN | https://www.amazon.ca/120pcs-Multicolored-Breadboard-Arduino-Raspberry/dp/B072L1XMJR/ref=sr_1_5?ie=UTF8&qid=1543265907&sr=8–5&keywords=jumper+wires | Metal, Polymer |
| A15 | Solderable Bread Board | 2 | $4.00 - CAN | $8.00 - CAN | https://www.sparkfun.com/products/12070 | Non-Specific |
| A16 | SD Card | 1 | $13.00 - CAN | $13.00 - CAN | Any SD card should work | Non-Specific |
| A17 | 5-pin JST SM Plug (optional) | 1 | $1.50 - CAN | $1.50 - CAN | https://www.adafruit.com/product/1664 | Metal, Polymer |
Items 10–16 are only required for every 8 assemblies.
The ATmega2560 Board can be any board based on the ATmega2560 architecture i.e. Arduino Mega.
5. Build Instructions
The first step requires the housing to be 3D-printed. The housing should be printed on its back (i.e., on the side opposite to the bottle slots). No structural supports are needed for this print. The printer filament used for this design was polylactic acid (PLA), however, any filament should work equally well. If the 3D-printer being used is too small to print the housing in one piece, the housing can be sliced, printed in several pieces, and epoxied together. The choice of triangular wire channels was made so that no structural supports would be required for the print. The wire channels help to avoid exposed wires that may be chewed by the rats.
3D-print two of the bottle caps. These are designed to keep the hydrostatic depth sensors (A4) straight as they are highly error prone when bent. They also prevent any accidental spillage from the bottles, and any potential evaporation.
Cut Syringe tops: Remove syringe plungers and cut the top of the syringe (A2) off to be flush with the top of the housing.
Cut the bottom of the syringe (A2) off and use epoxy (A13) to attach the plastic valve (A7) and let dry.
Assemble two photodetectors: Solder the photo interrupter (A5), a 1KΩ resistor (A1), and the JST Jumper 3 Wire Assembly (A3) to the photo interrupter breakout board (A6).
Attach SD shield (A10) to Arduino (A12): Place the male headers that are provided with the shield into all the Arduino’s female headers (long side down). Also place the 2×3 female header provided into the 2×3 pins in the center of the board. Line up the pins with the SD shield and press together. The pins can now be soldered to the SD shield.
Connect the photodetectors to the Arduino (A12): Place the photo interrupters into their slots on the bottle housing. Run the 3 wires up through the triangular channel of the housing and out the top. Solder additional wire (A8) to extend these wires as much as desired (this will dictate how far the bottle housing can reach away from the Arduino; something to consider when powering multiple assemblies off a single Arduino). Attach the red wire to the Arduino’s 3.3V power output, the black wire to ground, and the yellow wire to any of the 54 digital channels. For multiple assemblies, it is a good idea to organize the inputs and outputs on a solderable breadboard.
Connect the depth sensors to the Arduino: Connect pin 3 of each depth sensor to ground. Connect pin 2 of the depth sensors to one of the 16 analog inputs. Place a 1KΩ resistor (A1) between the Arduino’s 5V output and the analog pin chosen. Optional: If making several assemblies and would like to have each apparatus detachable, solder a 5-pin JST plug (A17) and receptor to each bottle’s outputs.
Assemble: Place bottle caps on bottles and bottles into the housing. Slide depth sensors into bottle-cap slots. Put one half of a picture hanging strip (A9) on the back of the housing and attach the assembly to a cage with the second half. Hanging strips were chosen as an attachment method to make the Automated Two-Bottle Choice Test compatible with as many different cage-types as possible.
Calibrate depth sensors: Flash the calibration.ino code onto the Arduino and follow the commented instructions. Fill the calibration values for each sensor into the TwoBottleChoice.ino code i.e. ZERO_VOLUME_RESISTANCE, CALIBRATION_RESISTANCE, and CALIBRATION_VOLUME. The TwoBottleChoice.ino program includes the code to run the maximum number of assemblies that one Arduino mega can handle (maximum is 8). However only the code for one assembly is uncommented. That is, all that needs to be done to run additional assemblies is uncomment the additional portions of code for each additional assembly.
Flash the TwoBottleChoice.ino code onto the Arduino.
6. Operation Instructions
Fill the bottles with desired Liquids to be tested.
Load the SD card (A16) into the SD shield (A10).
Plug in the Arduino (A12) using the power supply (A11).
Click the button on the SD shield shown in the image below. This will start a new file.
7. Validation and Characterization
One assembly was tested to determine the quality of data and reliability of the hardware. A rat was given water in one bottle and 10% ethanol in the other. The rat had not been exposed to any testing and had not undergone any surgeries or previous treatments. The rat was given access to the bottles for a 24-hour period.
The photodetectors were able to measure the number of licks in a bout (figure 11) as well as the duration of each bout (figure 12). Based on this data, there appeared to be an absolute preference for water over alcohol. Not only are there significantly more bouts for water, but they are much longer in duration (figure 12). This can be further corroborated by figure 13 showing the volume measurements made by the depth sensors. There was little to no change in alcohol volume throughout the 24-hour test period, however, the water volume decreased significantly with the largest and longest bouts corresponding to the largest changes in volume.
Figure 11.
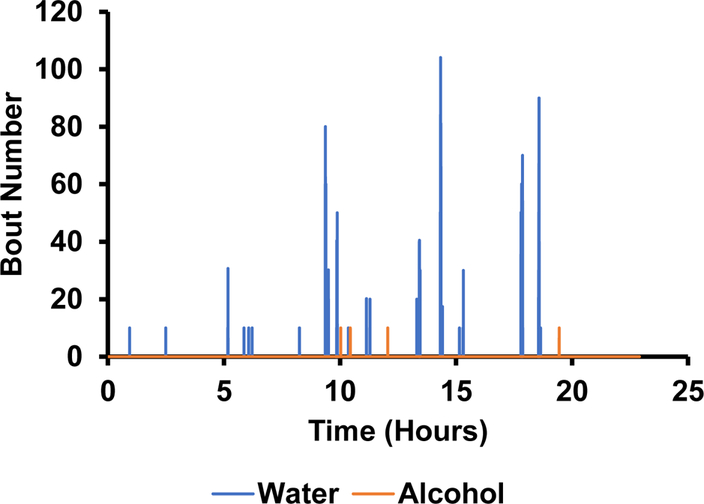
The number of times the photodetector beam was broken during each bout of drinking.
Figure 12.
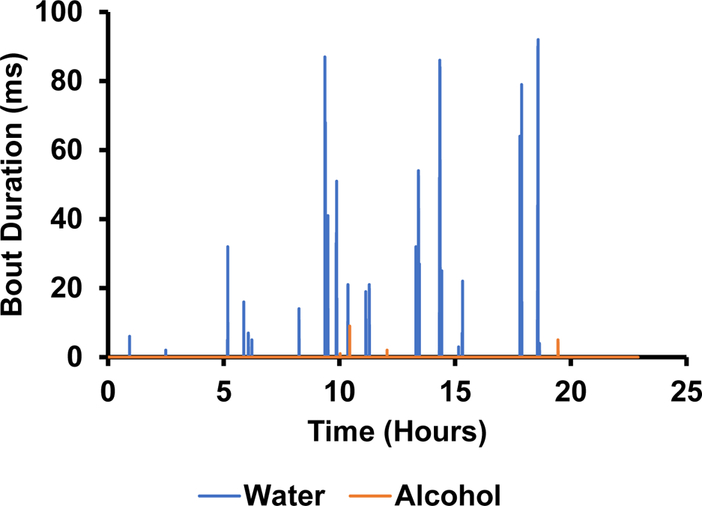
The duration of time the photodetector beam was broken during each bout of drinking.
Figure 13.
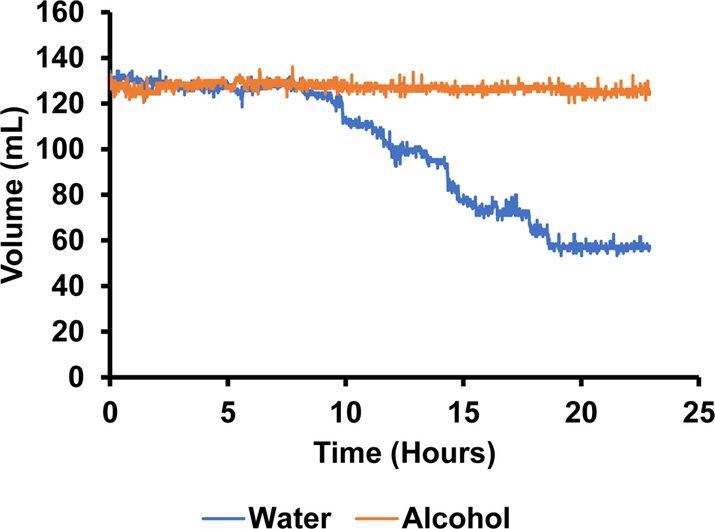
The change in volume in each bottle over a 24-hour period as measured by hydrostatic depth sensors (notice the fluctuations in volume readings over time).
The accuracy of the volume measurements is limited by the resolution of the depth sensor (< 0.25 mm), the cage’s ability to remain level and sturdy, and the depth sensors ability to remain straight. Fluctuations are visible in figure 13 highlighting these inaccuracies. Fortunately, knowing that the lickometer data is an accurate measure of when actual drinking is happening, we can use this data to filter the volume data by only registering changes in volume when a bout is in progress. The results of this filtering technique are shown in figure 14. The volume consumed during each drinking bout is depicted in figure 15.
Figure 14.
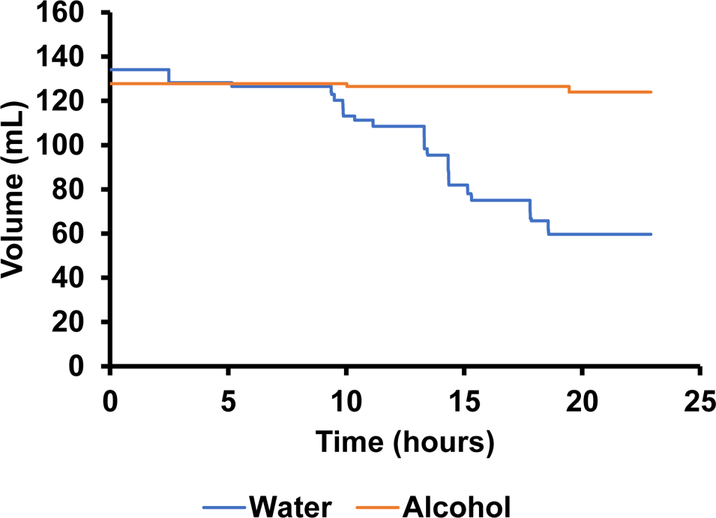
The change in volume over a 24-hour period as measured by hydrostatic depth sensors and filtered using the photodetector data to only change volume when the beam is broken i.e. the rat is licking.
Figure 15.
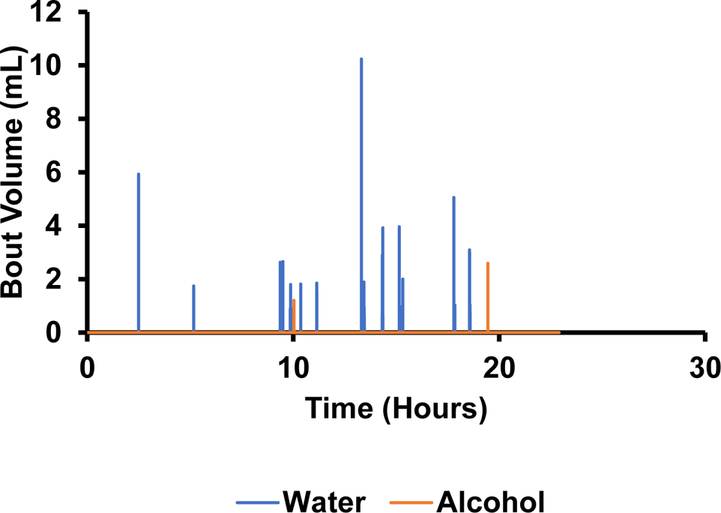
The volume of each drinking bout measured by the hydrostatic depth sensors over a 24-hour period
A second validation was conducted to determine the accuracy of the depth sensors given the previously mentioned limitations. Water was added to the bottle in 10 ml increments as measured by a graduated cylinder and the sensor’s reading was recorded. This was done at 10 different levels and the experiment was repeated 8 times. The results of this experiment are shown in figure 16. The average error of the sensors was ±0.086 ml with a high correlation between the true and measured volumes (Pearson’s R2=1.000; p=0.000).
Figure 16.
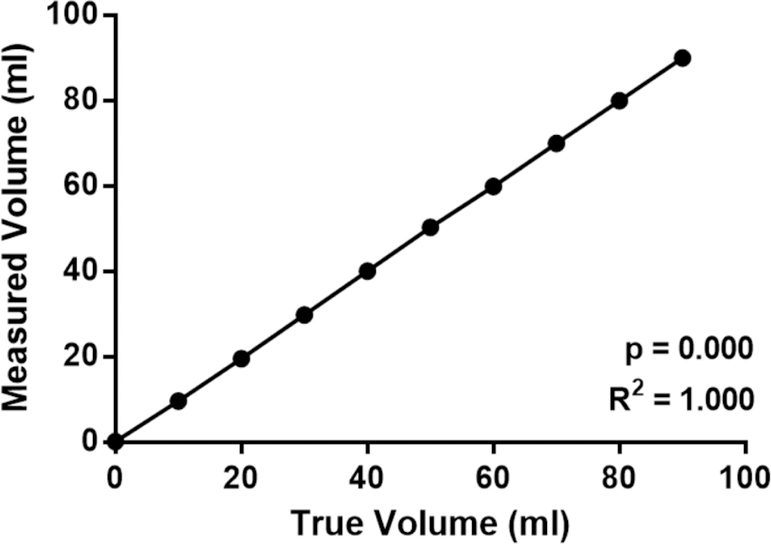
Differences in true volume as measured using a graduated cylinder compared with the mean volume as measured by hydrostatic depth sensor. Measured in 10 ml increments (n=8 per measurement).
Hardware Capabilities, limitations, and accuracy:
Each Arduino mega is capable of powering eight two-bottle choice test units.
Memory is only limited to the storage size of the SD card and number of SD cards available.
Each bottle can hold 150 ml.
The depth sensor functional temperature range is 15°F - 150°F (−9°C - 65°C).
The resolution of the depth sensors is < 0.01” (0.25 mm) (an issue we have dealt with by using the filtering method mentioned above).
Figure 1.
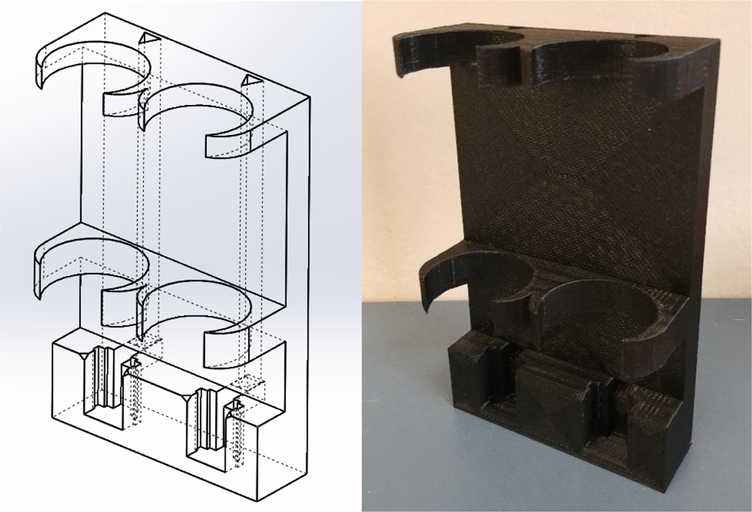
Wireframe diagram of the 3D printed housing (left) and completed 3D-printed housing (right).
Figure 2.
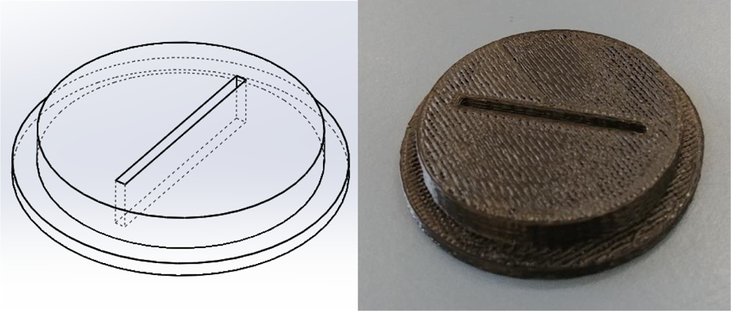
Wireframe diagram of the 3D printed bottle-cap (left) and completed 3D-printed bottle-cap (right).
Figure 3.
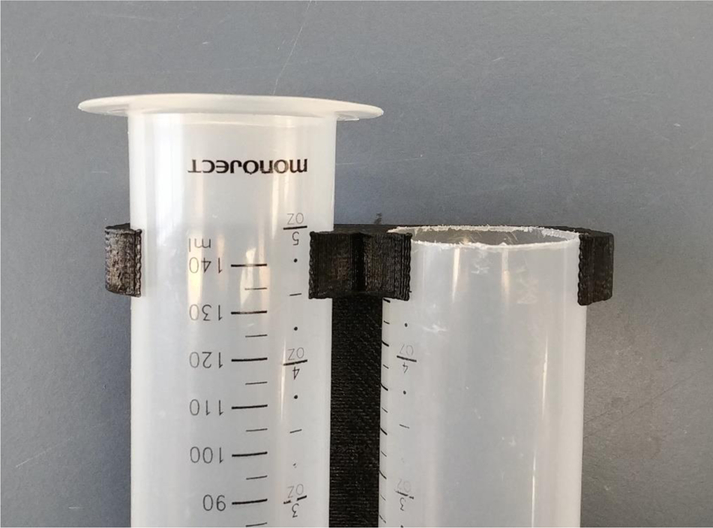
Syringe (right) cut to be flush with the 3d printed housing.
Figure 4.
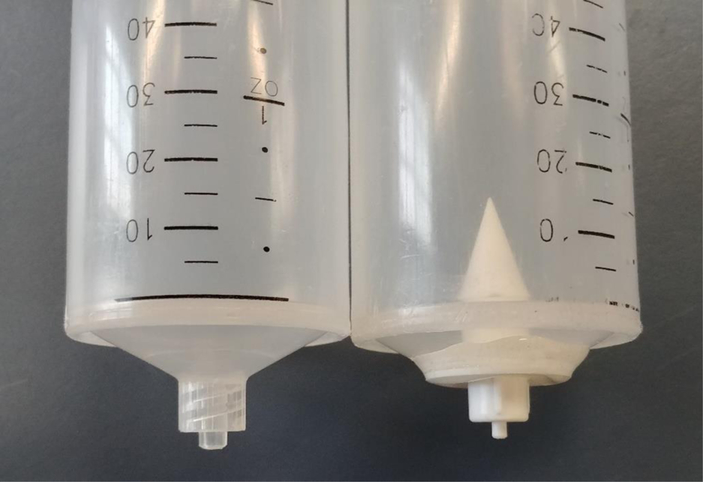
Syringe (right) that has had the bottom removed and replaced with a drinking valve.
Figure 5.
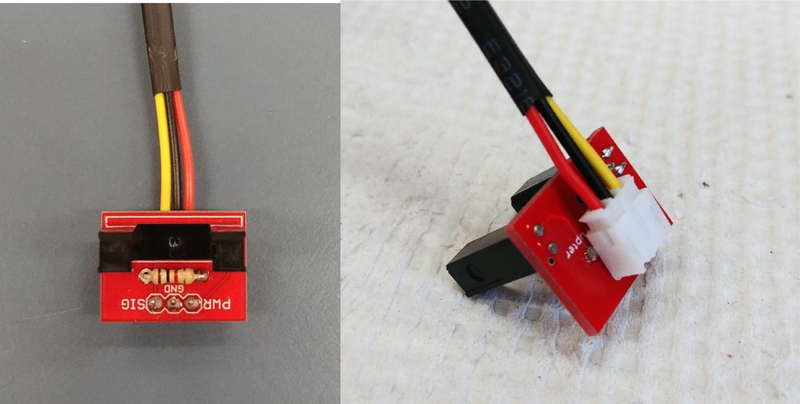
Assembled photodetector.
Figure 6.
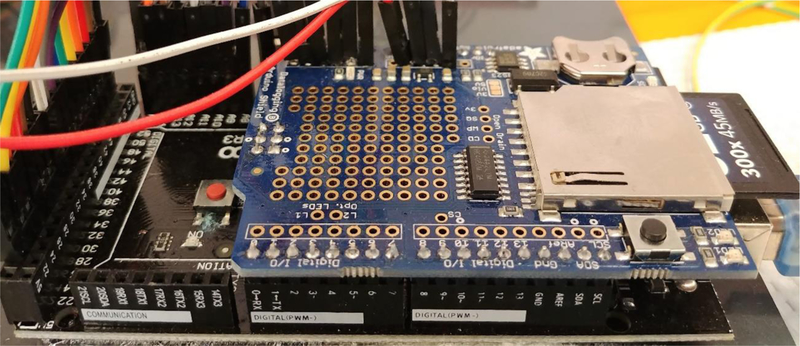
SD Shield soldered to Arduino.
Figure 7.

Photodetector being inserted into the 3D printed housing.
Figure 8.
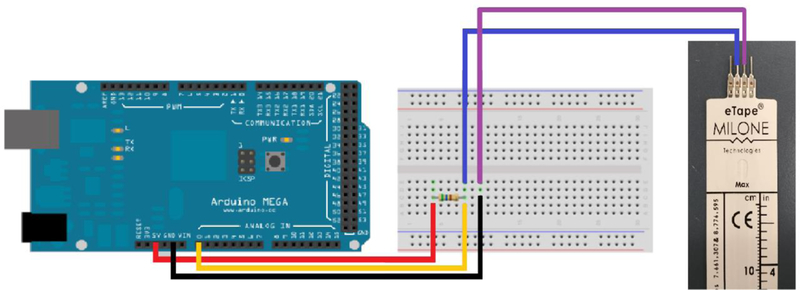
Wiring schematic for a single depth sensor.
Figure 9.
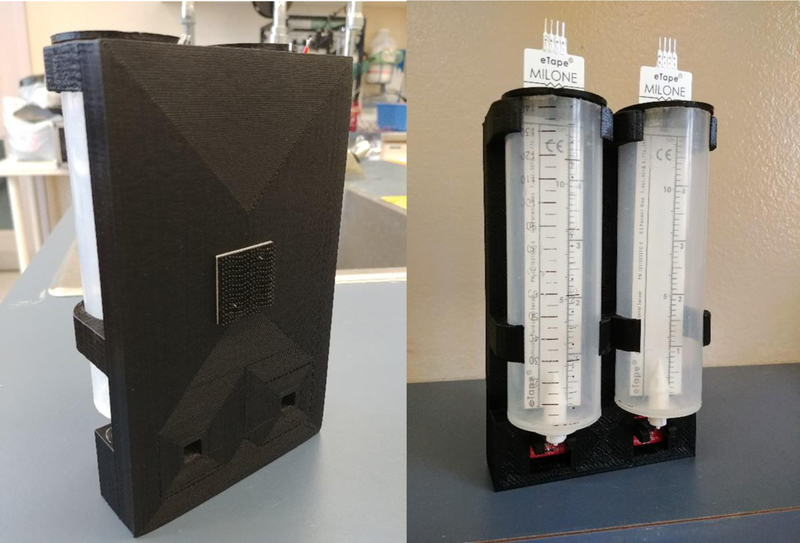
Assembled two-bottle choice test.
Figure 10.
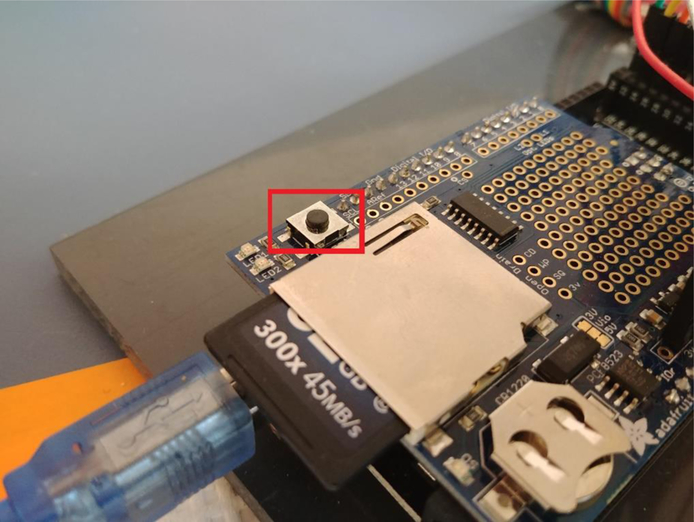
The red box indicates the button on the SD shield that will create a new excel file every time it is pressed.
Footnotes
Declaration of interest
None of the authors in this paper have reported any conflicts of interest.
Human and animal rights
The experiments outlined in this paper comply with the ARRIVE guidelines and were conducted in accordance with the National Institute of Health guide for the care and use of Laboratory animals (8th Edition, NIH Publications revised 2011) as well as the Animal Use Protocol approved by the University of Guelph Animal Care Committee.
References
- [1].Weijnen JAWM, “Lick sensors as tools in behavioral and neuroscience research,” Physiol. Behav, 1989. [DOI] [PubMed]
- [2].Muscat R and Willner P, “Effects of dopamine receptor antagonists on sucrose consumption and preference,” Psychopharmacology (Berl), 1989. [DOI] [PubMed]
- [3].Yoneyama N, Crabbe JC, Ford MM, Murillo A, and Finn DA, “Voluntary ethanol consumption in 22 inbred mouse strains,” Alcohol, 2008. [DOI] [PMC free article] [PubMed]
- [4].Blednov YA, Ponomarev I, Geil C, Bergeson S, Koob GF, and Harris RA, “Neuroimmune regulation of alcohol consumption: behavioral validation of genes obtained from genomic studies,” Addict. Biol, vol. 17, no. 1, pp. 108–120, January 2012. [DOI] [PMC free article] [PubMed] [Google Scholar]
- [5].Sclafani A, “Flavor preferences conditioned by sucrose depend upon training and testing methods: Two-bottle tests revisited,” Physiol. Behav, 2002. [DOI] [PubMed]
- [6].Gaillard D and Stratford JM, “Measurement of Behavioral Taste Responses in Mice: Two-Bottle Preference, Lickometer, and Conditioned Taste-Aversion Tests,” Curr. Protoc. Mouse Biol, 2016. [DOI] [PMC free article] [PubMed]
- [7].Eastwood EC, Barkley-Levenson AM, and Phillips TJ, “Methamphetamine drinking microstructure in mice bred to drink high or low amounts of methamphetamine,” Behav. Brain Res, 2014. [DOI] [PMC free article] [PubMed] [Google Scholar]
- [8].Heilig M and Koob GF, “A key role for corticotropin-releasing factor in alcohol dependence,” Trends in Neurosciences 2007. [DOI] [PMC free article] [PubMed]
- [9].Galistu A, Modde C, Pireddu MC, Franconi F, Serra G, and P. S. D'Aquila, “Clozapine increases reward evaluation but not overall ingestive behaviour in rats licking for sucrose,” Psychopharmacology (Berl), 2011. [DOI] [PubMed]
- [10].Gulick D, Chau DT, Khokhar JY, Dawson R, and Green AI, “Desipramine enhances the ability of risperidone to decrease alcohol intake in the Syrian golden hamster,” Psychiatry Res, 2014. [DOI] [PMC free article] [PubMed]
- [11].Rygula R, Abumaria N, Flügge G, Fuchs E, Rüther E, and Havemann-Reinecke U, “Anhedonia and motivational deficits in rats: Impact of chronic social stress,” Behav. Brain Res, 2005. [DOI] [PubMed]
- [12].Khokhar JY and Todd TP, “Behavioral predictors of alcohol drinking in a neurodevelopmental rat model of schizophrenia and co-occurring alcohol use disorder,” Schizophr. Res, 2018. [DOI] [PMC free article] [PubMed]
- [13].Sclafani A and Mann S, “Carbohydrate taste preferences in rats: Glucose, sucrose, maltose, fructose and polycose compared,” Physiol. Behav, 1987. [DOI] [PubMed]


