Abstract
Pelvic acetabular fracture is a common kind of fracture, mostly caused by high energy injuries. It is associated with high mortality and disability rates. The aim of surgical treatment of pelvic acetabular fractures is to restore the symmetry and stability of the pelvic ring structure and the anatomical structure of acetabular. Open reduction internal fixation is often used for the treatment of such fractures, but open surgery is in cases of serious injury, more bleeding, and high risk of infection. With the development of minimally invasive technology and the concept of the bone channel structure, the percutaneous lag screw technique for the treatment of pelvic and acetabular fractures has been applied in clinical practice and has proven to be effective. However, the anatomical structure of the pelvis and acetabulum is complex, and there are many important nerves and vessels adjacent to it. Traditional fluoroscopy screw placement is prone to screw malposition, and even minor angle changes may lead to screw perforation and damage of nerve vessels. The problem of radiation exposure is also noteworthy. Robotic‐assisted surgery can be used to carry out screw position planning through preoperative imaging, intraoperative real‐time tracking, and mechanical arm assistance to ensure that the screw placement position is consistent with the planning. In this way, robotic‐assisted surgery can be used to accurately insert lag screws, and can reduce surgical risk and radiation exposure. This guide uses the TiRobot system as an example to describe the application of robot surgery in detail, aiming at standardizing the application of robots in orthopaedic surgery.
Keywords: Minimally invasive internal fixation, Pelvic fracture, Robot‐assisted surgery
Introduction
Pelvic acetabular injuries are mostly caused by high‐energy injuries and account for 3% of total body fractures. The fatality rate is as high as 13.4%, and more than half of patients have other complications1. At the same time, pelvic fractures are associated with high rates of disability; Holdsworth followed up 50 patients with non‐surgical pelvic fractures, and the results showed that over 50% (15/27) of the patients were incapacitated2. Due to their high mortality and disability rates, pelvic acetabular injuries have become one of the most challenging diseases for trauma orthopaedic surgeons. How can the mortality and disability rates of patients be reduced through surgical treatment so that patients can return to normal working life and society as soon as possible?
The treatment of pelvis and acetabulum fractures usually involves open reduction and internal fixation, but there are many shortcomings. First, a large incision is required, and there can be more bleeding and huge injuries to the patient's body, which make it unsuitable for fixing early in patients with multiple traumas. Second, open surgery is likely to cause intraoperative vascular or nerve damage and postoperative infection and other complications are also significant. Third, it is difficult to carry out pelvic acetabular surgery due to because of its steep learning curve.
With the rise of the concept of channel screw fixation, percutaneous minimally invasive screw placement for the treatment of pelvic acetabular fracture has become a new trend. Cannulated screw fixation can be used, for instance, for the sacroiliac joint, the acetabular anterior and posterior column, the symphysis of the pubis, and the ilium bone. However, there are still some deficiencies in the traditional unarmed screw placement technique. First, the pelvic acetabular anatomy is complex with numerous nerves and vessels; screw malposition may lead to vascular and nerve complications. Statistically, the reported incidence of screw malposition in the sacroiliac joint under fluoroscopic guidance ranges from 2% to 15%3, 4, and the incidence of nerve damage ranges from 0.5% to 7.7%3. The pelvic acetabular morphology varies from individual to individual, and the size and direction of bone channels are different. For example, the incidence of variation of the S1 vertebral body is reported as high, at 30% to 50%5, 6, 7, which further increases the difficulty of safe screw placement. Second, the traditional surgical method relies on frequent intraoperative fluoroscopy to determine the position of the guide wire and screw, so that patients and medical staff are exposed to a large amount of radiation.
With the development of imageology and computer, robot and other technologies, orthopaedic robots can improve the accuracy of operations and the effect of surgical treatment, meanwhile reducing the radiation exposure of medical staff and patients8 and truly achieving precision therapy for fractures. China has intellectual property rights for the “Tianji” orthopaedic surgery robot (TiRobot), which is the first universal orthopaedic navigation robot and has been certified by the China Food and Drug Administration (CFDA). It can be used for cannulated screw internal fixation in the treatment of pelvic acetabular injuries. To standardize the application of orthopaedic surgical robots in the internal fixation of pelvic acetabular injuries and so that the orthopaedic precision therapy benefits more patients, the present paper will use TiRobot as an example to elaborate on the technical points of robot‐assisted percutaneous cannulated screw internal fixation in the treatment of pelvic acetabular injuries and guide the clinical application.
Introduction of Orthopaedic Surgery Robot
Structure Composition
The orthopaedic surgical robot system consists of surgical planning and control software, a host, a mechanical arm, an optical tracking system, a surgical tool kit, and accessories.
TiRobot (Fig. 1): The product consists of a host, a robotic arm, surgical planning and control software, an optical tracking system, a console vehicle, and a navigation and positioning kit.
Figure 1.
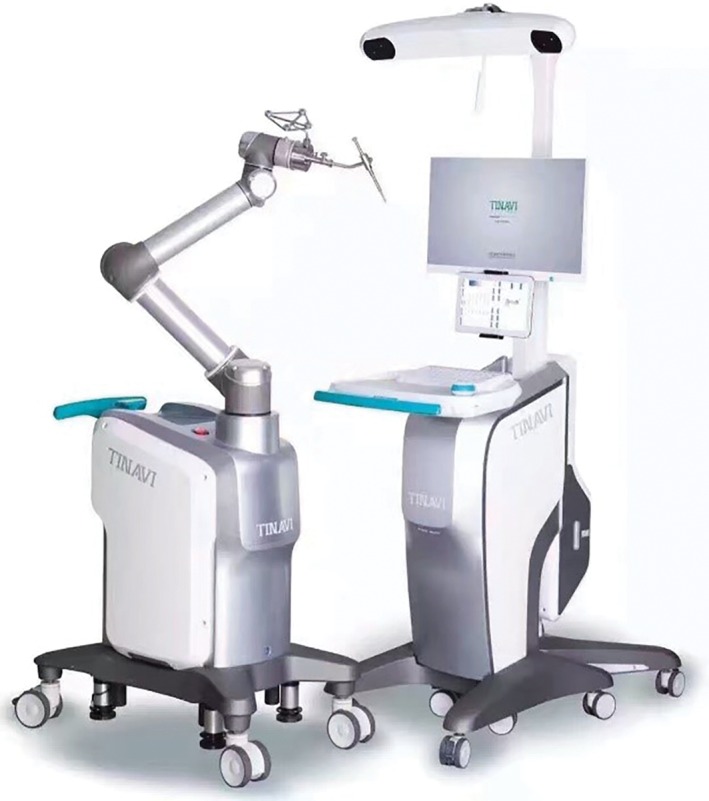
TiRobot orthopaedic surgery robot system.
Medical device classification directory: Usually consists of a host, a tracking and locating device, functional software, locating framework, adapter, markers, and accessories. There is optical navigation and electromagnetic navigation. Part of the navigation system has mechanical arms.
Working Principle
Robot‐assisted orthopaedic surgery, like conventional surgery, is a process of eye–brain–hand coordination.
Eye of Orthopaedic Surgery Robot: Image Acquisition and Recognition
As the most commonly used diagnostic method in orthopaedics, X‐ray and C‐arm CT can provide more information to doctors without exposing the wound. For orthopaedic surgery robots, obtaining this digital image information can provide more information and enable more accurate minimally invasive treatment in orthopaedic surgery. The intraoperative C‐arm CT image data can undoubtedly obtain more complete and accurate 3D information, to better serve the high‐precision orthopaedic surgery. However, due to radiation, the intraoperative location, and other reasons, intraoperative X‐rays are more widely used. Therefore, the compatibility of multimodality images largely influences the versatility of orthopaedic surgical robots.
To make better use of image information and realize spatial localization, some localization markers are placed in the field during image acquisition to develop on the image. The orthopaedic surgery robot can quickly and accurately realize the identification and location of marks through a software recognition algorithm, thus preparing for registration. Just as human eye vision affects precision surgery, image quality greatly affects the registration accuracy of the robot. Therefore, in 2D image acquisition, the high‐precision and low‐distortion digital flat C arm is more suitable for orthopaedic surgery than the ccd‐type C arm.
Brain of Orthopaedic Surgery Robot: Surgical Design and Registration
After an accurate image is obtained, the robot hosts will be allowed to produce a surgical design based on the medical image data, and the robot will be assigned to achieve spatial registration. With a human–computer interaction interface, doctors can perform surgical design before or during surgery, depending on the circumstances. According to the different images obtained, the surgical design can be divided into two dimensions and three dimensions. In general, the screw channel planning of the positioning robot usually follows a 2D surgery design, and the entry point and terminal point of the screw can be planned in multiple images. The joint robot is mainly based on the 3‐D surgical design to achieve a good match between the joint surface of the implant and the bone surface.
Registration algorithms are another core technology of orthopaedic surgery robots, and their essence is to completely and accurately present the surgical plan designed by doctors in the image space to the actual operation space. Due to the different medical image data used, the robot registration algorithm is quite different. The X‐ray image commonly used in traumatic orthopaedics is calibrated using the C‐arm calibration method. The principle is to calculate the relative spatial relation of the C‐arm's emitter source, marker point, and designed screw insertion and terminal point through the marker points of a specific structure, to become the identifiable kinematic parameters of the robot and guide the robot motion. For CT/C‐arm CT image data, 3D registration is needed to obtain the robot kinematics parameters. The more advanced technique is to use X‐ray and preoperative CT to achieve 2D/3D registration, which not only retains a lot of 3D spatial information but also reduces the intraoperative fluoroscopy time to the greatest extent. However, such technology is not yet advanced enough to be put into clinical use.
Hand of Orthopaedic Surgery Robot: Tool Tracking and Navigation
After obtaining the robot's kinematics parameters, the robot can accurately place the surgical tools (e.g. drill and milling cutter) on the surgical site. This process is called robot navigation. Theoretically, the robot can complete navigation and positioning independently due to its own position information. However, the absolute positioning accuracy of the robot does not meet the requirements of clinical surgery at the present time. Therefore, additional external equipment is needed to improve the accuracy of the robot navigation. An optical capture system is a common precision compensation device. A real‐time optical tracking guide robot can reduce the positioning precision from 1–2 mm to less than 1 mm. At the same time, important functions such as displacement compensation and breathing compensation can be realized. It should be noted that the optical capture system has certain requirements on the capture field, and reasonable robot positioning can largely avoid the tracking failure caused by occlusion of surgical tools.
The orthopaedic surgical robot has a mechanical emergency brake switch, which ensures that the robot can stop immediately during the navigation process to avoid injury in any dangerous situation. In addition, due to safety concerns, orthopaedic surgical robots, especially orthopaedic positioning surgery robots, are mostly used as auxiliary equipment for surgery, only guiding accurate and safe screw channels for doctors, instead of performing autonomous drilling operations. Through the only drilling channel, doctors perform the autonomous and controllable screw implant operation to complete the high‐precision and difficult orthopaedic surgery.
Indications and Contraindications of Surgical Robots
Indications
The robot‐assisted internal fixation of pelvic acetabular injuries is suitable for pelvic acetabular injuries that involve a small displacement or for closed/limited open reduction. For example: (i) anterior ring injuries, including bone ramus fracture and pubic symphysis separation; (ii) posterior ring injuries, including sacral fracture and sacroiliac joint dislocation; (iii) acetabular fractures, including acetabular anterior column and posterior column; and (iv) ilium fracture.
Contraindications
Unclear image collection caused by hardware or patient factors preventing safe planning.
The fracture cannot be effectively fixed using the percutaneous cannulated screw technique.
There may be important tissues, such as blood vessels and nerves, that cannot be avoided in the path planned by the robot.
The mechanical arm cannot be moved to the planned site: for example, multiple doctors are required to coordinate to complete the reduction during the operation, the tracer is blocked, or due to the patient's posture or surgical bed.
The tracer cannot be effectively fixed: for example, if a patient has severe osteoporosis, or multiple doctors are required to cooperate to complete the reduction and maintain the reduction due to the influence of respiratory magnitude.
Through planning, the angle between the guide wire and bone surface is too small to complete the fixation of the entry point, resulting in unavoidable error.
Procedure for Robot Operation Preparation
After successful anesthesia, the patient was placed on a nonopaque bed. The supine position, prone position, or another appropriate position can be selected for the operation. The affected side was kept as close to the bed as possible to prevent the direction of the screw from being blocked. After routine disinfection and draping, all parts of the robot and the C‐arm were placed in the appropriate position to ensure the robot arm can reach the operation area. The optical tracking camera was placed on the foot of the patient and the mobile C‐arm was placed on the opposite side of the surgeon.
Fracture Reduction
Restore the normal anatomical structure of the fracture as far as possible by means of closed reduction or limited open reduction under fluoroscopy and establish bone channels for cannulated screw internal fixation.
Image Collection and Registration
A patient tracer was fixed on the bone landmark (usually the anterior superior iliac spine of the healthy side); the robot arm was fixed with a sterile protective sleeve and the robot tracer was assembled, to establish a sterile working environment for the mechanical arm surgery. The C‐arm is used to obtain the intraoperative fluoroscopy image containing the robot positioning marking points and transmit it to the master workstation software for registration calculation.
Image Collection Requirements for Traumatic Femoral Neck Channel Screw Surgery
The screw bone channel has a complete and clear display.
As far as possible, the projection perspective images are perpendicular to each other, which is conducive to establishing the construction of 3D spatial relations by computer.
The tab ruler should be placed inside the image without overlapping.
Navigation Image Acquisition
Recommended intraoperative image of pelvic acetabular injuries:
Pelvic posterior ring injuries (pelvic inlet and outlet view, pelvic lateral view).
Acetabular anterior column injuries (obturator outlet view, pelvic inlet view, pelvic anteroposterior [AP] view).
Acetabular posterior column injuries (obturator oblique view, ilium oblique view, pelviclateral view).
Acetabular superior injuries (ilium oblique view, down‐the‐wing [DTW] view, teardrop view).
Symphysis pubis injuries (pelvic inlet and outlet view, pelvic lateral view).
Inferior ramus of the pubis (obturator outlet view, ilium oblique view, pelvic inlet view).
Key Points of Perspective Image Recognition
Pelvic AP view (supine position, fluoroscopic image intensifier is placed perpendicular to the pelvis horizontal plane, complete display of the projection of the pelvic anatomy on the horizontal plane) (Fig. 2).
Figure 2.
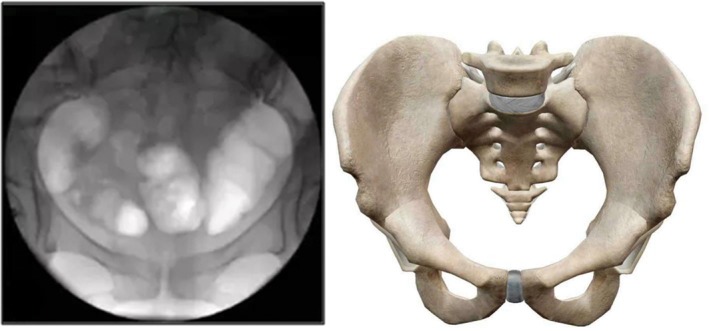
Pelvic anteroposterior view.
Pelvic lateral view (supine position, fluoroscopy image intensifier is placed along the pelvis horizontal plane, display of overlapping bilateral acetabulum, greater sciatic notch, and lateral view of the sacrum) (Fig. 3).
Figure 3.
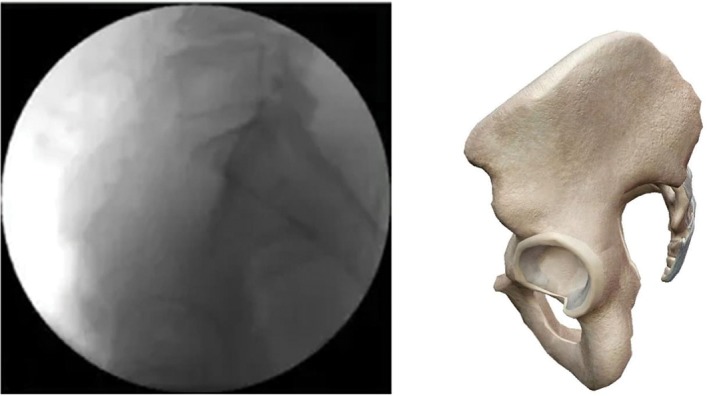
Pelvic lateral view.
Pelvic inlet view (supine position, fluoroscopic image intensifier is placed leaning 30°–45° to cranial; the anterior cortex of the sacrum promontory and S1 vertebra overlapped, and the pelvic ring was shaped like a goose egg, with the anteroposterior dimension greater than the mediolateral dimension) (Fig. 4).
Figure 4.
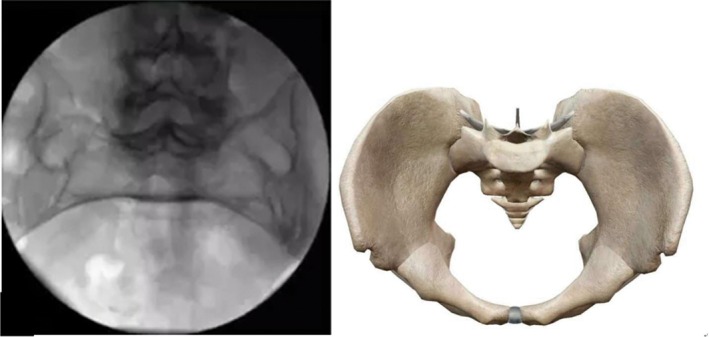
Pelvic inlet view.
Pelvic outlet view (supine position, fluoroscopic image intensifier is placed leaning 30°–45° to caudal. The symphysis pubis is in the position of S2 vertebral body level. By axial movement, the bilateral sacral foramen, symphysis pubis, upper and lower limbs of the pubis, bilateral obturator foramen, and upper and lower margins of the sacrum were clearly identified) (Fig. 5).
Figure 5.
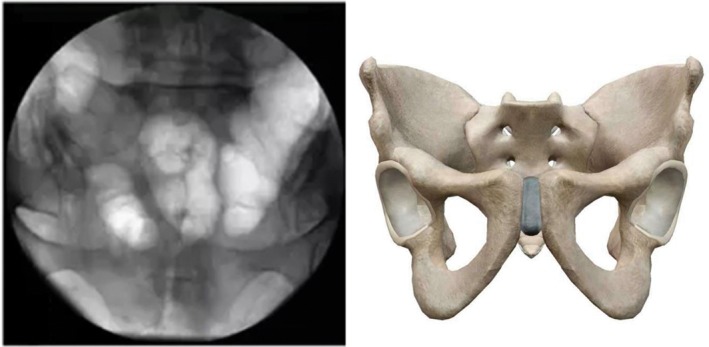
Pelvic outlet view.
Obturator outlet view (on the basis of pelvic outlet view, tilt fluoroscopic image intensifier 15°–30° to the affected side; the image plane can fully show the upper and lower ramus of the pubis and ischium that constitute the obturator foramen, presenting inverted triangle. This view can fully display the anterior column, the posterior column, and the inferior ramus of pubis) (Fig. 6).
Figure 6.
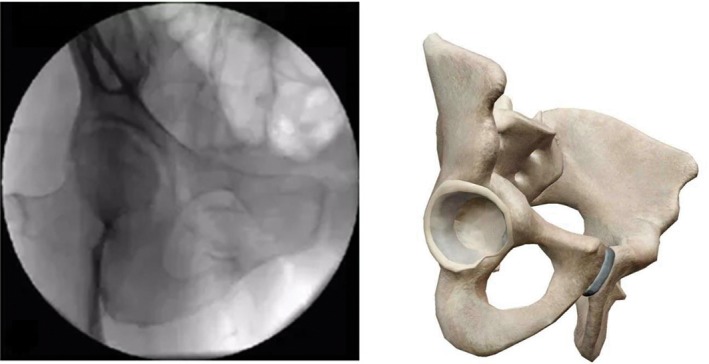
Obturator outlet view.
Ilium oblique view (on the basis of pelvic AP view, tilt fluoroscopic image intensifier 15°–30° to the healthy side. This view can fully display the anterior superior spine and anterior inferior iliac spine, sciatic notch, and posterior superior iliac spine) (Fig. 7).
Figure 7.
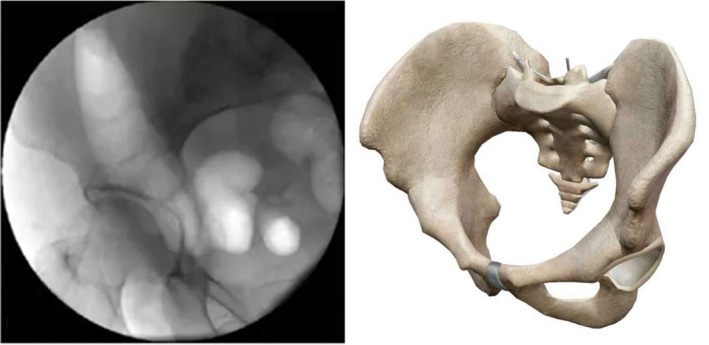
Ilium oblique view.
Teardrop view (on the basis of obturator outlet view, tilt fluoroscopic image intensifier 25°–35° to the affected side; the image plane is perpendicular to LC‐2 channel; ilium internal and external plate cross form tears sample image) (Fig. 8).
Figure 8.
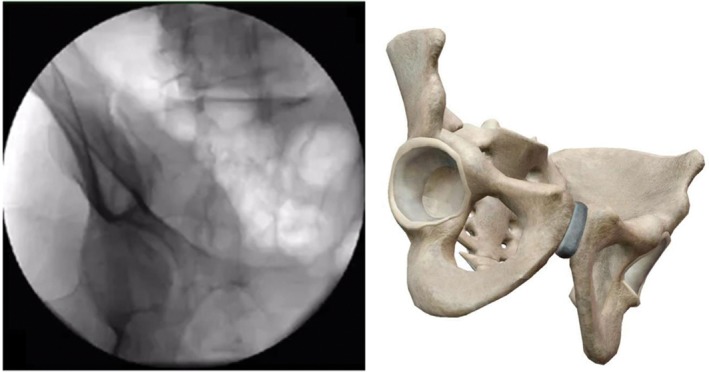
Teardrop view.
Down‐the‐wing view (on the basis of pelvic AP view, tilt fluoroscopic image intensifier 15°–30° to the affected side; the image plane is perpendicular to the iliac wing plane. This view can completely display the outside and inside diameters of the LC‐2 channel) (Fig. 9).
Figure 9.
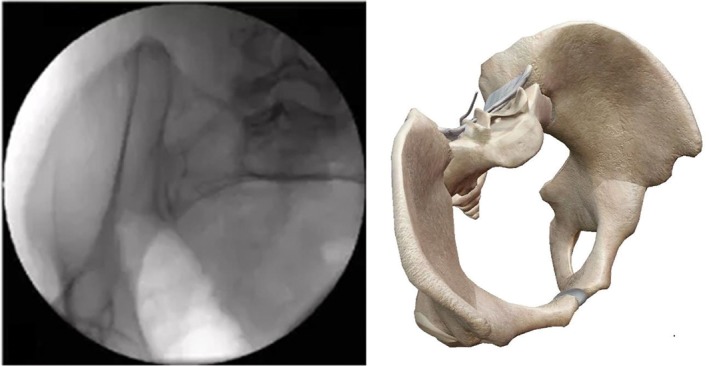
Down‐the‐wing (DTW) view.
Surgical Path Planning
According to the images collected, based on typical identification points and bone marker structure, surgical screw path planning is performed on the master control system planning software.
Mechanical Arm Operation
The mechanical arm posture simulation module of planning software is used to simulate the operation posture of the mechanical arm. After confirming that the mechanical arm posture is suitable for follow‐up surgery, the control software of the main control system controls and monitors the movement of the mechanical arm along the planning path to the target position. The guide sleeve is installed at the end of the mechanical arm, and the guide sleeve is positioned according to the following principles: (i) the guide sleeve is always moving in the clean area, and enough operating space is reserved; (ii) leave room for the operator to implant the guide wire; and (iii) ensure that the guide sleeve and patient tracer can be tracked by the optical tracker in real time to facilitate real‐time monitoring accuracy.
Guide Wire Placement
Make a 2‐cm incision in the entry points, with blunt separation of subcutaneous tissue. The sleeve is inserted to touch the bone cortex. Confirm whether entry point and direction of virtual guide wire is in accordance with the plan; if not, the surgeon can fine‐tune the path with the robot. Anteroposterior and lateral view images are verified through after the guide sleeve touches the bone surface, to ensure that the implanted path is consistent with the planning path. After confirming that the path is accurate, the guide wire is drilled into the bone passage through the sleeve under fluoroscopy monitoring.
Screw Placement and Verification
After confirming the position of the guide wire, place the cannulated screw. Finally, after confirming the good position of the cannulated screw, remove the guide wire and rinse the incision for suture.
Matters Needing Attention
Personnel Requirements
With the experience of open reduction surgery, when any problem occurs, the surgery can be completed without being limited to robot assistance.
Skill of closed reduction, internal fixation, and scientific surgical planning.
Familiar with the basic principles of robot work and can correctly complete the acquisition of robot images.
Pay attention to the position of the tracer during the operation to minimize the interference of any factors on the tracer and reduce errors.
When the guide device and the guide wire are inserted, try to avoid the impact of soft tissue tension on the premise of reducing local trauma.
Image Collection Requirements
All bone structures and anatomic landmarks of the surgical area are included, ensuring the bone pathways are continuous and complete.
The positioning registration component is clearly displayed in the perspective image.
The navigation camera can simultaneously identify and capture the spatial location information of the patient tracer and the robot tracer.
Collect the images in sequence according to requirements of different surgical methods, making clear the corresponding relation between the planned position image and the verified position image.
Image Drift
The accurate placement of the screw depends on the spatial position of the surgical site matching the image. Various factors, such as excessive traction during the operation, can lead to a change in the spatial position of the surgical site, or the relative displacement of the patient tracer and the surgical site, or interference of the transmission path between the tracer and the infrared optical tracker camera, which can cause the image to be inconsistent with the surgical site, which is called image drift. Surgeons should be able to determine whether the image drift occurs during the operation and verify it. If the image drift cannot be corrected, the image should be collected again.
Surgical Path Review
During the robot‐assisted operation, surgeons should always monitor the running of the system, and take emergency measures immediately in case of, for instance, unexpected movement or equipment failure. Stop the robot and remove all contact parts with the patient for corresponding treatment.
During the implantation placing, C‐arm fluoroscopy should be used for process monitoring, and surgery only can be completed after the implantation is confirmed to be correct.
Operating Room Requirements
The operating room area should be greater than 30 m2, with a good grounding system and power supply conditions.
The operation table should meet the requirements of body position and image collection.
Equipment Maintenance
Use in strict accordance with the operation manual, and use is prohibited without training.
The system has precision components, and the transportation and storage process should be conducted in strict accordance with the requirements of the operation manual.
Carry out regular maintenance and calibration.
Prevent the power supply voltage from being too high or too low. Check the grounding regularly to ensure safety.
When using fumigation for disinfection, the equipment should be pushed out of the fumigation room to avoid corrosion or damage of circuit boards and components.
Attention should be paid to dust prevention and dust should be wiped away frequently.
Electric power shall be applied to dehumidify and moisture‐proof when idle for a long time, especially in the humid southern areas, at least once a week, 2 to 3 h each time, to avoid damage from damp.
List of Names of Coauthors
Hua Chen, Wei Han, Zhi‐yong Hou, Yong‐cheng Hu, Jian Jia, Kai‐nan Li, YanLiao, Hua‐shui Liu, Xin‐long Ma, Da‐hui Sun, Pei‐fu Tang, Wei Tian, Jun‐qiang Wang, Xu Sun, Xin‐bao Wu, Li‐hai Zhang, Shu‐dong Zhang, Dong‐sheng Zhou.
Disclosure: This work was supported by National Key R&D Program of China (2016YFC0105800) and the Science and Technology Commission Project Fund of Beijing (Z161100000116023).
References
- 1. Wong JM, Bewsher S, Yew J, Bucknill A, de Steiger R. Fluoroscopically assisted computer navigation enables accurate percutaneous screw placement for pelvic and acetabular fracture fixation. Injury, 2015, 33: 1064–1068. [DOI] [PubMed] [Google Scholar]
- 2. Holdsworth FW. The classic: Dislocation and fracture‐dislocation of the pelvis. 1948. Clin Orthop Relat Res, 2012, 470: 2085–2089. [DOI] [PMC free article] [PubMed] [Google Scholar]
- 3. Templeman D, Schmidt A, Freese J, Weisman I. Proximity of iliosacral screws to neurovascular structures after internal fixation. Clin Orthop Relat Res, 1996, 329: 194–198. [DOI] [PubMed] [Google Scholar]
- 4. Hinsche AF, Giannoudis PV, Smith RM. Fluoroscopy‐based multiplanar image guidance for insertion of sacroiliac screws. Clin Orthop Relat Res, 2002, 395: 135–144. [DOI] [PubMed] [Google Scholar]
- 5. Miller AN, Routt ML Jr. Variations in sacral morphology and implications for iliosacral screw fixation. J Am Acad Orthop Surg, 2012, 20: 8–16. [DOI] [PubMed] [Google Scholar]
- 6. Conflitti JM, Graves ML, Chip Routt ML Jr. Radiographic quantification and analysis of dysmorphic upper sacral osseous anatomy and associated iliosacral screw insertions. J Orthop Trauma, 2010, 24: 630–636. [DOI] [PubMed] [Google Scholar]
- 7. Simonian PT, Routt ML Jr, Harrington RM, Mayo KA, Tencer AF. Biomechanical simulation of the anteroposterior compression injury of the pelvis. An understanding of instability and fixation. Clin Orthop Relat Res, 1994, 309: 245–256. [PubMed] [Google Scholar]
- 8. Li J, Wu T, Xu Z, Gu X. A pilot study of post‐total knee replacement gait rehabilitation using lower limbs robot‐assisted training system. Eur J Orthop Surg Traumatol, 2014, 24: 203–208. [DOI] [PubMed] [Google Scholar]


