Abstract
The placenta is a key organ during pregnancy that serves as a barrier to fetal xenobiotic exposure and mediates the exchange of nutrients for waste. An assay is described here to perfuse an isolated rat placenta and evaluate the maternal-to-fetal translocation of xenobiotics ex vivo. In addition, the evaluation of physiological processes such as fluid flow to the fetus and placental metabolism may be conducted with this methodology. This technique is suitable for evaluating maternal-to-fetal kinetics of pharmaceutical candidates or environmental contaminants. In contrast to current alternative approaches, this methodology allows the evaluation of the isolated maternal-fetal vasculature, with the systemic neural or immune involvement removed, allowing any observed changes in physiological function to be attributable to local factors within the isolated tissue.
Keywords: Developmental Biology, Issue 147, placenta, perfusion, xenobiotic transfer, engineered nanomaterial, placental pharmacokinetics, fetal exposure
Introduction
By maintaining morphological structure and physiological responsiveness, organ perfusion has been an accepted system- or tissue-based approach for analyzing metabolic function. These perfusion techniques allow for the ex vivo examination of intact tissue responses to a variety of pharmacological and mechanical stimuli. Perfusion of human placenta was initially described in 1958 to identify the hormonal effects on the metabolic activity of the citric acid cycle; having previously been identified in tissue homogenates, Troen and Gordon recognized the need to clarify endocrine activity using a novel physiological approach1. In the same era, single-perfusion (maternal-to-fetal or fetal-to-maternal) strategies were described in large2,3 and small4 animal models to understand the placental transfer of sugars, salts, and antipyrine drugs. In vivo and ex vivo dual-perfusion (coordinated maternal and fetal perfusion) techniques were described to further characterize placental transfer using in vivo5 and ex vivo6,7,8 methodologies. Technological advancements in transmission and scanning electron microscopy allowed researchers to verify the structural and functional integrity of human placental tissues after perfusion9.
While perfusion of human placental tissues and individual cotyledon is most relevant, the rapid development of pharmacological agents and environmental contaminants necessitates the use of an animal perfusion model for the early screening of xenobiotic transfer across the placental barrier. This placental perfusion method allows for the evaluation of transfer across the placental barrier using more easily attainable and physiologically relevant rat placenta. In addition, fluid flow across the placental barrier over a period of time after an exposure can be evaluated by measuring the volume of perfusate coming from the umbilical artery. By virtue of allowing placental perfusion from both the maternal and fetal circulations, this dual-flow whole organ approach can be advantageous compared to current in vitro and in vivo approaches. This method allows the administration of a xenobiotic through the maternal aspect to be measured from perfusate that emerges across the placenta through the umbilical vein, or vice versa. The protocol presented here will describe the transfer of 20 nm polystyrene (a common nanoplastic used in food and medical products) from the maternal uterine artery to the fetal compartment and an associated decrease in fluid flow across the placenta to illustrate the use of this method in multiple physiological, pharmacological, and toxicological settings to assess placental transfer, metabolism, and physiological alterations affecting maternal and/or fetal flow.
Protocol
All experimental procedures were approved by the Institutional Animal Care and Use Committee of Rutgers University.
1. Preparation before the experiment
NOTE: These steps may be performed within days/weeks prior to the experiment.
-
Modify the vessel chamber.
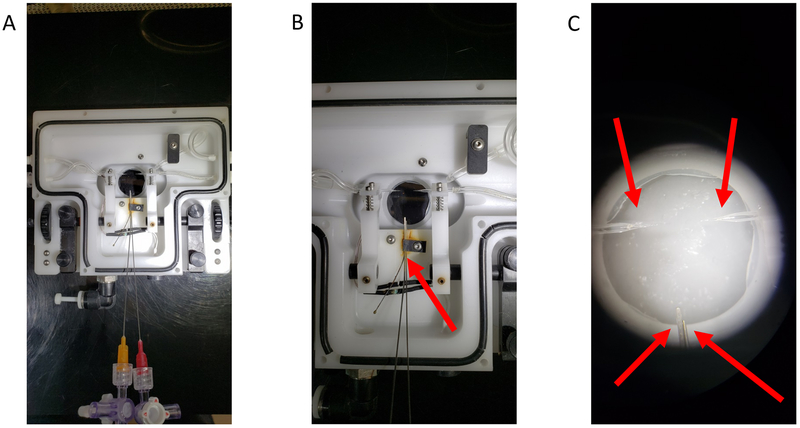
NOTE: Figure 1A,B shows the modified single vessel chamber.- Move the thermistor sensor from beneath the clip and bend it so that it hangs freely in the perfusion bath (Figure 1B).
-
Install two 4-inch blunt-tip stainless steel needles with standard luer connection hubs, one 25 G and one 23 G secured beneath the thermistor clip and add a 3-way stopcock to allow for cannulation of the umbilical vasculature (Figure 1B).NOTE: The luer connections of different gauge sizes are color coded. This facilitates easy identification of vessels during and after the experiment.
-
Install two 70–100 μm glass micropipettes. For further information on these procedures, please review the following references10,11.
NOTE: The tip diameter commonly used in these experiments is in the range of 70–100 μm. Tip diameters larger than this range may add difficulty to the cannulation process while tip diameters smaller than 60 μm may puncture the vascular wall during cannulation.
-
Prepare ties from sterile nylon suture (for proximal and distal ends of the uterine artery) and from black braided silk non-sterile suture (for the umbilical vessels). Make single ties by looping suture as to initiate a square knot or tie a shoe, as described previously11.
NOTE: Single ties are commonly made and kept in a Petri dish filled with a small layer of silicone rubber to help work on a sticky background.
Prepare 2 L of physiological salt solution (PSS) containing, in mmol/L, 129.8 NaCl, 5.4 KCl, 0.5 NaH2PO4, 0.83 MgSO4, 19 NaHCO3, 1.8 CaCl2, and 5.5 glucose. Adjust the pH to 7.40 ± 0.02 by slowly adding a few drops of acid (1 M hydrochloric acid) or base (1 N sodium hydroxide) to the solution and wait at least 20 s before reading the adjusted pH measurement. Store PSS until ready for use in the refrigerator to reduce contamination but do not store for more than 2 weeks.
Label microcentrifuge tubes for collecting “maternal” and “fetal” effluents at each time point, i.e., “MBaseline, M10, M20, …” up to the 180 min timepoint. Prepare the same for fetal effluents (FBaseline, M10, M20, ….).
Calibrate all equipment used within the system, including the circulating bath temperature and blood pressure monitors associated with maintaining uterine (80 mmHg) and umbilical (50 mmHg) perfusate pressures.
-
Prepare a dissection chamber (4” diameter × 1” deep) or a circulating heater dish by filling a layer (< 0.25”) of silicone rubber. This modification must be done in advance and as it will take 12–24 h for the rubber to dry.
NOTE: Use of a recirculating heater/chilling dish is recommended for novice surgeons, as the dish will not move and the tissue will maintain a consistent temperature.
Figure 1: The modified single vessel chamber.
(A) An overview of the modified chamber. (B) A close-up image of the blunt-tip needles secured within the vessel chamber. The red arrow indicates the thermistor clip that has been altered to hold the needles in place for umbilical cannulation. (C) A representative image of the four cannulas prepared for tissue cannulation. Red arrows point to each of the four cannulas.
2. Preparation of the surgical station and equilibration of equipment
Turn on all equipment that supports the perfusion system to check for proper function. Remove the PSS from refrigeration and warm to room temperature. The PSS will be used as both a perfusate and a superfusate.
Place a small bubbling stone to deliver a gas mixture into the superfusate reservoir. Commonly used mixtures include 21% O2, 8% O2, 3% O2, and 0% O2. Turn on the gas to provide small bubbles to the superfusate solution. Adjust the delivery of gas to avoid splashing.
Arrange the animal dissecting station by checking anesthetic, arranging surgical equipment, and preparing suture ties. Prepare the dissecting chamber by collecting dissecting pins, turning on the chiller (or retrieving ice), and filling the dissecting chamber (lined with rubber silicone) with cold PSS.
Gently fill all chambers, needles, glass micropipettes, tubing, and reservoirs with warmed PSS, carefully watching for and eliminating air bubbles by suctioning them out with a fine tip transfer pipette. Turn all 3-way stopcocks with “off” facing the direction of the pipette to secure the fluid within the pipette.
Place a single tie on each of the two glass micropipettes prepared for uterine cannulation and on the two blunt tip needles designated for umbilical cannulation. Secure ties to the pipettes and blunt tip needles in order to prevent loss during chamber movements (Figure 1C).
3. Placental harvesting
-
Anesthetize a pregnant female rat on gestational day 20 with 5% isoflurane for about 4 min or until the animal exhibits labored breathing. Move the animal to the nose cone and administer 2.5%−3% isoflurane to maintain anesthesia. Confirm unconsciousness by a lack of toe pinch reflex.
NOTE: The use of a rat at gestational day 20 is presented in this protocol. However, the protocol remains the same if experimental conditions require placental evaluation to take place earlier in gestation.
Identify and isolate the uterine horn (right or left) of choice by lifting out and spreading out long-ways outside of the rat carcass. Using a braided silk suture, tie off the uterine artery at the ovary end and vaginal end of the horn. Include the ovary inside of the suture with the uterine horn.
-
Using surgical scissors, excise away the uterine horn by making cuts on the proximal side of the ovary tie and distal side of the vaginal tie, leaving the uterine horn tied off with the sutures on both ends. Transfer the uterine horn into the dissecting dish lined with silicone rubber and filled with cold (4°C) PSS. Regardless of whether the right or left horn is chosen, maintain that same side for selection in each experiment for consistency.
NOTE: For fetal anesthesia, pups are kept in ice-cold PSS. Therefore, PSS temperature within the dissecting chamber is maintained by chilled circulating bath or dissecting chamber should be kept on ice.
NOTE: At this point anesthetized dam may be euthanized per laboratory IACUC protocol approval. In this case, euthanasia occurs via pneumothorax (by cutting the diaphragm) and removal of the maternal heart.
-
Gently push a dissecting pin through the uterine horn into the silicone rubber, with the ovary side to the left and vaginal side to the right to visualize the uterine vasculature. This will stabilize the uterus and prevent movement of the tissue during dissection of the fetal compartment. Select a maternal-placenta-fetal unit central to the horn and ligate the uterine artery and vein with surgical scissors. Cut the uterine muscle proximal and distal to the selected placenta and fetus. The uterine muscle can be retracted by pulling it to the side; it is important to leave it intact but pull it away from covering the fetal pup.
NOTE: Selection of the maternal-placenta-fetal unit should be based on the length of the uterine artery segment on either side of the arcuate artery. Longer segments will permit more successful cannulation.
Using fine forceps and scissors, remove the amniotic membrane from the fetal surface of the placenta, taking care to avoid the umbilical cord.
Unravel and ligate the umbilical cord to separate the fetal pup.
Identify the umbilical artery (thicker vessel) and vein (thinner vessel). Mark the umbilical vein for easy identification by cutting it slightly shorter than the umbilical artery.
Gently separate the umbilical artery and vein from each other.
The entire placental unit including the uterine vasculature, uterine muscle, placenta, and umbilical cord, may be cut and removed.
4. Placental perfusion
Maintain anatomical blood flow retaining correct distal-to-proximal orientation of uterine artery, place the placental unit (composed of the uterine vasculature, uterine muscle, placenta, and umbilical cord) into the modified isolated vessel chamber filled with warm, oxygenated PSS.
Using a pair of fine forceps in each hand, cannulate the proximal and distal ends of the uterine artery onto the glass micropipettes.
Tightly secure the uterine artery using the sterile nylon suture tie previously secured onto the micropipette. NOTE: Two-tie loops (knot) may be necessary; however, a single tie loop allows for greater adjustment.
Cannulate the umbilical artery (fetal-to-maternal blood flow) onto the 23 G (larger) needle and secure it with black braided silk suture.
Cannulate the umbilical vein (maternal-to-fetal blood flow) onto the 25 G (smaller) blunt needle and secure it with black braided silk suture.
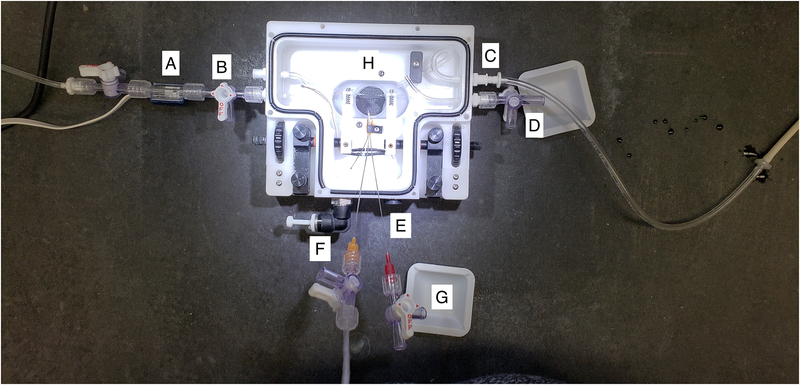
Move to the placental perfusion station and backfill all stopcocks and tubings to prevent air bubbles. Connect all tubings according to Figure 2.
Place small weighing boats under the distal cannulation of maternal uterine artery and the needle cannulation of fetal umbilical vein to catch the effluent that will emerge during the procedure.
Turn on the peristaltic pump, pressure controller, and pressure monitor and open the stopcock to permit fluid flow through the tubing toward the pressure transducer, but not yet to the placenta. Slowly increase the pressure to 80 mm Hg.
-
Slowly turn the stopcock to the placenta to open and watch for leaks inside the chamber and around the ties.
NOTE: If the peristaltic pump is running at a high speed, re-evaluate the proximal uterine cannulation and ties for fluid leaks. If identified, leaks must be remedied. Also note, while the mean uterine artery pressure will remain constant (set to 80 mmHg), the fluid flow rate may be variable depending on the vascular and placental physiological responses. Quantification of the fluid flow may be identified as an experimental variable in response to xenobiotic exposure.
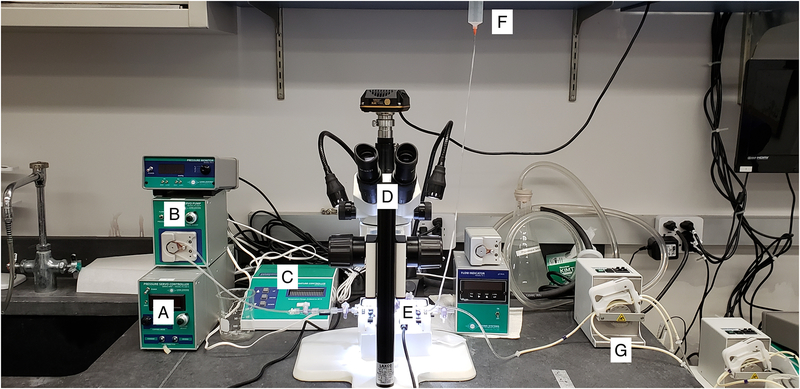
Turn the stopcock to permit fluid flow into the umbilical artery. Set the pressure to approximately 50 mmHg, which can be implemented with a peristaltic pump (Figure 3) or a hydrostatic column.
-
Refill all reservoirs (uterine, umbilical, and superfusate) to maintain fluid volume throughout the experiment.
NOTE: Once perfusion has been initiated and experiment is underway, anesthetized pups remaining in the dissecting dish may be assessed for viability by touching the pups with forceps to elicit a neurological response. Exsanguination of the pups will occur through hysterectomy of uterine horn; further euthanasia can be completed through approved IACUC protocols. In this case, opening the amniotic sac in the cold PSS and creating a pneumothorax by cutting the ribs.
Figure 2: A closer view of the placental perfusion chamber.
(A) This represents the tubing attached to the pressure transducer and cannulated the proximal maternal uterine artery, or the “inflow”. Pressure is set to a constant 80 mmHg as defined by the literature. (B) This represents the chamber drain port of the superfusate surrounding the placental tissue during perfusion. (C) This represents the chamber inflow of the superfusate to bathe the placenta with warmed PSS during perfusion. (D) This represents the distal maternal uterine port where effluent from the uterine perfusion may be collected. (E) This represents the temperature port, where the vessel chamber can be attached to a thermometer and heater to maintain a consistent temperature throughout the experiment. (F) This represents the umbilical artery cannulation. The umbilical artery is pressurized to 50 mmHg to allow for countercurrent flow at the level of the placenta. (G) This represents the umbilical vein effluent collection. Fluid that flows toward the fetal compartment during perfusion will be collected here. (H) This is the center of the perfusion system, where the placenta is cannulated and maintained throughout perfusion.
Figure 3: A view of the placental perfusion system.
(A and B) The pressure control system used to monitor and maintain 80 mmHg of perfusate through uterine artery. (C) This represents the thermo-regulation of the perfusion chamber. (D) Microscope. (E) Perfusion chamber. (F) Gravity-fed umbilical artery perfusion set at 50 mmHg. (G) A peristaltic pump used to fill and drain placental superfusate PSS.
5. Mock experiment
After cannulation and initiation of the PSS perfusion, let tissues equilibrate for 30 min to allow the vasculature to adjust to the new fluid flow. Suction up the effluent by a pipette and save it in a correspondingly labeled microcentrifuge tube.
After equilibration, establish the baseline perfusion by collecting effluents for 10 min from both weighing boats in microcentrifuge tubes and measuring the volume of fluid that emerges through the uterine artery and umbilical vein.
-
Initiate sample collection at 10-minute intervals by collecting the effluents from the distal uterine artery and umbilical vein. For example, administer a 900 μL bolus dose of 20 nm rhodamine-labeled polystyrene nanoparticles (8 × 10¹⁴ particles/mL) suspended in 0.01% surfactant to the line perfusing the uterine artery to identify the time course passage of xenobiotic nanoparticles across the placental barrier.
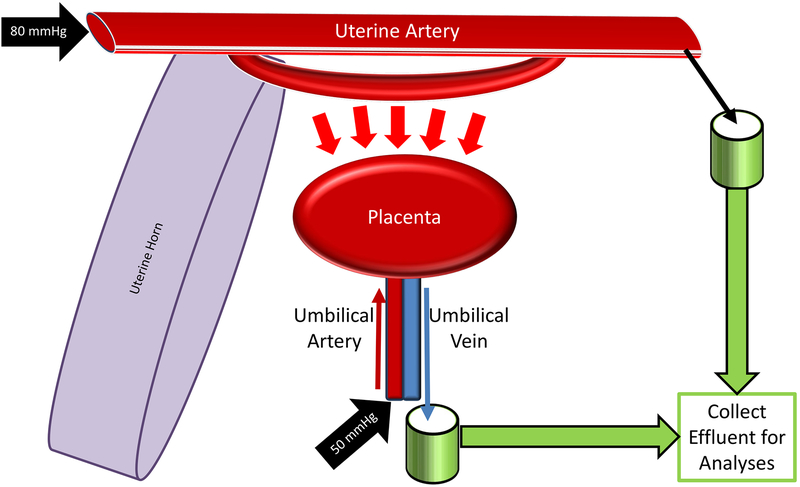
NOTE: These effluent samples will allow for the measurement of contaminants within the fluid (either xenobiotic, pharmacologic, or metabolite) and provide the rate of fluid flow through the uterine artery or across the placenta and into the fetal compartment (Figure 4).
After bolus infusion, collect samples from the distal uterine artery and fetal umbilical vein effluent every 10 min for a total of 180 min after infusion.
Figure 4:
Schematic of the placental perfusion system.
6. Cleaning the equipment
After each experiment, remove the placental unit from the pipettes. All sutures may be saved to be reused in future experiments. The placental tissue may be saved for additional histological or mechanistic studies.
-
Clean all tubings and cannulas of the perfusion system with 70% ethanol followed by distilled water and vacuum dry.
NOTE: If tubings or pipettes begin to discolor or appear damaged, replace prior to the next experiment. Further, after an experimental cohort is complete (e.g., all studies pertaining to a single contaminant), replace all tubings within the chamber to prevent cross contamination.
Representative Results
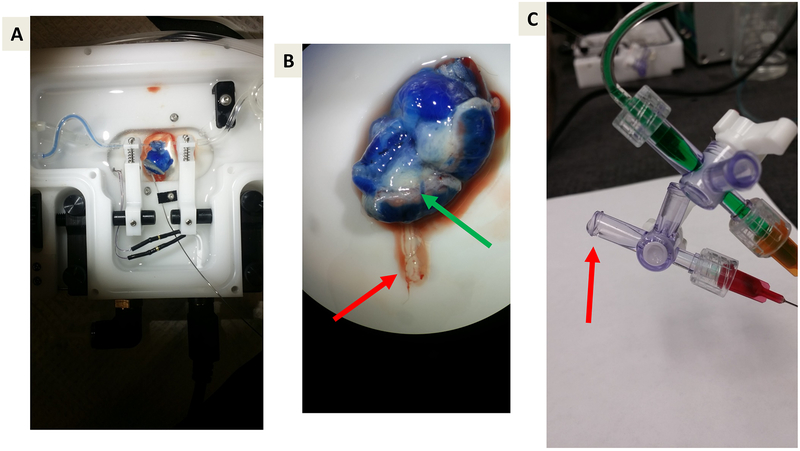
Figure 5 shows the proof-of-principle experiments using Evan’s blue dye, allowing us to test the system and visualize appropriate fluid and placental barrier function and to prevent containment transfer to the fetal compartment. The Evan’s blue dye reached and perfused the tissue of the placenta within this system (Figure 5A). Upon further investigation, it is clear that the Evan’s blue dye did not enter the fetal umbilical vein (Figure 5B), which is expected as Evan’s blue dye is bound to albumin.
Figure 5: Representative images of proof-of-principle experiments using Evan’s blue dye.
(A and B) Proof-of-principle that Evan’s blue will perfuse the uterine vasculature, uterine muscle, and placenta but will not cross the placental barrier due to albumin binding. The green arrow indicates the blue venous drainage from the placenta back to the maternal circulation. The Red arrow indicates the umbilical vein effluent toward the fetal compartment. Note the lack of blue dye. (C) A representative image of collecting effluent draining from the umbilical vein. The red arrow indicates drop formation prior to collection.
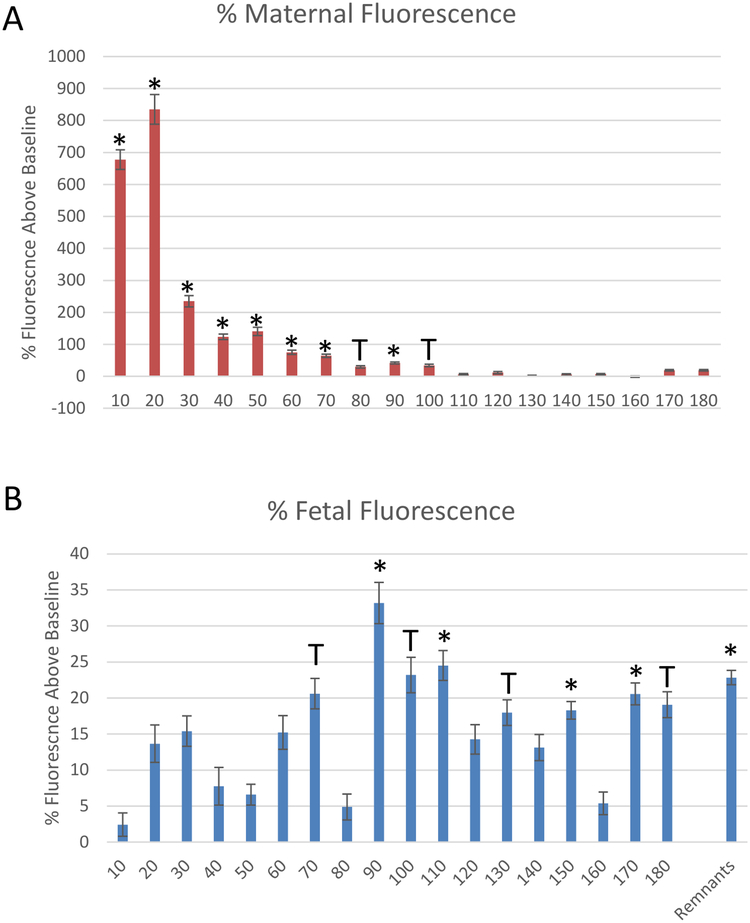
Figure 6 shows data for the mock experiment described in this protocol. Effluent samples from the distal end of the uterine artery and fetal umbilical vein were measured at each 10-minute segment to evaluate the fluid flow over time after the bolus dose was administered to the maternal uterine artery (Figure 6). Reduced fluid transfer to the fetal compartment within 10 minutes after polystyrene infusion was identified. To quantify the transfer of polystyrene to the fetal compartment during the time course when it occurs, 25 μL of the perfused fluid from each time point was placed in a 96 well plate in duplicate to measure the sample fluorescence. Fluorescence was determined by spectroscopic reading at 546/575 nm (ex/em) using a fluorescent microplate reader. Polystyrene transfer to the fetal compartment occurred within 10 minutes and peaked at 20 minutes and continued for 90 minutes (Figure 6B).
Figure 6: Data derived from the mock experiment.
Fluorescence measurements of rhodamine-labeled polystyrene nanomaterials, normalized to baseline fluorescence, through the collection of (A) uterine artery and (B) fetal umbilical vein effluents. Mean normalized to baseline fluorescence ± standard error (SE). *: p < 0.05 and T: p < 0.1 via analysis of variance (ANOVA).
A subset of perfused placental tissues were saved for histopathology and morphological assessments. The tissues were formalin-fixed and hematoxylin and eosin stained and reviewed by a board certified veterinary pathologist. These experts identified no structural abnormalities in placentas perfused by only PSS, or PSS with the bolus dose of rhodamine-labeled polystyrene.
Discussion
This perfusion method allows for rapid assessment of placental barrier and physiological function of the uterine vasculature and trophoblast layer. Cannulation and perfusion of the proximal to distal ends of the maternal uterine artery simulates the physiology of maternal blood flow through this major vessel responsible for sending blood to the developing fetus. This methodology allows for physiological evaluation of the isolated maternal, placental and umbilical vasculature, and therefore changes in physiology may be identified as vascular pathology; the immune and neural innervations are removed in the ex-vivo procedure. To ensure proper evaluation, it is therefore critical to cannulate these vessels carefully as to not create any tears or punctures in the vessel walls, and to remove air bubbles. Gas emboli may cause damage to the endothelial layer of the vasculature or obstruct blood vessels. By maintaining the vascular connections between the uterus, placenta and fetus during dissection, the evaluation of fluid and translocation to the fetus can be observed. With the administration of a xenobiotic, in this case 20 nm polystyrene, kinetics to the distal end of the uterine artery and through the placenta to the fetal compartment can be evaluated by analysis of effluents over a time course of 180 minutes.
While a dual-perfusion model was described and the transfer of particles and fluid from the maternal to the fetal compartment was monitored in this article, assessments can also be made in reverse from the fetal to the maternal compartment. One limitation of the method described here is that the distal uterine vein was not cannulated or sampled. In future studies, especially those focused on the fetal-to-maternal transfer, it will be important to cannulate and sample the distal uterine vessel. The effluents taken from this mock experiment were used to assess xenobiotic transfer; however, a wide array of assessments pertaining to endocrine and molecular placental functions or fetal nutrition may be performed.
The strengths of this protocol far outweigh its minor limitations. The preparation maintains the physiological structure and integrity of a whole organ to assess experimental conditions. Ex vivo placental perfusion is a scientific progression from cellular-based in vitro to whole animal exposure to properly determine reproductive risk assessment. This may be considered to be a valuable technique for studies evaluating placental pharmacologic drug disposition, pharmacokinetics, toxicology, physiology, and maternal-fetal medicine.
Acknowledgments
This work was supported by the National Institute of Environmental Health Sciences (R00-ES024783), Rutgers Center for Environmental Exposures and Disease (P30-ES005022), and Rutgers Joint Graduate Program in Toxicology (T32-ES007148). We would also like to thank Drs. Michael Goedken, Marianne Polunas, and Pedro Louro for their technical expertise and Dr. Adam Goodwill for his assistance in designing our perfusion schematic (Figure 5).
Footnotes
Video Link
The video component of this article can be found at https://www.jove.com/video/59412/
Disclosures
The authors have nothing to disclose.
References
- 1.Troen P, Gordon EE Perfusion studies of the human placenta. I. Effect of estradiol and human chorionic gonadotropin on citric acid metabolism. Journal of Clinical Investigation. 37, 1516–1523 (1958). [DOI] [PMC free article] [PubMed] [Google Scholar]
- 2.Alexander DP, Huggett AS, Nixon DA, Widdas WF The placental transfer of sugars in the sheep: the influence of concentration gradient upon the rates of hexose formation as shown in umbilical perfusion of the placenta. Journal of Physiology. 129, 367–383 (1955). [DOI] [PMC free article] [PubMed] [Google Scholar]
- 3.Alexander DP, Andrews RD, Huggett AS, Nixon DA, Widdas WF The placental transfer of sugars in the sheep: studies with radioactive sugar. Journal of Physiology. 129, 352–366 (1955). [DOI] [PMC free article] [PubMed] [Google Scholar]
- 4.Dancis J, Money WL Transfer of sodium and iodo-antipyrine across guinea pig placenta with an in situ perfusion technique. American Journal of Obstetrics and Gynecology. 80, 215–220 (1960). [DOI] [PubMed] [Google Scholar]
- 5.London WT, Money WL, Rawson RW Placental Transport of I-131-Labeled Thyroxine and Triiodothyronine in the Guinea Pig. Endocrinology. 73, 205–209 (1963). [DOI] [PubMed] [Google Scholar]
- 6.Stulc J, Stulcova B, Svihovec J Transport of calcium across the dually perfused placenta of the rat. Journal of Physiology. 420, 295–311 (1990). [DOI] [PMC free article] [PubMed] [Google Scholar]
- 7.Goeden N, Bonnin A Ex vivo perfusion of mid-to-late-gestation mouse placenta for maternal-fetal interaction studies during pregnancy. Nature Protocols. 8, 66–74 (2013). [DOI] [PMC free article] [PubMed] [Google Scholar]
- 8.Bond H et al. Artificial perfusion of the fetal circulation of the in situ mouse placenta: methodology and validation. Placenta. 27 Suppl A, S69–75 (2006). [DOI] [PubMed] [Google Scholar]
- 9.Illsley NP, Fox H, Van der Veen F, Chawner L, Penfold P Human placental ultrastructure after in vitro dual perfusion. Placenta. 6, 23–32 (1985). [DOI] [PubMed] [Google Scholar]
- 10.Davis MJ, Kuo L, Chilian WM and Muller JM Isolated, Perfused Microvessels In: Barker JH, Anderson GL and Menger MD, eds. Clinically Applied Microcirculation Research. 1 ed. Boca Raton: CRC Press, 435–456 (1995). [Google Scholar]
- 11.Butcher JT, Goodwill AG, Frisbee JC The ex vivo isolated skeletal microvessel preparation for investigation of vascular reactivity. Journal of Visualized Experiments. (62), 3674 (2012). [DOI] [PMC free article] [PubMed] [Google Scholar]


