Abstract
Background:
Critical-size bone defects are defined as bone defects where spontaneous regeneration is not expected without treatment1. The characteristics of bone defects (etiology, location, size, presence of infection, and soft-tissue conditions) vary greatly and, to be effective, the treatment method should address this variability. The induced-membrane technique, or Masquelet technique, is a method for treating critical-size bone defects2,3 of various sizes and anatomic locations. It has been used to treat infected and noninfected bone defects and may be performed with a variety of fixation methods2,3.
Description:
The induced-membrane technique is a 2-stage procedure. The first stage consists of debridement followed by insertion of a polymethylmethacrylate (PMMA) spacer in the bone defect. The presence of the PMMA leads to a foreign-body reaction with the development of a thick pseudosynovial membrane that is extremely vascularized and rich in growth factors. The filling of the bone defect with the cement spacer prevents fibrous tissue invasion and allows the development of an optimal vascularized gap for bone-grafting. After 6 to 8 weeks, the membrane around the spacer is carefully opened for the removal of the spacer, which is then replaced by bone graft2,3, which can be expanded with allograft or biomaterials.
Alternatives:
Alternatives include vascularized or nonvascularized autologous bone graft, allograft, bone transport methods, titanium cages, megaprostheses, shortening, and amputation.
Rationale:
Posttraumatic bone defects frequently are associated with soft-tissue injury and infection that impair the local vascularization and the healing potential. The highly vascularized induced membrane may play a role in restoring the local regenerative capacity. Numerous studies have demonstrated its successful use in the treatment of posttraumatic bone defects in the hand, forearm, humerus, femur, tibia, and foot. The induced-membrane technique is especially advantageous in the treatment of infected bone defects because the presence of the spacer helps in the treatment of the infection by reducing dead space, acting as a local antibiotic carrier, and promoting some degree of bone stability3-5.
Introduction
The induced-membrane technique (Figs. 1 through 10 and Video 1) involves meticulous debridement with complete removal of all devitalized tissue followed by proper soft-tissue reconstruction when necessary and insertion of a polymethylmethacrylate (PMMA) spacer to fill the bone void.
Fig. 1.
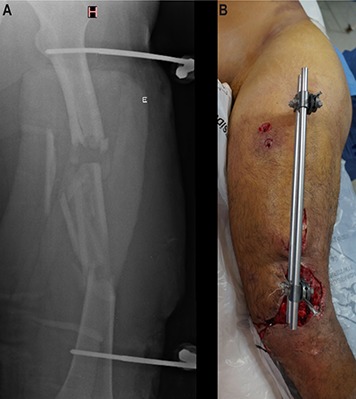
Figs. 1 through 10 A 35-year-old man who was involved in a motorcycle accident was treated initially in another hospital, where he underwent orthopaedic damage-control surgery and then was transferred to our institution after 5 days. (This case was not included in our original study of the technique5.) Fig. 1 Preoperative radiograph (Fig. 1-A) and appearance of the soft tissue (Fig. 1-B) on day 11 after the injury, when the external fixator on the left femoral fracture was primarily converted to a reamed intramedullary nail.
Fig. 10.
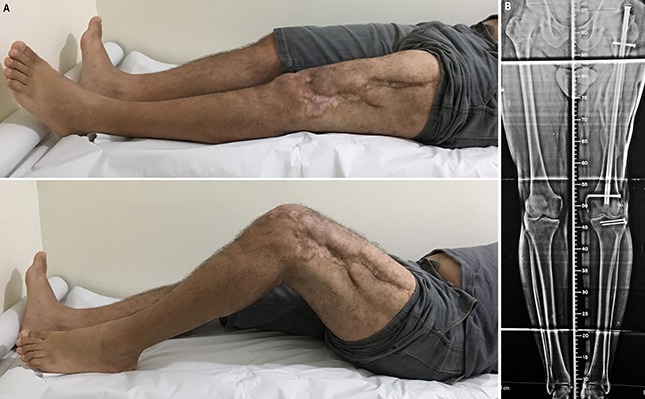
Clinical photographs and radiograph made at the time of the 4-year follow-up.
Video 1.
Essential steps of the induced-membrane technique.
Indications & Contraindications
Indications
Acute and chronic bone defects of various etiologies (posttraumatic, post-infection, and post-tumor resection).
Bone defects in various anatomic locations (hand, forearm, humerus, femur, tibia, foot, and others).
Bone defects of any size.
Bone defects of any type and shape (partial or complete, metaphyseal or diaphyseal).
Infected and noninfected bone defects.
Adults and children.
Soft-tissue envelope in good condition or amenable to reconstruction.
Contraindications
Articular osteochondral defects.
Soft-tissue defects that do not allow coverage of the bone defect and are not amenable to being reconstructed.
Previous irradiation following tumor excision.
In our opinion, there is no evidence that tobacco/nicotine usage, older age, immunosuppression, or ongoing cytotoxic chemotherapy will result in more complications in patients treated with the induced-membrane technique.
Step-by-Step Description of the Procedure
Step 1: Preoperative Planning
Detailed preoperative planning is important.
Order clinical, laboratory, and imaging studies to confirm or rule out infection3,6,7.
Manage comorbidities preoperatively to minimize the risk of complications.
Patient positioning, approach, and tourniquet use depend on the characteristics of the lesion and the surgeon’s preferences.
During surgical planning, take into consideration surgical scars to be included in the surgical approach and the soft-tissue coverage to be performed to cover the bone defect.
Adequate bone stability is essential for treatment. When deciding on the bone fixation method, consider the characteristics of the fracture and its location as well as the presence of infection and soft-tissue conditions. Options for internal and external fixation should be available3,4. If an infection is suspected, plan to remove previous implants and employ temporary external fixation in the first stage of the treatment. In cases with no signs of infection, plan to perform bone stabilization with internal fixation.
Inform the patient that a long period of hospitalization and multiple surgical procedures might be necessary.
Step 2: Debridement (Figs. 2 and 3 and Video 2)
Fig. 2.
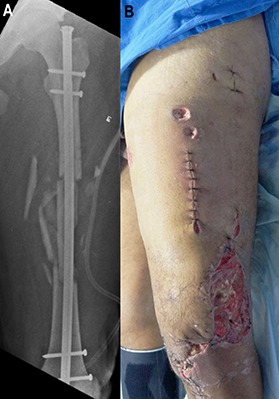
On day 16 after the injury and 5 days after internal fixation of the femoral fracture, the patient returned to the operating room because of the suspicion of infection. Fig. 2-A Preoperative radiograph. Fig. 2-B Preoperative appearance of the soft tissue.
Fig. 3.
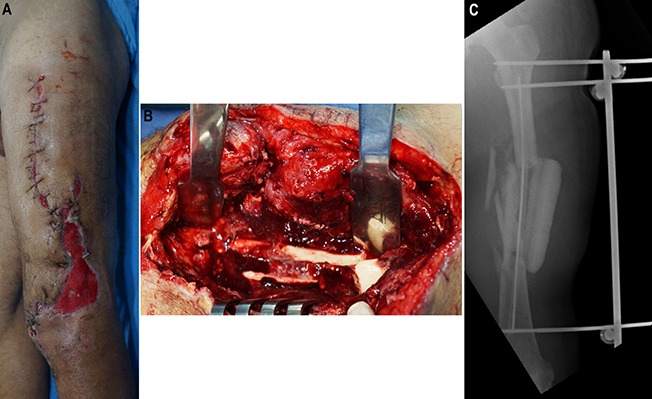
Day 31 after the injury. Infection with Enterobacter cloacae was confirmed. The patient was using an antibiotic (meropenem) chosen on the basis of culture and had already undergone 3 debridements. Fig. 3-A Preoperative appearance of the soft tissue. Fig. 3-B Intraoperative photograph showing infection in the medullary canal. The intramedullary nail was removed, and the canal was reamed. Debridement of bone and soft tissue resulted in a partial bone defect with an estimated size of 6 cm (12 cm involving 50% of the bone diameter). Fig. 3-C Postoperative radiograph. An intramedullary PMMA-with-antibiotic spacer (2 g of meropenem per 40-g package of PMMA) was used in the bone defect. (A smaller spacer was used in this case with active intramedullary infection to allow drainage of the canal). An external fixator was applied to provide bone stability.
Debridement of all devitalized tissue is essential.
Approach the fracture by extending the wound in open fractures and by using the previous surgical skin incision in reoperations.
Remove previous implants.
Bone resection is based on intraoperative visual inspection, and the paprika sign (bleeding from the edges) helps to identify viable tissue. Regular bone edges are not necessary, so no healthy bone tissue needs to be resected to create a flat surface.
Perform sufficient soft-tissue debridement to guarantee that all nonviable (nonbleeding) tissue is removed.
Obtain at least 3 tissue samples from the bone defect area and the medullary canal for microbiological analysis.
Also obtain a sample for histological analysis to help differentiate wound contamination from bone infection and acute from chronic bone infection.
Irrigate the wound with saline solution during and after debridement.
When soft-tissue reconstruction is required, the flap can be created at this step or later, after bone fixation.
Video 2.
Presence of seropurulent hematoma during wound debridement.
Step 3: Bone Stabilization
Stability is a central element in the healing of soft tissue and the management of infection.
Prepare the operative field again (changing surgical drapes and gloves), and discard the instrument used in the debridement.
The bone defect can be stabilized either with external fixation or, in selected cases with no evidence of infection or soft-tissue compromise, with open reduction and internal fixation.
Attempt to regain the length of the limb with manual traction, an AO distractor, or an AO articulated tension device.
Check reduction and limb alignment visually and with image intensification.
Step 4: PMMA Spacer (Videos 3 and 4)
Bone cement without antibiotics favors bacterial adhesion, so add antibiotics to the bone cement when there is a high risk of infection.
When using an antibiotic, mix it with the cement intraoperatively. Select the antibiotic according to the pathogen. When the pathogen has not been identified, vancomycin alone or in combination with an aminoglycoside (gentamicin or tobramycin) is the most frequently used for mixture with the cement.
Recommended doses of antibiotic for a 40-g cement package are: vancomycin, 4 g; tobramycin, 3.6 g; gentamicin, 0.5 to 3 g; meropenem, 2 g; and clindamycin, 1 g. Those values are a reference and may vary depending on the amount of cement to be implanted8,9. Recommended dosages may be used in the preparation of antibiotic cement spacers, pearls, or cement rods8,9. Antibiotics in liquid form may also be used10,11.
The addition of a large amount of antibiotics alters the properties of the cement. Curing is faster but it does not hinder the preparation of the spacer. Adding an extra monomer is an option when a more moldable cement is needed (for preparation of intramedullary spacers).
Cement should wrap the bone edges, extending 2 to 3 cm over each of the extremities of the bone defect2. The diameter of the spacer should also be slightly larger than the bone diameter to leave an adequate cavity for the bone graft and allow closure of the membrane over the graft and the wound without tension. However, very large spacers increase tension in the soft tissues, making wound closure difficult, and should be avoided.
Spacers produce high temperatures during curing and may damage the surrounding tissues. Surgical compresses soaked with cold saline solution or irrigation of the spacer with saline solution help reduce the heat in the soft tissues2.
Video 3.
Preparation of cement with antibiotic. The antibiotic powder is added to the polymer and mixed. Then the monomer is added and mixed. When the antibiotic is added in the liquid form, most authors recommend that it be mixed with the monomer beforehand10,11. However, we have added the liquid antibiotic after the monomer has been mixed into the polymer and have not observed changes in the polymerization or the macroscopic characteristics of the cement.
Video 4.
Placement of the cement in the pasty state within the bone defect and molding the spacer by hand. (The patient shown in this video is not the same patient seen in the article.)
Step 5: Wound Closure
Adequate soft-tissue coverage is essential; the entire spacer must be covered.
Close the wound, avoiding tension to prevent ischemia.
In cases requiring soft-tissue reconstruction, the flap should cover the spacer and the bone extremities in the area of the bone defect. If the flap cannot cover the wound entirely, muscle or subcutaneous tissue might be managed with vacuum-assisted closure (VAC) and skin graft can be applied later.
Step 6: Care After First Stage of Procedure
Severe infections may require supplementary surgical procedures for infection control.
Systemic antibiotics are administered, and, in culture-positive cases, treatment is extended for at least 6 weeks.
Severe infections occasionally require additional procedures for debridement, and the spacer should be changed during those procedures. At each debridement session, retrieve tissue samples from the area of the bone defect for microbiological analysis.
The day of the PMMA spacer insertion is defined as day zero of treatment and is used to schedule spacer exchange and follow-up visits.
Estimate the size of the bone defect. Measure the distances between the 4 cortices at the site of the bone defect on radiographs, and use the average measurement to define the final size of the defect.
When internal fixation is not possible after debridement, it may be done later, during the bone graft surgery. If an external fixator was in place for an extended period, the Schanz screws can be moved to a new position (a pin holiday) or removed to allow the soft tissue to heal (Figs. 4 and 5).
Consider the need for thromboprophylaxis.
Fig. 4.
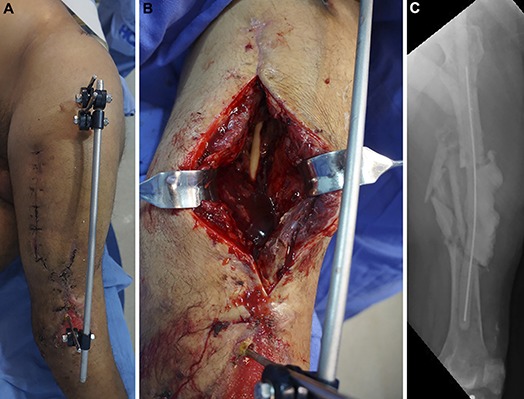
Day 58 after the injury. The spacer had been in the bone defect for 27 days. The patient underwent another procedure to remove the external fixator, obtain tissue samples for culture, and change the spacer in an attempt to prepare for internal fixation. Fig. 4-A Preoperative appearance of the soft tissue. Fig. 4-B Intraoperative photograph showing no clinical signs of infection. Fig. 4-C Radiograph made after removal of the external fixator and insertion of a new intramedullary PMMA-with-antibiotic spacer, which was larger than the previous one to provide stability.
Fig. 5.
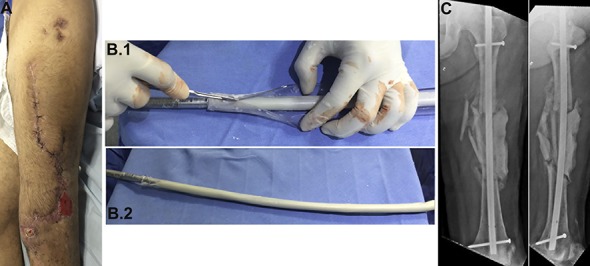
Day 78 after the injury. Cultures of specimens obtained during previous surgery were negative. Internal fixation was performed with a nail covered with PMMA mixed with antibiotics, and the spacer was changed. Fig. 5-A Preoperative appearance of the soft tissue. Fig. 5-B Intraoperative nail preparation. A chest tube was filled with PMMA mixed with antibiotics. The nail was introduced inside the tube and, after PMMA polymerization, the plastic tube was peeled from the PMMA-coated nail. Fig. 5-C Postoperative radiographs.
Step 7: Spacer Removal (Fig. 6)
Fig. 6.
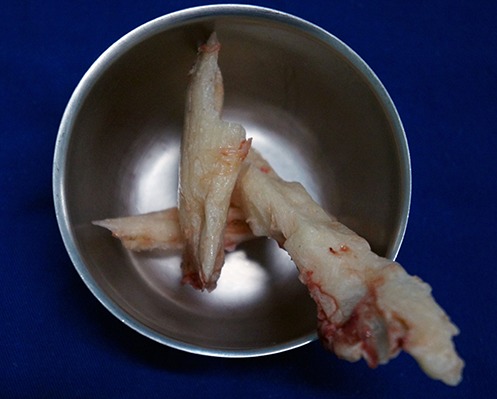
Pieces of the spacer after being broken with a chisel and removed from the bone defect.
Remove the spacer at least 6 weeks after implantation and just after soft-tissue healing.
Use a chisel to break the spacer into pieces. The added antibiotics make the cement weaker, facilitating its breakage and removal.
Open the medullary canal and revitalize the bone extremities to provide a bloody area for contact with the bone graft.
Irrigate the wound to remove fragments of bone cement.
Cultures should be performed every time the wound is addressed, including in this step.
If there are signs of infection such as pus, intense inflammation, and inadequate membrane formation, perform a new debridement followed by the replacement of the spacer.
Step 8: Bone Graft (Figs. 7 and 8)
Fig. 7.
Day 150 after the injury. The spacer was removed and bone graft was applied. Fig. 7-A Preoperative appearance of the soft tissue. Fig. 7-B RIA graft from the right femur. Fig. 7-C Graft inside the induced membrane. Fig. 7-D Membrane closure.
Fig. 8.
Induced-membrane maturation 4 weeks (Fig. 8-A), 7 weeks (Fig. 8-B), and 17 weeks (Fig. 8-C) after introduction of the spacer into the bone defect.
Sometimes a considerable amount of graft is needed to fill the bone defect.
There is no evidence-based algorithm for selection of the graft type or donor area. Planning based on the size of the bone defect is the most common method, but some other aspects should be considered. Metaphyseal defects require larger graft volumes than diaphyseal defects of the same size.
Use autograft obtained from the iliac crest or the medullary canal of another healthy long bone (Reamer/Irrigator/Aspirator [RIA; DePuy Synthes]) to fill the void (Video 5). Sometimes both anterior iliac crests and even the posterior iliac crest have to be approached to provide enough autograft.
When selecting the donor area of the graft, consider the particulars of the case, such as the location of the bone defect, the position of the patient for the surgery, and the graft amount needed.
The RIA system has the advantage of providing large quantities of bone graft with lower morbidity in the donor area12.
It is more convenient to harvest bone graft from the anterior iliac crest because most procedures in the lower limb are performed with the patient supine. However, the posterior iliac crest has more cancellous bone and is a better option when large amounts of graft are needed13,14.
Graft volume may be enlarged with allograft or biomaterials (demineralized bone matrix or tricalcium phosphate) and enriched with growth factors (bone morphogenetic protein or platelet-rich concentrate)3-5,15.
Intramedullary fixation is another strategy that helps reduce the amount of graft required16. Other options are the use of a cage, which also provides bone stability.
Place the graft inside the cavity delimited by the membrane; it must overlap the bone extremities for a few centimeters but remain inside the membrane sleeve.
Close the membrane, ensuring that the graft is retained inside. Do not suture the membrane tightly; avoid areas of constriction of the graft.
Close the wound as usual.
Video 5.
Technique for obtaining bone graft from the medullary canal with the RIA system. (The patient shown in this video is not the same patient seen in the article.)
Step 9: Follow-up (Figs. 9 and 10 and Video 6)
Fig. 9.
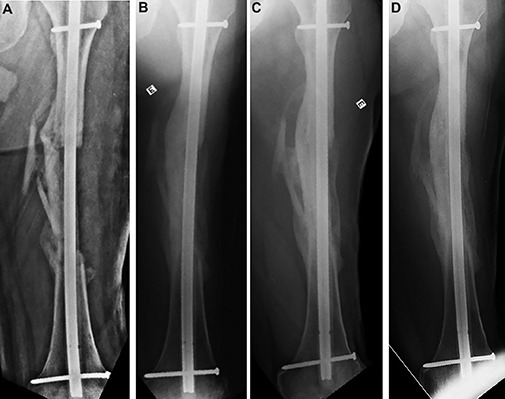
Radiographs showing the state of graft integration immediately (Fig. 9-A), 8 months (Fig. 9-B), 26 months (Fig. 9-C), and 48 months (Fig. 9-D) after application of the bone graft.
Close follow-up should be performed to identify and treat possible complications.
Cultures may be positive and have no correspondence with clinical findings. Positive cultures necessitate an additional course of antibiotics, and this approach should be decided in agreement with the infectious disease specialist.
Radiographs should be made every 2 months until bone union is seen and yearly thereafter.
Bone union is defined as the presence of a bridging callus between the bone graft and original bone ends (bone bridge in at least 3 cortices) associated with pain-free full weight-bearing.
Video 6.
The patient walking at the 4-year follow-up visit.
Results
The results of this procedure were assessed in a study of 33 patients with a total of 34 bone defects5. The mean age at the time of treatment was 33 years, and the mean defect size was 6.7 cm. An infection was present in 23 bone defects (68%), and soft-tissue reconstruction was required in 11 cases (32%). Bone union was achieved in 31 (91%) of the 34 bone defects. The average time to bone union was 8.5 months. Three of the previously infected patients demonstrated recurrent infection with graft resorption and, consequently, treatment failure.
The size of the bone defect, the bone segment involved, and the bone defect type were not related to the time until bone union5. Similar to our findings, previous studies on the induced-membrane technique demonstrated bone union rates of 67% to 100%4. The strength of this technique, which is suitable for both infected and noninfected cases, lies in its simplicity and reproducibility. Infection recurrence was the primary reason for treatment failure and is expected in <9% of previously infected cases4.
Pitfalls & Challenges
Adequate surgical debridement (removal of all necrotic tissue) is crucial. Inadequate bone debridement can lead to infection recurrence and treatment failure.
When necessary, the soft tissues should be reconstructed.
In cases with infection, antibiotics should be added to the spacer.
Provide bone stability. Whenever possible, select internal fixation for definitive bone stabilization.
The spacer should be slightly larger than the diameter of the bone and cover 2 to 3 cm of each bone end.
Selection of an adequate bone graft donor source is important.
The graft should overlap the bone ends and be uniform in the area of the bone defect.
The membrane should be sutured to surround the graft.
-
Future investigation should include:
◦ Prospective studies comparing the induced membrane with other reconstructive techniques, such as bone transport and microsurgical grafts, as well as alternative graft materials, to evaluate variables such as treatment cost, bone union, and complication rates.
◦ Multicenter studies with a more robust sample size.
◦ Experimental research to develop induced membranes with greater osteogenic potential.
◦ Studies to determine the best bone graft (iliac crest or RIA) and the best strategy to augment the bone graft.
Published outcomes of this procedure can be found at: J Orthop Trauma. 2016 Oct;30(10):545-50.
Investigation performed at Manoel Victorino Hospital, Salvador, Bahia, Brazil
Disclosure: The authors indicated that no external funding was received for any aspect of this work. The Disclosure of Potential Conflicts of Interest forms are provided with the online version of the article (http://links.lww.com/JBJSEST/A254).
References
- 1.Schemitsch EH. Size matters: defining critical in bone defect size! J Orthop Trauma. 2017. October;31(Suppl 5):S20-2. [DOI] [PubMed] [Google Scholar]
- 2.Masquelet AC. Induced membrane technique: pearls and pitfalls. J Orthop Trauma. 2017. October;31(Suppl 5):S36-8. [DOI] [PubMed] [Google Scholar]
- 3.Mauffrey C, Hake ME, Chadayammuri V, Masquelet AC. Reconstruction of long bone infections using the induced membrane technique: tips and tricks. J Orthop Trauma. 2016. June;30(6):e188-93. [DOI] [PubMed] [Google Scholar]
- 4.Morelli I, Drago L, George DA, Gallazzi E, Scarponi S, Romanò CL. Masquelet technique: myth or reality? A systematic review and meta-analysis. Injury. 2016. December;47(Suppl 6):S68-76. [DOI] [PubMed] [Google Scholar]
- 5.Azi ML, Teixeira AA, Cotias RB, Joeris A, Kfuri M., Jr Membrane induced osteogenesis in the management of posttraumatic bone defects. J Orthop Trauma. 2016. October;30(10):545-50. [DOI] [PubMed] [Google Scholar]
- 6.Mauffrey C, Giannoudis PV, Conway JD, Hsu JR, Masquelet AC. Masquelet technique for the treatment of segmental bone loss have we made any progress? Injury. 2016. October;47(10):2051-2. [DOI] [PubMed] [Google Scholar]
- 7.Giannoudis PV, Harwood PJ, Tosounidis T, Kanakaris NK. Restoration of long bone defects treated with the induced membrane technique: protocol and outcomes. Injury. 2016. December;47(Suppl 6):S53-61. [DOI] [PubMed] [Google Scholar]
- 8.Hake ME, Young H, Hak DJ, Stahel PF, Hammerberg EM, Mauffrey C. Local antibiotic therapy strategies in orthopaedic trauma: practical tips and tricks and review of the literature. Injury. 2015. August;46(8):1447-56. Epub 2015 May 14. [DOI] [PubMed] [Google Scholar]
- 9.Kühn KD, Renz N, Trampuz A. [Local antibiotic therapy.] Unfallchirurg. 2017. July;120(7):561-72. German. [DOI] [PubMed] [Google Scholar]
- 10.Seldes RM, Winiarsky R, Jordan LC, Baldini T, Brause B, Zodda F, Sculco TP. Liquid gentamicin in bone cement: a laboratory study of a potentially more cost-effective cement spacer. J Bone Joint Surg Am. 2005. February;87(2):268-72. [DOI] [PubMed] [Google Scholar]
- 11.Chang YH, Tai CL, Hsu HY, Hsieh PH, Lee MS, Ueng SW. Liquid antibiotics in bone cement: an effective way to improve the efficiency of antibiotic release in antibiotic loaded bone cement. Bone Joint Res. 2014. August;3(8):246-51. [DOI] [PMC free article] [PubMed] [Google Scholar]
- 12.Dimitriou R, Mataliotakis GI, Angoules AG, Kanakaris NK, Giannoudis PV. Complications following autologous bone graft harvesting from the iliac crest and using the RIA: a systematic review. Injury. 2011. September;42(Suppl 2):S3-15. Epub 2011 Jun 25. [DOI] [PubMed] [Google Scholar]
- 13.Finkemeier CG. Bone-grafting and bone-graft substitutes. J Bone Joint Surg Am. 2002. March;84(3):454-64. [DOI] [PubMed] [Google Scholar]
- 14.Kilinc A, Korkmaz IH, Kaymaz I, Kilinc Z, Dayi E, Kantarci A. Comprehensive analysis of the volume of bone for grafting that can be harvested from iliac crest donor sites. Br J Oral Maxillofac Surg. 2017. October;55(8):803-8. Epub 2017 Aug 23. [DOI] [PubMed] [Google Scholar]
- 15.Azi ML, Aprato A, Santi I, Kfuri M, Jr, Masse A, Joeris A. Autologous bone graft in the treatment of post-traumatic bone defects: a systematic review and meta-analysis. BMC Musculoskelet Disord. 2016. November 9;17(1):465. [DOI] [PMC free article] [PubMed] [Google Scholar]
- 16.Stafford PR, Norris BL. Reamer-Irrigator-Aspirator bone graft and bi Masquelet technique for segmental bone defect nonunions: a review of 25 cases. Injury. 2010. November;41(2)(Suppl 2):S72-7. [DOI] [PubMed] [Google Scholar]


