Abstract
Background:
Traditional posterior approaches to the hip, posterolateral and mini-posterior, violate the iliotibial band and the short external rotators, specifically the quadratus femoris and obturator externus muscles1-4. The direct anterior approach does not violate the iliotibial band or the quadratus femoris, resulting in earlier ambulation and lower dislocation rates1,5-9. The direct superior (DS) is a posterior approach that spares the iliotibial band, obturator externus tendon, and quadratus femoris muscle. The goal of minimally invasive surgery (MIS) is to disrupt the least amount of tissue necessary to adequately expose the hip and correctly place implants. Although MIS total hip arthroplasty (THA) has not lived up to all of its promises10-13, MIS-THA may enable early ambulation and decrease length of stay14-16.
Description:
The patient is positioned in the lateral decubitus position. An 8 to 10-cm incision is made at a 60° oblique angle starting from the posterior-proximal corner of the greater trochanter. Only the gluteus maximus fascia is incised; the Iliotibial band is completely spared. The gluteus maximus muscle is split bluntly, exposing the gluteus medius muscle, piriformis tendon, and triceps coxae (the obturator internus and superior and inferior gemellus muscles). The piriformis and conjoined tendon are released from the greater trochanter and tagged. The gluteus minimus is elevated, exposing the posterior hip capsule. An arthrotomy is performed prior to dislocating the hip with flexion, adduction, internal rotation, and axial compression. The femoral neck is resected, the acetabulum is reamed, and components or trials are impacted into position. Hip stability is assessed. Final implants are placed. The posterior capsule, piriformis, and obturator internus tendons are repaired anatomically. The fascia and skin are closed.
Alternatives:
Posterolateral approach.
Mini-posterior approach.
Direct lateral approach.
Anterolateral approach.
Percutaneously assisted total hip (PATH).
Supercapsular PATH (SuperPath).
Rationale:
The DS approach to the hip differs from the traditional posterior and mini-posterior approaches because it preserves the iliotibial band, quadratus femoris muscle, and obturator externus tendon1, potentially suppressing dislocation. The DS approach to the hip causes less soft-tissue destruction, especially to the gluteus minimus and tensor fasciae latae muscles, compared with the direct anterior approach to the hip, suggesting DS-THA may enhance postoperative mobility1,3,14-16. DS-THA is extensile by extending the incision distally, incising the iliotibial band, and releasing the quadratus femoris muscle. This converts a DS approach to a standard posterolateral approach, providing additional visualization.
Introductory Statement
The direct superior (DS) approach for total hip arthroplasty (THA) is a minimally invasive posterior approach that enables preservation of the iliotibial band, short external rotators (specifically the quadratus femoris and obturator externus muscles), and hip abductors1,2.
Indications & Contraindications
Indications
Primary THA.
Hip hemiarthroplasty.
Head and liner exchange.
Contraindications
Body mass index of >40 kg/m2.
Hip resurfacing.
Revision THA.
Substantial bone loss or deformity.
Crowe type-III/IV dysplasia.
Step-by-Step Description of Procedure
Step 1: Positioning and Incision
Position the patient in the lateral decubitus position and make an 8 to 10-cm incision at a 45° to 60° oblique angle, starting from the posterior-proximal corner of the greater trochanter (Video 1, Fig. 1).
Position the patient in the lateral decubitus position and secure the patient to the operating table using a pegboard or other lateral positioners according to the surgeon’s preference. It may help to have the patient positioned toward the anterior third of the table (in the anterior-posterior direction, not cranial-caudal).
Position the patient so that the pelvis is in a neutral position with the sacrum perpendicular to the ground so that the acetabular cup anteversion and abduction angle can be assessed intraoperatively.
Then prepare and drape the patient using a sterile technique based on the surgeon’s preference. We prefer preparation with 70% isopropyl alcohol followed by DuraPrep Surgical Solution (3M) to the foot. Isolate the foot and trunk with 2 impervious split drapes and an impervious stockinette. Wrap the lower leg with a cohesive bandage, apply a hip drape, and isolate the skin with an iodinated adhesive.
Slightly flex the involved leg while the leg is resting in adduction.
Palpate and mark the greater trochanter proximally and extending distally.
Mark the incision by starting at the posterior-proximal corner of the greater trochanter and extending proximally 6 to 10 cm at a 45° to 60° angle from a line perpendicular to the shaft of the femur (Fig. 2).
Incise the skin with a number-10 blade.
Fig. 1.
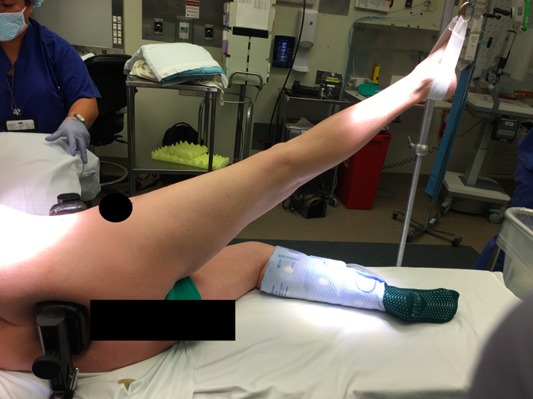
Intraoperative photograph of starting position.
Fig. 2.
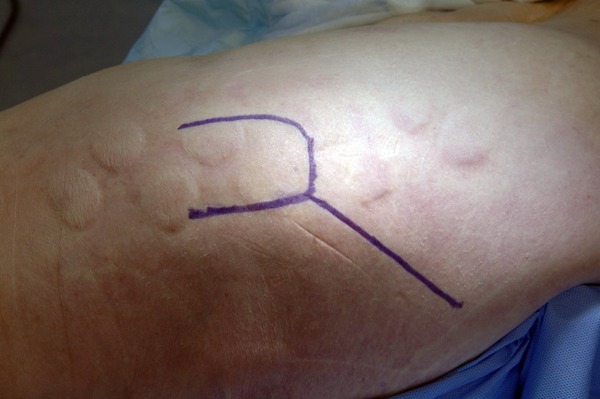
Intraoperative photograph of skin markings.
Video 1.
Skin incision and orientation. GT = greater trochanter.
Step 2: Superficial Exposure
Incise the gluteus maximus fascia and separate the gluteus maximus muscle fibers bluntly exposing the gluteus medius muscle, piriformis tendon, triceps coxae, and quadratus femoris muscle.
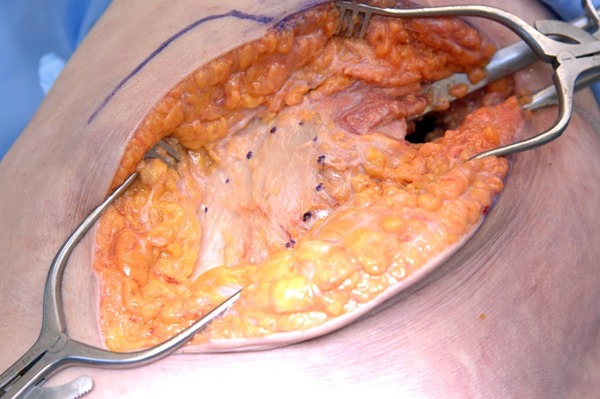
Use electrocautery to extend the incision through the subcutaneous fat until the fascia overlying the gluteus maximus muscle is encountered (Fig. 3).
Place 2 sharp 4-prong Weitlaner self-retaining retractors (1 proximal and 1 distal) to facilitate the division of the subcutaneous tissue.
Use a knife or electrocautery to incise the fascia overlying the gluteus maximus muscle in line with its muscle fibers.
Separate the gluteus maximus muscle bluntly in line with the muscle fibers using a small Cobb elevator placed initially at the level of the posterior-proximal aspect of the greater trochanter. In-line blunt dissection through the gluteus maximus muscle minimizes tissue damage (Fig. 4, Video 2).
All dissection is proximal to the posterior-proximal aspect of the greater trochanter, leaving the iliotibial band preserved.
Abduct the involved extremity with an assistant or by changing the position of a surgical instrument stand to relax the hip abductors.
Hold the gluteus maximus interval open with 2 Army-Navy-style retractors placed parallel to the shaft of the femur at the distal-inferior edge of the wound and perpendicular to the fibers of the gluteus maximus muscle at the distal-superior edge of the wound. If general anesthesia is utilized, paralysis greatly facilitates the deep exposure and mobility of the gluteus maximus muscle window.
Remove pericapsular fat and bursal tissue from the posterior-proximal aspect of the greater trochanter. Take care not to damage the posterior border of the gluteus medius muscle.
Use a finger to palpate the interval between the gluteus medius and gluteus minimus muscles (Video 3).
Position a 90° narrow retractor between the gluteus medius and minimus muscles, perpendicular to the fibers of the gluteus medius muscle (Fig. 5).
Use gentle internal rotation to help expose the gluteus minimus muscle, piriformis tendon, triceps coxae, and superior border of the quadratus femoris muscle (Fig. 6).
Fig. 3.
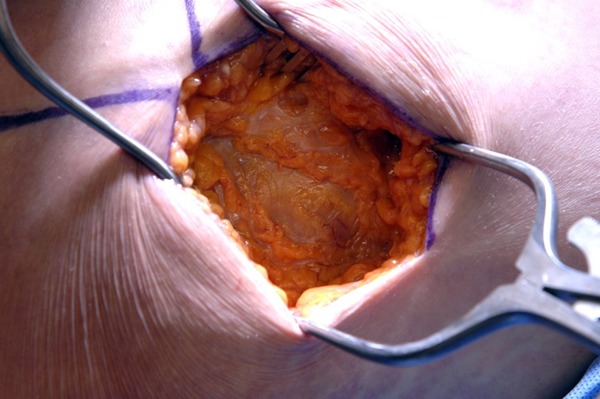
Intraoperative photograph of the fascial layer.
Fig. 4.
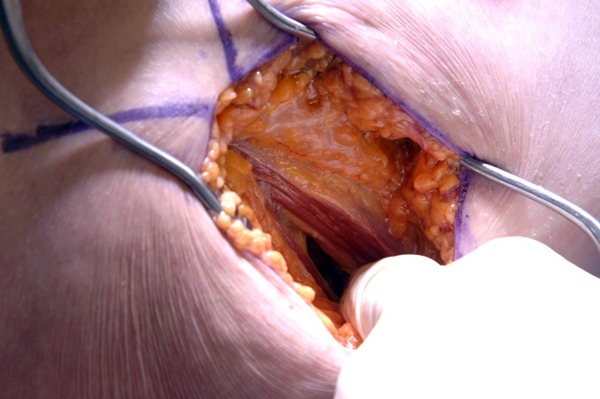
Intraoperative photograph of blunt dissection of the gluteus maximus.
Fig. 5.
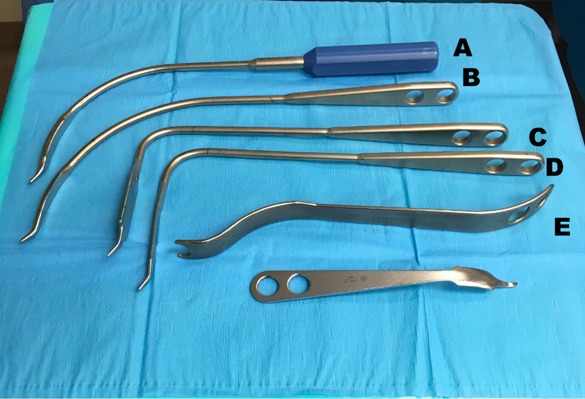
Intraoperative photograph of retractors utilized in the case, which included a blue handled, curved retractor (A); curved retractor (B); wide or fat 90° retractor (C); narrow or thin 90° retractor (D); and femoral neck elevator (E).
Fig. 6.
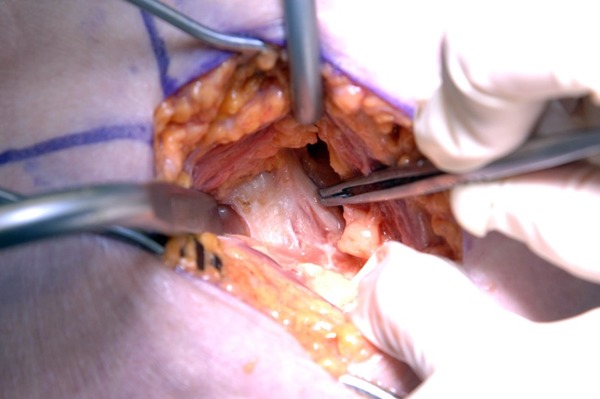
Intraoperative photograph of exposed obturator internus and piriformis tendons.
Video 2.
Fascial incision.
Video 3.
Removal of the pericapsular fat.
Step 3: Deep Exposure and Hip Dislocation
Release and tag the piriformis and obturator internus tendons, protecting the sciatic nerve; elevate the gluteus minimus muscle, exposing the posterior hip capsule; and perform an arthrotomy prior to dislocation of the hip with flexion, adduction, internal rotation, and axial compression.
Release the piriformis and conjoined tendons at their insertion on the posterior aspect of the femur with electrocautery. Tag the piriformis and conjoined tendon stumps with a number-5 Ethibond suture (Ethicon) (Video 4).
Use tension on the tag suture and a small Cobb elevator to bluntly reflect the piriformis and conjoined tendons posteriorly, protecting the sciatic nerve that runs from cranial to caudal just posterior to the conjoined tendon and exposing the inferior border of the gluteus minimus muscle and posterior hip capsule.
Suture the reflected piriformis and conjoined tendons to the proximal-posterior wound deep to the skin.
Reflect the inferior border of the gluteus minimus muscle off the posterior-superior hip capsule with electrocautery and a small Cobb elevator.
The 90° narrow retractor in the gluteus medius-minimus muscle interval is removed and repositioned between the reflected gluteus minimus muscle and the posterior-superior hip capsule (Fig. 7).
Make a full-thickness capsulotomy. The capsulotomy can be done by reflecting the capsule off the femur from the posterior-superior part of the acetabulum along the femoral neck to the posterior-proximal aspect of the femur and distally along the femoral neck-great trochanter junction. This “7-shaped” capsulotomy facilitates femoral exposure. Alternatively, the capsulotomy can be done by reflecting the capsule off the acetabulum from the posterior-inferior aspect of the acetabulum along the posterior part of the acetabulum to the posterior-proximal aspect of the femur. This “J-shaped” capsulotomy facilitates acetabular exposure (Figs. 8-A and 8-B) (Video 5).
Place a long, curved retractor along the inferior aspect of the femoral neck.
Place a long, curved retractor along the superior aspect of the femoral neck and remove the 90° narrow retractor from the gluteus minimus muscle-hip capsule interval.
Work the 2 long curved retractors laterally toward the greater trochanter with sequential capsular release and retractor replacement until the inferior and superior borders of the femoral neck are fully visualized.
Use electrocautery to remove the posterior labrum and release the superior capsule from the ilium prior to dislocation to facilitate subsequent acetabular retractor placement.
Dislocate the hip with gentle flexion, internal rotation, adduction, and axial compression (Video 6).
Fig. 7.
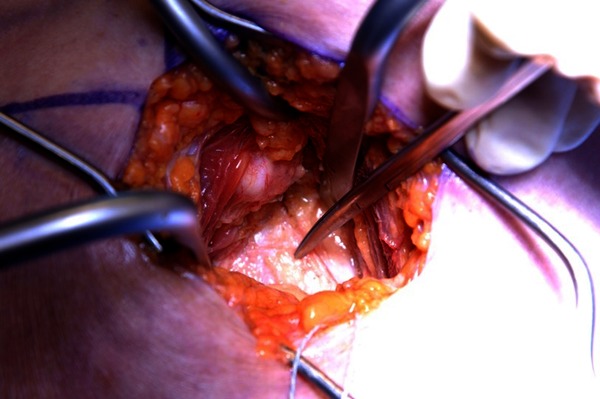
Intraoperative photograph of a 90° narrow retractor between the capsule and the gluteus minimus muscle.
Video 4.
The piriformis is dissected from its insertion on the femur.
Fig. 8-A.
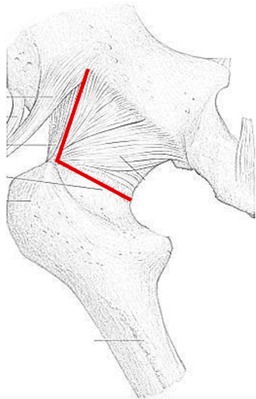
Illustration of the 7-shaped capsulotomy. The cut is made from the posterior-superior aspect of the acetabulum to the piriformis fossa and is continued inferiorly along the posterior aspect of the femoral neck to the posterior-inferior part of the femoral neck, leaving a capsular sleeve attached to the acetabulum.
Fig. 8-B.
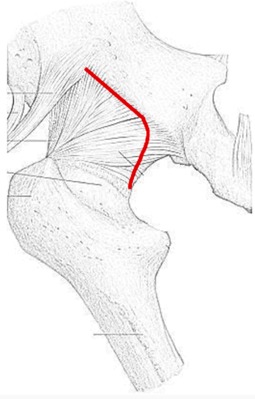
Illustration of the J-shaped capsulotomy. The cut is made from the posterior-inferior part of the femoral neck to the posterior-inferior aspect of the acetabulum and is continued superiorly along the posterior wall of the acetabulum to the posterior-superior aspect of the acetabulum, leaving a capsular sleeve attached to the posterior aspect of the femur.
Video 5.
J-shaped capsulotomy.
Video 6.
Dislocation of the hip.
Step 4: Femoral Neck Cut and Acetabular Component Placement
Perform a measured resection of the femoral neck, place retractors to expose and prepare the acetabulum for reaming, ream the acetabulum, and impact the acetabular component into position (Video 7).
Ensure that the long, curved retractors expose the piriformis fossa of the superior aspect of the femoral neck and the saddle region of the inferior aspect of the femoral neck.
With electrocautery, excise any soft tissue obscuring the femoral head laterally.
Measure the length of the femoral neck resection based on the distance from the center of the femoral head in accordance with the preoperative template (Fig. 9).
Make the femoral neck cut parallel to the intertrochanteric line, taking into account the version of the femoral neck (Fig. 10). Because the quadratus muscle is not released from its insertion in the femur, traditional posterior approach landmarks, like the lesser trochanter, cannot be easily visualized or palpated.
Remove the femoral head with a Steinmann pin or corkscrew placed into the center of the femoral head or a tenaculum placed from the fovea to the neck cut (Fig. 11).
Check the femoral neck resection by measuring the removed femoral head and neck from the center or medial apex of the femoral head to the level of the resection and ensure that it is in accordance with the preoperative template.
Let the operative extremity fall into extension, external rotation, and adduction. A sterile, mobile bowl or anterior pouch in which to place the foot may be helpful.
Place the long, curved retractor over the anterior rim of the acetabulum and retract the femur at the level of the greater trochanter anteriorly. A bone hook can be used to elevate the femur and facilitate placement of the long, curved retractor.
Place a 90° narrow retractor inferior to the transverse acetabular ligament into the superior aspect of the obturator foramen. An inferior capsulotomy can be performed from the inferior femoral neck to the inferior acetabular rim.
Impact a 90° wide retractor into the ilium above the superior acetabular rim, under the superior capsule, and perpendicular to the gluteus medius muscle. This may not be required with a 7-shaped capsulotomy.
Impact a double bent retractor into the ischium under the posterior capsule. This may not be required with a J-shaped capsulotomy.
With the acetabulum circumferentially exposed, use electrocautery to remove the labrum and pulvinar, exposing the acetabular rim, cotyloid fossa, and medial wall (Fig. 12).
Ream the acetabulum to the appropriate size and position on the basis of the preoperative template and intraoperative landmarks using a 50° single-offset (Fig. 13-A, Video 8) or 30° double-offset reamer (Fig. 13-B, Video 9), maintaining proper inclination and anteversion.
If a 35° offset reamer is used, it may be necessary to make a 1 to 2-cm extension of the distal skin incision parallel to the femur to adequately control inclination and anteversion during reaming, especially in a patient with obesity.
Use a double-offset impactor to impact the acetabular component or trial component into the appropriate position on the basis of the preoperative template and intraoperative landmarks. Secure the component with screws into the superior-posterior safe zone on the basis of surgeon preference or required stability.
Secure a trial acetabular liner or impact the real acetabular liner into position on the basis of surgeon preference (Video 10).
Fig. 9.
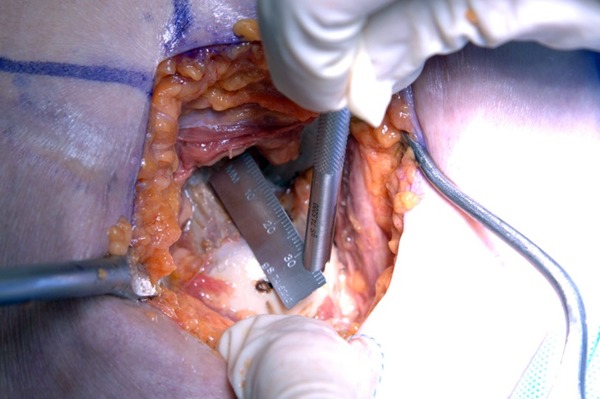
Intraoperative photograph of the femoral neck cut measurement from the marked femoral head.
Fig. 10.
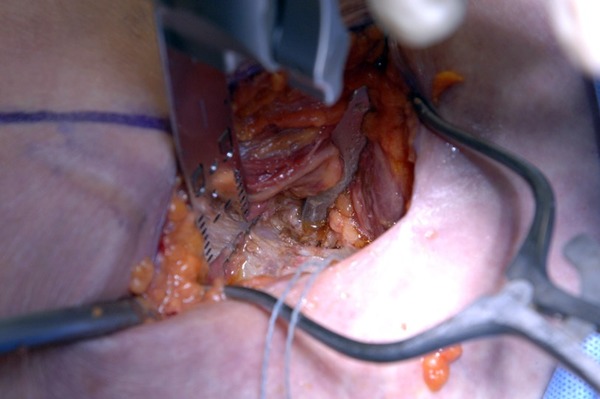
Intraoperative photograph of the femoral neck cut.
Fig. 11.
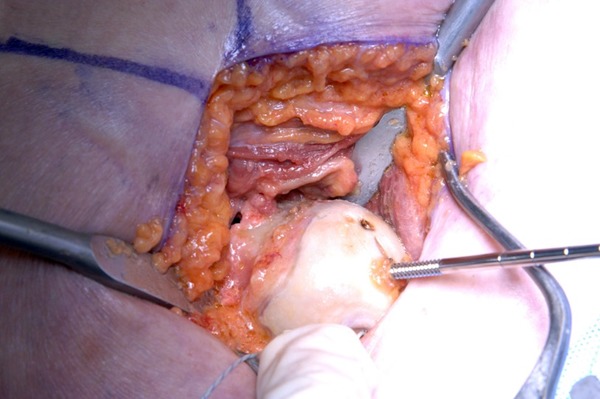
Intraoperative photograph of the femoral head being removed with a Steinmann pin.
Fig. 12.
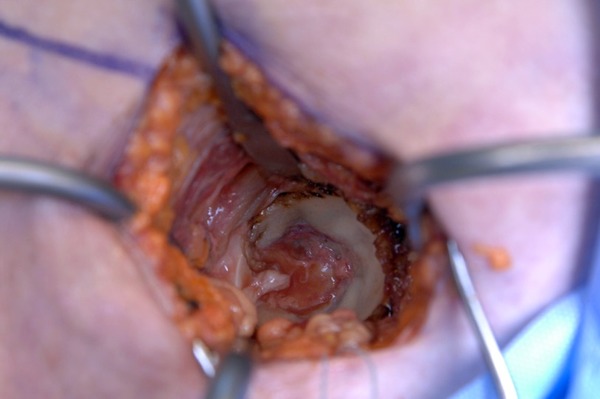
Intraoperative photograph of the exposed acetabulum.
Video 7.
Placement of the retractors for acetabular preparation.
Fig. 13-A.
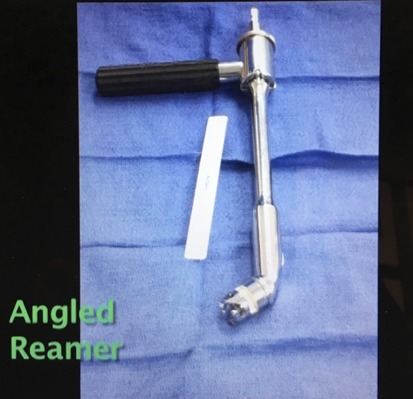
Intraoperative photograph of the 50° acetabular reamer.
Fig. 13-B.
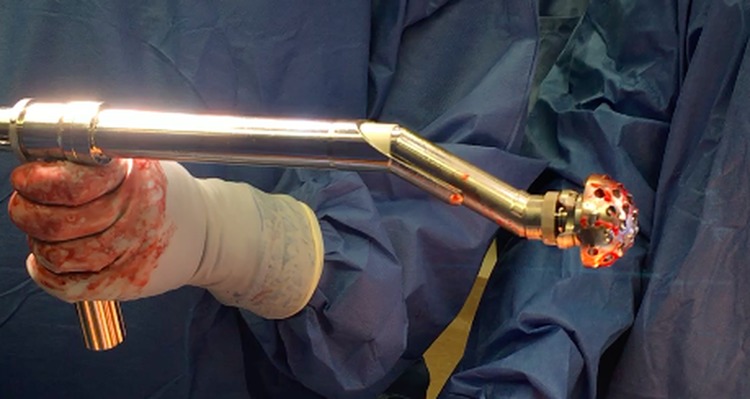
Intraoperative photograph of the double-offset reamer.
Video 8.
High-offset reamer used for acetabular preparation.
Video 9.
Double-offset reamer used for acetabular preparation.
Video 10.
Placement of the acetabular component and drilling and placement of the acetabular screw.
Step 5: Femoral Preparation and Implantation
Place retractors to expose and prepare the proximal part of the femur, assess hip stability, select the final implants, and implant them into position.
Place the hip in 40° of flexion and 40° of adduction.
Limit internal rotation to 40° to protect the obturator externus tendon.
Place the 90° narrow retractor over the anterolateral aspect of the femoral neck, retracting the overhanging gluteus medius and maximus muscles (Fig. 14, Video 11).
Use a double-ended retractor or the 90° wide retractor medial to the femoral neck, exposing the calcar (Fig. 14, Video 11).
Place a femoral neck elevator along the anterior femoral neck, exposing the femur for preparation (Fig. 14, Video 11).
Remove any residual soft tissue from the femoral start site.
Use a box osteotome to remove any residual lateral femoral neck.
Insert a canal finder by hand.
Begin sequential reaming or broaching from the smallest size to the size of the templated femoral component, utilizing the appropriate femoral anteversion from the piriformis fossa to the most robust bone in the calcar.
A lateralizing reamer or curved rasp may be useful to avoid broaching in varus. An undersized femoral trial compared with preoperative templating may indicate varus positioning (Video 12).
Plane the calcar, if necessary.
Place neck and head trial components.
Reduce the hip with gentle traction and external rotation.
Assess intraoperative stability in extension, external rotation, the position of sleep (45° of hip flexion and maximum adduction), and flexion, abduction, and internal rotation to >70°.
Assess combined anteversion.
Redislocate the hip with traction, flexion, adduction, and internal rotation.
This can be repeated as necessary until the appropriate components are determined.
A flat-plate anteroposterior pelvic radiograph can be useful in assessing acetabular component positioning, leg length restoration, femoral implant position, and femoral canal fill.
Assess rotational stability of the femoral trial on trial extraction.
Implant the final femoral implant and head according to the preoperative template, intraoperative stability, and intraoperative sizing according to surgeon preference.
Rereduce the hip using traction and external rotation and reassess the hip stability prior to closure (Video 13).
Irrigate the hip with a dilute sterile povidone-iodine solution (17.5 mL in 500 mL of normal saline solution) and/or 1 L of normal saline solution.
Fig. 14.
Intraoperative photograph of the placement of retractors for femoral shaft access.
Video 11.
Placement of the retractors for femoral preparation.
Video 12.
Preparation of the femur.
Video 13.
The hip is taken through the range of motion to assess stability.
Step 6: Capsulotendinous Repair and Closure
Anatomically repair the piriformis tendon, obturator internus tendon, and posterior capsule, and then close the gluteus maximus fascia and skin.
Repair with interrupted absorbable suture the posterior capsular flap that was made during the approach.
Remove the previous tag suture.
Grasp the previously tagged piriformis and obturator internus tendons.
Re-tag the piriformis and obturator internus tendons with a new non-absorbable suture (number-5 Ethibond suture; Ethicon).
Repair the piriformis and obturator internus tendons to the greater trochanter, approximating their insertion near the piriformis fossa along the posterior edge of the greater trochanter.
Repair the gluteus maximus muscle fascia with interrupted, running, or barbed absorbable suture.
Repair the deep dermal layer with an interrupted, running, or barbed absorbable suture.
Oppose the skin with staples, interrupted nylon, or a running subcuticular Monocryl stitch (Ethicon) with or without adhesive strips, 2-Octyl cyanoacrylate adhesive, or a negative pressure dressing according to surgeon preference.
Results
The DS approach for THA has promising early follow-up data as demonstrated in a series described by Roger and Hill, who reported no dislocations, no sciatic nerve palsies, and a low transfusion rate3. The mean operative time was 57 minutes. The postoperative Harris hip score averaged 97 points (range, 87 to 100 points), and the average length of hospital stay was 2 days (range, 1 to 3 days). In a cadaveric study, Amanatullah et al. demonstrated significantly less inadvertent muscle damage to the gluteus minimus, tensor fasciae latae, and rectus femoris muscles during the DS approach than during the direct anterior approach1.
Pitfalls & Challenges
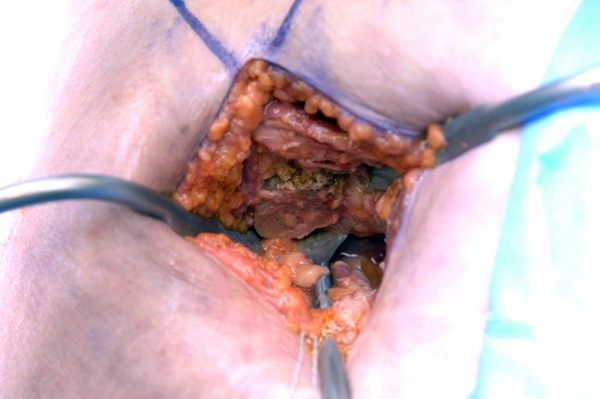
Due to the limited distal extent of the surgical incision, there are instances when obtaining adequate exposure of the acetabulum is difficult. To counter this challenge, we found that using offset reamers and acetabular impactors is helpful. The offset impactors still enable proper cup positioning as was demonstrated in the series by Roger and Hill3. If the exposure remains inadequate despite offset reamers, the exposure can be extended into a formal posterolateral approach. To do this, the incision is extended distally along the proximal aspect of the femur. The iliotibial band is visualized and released, and the remaining short external rotators (obturator externus tendon and quadratus femoris muscle) are released (Fig. 15).
Determining the location of the femoral neck cut can be difficult with this procedure as the lesser trochanter is not visible or palpable. As a result, we use a measured resection technique that is based on the center of the femoral head and we measure the neck cut distally on the basis of preoperative templating and component specification. When the surgeon is not sure where to make the femoral neck cut, the approach can be extended as described above to visualize and palpate the lesser trochanter and formally measure the level of the femoral neck cut.
Two assistants are often required to obtain adequate visualization. We are actively redesigning the retractors to eliminate the need for a second assistant.
Fig. 15.
Intraoperative photograph of the MIS site (purple markings) compared with the traditional surgical site.
Published outcomes of this procedure can be found at: Clin Orthop Relat Res. 2012 Aug;470(8):2227-34
Disclosure: The authors indicated that no external funding was received for any aspect of this work. On the Disclosure of Potential Conflicts of Interest forms, which are provided with the online version of the article, one or more of the authors checked “yes” to indicate that the author had a relevant financial relationship in the biomedical arena outside the submitted work and “yes” to indicate that the author had a patent and/or copyright, planned, pending, or issued, broadly relevant to this work (http://links.lww.com/JBJSEST/A248).
References
- 1.Amanatullah DF, Masini MA, Roger DJ, Pagnano MW. Greater inadvertent muscle damage in direct anterior approach when compared with the direct superior approach for total hip arthroplasty. Bone Joint J. 2016. August;98-B(8):1036-42. [DOI] [PubMed] [Google Scholar]
- 2.Mardones R, Pagnano MW, Nemanich JP, Trousdale RT. The Frank Stinchfield Award: muscle damage after total hip arthroplasty done with the two-incision and mini-posterior techniques. Clin Orthop Relat Res. 2005. December;441:63-7. [DOI] [PubMed] [Google Scholar]
- 3.Roger DJ, Hill D. Minimally invasive total hip arthroplasty using a transpiriformis approach: a preliminary report. Clin Orthop Relat Res. 2012. August;470(8):2227-34. Epub 2012 Jan 4. [DOI] [PMC free article] [PubMed] [Google Scholar]
- 4.Solomon LB, Lee YC, Callary SA, Beck M, Howie DW. Anatomy of piriformis, obturator internus and obturator externus: implications for the posterior surgical approach to the hip. J Bone Joint Surg Br. 2010. September;92(9):1317-24. [DOI] [PubMed] [Google Scholar]
- 5.Martin CT, Pugely AJ, Gao Y, Clark CR. A comparison of hospital length of stay and short-term morbidity between the anterior and the posterior approaches to total hip arthroplasty. J Arthroplasty. 2013. May;28(5):849-54. Epub 2013 Mar 11. [DOI] [PubMed] [Google Scholar]
- 6.Masonis JL, Bourne RB. Surgical approach, abductor function, and total hip arthroplasty dislocation. Clin Orthop Relat Res. 2002. December;405:46-53. [DOI] [PubMed] [Google Scholar]
- 7.Taunton MJ, Mason JB, Odum SM, Springer BD. Direct anterior total hip arthroplasty yields more rapid voluntary cessation of all walking aids: a prospective, randomized clinical trial. J Arthroplasty. 2014. September;29(9)(Suppl):169-72. Epub 2014 May 25. [DOI] [PubMed] [Google Scholar]
- 8.Vicar AJ, Coleman CR. A comparison of the anterolateral, transtrochanteric, and posterior surgical approaches in primary total hip arthroplasty. Clin Orthop Relat Res. 1984. September;188:152-9. [PubMed] [Google Scholar]
- 9.Woo RY, Morrey BF. Dislocations after total hip arthroplasty. J Bone Joint Surg Am. 1982. December;64(9):1295-306. [PubMed] [Google Scholar]
- 10.Nam D, Meyer Z, Rames RD, Nunley RM, Barrack RL, Roger DJ. Is the direct superior, iliotibial band-sparing approach associated with decreased pain after total hip arthroplasty? J Arthroplasty. 2017. February;32(2):453-7. Epub 2016 Aug 10. [DOI] [PubMed] [Google Scholar]
- 11.Ogonda L, Wilson R, Archbold P, Lawlor M, Humphreys P, O’Brien S, Beverland D. A minimal-incision technique in total hip arthroplasty does not improve early postoperative outcomes. A prospective, randomized, controlled trial. J Bone Joint Surg Am. 2005. April;87(4):701-10. [DOI] [PubMed] [Google Scholar]
- 12.Vail TP, Mariani EM, Bourne MH, Berger RA, Meneghini RM. Approaches in primary total hip arthroplasty. J Bone Joint Surg Am. 2009. August;91(Suppl 5):10-2. [DOI] [PubMed] [Google Scholar]
- 13.Woolson ST. In the absence of evidence—why bother? A literature review of minimally invasive total hip replacement surgery. Instr Course Lect. 2006;55:189-93. [PubMed] [Google Scholar]
- 14.Chimento GF, Pavone V, Sharrock N, Kahn B, Cahill J, Sculco TP. Minimally invasive total hip arthroplasty: a prospective randomized study. J Arthroplasty. 2005. February;20(2):139-44. [DOI] [PubMed] [Google Scholar]
- 15.de Verteuil R, Imamura M, Zhu S, Glazener C, Fraser C, Munro N, Hutchison J, Grant A, Coyle D, Coyle K, Vale L. A systematic review of the clinical effectiveness and cost-effectiveness and economic modelling of minimal incision total hip replacement approaches in the management of arthritic disease of the hip. Health Technol Assess. 2008. June;12(26):iii-iv, ix-223. [DOI] [PubMed] [Google Scholar]
- 16.Wenz JF, Gurkan I, Jibodh SR. Mini-incision total hip arthroplasty: a comparative assessment of perioperative outcomes. Orthopedics. 2002 Oct;25(10):1031-43. [DOI] [PubMed] [Google Scholar]


