Abstract
A Measurement Assurance Program for spectrophotometry is being established in order to assist laboratories involved in spectrophotometric calibrations. This paper deals with the preparation and calibration of neutral density glass filters for checking the linearity of photometric response, as applied to spectral transmittance measurements. Several sets of filters were prepared from suitable neutral glass to provide nominal transmittances of 92, 70, 50, 25, 10, 1, and 0.1% at a wavelength of 548.5 nm. These filter sets will be available in three sizes: these are, 38 mm diameter aperture in 51 × 51 mm holder, 25 mm diameter aperture in 51 × 28 mm holder, and 30 × 8 mm aperture in a cuvette holder. The filters were calibrated for spectral transmittance on the NBS Reference Spectrophotometer for high accuracy transmittance measurements. Measurements were made with a 1.5 nm passband collimated sample beam. The filters were checked for uniformity and measurements were made to determine the effects of sample beam polarization. The transmittance data for the wavelength range of interest were analyzed by statistical methods to determine the effects of passband for a range of 1.5 nm to 10.5 nm passband. The results of these measurements are presented in tabular and graphical detail for the master filter set.
Keywords: experimental design, filter uniformity, linearity testing, measurement assurance program, neutral density glass, passband effects, polarization effects, polynomial fitting, spectrophotometry, statistics, transmittance standards
1. Introduction
This paper deals with the preparation and calibration of neutral density glass filters for checking the linearity of photometric response, as applied to spectral transmittance measurements.
The application of absolute techniques, such as the double-aperture method [1],1 for checking the linearity of a spectrophotometer’s response, is difficult to realize on many instruments because of problems involving sample and reference beam geometry or detector configurations. The other approach to checking linearity is through the use of a set of transmittance standards. Several sets of glass filters have been prepared and calibrated for this purpose. A Measurement Assurance Program (MAP) is being established through which these sets of transmittance standards will be used for the purpose of improving the accuracy of spectrophotometer measurements in laboratories participating in the program,
2. Selection and Preparation of the Standards
Some of the factors to be considered in selecting suitable filters for transmittance standards are: available range of transmittances, light scattering properties, uniformity, stability, passband sensitivity, and wavelength sensitivity. Schott2 neutral density glass types NG-4, NG-9, and NG-11 were selected on the basis of these characteristics and properties as well as previous experiences with Schott glass by NBS in the preparation of Standard Reference Material (SRM) 930 [2].3 Two levels of transmittance were prepared from each of the glass types as follows:
| Glass Type | Nominal Transmittance | Equivalent Transmission Density |
|---|---|---|
| NG-11 | 70% | 0.15 |
| NG-11 | 50% | 0.3 |
| NG-4 | 25% | 0.6 |
| NG-4 | 10% | 1.0 |
| NG-9 | 1% | 2.0 |
| NG-9 | 0.1% | 3.0 |
An additional filter of borosilicate crown glass having a nominal transmittance of 92% (transmission density 0.036) is included in the set.
The filter sets were prepared in three sizes in order to accommodate different instruments. The largest filters are mounted in 51 × 51 mm holders with a filter aperture of 38 mm diameter. The intermediate size filters are mounted in 51 × 38 mm holders with a filter aperture of 25 mm. The smallest filters are mounted in cuvette holders and provide a filter aperture of 30 × 8 mm.
The preparation of the filters from the stock glass was done in the NBS Optical Shop. The tolerances on parallelism of the two faces of the filters was maintained at approximately 0.01°. They were polished to a flatness of 3 fringes or better.
Calculations of the required thicknesses were made from internal transmittance data supplied by the manufacturer. The internal transmittance of 1 mm path length for the three glass types is as follows:
| Glass Type | 1 mm path |
|---|---|
| NG-4 | 0.32 |
| NG-9 | 0.035 |
| NG-11 | 0.78 |
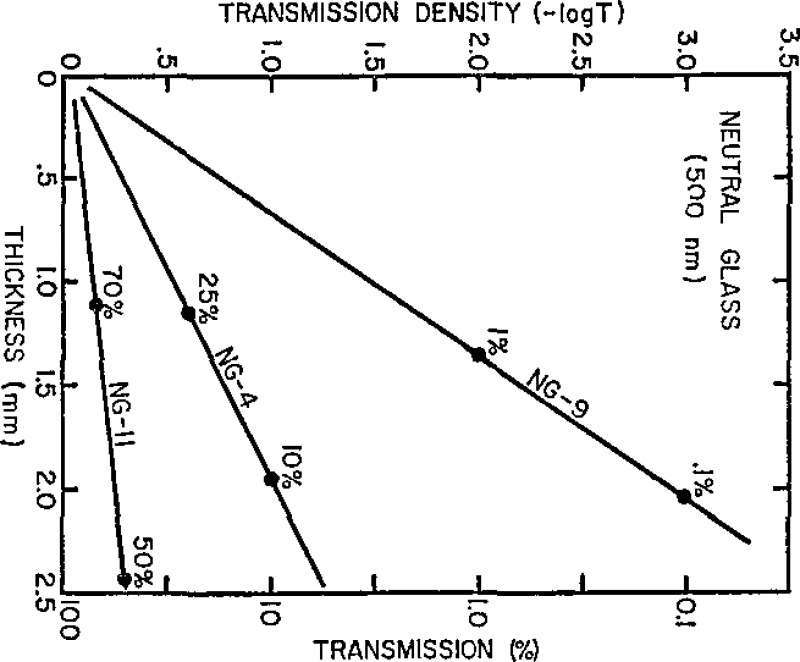
The values of transmittance for a wavelength of 500 nm were computed from these internal transmittance values. These transmittance values were converted to equivalent transmission density. Since the transmission density is linear with thickness, it is possible to determine, by graphical techniques, the required thickness for a desired transmittance value. Figure 1 shows the relationship of transmission density to thickness for the glass types NG-4, NG-9, and NG-11. The degree of accuracy in determining the required thickness for a given transmittance value by this graphical technique is dependent on the initial accuracy of the internal transmittance values used to determine the transmittance of 1 mm and 2 mm thicknesses. The actual transmittance values achieved by this technique closely approximated the desired nominal transmittance values for the filter set.
Figure 1.
Transmission density versus thickness of Schott NG-4, NG-9, and NG-11 neutral glasses as derived from internal transmission data for I mm and 2 mm thicknesses.
3. Transmission Analysis
3.1. Light Scattering
Scattering of a collimated sample beam transmitted through the neutral filters was quantitatively assessed by the ASTM recommended method [3] for measuring haze percentage. The measurements were made on the reference hazemeter [4] using the ASTM recommended geometry and methods. This instrument has a well collimated circular incident beam having a color temperature of approximately 6800 K. A visual response filter at the detector modifies its response to give the hazemeter a peak sensitivity at approximately 550 nm. The instrument measures total forward scattering relative to the total transmission within the definition of this response and for the ASTM recommended geometry. The haze percentage determined for a set of filters was found to be as follows:
| Filter | Haze Percentage | Nominal Transmittance |
|---|---|---|
| 1-1 | 0.05% | 92% |
| 1-2 | 0.02% | 70% |
| 1-3 | 0.05% | 50% |
| 1-4 | 0.06% | 25% |
| 1-5 | 0.04% | 10% |
| 1-6 | —* | 1% |
| 1-7 | —* | 0.1% |
The 1 and 0.1% transmitting filters were too low in transmittancefor analysis by the hazemeter. It was concluded from these results thatthe filters scattered less than 0.1% of the transmitted sample beam.
3.2. Survey Transmittance Measurements
The purpose of a survey study of the neutral filter transmittance was to assess their over-all spectral properties in the visible spectrum and select a specific wavelength for detailed analysis and calibration. Since the filters are not perfectly neutral, it was desirable that a wavelength be selected for calibration, at which the transmittance values of the filters would be least sensitive to variation in passband and wavelength scale errors associated with various spectrophotometers.
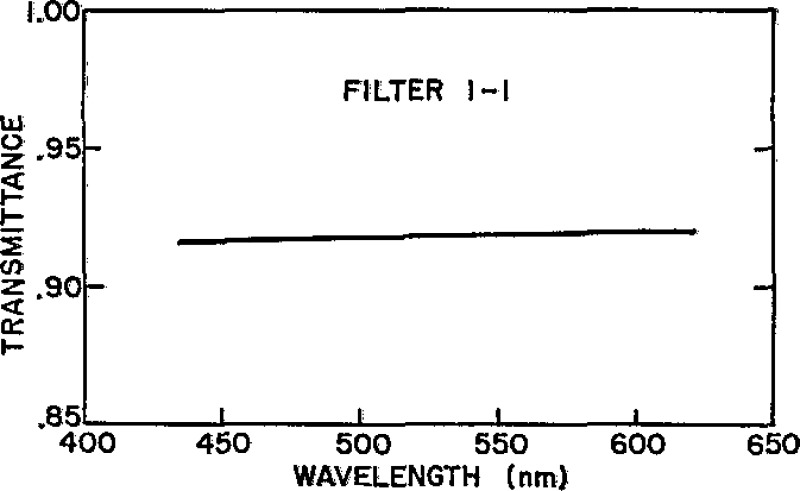
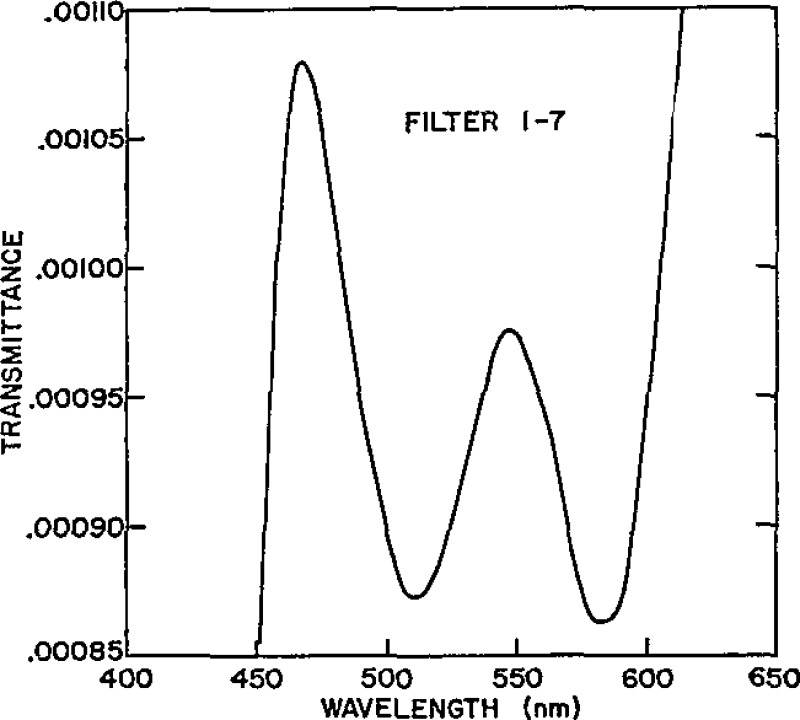
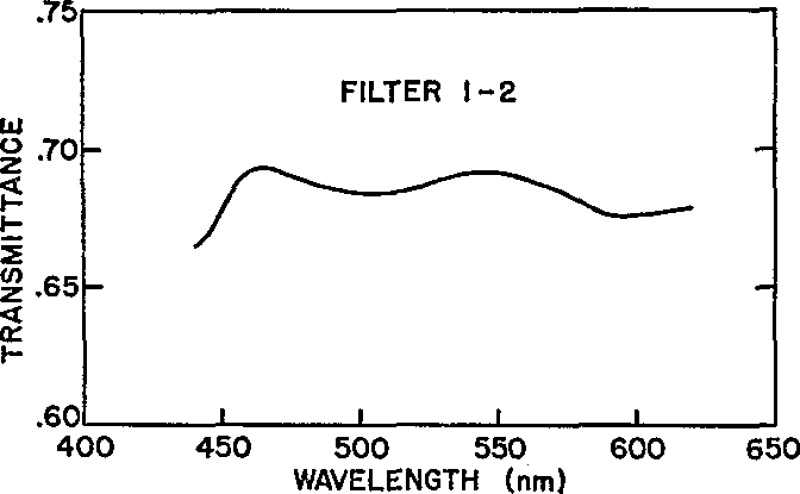
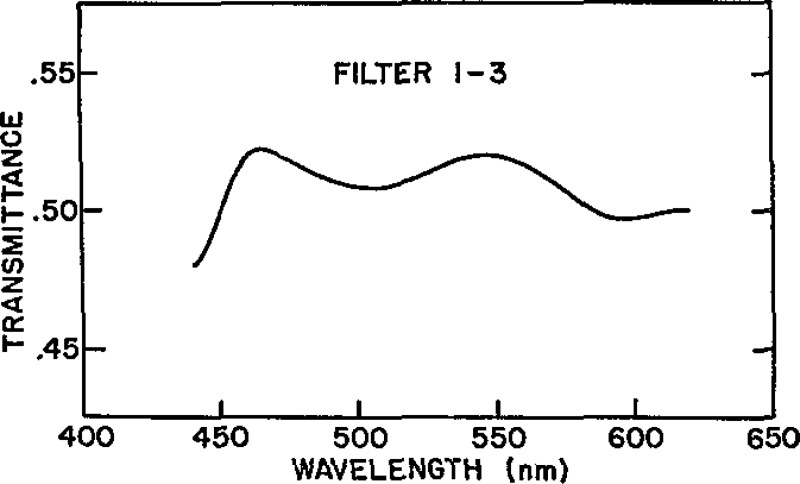
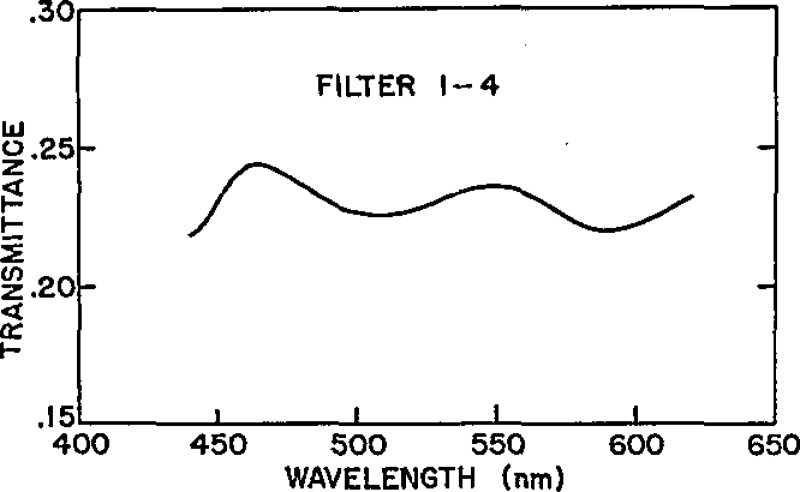
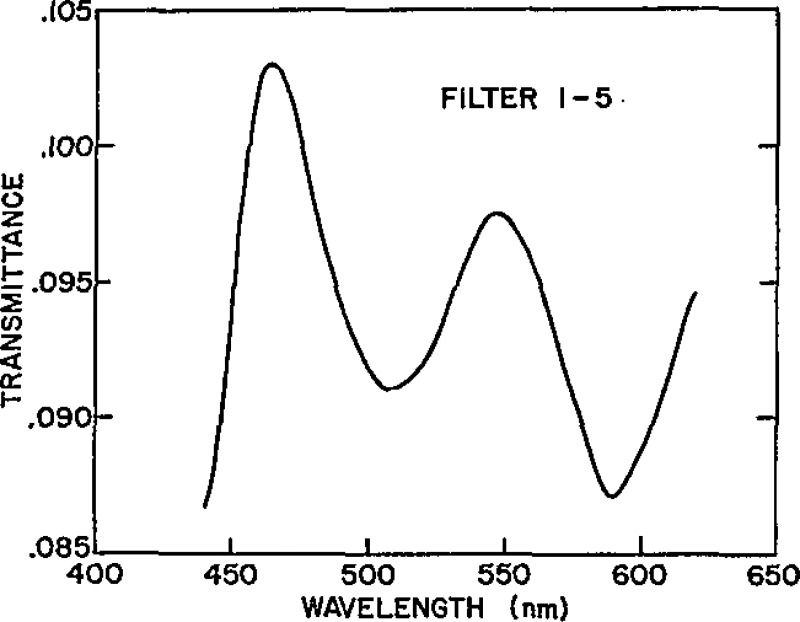
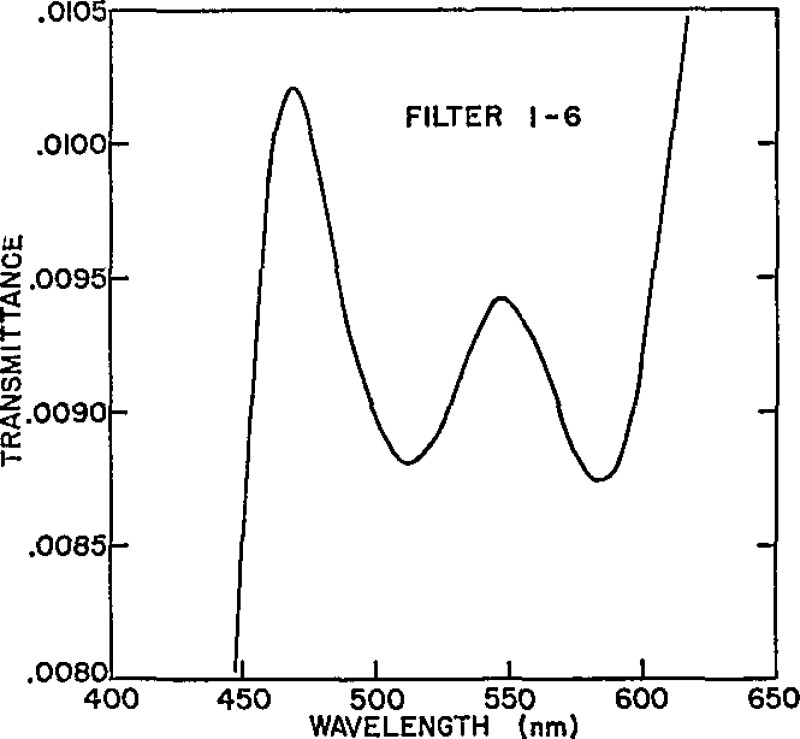
With the exception of the borosilicate crown glass filter, the filters in the set are of a similar type glass with a common dye in three different concentrations for the NG-4, NG-9, and NG-11 glass types. The spectral transmission density curves of these filters in the spectral range between approximately 440 nm and 620 nm shows that the absorptions appear at the same wavelengths for the different concentrations associated with these glass types. Figures 2 through 8 illustrate the results of a 1-nm interval survey of the spectral transmittance of the filters between 440 and 620 nm. These measurements were made with a commercial spectrophotometer. The slit-width was maintained at approximately 0.1 mm (0.37 nm passband). Further measurements were made of the 10% filter with slit-widths of 1.0, 2.0, and 3.0 mm. These slit-widths correspond to passbands of 3.7, 7.4, and 11.1 nm, respectively.
Figure 2.
Spectral transmittance of Master Filter 1–1.
Figure 8.
Spectral Transmittance of Master Filter 1–7.
Figure 3.
Spectral transmittance of Master Filter 1–2.
Figure 4.
Spectral transmittance of Master Filter 1–3.
Figure 5.
Spectral transmittance of Master Filter 1–4.
Figure 6.
Spectral transmittance of Master Filter 1–5.
Figure 7.
Spectral transmittance of Master Filter 1–6.
There are four wavelengths within the wavelength range 440 to 620 nm corresponding to peaks and valleys that could be used for the purpose of establishing a calibrated set of photometric scale standards. However, only one wavelength is needed and the absorption peak at approximately 548.5 nm was selected as being the most suitable. The spectral peak at approximately 464 nm and the absorption valleys at approximately 510 and 591 nm do not show a significant change in transmittance for the range of passbands used in this survey. A photometric resolution of approximately ±0.01% is required in order to detect the effect of passband on the spectral transmittance measured at these wavelengths.
3.3. High Accuracy Transmittance Measurements
Calibration of the spectral transmittance of the master set of filters and three other sets was done on the NBS Reference Spectrophotometer [5,6,7] for measuring high accuracy transmittance. The measurements were made with a passband of 1.5 nm and a beam diameter of 10 mm. Measurements were made for perpendicularly (s) and horizontally (p) polarized incident sample beams at 1.5 nm intervals from 545.5 to 557.5 nm. Each filter was scanned for uniformity at 547 nm. The uniformity measurements were made at three locations; center, 2 mm horizontally from center, and 2 mm below center. Transmittances for master set #1 filters are listed in table 1. The results of the uniformity scan at 547 nm are listed in table 2. The transmittance values listed in table 1 are an average of the two polarizations. The values for both polarizations are listed for the uniformity measurements made at 547 nm. The instrumental uncertainties in the values listed in tables 1 and 2 are estimated to be ±0.04% for filter 1–1 to ±0.0005% for filter 1–7. A complete description of the measurement sequence and data reduction for the high accuracy measurements and an analysis of the errors associated with such measurements is given in refs. [5–7].
Table 1.
Spectral Transmittance of Master Set No. 1 for a Passband of 1.5 nm.
| Wavelength (nm) | Filter 1-1 | Filter 1-2 | Filter 1-3 | Filter 1-4 | Filter 1-5 | Filter 1-6 | Filter 1-7 |
|---|---|---|---|---|---|---|---|
| 536.5 | 0.9164 | 0.6902 | 0.5177 | 0.2339 | 0.0955 | 0.00919 | 0.000915 |
| 538.0 | .9165 | .6905 | .5181 | .2345 | .0959 | .00922 | .000922 |
| 539.5 | .9165 | .6908 | .5185 | .2350 | .0962 | .00926 | .000925 |
| 541.0 | .9165 | .6910 | .5187 | .2353 | .0964 | .00928 | .000929 |
| 542.5 | .9166 | .6912 | .5190 | .2357 | .0966 | .00931 | .000933 |
| 544.0 | .9166 | .6913 | .5192 | .2360 | .0969 | .00932 | .000935 |
| 545.5 | .9166 | .6913 | .5192 | .2362 | .0970 | .00933 | .000936 |
| 547.0 | .9166 | .6914 | .5194 | .2363 | .0971 | .00934 | .000938 |
| 548.5 | .9168 | .6913 | .5193 | .2363 | .0971 | .00934 | .000938 |
| 550.0 | .9167 | .6912 | .5191 | .2363 | .0971 | .00934 | .000940 |
| 551.5 | .9167 | .6912 | .5190 | .2362 | .0971 | .00933 | .000937 |
| 553.0 | .9167 | .6911 | .5190 | .2361 | .0970 | .00931 | .000934 |
| 554.5 | .9166 | .6908 | .5187 | .2358 | .0968 | .00930 | .000934 |
| 556.0 | .9168 | .6908 | .5184 | .2355 | .0966 | .00928 | .000929 |
| 557.5 | .9168 | .6904 | .5180 | .2351 | .0964 | .00924 | .000923 |
Table 2.
Transmittance Uniformity of Master Set No. 1 at 547 nm.
| Location, Polarization | Filter 1-1 | Filter 1-2 | Filter 1-3 | Filter 1-4 | Filter 1-5 | Filter 1-6 | Filter 1-7 |
|---|---|---|---|---|---|---|---|
| 1, p | 0.9166 | 0.6913 | 0.5193 | 0.2362 | 0.0971 | 0.00934 | 0.000939 |
| 1, s | .9166 | .6913 | .5193 | .2362 | .0971 | .00935 | .000940 |
| 2, p | .9166 | .6914 | .5193 | .2361 | .0971 | .00934 | .000937 |
| 2, p | .9167 | .6914 | .5193 | .2362 | .0971 | .00934 | .000938 |
| 3, p | .9164 | .6913 | .5192 | .2362 | .0971 | .00934 | .000938 |
| 3, p | .9165 | .6913 | .5192 | .2362 | .0971 | .00933 | .000939 |
4. Statistical Analysis
A statistical analysis of the data obtained on the spectral transmittance of the neutral filters was used to determine the magnitude of change in transmittance values due to changes in passband and also the magnitude of change due to location of the sample beam (filter uniformity).
Preliminary data from the commercial instrument indicated that the central wavelength of interest was at approximately 547 nm. However, a further analysis of the data from the high accuracy instrument indicated that 548.5 nm was a better choice.
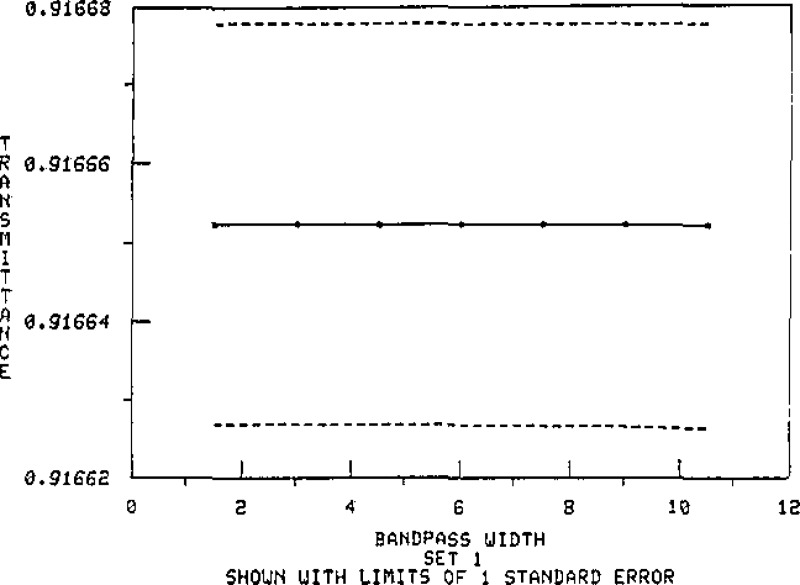
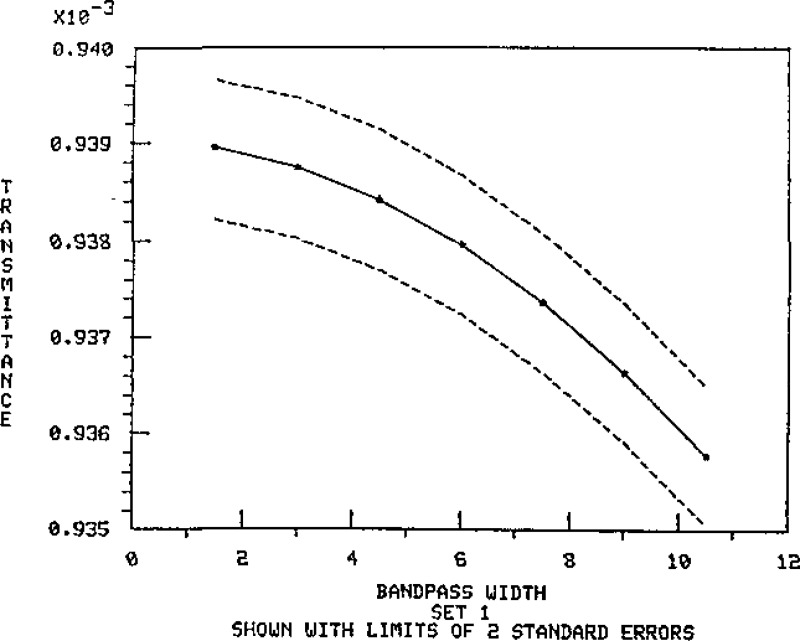
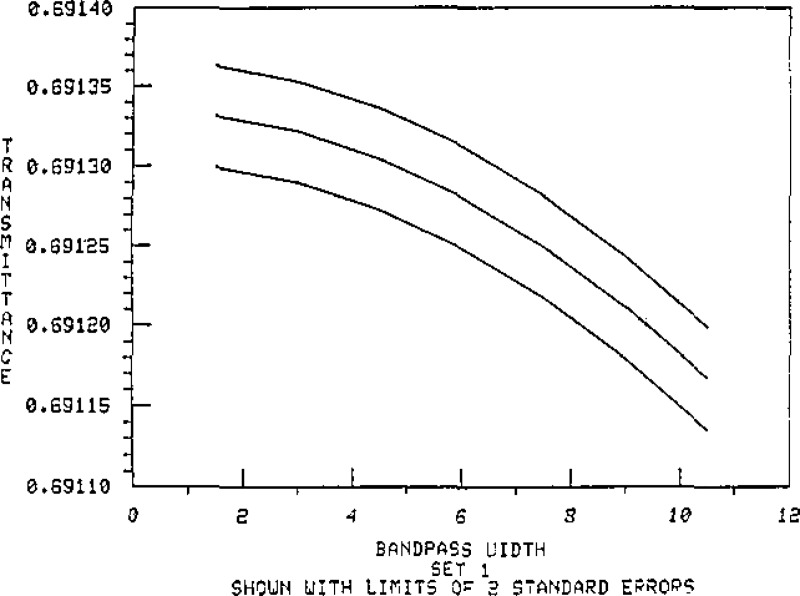
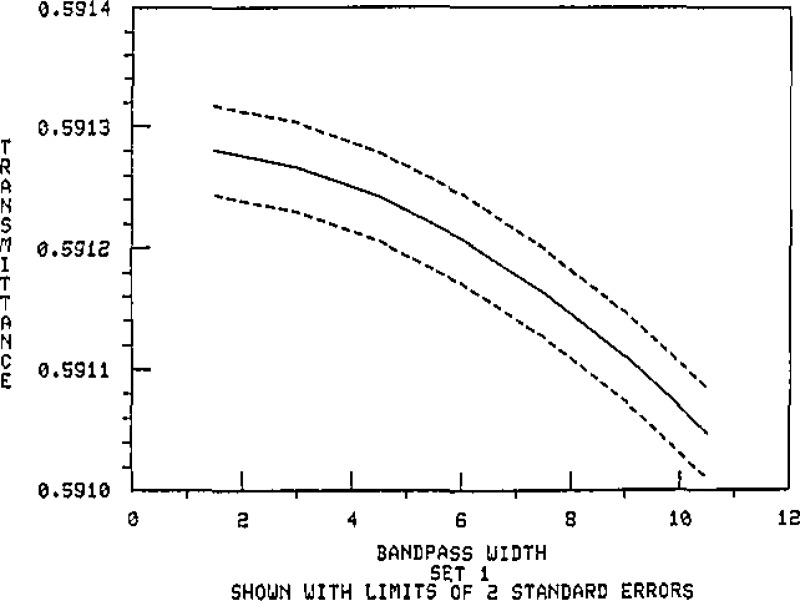
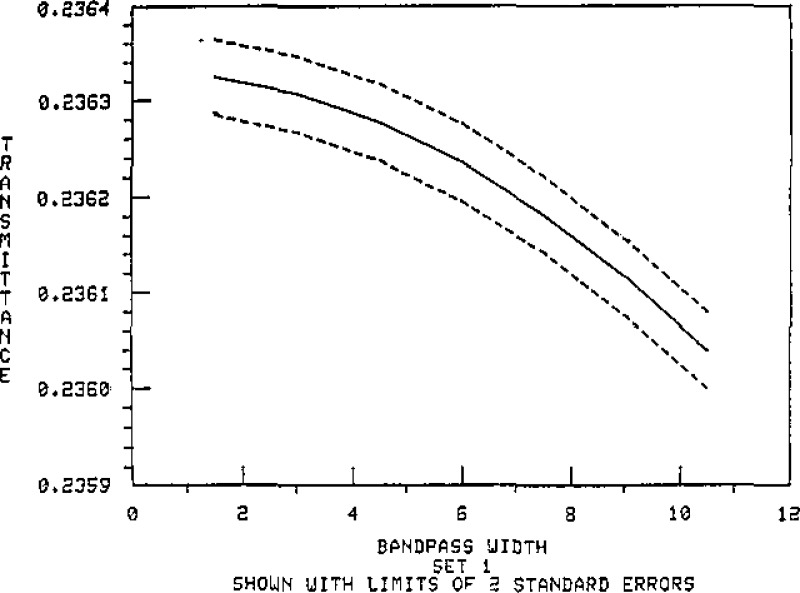
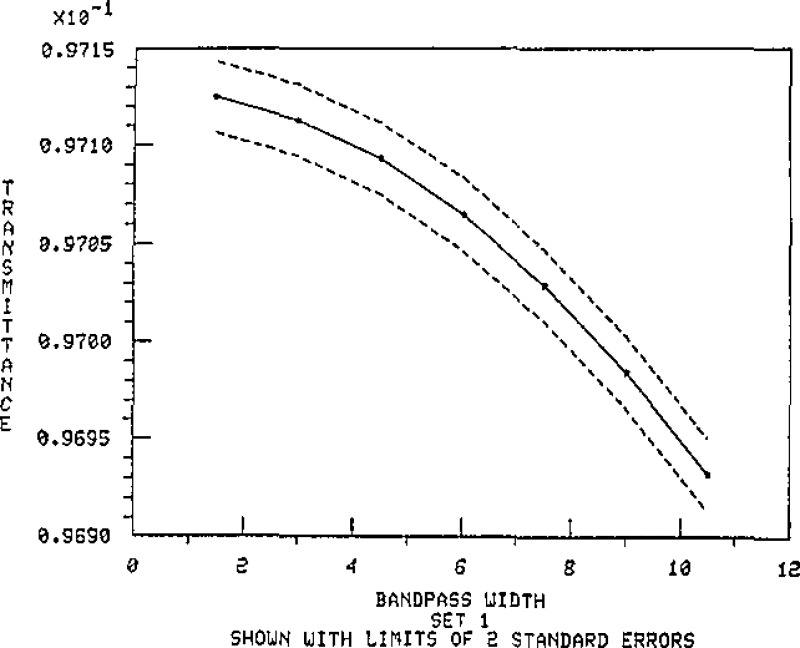
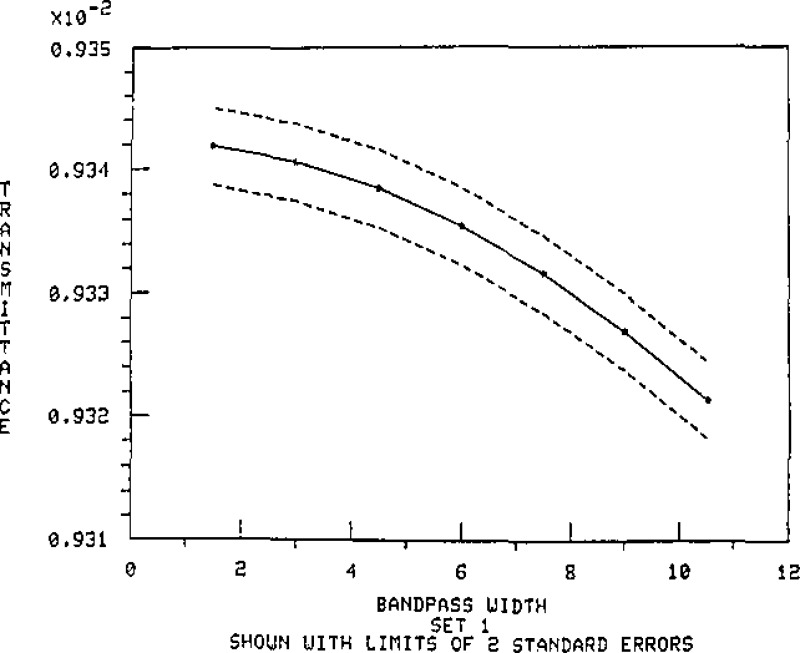
Data are presented in table 3 to illustrate the effect of passband on the transmittance at the central wavelength for the master set #1 filters. These values are based on calculation for a triangular passband, using continuous integration. Figures 9 through 15 show these results plotted with the standard error limits. The data listed in table 4 illustrate the magnitude of change due to position location for the master set of filters.
Table 3.
Transmittance of Master Set No. 1 at 548.5 nm as a Function of Passband for a Triangular Passband.
| Passband (nm) | Filter 1-1 | Filter 1-2 | Filter 1-3 | Filter 1-4 | Filter 1-5 | Filter 1-6 | Filter 1-7 |
|---|---|---|---|---|---|---|---|
| 1.5 | 0.91665 ( 3) | 0.69133 ( 2) | 0.51928 ( 2) | 0.23632 ( 2) | 0.09713 ( 1) | 0.009342 ( 2) | 0.000939 ( 4) |
| 3.0 | .91665 ( 3) | .69132 ( 2) | .51927 ( 2) | .23632 ( 2) | .09711 ( 1) | .009341 ( 2) | .000939 ( 4) |
| 4.5 | .91665 ( 3) | .69130 ( 2) | .51924 ( 2) | .23628 ( 2) | .9709 ( 1) | .009338 ( 2) | .000938 ( 4) |
| 6.0 | .91665 ( 3) | .69128 ( 2) | .51921 ( 2) | .23624 ( 2) | .09706 ( 1) | .009335 ( 2) | .000938 ( 4) |
| 7.5 | .91665 ( 3) | .69125 ( 2) | .51916 ( 2) | .23618 ( 2) | .09703 ( 1) | .009332 ( 2) | .000937 ( 4) |
| 9.0 | .91665 ( 3) | .69121 ( 2) | .51911 ( 2) | .23616 ( 2) | .09698 ( 1) | .009327 ( 2) | .000937 ( 4) |
| 10.5 | .91665 ( 3) | .69117 ( 2) | .51905 ( 2) | .23604 ( 2) | .09693 ( 1) | .009321 ( 2) | .000936 ( 4) |
Note: uncertainties (one standard deviation) are in parentheses
Figure 9.
Spectral transmittance at 548.5 nm versus bandpass for Master Filter 1–1.
Figure 15.
Spectral transmittance at 548.5 nm versus bandpass for Master Filter 1–7.
Table 4.
Magnitude of Filter Nonuniformity
| Filter No. | Location | Transmittance at 548.5 nm | Location Difference |
|---|---|---|---|
| 1-1 | 1 | 0.91658 | (1)-(2) = −0.00008 |
| 1-1 | 2 | .91666 | (2 )-(3) = .00018 |
| 1-1 | 3 | .91648 | (1)-(3) = .00010 |
| 1-2 | 1 | .69132 | (l)-(2) = −.00006 |
| 1-2 | 2 | .69138 | (2)-(3) = .00007 |
| 1-2 | 3 | .69131 | (1)-(3) = .00001 |
| 1-3 | 1 | .51926 | (1)-(2) = −.00002 |
| 1-3 | 2 | .51928 | (2)-(3) = .00009 |
| 1-3 | 3 | .51919 | (1)-(3) = .00007 |
| 1-4 | 1 | .23624 | (1)-(2) = .00009 |
| 1-4 | 2 | .23615 | (2)-(3) = −.00004 |
| 1-4 | 3 | .23619 | (1)-(3) = .00005 |
| 1-5 | 1 | .09709 | (1)-(2) = .00001 |
| 1-5 | 2 | .09708 | (2)-(3) = .00000 |
| 1-5 | 3 | .09708 | (1)-(3) = .00001 |
| 1-6 | 1 | .009341 | (1)-(2) = −.000001 |
| 1-6 | 2 | .009342 | (2M3) .000011 |
| 1-6 | 3 | .009331 | (l)-(3) = .000010 |
| 1-7 | 1 | .000939 | (1)-(2) = .000001 |
| 1-7 | 2 | .000938 | (2)-(3) = .000001 |
| 1-7 | 3 | .000937 | (1)-(3) = .000002 |
Figure 10.
Spectral transmittance at 548.5 nm versus bandpass for Master Filter 1–2.
Figure 11.
Spectral transmittance at 548.5 nm versus bandpass for Master Filter 1–3.
Figure 12.
Spectral transmittance at 548.5 nm versus bandpass for Master Filter 1–4.
Figure 13.
Spectral transmittance at 548.5 nm versus bandpass for Master Filter 1–5.
Figure 14.
Spectral transmittance at 548.5 nm versus bandpass for Master Filter 1–6.
Remeasurement of the spectral transmittances of the neutral filters was made one year after initial calibrations. The results of this second calibration for master set #1 are compared with the original calibration and listed in table 5 for wavelength 548.5 nm. Differences in spectral transmittances of the filters shown in table 5 are too small to be clearly interpreted as changes with the possible exception of filter 1–1. Here the apparent change in transmittance was −0.0009. Further measurements at longer time intervals will be required to confirm any real changes in spectral transmittance due to aging.
Table 5.
Spectral Transmittance of Master Set No. 1 for a Passband of 1.5 nm at 548.5 nm.
| Filter No. | (Apparent changes in transmittance) | Apparent change | |
|---|---|---|---|
| First Calibration (Oct. 1980) | Second Calibration (Oct. 1981) | ||
| 1-1 | 0.9168 | 0.9159 | −0.0009 |
| 1-2 | .6913 | .6914 | .0001 |
| 1-3 | .5193 | .5196 | .0003 |
| 1-4 | .2363 | .2365 | .0002 |
| 1-5 | .09712 | .09722 | .00010 |
| 1-6 | .009337 | .009350 | .000013 |
| 1-7 | .0009376 | .0009395 | .0000019 |
Additional details of the statistical analysis are given in appendix A.
5. Summary
One master set and three working sets of neutral density glass filters have been calibrated for use as spectral transmittance standards for checking the photometric scale linearity of spectrophotometers. Each set consists of seven filters ranging in transmittance from 0.1 to 92%. These filters will be used in a Measurement Assurance Program (MAP). The purpose of this program will be to assist laboratories wishing to maintain a high level of confidence in the accuracy of their spectrophotometric measurements.
Data are presented that show the spectral transmittances of these filters at 548.5 nm to be relatively insensitive to variations in passband and slight errors in instrument wavelength setting. The filters are of sufficient uniformity for use as transmittance standards.
Acknowledgments
This project is supported by the Office of Measurement Services (Dr. B. C. Belanger, Chief) and coordinated by Dr. L. J. Kieffer.
Appendix
Statistical Design and Analysis for Calibrating the Transmittance of Filters for Spectrophotometer Linearity Testing
For four sets of filters, each set containing seven filter types of various transmittances, an assigned transmittance value needed to be determined when a triangular passband of given width is superimposed. Additionally, the polarization and location of the spot size on the filter had an unknown influence on the transmittance value. Although a commercial instrument can scan the entire spectrum at little cost, the measurements are an order of magnitude less accurate than those obtained using the high accuracy instrument. For this reason, a design was developed to determine:
The values to be measured for purposes of calibration, and
The existence of a possible effect due to polarity or the effect of location on the filter.
The motivation behind the choice of design is discussed in section A below. In the event of (2), the calibration must be reconsidered. On the basis of these extremely precise measurements, an effect due to location was statistically significant. This suggests that either:
The calibrated values can be used only for the central location on each filter; or
Additional measurements will be required to determine the magnitude of changes in transmittance due to spot location.
Since the observed differences are small (<0.2%; see table 4), the location effect may not interfere with practical usage of these filters. However, measurement as near to the central location on each filter as possible is recommended. The conclusions regarding location and polarity effects are presented in section B, and the estimation of the transmittance curve leading to the calibration values is shown in sections C and D. The method of extension for general passbands is given in section E.
A. The Design
Most organizations using these filters will have triangular passbands on their measuring equipment. Therefore, adequate determination of the transmittance using this passband is essential. However, other passband shapes may be used, and for these, a more general approach is taken. The problem then becomes one of estimating the transmittance curve with high precision. Since the measurements on the high accuracy instrument are time-consuming, a design was chosen so as to permit adequate curve estimation with relatively few points.
1. Preliminary analysis: Choice of Wavelength.
The choice for a wavelength to be calibrated required consideration of:
Varying passband widths, and
The potential for imprecise wavelength specification.
We consider neighborhoods of 21 nanometers, since the widest passband that is most commonly used weights frequencies within a range of this length. The chosen wavelength is:
This subsection explains this choice in light of considerations (i) and (ii).
For a passband having width w and functional form hw(λ), the transmittance at wavelength λ0 is given by the convolution integral
where f(λ) is the spectrum (transmittance curve). If the passband is normalized so that
then this simplifies to
| (1) |
In all that follows, we will assume that the passband hw has been normalized in this way.
In order for this average value to be relatively insensitive to wavelength specification, f(λ) needs to be a smooth, slowly-varying function. In mathematical terms, we search for a neighborhood where the first two derivatives of the spectrum are fairly small. This suggests a region where f(λ) is nearly constant, or, at worst, a quadratic having very small degree of curvature. A locally linear spectrum with a noticeably nonlinear slope would yield a seriously biased estimate, whereas a locally quadratic spectrum, centered at a peak or trough, would have a negligible linear term and therefore a bias which depends primarily on the second-order term (hopefully small). Preliminary readouts on a commercial instrument suggested a central wavelength of 547.0 nm for most filters. On the basis of the first set of measurements on the high accuracy instrument, however, this was later amended to λo = 548.5 nm.
2. Number of Points
Assuming that the spectrum is locally quadratic and has a maximum around λo = 548.5 nm, our goal is to estimate the three parameters α, β, γ in the approximation:
| (2) |
In order to estimate α, β, and γ, by , , , the proposed design specifies a total of five points, one at the central wavelength, and one each at equal distances ±2δ from the central wavelength.
Let x = λ − 548.5, so as to center the relation at the origin. A minimum of three points is required to specify the parameters. This leaves no room for the assessment of error. With more points, the variance of (1) will be a linear combination of the variances and covariances of the parameters, and will be dominated primarily by the variance of the constant term. If our chosen points are symmetrically placed about 0, it can be shown that:
| (3) |
where
As , the smallest value of c2/e is 2 (all points at the origin except for the two at ±1). A lower bound on (3) is therefore:
| (3′) |
If we concern ourselves with only the first term, then, relative to σ2, eq (3′) gives the reduction in the overall variance that we may hope to gain in our variance of the transmittance value. With n = 3, there is no reduction; with n = 5, the variance is already reduced to 33% of its value. An extra two points provides only an extra 13% improvement. Thus, the design specifies a minimum of two points on either side of the central wavelength.
3. Location of Points
We consider two criteria in selecting the four wavelengths (two symmetrically placed on either side of the central wavelength):
Small error in quadratic interpolation of the transmittance curve;
Small variance in the transmittance estimate given by (1).
On the basis of these two criteria, the proposed design specifies measurements to be taken at:
The reasoning behind this choice is explained by considering (i) and (ii) separately.
(i). Error is quadratic interpolation
A bound for the estimate of error in polynominal interpolation of degree n at the points a ⩽ x1, x2, … xn+1 ⩽ b is
(see, e.g., [8]). The first part of this error depends upon the transmittance curve and led to the choice of l0 = 548.5 in subsection 1 above. Now we concentrate on selecting x1, … , xn+1 so that the error is as small as possible. The answer to this problem is given by the zeroes of the Chebyshev polynomials, namely
| (4) |
For the problem at hand, n+1 = 5; thus:
As most passbands are in multiples of 1.5 nm, the closest multiples to these points are ±6 nm and either ±9 nm or ±10.5 nm. However, the nature of the triangular passband which is frequently used in practice would assign zero weight to the values ±10.5 nm. Since a primary goal is the estimation of the transmittance using this passband, we choose ±9 nm.
(ii). Minimum variance of transmittance estimate
If we estimate the transmittance curve using a quadratic function, viz.
| (5) |
then the transmittance using passband of width w is
Let
Then
where
Then minimizing the variance of is equivalent to
A design which minimizes the variance-covariance matrix of the parameter estimates is given in [9]. The design would place the two observations each at λo + 10.5 nm in addition to the one at λo. If our function is truly quadratic, such a design would be optimal.
For many reasons, however, we modify the optimal design which permits more flexibility in our choice of model. Such a design is suggested in [10]. The design recommends two different values rather than repeating them at the endpoints.
Closely related to this design is the one which minimizes the maximum variance of the best linear unbiased estimate of the function f(x) given by eq (5). Reference [11] shows that the five points should be placed at the zeros of the polynomial
where P4′ is the derivative of the fourth degree Legendre polynomial
Hence, the five points are 0, ±7.1, ±10.5 nm from λ0. Again, since our passband applies decreasing weight to f(x) as x is further from the origin, we choose to make these points in towards 0, to ±6 and ±9 nm.
4. Tests for Polarity and Spot Location
Additional measurements at the central wavelength are needed to provide tests for difference in polarization and spot location. In addition to the measurement at the central wavelength with polarity 1 (point 1 at location (0,0)), measurements were taken at
Point 2: Spot location (2,0), Polarity 1
Point 3: Spot location (0,2), Polarity 2
Point 4: Spot location (0,2), Polarity 1.
This permits a check for a difference due to polarity by comparing the third and fourth points, and check for location differences by comparing points 1 and 4 (or 1 and 2 or 2 and 4). A more extensive check based on a full 2 × 3 factorial combination was made on the master set #1.
B. Results: Polarity and Location
The reported results are based on measurements taken on four sets of filters. A complete series of 15 measurements across the 21-nm range at 1.5 nm spacing was taken on the master set, as a check for the adequacy of the five-point design used on the other three sets. In addition, polarity and location were tested on each filter in all sets. The results of these tests are reported in this section; transmittance calculations are reported in section C.
For set 1, six measurements were taken at λ = 547.0, at both polarity 1 and 2 at the center of the filter (0,0) and at placements of two units to the right (2,0) and above (0,2) the center. This permits a 3 × 2 factorial analysis for detecting differences due to location and polarity.
For sets 2, 3, and 4, t-tests on location and polarity were calculated. The test on location was deemed significant if the comparison of either (0,0) and (0,2) or (0,2) and (2,0) indicated a chance of less than 1% under the hypothesis of no effect.
None of the tests of polarity was significant at the 0.01 level. (One filter from one set gave significance of 0.025. Out of 28 such tests, the chance of obtaining one or more spurious significances is more than 50%, so this is hardly surprising.) For location, however, the following sets showed a significant difference (level given in parentheses):
| Filter | Set (level of significance) |
|---|---|
| 2 | 3 (0.0004) |
| 3. | 2 (0.013), 3 (0.002), 4(<0.0001) |
| 4 | 2 (0.0013), 3(0.0003), 4 (0.01). |
| 5 | 3 (0.01), 4 (0.0003) |
| 6 | 1 (0.006), 4 (0.0013) [3 (0.02)] |
| 7 | 1 (0.0002), 4 (0.0025) |
Out of 28 tests of significance, the chance of 13 or more coming up significant at the 0.01 level when in fact location is irrelevant is
and the chance that at least 2 of the 4 sets would show significance on a given filter type is
For 7 types of filters, the overall level of significance is approximately 0.004.
These tests of significance suggest that it is highly unlikely that location on the filter in measuring transmittance is irrelevant. However, all tests were based on the internal standard errors of the four measurements made within the twenty-minute measurement period. This standard error reflects only the error of the four internal readings but does not reflect the measurement-to-measurement variation caused by apparatus set-up, filter placement in the wheel or polarity switches. As such, the actual error in taking successive measurements may in fact be larger than the reported standard error. However, measurements on these filters as near to the central location as possible is recommended. The transmittance values using triangular passbands have been calculated assuming location is irrelevant (thereby using all data in the estimation of the transmittance curve) and assuming location has a significant effect on the transmittance value (using only the data at the center (0,0) spot). Only the latter are given for the master Set #1 in table 3 of the main report.
C. Estimation of Transmittance Curve
As there are four sets which contain all filter types, it will be helpful to use all filters having the same nominal transmittance in estimating the transmittance curve. We fit quadratic functions of the form in eq (5).
Consider one filter type front each set having a nominal transmittance (say, 69%). The average value of transmittance, given by the parameter α, is likely to be specific to each filter in the different sets. However, the curvature parameters β and γ are likely to be common to all 4 filters, having a given nominal transmittance. Thus we use all these observations to fit a relation of the form
| (7) |
i = 1, …, nj (= # of measurements in jth set).
j = 1,…, 4 (= # of sets).
Note that
since set 1 has the full 15 measurements and 6 additional measurements for polarity and location, and
for sets 2, 3 and 4. Note also that the average level, αj, is specific to the filter in the set, as the level may reflect the amount of dye that is contained in the filter. However, the parameters β and γ are likely to be influenced by the properties of the dye contained in this glass and are thus common to the filters with the same nominal transmittance from all four sets. This joint estimation permits the more accurate calculation of β and γ in sets 2, 3, and 4, where the number of observations is only eight.
Since transmittance may depend on location (section B), we also estimate α, β, γ, for each of the 7 filter types, using only those observations at location (0,0). In this case,
These parameters were not found to differ from those using all the data by more than two standard errors. In light of potential location differences, however, table A1 provides these estimates of the parameters α, β and γ for the master set #1 filters.
D. Estimation of Transmittance Values Using Triangular Passband
As indicated in eq (1), when the transmittance curve is superimposed with a normalized passband centered at λ0, the observed transmittance can be expressed as a convolution integral. Using a triangular passband of width w, symmetric about λ0, the result is a weighted average of all transmittances around the central wavelength. This weighted average may be computed either as a discrete sum:
| (8) |
where
| (9) |
or as an integral as in eq (1). The first approach, based on eq (8), is a discrete computation based on the observed values yi. The second approach, eq (1), uses the values yi to estimate f(x) (eq (5)) and integrates directly. For sets 2, 3, and 4 where data inside ±6 nm exists only at the central wavelength, eq (1) is clearly the method of choice. Furthermore, the estimation of f(x) uses all of the data in its estimation (section C), and is therefore likely to remove much of the variability in the values yi.
The standard error of can be computed using the reported standard errors (si) associated with each measurement:
Using the triangular passband of width w (eq (9)) and the fitted relation (7), we have that the transmittance of a filter from the jth set is
| (10) |
for which
Table A1.
Coefficients for Estimation of Transmittance Curve for Set #1 (includes data from center location only).
| Table gives constant term; all standard errors given in parentheses | |||
|---|---|---|---|
| Filter 1 | −9166325 ( 200) | 1.6493 ( −1877) | −0.002562 ( −032669) |
| 2 | .6913352 ( 117) | −2.0067 (1.5030) | −0.91372 ( −02616) |
| 3 | −5192856 ( 135) | −2.7205 ( −1151) | −12973 ( −0200) |
| 4 | −2363304 ( 147) | +1.1966 ( −0923) | −15858 ( .0161) |
| 5 | .0971290 ( 068) | +0.8657 ( .0736) | −10699 ( .0128) |
| 6 | .00934226 ( 115) | −.05959 (-00979) | −0.11355 (-00170) |
| 7 | .000939014 ( 266) | −0.008245 ( .002893) | −0.017568 ( .000504) |
since the variance of the curvature parameter and the covariance term are typically two orders of magnitude smaller than the variance of the fitted constant term.
E. Other Passbands
Table 3 of the main report gives transmittances for the master set #1 filters for a triangular passband. For passbands other than those listed in table 3, the transmittance may be calculated directly via eq (10), using the estimated coefficients , , and listed in table A1.
Footnotes
Figure in brackets indicate literature references at the end of this paper.
Certain commercial materials are identified in this paper in order to adequately specify the experimental procedure. Such identification does not imply recommendation or endorsement by the National Bureau of Standards nor does it imply that the materials identified are necessarily the best available for the purpose.
SRM 930 consists of three filters with nominal transmittances of 10%, 20%, and 30% calibrated at several wavelengths. Originally these SRM filters were designed for use by clinical chemists and are sold by the set. Our goal with the present filters was to provide a larger dynamic range so that the filters could be used to measure linearity in applications when other methods are difficult if not impossible. Also, these filters are not for sale, but are to be retained by NBS and issued only temporarily as part of a MAP measurement service.
6. References
- [1].Mielenz K. D. and Eckerle K. L. Spectrophotometer Linearity Testing Using the Double-Aperture Method, Appl. Opt. 11 (10), 2294 (October 1972). [DOI] [PubMed] [Google Scholar]
- [2].Mavrodineanu R. and Baldwin J. R. Glass Filters as a Standard Reference Material for Spectrophotometer—Selection, Preparation, Certification, Use SRM 930. NBS Special Publication 260–51 (November 1975).
- [3].ASTM D1003, Haze and Luminous Transmittance of Transparent Plastics, ASTM Subcommittee D20, 40 on Optical Properties of Plastics,
- [4].Weidner V. R. and Hsia J. J. NBS reference hazemeter: its development and testing. Appl. Opt. 18 (10) 1619 (May 15, 1979). [DOI] [PubMed] [Google Scholar]
- [5].Mielenz K. D. and Eckerle K. L. Design, Construction, and Testing of a New High Accuracy Spectrophotometer. Natl. Bur. Stand. (U.S.) Tech. Note 729; June 1972. 55 p. [Google Scholar]
- [6].Eckerle K. L. Modification of an NBS Reference Spec trophotometer. Natl. Bur. Stand. (U.S.) Tech. Note 913; July 1976, 39 p. [Google Scholar]
- [7].Mielenz K. D., Eckerle K. L. Madden R. P., and Reader J. New Reference Spectrophotometer. Appl. Opt. 12 (7), 1630 (July 1973). [DOI] [PubMed] [Google Scholar]
- [8].Davis Philip J., Interpolation and Approximation . New York: Blaisdell; 1965. [Google Scholar]
- [9].Federov V.V., Theory of Optimal Experiments . New York: Academic Press; 1972. [Google Scholar]
- [10].Keifer J. and Studden W. J, Optimal designs for large degree polynominal regression, Ann. Statist. 4, 1113–23 (1976). [Google Scholar]
- [11].Karlin Samuel and Studden William. Optimal experimental designs. Ann. Math. Statist. 37, 783–815 (1966). [Google Scholar]


