INTRODUCTION
Genetic manipulation methods allow fluorescent labeling of virtually any cell type or protein of interest in developing embryos, providing powerful insights into morphogenetic events at cellular and subcellular resolutions. The development of ex vivo embryo culture methods combined with high-resolution imaging provides a strong platform for observing morphogenetic events as they occur within the developing embryo. In this protocol, postimplantation mouse embryos are cultured directly on the microscope stage under conditions that carefully control temperature, humidity, and gas exchange. This permits time-lapse imaging of developing mouse embryos.
RELATED INFORMATION
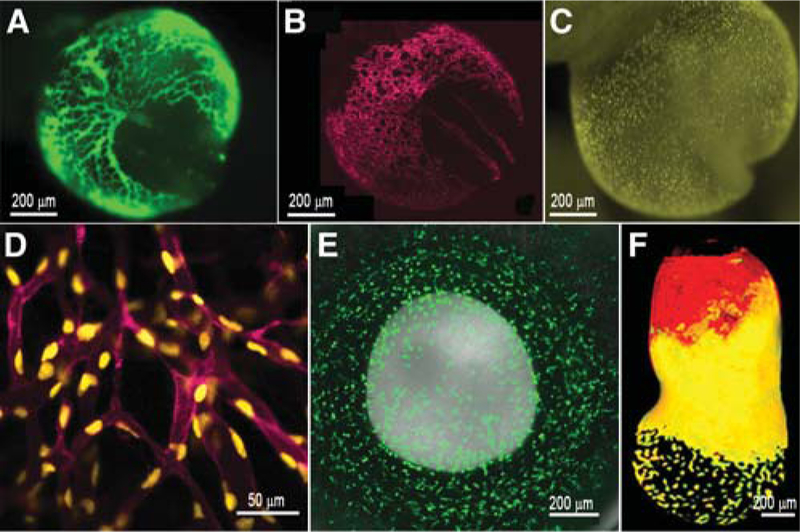
For an example of embryos used for live imaging, see Figure 1. For additional information, see Live Imaging of Mouse Embryos (Garcia et al. 2011a). Protocols for Preparation of Rat Serum for Culturing Mouse Embryos (Garcia et al. 2011b) and Preparation of Postimplantation Mouse Embryos for Imaging (Garcia et al. 2011c) are also available.
FIGURE 1.
Fluorescent transgene expression in mouse embryos. (A) β-globin marks primitive erythroblasts in circulation within the yolk sac and embryo proper at 8.5 dpc. (B,C) The Flk1 promoter is used to drive membrane mCherry (B) and nuclear yellow fluorescent protein (YFP) (C) in endothelial cells of the developing embryo at 8.5 dpc. (D) A close-up image of vessels expressing YFP and mCherry in distinct subcellular localizations. (E) Green fluorescent protein (GFP) expression driven by the cfms promoter in the neonatal eye (postnatal day 1), marking macrophages. (F) Expression of a double transgenic embryo at 7.0 dpc expressing GFP and red fluorescent protein (RFP) in cells derived from the visceral endoderm. (F, Reprinted from Hadjantonakis et al. 2008 with permission from Elsevier © 2008.)
METHOD
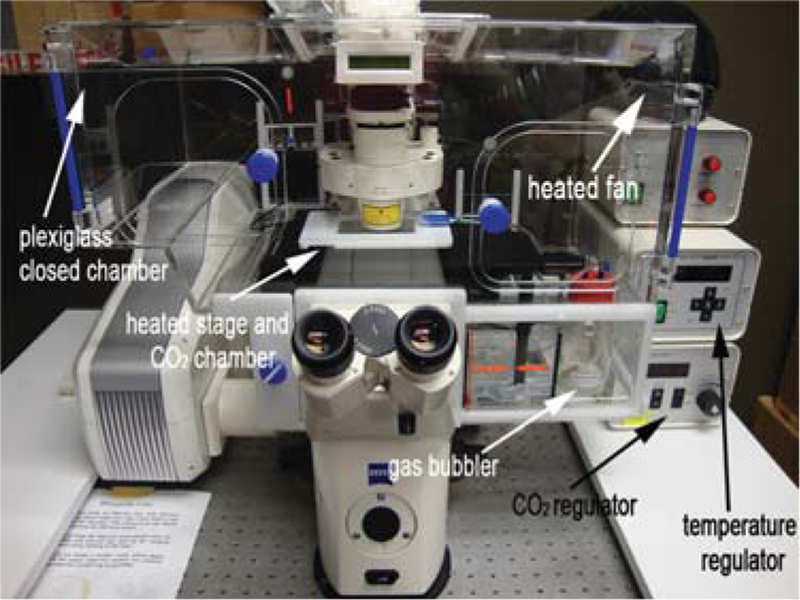
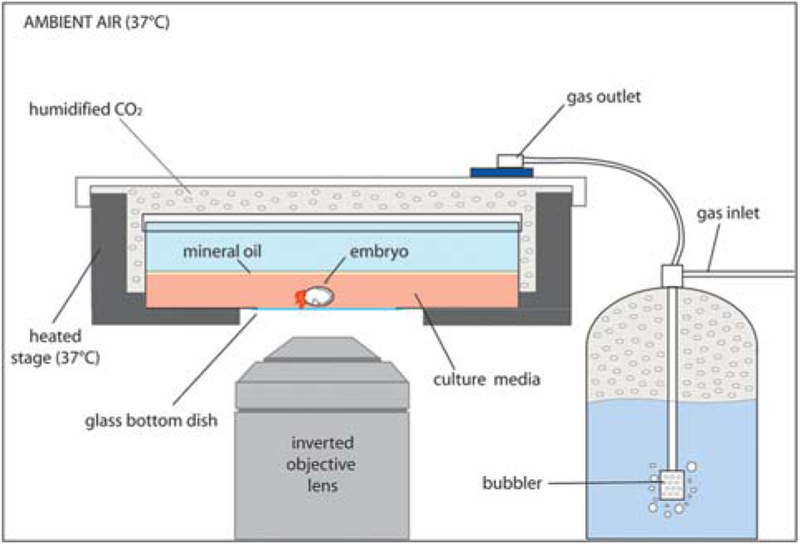
Assemble the heater box and turn it on at least 1 h before imaging starts to allow the equipment to warm up. Make sure that the gas-washing bubbler (fitted with a fine diffuser) is also placed within the heater box (see Fig. 2 and Fig. 3).
Place the embryos on the microscope stage and orient them as desired.
(Optional) Place a thin layer of sterile mineral oil on top of the medium to reduce evaporation.
-
Seal the inner edges of the lid with silicon grease.
As an alternative, the culture dish can be sealed with Teflon tape around the outer edges of the lid. If this method is used, seal the dish before the embryos are placed on the microscope stage, because no reorientation of the embryos is possible once they are on the stage.
- Collect images according to the needs of the chosen application (see below), taking care to minimize exposure to excitation light. Keep in mind the following points:
- For many applications, it is sufficient to image once every 5–10 min. Images can be a single frame or, if confocal imaging is being used, several sections can be taken along the z axis (this can compensate for embryo drift throughout the focal plane).
- If using a laser-scanning confocal microscope, acquire images using the lowest laser power possible, because the energy of the laser can adversely affect the embryo, causing tissue damage, cell death, and/or delays in development.
-
Image acquisition is simpler at lower magnifications (e.g., 5×), because small shifts in the embryo position do not affect the image field of view as drastically. At higher magnifications (>20×), watch the focus on the embryos closely and adjust every hour or two to account for embryonic drift during the culture period.Using this technique, 5.5–8.5-dpc embryos can be cultured for up to 24 h and 9.5-dpc embryos for 12–18 h.
- During the culture period, prevent any fluctuations in gas flow and temperature.
- At stage 8.0 dpc and older, observe embryos to ensure that the heart rate remains normal. This can be observed visually by the presence of a forward, pulsatile movement of blood cells throughout the yolk sac and/or embryo proper.
-
Once the culture is complete, evaluate the final morphology (as compared with normal in vivo development) of the embryos to assess whether development has occurred normally or has been adversely affected by poor culture conditions or exposure to powerful laser light.Most embryos are then fixed in 4% paraformaldehyde for later analysis in whole-mount or frozen section immunohistochemistry.
FIGURE 2.
Example of a commercial heater box. Static culture system for time-lapse imaging of postimplantation mouse embryos. The microscope and static culture are housed in a temperature- (37°C) and CO2-regulated Plexiglas chamber. The gas mixture for the culture is humidified using a bubbler, and an inlet to the heated stage allows for ample gas exchange during static culture.
FIGURE 3.
Schematic of heated culture chamber on an inverted microscope. The embryo is positioned inside a 37°C heated stage and covered with a gas outlet, allowing for humidified CO2 gas exchange within the chamber.
MATERIALS.
It is essential that you consult the appropriate Material Safety Data Sheets and your institution’s Environmental Health and Safety Office for proper handling of equipment and hazardous materials used in this protocol.
Reagents
Mineral oil, sterile (optional)
Mouse embryos (6.5–9.5 days post coitum [dpc]; prepared as in Preparation of Postimplantation Mouse Embryos for Imaging [Garcia et al. 2011c])
Equipment
Gas mixture (5% CO2, balanced air)
Gas-washing bubbler
Heater box, either commercial or homemade (see Imaging Setup in Live Imaging of Mouse Embryos [Garcia et al. 2011a])
Inverted microscope, with time-lapse imaging capability
Silicon grease or Teflon tape (see Step 4)
REFERENCES
- Garcia MD, Udan RS, Hadjantonakis A-K, Dickinson ME. 2011a. Live imaging of mouse embryos. Cold Spring Harb Protoc doi: 10.1101/pdb.top104. [DOI] [PMC free article] [PubMed] [Google Scholar]
- Garcia MD, Udan RS, Hadjantonakis A-K, Dickinson ME. 2011b. Preparation of rat serum for culturing mouse embryos. Cold Spring Harb Protoc doi: 10.1101/pdb.prot5593. [DOI] [PMC free article] [PubMed] [Google Scholar]
- Garcia MD, Udan RS, Hadjantonakis A-K, Dickinson ME. 2011c. Preparation of postimplantation mouse embryos for imaging. Cold Spring Harb Protoc doi: 10.1101/pdb.prot5594. [DOI] [PMC free article] [PubMed] [Google Scholar]
- Hadjantonakis AK, Pisano E, Papaioannou VE. 2008. Tbx6 regulates left/right patterning in mouse embryos through effects on nodal cilia and perinodal signaling. PLoS ONE 3: e2511. doi: 10.1371/journal.pone.0002511. [DOI] [PMC free article] [PubMed] [Google Scholar]


