Abstract
In ovo electroporation enables transfection of non-viral plasmid DNA and/or morpholinos to fluorescently label and/or perturb gene function in cells of interest. However, targeted electroporation into specific subregions of the embryo can be challenging due to placement and size limitations of the electrodes. Here we describe the basic techniques for in ovo electroporation in the chick embryo and suggest parameters to electroporate cells within different target tissues that with some modifications may be applicable to a wide range of developmental stages and other embryo model organisms.
Keywords: Chick, Embryogenesis, Electroporation, Cell labeling, Gene perturbation, Morpholinos, Targeted transfection
1. Introduction
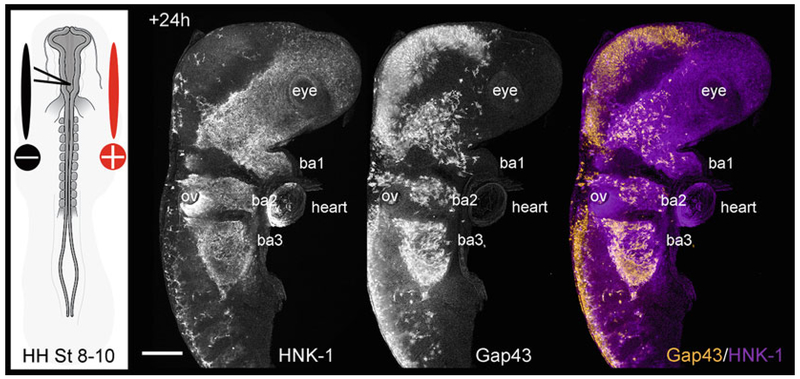
In ovo electroporation is a technique that has been successfully used over the last two decades to transfect cells of interest in a living, developing chick embryo [1-5]. Briefly, an electrical field is applied in a specific direction that opens pores in a plasma membrane through which DNA or morpholinos pass. Electroporation is used to perturb genes of interest in specific tissues, as well as label different subcellular structures, including the plasma membrane, nucleus, and actin filaments for dynamic tracking of cell behaviors [6] (Fig. 1). Furthermore, in ovo electroporation may be targeted to transfect specific cell and tissue types such as the neural crest (Fig. 1), motor axons, somites, mesoderm, and ectoderm, without significantly affecting endogenous gene expression [7-13].
Fig. 1.

Neural crest cell electroporation. (Left panel) Schematic representation of injection and electroporation of premigratory cranial neural crest cells in the dorsal neural tube in a typical HH stage 8-10 chick embryo. (Right panel) Whole chick cranial-to-cardiac region in which neural crest cells have been transfected with Gap43-YFP (orange) via electroporation and then immunostained with HNK-1 (marker of migrating neural crest cells; purple) shown +24 h after electroporation and reincubation. BA branchial arches, OV otic vesicle, HH St Hamburger and Hamilton stage
The methods described here will focus on non-viral transient transfections (plasmid DNA and morpholinos) into the chick embryo. These methods may serve as a basis for broader applications to transfect many different embryo model organisms. Transfection with electroporation delivery is possible when plasmids possess an electric charge, including retrovirus vectors, for more stable, long-term cell labeling. Plasmid DNA may be used in a wide variety of applications, from overexpression of a gene of interest with a full-length construct to gene knockdown with a dominant negative (when applicable) and/or shRNA construct. Fluorescently tagged morpholinos (translation and splice blocking) have also been widely used successfully in the transient knockdown of genes in the chick embryo [14-20]. Furthermore, morpholinos have been shown to be more effective and target-specific in chick embryos when compared to shRNA constructs [21]. Specifically, shRNA constructs have been shown to cause more off target effects, morphological defects and cell death when compared to morpholinos in chick embryos [21].
During in ovo electroporation, plasmid DNA or morpholinos are injected into, or adjacent to, the region of interest. DNA and fluorescein-tagged morpholinos are negatively charged and so move into cells toward the positive electrode upon application of an electric field [22]. In our hands, plasmid DNA electroporations are typically more directed than morpholino electroporations. We hypothesize that this is due to DNA being more negatively charged than the fluorescein-tagged morpholinos. Therefore, plasmid DNA is more influenced by the electrical charge, while morpholinos are more influenced by the opening of the pores in the surrounding plasma membranes. However, the size of plasmid DNA compared to morpholinos could also influence electroporation efficiency. Here, we describe the electroporation settings that allow for high transfection efficiency and low cell death.
2. Materials
2.1. Self-Made Electrodes
Soldering iron.
Silver lead-free plumbing solder.
Platinum rods.
d-Sub contact male pin gold (Digi-Key Electronics).
Heat shrink tubing.
Parafilm.
2.2. Pulled Glass Needles
Borosilicate glass tubing with filament (Sutter Instrument).
Flaming micropipette puller (Sutter Instrument).
Trough filament (Sutter Instrument).
2.3. Embryo Preparation
Fertilized avian eggs.
Egg incubator with humidity.
70% ethanol.
Watch glass.
Woven gauze sponges 2 × 2.
1 mL syringe.
10 mL syringe.
25 gauge needle, regular bevel.
18 gauge needle, regular bevel.
Pelikan fountain pen drawing ink.
Sterile Ringer’s solution (7.2 g NaCl, 0.37 g KCl, 0.17 g CaCl2, H2O to make 1 L).
Penicillin-Streptomycin (5000 U/mL).
Fine scissors.
Dumont #5 fine forceps.
Scotch Transparent Tape 600, 1″ × 72 yards, 3″ core.
General-purpose transfer pipets, 8 mL.
2.4. Microinjection and Electroporation
Plasmid DNA encoding fluorescent proteins in backbones such as pMES or pCIG are recommended (prepared in 1–5 μg/μL sterile PBS or water) or fluorescein-labelled morpholinos (1 mM in water) [4, 23].
Fast Green FCF.
Manual micromanipulator with stand and needle holder (World Precision Instruments).
Microloader tips.
Pipetman, 2-20 μL.
Dissecting scope.
Light source.
Picospritzer III with air and foot pedal (Micro Control Instruments).
Electroporator with foot pedal (BTX Harvard Apparatus).
Electrodes (Genetrodes, BTX Harvard Apparatus, or self-made (see Subheading 3.1 )).
3. Methods
The basic in ovo electroporation procedure described here is for neural crest transfection. Transfection of other tissues such as spinal motor axons, ectoderm, mesoderm, and somites follows the same basic setup. Parameters to adjust accordingly include age of embryo, voltage used, injection site and position of electrodes. We find that electroporation efficiency and accuracy are higher for tissues that contain a lumen into which plasmid DNA can be injected and not readily diffuse, such as newly formed somites and the neural tube.
3.1. Self-Made Electrodes
Plug in soldering iron and allow to come to temperature.
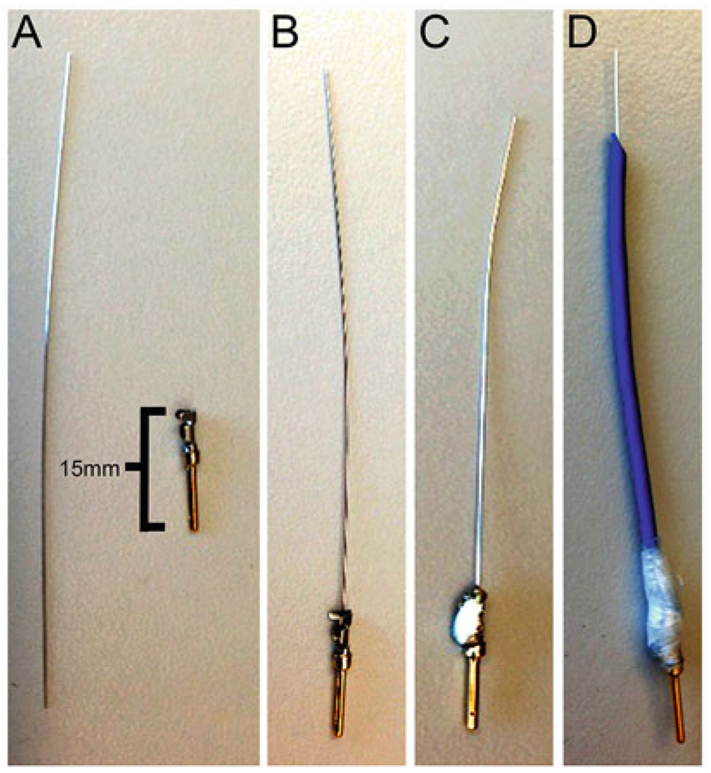
Solder the platinum rod and male gold pin together using minimum solder (1–2 drops) (Fig. 2c).
Cut a section of heat shrink tubing so that once in place, 1–2 cm of platinum rod is exposed and placed over the platinum rod. Ideally, the end of the heat shrinking tube should go over the part of the male gold pin.
Shrink the heat shrinking tube using the heat from the side of the soldering iron, until the tubing is tightly insulating the platinum rod.
Cut 0.5 cm strip of parafilm, and wrap around the section where the platinum rod, male gold pin, and heat shrinking tube meet to strengthen this area (Fig. 2d).
Bend approximately 3 mm of the exposed end of the platinum rod 90°, to form an L-shaped end (see Note 1).
Fig. 2.

Making platinum electrodes. (a) Platinum rod and male gold pin. (b) Insert platinum rod into male gold pin. The teeth of the male gold pin can be left open or clamped close. (c) Platinum rod and male gold pin are soldered together. (d) Platinum rod is encased with heat shrink tubing and wrapped in parafilm
3.2. Pulled Glass Needles
Before use, make sure that the trough filament is intact in the micropipette puller. If not, follow manufacturer’s instructions to replace.
Insert borosilicate glass tubing into the micropipette puller.
- Enter settings into micropipette puller to pull tubing. For the equipment and supplies listed above, use:
- Heat = 450.
- Pull = 100.
- Velocity = 100.
- Time = 100 (see Note 2).
Pull glass tubing and use or store carefully so that the pulled tip is not damaged (see Note 3).
3.3. Embryo Preparation
Incubate fertilized avian eggs with the egg laying horizontally at 38° until the desired stage. For cranial neural crest cell transfection, incubate eggs to HH (Hamburger-Hamilton) stages 8–10 (Fig. 3a) [24]. For trunk neural crest cell transfection, incubate eggs to HH stages 11–13.
Lightly spray eggs with 70% ethanol.
Mix sterile Ringer’s solution with Penicillin-Streptomycin and 5–10% Pelikan ink in sterile Ringer’s solution (see Note 4).
Prepare all tools needed. Clean and spray forceps and scissors with ethanol. Attach the 18 gauge needles to the 10 mL syringe. Attach the 25 gauge needle to the 1 mL syringe, and using forceps bend the tip of the needle into an L shape, beveled edge facing the interior of the “L.” Load the 1 mL syringe with the Pelikan ink solution.
Insert the 18 gauge needle (with the 10 mL syringe attached) into the flat end of the egg, angled downward to avoid piercing the yolk, and remove 3 mL of albumen from each egg (see Notes 5 and 6).
Move an egg onto a watch glass padded with multiple layers of gauze.
Using fine scissors gently cut a hole in the top flat side of the egg about the size of an American quarter or an Australian 10 cent piece (see Note 7).
Add a few drops of sterile Ringer’s solution (with Penicillin-Streptomycin) to the top of the yolk. This is where the developing embryo should be; at least the area opaca should be visible through the dissecting scope.
Insert the 25 gauge needle (with the 1 mL syringe attached) into the edge of the yolk, away from the developing embryo, with the tip of the “L” pointed toward the embryo, and inject a small amount of ink so that the embryo becomes visible against a dark background and remove needle carefully (see Note 8).
Stage the embryo according to HH stages under the dissecting scope. If the embryo is in the correct age, continue with protocol. If the embryo is unhealthy, membranes have been accidentally ripped, or the egg is unfertilized, discard the egg. If the embryo is too young, seal egg with Scotch Tape until appropriate age is reached. If the embryo is too old, use it in a different experiment or discard the egg.
Add a few more drops of Ringer’s solution to avoid drying out.
Using the 25 gauge needle or forceps, carefully remove a small portion of the vitelline membrane over where the microinjection will occur. Make sure not to damage the embryo or area pellucida (see Notes 9 and 10).
Add a few more drops of Ringer’s solution and embryo is ready for microinjection and electroporation.
Fig. 3.

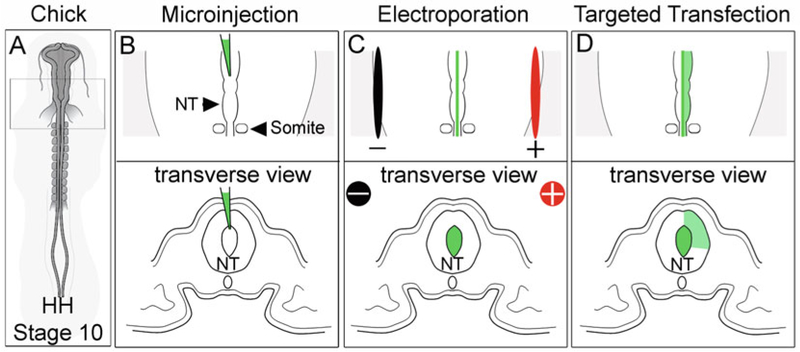
In ovo electroporation of neural crest cells. (a) HH stage 10 chick embryos. (b) Dorsal and transverse views of injection into the lumen of the neural tube. (c) Dorsal and transverse views of placement of electrodes. (d) Dorsal and transverse view of cell targets by electroporation. NT neural tube
3.4. Microinjection and Electroporation
Mix 1.5–3 μL of plasmid DNA and/or morpholino with Fast Green so that it can be visualized when injected into the embryo (see Note 11).
Use the microloader and pipetman to backfill the plasmid DNA/morpholino into a pulled glass needle (see Note 12).
Insert loaded pulled glass needle into the needle holder of the micromanipulator.
Insert electrodes into cables attached to electroporator (positive is red, negative is black).
- Turn on picospritzer and electroporator and make sure the settings are correct. For neural crest injection and electroporation at HH stage 9 using the equipment listed above, set the picospritzer to:
- Pressure = 20 psi.
-
Duration = 100 ms.and electroporator to:
- Mode = LV.
- Voltage = 25 V.
- Pulse length = 45 ms.
- Pulses = 5.
- Interval = 1 s.
Move prepared egg so that the embryo is visible through the dissecting scope (Fig. 3a).
Move the focus knob so that the oculars are focused above the embryo, and use the micromanipulator to bring the glass needle into focus.
Break a small part of the pulled glass needle tip off with forceps and carefully discard to glass waste.
Press the foot pedal of the picospritzer, and see if any liquid is injected from the pulled glass needle. It should make a small ball of liquid at the end of the tip.
If no liquid comes out, break off a little more of the tip, and repeat until liquid is coming out of the needle (see Note 13).
Once the needle is ready, move needle out of field of view with the micromanipulator, and refocus on the embryo.
Move glass needle back into field of view and insert into region of interest (see Notes 14 and 15). For neural crest electroporation, that is the lumen of the cranial or trunk neural tube (Fig. 3b).
Use the picospritzer to inject plasmid DNA/morpholinos into the lumen, as much as possible without harming the integrity of the embryo.
Remove glass needle from embryo.
Add a few drops of Ringer’s solution to add extra liquid over the embryo prior to electroporation and to dilute any plasmid DNA/morpholino that has escaped the region of interest.
Place electrodes into the Ringer’s solution, approximately at the border of the area opaca and area pellucida, parallel to the embryo, positive on the right and negative on the left (see Note 16) (Fig. 3c).
Push the foot pedal of the electroporator and hold electrodes steady until the pulses have stopped (see Note 17). The DNA will enter cells in the dorsal portion of the right side of the neural tube (toward the positive electrode) (Fig. 3d).
Remove the electrodes and gently clean the platinum rod ends with Kimwipes to avoid albumen accumulation.
Add a few drops of Ringer’s solution over the embryo.
Seal up egg shell with Scotch Tape.
Reincubate until the desired HH stage (see Note 18).
Fig. 4.

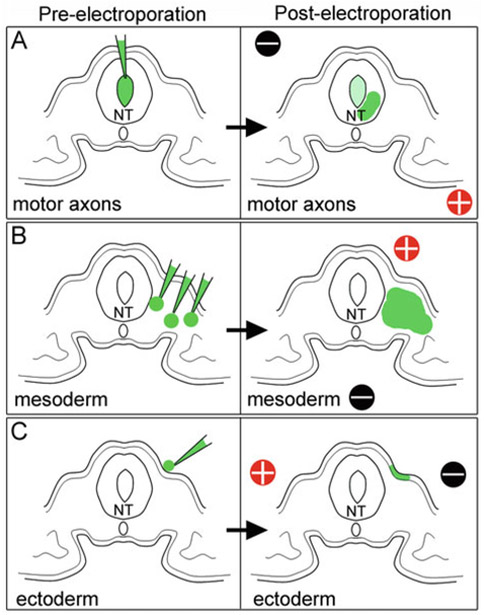
In ovo electroporation of other embryonic regions. (a) Injection and electrode placement for transfection of motor axons. (b) Injection and electrode placement for transfection of paraxial mesoderm. (c) Injection and electrode placement for transfection of ectoderm. NT neural tube
Footnotes
Electrodes can be formed into any shape depending on the type of electroporation. For example, the end of the platinum rod can be used as a point or tip electrode or coiled to form a “paddle” structure.
Start with these setting(s) and optimize. Ideally, the end of the pipette is long and slender, not short and stumpy.
To store pulled glass capillary tubes, one option is to stick a strip of dental wax to the inside of a petri dish and lay pulled glass tubes perpendicular to it. That way the pulled tip will not be touched and damaged.
Always use fresh reagents and disposable equipment (Ringer’s solution, ink, needles, syringes, and transfer pipettes) every day. For a typical electroporation session, we use 10 mL aliquot of 5% Pelikan ink and 50 mL aliquot of Ringer’s solution.
Removing albumen from one to three dozens at a time is typical. How many eggs to remove the albumen from at one time will depend on how quickly the experimenter uses the eggs. Ideally, eggs should be allowed to sit for at least 15 min after albumen is removed so that the yolk can settle, but no longer than 1 h (otherwise the embryo will become dry and survival will be affected).
If the experimenter is unable to insert the needle cleanly without cracking the egg, place a small amount of tape over where the needle will be inserted first. This will ensure the egg shell undergoes minimal damage.
If the experimenter is not experienced at opening an egg with scissors, place tape over the top of the egg where the cut will be made. This will not only ensure the egg shell undergoes minimal damage but also prevents egg shell debris from falling into the egg.
Make the hole in the yolk as small as possible; otherwise the yolk will not maintain its integrity during reincubation, and embryo health will be compromised.
For mesoderm or ectoderm electroporations, do not remove the vitelline membrane. The vitelline membrane not only provides a layer of protection in between the electrodes and the embryos but also prevents rapid diffusion of the injected plasmid/morpholino.
If the embryo or surrounding tissue is damaged, discard the egg.
Different plasmid DNAs can be mixed together or with cell trackers such as DiI at this step. Morpholino transfection is more successful when mixed with plasmid DNA. A few particles of the powdered Fast Green added into the morpholino or DNA to be injected allow for visual confirmation of injection.
Ideally the liquid will be inserted into the pulled glass needle as close to the tip as possible. If bubbles form, make sure that they are not injected into the embryo. Also make sure that the liquid does not come out of the open end of the pulled glass needle as that liquid could contaminate your needle holder.
Only a small amount of liquid should come out of the needle. If too much is coming out after breaking tip, lower the picospritzer duration or pressure so that only a small ball of liquid forms on the end of the tip. If the tip end is too blunt, it will not pierce through the embryonic tissue cleanly. When this occurs, discard needle and make a new one.
If liquid does not come out at the end of glass needle as it had previously, the liquid in the tip may have dried out. Place the tip of needle in a small amount of Ringer’s solution to rehydrate tip, and press foot pedal for picospritzer. If liquid is still not coming out, break off a small amount of the tip again. Before pushing the picospritzer foot pedal, lower either duration or pressure of picospritzer to avoid too much liquid coming out from the glass needle. The pressure and duration can always be increased again as needed.
For placement of injection and electrodes to target motor axons, mesoderm, or ectoderm, see Fig. 4.
Electrodes should be in the Ringer’s solution to achieve conduction, but not touching any embryonic tissues. If the electrodes touch the area pellucida, they will leave burn marks which will lead to a decrease in embryonic health.
Settings on electroporator (especially voltage), as well as placement of the electrodes, will have to be adjusted depending on age/size of tissue and transfection target.
- Replace electrodes (typically self-made platinum electrodes are good for 3–6 months, depending on usage).
- Adjust position of electrodes.
- Apply adequately Ringer’s solution to prevent burning of tissue and increase conduction.
- Adjust voltage.
- Confirm membranes are not being compromised during the experiment.
References
- 1.Muramatsu T, Mizutani Y, Ohmori Y, Okumura J (1997) Comparison of three nonviral transfection methods for foreign gene expression in early chicken embryos in ovo. Biochem Biophys Res Commun 230(2):376–380 [DOI] [PubMed] [Google Scholar]
- 2.Momose T, Tonegawa A, Takeuchi J, Ogawa H, Umesono K, Yasuda K (1999) Efficient targeting of gene expression in chick embryos by microelectroporation. Develop Growth Differ 41(3):335–344 [DOI] [PubMed] [Google Scholar]
- 3.Itasaki N, Bel-Vialar S, Krumlauf R (1999) ‘Shocking’ developments in chick embryology: electroporation and in ovo gene expression. Nat Cell Biol 1(8):E203–E207. 10.1038/70231 [DOI] [PubMed] [Google Scholar]
- 4.Swartz M, Eberhart J, Mastick GS, Krull CE (2001) Sparking new frontiers: using in vivo electroporation for genetic manipulations. Dev Biol 233(1):13–21. 10.1006/dbio.2001.0181 [DOI] [PubMed] [Google Scholar]
- 5.Nakamura H, Katahira T, Sato T, Watanabe Y, Funahashi J (2004) Gain- and loss-of-function in chick embryos by electroporation. Mech Dev 121(9):1137–1143. 10.1016/j.mod.2004.05.013 [DOI] [PubMed] [Google Scholar]
- 6.Kulesa PM, Teddy JM, Smith M, Alexander R, Cooper CH, Lansford R, McLennan R (2010) Multispectral fingerprinting for improved in vivo cell dynamics analysis. BMC Dev Biol 10:101 10.1186/1471-213X-10-101 [DOI] [PMC free article] [PubMed] [Google Scholar]
- 7.Scaal M, Gros J, Lesbros C, Marcelle C (2004) In ovo electroporation of avian somites. Dev Dyn 229(3):643–650. 10.1002/dvdy.10433 [DOI] [PubMed] [Google Scholar]
- 8.Sato Y, Kasai T, Nakagawa S, Tanabe K, Watanabe T, Kawakami K, Takahashi Y (2007) Stable integration and conditional expression of electroporated transgenes in chicken embryos. Dev Biol 305(2):616–624. 10.1016/j.ydbio.2007.01.043 [DOI] [PubMed] [Google Scholar]
- 9.Watanabe T, Saito D, Tanabe K, Suetsugu R, Nakaya Y, Nakagawa S, Takahashi Y (2007) Tet-on inducible system combined with in ovo electroporation dissects multiple roles of genes in somitogenesis of chicken embryos. Dev Biol 305(2):625–636. 10.1016/j.ydbio.2007.01.042 [DOI] [PubMed] [Google Scholar]
- 10.Chen YX, Krull CE (2008) Using in ovo electroporation to transfect cells in avian somites. CSH Protoc 2008. 10.1101/pdb.prot4924 [DOI] [PubMed] [Google Scholar]
- 11.Linn SA, Krull CE (2008) Transfecting avian motor neurons and their axons using in ovo electroporation. CSH Protoc 2008. 10.1101/pdb.prot4926 [DOI] [PubMed] [Google Scholar]
- 12.Farley EK, Gale E, Chambers D, Li M (2011) Effects of in ovo electroporation on endogenous gene expression: genome-wide analysis. Neural Dev 6:17 10.1186/1749-8104-6-17 [DOI] [PMC free article] [PubMed] [Google Scholar]
- 13.Simkin JE, Zhang D, Ighaniyan S, Newgreen DF (2014) Parameters affecting efficiency of in ovo electroporation of the avian neural tube and crest. Dev Dyn 243(11):1440–1447. 10.1002/dvdy.24163 [DOI] [PubMed] [Google Scholar]
- 14.Taneyhill LA, Coles EG, Bronner-Fraser M (2007) Snail2 directly represses cadherin6B during epithelial-to-mesenchymal transitions of the neural crest. Development 134 (8):1481–1490. 10.1242/dev.02834 [DOI] [PMC free article] [PubMed] [Google Scholar]
- 15.Wagner G, Peradziryi H, Wehner P, Borchers A (2010) PlexinA1 interacts with PTK7 and is required for neural crest migration. Biochem Biophys Res Commun 402(2):402–407. 10.1016/j.bbrc.2010.10.044 [DOI] [PubMed] [Google Scholar]
- 16.Zanin JP, Battiato NL, Rovasio RA (2013) Neurotrophic factor NT-3 displays a non-canonical cell guidance signaling function for cephalic neural crest cells. Eur J Cell Biol 92 (8–9):264–279. 10.1016/j.ejcb.2013.10.006 [DOI] [PubMed] [Google Scholar]
- 17.Betancur P, Simoes-Costa M, Sauka-Spengler- T, Bronner ME (2014) Expression and function of transcription factor cMyb during cranial neural crest development. Mech Dev 132:38–43. 10.1016/j.mod.2014.01.005 [DOI] [PMC free article] [PubMed] [Google Scholar]
- 18.Vermillion KL, Lidberg KA, Gammill LS (2014) Expression of actin-binding proteins and requirement for actin-depolymerizing factor in chick neural crest cells. Dev Dyn 243 (5):730–738 [DOI] [PMC free article] [PubMed] [Google Scholar]
- 19.Khatri SB, Edlund RK, Groves AK (2014) Foxi3 is necessary for the induction of the chick otic placode in response to FGF signaling. Dev Biol 391(2):158–169. 10.1016/j.ydbio.2014.04.014 [DOI] [PMC free article] [PubMed] [Google Scholar]
- 20.McLennan R, Schumacher LJ, Morrison JA, Teddy JM, Ridenour DA, Box AC, Semerad CL, Li H, McDowell W, Kay D, Maini PK, Baker RE, Kulesa PM (2015) VEGF signals induce trailblazer cell identity that drives neural crest migration. Dev Biol 407(1):12–25. 10.1016/j.ydbio.2015.08.011 [DOI] [PubMed] [Google Scholar]
- 21.Mende M, Christophorou NA, Streit A (2008) Specific and effective gene knock-down in early chick embryos using morpholinos but not pRFPRNAi vectors. Mech Dev 125 (11–12):947–962. 10.1016/j.mod.2008.08.005 [DOI] [PubMed] [Google Scholar]
- 22.Voiculescu O, Papanayotou C, Stern CD (2008) Spatially and temporally controlled electroporation of early chick embryos. Nat Protoc 3(3):419–426. 10.1038/nprot.2008.10 [DOI] [PubMed] [Google Scholar]
- 23.Wu CY, Taneyhill LA (2012) Annexin a6 modulates chick cranial neural crest cell emigration. PLoS One 7(9):e44903 10.1371/journal.pone.0044903 [DOI] [PMC free article] [PubMed] [Google Scholar]
- 24.Hamburger V, Hamilton HL (1951) A series of normal stages in the development of the chick embryo. J Morphol 88(1):49–92 [PubMed] [Google Scholar]


