Abstract
Simultaneous recordings from large populations of individual neurons across distributed brain regions over months to years will enable new avenues of scientific and clinical development. The use of flexible polymer electrode arrays can support long-lasting recording, but the same mechanical properties that allow for longevity of recording make multiple insertions and integration into a chronic implant a challenge. Here is a methodology by which multiple polymer electrode arrays can be targeted to a relatively spatially unconstrained set of brain areas.
The method utilizes thin-film polymer devices, selected for their biocompatibility and capability to achieve long-term and stable, electrophysiologic recording interfaces. The resultant implant allows accurate and flexible targeting of anatomically distant regions, physical stability for months, and robustness to electrical noise. The methodology supports up to sixteen serially inserted devices across eight different anatomic targets. As previously demonstrated, the methodology is capable of recording from 1024 channels. Of these, the 512 channels in this demonstration used for single neuron recording yielded 375 single units distributed across six recording sites. Importantly, this method also can record single units for at least 160 days.
This implantation strategy, including temporarily bracing each device with a retractable silicon insertion shuttle, involves tethering of devices at their target depths to a skull-adhered plastic base piece that is custom-designed for each set of recording targets, and stabilization/protection of the devices within a silicone-filled, custom-designed plastic case. Also covered is the preparation of devices for implantation, and design principles that should guide adaptation to different combinations of brain areas or array designs.
Keywords: microelectrode arrays, polymer neural probes, polymer electrode arrays, chronic implantation, electrophysiology, rodent, local field potential, single-unit, neuron, multi-site recording
SUMMARY:
Described below is a method for implantation of multiple polymer electrode arrays across anatomically distant brain regions for chronic electrophysiological recording in freely moving rats. Preparation and surgical implantation are described in detail, with emphasis on design principles to guide adaptation of these methods for use in other species.
INTRODUCTION:
An ideal neural implant would record from a very large number of individual neurons in distributed brain areas over weeks to months. Flexible polymer electrode arrays provide electrophysiological recordings with the longevity to record for months and the stability to track individual neurons1–3. However, the same mechanical properties that reduce shearing damage4 and confer biocompatibility and recording capability2,3,5–8 pose a challenge to their insertion into the brain relative to their rigid counterparts. Previous work accomplished a maximum of four 32-channel arrays, but the total yield of sorted putative single neurons is unreported2,3,9. Conversely, silicon-based electrode arrays have been used in high-density, multi-region implants, but these technologies lack either the ability to record spikes from neurons over months (longevity) or to track the same neurons (stability) on that timescale, or the density to record from hundreds of individual neurons across multiple brain regions. The method presented here overcomes the low number of insertions in current polymer electrode array-based methods, thereby providing means for the electrophysiologic recording of large numbers of individual neurons in multiple anatomically distant regions for months, with the stability to record from the same individual neurons across many days.
There is some debate regarding the importance of using a polymer substrate instead of microwire- or silicon- based strategies. As demonstrated by Dhawale et al.10, microwires are indeed capable of months-long stable recordings in rodents, though the implants were limited to 16 tetrodes in a single region. Scaling up the size of the microwire implant reaches a relatively high upper limit, with up to 1792 implanted channels achieved in a non-human primate11. However, construction of the microwire arrays is incompatible with silicon nanofabrication processes and is, therefore, extremely time consuming, requiring manual handling of each channel individually during the construction12–14. As such, it is not clear if this technology could support an order of magnitude increase in recording channels.
The latest silicon devices can place hundreds or even over a thousand electrodes on a single monolithic device15–19. The latest silicon fabrication processes generate devices with smaller cross-sectional areas, regardless of the material, resulting in less glial activation20–24 and more compliant devices. There is a variability in reports of silicon probe single-unit recording longevity, with some indicating that relatively large silicon probes can provide long-term recording25,26. Notably, the latest commercially-available silicon devices17 have the longevity to record for several months and have cross-sectional areas very similar to the shanks used in the method described here (Jun et al. 201717: 70 μm × 20 μm, devices described here and in Chung et al. 20191: 68 μm – 80 μm × 14 μm). Due to the difference in stability, this probe has not been demonstrated to be able to record from the same neurons over weeks. This likely is due to some combination of the use of rigid silicon as well as direct tethering to the skull, known to cause micromotion, instability, and gliosis at the array-brain interface27,28. To construct a device that can move with the neural tissue, materials that are soft5,29 and flexible7 are required. Many available polymers (see Geddes and Roeder30, Fattahi et al.31, and Weltman et al.32 for reviews) have the flexibility and stability of microwires and are also compatible with the nanofabrication processes, which allow the dense packing of silicon devices.
Several neural implantation issues are specific to the use of flexible polymer electrode arrays. The first of these is the insertion of the array, as flexible arrays lack the rigidity to be advanced into the brain like silicon- or microwire-based strategies. The majority of insertion strategies for flexible devices depend on a temporary stiffening of the substrate as is done in this method (see Weltman et al.32 for review). There are five notable strategies that do not make use of a rigid shuttle. First, there are methods that make use of materials that transition from rigid to compliant upon implantation33,34. A drawback of this strategy is that it requires a relatively large cross-sectional area to achieve the force required for penetration of brain tissue before buckling as dictated by Euler’s buckling force calculation35. This increase in cross-sectional area will negatively impact the health of the surrounding tissue20–24. Second is the use of a removable supporting structure above the brain36, though this requires time-consuming removal or dissolution of scaffolding to maintain a minimal unsupported length (and high buckling force). Alternatively, it would require the array to be inserted with a longer unsupported length, thereby requiring a stiffer array substrate or a larger array cross-sectional area. Third is pre-penetration to open a hole for the flexible array to be inserted in afterward35. This requires precise realignment or relatively large pre-penetration diameter, and electrode array rigidity and cross-sectional area to permit unsupported insertion. Fourth is the use of dissolvable coatings to stiffen the flexible device. This significantly increases the cross-sectional area and acute damage caused by insertion, even when special precautions are taken to preserve the sharp tip of a device37. Fifth is the injection of the polymer array. This strategy has had success in achieving implants with up to four 32-ch insertions2, but requires using a far larger cross-sectional area for insertion, a 250 μm – 1.5 mm outer diameter glass capillary tube9, causing greater acute damage. In contrast, using a removable shuttle, while adding cross-sectional area to the acute insertion, allows for the use of the stiffest possible materials, and can, therefore, be the theoretical minimum size when inserting an arbitrarily flexible device. Thus, insertion using a rigid shuttle is currently the most attractive option for inserting flexible devices.
There are two requirements of any insertion shuttle approach: a suitably stiff substrate and a way to couple the flexible device to the substrate. Insertion shuttle materials are typically silicon38–40, stainless steel8,41, or tungsten42–44, with stiffer materials allowing for smaller cross-sectional areas. These are typically affixed using an adhesive such as polyethylene glycol (PEG)8,38,39,41,42, electrostatic forces40, or direct physical coupling44,45. In all cases, the challenges are the alignment and coupling of the electrode array and insertion shuttle before insertion and decoupling after insertion. Recounted below is a refinement of the method introduced by Felix et al.39 to temporarily brace the electrode array with a silicon insertion shuttle, attached using PEG, that is removed after insertion of the array to its target depth.
A second challenge presented by flexible devices within a chronic implant is that of stabilizing the device within the brain while still allowing for the device to be integrated into an implant attached to the skull. The brain moves relative to the skull due to natural pulsations, post-traumatic edematous changes, impact, and other causes, and the electrode array must therefore be at least somewhat free to move relative to where it is affixed to the skull and recording hardware. This is achieved using a 3D-printed plastic base piece, custom-designed for each set of implant targets, that has multiple functions: a saline reservoir during implantation, location to tether the polymer arrays, and housing for silicone gel. The tethering location above the skull and silicone gel work together to create a larger radius of curvature for the array and thereby allow for larger compressive forces on the array. This in turn allows for movement of brain relative to the anchor points of the array (skull) to be translated into buckling load.
Further challenges include the need to house multiple arrays and provide ample strain relief for the animal to freely behave without transfer of vibrations or impact forces to the electrode arrays, which can cause motion relative to neural tissue. Adaptations to solutions that have been used in similar applications where the brain must be stable relative to a rigid recording window have addressed this challenge. An artificial dural sealant silicone gel (Table of Materials), which has previously been demonstrated to be non-toxic and prevent CSF leakage46, provides counter-pressure to the brain to prevent outward swelling and to stabilize the array at the brain surface. An additional layer of protection is added to the device ribbons by the medium-viscosity, surgical grade silicone elastomer, previously demonstrated for use in sealing chronic neural electrode implants47. Finally, the silicone-buffered implant and headstage is encased with 3D-printed pieces custom designed to maintain a low center of mass for minimal reduction of the animal’s normal mobility.
Materials
| Name of Material/Equipment | Company | Catalog Number | Comments/Description |
|---|---|---|---|
| 3D Printed Stereotax Adapter Parts (3) and Base Piece (1) | N/A | N/A | 3d print parts, suggest <30 μm resolution for minimal hand finishing of parts. Files available at: https://github.com/jasonechung/PolymerProbe3dParts |
| Dental Acrylic (Hygenic Repair Resin, Coltene type II quick set) | Colten/Whaledent | 8886784, 8881627 | Dental acrylic for use during implant construction |
| Hydraulic Micromanipulator (x2) | Narishige Group | MO-10 | 1-axis micromanipulator |
| Kapton Polyimide Tape | Bertech | PPTDE-1/2 | Double-sided tape |
| Kopf Stereotax Arm | Kopf Instruments | 103088R, 103088L | Standard rodent stereotax |
| Light Curable Dental Acrylic, Vivid Flow | Coltene/Whaledent | D33-01-00 | Light curable dental acrylic for use during implant construction |
| Loctite Gel Control | Henkel Corp. | 234790 1364076 1735574 1752699 |
Cyanoacrylate for adhering silicon shuttle to corresponding 3d printed part |
| Metabond Quick Cement | Parkell | S380 | For direct application to skull to create strong connection between skull and implant |
| Polymer Electrode Arrays and Silicon Insertion Shuttles | Lawrence-Livermore National Laboratory | N/A | Fabricated at Lawrence-Livermore National Laboratory, polyimide electrode arrays, silicon insertion shuttle |
| Silicone Gel Kit, Low Viscosity | Dow Corning | Mar-80 | Low-viscosity silicone gel for filling of 3d printed base piece |
| Silicone, Medium-Viscosity Kit | World Precision Instruments | Kwik-Sil | Medium-viscosity silicone gel for protection of polymer electrode arrays |
This protocol starts with a flexible polymer microelectrode array mounted to a silicon insertion shuttle. It proceeds with mounting of the array-shuttle device to the 3D-printed insertion pieces, describes the surgical technique and implant construction steps required to successfully implant an animal, and is capable of supporting sixteen polymer multi-electrode arrays implanted in eight anatomically distant regions in a single rat1.
This protocol assumes the starting materials of polymer electrode arrays attached by the biodissolvable adhesive polyethylene glycol (PEG) to a silicon insertion shuttle, as shown in Felix et al.39, and at least two independently movable insertion pieces: one to which the silicon shuttle will be glued and one to which the electrode array’s connector will be adhered. This protocol also uses a third insertion piece to more securely attach the two insertion pieces to a micron-scale micromanipulator. All files for 3D printing can be found at: https://github.com/jasonechung/PolymerProbe3DParts
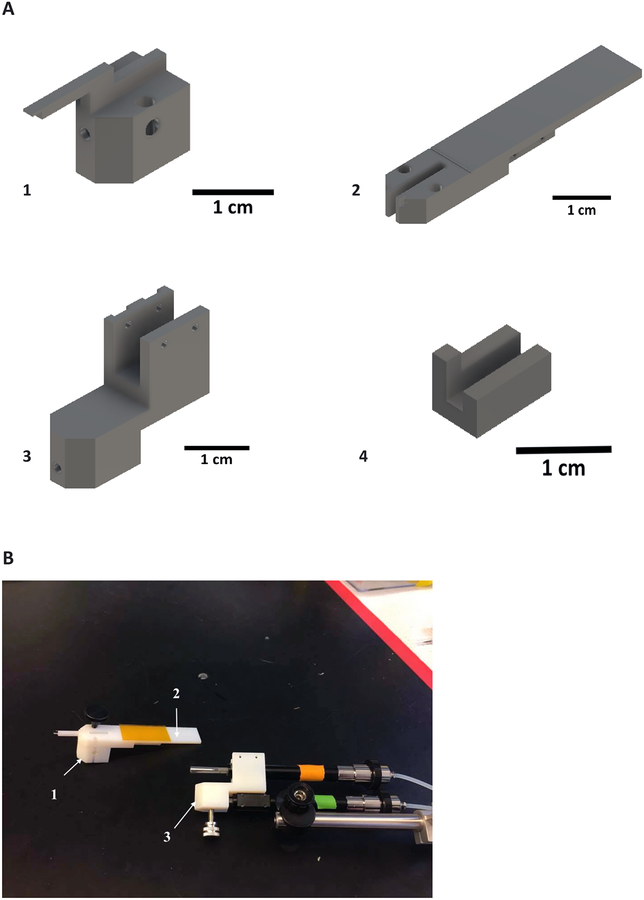
Each polymer electrode array, used in this method is comprised of two to four recording shanks, a ribbon that conveys the electrical traces, and, at the end of the ribbon, a hardware connector or printed circuit board. The electrode array and ribbon are fixed atop the silicon shuttle with PEG. Each ribbon has a 2 cm long × 1 mm thick polyimide tube attached to the ribbon via UV curable epoxy, extending perpendicular to the length of the ribbon. Each device (electrode array and insertion shuttle) must be loaded onto the 3D-printed insertion pieces that will be used to insert the array into the brain and retract the shuttle (Figure 1). In this design, the hydraulic insertion micromanipulator (green, Table of Materials) moves the entire insertion apparatus (piece 1, piece 2 and the retraction micromanipulator, orange) to its target depth. Once the array has been detached from the insertion apparatus and fixed, the second, retraction micromanipulator (orange) retracts piece 1 and the attached shuttle independently from the rest of the insertion apparatus, removing the shuttle without displacing the array.
Figure 1: Inserter components.
(A) Pieces 1 and 2 are temporarily fixed to each other with a removable screw and will later be docked onto the retraction micromanipulator piston (orange). (B) The array and insertion shuttle are adhered to piece 1 and the array connector is attached to piece 2 with double-sided tape. Piece 3 connects the retraction micromanipulator and pieces 1 and 2 to the insertion micromanipulator (green). The insertion micromanipulator is fixed to a stereotactic adapter for implant positioning. Pieces 1–3 are pictured in their relative sizes. Piece 4 is a stabilizing piece for proper alignment of the insertion shuttle.
PROTOCOL:
All animal-involved protocols described in this manuscript have been approved by the Institutional Animal Care and Use Committee at UCSF.
1. Preparation of polymer electrode arrays for insertion (~30 min)
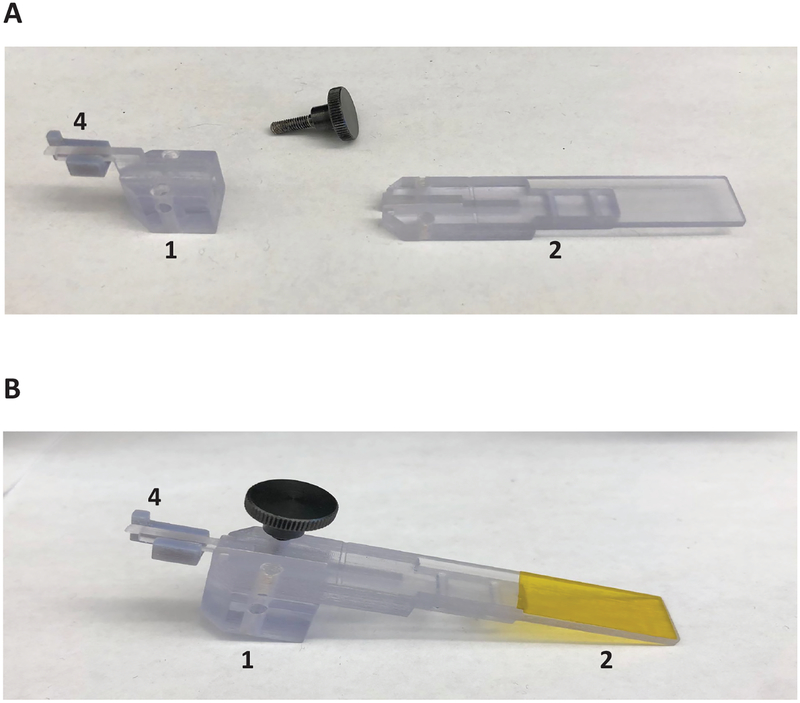
1.1. Attach piece 1 to piece 2 by inserting a screw through aligned, vertically oriented holes to lock the pieces together (Figure 2). Hold these two pieces in a vice. Attach double-sided tape (Table of Materials) to the top of piece 2. Attach the stabilizing piece 4 to the end of piece 1. It will be held in place by friction.
Figure 2: Assembly for array-shuttle alignment.
(A) Assembly of pieces 1, 2, and stabilizing piece in preparation of insertion shuttle attachment. (B) Pieces 1 and 2 held together with thumb screw.
1.2. By hand, align the electrode array and attach the insertion shuttle with the narrow end segment of piece 1. When the probe is aligned with the longitudinal axis of piece 1, adhere the array connector to the polyimide double-sided tape on the flat portion of piece 2.
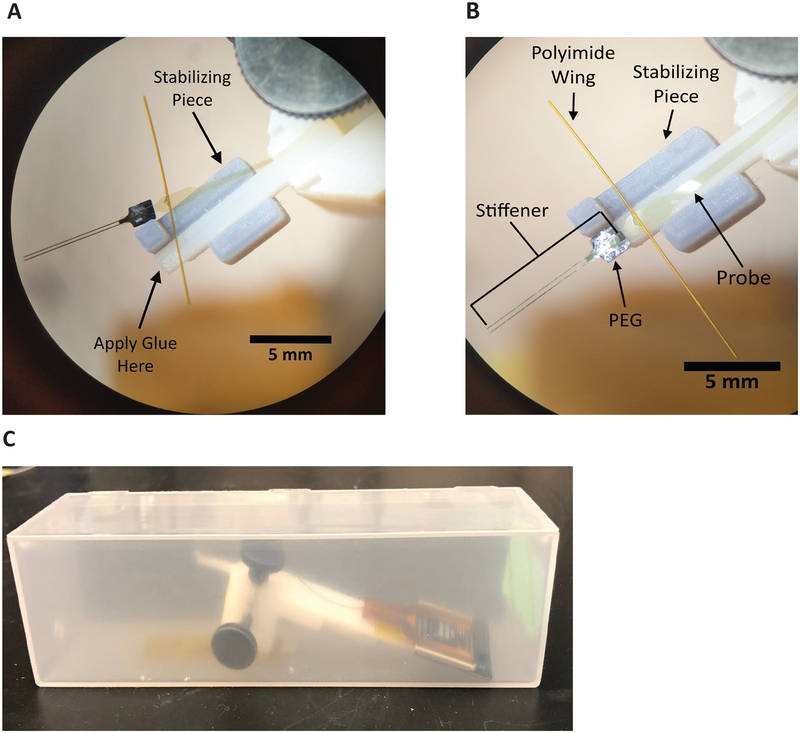
1.3. With plastic tipped forceps, contacting only the polyimide wing attached to the array ribbon, lift the insertion shuttle-electrode array device tip off piece 1, to the exterior of the stabilizing piece (Figure 3A).
Figure 3: Alignment, attachment, and sterilization of array-shuttle.
(A) Proper orientation of insertion shuttle-electrode array device for application of glue on docking station of piece 1. Two-shank array-shuttle shown. (B) Polymer electrode array and insertion shuttle mounted on insertion piece, with temporary stabilizing piece for alignment. Two-shank array-shuttle shown. (C) Insertion device encased in plastic box for protection during sterilization.
1.4. Apply a small amount of cyanoacrylate (Table of Materials) or other adhesive (~10 μL) to the end of piece 1. Too little will not strongly adhere the insertion shuttle to piece 1, risking detachment during insertion or retraction. Too much risks overflowing the shuttle and adhering the array itself to piece 1.
1.5. Using plastic tipped forceps, contacting only the polyimide wing attached to the array ribbon, re-align the device with the narrow segment of piece 1, with the square tab of the insertion shuttle (and only the shuttle) atop the glue (Figure 3B). Make small alignment adjustments by manipulating the side of the silicon shuttle or the PEG. Avoid applying excessive force to the ribbon or shanks.
1.6. Apply gentle downward pressure with forceps on both sides of the stabilizing piece and remove it from the assembly without moving the array.
1.7. Remove the mounted device assembly (pieces 1 and 2, array, insertion shuttle, and array connector) from the vice and adhere it with double-sided tape to the base of a small plastic box for sterilization by ethylene oxide (Figure 3C). Steam sterilization is not appropriate for these devices.
2. Design of base piece
2.1. Determine craniectomy sizes for selected stereotactic targets as well as locations of skull screws and ground screws. Craniectomy size is determined by array footprint, with a few hundred (~300) micron circumference for placement adjustments to avoid surface vasculature.
2.2. Using a design software (e.g., CAD), design the footprint of the base piece to surround the planned craniectomies and fit within the perimeter defined by the temporal ridge and skull screws, maximizing skull surface area that will be outside of the base piece to which adhesive luting cement can bind to adhere the implant to the skull.
2.3. Contour the bottom surface of the base piece so it can be adhered to the skull without gaps, reducing the chance of infection and preventing saline or silicone elastomer from seeping out.
2.4. Set the height of the base piece to 3–7 mm, high enough to hold saline and silicone elastomer but low enough to not impede visibility during array insertion(s).
NOTE: The base piece can be designed with vertical posts or similar features to which the polyimide wings can be tethered at a point higher above the skull. Do not allow attachment points to impede view.
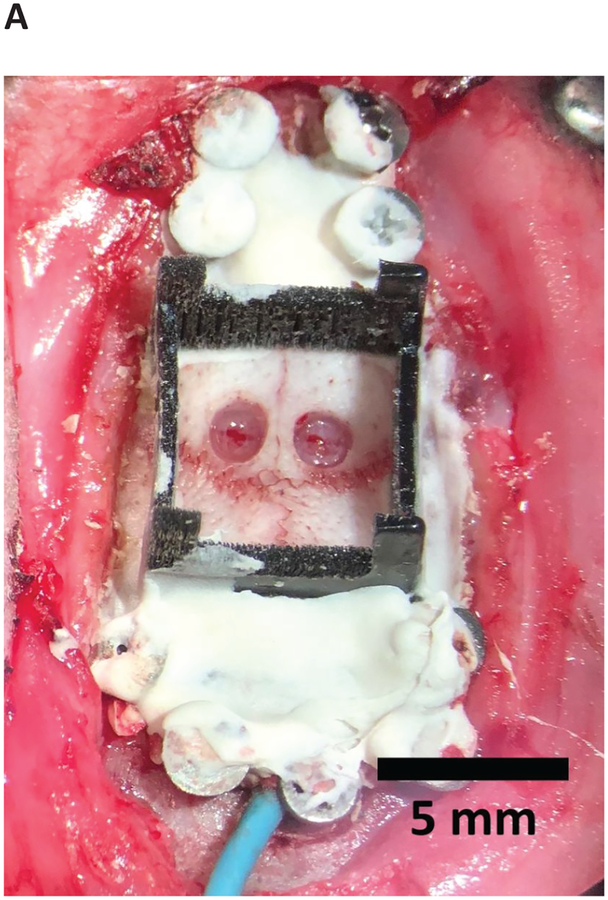
2.5. 3D print the base piece (Figure 4) and sterilize the base piece prior to implantation.
Figure 4: Skull prepared for implant.
Durectomies complete with skull screws, base acrylic layer, and base piece fixed to skull.
3. Preparation of skull (~2 h)
3.1. Select a rat 400 g or greater to support the weight of the implant. Male Long-Evans rats, at 6–12 months of age were used.
3.2. Anesthetize the rat. Place the animal into an anesthesia chamber. Turn on 5% isoflurane.
3.3. Inject an intraperitoneal dose of ketamine (50 mg/kg), xylazine (6 mg/kg), and atropine (0.14 mg/kg).
3.3.1. Monitor anesthesia depth every 20 min throughout the procedure by verifying there is no withdrawal from paw pinch and respiratory rate remains 50–75 breaths/min.
3.4. Apply eye ointment to the rat.
3.5. Shave the head of the rat.
3.6. Place the animal into the stereotaxic holder.
3.7. Inject 1% lidocaine into the scalp.
3.8. Make a sagittal incision at the midline of the skull exposing at least 3 mm anterior to the bregma and 3 mm posterior to the lambda.
3.9. Remove the periosteum using cotton swabs.
3.10. Mark insertion and craniectomy sites by scoring the skull with a scalpel using a Cartesian coordinate plane zeroed at the bregma with a stereotactic instrument.
3.11. Drill craniectomy sites, leaving a thin layer of bone that can be removed with forceps. Do not expose dura. This allows for cleaning skull of bone dust without disrupting dura.
3.12. Drill and insert bone screws, one at a time, to prevent bone dust from entering the holes. Use generous isotonic irrigation to remove bone dust. For an implant of approximately 50 grams, use 10–12 screws. Titanium screws allow osseointegration48.
3.12.1.1. Advance the screws to a depth that fully penetrates the skull without impacting the brain.
3.13. Connect at least one bone screw to an electrically conductive wire to function as a circuit ground.
3.14. After all drilling is complete, clean the skull of bone dust with a saline wash.
3.15. Dry the skull with cotton swabs or other absorbents and apply an initial layer of adhesive luting cement (Table of Materials) to the screws (do not use enamel etchant on rodent skull). This preliminary adhesive luting cement layer will increase implant adhesion and decrease labor in later adhesion steps.
3.16. Remove the thin layer of bone remaining at each craniectomy site.
3.17. Incise dura using a 30-gauge needle with a bent tip while avoiding any vasculature. The length of the incision matches the dimensions of the insertion shuttle.
3.17.1. If there is bleeding, irrigate manually with a gentle saline drip and do not continue until the bleeding has stopped.
3.18. If multiple durectomies are being performed, keep sites moist with gel foam or another method, such as regular irrigation every few minutes with body-temperature saline.
3.19. Dry the skull again with cotton swabs or other absorbents in preparation for luting cement adhesion of the base piece to the skull.
3.20. Position the sterile base piece. If the base piece will cover the bregma, mark another location at a known distance away as a proxy.
3.21. Apply adhesive luting cement around the perimeter of the base piece. Fill the adhered base piece with saline; identify and patch any leakage with adhesive luting cement at the interface between the base piece and the skull interface (Figure 5).
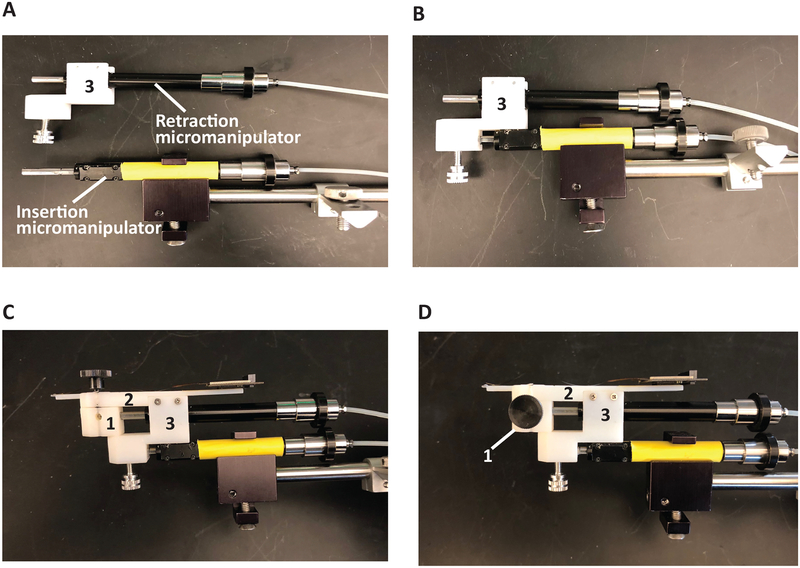
Figure 5: Assembly of inserter.
(A) Mounting of piece 3 to micromanipulators. (B) Attachment of pieces 1 and 2 onto insertion apparatus. (C) Insertion pieces with mounted electrode array-insertion shuttle device. (D) Thumb screw holding piece 1 and 2 together removed.
NOTE: It is crucial that the base piece be completely secured to the skull to prevent leakage of the artificial dural sealant silicone gel, as this will prevent adequate adhesion of the implant to the skull. The animal is ready to have arrays inserted.
4. Serial insertions of arrays and retractions of shuttles (~1 h per array)
NOTE: This procedure should be piloted with a nonviable device, particularly for multiple-array implants where one device may interfere with the implantation of subsequent devices.
4.1. Load pieces 1 and 2 onto the retraction micromanipulator piston. Set piece 1’s micromanipulator to an extended position and piece 3’s micromanipulator to a retracted position. The piston will slide to a terminal depth inside of piece 1. Piece 2 fits within the top portion of piece 3, with the holes aligned.
4.1.1. Load piece 3 onto the insertion micromanipulator piston, and secure in place with a screw on the underside of piece 3 (Figure 5A,B).
4.1.2. Load and screw pieces 2 and 3 together, so that moving the insertion micromanipulator moves the whole insertion apparatus (Figure 5C).
4.1.3. Remove the screw that holds pieces 1 and 2 together. Piece 1 moves independently of Piece 2, to allow separate retraction of the insertion shuttle from the apparatus.
4.1.4. Insert this screw into the lateral hole of piece 1, perpendicular to the piston track, until the screw applies pressure on the piston. This assures that piece 1 moves in accordance with the retracting piston, as seen in Figure 5D. Be sure to choose the lateral hole that will not impede vision when the apparatus is mounted on the stereotactic instrument.
4.2. Remove any gel-foam from the craniectomies. Use the real or proxy bregma for stereotactic targeting. When moving the device to the insertion site, maintain a height of at least a few centimeters above the skull.
4.2.1. Avoid prolonged periods of the array-shuttle device near the skull or brain to decrease the chances that condensation will detach the array from the insertion shuttle prior to or during insertion. If this occurs, attempt to raise the array-shuttle device high above the brain and skull and wait for it to dry and re-adhere.
4.3. Adjust implant coordinates to avoid surface vasculature. As during craniectomy and durectomy, avoid penetrating vessels directly.
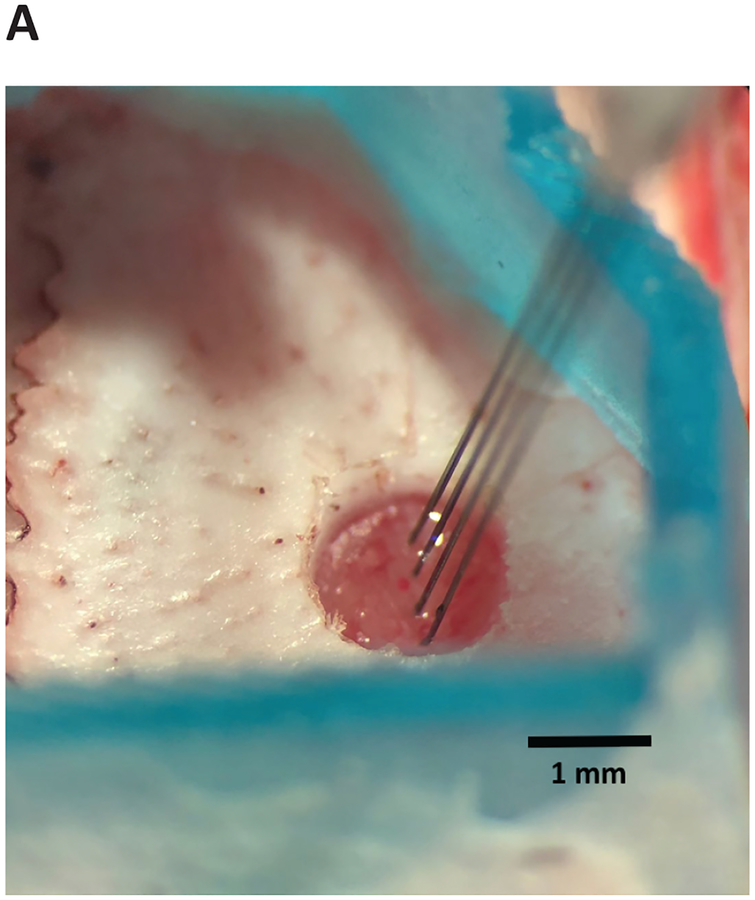
4.4. Insert the device briskly (~25 μm/s), lowering with the stereotactic instrument until the device enters the brain. The device will not penetrate the brain immediately. The degree of resistance and dimpling will depend on the target location and the device design (e.g., two versus four shanks, tip angle), but dimpling usually does not exceed 1 mm (Figure 6).
Figure 6: Array-shuttle insertion.
Array-shuttle is advanced into brain to target depth. Four-shank array-shuttle shown.
4.5. Once in the brain, lower with micromanipulator, decreasing speed on approach to target depth:
4.5.1. Use the stereotactic arm to start inserting at 25 μm/s.
4.5.2. Use the micromanipulator to insert at 10 μm/s when 2 mm to 1 mm above the target depth.
4.5.3. Slow insertion with micromanipulator to 5 μm/s when 1 mm to 500 μm above the target depth.
4.5.4. Slow insertion further to 1–2 μm/s during the final 500 μm to the target.
4.6. Visualize the device wings (horizontal polyimide tubing) and the point of insertion during lowering to avoid premature shuttle-array detachment.
4.7. When the target depth has been reached (Figure 7A), bilaterally anchor the polyimide wings to the base piece attachment sites via light-curable acrylic or another adhesive such as cyanoacrylate (Table of Materials). Dry, if necessary, the wings or the attachment point on the base piece, as condensation can collect on these surfaces and prevent adhesion. If visibility or other space constraints require, anchoring at only one polyimide wing is typically sufficient.
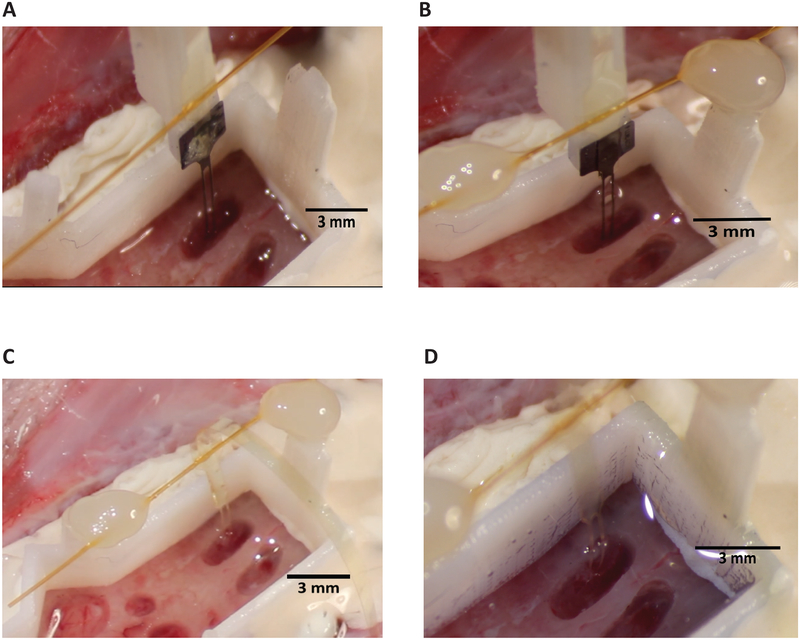
Figure 7: Retraction of shuttle.
(A) Tethering of wings before retraction. Two-shank array and shuttle shown. (B) PEG dissolution and wing adhesion with shank feature (circled, blue) that allows for visual confirmation of successful decoupling of array and shuttle during retraction. (C) A successful array insertion after insertion shuttle has been retracted. (D) Base piece with silicone gel fills for a single two-shank array insertion. The low-viscosity silicone gel used has a blue tint.
4.8. Prior to dissolution, the PEG will appear as a globular mass sitting atop the array and insertion shuttle interface (Figure 7A). Dissolve PEG by gently dripping body-temperature saline on the array at the point where it is adhered to the shuttle. The length of time this requires will depend on the molecular weight of the PEG selected and complete dissolution can be verified with direct visualization. When the PEG has fully dissolved the boundaries of the arrays will be completely discernable from the shuttle and piece 1 (Figure 7B).
4.9. Using the retraction micromanipulator, slowly withdraw the insertion shuttle. Continue saline irrigation (~1 drop/s) onto the array being retracted. Use retraction speeds that are the same as the insertion speed at relevant distances from target depth:
4.9.1. Retract using the micromanipulator at 1–2 μm/s from target depth to −500 μm.
4.9.2. Speed up the retraction using the micromanipulator at 5 μm/s when −500 μm to −1 mm.
4.9.3. Speed up the retraction using the micromanipulator at 10 μm/s when −1 mm to −2 mm.
4.9.4. Retract using the stereotactic arm at 25 μm/s from −2 mm from target and upwards.
4.10. Visualize the interface between the array and insertion shuttle during retraction. The polymer array will visibly separate from the shuttle and appear translucent as the shuttle is retracted at the semicircular junction between shanks of the insertion shuttle (Figure 7B).
4.11. Remove the array connector from piece 2 and move to a location that will not interfere with subsequent insertions. The polymer electrode array is now in the brain and no longer connected to the stereotactic instrument (Figure 7C). Remove the insertion shuttle and other insertion hardware.
4.10 For multiple insertions, repeat steps 4.1–4.9; do not move on to next section until all desired arrays are inserted. It is ill-advised to insert two devices within 250 μm of each other, as the slight bowing of the device ribbon between brain and wings in the strain relief region can extend at least this far.
5. Implant construction (~2 h)
5.1. After the final array insertion, empty saline from the base piece using a pipette or cotton swab, being careful not to disrupt the implanted arrays or ribbons.
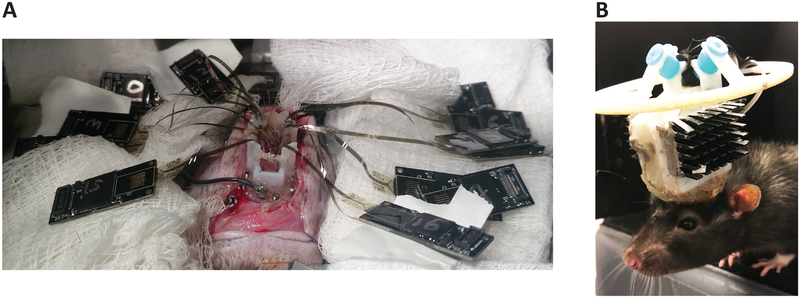
5.2. Fill the craniectomies and the base piece with low-viscosity silicone elastomer, or other artificial dural sealant. Allow it to cure (Figure 7D). With multiple insertions, place the hardware connectors where they do not interfere (Figure 8A). Appropriately orient the array connectors, and construct implant, so the ribbons are in their final desired position.
Figure 8: Multiple inserted arrays and rat after recovery from implantation.
(A) Hardware connectors in locations to not interfere with subsequent insertions. (B) A 1,024-channel, chronic polymer array implant. Reproduced with permission from Neuron [Supplemental Figure 1H]1.
5.3. Cover the arrays, array ribbons, and connectors in medium-viscosity silicone elastomer. Give special attention to the polymer-connector interface, as this soft-hard material interface is prone to damage. Cover the array ribbons completely such that when the medium-viscosity silicone cures, they are immobilized.
5.4. Enclose the elastomer-covered devices in the designed case.
5.5. Reinforce the implant base with dental acrylic. Do not allow acrylic to come into direct contact with the array ribbons because expansion of the acrylic while it cures can damage the conductive traces.
5.6. Apply Bupivicaine and bacitracin ointment around the incision.
5.7. Close the incision using 4–0 nylon sutures and skin glue.
6. Recovery and implant care
6.1. Remove animal from stereotactic instrument and place on its side on a heating pad.
6.2. Give subcutaneous injection of warm Ringer’s solution (5 – 10 mL) to hydrate animal.
6.3. Once animal is locomoting (10 – 60 min), transfer to a cage with half of the cage under a heating pad at 37 °C for 2–3 days.
6.4. Under a heating pad, give access to softened food and water.
6.5. Inject animal with 2 mg/kg Meloxicam for 1 week for pain control.
6.6. Allow the rat 1–2 weeks to heal and adjust to the implant weight (Figure 8B).
6.7. Perform regular chlorhexidine wash of the tissue around the implant and daily inspection for irritation, infection, or dehiscence.
REPRESENTATIVE RESULTS:
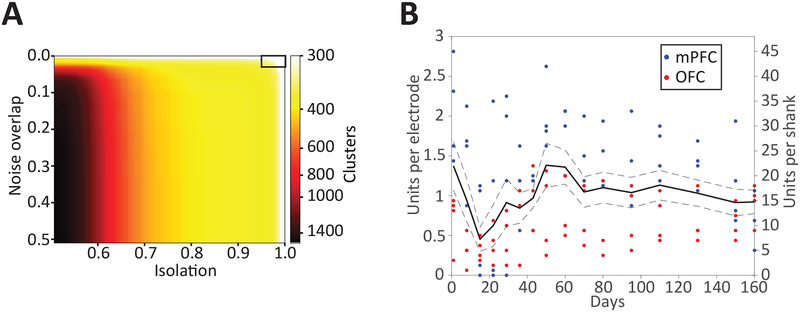
Following this protocol, a 1,024-channel neural implant recording yielded 375 single units1 (sorted with MountainSort49, noise overlap < 0.03, isolation > 0.96, 512 channels used for single unit recording, Figure 9A). This protocol can be used to implant different numbers of devices, with different channel counts and specifications, to different combinations of recording targets. Using the same protocol, single unit recording longevity has been demonstrated for at least 160 days1 in data from 19 devices (18 32-channel devices in prefrontal cortices, one 64-channel device in orbitofrontal cortex) across three different rats (Figure 9B). One of the three animals had a digital electrical failure resulting in an inability to record from four devices. Of the remaining 15/19 devices, there was a recording yield average of ~1 single unit per channel. Individual devices had yields of only a few single units up to ~2 units per channel. It is typical to see very different yields on devices implanted in the same animal in the same region.
Figure 9: Single-unit yield and recording longevity.
(A) Number of putative single-unit clusters from 512 channels (of the 1,024-channel implant), stratified by quality metric thresholds. Automated curation using MountainSort (noise overlap 0.03, isolation 0.96, black box in upper right) resulted in the identification of 375 single units from the 512 channels. Reproduced with permission from Neuron [Figure 2A]1. (B) Single-unit yields for polymer arrays per channel (left y-axis) or per 16-channel shank (right y-axis) over 160 days post-implantation (x-axis) in rats. Solid line is the mean cell yield across 8 shanks, dotted lines ± 1 SE. Individual time points per shank are shown as color-coded dots by region. Reproduced with permission from Neuron [Figure 3A]1.
In addition, a different surgical team following the protocol described here implanted six additional animals each with a combination of 4–6 32-channel devices targeted to orbitofrontal cortex and nucleus accumbens, and a tetrode hyperdrive (total implant weight approximately 50 g). One animal had an implant detach within one month of surgery. A second animal died during the post-operative recovery period, likely unrelated to the protocol steps described here. The remaining four animals remained healthy with stable implants that for the length of experiment, which lasted 4–11 months. Single unit counts were similar to those previously reported for 32-channel devices.
DISCUSSION:
This is a method for the implantation of multiple polymer electrode arrays to distributed brain areas for recording of single units over months. This method represents an 8x increase in recording channels and 4x increase in number of insertions from the closest large-scale polymer-array based system2,3. That system utilized a polymer mesh injection-based system in mouse but did not report an absolute number of putative single-units and thus a comparison of single neuron yield is not possible.
The method for insertion of a flexible device is based on an earlier protocol from Felix et al.39, with important modifications: a three-piece insertion apparatus for independent motion of the silicon shuttle during retraction, and tethering of the array at its target depth prior to retraction of the shuttle, which together eliminate the need for the quick withdrawal described in the original protocol. These changes minimize tissue damage and maintain array stability during retraction of the shuttle. Other flexible device implantation strategies, such as temporarily stiffening devices with bio dissolvable materials, are compatible with subsequent steps in this protocol. Securing the devices within the implant necessitated integrating previously validated strategies for covering the brain and protecting the delicate device ribbons.
Due to their fragility, care and attention are required to avoid directly contacting or otherwise transmitting force to the polymer electrode arrays and the silicon insertion shuttles. Particularly when working with multiple devices, insertion should be observed under a microscope to avoid interference of one device with another. In general, it is possible to handle an electrode array gently with plastic tipped forceps, avoiding the traces. Such a strategy is appropriate, for example, if the polymer electrode array begins to retract with the insertion shuttle. This can occur if the PEG is not completely dissolved, or due to surface tension of saline or CSF between the polymer and silicon.
One of the most common recoverable errors is array detachment from the insertion shuttle. This can occur at insertion, as the brain dimples and pressure at the device tip increases, if the array and shuttle are imperfectly aligned or if condensation has partially dissolved the PEG. To re-adhere an array, raise it as high as possible above the brain surface and wait for it to dry (approximately 5 min).
A critical aspect of planning a multi-array implantation surgery is the design of the base piece to accommodate all implant targets and sit without gaps against the contour of the skull. The base piece is a small plastic piece that is fixed to the skull after skull cleaning, screw placement, and partial craniectomies, prior to the insertion of the arrays. It has three functions: 1) to hold saline for dissolving the PEG following array insertion but before silicon shuttle retraction, 2) to provide a location above the skull surface to which the arrays can be attached by polyimide wings, thereby allowing strain relief along the ribbon above its insertion point in the brain, and 3) to hold artificial dural sealant, which stabilizes and protects the arrays and brain. The base piece can be fashioned by hand or 3D-printed. It was observed that draining and drying the base piece of saline are very important preceding device insertion. These steps prevent condensation and separation of the array and insertion shuttle. Drying the base piece is also critical to filling the base piece with artificial dural sealant. It is also important that the base piece not leak, as a film of silicone gel is difficult to remove from the skull and will prevent adhesion of dental acrylic for reliable chronic attachment of the implant to the skull. It is expected that any low-viscosity, biocompatible silicone elastomer could be used to fill the craniectomies and base piece, with a higher viscosity silicone elastomer surrounding it and the exposed polymer array ribbons.
Advances in polymer nanofabrication will translate to polymer-based electrode arrays, reducing feature sizes and increasing the possible number of electrodes in an array closer to those of silicon devices15–19. Similarly, the cross-sectional areas of polymer devices will shrink alongside feature sizes, providing even better biocompatibility8. Again, as is being accomplished with silicon devices, integration with amplifying, digitizing, and multiplexing chips17 will further enable larger-scale neural recording.
ACKNOWLEDGMENTS:
This work was supported by NINDS grant U01NS090537 to L.M.F and V.M.T., NIMH grant F30MH109292 to J.E.C, and NIMH grant F30MH115582 to H.R.J. J.E.C. and H.R.J. are also supported by NIGMS MSTP grant #T32GM007618. The Flatiron Institute is a division of the Simons Foundation.
Footnotes
DISCLOSURES:
J.E.C and L.M.F. are inventors on a pending patent related to the work described here.
REFERENCES:
- 1.Chung JE et al. High-Density, Long-Lasting, and Multi-region Electrophysiological Recordings Using Polymer Electrode Arrays. Neuron. 101 (1), 21–31 e25 (2019). [DOI] [PMC free article] [PubMed] [Google Scholar]
- 2.Fu TM, Hong G, Viveros RD, Zhou T, Lieber CM Highly scalable multichannel mesh electronics for stable chronic brain electrophysiology. Proceedings of the National Academy of Sciences of the United States of America. 114 (47), E10046–E10055 (2017). [DOI] [PMC free article] [PubMed] [Google Scholar]
- 3.Fu TM et al. Stable long-term chronic brain mapping at the single-neuron level. Nature Methods. 13 (10), 875–882 (2016). [DOI] [PubMed] [Google Scholar]
- 4.Gilletti A, Muthuswamy J Brain micromotion around implants in the rodent somatosensory cortex. Journal of Neural Engineering. 3 (3), 189–195 (2006). [DOI] [PubMed] [Google Scholar]
- 5.Jeong JW et al. Soft Materials in Neuroengineering for Hard Problems in Neuroscience. Neuron. 86 (1), 175–186 (2015). [DOI] [PubMed] [Google Scholar]
- 6.Kim TI et al. Injectable, cellular-scale optoelectronics with applications for wireless optogenetics. Science. 340 (6129), 211–216 (2013). [DOI] [PMC free article] [PubMed] [Google Scholar]
- 7.Lee HC et al. Histological evaluation of flexible neural implants; flexibility limit for reducing the tissue response? Journal of Neural Engineering. 14 (3) (2017). [DOI] [PubMed] [Google Scholar]
- 8.Luan L et al. Ultraflexible nanoelectronic probes form reliable, glial scar-free neural integration. Science Advances. 3 (2) (2017). [DOI] [PMC free article] [PubMed] [Google Scholar]
- 9.Schuhmann TG Jr. et al. Syringe-injectable Mesh Electronics for Stable Chronic Rodent Electrophysiology. Journal of Visualized Experiments. 10.3791/58003 (137) (2018). [DOI] [PMC free article] [PubMed] [Google Scholar]
- 10.Dhawale AK et al. Automated long-term recording and analysis of neural activity in behaving animals. Elife. 6 (2017). [DOI] [PMC free article] [PubMed] [Google Scholar]
- 11.Schwarz DA et al. Chronic, wireless recordings of large-scale brain activity in freely moving rhesus monkeys. Nature Methods. 11 (6), 670–676 (2014). [DOI] [PMC free article] [PubMed] [Google Scholar]
- 12.Kloosterman F et al. Micro-drive array for chronic in vivo recording: drive fabrication. Journal of Visualized Experiments. 10.3791/1094 (26) (2009). [DOI] [PMC free article] [PubMed] [Google Scholar]
- 13.Lu L, Popeney B, Dickman JD, Angelaki DE Construction of an Improved Multi-Tetrode Hyperdrive for Large-Scale Neural Recording in Behaving Rats. Journal of Visualized Experiments. 10.3791/57388 (135) (2018). [DOI] [PMC free article] [PubMed] [Google Scholar]
- 14.Nguyen DP et al. Micro-drive array for chronic in vivo recording: tetrode assembly. Journal of Visualized Experiments. 10.3791/1098 (26) (2009). [DOI] [PMC free article] [PubMed] [Google Scholar]
- 15.Herbawi AS, Kiessner L, Paul O, Ruther P High-Density Cmos Neural Probe Implementing a Hierarchical Addressing Scheme for 1600 Recording Sites and 32 Output Channels. 2017 19th International Conference on Solid-State Sensors, Actuators and Microsystems (Transducers) 20–23 (2017). [Google Scholar]
- 16.Raducanu BC et al. Time Multiplexed Active Neural Probe with 1356 Parallel Recording Sites. Sensors (Basel). 17 (10) (2017). [DOI] [PMC free article] [PubMed] [Google Scholar]
- 17.Jun JJ et al. Fully integrated silicon probes for high-density recording of neural activity. Nature. 551 (7679), 232–236 (2017). [DOI] [PMC free article] [PubMed] [Google Scholar]
- 18.Lopez CM et al. A Neural Probe With Up to 966 Electrodes and Up to 384 Configurable Channels in 0.13 mu m SOI CMOS. Ieee Transactions on Biomedical Circuits and Systems. 11 (3), 510–522 (2017). [DOI] [PubMed] [Google Scholar]
- 19.Scholvin J et al. Close-Packed Silicon Microelectrodes for Scalable Spatially Oversampled Neural Recording. Ieee Transactions on Biomedical Engineering. 63 (1), 120–130 (2016). [DOI] [PMC free article] [PubMed] [Google Scholar]
- 20.Bernatchez SF, Parks PJ, Gibbons DF Interaction of macrophages with fibrous materials in vitro. Biomaterials. 17 (21), 2077–2086 (1996). [DOI] [PubMed] [Google Scholar]
- 21.Sanders JE, Stiles CE, Hayes CL Tissue response to single-polymer fibers of varying diameters: Evaluation of fibrous encapsulation and macrophage density. Journal of Biomedical Materials Research. 52 (1), 231–237 (2000). [DOI] [PubMed] [Google Scholar]
- 22.Seymour JP, Kipke DR Neural probe design for reduced tissue encapsulation in CNS. Biomaterials. 28 (25), 3594–3607 (2007). [DOI] [PubMed] [Google Scholar]
- 23.Szarowski DH et al. Brain responses to micro-machined silicon devices. Brain Research. 983 (1–2), 23–35 (2003). [DOI] [PubMed] [Google Scholar]
- 24.Thelin J et al. Implant Size and Fixation Mode Strongly Influence Tissue Reactions in the CNS. PLoS One. 6 (1) (2011). [DOI] [PMC free article] [PubMed] [Google Scholar]
- 25.Mols K, Musa S, Nuttin B, Lagae L, Bonin V In vivo characterization of the electrophysiological and astrocytic responses to a silicon neuroprobe implanted in the mouse neocortex. Science Reports. 7 (1), 15642 (2017). [DOI] [PMC free article] [PubMed] [Google Scholar]
- 26.Okun M, Lak A, Carandini M, Harris KD Long Term Recordings with Immobile Silicon Probes in the Mouse Cortex. PLoS One. 11 (3), e0151180 (2016). [DOI] [PMC free article] [PubMed] [Google Scholar]
- 27.Kim YT, Hitchcock RW, Bridge MJ, Tresco PA Chronic response of adult rat brain tissue to implants anchored to the skull. Biomaterials. 25 (12), 2229–2237 (2004). [DOI] [PubMed] [Google Scholar]
- 28.Biran R, Martin DC, Tresco PA The brain tissue response to implanted silicon microelectrode arrays is increased when the device is tethered to the skull. Journal of Biomedical Materials Research. Part A. 82 (1), 169–178 (2007). [DOI] [PubMed] [Google Scholar]
- 29.Lacour SP, Courtine G, Guck J Materials and technologies for soft implantable neuroprostheses. Nature Reviews Materials. 1 (10) (2016). [Google Scholar]
- 30.Geddes LA, Roeder R Criteria for the selection of materials for implanted electrodes. Annals of Biomedical Engineering. 31 (7), 879–890 (2003). [DOI] [PubMed] [Google Scholar]
- 31.Fattahi P, Yang G, Kim G, Abidian MR A Review of Organic and Inorganic Biomaterials for Neural Interfaces. Advanced Materials. 26 (12), 1846–1885 (2014). [DOI] [PMC free article] [PubMed] [Google Scholar]
- 32.Weltman A, Yoo J, Meng E Flexible, Penetrating Brain Probes Enabled by Advances in Polymer Microfabrication. Micromachines. 7 (10) (2016). [DOI] [PMC free article] [PubMed] [Google Scholar]
- 33.Ware T et al. Fabrication of Responsive, Softening Neural Interfaces. Advanced Functional Materials. 22 (16), 3470–3479 (2012). [Google Scholar]
- 34.Harris JP et al. Mechanically adaptive intracortical implants improve the proximity of neuronal cell bodies. Journal of Neural Engineering. 8 (6) (2011). [DOI] [PMC free article] [PubMed] [Google Scholar]
- 35.Rousche PJ et al. Flexible polyimide-based intracortical electrode arrays with bioactive capability. Ieee Transactions on Biomedical Engineering. 48 (3), 361–371 (2001). [DOI] [PubMed] [Google Scholar]
- 36.Patel PR et al. Insertion of linear 8.4 mu m diameter 16 channel carbon fiber electrode arrays for single unit recordings. Journal of Neural Engineering. 12 (4) (2015). [DOI] [PMC free article] [PubMed] [Google Scholar]
- 37.Xiang ZL et al. Ultra-thin flexible polyimide neural probe embedded in a dissolvable maltose-coated microneedle. Journal of Micromechanics and Microengineering. 24 (6) (2014). [Google Scholar]
- 38.Felix S et al. Removable silicon insertion stiffeners for neural probes using polyethylene glycol as a biodissolvable adhesive. Conference Proceedings of the IEEE Engineering in Medicine and Biology Society. 2012 871–874 (2012). [DOI] [PubMed] [Google Scholar]
- 39.Felix SH et al. Insertion of flexible neural probes using rigid stiffeners attached with biodissolvable adhesive. Journal of Visualized Experiments. 10.3791/50609 (79), e50609 (2013). [DOI] [PMC free article] [PubMed] [Google Scholar]
- 40.Kozai TDY, Kipke DR Insertion shuttle with carboxyl terminated self-assembled monolayer coatings for implanting flexible polymer neural probes in the brain. Journal of Neuroscience Methods. 184 (2), 199–205 (2009). [DOI] [PMC free article] [PubMed] [Google Scholar]
- 41.Sohal HS et al. The sinusoidal probe: a new approach to improve electrode longevity. Frontiers in Neuroengineering. 7 10 (2014). [DOI] [PMC free article] [PubMed] [Google Scholar]
- 42.Kim BJ et al. 3D Parylene sheath neural probe for chronic recordings. Journal of Neural Engineering. 10 (4) (2013). [DOI] [PubMed] [Google Scholar]
- 43.Zhao Z et al. Parallel, minimally-invasive implantation of ultra-flexible neural electrode arrays. Journal of Neural Engineering. 10.1088/1741-2552/ab05b6 (2019). [DOI] [PMC free article] [PubMed] [Google Scholar]
- 44.Richter A et al. A simple implantation method for flexible, multisite microelectrodes into rat brains. Frontiers in Neuroengineering. 6 6 (2013). [DOI] [PMC free article] [PubMed] [Google Scholar]
- 45.Hanson TL, Diaz-Botia CA, Kharazia V, Maharbiz MM, Sabes PN The “sewing machine” for minimally invasive neural recording. bioRxiv. 10.1101/578542 (2019). [DOI] [Google Scholar]
- 46.Jackson N, Muthuswamy J Artificial dural sealant that allows multiple penetrations of implantable brain probes. Journal of Neuroscience Methods. 171 (1), 147–152 (2008). [DOI] [PMC free article] [PubMed] [Google Scholar]
- 47.Gage GJ et al. Surgical implantation of chronic neural electrodes for recording single unit activity and electrocorticographic signals. Journal of Visualized Experiments. 10.3791/3565 (60) (2012). [DOI] [PMC free article] [PubMed] [Google Scholar]
- 48.Bothe RT, Beaton KE, Davenport HA Reaction of Bone to Multiple Metallic Implants. Surgery, Gynecology and Obstetrics. 71 598–602 (1940). [Google Scholar]
- 49.Chung JE et al. A Fully Automated Approach to Spike Sorting. Neuron. 95 (6), 1381–1394 e1386 (2017). [DOI] [PMC free article] [PubMed] [Google Scholar]


