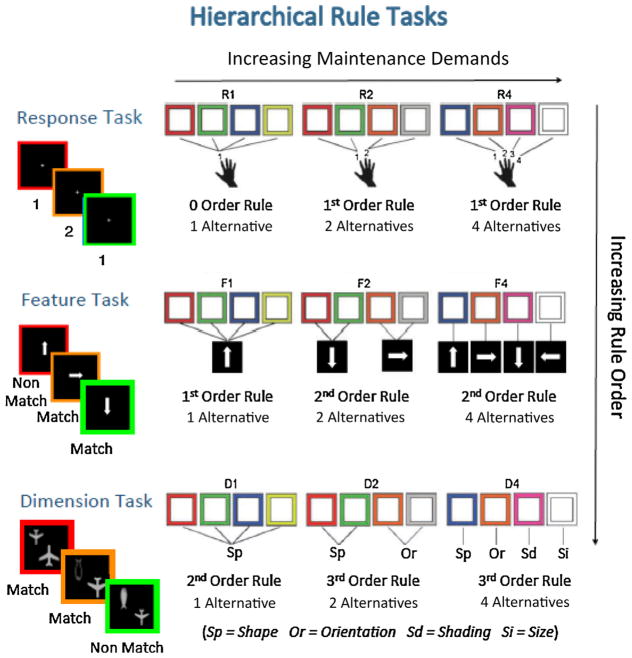
Fig. 1.
Schematic depicting trial events (left) and rule mappings (right) across working memory load conditions for the response, feature, and dimension tasks. In the response task (top row), participants respond by pressing one of four keys (1–4) that was cued by the color of the square. Across three, blocked working memory load levels, four color cues to be encountered during a block could map to either one (R1), two (R2), or four (R4) potential responses. The example trials on the left use the R2 rule mappings shown on the right. In the feature task (middle row), participants respond by pressing one of two keys (“match” vs. “nonmatch”) depending on whether or not an arrow pointed in the target direction, as cued by color. Across three, blocked working memory load levels, four color cues could map to one (F1), two (F2), or four (F4) potential target directions. The example trials on the left use the F2 rule mappings shown on the right. In the dimension task (bottom row), participants responded by pressing “match” or “nonmatch” depending on whether the presented objects match along a certain dimension (shape, size, orientation, or shading) as cued by color. Across three, blocked working memory load levels, four color cues could map to one (D1), two (D2), or four (D4) candidate dimensions for a given block. The example trials on the left use the D2 rule mappings shown on the right. Thus, across the three tasks, rule order increases from response task (0 order [R1] and 1st order [R2/R4]), to feature task (1st [F1] and 2nd order [F2/F4]), to dimension task (2nd [D1] and 3rd order [D2/D4]). Note that moving from load 1 to load 2 within each task is associated with an increase in both rule order and maintenance demands, whereas rule order is kept constant and only maintenance demands increase when moving from load 2 to load 4. (For interpretation of the references to color in this figure legend, the reader is referred to the web version of this article.)

