

Abstract
The CRISPR (clustered regularly interspaced short palindromic repeats)-Cas (CRISPR-associated) system is successfully being used for efficient and targeted genome editing in various organisms, including the nematode Caenorhabditis elegans. Recent studies have developed various CRISPR-Cas9 approaches to enhance genome engineering via two major DNA double-strand break repair pathways: non-homologous end joining and homologous recombination. Here we describe a protocol for Cas9-mediated C. elegans genome editing together with single guide RNA (sgRNA) and repair template cloning (canonical marker-free and cassette selection methods), as well as injection methods required for delivering Cas9, sgRNAs, and repair template DNA into the C. elegans germline.
BASIC PROTOCOL 1: guide RNA preparation
ALTERNATE PROTOCOL 1: sgRNA cloning using fusion PCR
BASIC PROTOCOL 2: Preparation of a repair template for homologous recombination
ALTERNATE PROTOCOL 1: Preparation of repair template donors for the cassette selection method
BASIC PROTOCOL 3. Injecting animals
BASIC PROTOCOL 4. Screening transgenic worms with marker-free method
ALTERNATE PROTOCOL 2: Screening transgenic worms with a cassette selection method
Keywords: CRISPR, Cas9, genome editing, genome engineering, C. elegans, CRISPR-Cas
INTRODUCTION
Overview of the CRISPR-Cas9 system and function
The CRISPR-Cas system is primarily a nuclease-based defense mechanism utilized by bacteria against bacteriophages to avoid viral attacks (Barrangou et al., 2007). Key features of all major CRISPR-Cas systems are the presence of an array of direct repeats referred to as CRISPR (clustered regularly interspaced short palindromic repeats) as well as genes encoding CRISPR-associated (Cas) proteins, including an RNA-guided site-specific nuclease (RGN). CRISPR loci are composed of palindromic repeats with spacer regions originating from viral or plasmid DNA and are accompanied by adjacent Cas genes, including a gene that encodes the RGN. The so-called Type II CRISPR system from Streptococcus pyogenes is the best-studied system for genome editing (Garneau et al., 2010; Horvath & Barrangou, 2010; Mali et al., 2013). In brief, this system consists of two non-coding RNAs, crRNA and trRNA, which are transcribed from the CRISPR locus. The crRNA or CRISPR targeting RNA consists of a 20-nucleotide sequence from the spacer region of the CRISPR locus and corresponds to a viral DNA signature. The trRNA or trans-activating RNA is complementary to a pre-crRNA, thus forming a RNA duplex which is later cleaved by RNase III to form a crRNA-trRNA hybrid, thereby directing the Cas9 RGN to make a double-stranded break (DSB) at the target site as long as the target is directly 5’ of a so-called protospacer adjacent motif (PAM) with the sequence NGG (Deltcheva et al., 2011). The DSB is within ~3 bases from the target site’s PAM. The CRISPR locus itself is not cleaved by the RGN because it does not contain any NGG sequences (Figure 1).
Figure 1.

Schematic representation of the CRISPR-Cas9 genome editing approach in C. elegans. Young adult hermaphrodites are injected with the CRISPR-Cas9-containing DNA mixture. A DSB generated by Cas9 is repaired via error-prone NHEJ or error-free HR. Yellow box represents small nucleotide insertion and green box represents insertion of GFP tag.
The S. pyogenes CRISPR-Cas9 system has been utilized for genetic engineering because the S. pyogenes crRNA and trRNA are functional when fused as a single RNA molecule (referred to as a single guide RNA (sgRNA)), and because the S. pyogenes RGN is a single subunit protein. This system can thus be used to introduce a DSB in vivo at the locus N20-NGG by engineering a sgRNA molecule in which the first 20 nucleotides correspond to a 20-nucleotide target sequence directly 5’ of an NGG (PAM) sequence.
Non-Homologous End joining (NHEJ) and Homologous Recombination (HR)
DNA double-strand breaks (DSBs) induced by the Cas9 RGN at the target site can be repaired by either Non-Homologous End Joining (NHEJ) or Homologous Recombination (HR) (Figure 1). In the absence of a repair template, DSBs introduced by CRISPR-Cas9 are repaired by NHEJ, which often results in small insertions and/or deletions (InDels) at the targeted site (Figure 1). In the generation of InDels, nucleotides are randomly inserted and/or deleted. This can result in the early termination of a protein either due to sequence alteration or a frame shift when the targeted site is located in an open reading frame. Importantly, when aiming for gene disruption, targeting of the N-terminus of a gene is preferred. However, the presence of potential cryptic start codons has to be evaluated to confirm the loss of gene function.
Unlike error-prone NHEJ-driven InDel events, HR is error-free and can be utilized with the CRISPR-Cas9 system for the insertion of tags and/or to generate precise point mutations in a specific gene. This requires introducing a repair template carrying homology both upstream and downstream of the target site that is used for DSB repair (Figure 1).
Various approaches have been developed by different laboratories to engineer the C. elegans genome, which can be divided into two major categories based on their dependency on a phenotypic marker which probes/marks the edited genome sequence (Table 1). Here, we describe reproducible marker-free and marker (selection cassette)-based methods using S. pyogenes Cas9 in C. elegans to create heritable genome modifications via either the NHEJ or HR pathways. The overall strategy, which is broken down into 4 separate Basic Protocols, involves 1) generating the sgRNA, 2) generating the repair template DNA if homologous recombination is going to be employed to specifically modify a particular gene, 3) introducing the cas9 gene, sgRNA, and repair DNA templates into C. elegans animals on separate plasmids, and 4) screening for transgenic worms carrying the CRISP-Cas9-mediated gene editing event (Figure 2). This strategy can generate targeted deletions/disruptions, point mutations and endogenous tagging through canonical marker-free and maker-based (cassette selection) methods. Advantages afforded by each method, which can aid in deciding what method to follow, are presented in the Critical Parameters section.
Table 1.
Types of CRISPR-Cas9 methods developed in C. elegans
| Selection marker | References |
|---|---|
| Marker-free | Single-CRISPR (Friedland et al., 2013; Paix et al., 2014; Tzur et al., 2013) Co-CRISPR (Arribere et al., 2014; H. Kim et al., 2014; Ward, 2015) |
| Marker-dependent |
unc-119(+) (Dickinson et al., 2013) Drug resistance (Dickinson et al., 2015; Dickinson et al., 2013; Norris et al., 2015) |
Figure 2.

Outline of building genome engineered C. elegans in this protocol. Note that we present two alternative protocols for guide RNA and repair template. Each requires its own screening strategy.
BASIC PROTOCOL 1: GUIDE RNA PREPARATION
Plasmids containing sgRNAs are necessary for Cas9-mediated genome editing. This basic protocol outlines the steps required to prepare these plasmids in two alternative ways for microinjection.
Materials
BamHI (NEB R0136S)
NotI (NEB R0189S)
EcoRI (NEB R0101S)
HindIII (NEB R0104S)
Nuclease-free water (Qiagen 129114 or equivalent)
T4 DNA ligase (NEB M0202S)
Sterile pipet tips or toothpicks for picking colonies
Gibson assembly Master Mix (NEB E2611S)
pHKMC1 - Empty sgRNA (Addgene #67720)
Chemically competent E. coli cells (DH5α NEB C2987I or equivalent)
High Fidelity Phusion DNA polymerase (NEB M0530S or equivalent)
Gel DNA Extraction Kit (Zymoclean D4001)
Plasmid Miniprep Kit (GeneJet K0502 or Qiagen 27104)
Plasmid Midiprep Kit (Qiagen 12143)
Heat Block (VWR Scientific Standard Heat Block or equivalent)
PCR thermo cycler (BioRad T100 or equivalent)
sgRNA Top: 5’-ATTGCAAATCTAAATGTTT-N19/N20-GTTTTAGAGCTAGAAATAGC-3’ (where N19/20 represents a 19 or 20-long nucleotide sequence corresponding to the target sequence of interest).
sgRNA Bottom: 5’-GCTATTTCTAGCTCTAAAAC-N19/N20-RC-AAACATTTAGATTTGCAAT-3’(where N19/20-RC represents the reverse complementary sequence of the N19/20 target sequence).
M13F: 5’-GTAAAACGACGGCCAGT-3’
M13R: 5’-AACAGCTATGACCATG-3’
P1: 5’-CGGGAATTCCTCCAAGAACTCGTACAAAAATGCTCT-3’
P2: 5’-(N19/20-RC) + AAACATTTAGATTTGCAATTCAATTATATAG-3’ (where N19/20-RC is the reverse complementary sequence of the N19/20 target sequence used in primer P3).
P3: 5’-(N19/20) + GTTTTAGAGCTAGAAATAGCAAGTTA-3’ (where N19/20 represents the sgRNA target sequence)
P4: 5’-CGGAAGCTTCACAGCCGACTATGTTTGGCGT-3’
Identifying a sgRNA targeting sequence
-
1
To construct an appropriate sgRNA (single guide RNA), first identify a targeting sequence within ~70 bp of the intended genomic target site in the form 5’-N19/20-NGG-3’ using nucleotide sequence analysis software or a text editor program such as Notepad.
The 3’ NGG is the PAM sequence that is necessary for Cas9 binding to the target sequence but is not included in the sgRNA expression vector.
To minimize the potential of generating off-target mutations, use software such as NCBI BLAST to find possible off-target sites. Once the targeting sgRNA sequence is identified, generate an sgRNA expression vector as described below. We present two alternative reliable methods that we have implemented successfully.
NOTE: The presence of GG at positions N19 and 20 on the target sequence has been shown to enhance the efficiency of recombination (Farboud & Meyer, 2015).
NOTE: Instead of NGG, an NGA PAM can be used with the VQR Cas9 variant, achieving the same efficiency as wild-type Cas9 (Bell, Fu, & Fire, 2016).
sgRNA cloning using an empty sgRNA expression vector
This section describes how to engineer an sgRNA in an empty sgRNA expression vector using restriction digestion and either Gibson or HiFi DNA assembly).
-
2
Order both top (forward) and bottom (reverse complement) oligos containing 19–20 nucleotides of homology (N19/N20) to the target sequence from a DNA synthesis service (Figure 3A). When N1 ≠ G, add one additional ‘G’ in front of N1 to ensure expression from the U6 promoter.
Figure 3.
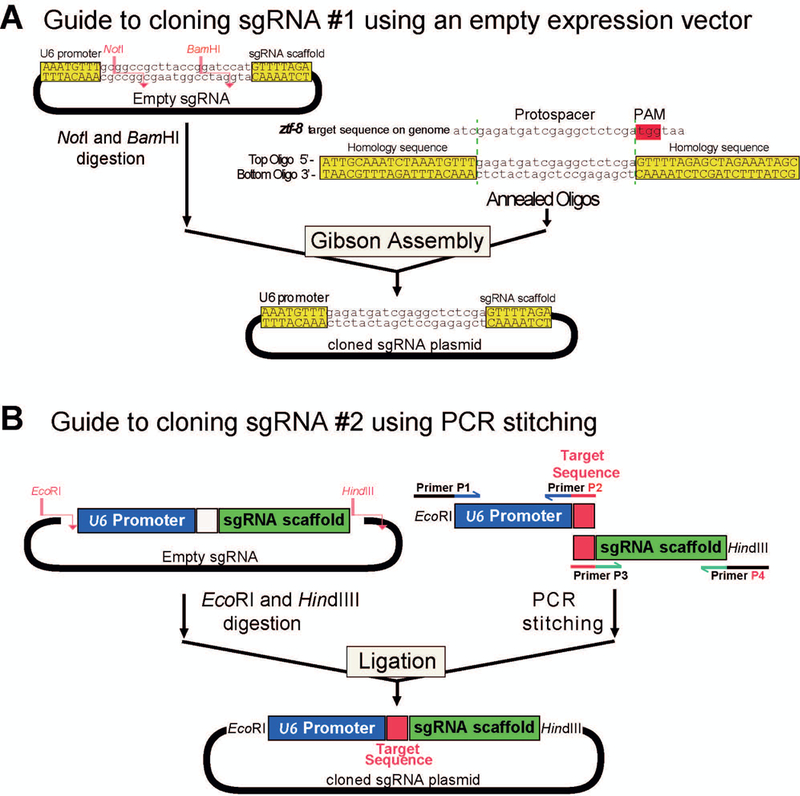
Schematic representation of the sgRNA cloning by two alternative methods. A. sgRNA cloning using an empty sgRNA expression vector. The sgRNA comprised of a pair of annealed oligos specifically targeting ztf-8 is cloned into the NotI and BamHI digested empty sgRNA vector (left) using Gibson assembly. B. sgRNA cloning using fusion PCR. To generate an sgRNA containing the EcoRI-HindIII fragment, two amplicons are stitched by PCR (right). Both the fused PCR fragment and the empty sgRNA vector are digested with EcoRI and HindIII and ligated to create the sgRNA expression vector.
Following are the generic sgRNA sequences (in CAPs) as well as an example of the sgRNA sequence design (lower case) adopted for C-terminal tagging of the C. elegans ztf-8 gene with GFP (H. M. Kim & Colaiacovo, 2015b).
Generic sgRNA sequences:
sgRNA_Top: 5’-ATTGCAAATCTAAATGTTT-N19/N20-GTTTTAGAGCTAGAAATAGC-3’
sgRNA_Bottom: 5’-GCTATTTCTAGCTCTAAAAC-N19/N20-RC-AAACATTTAGATTTGCAAT-3’
sgRNA adopted for C-terminal GFP tagging of the C. elegans ztf-8 gene as described in (H. M. Kim & Colaiacovo, 2015b).
ztf-8_Top: 5’-ATTGCAAATCTAAATGTTT-gagatgatcgaggctctcga-GTTTTAGAGCTAGAAATAGC-3’
ztf-8_Bottom: 5’-GCTATTTCTAGCTCTAAAAC-tcgagagcctcgatcatctc-AAACATTTAGATTTGCAAT-3’
-
2
Perform a miniprep of an empty sgRNA vector (3482bp, Addgene #67720) that contains the U6 Promoter and sgRNA scaffold sequence as illustrated in Figure 3A. Digest 1–2 μg of empty sgRNA vector with BamHI and NotI. Extract the 3470 bp band from an agarose gel using the Gel DNA recovery kit.
This will be sufficient for ~10 reactions.
-
2To generate double stranded DNA, mix equal amounts of the “Top” and “Bottom” strand of sgRNA targeting oligonucleotides (e.g. 5μl of 200 pM each) in distilled water and anneal them using a thermal cycler.
- Heat to 95°C for ~2 min.
- Slowly ramp cool to 25°C over a period of ~40 min.
Alternatively, place the tube containing the Top and Bottom oligos in a heat block at ~90°C for ~3 minutes. Remove the block from the heat block apparatus and allow it to cool at room temperature for ~40 min until it reaches ~30°C.
-
3
Set up the Gibson assembly reaction:
5 μl of annealed oligonucleotides
+ ~100 ng BamHI and NotI digested empty sgRNA
+ 1/2 of total volume of Gibson assembly mix.
-
4
Use 1 to 2 μl for bacterial transformation of chemically competent E. coli (UNIT 1.8; Seidman et al., 1997). Spread the transformants onto LB plates containing 100 μg/mL ampicillin and incubate overnight.
-
5
The following day, pick and inoculate ~10 ampicillin-resistant colonies, purify plasmid DNA using a plasmid miniprep kit, and screen for insertion of sgRNA by restriction digest analysis.
NOTE: For colony PCR screening, M13F and M13R primers will amplify ~890bp from the empty vector and this PCR product can be used for sequencing and/or be further analyzed with a BamHI or NotI digestion. The plasmid containing the sgRNA insert can be distinguished from either the undigested or self-ligated vector lacking an insert via digestion with either of these two restriction enzymes, since an undigested or self-ligated vector will produce both a 530bp and a 360 bp products. Although BamHI and NotI-cleaved ends are not compatible with each other, Gibson assembly has 5’ to 3’ resection activity and this may enhance the self-ligation of empty vectors by removing the staggered incompatible ends produced by BamHI and NotI.
-
6
Verify sgRNA insertion by Sanger sequencing using the primers M13R and M13F.
ALTERNATE PROTOCOL 1: sgRNA cloning using fusion PCR
This section describes how to clone a sgRNA targeting sequence using fusion PCR (adapted from (Friedland et al., 2013).
Additional Materials (also see Basic Protocol 1)
P1: 5’-CGGGAATTCCTCCAAGAACTCGTACAAAAATGCTCT-3’
P2: 5’-(N19/20-RC) + AAACATTTAGATTTGCAATTCAATTATATAG-3’ (where N19/20-RC is the reverse complementary sequence of the N19/20 target sequence used in primer P3; synthesized by DNA synthesis service)
P3: 5’-(N19/20) + GTTTTAGAGCTAGAAATAGCAAGTTA-3’ (where N19/20 represents the sgRNA target sequence; synthesized by DNA synthesis service)
P4: 5’-CGGAAGCTTCACAGCCGACTATGTTTGGCGT-3’ (synthesized by DNA synthesis service)
High Fidelity Phusion DNA polymerase (NEB M0530S or equivalent) and 5× HF buffer
10 mM dNTP mix (10 mM each dNTP)
PCR purification kit
EcoRI (NEB, cat. no. R0101S)
HindIII (NEB, cat. no. R0104S)
T4 DNA ligase (NEB, cat. no. M0202S) and 10× buffer
Additional reagents and equipment for PCR (see Current Protocols article: Kramer and Coen, 2000) and agarose gel electrophoresis (see Current Protocols article: Voytas, 2000)
Design primers to amplify upstream (P1 + P2; PCR-up) and downstream (P3 + P4; PCR-down) of the empty sgRNA vector (Figure 3B). Primers P2 and P3 contain the sgRNA target sequence N19/20 (19–20nt) (Figure 3B). When N1 ≠ G, add one additional ‘G’ in front of N1 to ensure expression from the U6 promoter. P1 and P4 contain EcoRI and HindIII restriction sites, which will be used for ligation to the vector plasmid. Note that 3 nucleotides at the 5’ end of P1 and P4 are not complementary to the empty sgRNA vector, but the remaining sequences (33nt and 28nt for P1 and P4) are complementary to the empty sgRNA.
- Amplify upstream (P1 + P2; PCR-up) and downstream (P3 + P4; PCR-down) of sgRNA expression vector using empty sgRNA as a template (Figure 3B):
- 10 μL 5x HF buffer
- 1 μL 10 mM dNTP mix
- 1.25 μL 10 uM each of P1 and P2 for PCR-up, P3 and P4 for PCR-down
- 2 μL 50 ng/uL Empty sgRNA vector
- 0.5 μL Phusion polymerase
- 34 μL ddH2O (Total 50 μl)
- Run reactions in a thermal cycler using the following PCR thermal cycling program:
- 1 cycle: 30 sec 98°C (initial denaturation)
- 30 cycles: 5–10 sec 98°C (denaturation)
- 10–30 sec 45°−72°C (annealing)
- 15–30 sec/kb 72°C (extension)
- 1 cycle: 5–10 min 72°C (final extension).
Gel purify PCR amplicons by agarose gel electrophoresis (1% agarose gel) and by using a gel DNA extraction kit.
- Amplify a stitched sgRNA amplicon by using amplicons from PCR-up and -down as templates (PCR-whole).
- 10 μL 5x HF buffer
- 1 μL 10 mM dNTP mix
- 1.25 μL 10 uM each of P1 and P4
- 1 μL amplicon each from PCR-up and PCR-down (5–10 ng)
- 0.5 μL Phusion polymerase
- 35 μL ddH2O (Total 50 μl)
- Run reactions in a thermal cycler using the following PCR thermal cycling program:
- 1 cycle: 30 sec 98°C (initial denaturation)
- 30 cycles: 5–10 sec 98°C (denaturation)
- 10–30 sec 45°−72°C (annealing)
- 15–30 sec/kb 72°C (extension)
- 1 cycle: 5–10 min 72°C (final extension).
Clean up PCR product from PCR-whole reaction using a PCR purification kit.
Digest empty sgRNA vector and purified PCR amplicon with EcoRI and HindIII restriction enzymes. Gel purify digested vector backbone and PCR amplicon using agarose gel electrophoresis (1% agarose gel).
- Ligate the digested amplicon with the digested vector. A control ligation with “vector only” will help assess enrichment of transformed bacteria carrying amplicon insertions in the vector. Control ligation can be set up by dropping out stitched amplicon from the reaction.
- 50ng digested vector
- 50 ng digested stitched PCR products
- 2 μL 10x T4 DNA ligase buffer
- 2 μL T4 DNA ligase
- Add ddH2O to make a total 20 μl
- NOTE: A control ligation with “vector only” will help assess enrichment of transformed bacteria carrying amplicon insertions in the vector. A control ligation can be set up by dropping the stitched amplicon from the reaction.
Incubate ligation reactions at room temperature for 1 hour. Transform 5 μL of each ligation reaction into 45 μL DH5alpha competent cells according to manufacturer’s recommendations, and then spread bacteria onto LB + ampicillin plates. Incubate at 37°C overnight.
-
Pick and grow up ampicillin-resistant colonies from the plate containing bacterial transformants, purify plasmids, and screen for insertion of the sgRNA cassette by restriction digest analysis.
NOTE: For PCR screening, M13F and M13R primers (or P1 and P4) will amplify ~890bp from the empty vector and this PCR product can be used for sequencing and/or be further analyzed with a BamHI or NotI digestion as described in Step 7 in the Basic Protocol.
-
Further verify correct sgRNA insert by sequencing the vector by Sanger sequencing using primers P1 and P4.
NOTE: Instead of the empty vector, another sgRNA containing vector can be used for the above described steps such as pU6::klp-12_sgRNA or pU6::unc-119_sgRNA as described in (Friedland et al., 2013).
NOTE: Although gel purification is not generally necessary for PCR stitching, the original PCR template used in the PCR-up and PCR-down reactions contains an empty sgRNA vector. Gel purification helps ensure that the original template is not utilized in the amplification cycles in the “PCR-whole” reaction.
BASIC PROTOCOL 2: PREPARATION OF A REPAIR TEMPLATE FOR HOMOLOGOUS RECOMBINATION
We present two independent protocols for donor template preparation: Canonical marker-free and marker-based cassette selection methods. Since the latter requires both drug and fluorescent selections followed by removal of a cassette, the donor templates for the two protocols are not compatible with each other and each method requires its own screening procedure (Figure 2). While more time is involved for achieving completion of the screening process with the marker-based cassette selection method (see Table 6), this method is considered less laborious due to its drug and fluorescent screening capabilities. However, by using multiple cassette vectors, this system is tailored for endogenous tagging and deletions but not for generating point mutations. On the other hand, the marker-free method is universal and customizable and does not require specific cassette vectors. However, it often entails laborious PCR screening. Therefore, these two methods present both pros and cons that need to be considered when deciding which approach to use.
Table 6.
Workflow and time considerations for CRISPR-Cas9 protocols corresponding to Figure 7.
| Step | From - To | Duration | Marker-free method | Stopping point |
|---|---|---|---|---|
| 1 | Day 1–3 | 3 days | Design sgRNA, repair template (HR) and order oligonucleotides. | Yes |
| 2 | Day 4–8 | 5 days | Prepare sgRNA, repair template (HR) and injection markers. | Yes |
| 3 | Day 9 | 1 day | Microinject CRISPR-Cas9 DNA mix into young adult worms. | No |
| 4 | Day 11–13 | 1–2 days | Screen the injection marker (mCherry+) expressing F1 worms. | No |
| 5 | Day 13–14 | 1 day | PCR genotyping of F1 worms. | No |
| 6 | Day 15–16 | 1 day | Re-genotyping and/or re-sequencing F2 worms. | Yes |
| Step | From - To | Duration | Cassette selection method (Alternative method) | Stopping point |
| 1 | Day 1–3 | 3 days | Design sgRNA, repair template (HR) and order oligonucleotides. | Yes |
| 2 | Day 4–8 | 5 days | Prepare sgRNA, repair template (HR) and injection markers. | Yes |
| 3 | Day 9 | 1 day | Microinject CRISPR-Cas9 DNA mix into young adult worms. | No |
| 4 | Day 10 | 1 day | Add G418 to each plate. Swirl G418 solution. | No |
| 5 | Day 13–15 | 1–3 days | Screen dim pharyngeal GFP expression (GFP+, mCherry-). | No |
| 6 | Day 17–19 | 1 day | Microinject CRE recombinase. | No |
| 7 | Day 19–21 | 1 day | Pick mCherry+ worms. | No |
| 8 | Day 21–24 | 1 day | Screen mCherry-, pharyngeal GFP- worms. | No |
Designing the repair template DNA for using the canonical marker-free method
Decide whether you are aiming for an N- or C-terminal fusion of your protein of interest before designing the oligonucleotides for the repair template (donor vector) since that determines what primer sequences you must use (Figure 4A). Here we present an example of C-terminal tagging with GFP (Figure 4B). Using DNA from Bristol N2 worms as template, PCR amplify both upstream and downstream homology arms (aim to amplify between 500 to 1500bp of homology sequence flanking each side of the target site). Design PCR primers with ~20–30nt of overlapping sequence for cloning via Gibson assembly. Specifically, for Gibson assembly, the “upstream” PCR product will contain overlapping sequences for the KpnI side of pUC19 (gray line of Up-F primer) as well as for the 5’ end of GFP (green line). The “downstream” PCR product will overlap with the 3’ end of GFP (green line) and the SalI side of pUC19 (gray line). The GFP fragment can be PCR amplified from a GFP-containing plasmid such as pPV477 because sufficient homology is provided by the up and downstream overhangs. The same strategy can be applied to generate similar fusion tags using, for example, mCherry, HIS, or Flag, by simply replacing the GFP fragment.
Figure 4.

Schematic representation of the construction of the repair template. A. Diagrams illustrate the N- and C-terminal GFP tagging of a gene of interest. Note the position of GFP as well as the Start and Stop codons of the protein. Flag represents start codon. B. Schematic representation of the repair template cloning for C-terminal GFP tagging. Three PCR amplicons are assembled into a KpnI and SalI digested pUC19 vector to create a repair template (donor plasmid).
Materials
KpnI (NEB R0142S)
SalI (NEB R0138S)
pUC19 (NEB N3041S)
pPV477 (Addgene plasmid #42930)
37°C water bath incubator
42°C water bath incubator for bacterial transformation
Spectrophotometer for measuring DNA concentration
PCR thermo cycler (Biorad T100 or equivalent)
LB agar plate containing 100 μg/ml ampicillin (UNIT 1.1)
LB liquid medium containing 100 μg/ml ampicillin (UNIT 1.1)
Gibson assembly Master Mix (NEB E2611S)
High Fidelity Phusion DNA polymerase (NEB M0530S or equivalent)
Plasmid Miniprep Kit (GeneJet K0502 or Qiagen 27104)
Plasmid Midiprep Kit (Qiagen 12143)
Nuclease-free water (Qiagen 129114 or equivalent)
Gel DNA Extraction Kit (Zymoclean D4001)
Q5® Site-Directed Mutagenesis Kit (NEB E0554S)
Thermo-alkaline phosphatase (Fermentas FastAP EF0651)
UP-F: 5’-ACGGCCAGTGAATTCGAGCTCGGTA + ~N18–24 −3’. N18–24 from upstream of a gene of interest
UP-R: 5’-GTGAAAAGTTCTTCTCCTTTACTCAT + ~N18–24 (RC) −3’. N18–24 from upstream of a gene of interest (Reverse complement)
DN-F: 5’-TGGCATGGACGAACTATACAAA + ~ N18–24 −3’. N18–24 from stop codon of a gene of interest
DN-R: 5’-ACGCCAAGCTTGCATGCCTGCAGG + ~ N18–24 (RC) −3’. N18–24 from downstream of a gene of interest (Reverse complement)
GFP-F: 5’-ATGAGTAAAGGAGAAGAACT-3’
GFP-R: 5’-TTTGTATAGTTCGTCCATGC-3’
M13F: 5’-GTAAAACGACGGCCAGT-3’
M13R: 5’-AACAGCTATGACCATG-3’
Repair template cloning
- PCR amplify (see Current Protocols article: Kramer and Coen, 2000) the upstream sequence of a gene of interest (500 to 1500 bp, Figure 4B).
- UP-F: 5’-ACGGCCAGTGAATTCGAGCTCGGTA + ~ N18–24 −3’. N18–24 from upstream of a gene of interest
-
UP-R: 5’-GTGAAAAGTTCTTCTCCTTTACTCAT + ~ N18–24 (RC)-3’. N18–24 from upstream of a gene of interest (Reverse complement).Prepare the following PCR mix:
- Template DNA (<250ng)
- 2 μl of 10mM dNTP mix
- 2 μl each of 10 μM forward and reverse primer
- 10 μl 5× HF buffer
- 0.5 μl Phusion polymerase
- Distilled deionized H2O up to total 50 μl
Use the following PCR thermal cycling conditions:- 1 cycle: 30 sec 98°C (initial denaturation)
- 30 cycles: 5–10 sec 98°C (denaturation)
- 10–30 sec 45°−72°C (annealing)
- 15–30 sec/kb 72°C (extension)
- 1 cycle: 5–10 min 72°C (final extension).
- PCR amplify the downstream sequence of a gene of interest (500–1500bp, Figure 4B) using the reaction mixture and PCR cycling conditions described in step 1.
- DN-F: 5’-TGGCATGGACGAACTATACAAA + ~ N18–24 −3’. N18–24 from stop codon of a gene of interest
- DN-R: 5’-ACGCCAAGCTTGCATGCCTGCAGG + ~ N18–24 (RC)-3’. N18–24 from downstream of a gene of interest (Reverse complement)
- PCR amplify the 867bp GFP fragment from plasmid pPV477 (Addgene #42930) using the reaction mixture and PCR cycling conditions described in step 1.
- GFP-F: 5’-ATGAGTAAAGGAGAAGAACT-3’
- GFP-R: 5’-TTTGTATAGTTCGTCCATGC-3’
-
Digest pUC19 (or pUC18) DNA with KpnI and SalI (Figure 4B, top left). Run digest on an agarose gel to confirm plasmid linearization at 2686 bp. Since the result of a successful double digest (2669 + 17bp) is barely distinguishable from the outcome of a single restriction enzyme digest due to the subtle change in size, make sure both enzymes are working properly by comparing the size of undigested to digested plasmid with either restriction enzyme. Load 5–10 μg of the digested vector on a gel and using the Gel DNA extraction kit extract the 2669 bp size band resulting from the KpnI and SalI digestion of the vector from the gel.
Other DNA cloning vectors can be used instead of pUC vectors.
Perform Gibson assembly with the KpnI and SalI digested vector + 3 PCR fragments (Upstream, GFP, and Downstream) as described in the manufacturer’s instructions (Figure 4B). After the Gibson assembly reaction, use 1–2 μl for bacterial transformation, spread bacteria onto LB plates containing 100 μg/ml ampicillin, and select ampicillin-resistant colonies the following day.
-
Inoculate ~10 ampicillin-resistant colonies for plasmid minipreps and analyze them by Sanger sequencing using the M13F and M13R primers.
NOTE: Aim to introduce a silent mutation at the PAM site of the repair template to avoid it being cut by Cas9 when it is subsequently injected into the nematodes. This can be achieved by incorporating mutations on primer tails when designing the repair template. Alternatively, use a site directed mutagenesis kit if you are working with a pre-existing repair template (donor vector). There are also companies that will synthesize a whole DNA fragment, although this may be a costly option. If it is not feasible to introduce a silent mutation at the PAM site, introduce multiple silent mutations in the sequence corresponding to the sgRNA sequence. See the example in Figure 5A.
NOTE: Any fusion protein, such as HA, Flag or GFP, must be in frame and contain a start (AUG) and/or a stop (UGA, UAG &UAA) codon.
NOTE: The repair template is required only for gene editing using HR, not for NHEJ.
NOTE: A single-stranded oligonucleotide or PCR product can be used as a repair template, which removes the hassle of the cloning procedure (Paix et al., 2014; Zhao, Zhang, Ke, Yue, & Xue, 2014). Insertion of a GFP fragment with ~60nt homology arms, has been reported. Small size insertions, such as insertions of 3xFlag, Myc, His, and HA tags, can be achieved with oligonucleotides with ~60nt homology arms. Therefore, these can be an alternative option, especially when cloning is not feasible due to technical issues such as difficulties with Gibson assembly stemming from the presence of repetitive sequences, although it remains to be determined whether the vector-free method is as efficient as the vector-based method.
Figure 5.

A. Introduction of silent mutations in S (serine) and R (arginine) with the primer ztf-8 UP-R to avoid cutting repair template. The original wild type and designed repair template sequences are compared. B. Primer sequences for amplifying homology arms for cassette selection method. Identical sequences are highlighted with the same colors. For example, all constructs share the downstream R primer (cyan color) in common. The reverse complement (RC) is underlined. N: ~20bp sense complementary sequence to your gene of interest for a PCR reaction. N-RC: ~20bp reverse complementary sequence to your gene of interest for a PCR reaction (underlined).
ALTERNATE PROTOCOL 2: Preparation of repair template donors for the cassette selection method
This section describes an alternative to using the marker-free method. The main advantages of the cassette selection method are that: 1) it provides platforms for tagging reporters (GFP, RFP, 3xHA, GFP+3xHA) and deletion/disruption backbone (Figure 5B); and 2) it involves the use of dual selection (drug+fluorescent) cassettes for easier screening of transgenic worms. This section describes how to prepare repair template donors with a cassette selection toolkit as described in (Norris, Kim, Colaiacovo, & Calarco, 2015). With this method, it is important to screen the transgenic worms at a specific time point after injection as described in Table 6.
Materials
Pmyo-2::GFP neoR loxP (Disruption/deletion, Calarco lab http://www.calarcolab.ca/ )
GFP‐Pmyo-2::GFP neoR loxP (GFP tag, Calarco lab http://www.calarcolab.ca/ )
RFP‐Pmyo-2::GFP neoR loxP (RFP tag, Calarco lab http://www.calarcolab.ca/ )
3xHA‐Pmyo-2::GFP neoR loxP (3xHA tag, Calarco lab http://www.calarcolab.ca/ )
GFP‐3xHA‐Pmyo-2::GFP neoR loxP (GFP 3xHA tag, Calarco lab http://www.calarcolab.ca/ )
NotI (NEB HF R3189S, for cassette selection method)
SacII (NEB R0157S, for cassette selection method)
SpeI (NEB HF R3133S, for cassette selection method)
Thermo-alkaline phosphatase (Fermentas FastAP EF0651)
PCR purification Kit (ThermoFisher GeneJET K0701 or equivalent)
Spectrophotometer for measuring DNA concentration
UP-F primer AACGACGGCCAGTGAATTCACTAGTcgtaaggttacatattaattc
UP-R primer GTTCTTCTCCTTTACTCATACTAGTccaACGACTgcctcgatcatctcgattg
DN-F primer TGGATGAACTATACAAAGCGGCCGCtaaagccgccatcaatatta
DN-R primer ATGATTACGCCAAGCTTGCGGCCGCcggtctcgatacgacaaat
M13F: 5’-GTAAAACGACGGCCAGT-3’
M13R: 5’-AACAGCTATGACCATG-3’
Phusion polymerase (NEB E0553S), or Prime star GXL polymerase (Takara R050B)
Chemically Competent E. coli cells (NEB C2987I or equivalent)
Gibson assembly Master Mix (NEB E2611S)
Digest vector and alkaline phosphatase treatment
-
1
Based on the design of your donor template, choose the desired template vector among the five types of vectors and set up the appropriate restriction enzyme digestion of the vector as suggested in Table 2.
-
2
Incubate at 37C for 4–6 hours to ensure complete digestion.
A longer digestion is preferred to avoid incomplete digestion that can result in false positive ampicillin resistant clones.
-
3
To verify that the plasmid has been fully and correctly digested, use ~4 μL of the digestion mix (200 ng) and run on a ~0.8 % agarose gel.
Note the changes in the sizes of the bands for the single and double digestions (Table 3). For example, either a single 2828 bp band or both a 2651 bp and 177 bp bands are expected from single and double digestions of loxP_myo2_neoR, respectively. If incorrect sizes are detected following digestion, you may try single and double digestions to verify the restriction enzyme or vector. Also, make sure you don’t have either partially digested or undigested plasmids since they can grow on LB-ampicillin plates.
-
4
Add 1ul of FastAP (thermo-alkaline phosphatase) and incubate at 37C for 30 minutes.
-
5
Run samples from step 4 through PCR purification (ThermoFisher GeneJET K0701 or equivalent). Elute DNA in ~ 30 μL.
-
6
Measure the amount of DNA with a spectrophotometer such as Nanodrop.
Note: NotI HF, SpeI HF and SacII are all compatible in the CutSmart buffer, which makes digestion convenient since they all work in the same reaction buffer.
Note: 2 μg of digestion is usually enough for ~15 reactions. It is convenient to keep the prepared/digested plasmids at −20C for a future reaction.
Note: Restriction enzyme digestion will release the selection cassette and backbone for all five vectors (Figure 6). Cassette and backbone stay together in the same tube after digestion. Along with two homology arms, a total of four pieces (Cassette+backbone+two homology arms) will be stitched together by the Gibson assembly reaction.
Table 2.
Setting up restriction digestion reactions. For deletion/disruption, set up a reaction according to the left column. For tagging with GFP, mCherry, 3xHA or GFP::3xHA, set up a reaction based on the right column.
| Deletion/disruption template donor |
4 types of tagging template donors | |||||
|---|---|---|---|---|---|---|
| 1 | loxP_myo2_neoR (Deletion/disruption) | x μl (~2μg) | 1 | loxP_myo2_neoR_GFP_intron (GFP) loxP_myo2_neoR_mCherry_intron (mCherry) loxP_myo2_neoR_3xHA_intron (3xHA) loxP_myo2_neoR_GFP_3xHA_intron (GFP::3xHA) |
x μl (~2μg) | |
| 2 | CutSmart buffer(10x) | 4 μl | 2 | CutSmart buffer (10x) | 4 μl | |
| 3 | SacII | 2 μl | 3 | SpeI HF | 2 μl | |
| 4 | NotI HF | 2 μl | 4 | NotI HF | 2 μl | |
| 5 | ddH2O | 32- x μl | 5 | ddH2O | 32-x μl | |
| Total volume | 40 μl | Total volume | 40 μl | |||
Table 3.
Expected sizes with restriction enzyme digestion. Single RE digestion linearizes plasmid in all cases.
| Types | Deletion or Tagging Vectors |
NotI (bp) |
SacII (bp) |
SpeI (bp) |
Double digest (bp) |
|---|---|---|---|---|---|
| Deletion/disruption | loxP_myo2_neoR | 2828 | 2828 | N/A | 2651, 177 |
| GFP | loxP_myo2_neoR_GFP_intron | 3708 | N/A | 3708 | 2648, 1060 |
| mCherry | loxP_myo2_neoR_mCherry_intron | 3702 | N/A | 3702 | 2648, 1054 |
| 3xHA | loxP_myo2_neoR_3xHA_intron | 2982 | N/A | 2982 | 2648, 334 |
| GFP::3xHA | loxP_myo2_neoR_GFP_3xHA_intron | 3798 | N/A | 3798 | 2648, 1150 |
Figure 6.

Schematic representation of the construction of the repair template with a selection cassette toolkit. Top left: Diagrams illustrate the PCR amplification of sequences up and downstream of the target gene. Top right: Vector containing backbone and selection cassette is digested with restriction enzyme (RE) and stitched together with up and downstream homology arms through a 4 fragment Gibson assembly reaction. Note that 5 types of vectors (disruption/deletion, GFP, RFP, 3xHA and GFP::3xHA) are available for generating distuption/deletion or tagging template. The cassette in tagging vectors contains selection markers (GFP + neomycin) and DNA sequences for tagging while the cassette in disruption/deletion vector contains only selection markers. Color code denotes homology containing DNA sequences.
Preparing homology arms: Designing primers for homology arm amplification
-
7
Find your primer sequences in Figure 5B. For example, for GFP tagging you need homology sequences for a loxP_myo2_neoR_GFP_intron vector.
-
8
Design primers that bridge your target gene and cassette/backbone.
As an example, for ZTF-8::GFP tagging donor: dnF and dnR primers will amplify 1011 bp downstream and the upF and upR primers will amplify 1083bp upstream from the ZTF-8 gene. Sequences shown in lower case anneal to the ztf-8 gene.
UP-F primer AACGACGGCCAGTGAATTCACTAGTcgtaaggttacatattaattc
UP-R primer GTTCTTCTCCTTTACTCATACTAGTccaACGACTgcctcgatcatctcgattg
DN-F primer TGGATGAACTATACAAAGCGGCCGCtaaagccgccatcaatatta
DN-R primer ATGATTACGCCAAGCTTGCGGCCGCcggtctcgatacgacaaat
NOTE: For tagging donors, mutate the PAM sequence on your donor to avoid having your template targeted by the sgRNA. You may want to consider introducing a silencing mutation for an exon region when designing primers. However, for deletion donors, the sgRNA targeting sequence can be omitted in the donor template, therefore this is not an issue in general.
NOTE: The sgRNA can target both genomic and donor sequences when the donor sequence contains the target sequence. For disruption or deletion donors, target sequences can be omitted in the donor and this is not an issue. However, for tagging donors, you may need to mutate the targeting sequence of the donor template. As an example, we designed a silent mutation on the sgRNA target region of the donor DNA, which will be introduced by PCR with partially complementary primer (upR). In general, mutating the PAM (NGG) is convenient, however in the example, TGG (PAM) is the only codon that codes for W (tryptophan). Therefore, we introduced silent mutations in S (serine) and R (arginine) with the primer ztf-8 UP-R (Figure 5A).
NOTE: Tags contain start codon but no stop codon, except for the 3xHA tag which has no start codon as well. When designing C-terminal tagging, make sure you have a stop codon after a tag. You can utilize the endogenous stop codon. Similarly, for N-terminal tagging, the start codon must be present in the final version.
PCR amplification of homology arms
Set up a PCR to amplify homology arms from genomic DNA prepared from a single worm PCR method (Basic Protocol 4) with primers designed from the previous section. Plasmid/fosmid harboring C. elegans genomic DNA can be alternative template DNA for PCR. In general, 500 bp-1000 bp of homology arm length is preferred. Confirm your PCR product contains a specific band. If not, do a gel extraction to obtain a specific band. We suggest high fidelity polymerases such as Phusion polymerase (NEB E0553S) or Prime star GXL polymerase (Takara R050B).
Setting up Gibson assembly reaction: up and downstream homology arms with a vector backbone and a selection cassette
-
7
Set up assembly reaction and control in PCR tubes as in Table 4.
-
8
Incubate at 50°C for 1 hour in a PCR machine and transform into competent cells such as DH5α (NEB C2987I).
-
9
After transformation, screen the ampicillin resistant clones that have both homology arms and selection cassette. Amplify homology arms from the bacterial colony PCR (or plasmid mini prep), using primer Up F and Up R and/or down F and Down R. You are expecting clones that contain both Up and Down homology arms.
-
10
Validate candidate’s clones by Sanger DNA sequencing. M13F for upstream, and M13R primer for downstream verification.
Note: A negative control is useful to validate the absence of self-ligation or incomplete digestion of the vector. On the other hand, a positive control is useful to ensure the quality of reagents provided by the vendor.
Note: NEB HiFi worked more efficiently than Gibson assembly (at the same cost) in our hands.
Table 4.
Setting up a Gibson assembly reaction
| Deletion template donor | Negative control | Positive control | ||
|---|---|---|---|---|
| 1 | Digested vector (Backbone+Cassette) | x ul (~100 ng) | x ul | 10 ul (provided from NEB) |
| 2 | Upstream homology arm | y ul ( ~100ng) | 0 ul | 0 ul |
| 3 | Downstream homology arm | z ul ( ~100ng) | 0 ul | 0 ul |
| 4 | 2x master assembly mix | 10 ul | 10 ul | 10 ul |
| 5 | ddH2O | 10 - x - y - z ul | 10 - x ul | 0 ul |
| Total volume | 20 ul | 20 ul | 20 ul | |
BASIC PROTOCOL 3. INJECTING ANIMALS
At 20–24 hr post L4 stage young adults are injected with the CRISPR, Cas9, and if appropriate, the repair template DNA plasmid.
Materials
General purpose agarose (Bioexpress, cat. no. E-3119–500BX)
Plasmids (good-quality DNA is required for efficient CRISPR-Cas9 genome editing; use a Qiagen midiprep kit or equivalent for plasmid extraction)
Cas9 Expression Plasmid (Addgene plasmid #46168)
pCFJ90 - Pmyo-2::mCherry::unc-54 3’UTR (Addgene plasmid #19327)
pCFJ104 - Pmyo-3::mCherry::unc-54 3’UTR (Addgene plasmid #19328)
pMA122 - peel-1 negative selection (Addgene plasmid #34873, Optional)
sgRNA expression vector
Repair template DNA vector for HR
M9 buffer
Recovery solution: M9 with 4% glucose
N2 C. elegans wild type worms for injection (http://www.cgc.cbs.umn.edu/)
E. coli OP50 for seeding nematode growth medium plate (http://www.cgc.cbs.umn.edu/)
Microinjection apparatus
Microloader (Eppendorf 930001007)
Sutter P-97 needle puller or equivalent
Microwave
24 × 40 mm Glass Coverslips (VWR 470145–746 or equivalent)
22 × 22 mm coverslips (VWR 48366–227or equivalent)
Petri plates (6 cm) containing nematode growth medium seeded with OP50
25°C incubator (PRECISION 815 or equivalent)
Prepare agarose pads for microinjection
-
1
Prepare agarose pads consisting of ~ 2 % agarose in distilled water melted in a microwave. Line up three 22 × 40 mm size cover slips and place a dime sized drop of melted agarose onto each cover slip and quickly place a glass slide on top of the drops to flatten the agarose. Wait for 1 min, remove the glass slide, and allow cover slips with the agarose pads to air dry overnight.
Microinjection
-
2Pick L4 worms and incubate them at 20–25°C for ~24 hrs. Plan to inject between 60 and 100 24 hr post-L4 worms for each target although the recombination rate relies on the quality of the injection and therefore the number of required injections is difficult to predict.
- NOTE: L4 stage worms can be obtained either by hand picking L4 worms or from a synchronized population from eggs obtained by bleaching of gravid hermaphrodites as described in (H. M. Kim & Colaiacovo, 2015a).
-
3Prepare the injection mixture using the following concentrations and spin it down using a tabletop centrifuge at ~18,000 RCF for 4 min.
- 50–200 ng/μL of Cas9 expression vector
- 50–200 ng/μL of sgRNA expression vector
- 50 ng/μL of repair template vector (for HR)
- 2.5 ng/μL of the pCFJ90 injection marker for mCherry expression in pharynx muscle
- 5 ng/μL of the pCFJ104 injection marker for mCherry expression in body wall muscle
- 10 ng/μL of the pMA122 negative selection plasmid (Optional)
To avoid clogging of the microinjection needle, centrifuge the injection mixture in a tabletop centrifuge for 10 min at ~18,000 × g, room temperature. Use injection mixture from the top of the tube to load your needle. We suggest similar components for injection when following the cassette selection method (Norris et al., 2015). For example:- 50 ng/uL Peft-3::Cas9_SV40_NLS::tbb-2_UTR
- 100 ng/uL pU6::sgRNA vector
- 50ng/uL Repair template contains selection Cassette
- 2.5ng/uL pCFJ90 (Pmyo-2::mCherry) 5ng/uL pCFJ104 (Pmyo-3::mCherry)
-
4Inject worms:
- Pick 60 to 100 L4 worms a day before microinjection (it takes 37 hr from eggs to L4 at 20°C).
- To load the microinjection needle, use an Eppendorf microloader tip and load 1 to 2 μl of injection mix to the needle pulled with a Sutter P-97 needle puller or equivalent.
- Place the needle into the needle holder of the microinjection module and adjust needle alignment so that the needle is visible through the objective lenses.
- To break the tip of the needle, prepare a sandwich with coverslips of two different sizes (22 × 22-mm and 22 × 40-mm or similar). Place the smaller coverslip on top of the larger one and add a drop of halocarbon oil along the area where the two coverslips meet. Transfer the sandwiched coverslips onto the stage of the microinjection microscope. Gently move the needle to the edge of the smaller coverslip where the halocarbon oil was added and tap the edge with the needle tip. Make sure the tip of the needle has been successfully opened by pumping the injection mix through it.
- Add a drop of halocarbon oil onto the agarose pad, and, under the stereo microscope place 1 to 10 worms on the pad.
- Transfer worms on the agarose pad onto the microinjection microscope for injection.
- Looking through the objectives, find the proper focal plane in which you can see the worm’s gonad and align the needle at a 30-degree angle parallel to the gonad. Lower the needle and carefully move either the stage or the needle (by using the micromanipulator) to inject the DNA mixture into the gonad. When the DNA mixture is injected, the gonad will briefly swell. Repeat this step until all the worms on the agarose pad have been injected. It is recommended to start with 1 to 2 worms the first time.
- After injection, transfer the agarose pad back to the stereo microscope and add 2 to 3 μl of recovery buffer to the injected worms. With a worm pick, gently rescue the injected worms and place 2 to 4 rescued worms onto an OP50-seeded NGM plate.
-
5
Rehydrate injected worms in M9 or recovery buffer and place on NGM plates (Stiernagle, 2006) seeded with OP50 (~3 per plate). Let worms recover at room temperature for an hour. Incubate animals at 25°C until the screening step.
NOTE: pMA122 is a negative selection marker to eliminate array carrying worms. This requires an additional 2 hour heat-shock at 34 °C (Frokjaer-Jensen, Davis, Ailion, & Jorgensen, 2012).
NOTE: For the cassette selection method, aim to inject 30 or more animals to obtain hundreds of transgenic mCherry glowing F1 progeny. Add the G418 solution to the worms 1 day after the injection as described in the second section of Basic Protocol 4.
BASIC PROTOCOL 4. Screening transgenic worms with marker-free method
This section describes the screening for marker-free method. You can start screening for mCherry expressing F1 worms ~3 days after injection. Note that the pCFJ90 marker is expressed in the pharynx muscle and that the pCFJ104 marker is expressed in the body wall muscle. Some C. elegans mutants may grow slower than wild-type N2 animals and may exhibit a developmental delay. Therefore, if injecting such mutants, the screening period needs to be extended because they grow slower.
Materials
Injected worms for analysis (Basic Protocol 3)
E. coli OP50 for seeding nematode growth medium plate (http://www.cgc.cbs.umn.edu/)
Worm Lysis Buffer
10 mM dNTP mix (10 mM each dNTP)
Primers
High Fidelity Phusion DNA polymerase (NEB M0530S or equivalent) and 5x HF buffer
N2 C. elegans wild type worms for injection (http://www.cgc.cbs.umn.edu/)
Fluorescence stereomicroscope
PCR tubes
Heat block (VWR Scientific Standard Heat Block or equivalent)
Petri plates (6 cm) containing nematode growth medium agar seeded with OP50
25°C incubator
Deep Freezer (Thermo ULT2580 or equivalent)
PCR thermo cycler (Biorad T100 or equivalent)
Additional reagents and equipment for PCR (see Current Protocols article: Kramer and Coen, 2000) and DNA sequencing (Chapter 7)
Single mCherry expressing F1 worms
-
1
Pick mCherry expressing F1 worms using a fluorescent stereomicroscope and “single” them to OP50 seeded NGM plates. In general, you can expect 80 to 300 mCherry+ worms when 60 to 100 worms are injected.
Genotyping potential candidates
Restriction fragment length polymorphisms are useful when screening for changes in only a few nucleotides such as those in InDel or point mutations driven by HR. InDels or point mutations at the site normally recognized by a restriction enzyme prevents digestion at that position by the restriction enzyme and this can be useful for screening purposes. Alternatively, when a restriction enzyme site is not available, worms carrying fluorescent markers can be used for PCR analysis followed by Sanger sequencing. Although this can be a laborious process it is still achievable using 96 well plates and further shortened by pooling DNA samples for PCR, as shown in (Paix et al., 2014). Alternatively, changes as small as 5 nucleotides can be detected by PCR using 15% polyacrylamide gels without the need of additional restriction enzyme digestion or Sanger sequencing (H. Kim et al., 2014).
Regular PCR combined with agarose gel analysis allows for effective screening of transgenic lines when the insertion or deletion is >10 bp in size. To avoid amplifying from the repair template DNA in the case of HR, primers located outside of the repair template sequence region are recommended. Alternatively, if the region is too large to PCR amplify, it is possible to amplify the junction of the repair template and flanking sequence.
The screening for transgenic worms can be further facilitated if as a result of the genomic editing they now exhibit phenotypes that can be easily identified such as GFP or mCherry expression in a specific tissue or a Dpy or Unc phenotype on plates.
-
2
Incubate singled mCherry expressing F1 worms at 25°C for 1–2 days and sacrifice for single worm PCR genotyping as described below.
Protocol adapted from (He, 2011; Williams, Schrank, Huynh, Shownkeen, & Waterston, 1992).
Worm lysis
-
2
Transfer a single worm directly from a plate to 5 μL of lysis buffer in a PCR tube.
-
3
Spin capped PCR tubes briefly to bring worm down to the bottom of the tube.
-
4
Freeze at −80°C for 10 min or longer (up to a week).
-
5
Heat sample at 60°C for 1 h, then inactivate protease K at 95°C for 15 min. Store the worm lysate at −80°C if needed.
Single worm PCR
-
2Prepare the following PCR mix:
- 1–2 μL of worm lysate
- 2 μL 10 p dNTP mix
- 2 μL 10 μM each of forward and reverse primer located outside of the repair template
- 10 μL 5x HF buffer
- 0.5 μL Phusion polymerase
- Add ddH2O to 50 μL
-
3
Run reactions in a thermal cycler as described in the manufacturer’s instructions for NEB Phusion High-Fidelity DNA Polymerase.
-
4
Once F1 screening is completed, it is advisable to re-genotype the F1 progeny (F2s or F3s) from the potential candidates to eliminate possible false-positives and non-heritable mitotic mutants (Arribere et al., 2014; Farboud & Meyer, 2015). Using a fluorescent scope make sure that the F2 and/or F3 have lost the mCherry extrachromosomal signal. pMA122 can also be used for negatively selecting arrays with an additional 2 hour heat-shock at 34°C (Frokjaer-Jensen et al., 2012).
-
5
Order Sanger sequencing analysis (See Chapter 7) to confirm mutations.
-
6
To verify an anticipated genome alteration as well as relevant protein expression, further analysis can be performed such as immunofluorescent staining, Western/Northern blot, or qRT-PCR. A tagged protein’s localization can be assessed by comparing it to the localization observed using protein-specific antibodies if these are available, as described in (H. M. Kim & Colaiacovo, 2015b).
-
7
It is recommended to outcross the derived transgenic/edited lines several times to eliminate potential off-target mutations although there are yet no reports of such events resulting from CRISPR-Cas9 genomic editing in C. elegans (Dickinson, Ward, Reiner, & Goldstein, 2013; Friedland et al., 2013).
ALTERNATE PROTOCOL 3: Screening transgenic worms with a cassette selection method
This section describes how to identify transgenic worms with a cassette selection method after microinjection.
Materials
G418 (Sigma G418-RO, for cassette selection method)
pDD104 - Peft-3::Cre (Addgene plasmid #47551)
pCFJ90 - Pmyo-2::mCherry::unc-54 3’UTR (Addgene plasmid #19327)
Petri plates (6 cm) containing nematode growth medium (NGM, Stiernagle, 2006) seeded with OP50
Fluorescence stereomicroscope
25°C incubators
Microinjection apparatus
1 day after injection
-
1
Add 500 μL of 25 mg/ml G418 to each plate. Swirl G418 solution over the surface of each plate to cover the entire plate.
-
2
Open the lid and incubate until G148 is soaked in, which may take 30–90 minutes. Once the agar is dry, return lids and continue incubation at 25C for the next week to ten days.
4–6 days after injection
-
3
Screen for CRISPR integrant animals, which usually have dim GFP pharyngeal expression, are completely uniformly fluorescent, and lack the mCherry co‐injection marker expression. In contrast, extra‐chromosomal array animals will have mosaic and very bright GFP expression in the pharynx and will have one or both of the mCherry expressing markers. Single 6–8 candidate worms on NGM plates seeded with OP50. You will expect ¾ of progeny for heterozygous or 100% of the progeny for homozygous with pharyngeal GFP expression.
NOTE: 1. Some transgenic worms appear late such as days 7–11 after injection although most appear at 4–6 days. 2. G418 will not lead to perfect selection but kills the majority of non-transgenic worms. 3. In most cases, bright GFP + worms are not integrants. However, in rare cases, you may get bright GFP + integrants, but they still lack the mCherry markers and exhibit uniformly bright pharyngeal GFP.
Excision of the selection cassette
Homozygous animals containing the selection cassette can be used to excise the cassette by microinjecting Cre recombinase (DICKINSON et al. 2013). You can screen for loss of GFP expression in the pharynx of F2 animals to isolate homozygous animals that have lost the selection cassette.
NOTE: If working with essential genes and Cre-mediated excision is required, it is recommended to cross insertion animals into an appropriate balancer strain to propagate heterozygotes and facilitate differentiating animals with alleles that have truly excised the dual marker cassette versus animals with the wild type allele. If you are deleting an essential gene, you may want to balance your worms before Cre injection since the homozygous deletion can be lethal.
Day of Cre recombinase injection
-
3Set up injection mix
- Peft-3::Cre (pDD104) 50 ng/ul
- pCFJ90 (Pmyo-2::mCherry) 2.5 ng/ul
-
4
Inject around 10–15 animals.
-
5
After injection, place 3–4 injected worms per plate. Let then recover an hour at room temperature. Incubate worms at 25°C.
2 days after Cre injection
-
3
Pick 25 to 30 F1 progeny displaying mCherry+. Transfer 4‐5 worms per plate and return for incubation at 25°C.
4–5 days after Cre injection
-
3
Screen F2 progeny that have completely lost both pharyngeal GFP and mCherry expression. These animals should now be homozygous for the excised dual marker cassette. Pick and single candidates for further applications.
7–8 days after Cre injection
-
3
Use GFP- and mCherry- worms for genotyping and/or Sanger DNA sequencing.
REAGENTS AND SOLUTIONS
Use deionized, distilled water in all recipes and protocol steps. Use molecular biology-grade nuclease-free water for PCR, ligation, and Gibson assembly. See APPENDIX 2 for common stock solutions.
Plasmids
Cas9 Expression Plasmid (Addgene plasmid #46168)
pHKMC1 - Empty sgRNA Cloning Plasmid (Addgene plasmid #67720)
pCFJ90 - Pmyo-2::mCherry::unc-54utr (Addgene plasmid #19327)
pCFJ104 - Pmyo-3::mCherry::unc-54 (Addgene plasmid #19328)
pMA122 - peel-1 negative selection (Addgene plasmid #34873, Optional)
Peft-3::Cas9-SV40_NLS::tbb-2 3’UTR (Addgene plasmid #46168)
pUC19 (NEB N3041S)
pPV477 (Addgene plasmid #42930)
Pmyo-2::GFP neoR loxP (Calarco lab http://www.calarcolab.ca/ )
GFP‐Pmyo-2::GFP neoR loxP (Calarco lab http://www.calarcolab.ca/ )
RFP‐Pmyo-2::GFP neoR loxP (Calarco lab http://www.calarcolab.ca/ )
3xHA‐Pmyo-2::GFP neoR loxP (Calarco lab http://www.calarcolab.ca/ )
GFP‐3xHA‐Pmyo-2::GFP neoR loxP (Calarco lab http://www.calarcolab.ca/ E-mail: john.calarco@utoronto.ca)
Worms
N2 C. elegans wild type worms for injection (http://www.cgc.cbs.umn.edu/)
Reagents
LB agar plate containing 100 μg/ml ampicillin (UNIT 1.1)
LB liquid medium containing 100 μg/ml ampicillin (UNIT 1.1)
Plasmid Miniprep Kit (GeneJet K0502 or Qiagen 27104)
Plasmid Midiprep Kit (Qiagen 12143)
PCR purification Kit (ThermoFisher GeneJET K0701 or equivalent)
Nuclease-free water (Qiagen 129114, Zymo research W1001–10 or equivalent)
Gel DNA Extraction Kit (Zymoclean D4001)
Chemically Competent E. coli cells (NEB C2987I or equivalent)
High Fidelity Phusion DNA polymerase (NEB M0530S or equivalent)
T4 DNA ligase (NEB M0202S or equivalent)
BamHI (NEB R0136S)
NotI (NEB R0189S)
EcoRI (NEB R0101S)
HindIII (NEB R0104S)
KpnI (NEB R0142S)
SalI (NEB R0138S)
NotI (NEB HF R3189S, for cassette selection method)
SacII (NEB R0157S, for cassette selection method)
SpeI (NEB HF R3133S, for cassette selection method)
G418 (Sigma G418-RO, for cassette selection method)
Sterile pipet tips or toothpicks for picking colonies
Halocarbon oil 700 (Sigma H8898)
M9 buffer
3 g KH2PO4
6 g Na2HPO4
5 g NaCl
1 ml 1 M MgSO4
H2O to 1 liter.
Sterilize by autoclaving.
Recovery solution
M9 with 4% glucose
24 × 40mm Glass Coverslips (VWR 470145–746 or equivalent)
E. coli OP50 for seeding NGM plate (http://www.cgc.cbs.umn.edu/)
Petri plates (6 cm) containing nematode growth medium (NGM, (Stiernagle, 2006)) seeded with OP50
Worm Lysis Buffer
50 mM KCl
10 mM Tris (pH 8.3
2.5 mM MgCl2
0.45% Nonidet P-40
0.045% Tween-20
0.01% (w/v) gelatin
Autoclave and store up to 6 months at 4 °C. Right before use, add proteinase K to the lysis buffer with final concentration 60 μg/ml.
Equipment
25°C and 37°C incubators
42°C water bath incubator for bacterial transformation
Microinjection apparatus
Spectrophotometer for measuring DNA concentration
Sequence analysis software (e.g. NCBI BLAST, UCSC Genome Browser BLAT, LaserGene)
PCR thermo cycler (Biorad T100 or equivalent)
Heat Block (VWR Scientific Standard Heat Block or equivalent)
Deep Freezer (Thermo ULT2580 or equivalent)
Primers
For sequencing and screening purpose
M13F: 5’-GTAAAACGACGGCCAGT-3’
M13R: 5’-AACAGCTATGACCATG-3’
For sgRNA expression vector
sgRNA_Top: 5’-ATTGCAAATCTAAATGTTT + N19/20 + GTTTTAGAGCTAGAAATAGC-3’
sgRNA_Bottom: 5’-GCTATTTCTAGCTCTAAAAC + N19/20 Reverse Complement + AAACATTTAGATTTGCAAT-3’
P1: 5’-CGGGAATTCCTCCAAGAACTCGTACAAAAATGCTCT −3’
P2: 5’-N19/20-RC + AAACATTTAGATTTGCAATTCAATTATATAG-3’ (where N19/20-RC is the reverse complementary sequence of the N19/20 target sequence used in primer P3).
P3: 5’-N19/20 + GTTTTAGAGCTAGAAATAGCAAGTTA-3’(where N19/20 represents the sgRNA target sequence)
P4: 5’-CGGAAGCTTCACAGCCGACTATGTTTGGCGT-3’
For repair template vector for canonical marker-free method
UP-F: 5’-acggccagtgaattcgagctcggta + ~N18–3’. N18 from Upstream of a gene of interest
UP-R: 5’-GTGAAAAGTTCTTCTCCTTTACTCAT + ~N18(RC)-3’. N18 from Upstream of a gene of interest (Reverse complement)
DN-F: 5’-TGGCATGGACGAACTATACAAA + ~N18–3’. N18 from stop codon of a gene of interest
DN-R: 5’-acgccaagcttgcatgcctgcagg + ~N18(RC)-3’. N18 from Downstream of a gene of interest (Reverse complement)
GFP-F: 5’-ATGAGTAAAGGAGAAGAACT-3’
GFP-R: 5’-TTTGTATAGTTCGTCCATGC-3’
For repair template vector for cassette selection method
Pmyo‐2::GFP neoR loxP (disruption/deletion)
Up F: 5’ AACGACGGCCAGTGAATTCCCGCGG -N 3’
Up R: 5’ TTATAGGCCGCCTGATGCGCCGCGG -N18(RC)-3’.
Down F: 5’ ATAGTTGCAGGACCACTGCGGCCGC -N 3’
Down R: 5’ ATGATTACGCCAAGCTTGCGGCCGC -N18(RC)-3’.
GFP‐Pmyo‐2::GFP neoR loxP (GFP tagging)
Up F: 5’ AACGACGGCCAGTGAATTCACTAGT -N 3’
Up R: 5’ GTTCTTCTCCTTTACTCATACTAGT -N18(RC)-3’.
Down F: 5’ TGGATGAACTATACAAAGCGGCCGC -N 3’
Down R: 5’ ATGATTACGCCAAGCTTGCGGCCGC -N18(RC)-3’.
RFP‐Pmyo‐2::GFP neoR loxP (RFP tagging)
Up F: 5’ AACGACGGCCAGTGAATTCACTAGT -N 3’
Up R: 5’ CTTCACCCTTTGAGACCATACTAGT -N18(RC)-3’.
Down F: 5’ TGGATGAATTGTATAAGGCGGCCGC -N 3’
Down R: 5’ ATGATTACGCCAAGCTTGCGGCCGC -N18(RC)-3’.
3xHA‐Pmyo‐2::GFP neoR loxP (3xHA tagging)
Up F: 5 AACGACGGCCAGTGAATTCACTAGT -N 3’
Up R: 5’ CTGGAACGTCGTATGGGTAACTAGT -N18(RC)-3’.
Down F: 5’ ACGTCCCAGATTACGCTGCGGCCGC -N 3’
Down R: 5’ ATGATTACGCCAAGCTTGCGGCCGC -N18(RC)-3’.
GFP‐3xHA‐Pmyo‐2::GFP neoR loxP (GFP‐3xHA tagging)
Up F: 5’ AACGACGGCCAGTGAATTCACTAGT -N 3’
Up R: 5’ GTTCTTCTCCTTTACTCATACTAGT -N18(RC)-3’.
Down F: 5’ ACGTCCCAGATTACGCTGCGGCCGC -N 3’
Down R: 5’ ATGATTACGCCAAGCTTGCGGCCGC -N18(RC)-3’.
COMMENTARY
Background Information
Engineering precise modifications of endogenous genomes has long been desired and different technologies including zinc-finger nucleases and transcription activator-like effector nucleases have been developed for this purpose in the past. Recently, the type II CRISPR-Cas9 system has been shown to be the most proficient and adaptable system to create desired genome modifications.
Previous studies using the S. pyogenes type II CRISPR system, which requires the Cas9 nuclease, a targeting crRNA and an additional trans-activating trRNA, have shown that a fusion of the targeting and trans-activating RNAs to form a single guide RNA (sgRNA) is sufficient to direct Cas9-mediated target cleavage (Jinek et al., 2012). This strategy has been used in C. elegans (Friedland et al., 2013; Tzur et al., 2013) and provides a convenient approach for generating mutants via a marker-free strategy. In this protocol, we describe both marker-free and marker-based (drug and fluorescent selection) protocols using the S. pyogenes Cas9 in C. elegans to create heritable genome modifications via the NHEJ or HR pathways.
Critical Parameters
The protocols for marker-free strategies described in this unit stem from several previous studies in our lab (Friedland et al., 2013; H. M. Kim, Beese-Sims, & Colaiacovo, 2018; H. M. Kim & Colaiacovo, 2015b; Tzur et al., 2013). Due to the absence of selective markers, these protocols rely on relatively time-consuming screening procedures to identify animals with the desired modification using PCR techniques compared to maker-dependent Unc, Rol or drug selection protocols (Arribere et al., 2014; Dickinson, Pani, Heppert, Higgins, & Goldstein, 2015; Dickinson et al., 2013; H. Kim et al., 2014). However, in contrast, the protocol presented in this unit is straight-forward with respect to the design of repair templates and it progresses very quickly from microinjection to screening since it requires only one round of injection to obtain the final product of genome editing. In contrast, the marker-based cassette selection method facilitates the step of screening for transgenic animals due to the presence of both drug and fluorescent selection markers. However, it is a relatively longer method compared to the marker-free approach (Figure 7). Cassette selection can be a useful alternative since it provides various vectors for endogenous gene-tagging.
Figure 7.

Workflow and timeline for CRISPR-Cas9-guided genome editing in C. elegans. The expected timelines (14 days and 27 days for completion for the marker-free and cassette selection methods, respectively) assume that each step is not delayed. See Table 6 for details.
Trouble shooting
Table 5 describes common problems encountered with the protocols described in this unit together with accompanying solutions.
Table 5.
Trouble shooting common problems associated with CRISPR-Cas9 genome editing
| Problem | Potential causes | Solutions |
|---|---|---|
| Low yield of mCherry-expressing F1 worms | Purity of DNA mixture is low Either too low or too high Cas9 and/or sgRNA concentrations When injecting mutant worms which exhibit a developmental delay |
Use plasmid midiprep kit Adjust Cas9 and/or sgRNA concentration Screening period needs to be extended as worms grow slower |
| High embryonic lethality among F1 worms | Cas9 and/or sgRNA causing toxicity in the worms | Reduce the concentration of Cas9 and/or sgRNA |
| High larval lethality among F1 worms | Cas9 and/or sgRNA causing toxicity in the worms | Reduce the concentration of Cas9 and/or sgRNA |
| Low genome targeting efficiency | gRNA targeting efficiency varies significantly | Design and test multiple sgRNAs |
Understanding Results
The efficiency of genome editing varies for different targeting sites. We observed 1.3 – 16.7% genome targeting efficiency for HR with injection of 7–13 worms and 24–72 mCherry expressing F1 worms (Tzur et al., 2013). A 0.5 – 80.3% gene disruption frequency was reported for InDels from four different targeting loci (Friedland et al., 2013). Frequencies of 5–25% were reported for disruptions, deletions or insertions at six different loci using the cassette selection method (Norris et al., 2015).
Time Considerations
See Table 6 and Figure 7 for a description of the time required for each step of the protocols described in this article.
Acknowledgements
We thank John A. Calarco and Elisabeth Altendorfer for helpful comments. This work was supported by National Institutes of Health grant R01 GM105853 to M.P.C.
Footnotes
Conflict of Interest
The authors declare that there are no conflicts of interest.
Literature Cited
- Arribere JA, Bell RT, Fu BX, Artiles KL, Hartman PS, & Fire AZ (2014). Efficient marker-free recovery of custom genetic modifications with CRISPR/Cas9 in Caenorhabditis elegans. Genetics, 198(3), 837–846. doi: 10.1534/genetics.114.169730 [DOI] [PMC free article] [PubMed] [Google Scholar]
- Barrangou R, Fremaux C, Deveau H, Richards M, Boyaval P, Moineau S, . . . Horvath P. (2007). CRISPR provides acquired resistance against viruses in prokaryotes. Science, 315(5819), 1709–1712. doi: 10.1126/science.1138140 [DOI] [PubMed] [Google Scholar]
- Bell RT, Fu BX, & Fire AZ (2016). Cas9 Variants Expand the Target Repertoire in Caenorhabditis elegans. Genetics, 202(2), 381–388. doi: 10.1534/genetics.115.185041 [DOI] [PMC free article] [PubMed] [Google Scholar]
- Deltcheva E, Chylinski K, Sharma CM, Gonzales K, Chao Y, Pirzada ZA, . . . Charpentier E. (2011). CRISPR RNA maturation by trans-encoded small RNA and host factor RNase III. Nature, 471(7340), 602–607. doi: 10.1038/nature09886 [DOI] [PMC free article] [PubMed] [Google Scholar]
- Dickinson DJ, Pani AM, Heppert JK, Higgins CD, & Goldstein B. (2015). Streamlined Genome Engineering with a Self-Excising Drug Selection Cassette. Genetics. doi: 10.1534/genetics.115.178335 [DOI] [PMC free article] [PubMed] [Google Scholar]
- Dickinson DJ, Ward JD, Reiner DJ, & Goldstein B. (2013). Engineering the Caenorhabditis elegans genome using Cas9-triggered homologous recombination. Nat Methods, 10(10), 1028–1034. doi: 10.1038/nmeth.2641 [DOI] [PMC free article] [PubMed] [Google Scholar]
- Farboud B, & Meyer BJ (2015). Dramatic enhancement of genome editing by CRISPR/Cas9 through improved guide RNA design. Genetics, 199(4), 959–971. doi: 10.1534/genetics.115.175166 [DOI] [PMC free article] [PubMed] [Google Scholar]
- Friedland AE, Tzur YB, Esvelt KM, Colaiacovo MP, Church GM, & Calarco JA (2013). Heritable genome editing in C. elegans via a CRISPR-Cas9 system. Nat Methods, 10(8), 741–743. doi: 10.1038/nmeth.2532 [DOI] [PMC free article] [PubMed] [Google Scholar]
- Frokjaer-Jensen C, Davis MW, Ailion M, & Jorgensen EM (2012). Improved Mos1-mediated transgenesis in C. elegans. Nat Methods, 9(2), 117–118. doi: 10.1038/nmeth.1865 [DOI] [PMC free article] [PubMed] [Google Scholar]
- Garneau JE, Dupuis ME, Villion M, Romero DA, Barrangou R, Boyaval P, . . . Moineau S. (2010). The CRISPR/Cas bacterial immune system cleaves bacteriophage and plasmid DNA. Nature, 468(7320), 67–71. doi: 10.1038/nature09523 [DOI] [PubMed] [Google Scholar]
- He F. (2011). Single Worm PCR. Bio-protocol, Bio101: e60. http://www.bio-protocol.org/e60 [Google Scholar]
- Horvath P, & Barrangou R. (2010). CRISPR/Cas, the immune system of bacteria and archaea. Science, 327(5962), 167–170. doi: 10.1126/science.1179555 [DOI] [PubMed] [Google Scholar]
- Jinek M, Chylinski K, Fonfara I, Hauer M, Doudna JA, & Charpentier E. (2012). A programmable dual-RNA-guided DNA endonuclease in adaptive bacterial immunity. Science, 337(6096), 816–821. doi: 10.1126/science.1225829 [DOI] [PMC free article] [PubMed] [Google Scholar]
- Kim H, Ishidate T, Ghanta KS, Seth M, Conte D Jr., Shirayama M, & Mello CC (2014). A co-CRISPR strategy for efficient genome editing in Caenorhabditis elegans. Genetics, 197(4), 1069–1080. doi: 10.1534/genetics.114.166389 [DOI] [PMC free article] [PubMed] [Google Scholar]
- Kim HM, Beese-Sims SE, & Colaiacovo MP (2018). Fanconi Anemia FANCM/FNCM-1 and FANCD2/FCD-2 Are Required for Maintaining Histone Methylation Levels and Interact with the Histone Demethylase LSD1/SPR-5 in Caenorhabditis elegans. Genetics, 209(2), 409–423. doi: 10.1534/genetics.118.300823 [DOI] [PMC free article] [PubMed] [Google Scholar]
- Kim HM, & Colaiacovo MP (2015a). DNA Damage Sensitivity Assays in Caenorhabditis elegans. Bio-Protocol, Bio-protocol 5(11): e1487. [PMC free article] [PubMed] [Google Scholar]
- Kim HM, & Colaiacovo MP (2015b). New Insights into the Post-Translational Regulation of DNA Damage Response and Double-Strand Break Repair in Caenorhabditis elegans. Genetics. doi: 10.1534/genetics.115.175661 [DOI] [PMC free article] [PubMed] [Google Scholar]
- Mali P, Yang L, Esvelt KM, Aach J, Guell M, DiCarlo JE, . . . Church GM. (2013). RNA-guided human genome engineering via Cas9. Science, 339(6121), 823–826. doi: 10.1126/science.1232033 [DOI] [PMC free article] [PubMed] [Google Scholar]
- Norris AD, Kim HM, Colaiacovo MP, & Calarco JA (2015). Efficient Genome Editing in Caenorhabditis elegans with a Toolkit of Dual-Marker Selection Cassettes. Genetics, 201(2), 449–458. doi: 10.1534/genetics.115.180679 [DOI] [PMC free article] [PubMed] [Google Scholar]
- Paix A, Wang Y, Smith HE, Lee CY, Calidas D, Lu T, . . . Seydoux G. (2014). Scalable and versatile genome editing using linear DNAs with microhomology to Cas9 Sites in Caenorhabditis elegans. Genetics, 198(4), 1347–1356. doi: 10.1534/genetics.114.170423 [DOI] [PMC free article] [PubMed] [Google Scholar]
- Stiernagle T. (2006). Maintenance of C. elegans, WormBook, ed.: The C. elegans Research Community, WormBook. [DOI] [PMC free article] [PubMed] [Google Scholar]
- Tzur YB, Friedland AE, Nadarajan S, Church GM, Calarco JA, & Colaiacovo MP (2013). Heritable custom genomic modifications in Caenorhabditis elegans via a CRISPR-Cas9 system. Genetics, 195(3), 1181–1185. doi: 10.1534/genetics.113.156075 [DOI] [PMC free article] [PubMed] [Google Scholar]
- Ward JD (2015). Rapid and precise engineering of the Caenorhabditis elegans genome with lethal mutation co-conversion and inactivation of NHEJ repair. Genetics, 199(2), 363–377. doi: 10.1534/genetics.114.172361 [DOI] [PMC free article] [PubMed] [Google Scholar]
- Williams BD, Schrank B, Huynh C, Shownkeen R, & Waterston RH (1992). A genetic mapping system in Caenorhabditis elegans based on polymorphic sequence-tagged sites. Genetics, 131(3), 609–624. [DOI] [PMC free article] [PubMed] [Google Scholar]
- Zhao P, Zhang Z, Ke H, Yue Y, & Xue D. (2014). Oligonucleotide-based targeted gene editing in C. elegans via the CRISPR/Cas9 system. Cell Res, 24(2), 247–250. doi: 10.1038/cr.2014.9 [DOI] [PMC free article] [PubMed] [Google Scholar]