Summary
Immunofluorescence (IF) is an important immunochemical technique that allows detection and localization of a wide variety of antigens in different types of tissues of various cell preparations. IF allows for excellent sensitivity and amplification of signal in comparison to immunohistochemistry, employing various microscopy techniques. There are two methods available, depending on the scope of the experiment or the specific antibodies in use: Direct (Primary) or Indirect (Secondary). Here, we describe preparation of specimens preserved in different types of media and step-by-step methods for both direct and indirect immunofluorescence staining.
Keywords: Immunofluorescence, Immunohistochemistry, Immunocytochemistry, Fixation, Antigen Retrieval, Fluorescence, Fluorophore
1. Introduction
Immunofluorescence (IF) is a technique that permits visualization of virtually many components in any given tissue or cell type. This broad capability is achieved through combinations of specific antibodies tagged with fluorophores. Consequently, the possible applications in research and patient care are numerous. For IF evaluation, a variety of sample conditions can be employed. It can be performed on cultured cells or cell suspensions, as well as on specific targets in tissues samples or entire organisms. Fresh samples can also be used in IF studies if they are snap frozen or placed in Michel’s transport medium, which allows transportation and storage at room temperature for up to 72 hours.
Fixation is an essential preliminary step in IF staining in order to prevent autolysis, mitigate putrefaction, and preserve morphology while maintaining antigenicity. The ideal fixation method serves to immobilize target antigens without disturbing cellular architecture to allow antibodies maximum access to any targeted cellular components. It is possible that a given fixative may adequately preserve the immunoreactivity of a particular epitope, while degrading or masking other epitopes within the same protein. Consequently, as there is no universal fixative for every antigen, optimal fixatives and fixation methods may need to be determined empirically based on the given antigen and sample type. Chemical fixatives include cross-linking reagents and organic solvents, used separately or in combination. Cross-linking (additive) reagents bind to cellular and tissue components by addition, forming intra and intermolecular methylene cross-links. Common examples include formaldehyde and glutaraldehyde. Organic solvents work to remove lipids and dehydrate cells, denaturing and precipitating cellular components. In addition, by permeabilizing cell membranes, organic solvents eliminate the need for detergent treatments. Common examples include methanol and acetone (1).
Following fixation, tissues are often embedded into paraffin in order to solidify the sample for sectioning. Thin slices embedded in a hard matrix allow for dyes, probes, and antibodies to effective reach target sites without the obstruction of multiple cell layers. Paraffin blocks can be stored at room temperature, but they must be kept in the dark under moisture-controlled conditions. Embedded tissue blocks should be considered infectious material, ensuring all proper personal protective equipment is worn when handling or working with blocks. Once paraffin sections have been cut and mounted onto glass slides, however, they must be deparaffinated and rehydrated so that only the tissue section remains on the slide for subsequent antigen retrieval and IF procedures. Xylene is the most common medium for deparaffinization, followed with washes of ethanol and distilled water for rehydration (2).
Antigen retrieval is necessary to restore epitope-antibody reactivity. Reactivity is altered during fixation, in which proteins undergo structural modification, forming cross-links that can mask the target epitope. This is especially prevalent with the use of additive reagents. The need for antigen retrieval is dictated by various factors: target antigen identity, antibody character, tissue type, the method and duration of fixation. Antigen demonstration levels can be recovered using retrieval agents to cleave the cross-links formed during fixation. There are two main methods of antigen retrieval: Protease-Induced Epitope Retrieval (PIER) and Heat-Induced Epitope Retrieval (HIER). As with any technique, both methods must be optimized prior to any application.
In PIER, enzymes serve as the primary method in restoring antigenicity. Though the exact mechanism is not yet fully understood, it is generally thought that the enzymes cleave the protein cross-links to unmask the target epitopes. Common examples of proteases include Proteinase K, Trypsin, Pepsin, and Pronase. The specific enzyme to be used should be detailed in any antibody data sheet provided by the manufacturer. However, there are several disadvantages to the PIER method. Because the enzymes used for PIER cannot target only the exact protein cross-links present in the fixed tissue sample, non-specific enzyme digestion can potentially destroy tissue morphology and any antigens of interest (3). Consequently, strict incubation times and optimal enzyme concentrations must be determined beforehand. Much higher rates of restoring immunoreactivity can be achieved with the HIER method.
With HIER, heat and pressure are used to restore antigenicity. Just as in the case of PIER, the exact mechanism of reversing protein cross-links is unknown, though it is assumed secondary and tertiary protein structure must be restored for the epitope to be unmasked. In general, the HIER method involves heating the mounted tissue sample in a buffer solution, with heat to cleave cross-links and buffer to maintain protein conformation. Buffer solutions can be categorized into low, neutral, and high pH solution compositions. Low pH solutions are usually buffered with glycine-HCl, neutral pH solutions with citric acid, and high pH solutions with Tris or EDTA. Though high pH solutions usually serve as the most effective buffers, high pH and EDTA have higher chances of convoluting tissue and cellular morphology (4). As different HIER methods vary upon combinations of appliance type, temperature, duration, and pH, the optimal method and specifications must be determined by conducting preliminary control studies. In addition, an HIER device should be chosen based on the following factors: temperature range, buffer volume, minimal evaporation, and minimal boil-over. A variety of commercial HIER devices are available to meet these requirements, though there are no set industry standards or specialized manufacturers (5).
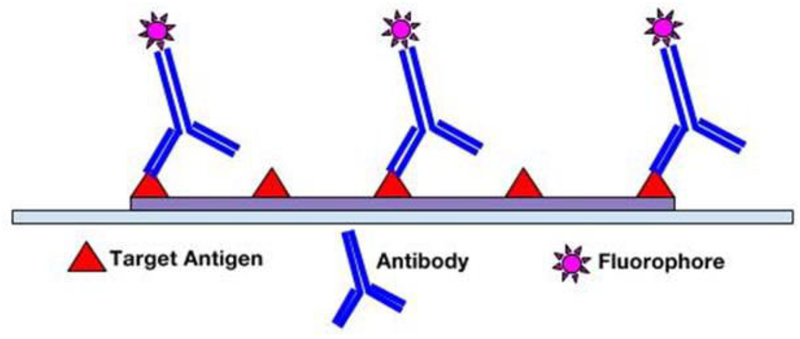
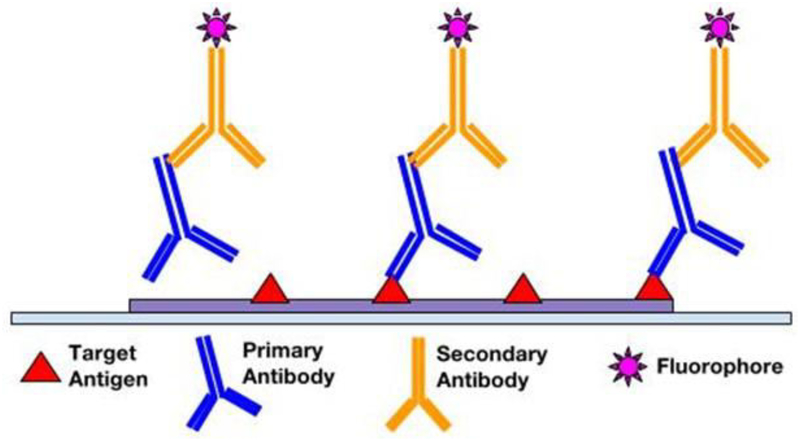
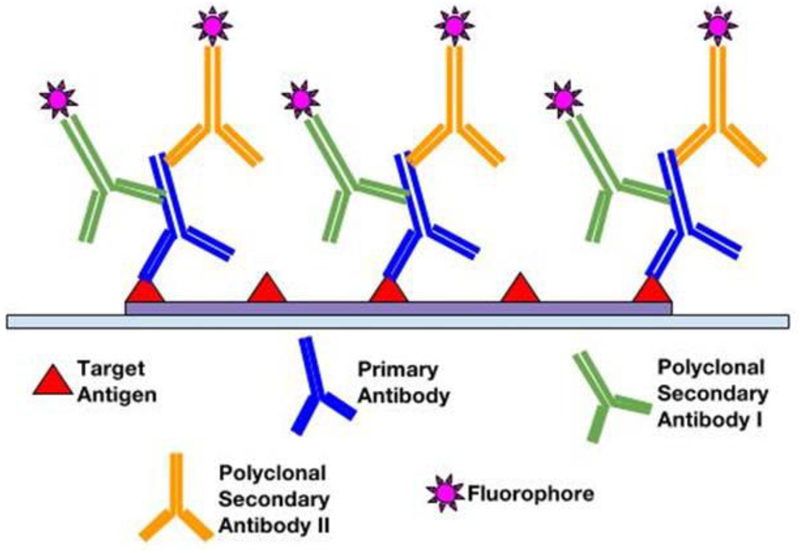
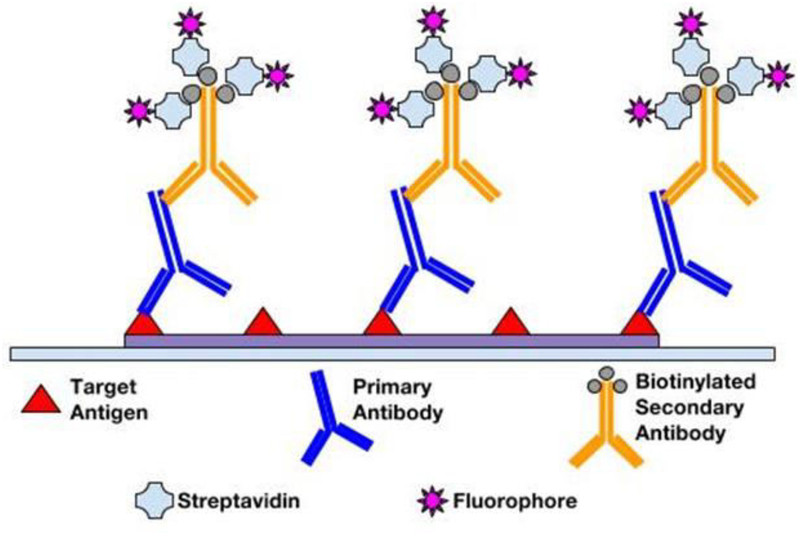
Following fixation and antigen retrieval, either of two IF methods can be employed: Direct (Primary) IF or Indirect (Secondary) IF. In the direct method, fluorophore label is conjugated directly to the primary antibody that will be reacting with the target epitope (see Figure 1). The indirect method involves a two-step incubation process: 1) a primary antibody binds to the target epitope, 2) a fluorophore-tagged secondary antibody recognizes and binds to the primary antibody (see Figure 2). Although the direct method is quicker, the indirect method is more widely employed for its high sensitivity, signal amplification, and its ability to detect several targets in the same sample (6, 7). In choosing the proper antibodies, several criteria must be taken into consideration. To prevent the secondary antibody from cross-reacting with endogenous immunoglobulins in the tissue sample, the primary antibody should be derived from a different species than that of the sample. Consequently, the secondary antibody must be against the host species of the primary antibody (8). Secondary antibodies can be modified and conjugated in multiple ways for purposes of visualization and signal amplification. Commonly, secondary antibodies are conjugated with fluorescent labels which emit upon photoexcitation. Enzymatic labels can also be conjugated to react with chromogen substrates for colorimetric analyses. For greater signal amplification, polyclonal or biotinylated secondary antibodies can be employed. For each primary antibody, polyclonal secondary antibodies are able to recognize multiple epitopes to increase binding and signal levels (see Figure 3) (9). Similarly, multiple fluorochrome-protein (avidin or streptavidin) complexes can bind to a single biotinylated secondary antibody to increase signal levels (see Figure 4). A combination of these methods can be used as well for greater signal amplification, as detailed later on.
Figure 1.
Direct immunofluorescence
Figure 2.
Indirect immunofluorescence
Figure 3.
Amplification of signal with polyclonal secondary antibodies labeled with a fluorophore
Figure 4.
Amplification of signal by a secondary antibody conjugated with multiple fluorophore–protein complexes
Before any antibody application, however, blocking must be performed on tissue samples to prevent antibodies from binding to non-target epitopes present. Blocking reagents should be chosen to ideally have no affinity for the target epitopes, high binding rates to non-target reactive sites, and stabilization of cellular morphology. As no universal methodology exists, the best combination of blocking reagents, blocking duration, and antibody types must be determined empirically. In general, most blocking buffers fall into the following categories: protein solutions, normal serums, protein-free commercial buffers. Protein blocking solutions are concentrated protein buffers that essentially bind all proteins present in the sample. As antibodies are forced to compete with the blocking protein for target epitopes, non-specific binding can be reduced. Common examples include bovine serum albumin (BSA), non-fat dry milk, and gelatin. Normal serum is a blocking reagent containing antibodies from the same species as that of the secondary antibody. This property serves to block non-target reactive sites to which secondary antibodies would otherwise bind. Finally, protein-free commercial blocking buffers are also widely available, with multiple options specific for various antibodies as well as increased shelf life (10).
Fluorescence detection is possible with use of fluorophore-conjugated antibodies, which emit light upon excitation via light of a shorter wavelength. The most commonly used fluorophores are fluorescein isothiocyanate (FITC) and tetramethylrhodamine isothiocyanate (TRITC). The ideal fluorophore for a particular experiment can be determined by various factors (11). Depending on the use of confocal or epifluorescence microscopes, fluorophores that can actually be excited and detected by the equipment available must be selected. In addition, most manufacturers include fluorophore reference charts indicating maximum excitation and emission wavelengths of the given fluorophore. High extinction coefficients and high quantum yields are also important factors in choosing the ideal fluorophore. With poor extinction coefficients and quantum yields, the fluorophore will appear very dim. Fluorophores are also susceptible to photobleaching. To minimize photobleaching, photostable fluorophores can be selected, excitation duration and intensity can be reduced, and antifade mounting reagents can be applied. When multiple fluorophores are in use, additional issues arise. Spectral overlap occurs when the excitation and emission wavelength spectrum of one fluorophore includes the spectrum of the other fluorophore in use. Selected fluorophores should be checked for spectral overlap in reference to the manufacturer’s’ spectrum viewer. When there exists contrasting expression levels of the different antigens of interest, dimmer fluorophores should be used to detect abundant antigens, with sparse antigens detected by brighter fluorophores (12, 13).
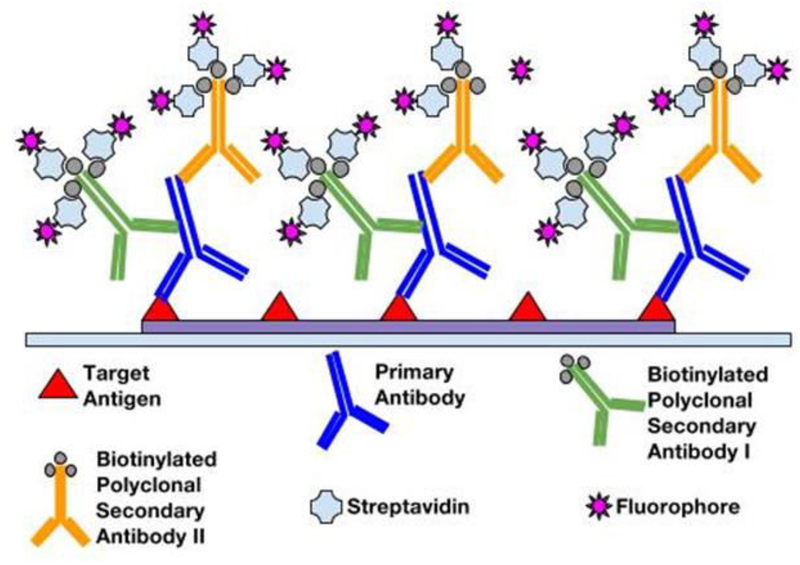
The immunofluorescence method has inherent advantages with regards to signal amplification, targeting specificity, resolution, and analytical capabilities. The IF method can be further improved for greater amplification of signal with the use of polyclonal antibodies in conjugation with enzyme complexes (see Figure 5). One such example is the fluorophore-labeled Streptavidin-Biotin complex. Being polyclonal, multiple biotinylated secondary antibodies are able to recognize and bind to a single primary antibody. In turn, binding of greater numbers of fluorophore-labeled Streptavidin per primary antibody greatly amplifies the fluorescence signal relative to a simple direct IF method. In addition, IF methods allow the possibility of multiplexing (14, 15). For chromogen labeling, target antigens in close proximity will be masked due to counterstaining. However, multiple antigens regardless of spatial orientation can be stained simultaneously since different fluorophores are only sensitive to their corresponding excitation wavelengths. This multiplexity is ideal for co-localization studies requiring high-resolution multi-antigen imaging. Furthermore, for fluorescence detection, better image qualities and quantitative microscopy are available. Confocal fluorescent microscopes can obtain higher resolutions and multi-planar images, and fluorescent detection methods avoid “fuzzy” images resulting from chromogenic enzyme precipitates in imaging protein localization (16). While the enzymatic approach of chromogenic methods limits quantitative capabilities of immunochemical analyses, fluorescent probes permit high-throughput and quantitative automated approaches (17). In the following sections, we will describe the materials and step-by-step methods.
Figure 5.
Amplification of signal with polyclonal secondary antibodies conjugated with multiple fluorophore–protein complexes
2. Materials
Prepare solutions with Milli-Q or equivalently purified deionized water. Prepare and store all reagents at room temperature (unless indicated otherwise). Follow all waste disposal regulations when disposing waste materials.
2.1. Buffers and solutions
Phosphate Buffered Saline (PBS) (10x).
Triton X-100.
Bovine Serum Albumin (BSA).
PBS Wash buffer: Phosphate Buffered Saline (PBS) (10x), 1L. Add about 500mL water to 1L graduated cylinder or glass beaker. Weigh out 80g NaCl, 2g KCl, 14.4g Na2HPO4, and 2.4g KH2PO4, and transfer to cylinder. Add water to a volume of 900mL. Mix and adjust pH to 8.0. Make up to 1L with water.
Blocking buffer: 1X PBS, 5% normal serum, 0.3% Triton X-100, 25mL. Add 21.25mL water to 50mL conical tube. Measure 2.5mL 10X PBS and 1.25mL normal serum, and transfer to conical tube and mix well. While stirring, add 75μL Triton X-100.
Antibody diluent: 1X PBS, 1% BSA, 0.3% Triton X-100, 40 mL. Add 36mL water to 50mL conical tube. Measure 4mL 10X PBS and weigh 0.5g BSA, and transfer to conical tube and mix well. While stirring, add 120μL Triton X-100.
2.2. Fixatives
Neutral buffered Formalin, 10%.
Methanol, 100%. Bring temperature down to −20°C before use.
Acetone, 100%. Bring temperature down to −20°C before use.
Methanol/Acetone, 50% methanol, 50% acetone, by volume. Bring temperature down to −20°C before use.
1 M NaOH. For 1 L of 1M NaOh, dissolve 40 g of NaOH in water for a total solution volume of 1 L.
1 M HCl. For 1 L of 1 M HCl, add 83 mL of 37% HCl solution to a graduated cylinder, and make up to 1 L with water.
4% Formaldehyde in PBS. For 1 L of 4% Formaldehyde, add 800 mL of 1X PBS to a glass beaker on a stir plate in a ventilated hood. Heat while stirring to approximately 60 °C. Take care that the solution does not boil. Add 40 g of paraformaldehyde powder to the heated PBS solution. The powder will not immediately dissolve into solution. Slowly raise the pH by adding 1 M NaOH dropwise from a pipette until the solution clears. Once the paraformaldehyde is dissolved, the solution should be cooled and filtered. Adjust the volume of the solution to 1 L with 1X PBS. Recheck the pH, and adjust it with small amounts of 1 M HCl to approximately 6.9. The solution can be aliquoted and frozen or stored at 2–8 °C for up to one month.
2.3. De-paraffinization and Rehydration Solutions
Xylene.
100% Ethanol.
95% Ethanol. For 500 mL of 95% Ethanol, add 475 mL of 100% Ethanol to a graduated cylinder. Make up to 500mL with water.
80% Ethanol. For 500 mL of 80% Ethanol, add 400 mL of 100% Ethanol to graduated cylinder. Make up to 500mL with water.
70% Ethanol. For 500 mL of 70% Ethanol, add 350 mL of 100% Ethanol to graduated cylinder. Make up to 350 mL with water.
2.4. Antigen Retrieval
10X Biocare Antigen Decloaker.
10X TBS.
Tween-20.
1X Biocare Antigen Retrieval Buffer. For 100 mL of retrieval buffer, add 10 mL of 10X Biocare Antigen Decloaker to graduated cylinder. Make up to 100 mL with water.
10 mM sodium citrate buffer, pH 6.0.
1 mM EDTA, pH 8.0.
Decloaker (Pressure Cooker).
Polypropylene staining container
0.1% TBS-Tween. For 1 L, add 100 ml 10X TBS to 900 ml dH2O. Add 1 ml Tween-20 and mix.
2.5. Immunostaining
Streptavidin.
0.2 M Sodium phosphate buffer, pH 7.0. For 1 L, dissolve 32.73 g of Sodium Phosphate Dibasic Heptahydrate in water for a total solution volume of 1 L.
0.1 M Sodium phosphate buffer, pH 7.0. For 1 L, add 500 mL of 0.2 M Sodium phosphate buffer, pH 7.0 into a graduated cylinder, and make up to 1 L with water.
Biotin.
Streptavidin (0.1%). For 1 mL, dissolve 1 mg Streptavidin in 1 mL of 0.1 M sodium phosphate buffer, pH 7.0.
Biotin (0.01%). For 10 mL, dissolve 1 mg Biotin in 10 mL 0.1 M sodium phosphate buffer, pH 7.0.
1:100 Primary antibody dilution. For 200 μL, add 2 μL of primary antibody to 198 μL of Antibody dilution buffer.
1:100 Polyclonal biotinylated secondary antibody dilution. For 200 μL, add 2 μL of secondary antibody to 198 μL of Antibody dilution buffer.
1:100 Fluorophore-conjugated Streptavidin dilution. For 200 μL, add 2 μL conjugated streptavidin to 198 μL of Antibody dilution buffer.
1% Glutaraldehyde. For 10 mL, add 100 μL 50% glutaraldehyde solution to conical tube, and make up to 10 mL with water.
ProLong Gold Antifade Reagent with DAPI.
3. Methods
3.1. Cultured Cell Line Preparation
Aspirate liquid and cover cells to a depth of 2–3 mm with 4% formaldehyde in PBS in tissue culture dish (see Note 1, see Note 2).
Allow cells to fix for 10 minutes at room temperature.
Aspirate fixative, and wash three times in PBS Wash Buffer in a depth of 2–3mm for 5 minutes each.
Proceed with Immunostaining.
3.2. Frozen Section Preparation
Obtain tissue sections from frozen OCT blocks using cryostat.
Cut blocks at a thickness of 2–4 μm for optimal resolution and place onto microscope slides.
Appropriately label slides with specimen identity and date of block cutting using pencil or slide labels.
Add 10% neutral buffered formalin (NPF) to slides for 10–15 min.
Wash 3x with PBS.
Proceed with IF staining.
3.3. Formalin-fixed Paraffin Embedded (FFPE) Slide De-paraffinization and rehydration
Place slides in 60°C oven for 30 min or overnight at 37C
Incubate 2–4 μm thick sections in three 100 mL washes of xylene for 5 minutes each, for a total of 15 minutes. (see Note 3)
Incubate sections in two 100 mL washes of 100% ethanol for 2 minutes each.
Incubate sections in one 100 mL wash of 95% ethanol for 2 minutes.
Incubate sections in one 100 mL wash of 80% ethanol for 2 minutes.
Incubate sections in one 100 mL wash of 70% ethanol for 2 minutes.
Immerse sections in 100 mL dH2O for 5 minutes.
Antigen retrieval can be performed using steps described in either 3.3.1 or 3.3.2 or 3.3.3.
3.3.1. Heat-Induced Epitope Retrieval (FFPE tissue)
Place removable pan in body of Decloaker Pressure Cooker.
Add 750 mL dH2O water to pressure cooker and submerge heat shield, positioning it in center of the removable pan. Ensure that the pressure gasket is properly positioned on the removable pan.
Fill polypropylene staining container with 100 mL of 1X Biocare antigen retrieval buffer. Load slides into staining container, and transfer the container into pressure cooker.
Set two pressure and temperature cycles: 1) 95°C for 40 minutes, 2) 90°C for 10 minutes.
Secure lid on pressure cooker tightly, and begin cycles.
Once cycles are complete, open pressure cooker and remove the slide container. Leave slides within the container of antigen retrieval buffer, and set to cool for 30 to 40 minutes.
Wash slides with 100 mL dH2O for 2 minutes.
Transfer slides to 100 mL of 0.1% TBS-Tween for 5 minutes. Slides can remain in solution up to 1 hour.
Proceed with Immunostaining.
3.3.2. Antigen Retrieval with Citrate (FFPE tissue)
Bring slides to a boil in 100 mL of 10 mM sodium citrate buffer, pH 6.0 in glass beaker.
Maintain at sub-boiling temperature for 10 minutes.
Cool slides on bench top for 30 minutes.
Proceed with Immunostaining.
3.3.3. Antigen Retrieval with EDTA
Bring slides to a boil in 100 mL of 1 mM EDTA, pH 8.0 in glass beaker.
Maintain at sub-boiling temperature for 15 minutes. No cooling is necessary.
Proceed with Immunostaining.
3.4. Immunofluorescence staining
3.4.1. Blocking
Block specimen in 200 μL blocking buffer for 15–20 minutes (see Note 4).
Apply excess of 200 μL streptavidin (0.1%) to specimen section for 20 minutes to block endogenous biotin.
Rinse three times in 100 mL PBS Wash Buffer for 5 minutes each.
Apply excess of 200 μL biotin (0.01%) to specimen section for 20 minutes to cover remaining binding sites of streptavidin.
While blocking, prepare working 1:100 dilution of primary antibodies in Antibody Dilution Buffer.
3.4.2. Antibody and Biotin-Streptavidin Incubation
Aspirate blocking solution, and add small volumes of 200 μL of prepared primary antibody dilutions to cover specimen, and incubate at 4°C overnight, or incubate at room temperature for 30–60 minutes (see Note 5, see Note 6).
Rinse three times in 100 mL PBS Wash Buffer for 5 minutes each.(If using primary antibodies directly conjugated with fluorophores, skip to step 10)
While rinsing, prepare working 1:100 dilution of polyclonal biotinylated secondary antibodies in Antibody Dilution Buffer.
Incubate specimen in small volumes of 200 μL of prepared secondary antibody dilutions to cover specimen, and incubate at 4°C overnight, or incubate at room temperature for 30–60 minutes.
Rinse three times in 100 mL PBS Wash Buffer for 5 minutes each.
While rinsing, prepare working 1:100 dilution of fluorophore-conjugated Streptavidin in Antibody Dilution Buffer.
Incubate specimen in 200 μL of fluorophore-conjugated Streptavidin dilution for 30 minutes at room temperature in dark.
Rinse three times in 100 mL PBS Wash Buffer for 5 minutes each.
Apply 200 μL of 1% glutaraldehyde in PBS Wash Buffer for 5 minutes to fix the antibody-streptavidin conjugate to the section.
Rinse three times in 100 mL PBS Wash Buffer for 5 minutes each.
Wash slides with 100 mL dH2O for 2 minutes.
Coverslip slides with 200 μL ProLong Gold Antifade Reagent with DAPI.
For best results, examine specimens immediately at the appropriate excitation wavelength of fluorophore.
Store slides flat at 4°C protected from light.
4. Notes
Cells should be grown, treated, fixed, and stained directly in multi-well plates, chamber slides, or on coverslips.
Formaldehyde is toxic; use only in fume hood.
Do not allow slides to dry at any time during this process.
To prevent drying and fluorophore fading, carry out all subsequent incubations at room temperature in a humid light-tight box, or carry out in a covered dish or plate, unless otherwise noted.
Multiple primary antibodies to different antigens can be added as long as care is taken to avoid the use of secondary reagents with overlapping spectra. If possible, primary antibodies should be raised in different species.
A negative control and/or an isotype-matched control should be included to identify nonspecific binding from the secondary antibody.
Acknowledgement
This work was supported in part by NIH:NCI P50-CA211015, NIH:NIMH U24 MH100929, the Art of the Brain Foundation, and the Henry E. Singleton Brain Cancer Research Program.
References
- 1.Abcam (2008) Fixation and permeabilisation tips for IHC and ICC. http://www.abcam.com/ps/pdf/protocols/fixation_permeabilization.pdf. Accessed 23 Feb 2016
- 2.Harlow E, Lane D (1999) Using Antibodies: A Laboratory Manual. Cold Spring Harbor, New York. [Google Scholar]
- 3.R&D Systems Inc. Antigen Retrieval Methods. https://www.rndsystems.com/resources/protocols/antigen-retrieval-methods. Accessed 23 Feb 2016
- 4.Myers R. Technical Brief of Heat Induced Epitope Retrieval. http://www.leicabiosystems.com/pathologyleaders/technical-brief-of-heat-induced-epitope-retrieval/. Accessed 24 Feb 2016
- 5.Myers J (2011) Overview of Heat-Induced Epitope Retrieval (HIER) Techniques and Devices. http://www.ihcworld.com/_protocols/epitope_retrieval/overview.htm. Accessed 24 Feb 2016
- 6.Vancells JC. Direct vs indirect immunofluorescence. http://www.abcam.com/secondary-antibodies/direct-vs-indirect-immunofluorescence. Accessed 24 Feb 2016
- 7.Rockland Immunochemicals Inc. Immunofluorescence Microscopy. http://www.rockland-inc.com/fluorescence_microscopy.aspx. Accessed 25 Feb 2016
- 8.Carpenter B. Secondary antibody selection guide. http://www.abcam.com/secondary-antibodies/secondary-antibody-selection-guide. Accessed 25 Feb 2016
- 9.Abcam. A comparison between polyclonal and monoclonal. http://www.abcam.com/protocols/a-comparison-between-polyclonal-and-monoclonal. Accessed 26 Feb 2016
- 10.Thermo Fisher Scientific Inc. (2016) Blocking Strategies for IHC. https://www.thermofisher.com/us/en/home/life-science/protein-biology/protein-biology-learning-center/protein-biology-resource-library/pierce-protein-methods/blocking-strategies-ihc.html. Accessed 26 Feb 2016
- 11.Brelje TC, Wessendorf MW, Sorenson RL (1993) Multicolor laser scanning confocal immunofluorescence microscopy: practical application and limitations. Methods Cell Biol 38:97–181. [DOI] [PubMed] [Google Scholar]
- 12.Thermo Scientific Inc (2012). Thermo Scientific Pierce Fluorescent Products Guide. https://tools.lifetechnologies.com/content/sfs/brochures/1602361-Fluorescent-Products-Guide.pdf. Accessed 29 Feb 2016
- 13.Cancer Institute, The University of Mississippi Medical Centre (2015). Selecting Fluorochromes for Analysis and Sorting. https://www.umc.edu/Administration/Centers_and_Institutes/Cancer_Institute/Selecting_Fluorochromes_for_Analysis_and_Sorting.aspx. Accessed 29 Feb 2016
- 14.Phillips ML (2007). How to Maximize Immunofluorescence Multiplexing. http://www.the-scientist.com/?articles.view/articleNo/25735/title/How-to-Maximize-Immunofluorescence-Multiplexing/. Accessed 29 Feb 2016
- 15.Yarilin D, Xu K, Turkekul M et al. (2015) Machine-based method for multiplex in situ molecular characterization of tissues by immunofluorescence detection. Nature Scientific Reports. doi: 10.1038/srep09534 [DOI] [PMC free article] [PubMed] [Google Scholar]
- 16.Thermo Fisher Scientific Inc. (2016) Immunofluorescence Method for IHC Detection. https://www.thermofisher.com/us/en/home/life-science/protein-biology/protein-biology-learning-center/protein-biology-resource-library/pierce-protein-methods/immunofluorescence-method-ihc-detection.html. Accessed 1 Mar 2016
- 17.Shipitsin M, Small C, Giladi E et al. (2014) Automated quantitative multiplex immunofluorescence in situ imaging identifies phospho-S6 and phospho-PRAS40 as predictive protein biomarkers for prostate cancer lethality. Proteome Sci 12:40. doi: 10.1186/1477-5956-12-40 [DOI] [PMC free article] [PubMed] [Google Scholar]


