

Abstract
Arthroscopy frequently has been used to treat a variety of shoulder conditions, including anterior labrum tears. Anterior labrum repair techniques have progressed from multiple incision techniques to most recently a single anterior working portal with a posterior viewing portal. With the development of the NanoScope (Arthrex, Naples, FL), we do not need to make a standard portal for viewing purposes. In this article, we describe the single-incision anterior labrum repair bypassing the need for a posterior skin incision. The removal of this incision and portal should result in less fluid needed and less swelling. We hope this leads to less pain and improved patient outcomes.
Anterior shoulder instability is a common problem affecting 1% to 2% of the general population. This number increases up to 15% for athletes participating in contact sports.1,2 Traditionally, open repair of a torn labrum has provided excellent results with high patient satisfaction scores and low reoperation rates.3, 4, 5 This surgery, however, can be associated with a high morbidity and a significant loss of shoulder motion.5 Arthroscopic Bankart repair, originally described by Wolf et al., has gained popularity as a less-invasive surgery that has been shown to provide equivalent results compared with open surgery.6,7 This is traditionally done with the use of a viewing portal in the back of the shoulder and 2 anterior working portals in the front of the shoulder.
A more minimally invasive approach using a single anterior working portal recently has been adopted by many surgeons. This also can be associated with lower patient morbidity.3,8, 9, 10 In sports medicine, we continue to try to provide improved outcomes by decreasing size and number of incisions, and in this technique we describe a single-incision anterior labrum repair without the need for a posterior incision. Our technique uses the NanoScope (Arthrex, Naples, FL) to eliminate the posterior portal, achieving a single-incision arthroscopic anterior labrum repair.
Surgical Technique (With Video Illustration)
Fig 1, Fig 2, Fig 3, Fig 4, Fig 5, Fig 6, Fig 7, Fig 8, Fig 9, Fig 10 and Video 1 show the surgical technique.
Fig 1.
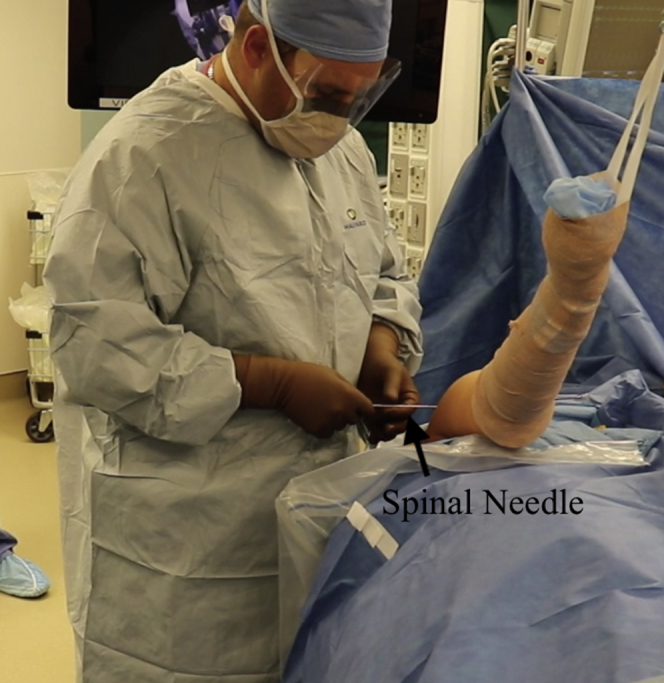
Viewing the right shoulder in the lateral position, a spinal needle is inserted from posteriorly.
Fig 2.
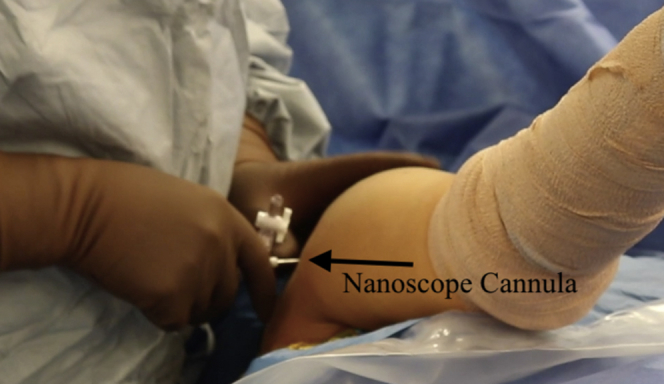
Viewing the right shoulder from outside of the joint, a 2.7-mm cannula is inserted from posteriorly over a nitinol wire.
Fig 3.
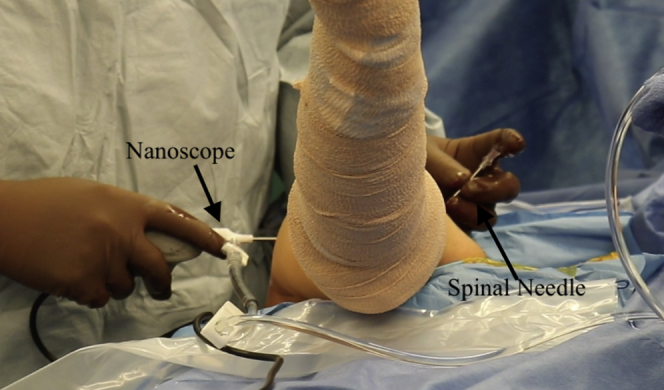
Viewing the right shoulder from outside the joint, a spinal needle has been inserted anteriorly and the NanoScope (Arthrex) is placed through the posterior cannula.
Fig 4.
Viewing the right shoulder from posteriorly using the 0° NanoScope, the 45°suture lasso has been used to place a nitinol wire through the labrum.
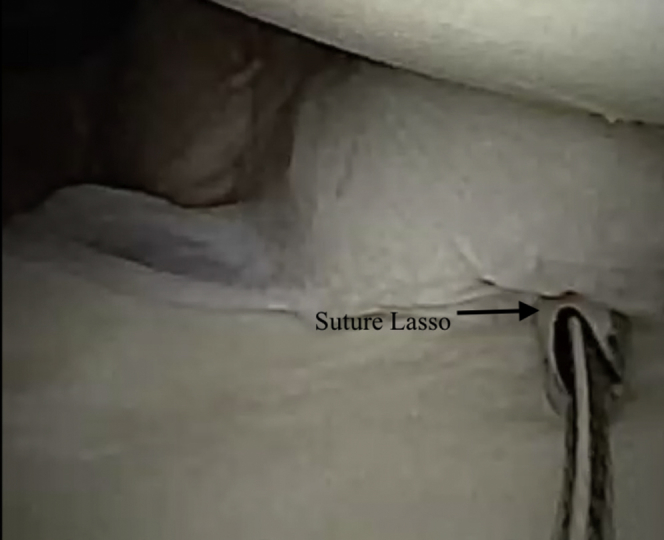
Fig 5.
Viewing the right shoulder from outside the joint, the nitinol wire is being pulled out of the anterior portal loading the labral tape through the anterior labrum. The NanoScope is viewing from posteriorly.
Fig 6.
Viewing the right shoulder from posteriorly using the 0° NanoScope, a 2.9-mm PushLock anchor loaded with labral tape is seen being inserted through into the glenoid.
Fig 7.
Viewing the right shoulder from posteriorly using the 0° NanoScope, the second anchor has been placed and you can see the 30° arthroscope has been placed into the anterior portal.
Fig 8.
Viewing the right shoulder from posteriorly with the 0° NanoScope, you can see the final anterior labrum repair.
Fig 9.

The right side is a view of the right shoulder with the 0° NanoScope from posteriorly and the left side is a view of the right shoulder with the 30° arthroscope from anteriorly.
Fig 10.
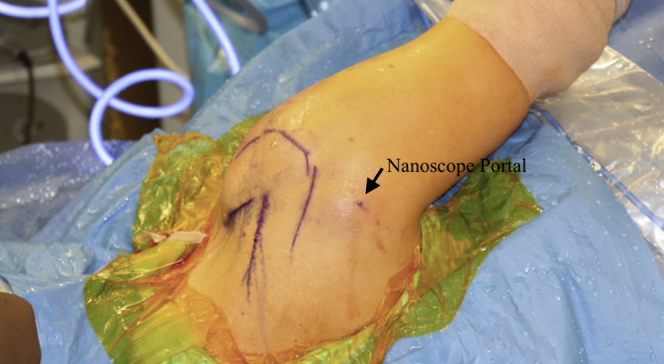
View of the right shoulder from outside the joint in the lateral position seeing there is no posterior incision.
Patient Setup
The patient is placed in the lateral position with the operative extremity placed in a standard lateral arm positioner. An axillary roll is placed under the nonoperative extremity. The operative shoulder landmarks are marked out including the scapula, coracoid, and acromioclavicular joint.
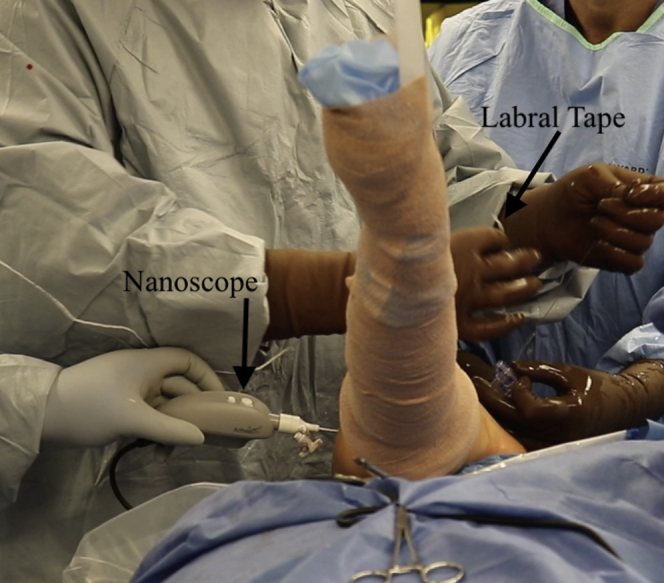
NanoScope Insertion
A spinal needle is inserted into the glenohumeral joint from posteriorly (Fig 1). In total, 30 cc of normal saline can be loaded into the joint to help with initial visualization. A nitinol wire is inserted into the needle and the needle is removed. A small 2.7-mm cannula is then inserted over the wire and the wire is removed (Video 1 and Fig 2). Inflow is then placed onto the cannula and the NanoScope is inserted for visualization of the joint. A standard diagnostic arthroscopy is then performed identifying the anterior labrum tear.
Anterior Portal
An 18-gauge spinal needle is then used to localized the anterior portal location in an outside in fashion (Fig 3). A small incision is made and a switching stick is placed into the glenohumeral joint from anteriorly. An 8-mm dilator is then used to dilate for cannula insertion. The 8.25-mm cannula (Arthrex) is then placed into the joint from anteriorly for a working portal. Inflow is then switched to the anterior portal.
Labrum Repair
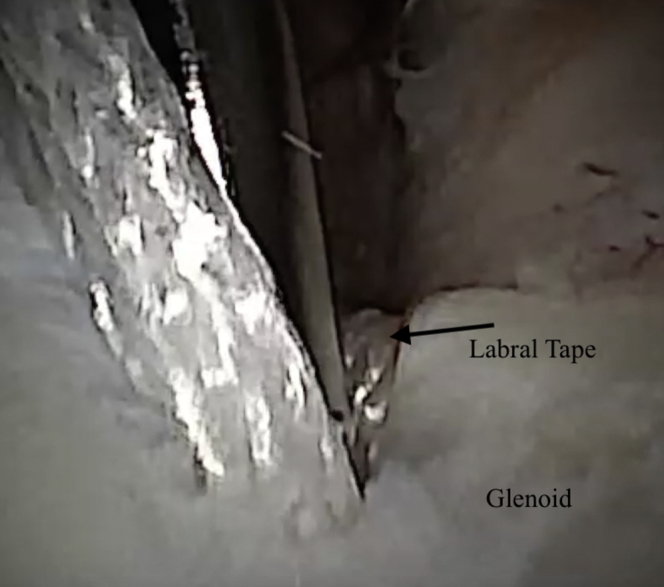
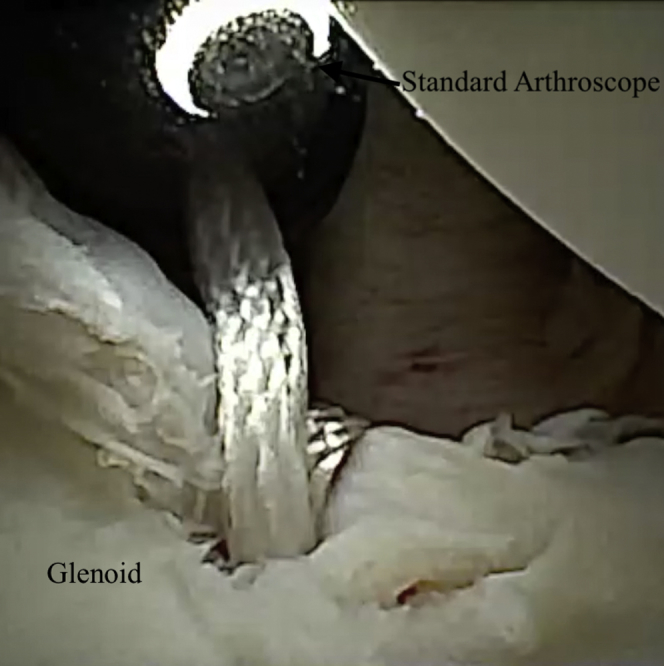
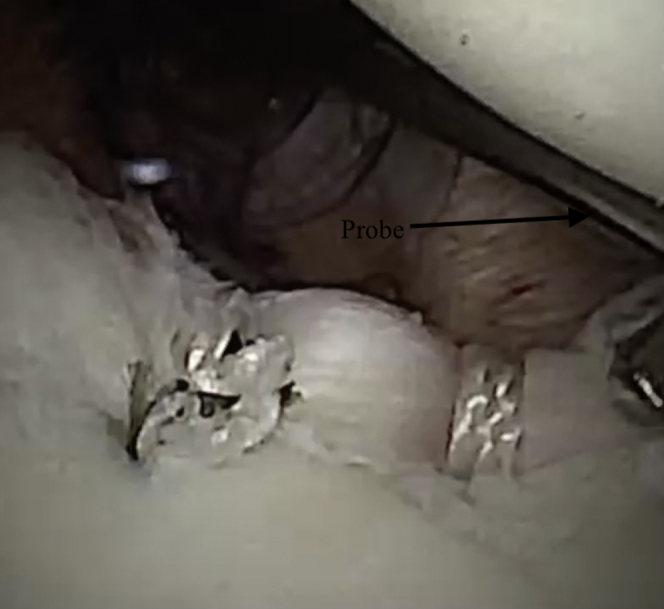
A small elevator and rasp are used to prepare the glenoid and labrum tear. A 45° to the right suture lasso is used to pass a nitinol wire loop through the anterior inferior labrum and this wire is retrieved (Fig 4). Labral tape is then passed using this loop and pulled through the anterior inferior labrum (Fig 5). Using a drill guide and the drill for the 2.9-mm PushLock anchor (Arthrex), the anchor hole is drilled in the anterior surface of the glenoid. The labral tape has been placed through the PushLock (Arthrex) anchor and tensioned as the PushLock is inserted into the glenoid (Fig 6). At this point, the 30° arthroscope can be placed through the anterior portal for a view directly onto the labrum and we will view both angles simultaneously with the NanoScope (Arthrex) posteriorly (Table 1 and Fig 7). These steps are repeated for 2 more superior anchors until the labrum is fully repaired and stable to probing (Fig 8). At the end of the repair, we view from both portal simultaneously to give a view of the entire repair from various angles (Fig 9).
Table 1.
Pearls and Pitfalls of the Single-Incision Anterior Labrum Repair
| Pearls |
| Using the 30° arthroscope can aid in visualization anteriorly simultaneously |
| Inflow should be placed through the anterior working portal |
| Pitfalls |
| Improper placement of the posterior spinal needle can cause difficult visualization |
Discussion
Arthroscopic anterior labral repair has grown significantly in popularity and is associated with less morbidity and equivalent outcomes when compared with open labral repair. We describe the use of the NanoScope to eliminate the posterior portal. This has many advantages. First, it allows for the use of a single incision, leading to less morbidity for the patient and, theoretically, a lower surgical-site infection risk as there are fewer incisions (Fig 10). Fewer holes created in the capsule means less fluid extravasation to the surrounding soft tissues, leading to decreased swelling. This in turn may lead to less pain postoperatively. Because there is less extravasation of the arthroscopy fluid, it is easier to distend the shoulder for visualization and there is decreased need for fluid overall. Lastly, and most importantly, the 2.7-mm NanoScope inflow sheath causes less damage done to the posterior capsule and rotator cuff than the traditional 5.9-mm arthroscopic inflow sheath. This can then lead to an easier early recovery and return to function.
Potential disadvantages of using this system include view limitations. Initial needle placement must be correct to allow for adequate visualization of the anterior labrum and capsular tissue (Table 2). The NanoScope is a 0-degree viewing camera, which can make it difficult to see down over the anterior rim of the glenoid from the posterior portal. This, however, can be overcome by inserting the traditional 4.0 mm 30° or 70°arthroscope through the anterior cannula giving a complete picture of the injury and repair. Because of these potential technical issues, one should never hesitate to abort and make a traditional posterior portal is the quality of the repair anteriorly is at risk.
Table 2.
Advantages and Disadvantages of the Single-Incision Anterior Labrum Repair
| Advantages |
| Decreased loss and need for fluid |
| Less swelling and pain |
| Possible increase in motion |
| Disadvantages |
| Additional cost of NanoScope |
| Difficult viewing angles |
We feel that the NanoScope (Arthrex) is a useful tool to decrease patient morbidity and possibly speed up recovery when used appropriately. Further studies are planned to evaluate subjective and objective outcomes in patients who have this surgery.
Footnotes
The author reports the following potential conflict of interest or source of funding: C.L. reports personal fees from Arthrex, outside the submitted work. Full ICMJE author disclosure forms are available for this article online, as supplementary material.
Supplementary Data
The patient is placed in the lateral position with the operative extremity placed in a standard lateral arm positioner. An axillary roll is placed under the nonoperative extremity. The operative shoulder landmarks are marked out including the scapula, coracoid, and acromioclavicular joint. Next, you can see a spinal needle is inserted into the glenohumeral joint from posteriorly. A nitinol wire is then seen inserted into the needle and the needle is removed. A small 2.7-mm cannula is then inserted over the wire and the wire is removed. Inflow is then placed onto the cannula and the NanoScope is inserted for visualization of the joint. An 18-gauge spinal needle is then used to localized the anterior portal location in an outside in fashion. A small incision is made, and you can see a switching stick is placed into the glenohumeral joint from anteriorly. An 8-mm dilator is then used next to dilate for cannula insertion. The 8.25-mm cannula (Arthrex) is then placed into the joint from anteriorly for a working portal. Inflow is then switched to the anterior portal. Next, we view from posteriorly with the NanoScope and the labrum repair is seen being probed. A small elevator and rasp are used to prepare the glenoid and labrum tear. A 45° to the right suture lasso is used to pass a nitinol wire loop through the anterior inferior capsule and this wire is retrieved. Labral tape is then passed using this loop and pulled through the anterior inferior capsule to give the inferior capsule stitch. With a drill guide and the drill for the 2.9-mm PushLock anchor (Arthrex, Naples, FL) the anchor hole is drilled in the anterior surface of the glenoid. The labral tape has been placed through the PushLock (Arthrex) anchor and tensioned as the PushLock is inserted into the glenoid. At this point, you can see the 30° arthroscope is placed through the anterior portal for a view directly onto the labrum and we will view both angles simultaneously. The labral tape is then cut. Next, we address the anterior labrum tear more superiorly by again threading a labral tape suture using the lasso once again. We then drill for the second anchor and in the lower right screen this step is viewed from outside the joint. The second anchor is placed and viewed with the 30° arthroscope from the anterior portal. Once again, a lasso is used to pass the labral tape and you can see a split screen showing this step outside of the joint. This is loaded into the final anchor and it is drilled for and inserted as seen. We then come in from anteriorly and probe the tear. Next, a split screen is shown with a posterior view obtained from the NanoScope on the right and on the left a view with the 30° arthroscope from anteriorly. Finally, you will see a view of the shoulder showing no posterior incision.
References
- 1.Galvin J.W., Ernat J.J., Waterman B.R., Stadecker M.J., Parada S.A. The epidemiology and natural history of anterior shoulder instability. Curr Rev Musculoskel Med. 2017;10:411–424. doi: 10.1007/s12178-017-9432-5. [DOI] [PMC free article] [PubMed] [Google Scholar]
- 2.Gottschalk L.J., 4th, Walia P., Patel R.M. Stability of the glenohumeral joint with combined humeral head and glenoid defects: A cadaveric study. Am J Sports Med. 2016;44:933–940. doi: 10.1177/0363546515624914. [DOI] [PubMed] [Google Scholar]
- 3.Ng D.Z., Lau B.P.H., Tan B.H.M., Kumar V.P. Single working portal technique for knotless arthroscopic Bankart repair. Arthrosc Tech. 2017;6:e1989–e1992. doi: 10.1016/j.eats.2017.07.021. [DOI] [PMC free article] [PubMed] [Google Scholar]
- 4.Coughlin R.P., Crapser A., Coughlin K., Coughlin L.P. Open Bankart revisited. Arthrosc Tech. 2017;6:e233–e237. doi: 10.1016/j.eats.2016.09.027. [DOI] [PMC free article] [PubMed] [Google Scholar]
- 5.Khatri K., Arora H., Chaudhary S., Goyal D. Meta-analysis of randomized controlled trials involving anterior shoulder instability. Open Orthop J. 2018;12:411–418. doi: 10.2174/1874325001812010411. [DOI] [PMC free article] [PubMed] [Google Scholar]
- 6.Huerta A., Rincón G., Peidro L., Combalia A., Sastre S. Controversies in the surgical management of shoulder instability: Open vs arthroscopic procedures. Open Orthop J. 2017;11:875–881. doi: 10.2174/1874325001711010875. [DOI] [PMC free article] [PubMed] [Google Scholar]
- 7.Wolf E.M., Wilk R.M., Richmond J.C. Arthroscopic Bankart repair using suture anchors. Op Tech Orthop. 1991;1:184–191. [Google Scholar]
- 8.Armangil M., Basat H.Ç., Akan B., Karaduman M., Demirtaş M. Arthroscopic stabilization of anterior shoulder instability using a single anterior portal. Acta Orthop Traumatol Turc. 2015;49:6–12. doi: 10.3944/AOTT.2015.14.0035. [DOI] [PubMed] [Google Scholar]
- 9.Burks R.T., Presson A.P., Weng H.Y. An analysis of technical aspects of the arthroscopic Bankart procedure as performed in the United States. Arthroscopy. 2014;30:1246–1253. doi: 10.1016/j.arthro.2014.05.026. [DOI] [PubMed] [Google Scholar]
- 10.Elena N., Woodall B.M., Ahn S. Anterior shoulder stabilization using a single portal technique with suture lasso. Arthrosc Tech. 2018;7:e505–e509. doi: 10.1016/j.eats.2018.01.002. [DOI] [PMC free article] [PubMed] [Google Scholar]
Associated Data
This section collects any data citations, data availability statements, or supplementary materials included in this article.
Supplementary Materials
The patient is placed in the lateral position with the operative extremity placed in a standard lateral arm positioner. An axillary roll is placed under the nonoperative extremity. The operative shoulder landmarks are marked out including the scapula, coracoid, and acromioclavicular joint. Next, you can see a spinal needle is inserted into the glenohumeral joint from posteriorly. A nitinol wire is then seen inserted into the needle and the needle is removed. A small 2.7-mm cannula is then inserted over the wire and the wire is removed. Inflow is then placed onto the cannula and the NanoScope is inserted for visualization of the joint. An 18-gauge spinal needle is then used to localized the anterior portal location in an outside in fashion. A small incision is made, and you can see a switching stick is placed into the glenohumeral joint from anteriorly. An 8-mm dilator is then used next to dilate for cannula insertion. The 8.25-mm cannula (Arthrex) is then placed into the joint from anteriorly for a working portal. Inflow is then switched to the anterior portal. Next, we view from posteriorly with the NanoScope and the labrum repair is seen being probed. A small elevator and rasp are used to prepare the glenoid and labrum tear. A 45° to the right suture lasso is used to pass a nitinol wire loop through the anterior inferior capsule and this wire is retrieved. Labral tape is then passed using this loop and pulled through the anterior inferior capsule to give the inferior capsule stitch. With a drill guide and the drill for the 2.9-mm PushLock anchor (Arthrex, Naples, FL) the anchor hole is drilled in the anterior surface of the glenoid. The labral tape has been placed through the PushLock (Arthrex) anchor and tensioned as the PushLock is inserted into the glenoid. At this point, you can see the 30° arthroscope is placed through the anterior portal for a view directly onto the labrum and we will view both angles simultaneously. The labral tape is then cut. Next, we address the anterior labrum tear more superiorly by again threading a labral tape suture using the lasso once again. We then drill for the second anchor and in the lower right screen this step is viewed from outside the joint. The second anchor is placed and viewed with the 30° arthroscope from the anterior portal. Once again, a lasso is used to pass the labral tape and you can see a split screen showing this step outside of the joint. This is loaded into the final anchor and it is drilled for and inserted as seen. We then come in from anteriorly and probe the tear. Next, a split screen is shown with a posterior view obtained from the NanoScope on the right and on the left a view with the 30° arthroscope from anteriorly. Finally, you will see a view of the shoulder showing no posterior incision.