

Why do a Postmortem Examination?
Puppy and kitten losses within the first few months of life are a common but unavoidable problem. Postmortem examinations provide essential information for preventative strategies and should be pursued aggressively. This is particularly important when losses occur in the preweaning period, and contributing factors should be eliminated before the next breeding cycle. Postmortem examinations are also an important part of quality assurance and quality control programs of veterinary clinics and provide great opportunities for continued education when faced with the unexpected or unexplained death of a patient or a patient's death despite diagnosis-based treatment. Postmortem examinations address the owner's concern about littermates and other pets in the household, the future of the breeding program, and the owner's health. Results from a postmortem examination can also provide consolation, particularly after the difficult decision to have a pet euthanized.
What Comprises a Postmortem Examination?
A postmortem examination is actually a series of examinations. The gross examination during the necropsy of the animal is followed by the microscopic examination of fixed tissues (histopathology). Often additional tests on fresh tissues like microbiology (bacteriology, virology, parasitology, mycology, and serology) and/or toxicology (chemical analysis of tissues for toxins, minerals, and heavy metals) are necessary to determine the specific etiology of an identified disease process. These additional tests can be requested at time of necropsy, or samples may be collected and saved for testing at a later time, for example, when histopathology results are available and allow a focused approach to further testing to minimize expenses.
Who Performs Postmortem Examinations?
Ideally, the entire animal is submitted to a diagnostic laboratory for complete postmortem examination. If this is not possible, the necropsy may be performed at the clinic, and collected samples can be sent to a diagnostic laboratory for testing. Some of the advantages and disadvantages of the available approaches are listed in Table 31-1 .
TABLE 31-1.
Pros and cons of postmortem examination at a diagnostic laboratory versus at a clinic
| Examination at | Advantages | Disadvantages |
|---|---|---|
| Diagnostic laboratory | Workup by specialists: gross lesions may be subtle and can be easily missed | Transport/shipping: expense and time in transit |
| Coordination of ancillary testing | Additional cost (for gross examination) | |
| Infrastructure for safe and complete examination | ||
| Carcass: prearranged disposal or cremation | ||
| Clinic | Immediate sample collection | Time consuming |
| Immediate feedback | Biosafety and containment | |
| Necropsy equipment and area | ||
| Disposal of carcass; release to client not recommended | ||
| Interpretation of findings (more often the challenge is the lack of significant gross lesions) |
Puppy and Kitten Losses and Common Causes
The pediatric patient poses some unique challenges with respect to postmortem examinations. The quick succession of developmental phases is associated with a rapid change of commonly encountered diseases to which the diagnostic approach has to be tailored. The perinatal puppy or kitten is commonly worked up as an abortion with a simplified gross examination and emphasis on histopathology and microbiological testing. In contrast, animals older than 1 day of age require a thorough and complete necropsy because gross findings determine the menu of additional tests to be performed. Before weaning, health concerns extend to littermates, the dam, and often the breeding program in general. After weaning, the problem is usually viewed as that of an individual animal and rarely of the household.
Very few studies on necropsy findings of the puppy and kitten have been published in the primary literature. In puppies, most deaths occur before rather than after weaning, which amount to more than 20% and less than 5% of all puppy deaths in the first year of life, respectively. More than 50% of the preweaning puppy losses occur during the first week of life. Common causes in this age group are stillbirth (incidence of 2.2% to 4.6%), trauma, failure to thrive, or congenital anomalies resulting in death or euthanasia. In puppies older than 1 week, respiratory and gastrointestinal diseases are the most common primary issues identified on postmortem examination, followed by malnutrition. In kittens, 50% of neonatal mortalities are the result of stillbirth (incidence of 4.3% to 10.1%), and an additional 25% occur in kittens less than 1 week of age. Approximately 15% of all litters have at least one kitten with one or more congenital anomalies (nearly 10% of kittens born alive). Based on histopathological examination, more than half of the kitten deaths up to 4 months of age are caused by infectious diseases, with the majority having a viral etiology. Before weaning, feline herpesvirus 1 and feline calicivirus are the main causes; after weaning, it is feline parvovirus followed by feline infectious peritonitis (corona)virus.
Box 31-1 highlights commonly encountered causes of canine and feline mortality by age group.
BOX 31-1. Common causes of mortality by age group.
Abortion, Stillbirth, and Perinatal Phase (0 to 1 day)
-
•Infectious: Brucella canis/abortus; canine and feline herpesvirus; Toxoplasma gondii; Escherichia coli; Salmonella and Mycoplasma species; Campylobacter jejuni; β-hemolytic streptococci; feline leukemia virus (Figure 31-1, A )
Figure 31-1.


 A, Moderate anasarca and severe hemoperitoneum, puppy. The subcutis is markedly expanded with edema (anasarca). The abdominal cavity is severely dilated with blood, most likely because of septicemia. Note how the umbilicus has been preserved in this partially skinned puppy. B, Cleft palate (palatoschisis), roof of oral cavity, dog fetus. C, Exencephaly, dorsal aspect of head and neck, dog fetus. The incomplete closure of the crania with protrusion of the brain through the defect in the bone and skin is often associated with cleft palate and other anomalies of the head. D, Bilateral hindlimb deformity and unilateral hydroureter, dog fetus. The abdominal cavity is partially exenterated, and the thoracic cavity is completely exenterated. The left ureter in the upper half of the picture is severely dilated with clear watery fluid (urine).
 -
•Noninfectious
-
•Low birth weight (puppies and kittens) and litter size of one (kittens)
-
•Congenital anomalies (Figure 31-1, B to D): in this age group most commonly cleft palate, exencephaly, intestinal agenesis, schistosomas reflexus, limb deformity, atresia ani, diaphragmatic or umbilical hernia, renal hypoplasia or aplasia, and complex cardiovascular or respiratory anomalies
-
•Other: intrapartum hypoxia or asphyxiation, trauma in association with dystocia or maternal neglect; hormonal, metabolic, or chromosomal anomalies; drugs and chemicals administered during gestation
-
•
Neonatal Phase (Puppies: 1 day to 10 days; Kittens: 1 day to 7 days)
-
•
Malnutrition including primary maternal neglect
-
•
Enteric disease: coronavirus, rotavirus; Escherichia coli; cryptosporidia
-
•Septicemia (Figure 31-2 ): commonly Staphylococcus, Streptococcus, Escherichia, Klebsiella, Enterococcus, or Salmonella species
Figure 31-2.
 Multifocal hemorrhage, lungs, puppy. Compare these normally inflated and pink lungs with the pneumonic lungs depicted in Figures 31-3, B and 31-5. Cause of death in this puppy was septicemia.
 -
•Other systemic infectious diseases like canine herpesvirus in puppies (Figure 31-3 ) and toxoplasmosis in kittens (Figure 31-4 )
Figure 31-3.


 Systemic canine herpesvirus 1 infection. All the photographs in this figure show the same puppy. A, Severe acute hydrothorax and multifocal acute hepatic necrosis, situs of thoracic and cranial abdominal cavity. Pleural effusion and hepatic necrosis are common findings in herpesvirus infections. Canine herpesvirus infection is commonly diagnosed in puppies that died during the first 2 weeks of life. B, Severe acute interstitial pneumonia, lungs. The lungs are poorly collapsed and mottled red-beige. Compare with normally colored and collapsed lungs shown in Figure 31-2. C, Multifocal, severe, acute renal necrosis and hemorrhage, sagittal cut, kidney. Petechiation on the cut (left) and capsular (right) surface in the puppy is characteristic for an infection with canine herpesvirus 1.
Figure 31-4.
 Severe disseminated necrotizing hepatitis, abdominal situs, kitten. The liver is severely enlarged and mottled beige-brown. On histopathology, protozoan cysts consistent with Toxoplasma sp. were identified in areas of necrotizing hepatitis. The protozoal infection in this kitten involved many other organs, including the brain and lungs.
 -
•
Omphalitis with or without phlebitis or arteritis as a result of opportunistic bacteria
-
•
Congenital anomalies: in this age group most commonly involving the central nervous, cardiovascular, or respiratory system (e.g., cerebellar hypoplasia because of feline parvovirus, or patent ductus arteriosus Botalli)
Pediatric Phase
-
•Puppies (older than 10 days)
-
•Respiratory disease: infectious tracheobronchitis complex with secondary Bordetella bronchiseptica (Figure 31-5 ) and canine distemper virus
Figure 31-5.
 Severe subacute bronchopneumonia, lung, puppy. This gross presentation is typical for suppurative bronchopneumonia as a result of aerogenous infection with bacteria. Bordetella bronchiseptica was isolated in this case and is the most common bacterial pathogen in feline and canine respiratory disease. Compare with normally inflated and pink lung in Figure 31-2 and interstitial pneumonia depicted in Figure 31-3, B.
 -
•Enteric disease: canine parvovirus 2 (Figure 31-6, A ), canine distemper virus, and coccidia
Figure 31-6.

 A, Necrotizing enteritis, jejunum and ileum, puppy. The Peyer's patches in the affected flaccid segments of small intestine appear sunken because of loss of lymphoid tissue to necrosis. Parvovirus was identified in a mucosal scraping that included the malodorous intestinal contents. B, Segmental enteritis, abdominal situs, kitten. The severe hyperemia and dilation of loops of small intestine are typical for parvoviral enteritis (panleukopenia).
 -
•Congenital anomalies with metabolic or systemic consequences like portosystemic shunt and progressive juvenile nephropathy
-
•
-
•Kittens (older than 7 days)
-
•Respiratory disease: feline herpesvirus 1 and/or feline calicivirus, and Bordetella bronchiseptica as primary or secondary pathogen
-
•Enteric disease: feline parvovirus (Figure 31-6, B) and feline coronavirus
-
•Congenital anomalies with metabolic consequences (less commonly diagnosed than in puppies)
-
•
In a large number of cases, a definitive diagnosis is not established, and the cases are released as idiopathic deaths or abortions. In a retrospective study on kitten losses during the first 4 months of life, this apparent failure to identify a specific cause was significantly associated with submission of tissue samples instead of the entire animal to the diagnostic laboratory for postmortem diagnostics. This underlines the fact that a thorough gross examination and collection of a complete set of samples for histopathology and microbiology are imperative to successful postmortem diagnostics. Gross lesions may be subtle and can be easily missed by an inexperienced examiner. This may result in collection of incomplete sample sets, which in turn will limit the spectrum of available diagnostic tests.
The Postmortem Examination
Euthanasia of moribund animals should avoid injection into organs or body cavities that are suspected to be involved in the disease process (e.g., intracardiac, intrapulmonary, and intraabdominal injections are not recommended if the disease/syndrome is suspected to be cardiac, pulmonary, and abdominal, respectively). The remains should be immediately refrigerated at 39° F (4° C) . Freezing before collection of samples for histopathology will cause severe artifacts as a result of disruption of the microanatomy by formation of ice crystals and should therefore be avoided. If delays of more than 2 days until a complete postmortem examination are expected, a necropsy at the clinic with collections of a complete set of well-preserved samples is recommended. If in doubt about the appropriate approach, contact a diagnostic pathologist.
Submission to a Diagnostic Laboratory
Shipping of the Entire Animal
The remains should be allowed to completely cool before packaging into plastic bags or containers for transport or shipping. While in transit, the remains should be chilled with ice packs placed inside the bag or container. Packages have to be absolutely leak-proof and include padding with absorbent material. The remains may be transported to the laboratory by the owner or veterinary practice personnel, or shipped via a carrier service providing same-day or next-day delivery. Shipping of remains late in the week should be avoided as they may end up without adequate cooling over the weekend.
Communication with the Diagnostic Laboratory
Effective communication with the laboratory personnel, especially the pathologist or case coordinator, is central to successful postmortem diagnostics. The importance of a complete clinical history, including signalment of the animal and clinical findings and diagnoses, cannot be stressed enough. Important points to cover in the clinical history are provided in Box 31-2 . Specific questions from the clinician should be noted on the submission sheet, so that the diagnostician is aware of them at the time of gross examination. Submission sheets should be filled out by the attending veterinarian (not by support personnel) to avoid loss of critical information and miscommunication. If the space on the submission sheet is too limited, the attending veterinarian should include additional pages.
BOX 31-2. Basic components of a clinical history.
-
•
Signalment
-
•
History provided by owner
-
•
For abortions: gestation time, due date, type of delivery (normal or cesarean section), duration of labor, breeding history
-
•
Date of onset and duration of illness
-
•
Other animals in the household
-
•
Other animals affected, number, and clinical presentation
-
•
Introductions of new animals
-
•
Husbandry and changes in husbandry
-
•
Results from the clinical examination
-
•
Test results (e.g., clinical pathology and radiology)
-
•
Clinical diagnosis(es) with top differential diagnoses
-
•
Treatment
-
•
Death (euthanasia or natural) and date of death
-
•
Date of postmortem examination and shipping
It may sound trivial, but information needs to be clearly legible because text that cannot be deciphered is of no use. Additional information, like results of recent clinical, pathological, or radiographic examinations, can be very helpful and should be included liberally. If additional material is extensive, a brief summary will be welcomed by the diagnostician. Contact information (telephone and fax numbers, e-mail address) will facilitate timely reporting of results. Many laboratories issue preliminary reports, which should be taken as such: preliminary results without final conclusions. Pet owners may be anxious for results, but some tests take a few days to complete or may not be offered daily. For example, the histopathologic examination of a brain can take up to 10 days from the date of necropsy. In this case, sufficient fixation before processing is necessary to ensure high quality and artifact-free microscopic specimens.
Postmortem Examination at the Clinic
Biosafety and containment are major issues associated with postmortem examinations at a clinic. A designated work area and a separate set of instruments for necropsy reduce risk of contamination of clean and sterile areas. Minimal protective equipment includes gloves, a laboratory coat, and goggles. A disposable plastic apron and a surgical mask (3M, St. Paul, MN; filtering >95% of microorganisms) greatly enhance protection. Aerosolization of pathogens can be decreased by wetting down the animal's haircoat and the work surface. Disinfection with household bleach after thorough cleaning provides sufficient decontamination of surfaces.
Setting up for a Necropsy
Getting ready for a necropsy is similar to setting up for surgery. Instruments are set out ahead of time and ideally include the following:
-
•
Sharp knife and steel (a sharp necropsy or meat knife is the ideal tool for most tasks)
-
•
Scissors (blunt/sharp straight work best)
-
•
Forceps (small dissecting forceps minimize crush artifacts of small tissue samples; tissue thumb 1 × 2 or 2 × 3 teeth are fine for larger specimens)
-
•
Rib or poultry shears or branch cutters (for cutting ribs)
-
•
Small bone shears, cutting forceps, or rongeurs (to open skull of kittens and small puppies)
-
•
Stryker saw, hacksaw, or meat cleaver (to open larger skulls)
-
•
Scalpel blades and handle
-
•
Measuring tape
-
•
Syringes and needles to collect fluids
-
•
Tongue depressors to scrape intestinal mucosa, collect feces, or fix muscle samples
Scissors will dull quickly when cutting muscle and skin but are the instrument of choice to open hollow organs. For small animals less than 10 lb, a scalpel with a larger blade works better than a necropsy knife.
Sample containers should be kept at hand and ready to use. Please refer to the section on sample collection for further details on appropriate equipment and sampling strategies.
A camera is very helpful to document lesions that are difficult to describe or explain. Printed pictures or digital files of photographs can add tremendous value to a submission—“a picture speaks more than a thousand words.” Pictures should be well-labeled, and topographic orientation should be provided.
Complete Necropsy
A complete necropsy is the ideal approach if submission of the remains to a diagnostic laboratory cannot be accomplished in a timely or economical manner. There is no one best necropsy protocol. Regardless of the approach, consistency is what matters most. Recognition of lesions, especially absence or displacement of organs, is greatly facilitated by a standardized approach. Suggestions for necropsy procedures with emphasis on the pediatric patient are provided in Box 31-3 .
BOX 31-3. Necropsy technique.
A necropsy entails three basic tasks:
-
1.
External examination
-
2.
Exenteration of organs
-
3.
Examination of internal organs and body parts
A list with the structures examined during a complete necropsy is given in Figure 31-9. For a more detailed necropsy protocol, see the suggested reading at the end of the chapter.
Laying out the Animal and Opening of Thorax and Abdomen
-
1.
Place body with head facing left and tail facing right, and examine externally. Dorsal recumbency works best.
-
2.
Make a midline skin incision from chin to pubic area (avoid umbilicus and penis), and then partially skin the trunk to expose rib cage and abdominal wall.
-
3.
Transect connections of limbs to trunk in axillary and inguinal regions without cutting limbs off, and disarticulate hip joints.
-
4.
Cut through abdominal wall along midline caudal to sternum, push organs down, and pull body wall up to extend cut to pelvic aperture. Check for fluid.
-
5.
Along rib arch, extend cut through body wall bilaterally to the vertebral column. Check position of diaphragm, then cut it off along rib arch.
-
6.
Use scissors, poultry shears, or branch cutter to bilaterally cut ribs from renal area to thoracic inlet; lift sternum and ribs off by separating mediastinum from sternum. Check for fluid.
-
7.
Take samples for culture; in case of abortion/stillbirth, also for histopathology (see Figures 31-7 and 31-8).
Thoracic Cavity and Plug
-
1.
Carefully check position of all thoracic organs for completeness and position, especially for anomalies of the large vessels (once the plug is removed, these are extremely difficult to reconstruct).
-
2.
Cut bilaterally along medial aspect of mandible, and between soft and hard palate, and disarticulate hyoid bones to reflect tongue, pharynx, and larynx.
-
3.
Continue to pull tongue out and to right, and separate trachea and esophagus from neck. Continue to pull on plug to remove it out of the thoracic cavity and transect aorta, vena cava caudalis, and esophagus at the diaphragm.
-
4.
With scissors, open pericardium (leave heart attached to lungs!). Beginning in right ventricle, cut with scissors along septum up into atrium and then pulmonary artery. Start in left ventricle, cut up along septum into left atrium and (under septal leaflet of atrioventricular valve) into aorta transecting pulmonary artery above valves.
-
5.
If heart is less than 3 cm from base to apex, bisect with scalpel along long axis from apex to base perpendicular to septum to open (half) ventricles, and fix heart whole.
-
6.
Open entire length of esophagus with scissors, then larynx and trachea all the way into bronchi.
-
7.
Take samples for histopathology and additional testing (see Figures 31-7 and 31-8).
Abdominal Cavity
-
1.
Before moving anything, carefully check all organs for position and completeness. Carefully examine umbilicus, umbilical arteries, vein (all the way up to liver), and urachus.
-
2.
Separate omentum with spleen from stomach and pancreas.
-
3.
Find distal colon, transect, and separate guts from mesentery as close as possible to its intestinal insertion. This will permit laying out intestines in long straight lines, which facilitates rapid opening along entire length. Be careful at the transverse colon to not cut off cecum and pancreas.
-
4.
Pull liver back from diaphragm, and transect esophagus, aorta, and caudal vena cava; lift out liver, stomach, pancreas, and guts by transecting remaining connections. Secure adrenal glands cranial to kidneys (if they are not there, check dorsal margin of liver).
-
5.
To check patency of bile duct, open duodenum and squeeze gall bladder to extrude bile. Remove liver from other organs.
-
6.
Open stomach along greater curvature from cardia to pylorus and intestines with scissors (as if cutting fabric) along mesenteric insertion to preserve Peyer's patches.
-
7.
Take samples for histopathology and additional testing (see Figures 31-7 and 31-8).
Pelvic Cavity
-
1.
Remove muscles from ventral aspect of pelvis, find obturator foramina, and nip cranial and caudal bony bridges (pubis and ischium).
-
2.
Free pelvic floor and lift off.
-
3.
Using caudal aperture as guideline, cut perineum around external genitalia and anus.
-
4.
Peel kidneys away from body wall.
-
5.
Pull rectum, genital, and lower urinary tract out of pelvic cavity, and lift out with kidneys attached. Open kidneys sagittally from cortex to pelvis, and peel capsule back.
-
6.
With scissors, open urinary bladder and extend cut down urethra (careful: os penis!).
-
7.
Open rectum.
-
8.
Bisect testes and epididymides or ovaries with knife.
-
9.
If large enough open uterus with scissors.
-
10.
Take samples for histopathology (see Figures 31-7 and 31-8).
Bone Marrow
-
1.
Free femur from surrounding muscles, and disarticulate at hip and knee.
-
2.
Scrub remaining muscle off the bone with back of knife blade.
-
3.
Place bone perpendicular across edge of table, and smash shaft with back of knife. Open induced spiral fracture by breaking shaft.
-
4.
Roll bone marrow cylinder out on glass slide for cytology.
-
5.
Fix in formalin for histopathology by immersing bone half.
Central Nervous System
This is a bit time consuming but essential if the animal showed nervous signs.
Brain:
-
1.
Move head slightly up and down to locate atlantooccipital joint, disarticulate from ventral aspect, and transect spinal cord.
-
2.
Skin head from occiput to cranial of eyes.
-
3.
As long as bones are soft, use scissors to open skull from occipital foramen to a line connecting the caudal canthus of both eyes, and peel off crania. Otherwise, use Stryker saw, hacksaw, or meat cleaver to generate same trapezoid cut, and lift off crania.
-
4.
Cut dura mater with scissors to expose brain, and turn head upside down. Gravity will pull brain away from base of skull.
-
5.
Transect cranial nerves and olfactory bulbs with scissors, and let brain slide out into palm of hand.
-
6.
Samples for microbiology may include : small pieces of brainstem, cerebellum, and cerebral cortex; cerebrospinal fluid; swab from ventricle and/or meninges.
-
7.
Place brain in tenfold volume of formalin to fix for histopathology.
-
8.
Check tympanic bullae at base of skull by nipping open with bone cutter.
-
9.
Sagittally cut through nose to open nasal cavity, and remove septum. Alternatively, cut nose transversely behind canine teeth.
-
10.
Enucleate eyes if examination is desired, and fix whole.
Spinal Cord:
-
1.
Cut off limbs, rib, and pelvis.
-
2.
Flesh out vertebral column.
-
3.
With bone cutters, cut dorsal arch on each side of vertebrae, and reflect dorsally and back to remove. Once spinal cord is completely exposed, grasp dura mater with forceps, and gently lift out by cutting nerves and attachments as needed with scissors (leave nerve rootlets and ganglia attached).
-
4.
Open dura mater dorsally along entire length, and fix spinal cord (ideally flat) in large tub with formalin.
Tissue Identification (e.g., Left versus Right)
Label paper towel or tongue depressor with pencil or permanent marker, and place tissue (mucosa facing up) on it. Fold paper towel over, and immerse in formalin by squeezing out air. Alternatively, place tissues in separate, labeled containers.
A necropsy protocol provides a standardized approach to the dissection of animals and should be applied consequently. At times, however, it is essential to deviate from the dissection protocol to preserve a lesion, and technical adjustments have to be made. Congenital anomalies are more commonly encountered in the pediatric patient. Their identification can be challenging and often requires careful examination of organs before exenteration.
Partial Necropsy
In any situation other than an abortion or stillbirth, a partial necropsy is not ideal. Most diseases cause lesions in multiple organs, and important changes may be missed by focusing on a single or a few (potentially incorrectly) selected organs or systems. A common scenario is failure to examine and collect the brain from a patient with a history of vague clinical symptoms or even seizures. However, a complete necropsy is not always an option, and a partial necropsy may provide at least some answers.
In case of abortions or stillbirth, the primary concern is the collection of samples without cross-contamination. Sampling is done first and is followed by a close examination of organs and tissues in situ (before exenteration) as it facilitates identification of common anatomic congenital anomalies like aplasia, hypoplasia, and heterotopia.
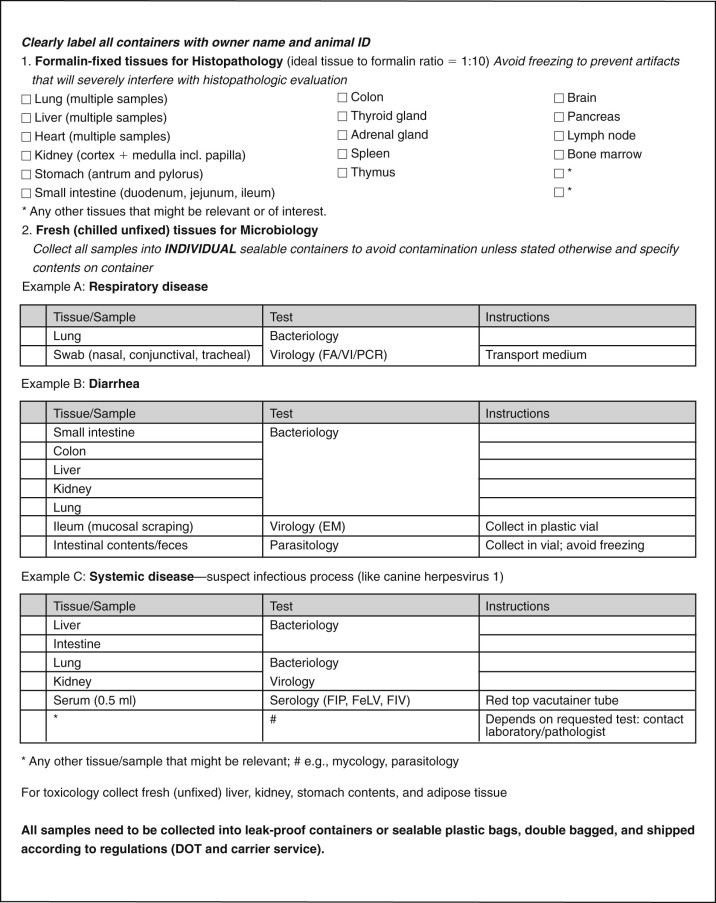
Sample Collection and Data Recording
Basic sample containers include large and tightly shutting plastic jars filled halfway with formalin for histopathological samples, sterile and sealable plastic bags for fresh samples, red-top Vacutainer tubes (BD, Franklin Lakes, NJ) for safe transport of fluids, and culture swabs. Containers need to be labeled with the owner's name and animal identification. Those containers holding fresh samples should also state the content.
For histopathology, tissue samples are fixed in 10% formalin (3.4% formaldehyde) at a tissue/formalin ratio of 1 : 10. In cool climates, addition of 10% to 15% methanol will prevent frost damage of fixed tissues. In very cold climates (temperatures well below freezing), tissues may be shipped in 60% ethylene glycol in phosphate-buffered saline and fixed in formalin on arrival at the laboratory as long as cooling is guaranteed during transport. The thickness of tissue sections should not exceed 5 mm ( inch) to allow for rapid and complete penetration and fixation. Fresh samples should be collected from areas with visible lesions. Contamination of other tissues or handling of samples with contaminated instruments should be avoided.
Samples for microbiology require immediate refrigeration or cooling (blue ice). Samples for bacteriology, virology, and toxicology may be sent frozen. Freezing of samples for parasitology and mycology should be avoided as it destroys organisms. Swabs for virology and bacteriology have different requirements for transport media (addition or omission of antimicrobials, respectively).
Abortions, stillbirth, and perinatal puppies and kittens up to 24 hours of age
Fetal and perinatal losses warrant aggressive diagnostics to prevent recurrence of problems in subsequent breeding cycles. Some diagnostic laboratories offer discounts on testing in the form of abortion screens, which include but are not limited to pathology and microbiology. An example of a sampling checklist for abortions is provided in Figure 31-7 (please feel free to photocopy for use in practice). Inclusion of the placenta for both histopathology and microbiological testing is very helpful.
Figure 31-7.

Abortion screen: data recording and sampling checklist.
A thorough physical examination of the dam is recommended and may be supplemented with hormonal assays and karyotyping of fetal or placental tissue. The perinatal phase is an extension of gestation and parturition, and neonatal losses within the first 24 hours postpartum should be worked up as an abortion. Nonetheless, a thorough and complete gross examination is recommended for puppies and kittens in this age group.
Neonatal, preweaning, and postweaning puppies and kittens
A datasheet for recording of necropsy findings and a sample checklist are provided in Figures 31-8
and 31-9
, respectively (please feel free to photocopy for use in practice). The age and clinical presentation of the animal and the necropsy findings determine the most appropriate panel of samples for a diagnostic workup. The sampling checklist provided covers three scenarios frequently encountered in the pediatric patient: respiratory, gastrointestinal, and systemic (infectious) diseases. Submission of a complete set of tissue samples for histopathology is highly recommended for all disease processes. Many laboratories charge a standard fee for histopathology on necropsies regardless of the number of tissues included; subsequently, the more the better for yielding a diagnosis at no additional expense for the client. Tissue samples collected for histopathology should be no thicker than 5 mm ( inch). Samples of the heart include longitudinal sections taken from the left and right ventricle, ideally the papillary muscles, and a thin cross-section through the septum. In case of organs with multiple anatomic subunits like the kidney, adrenal gland, or testis, it is important to obtain a sample that includes all components (in the case of the kidney, these are cortex, medulla, and pelvis). Collection of multiple samples is also recommended for multilobar organs like the liver and lungs. In the case of paired organs, a sample from each side is helpful. Hollow organs like the stomach, intestines, and urinary bladder are opened up to expose the mucosa to the fixative. Hollow organs with a diameter of less than 3 mm, like the intestines of neonatal patients or ureters, can be gently filled with formalin using a syringe and needle and left unopened. The nervous system and special senses should be fixed intact. After enucleation, it is best to gently inject formalin into the posterior chamber of the globe to speed up fixation. Bone marrow cores may be fixed in formalin for histopathology and/or rolled out on glass slides and air dried for cytology. Wrapping of samples smaller than 5 mm in diameter in a paper towel reduces the risk of loss during processing. Identification of individual samples can be accomplished by submission in separate, labeled containers or wrapped in a paper towel clearly labeled with pencil, roller ball, or permanent marker and added to the remaining fixed samples.
Figure 31-8.

Recording of necropsy findings.
Figure 31-9.
Necropsy sampling checklist.
Packaging and Shipping
Shipping regulations have become increasingly strict and have to be carefully observed. Please check shipping guidelines put forth by the Federal Department of Transportation (DOT) and specific carrier services. Many diagnostic laboratories have websites with helpful information on this topic.
Disposal of Remains
Whether a necropsy is performed, the remains need to be disposed of safely. Release of remains to the owner is not ideal, especially when pets are large or an infectious disease process is suspected. Should there be any potential for a zoonosis release of the remains should be avoided at all cost. Cremation with return of ashes to the owner is popular and generally available both in practice and through diagnostic laboratories. Double bagging with the appropriate strength of tightly closed bags or holding of the carcass in a large leak-proof plastic box with lid in a secured area until pickup is recommended. Ideally, hazardous waste bags are used.
Conclusion
Postmortem examinations provide essential information for preventative strategies and should be pursued aggressively. Submission of the whole animal accompanied by a detailed history to a diagnostic laboratory for complete postmortem examination is ideal. If timely transport to a diagnostic laboratory is not feasible, necropsy in the practice is recommended. A thorough gross examination, collection of a complete set of samples, and effective communication of findings are imperative for this approach to be successful. It is in the best interest of the practitioner to maximize the client's benefits. Successful postmortem examinations can only be achieved through proper gross examination, sampling, and close communication with the diagnostic laboratory.
Suggested Readings
- Cave TA. Kitten mortality in the United Kingdom: a retrospective analysis of 274 histopathologic examinations (1986-2000) Vet Rec. 2002;151:496. doi: 10.1136/vr.151.17.497. [DOI] [PubMed] [Google Scholar]
- Johnston SD, Raksil S. Fetal loss in the dog and cat. Vet Clin North Am Small Anim Pract. 1987;17:535. doi: 10.1016/s0195-5616(87)50052-3. [DOI] [PubMed] [Google Scholar]
- King JM. ed 4. Charles Louis Davis, DVM Foundation Publisher; Gurnee, IL: 2006. The necropsy book. [Google Scholar]
- Lawler DF, Monti KL. Morbidity and mortality in neonatal kittens. Am J Vet Res. 1984;45:1455. [PubMed] [Google Scholar]
- McGavin MD, Zachary JF, editors. Pathologic basis of veterinary disease. ed 4. Mosby/Elsevier; St Louis: 2007. [Google Scholar]
- Nielen ALJ. Investigation of mortality and pathological changes in a 14-month birth cohort of boxer puppies. Vet Rec. 1998;142:602. doi: 10.1136/vr.142.22.602. [DOI] [PubMed] [Google Scholar]