Abstract
Microfluidic devices have historically been prepared using fabrication techniques that often include photolithography and/or etching. Recently, additive manufacturing technologies, commonly known as 3D-printing, have emerged as fabrication tools for microfluidic devices. Unfortunately, PolyJet 3D-printing, which utilizes a photocurable resin that can be accurately printed, requires the use of support material for any designed void space internal to the model. Removing the support material from the printed channels is difficult in small channels with single dimensions of less than ∼200 μm and nearly impossible to remove from designs that contain turns or serpentines. Here, we describe techniques for printing channels ranging in cross sections from 0.6 cm × 1.5 cm to 125 μm × 54 μm utilizing commercially available PolyJet printers that require minimal to no postprocessing to form sealed channels. Specifically, printer software manipulation allows printing of one model with an open channel or void that is sealed with either a viscous liquid or a polycarbonate membrane (no commercially available support material). The printer stage is then adjusted and a second model is printed directly on top of the first model with the selected support system. Both the liquid-fill and the membrane method have enough structural integrity to support the printing resin while it is being cured. Importantly, such complex channel geometries as serpentine and Y-mixers can be designed, printed, and in use in under 2 h. We demonstrate device utility by measuring ATP release from flowing red blood cells using a luciferin/luciferase chemiluminescent assay that involves on-chip mixing and optical detection.
Graphical Abstract
Approaching three decades since introduction into the laboratory, microfluidics is an established tool for preparation and measurement of analytes of interest in channels or areas on the micrometer scale.1 The prototypical microfluidic device has the potential to perform several laboratory functions on a single device, often leveraged by the seamless streams of fluid within the device channels. These streams provide a continuous and often automated mode of performing separations or reactions, which can often be manipulated and detected with integration of such components as valves, injectors, and detectors. Combined with reduced reagent and sample consumption, these systems comprise the concept of the micro total analysis system (μTAS) or lab-on-a-chip device that commonly enable chromatographic and electrophoretic separations and a wide range of quantitative measurements.2–4
The first application of a microfluidic device for an analysis goes back to the gas chromatography chip on a silicon wafer in 1979.5 Following the fabrication of channels into plastic devices for continuous flow analyses in the 1980s, the 1990s were dominated by electrophoretic separations on glass and silicon structures.6 Beginning in the late 1990s, these hard substrates were often replaced by soft lithographic fabrication techniques employing poly(dimethylsiloxane) (PDMS). PDMS has advantages for microfluidic device preparation, including its ability for rapid prototyping, favorable optical properties for detection, nontoxic nature toward biological samples, and having a modifiable surface.7
More recently, 3D printed fluidic devices have been reported.8 3D printing was first developed in the 1980s and produces devices through layer addition printing.9 Devices are designed in CAD format so files can be easily manipulated for device replication or device variation studies.10 Currently, there are available stereolithography printers (SLA) that can print channels with dimensions below 100 μm.11 These printers are often custom-made and can have quality limitations as channel complexity increases or require a relatively small build platform, limiting prints to a single device.12,13 Furthermore, during production of channel sizes below ∼500 μm, device replication is challenging.3
PolyJet printing utilizes inkjet-style print heads to drop beads of photopolymers to create layers consisting of a mixture of support and build material that are rapidly photocured. Key advantages of PolyJet printing over other methods is the wide variety of materials you can print and the ability to print one device that has multiple materials. However, PolyJet printers have channel size limitations due to the necessity of removing photocurable support material required to support build material that would otherwise fill a desired enclosed channel.7,14 When combined with increasing complexities in channel geometry (right angle channels, serpentine channels, etc.), the task of cleaning channels and removal of the support material is sometimes impossible.14 While the removal of support material is a time-consuming process, without proper removal, residual support material can lead to the disruption of device assays or complete blockage of the channel.14,15 Here, we have printed channels with cross sectional areas as small as 125 μm × 54 μm using a commercially available PolyJet 3D printer and a novel technique that circumvents the necessity of a photocurable support material. We show how the resulting devices can be used in microfluidic-based analytical measurements.
EXPERIMENTAL SECTION
Materials and Chemicals.
Materials for the Stratasys J750 PolyJet printer (VeroClear, MED610, and Tango+) were obtained directly from Stratasys (Eden Prairie, MN). ATP, crude firefly lanterns, HBSS, tris (hydroxymethyl)-aminomethane, CaCl2, NaCl, Mg(SO4), glucose, and glycerol were obtained from Sigma-Aldrich (St. Louis, MO). Luciferin was obtained from GoldBiotechnology (St. Louis, MO). KCl was obtained from Fisher Scientific (Fair Lawn, NJ). Bovine serum albumin was obtained from MP Biomedical.
Device Design.
All devices in this paper were designed using Autodesk Inventor Professional 2019 or earlier versions (Autodesk Inventor, San Rafael, CA). Devices were designed in either two components, channels greater than 200 μm, or three components, channels less than 200 μm. For channels less than 200 μm a three-component design is preferred because channel layer can be designed in heights corresponding to the resolution of the printer (28, 56, 84, 112 μm, etc.) and the exact number of slices for the height of the channel can be seen. A rectangular channel design was used in all circumstances. For the final component, the channels were sealed with a cover layer with ports to enable connecting tubing for flow applications. The cover layer utilized the printer’s multimaterial capabilities, specifically the rubber like Tango+. These parts were constructed as an assembly file with the bulk of the cover layer constructed from hard plastic (VeroClear) and the inlet/outlet holes (outer dimensions of 2.5 mm and inner hole dimensions of 0.75 mm) having a cylindrical rubber-like gasket printed with the Tango+ material. These dimensions allow facile connections to the device with commercially available metal pins or 365 μm OD fused silica capillary tubing (Figure S1) slid inside of a fitted sleeve (MicroTight Sleeves-green, IDEX Health & Science, Oak Harbor, WA). All files were exported as single.stl files, except for the cover, which was exported as a multipart file.
Printer Set Up.
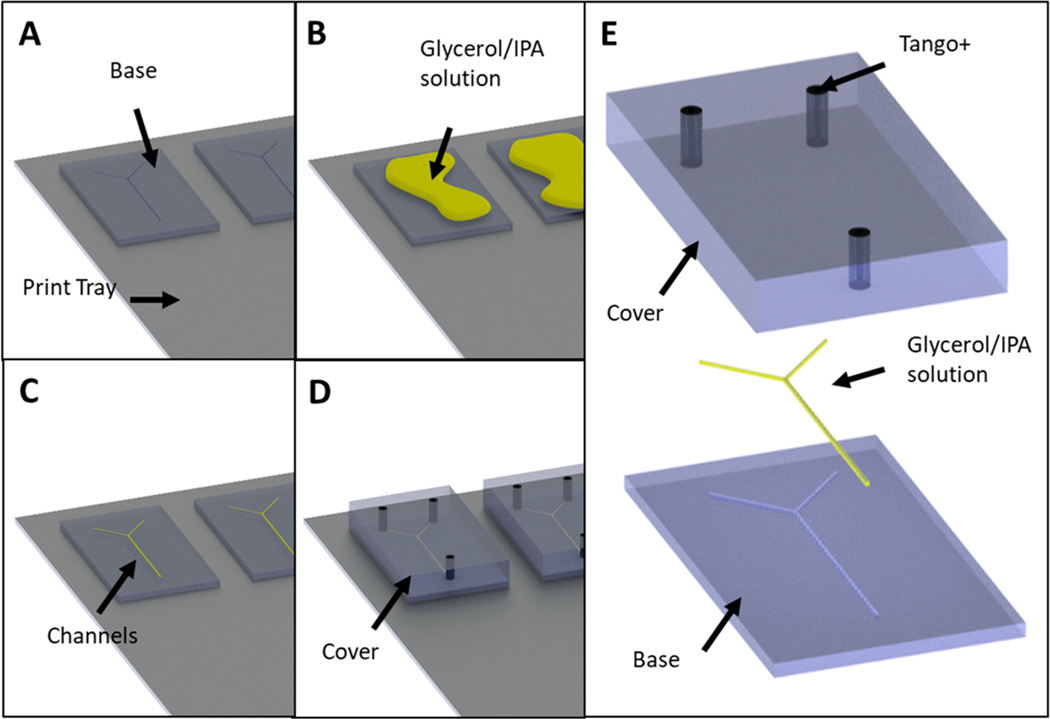
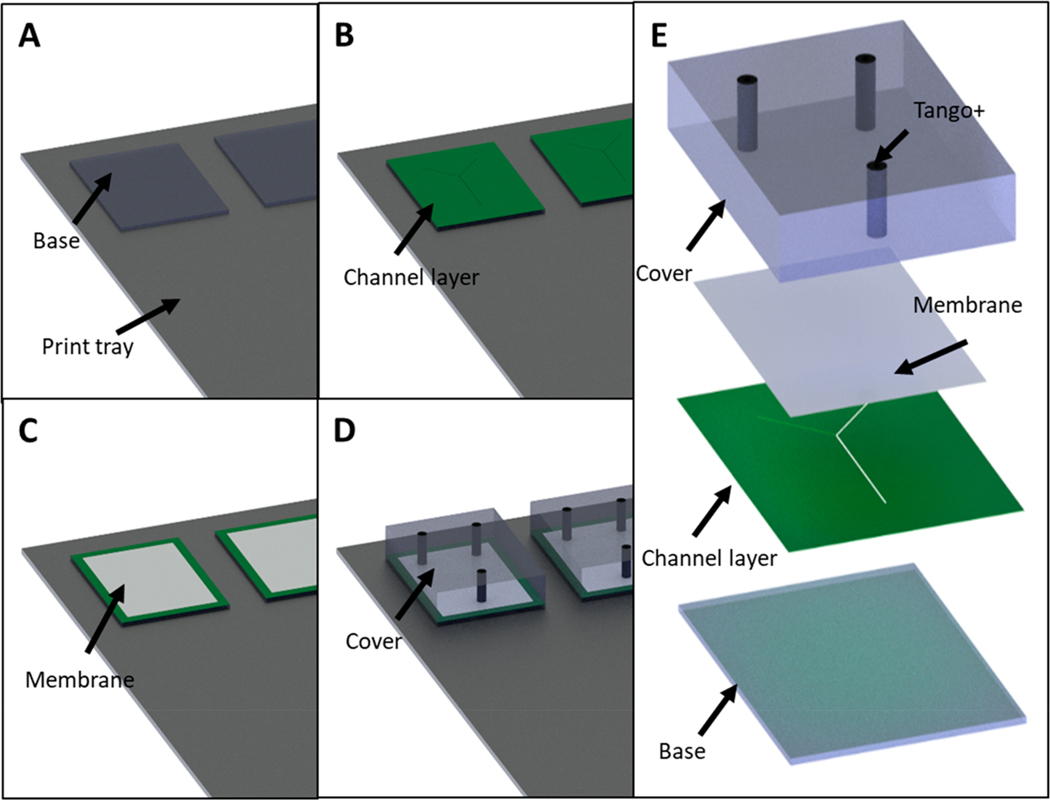
The 3D-printer was programmed to print without the use of a carpet layer or a bed of support material by accessing the Stratasys Parameters Manager application on the computer connected to the printer.16 Within this application, the Carpet_height, Carpet_protectorZ, and ImproveSupport_ThickOfPedestal parameters were altered from their original values to zero millimeters. It should be noted that this is a nonstandard procedure and is not recommended by Stratasys. Then, the .stl file of the channel-containing device was loaded into GrabCAD Pro (Stratasys, Eden Prairie, MN). The first device (Figure 1A) was printed in a rigid material (VeroClear or MED610) containing an open channel facing up. Then, without removing the device from the printer’s build tray, the channel was overfilled with a solution of glycerol and isopropanol (IPA) (65:35) (Figure 1B). The excess solution was then removed (Figure 1C) with a 3D printed squeegee with a shore value of 50 (Figure S2). The .stl of the second device was then loaded into GrabCAD in the exact position and orientation on the build-tray as the first device. By accessing the maintenance settings of the computer hosting the printer and selecting Motor Control, the build-tray was lowered by the exact height of the channel-containing device. The printer was instructed to print the second device directly on top of the first device, spraying the first layers of material directly onto the first device and the glycerol/IPA solution-filled channels (Figure 1D). The liquid photocurable resin was cured on top of the support solution sealing the two separate devices together as a single object. An exploded view (showing the order of assembly) of the entire device is shown in Figure 1E. For the three-component system (channels <200 μm), a base layer was printed, the build tray was lowered and then the channel layer printed. The the build tray was lowered again and the final cover layer printed.
Figure 1.
CAD representation of the device fabrication process using glycerol/isopropanol support (A–E). In (A) the initial base model is printed directly onto the printer stage (i.e., no support material under the base). The surface of this base model contains an open channel. Next, (B) a mixture of glycerol and isopropanol (65:35 v:v) is liberally applied to the surface of the model, filling in the open channel. In (C) the entire print stage is lowered by the height of the base model following removal of the excess glycerol mixture. Finally (D), a new model (containing ports to access the channel) is printed directly on top of the base model, thereby enclosing the channel. The ports shown in black are printed in Tango+, a rubber like material allowing for pressure based connections to capillaries. (E) Exploded CAD view of the final Y shaped mixing chip.
Device Characterization.
Cross-sectional images of the channels discussed in this paper were obtained by first cutting the device perpendicular to the channel (using a band saw) and squaring with a vertical knee mill. These rough edges were then mechanically sanded with progressively finer sand paper (P1200–P4000) until a smooth finish was achieved. The channels were then imaged using a 20× magnification on an optical microscope. The corresponding optical micrograph was imported into ImageJ and analyzed for cross-sectional area. Additional visual characterization of the device was performed via computerized tomography (CT) with a PerkinElmer (Waltham, MA) QuantumGX microCT scanner. The microCT scanner was operated in high resolution mode for a scan duration of 57 min. Scan data was exported to DICOM files and segmented in 3DSlicer.
Preparation of Red Blood Cells and Determination of ATP Release.
Whole blood (40 mL) was collected via venipuncture from consented healthy human donors. The protocol for blood removal was approved by the Institutional Review Board of Saint Louis University, and all record keeping was in compliance with HIPAA regulations. Whole blood was centrifuged at 500g and 4 °C for 10 min to remove the supernatant and white blood cell layer by aspiration. The remaining red blood cells (RBCs) were washed three times using a physiological salt solution (PSS) containing 21.0 mM tris(hydroxymethyl)aminomethane, 4.7 mM KCl, 2.0 mM CaCl2, 140.5 mM NaCl, 1.2 mM MgSO4, 5.5 mM glucose, and 0.5% (w/v) bovine serum albumin, pH 7.4. All solutions were prepared on the day of RBC isolation followed by analysis on the same day. For creating the standard addition curve, a 10 μM ATP stock solution was prepared in HBSS. For each standard, 100 μL of isolated RBCs were combined with various volumes (0–500 μL) of the ATP stock solution. Each solution was diluted with HBSS to a final volume of 1 mL so that the final RBC hematocrit was 7%. The luciferin and luciferase solution was prepared by dissolving 50 mg of crude firefly lanterns and 3.6 mg of luciferin in 10 mL of HBSS. The luciferin/luciferase chemiluminescence assay is catalyzed by ATP, which in these studies is released from RBCs flowing through the microchannels of the 3D-printed device. To measure emission, the polished 3D-printed device was placed directly on a PMT (Hamamatsu Photonics) such that the mixing channel in the device was directly over the window of the PMT. The entire system was housed in a light excluding box as previously described.17 While the luciferin/luciferase mixture was pumped through the 3D-printed device at 20 μL/min, a series of 1 μL injections of either the standards or RBC samples were performed using a 4-port injection valve. The peak heights resulting from the ATP spiked samples were used to determine the concentration of ATP released from the 7% solution of RBCs. To demonstrate response to a known therapeutic, the RBCs were incubated with a stable prostacyclin analogue, treprostinil (United Therapeutics), to stimulate ATP release. A 15 mL, 1 mM stock solution of treprostinil was prepared in dimethylformamide. Then 1 μL of the stock treprostinil solution was added to 1 mL of 7% RBCs for a final concentration of 1 μM treprostinil. All RBC solutions were allowed to incubate for 30 min at room temperature prior to introduction into the 3D printed mixing device.
RESULTS AND DISCUSSION
Liquid Support.
A method for using a liquid support material is shown in Figure 1. The printer was set to print without any support material, as described above, and a base layer was printed directly on the tray (Figure 1A). A 65:35 glycerol/IPA solution was applied to the channel area (Figure 1B), followed by removal of excess solution, leaving only liquid support in the channels (Figure 1C). The build tray start position was dropped to account for the height of the first part, and a cover layer was printed to seal the channel (Figure 1D). Initially, the smallest channel dimensions using the liquid support system described in Figure 1 were limited to above 500 × 500 μm. It was noted however that, while glycerol is significantly denser than the uncured photopolymers used by the printer, allowing the printed droplets to remain on the surface long enough to be cured, the glycerol would bead when in contact with the cured resin. This beading led to segmentation of the glycerol in small channels. Combining the glycerol with the IPA resulted in a solution with a density greater than the uncured resin, yet improved wettability for channels as small as 200 × 200 μm to be filled. Images showing the uncured resin and its density relative to different glycerol/IPA solutions are shown in Figure S3, along with accompanying contact angle measurements for various glycerol/IPA ratios on VeroClear. Below a ratio of 65:35 glycerol to IPA, the density of the uncured resin was greater than the solution and would sink to the bottom of the channel, thereby closing it off upon curing. Solutions containing more than 70% glycerol resulted in the beading problem within the channel, leading to segments where the channel would again be closed off. Thus, a 65% solution of glycerol in IPA was used for all subsequent prints.
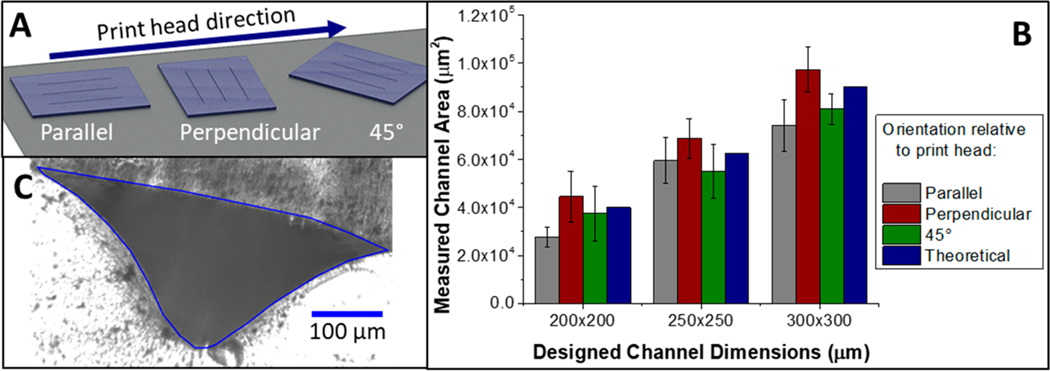
Characterization of the channels resulting from the liquid support technique was performed because feature resolution using PolyJet 3D printers depends heavily on where the feature is in relation to the movement of the print heads. Figure 2A shows the geometries that were explored throughout these studies, while the data in Figure 2B shows the effect of these geometries for the smallest channels printed using liquid support. Our results suggest no statistically significant difference in the channel size based on the orientation, although the perpendicular orientation did trend toward higher cross-sectional areas in comparison to the other tested orientations. Importantly, the measured area for each orientation was within error of the designed area. Each bar shows the average of up to five measurements on three different channels for three different orientations, with the error represented as the pooled standard deviation for these measurements. While the error in channel dimensions is larger than traditional microfluidic fabrication techniques, other obtained data suggest that this is a limitation with printer design. The intra channel variation, measuring channel dimensions 5 times along 1 channel that is 2.5 cm in length, is as low as 5% RSD for the 300 × 300 μm channel and up to 20% RSD for the 200 × 200 μm. This increase in variability with a decrease in channel size is not unexpected with this printer, which has a reported accuracy of 200 μm.18
Figure 2.
Analysis of channel area for various device channel orientations on the printer stage (A). Models containing straight channels were printed using the glycerol/isopropanol support technique. The channels were parallel, perpendicular, and at a 45 deg angle to the direction of movement of the print heads. The cross sectional areas of the printed channels as a function of the orientations are shown in (B). Error bars represent pooled standard deviation from n = 3 channels. (C) Cross sectional image of a channel designed at 200 × 200 μm with a measured area of 5.0 × 104 μm2, height of 210 μm, and a corner width of 490 μm.
Figure 2C shows a cross sectional image of a liquid supported channel designed to be 200 × 200 μm. While reminiscent of some designs seen on isotropically etched glass, this irregular triangular shape is due to exactly the opposite effects. Etching is a subtractive technique in which material is removed to make a channel, whereas PolyJet 3D printing is an additive technique where droplets of photocurable resin are sprayed layer-by-layer.19 When forming a channel under standard printer conditions, droplets of support material (that are removed at a later time) are printed in the area of the channel void. Here, no solid support material is used, which allows droplets of uncured resin to spread into the underlying vacant area. This effect is compounded by pressure exerted by the roller to smooth each layer. The top of the channel is flat because the first closing layer is supported by the liquid support material (Glycerol/IPA). We postulate that a truer square channel can be achieved with increased control over printer settings, which will enable more control over the force with which the roller presses on the semicured material. The build tray height can be adjusted, which will not only adjust the roller force but will also change the distance from which the droplets are sprayed (a variable reported else-where).11
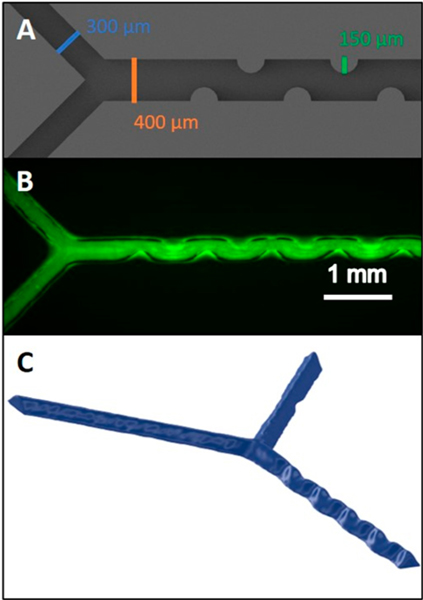
In addition to simple straight channels used for characterizing the device, the printed material provides clarity for use in optical quantitation of reactions.8,11,20 To facilitate such measurements, a mixing channel was developed to enhance in-channel mixing of reagents for a quantitative determination of ATP released from a flowing stream of RBCs. Figure 3A shows the CAD rendering of the device, which has a traditional Y-mixing design and built in turns to improve mixing. The arms of the Y were designed as 300 × 300 μm, while the mixing channel was designed at 400 μm wide by 300 μm tall with ridges protruding into the channel. These ridges, which have a radius of 150 μm, can be clearly seen in Figure 3B, although channel uniformity is less clear. The device could not be opened in a reliable way to measure the shape of the mixing ridges (by SEM) without damaging or altering the ridges. The device was placed in a microCT scanner to solve this problem. The results of the segmentation of the void space can be seen in Figure 3C. While only a small portion of the channel could be imaged at the resolution required to see the mixing ridges, a distinct difference is visible between the smooth inlet channels and the distinct serpentine shape of the mixing channel. Additionally, even though the triangular shape is present through the mixing channel, the ridges persist through the entirety of that shape, with the possible exception of the very top of the channel where the liquid support put space between the ridge and the closing layer. Additional information is in the microCT data in the 3D PDF included in Figure S4.
Figure 3.
Various images of the device channel. The CAD rendering of the mixing channel design is shown in (A). The channel depth is 300 μm. A fluorescein solution flowing through the channel (B). A microCT rendering (C) of the same channel shown in B.
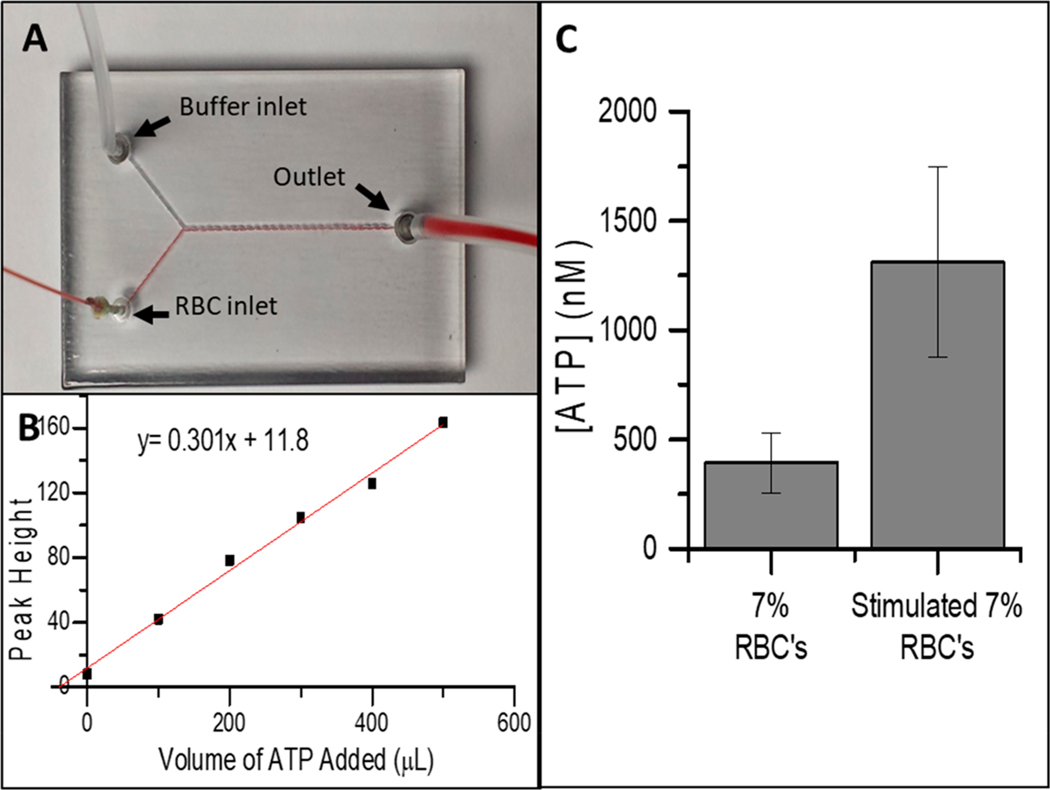
The multi material capabilities of the printer were utilized to make crucial connections to the device for flow-based determinations. Specifically, the rubber like Tango+ was incorporated into the access ports to enable a pressure-based seal of either a steel pin or capillary. The steel pins were used when dead volume was less important, such as the luciferin/luciferase side (a continuous flow of reagent) or the outlet port. A capillary (150 μm ID, 365 μm OD) was used to minimize dead volume of the injection port and could be connected directly to the device by placing the capillary in commercially available capillary sleeves. This device has two inlets to allow the RBCs to mix with the luciferin/luciferase solution and produce light in direct proportion to the concentration of ATP (Figure 4A). The effect of the mixing channel length on the response is shown in Figure S5. A standard addition curve was generated for samples containing a 7% solution of RBCs (Figure 4B). The data in Figure 4C shows a statistical difference in the release of the ATP from RBCs (393 ± 137 nM) and RBCs stimulated with a prostacyclin analogue, treprostinil21,22 (1305 ± 436 nM). This device would be difficult to fabricate with the available PolyJet support material, as the Y design would be difficult to remove from the smaller channel dimensions. However, such dimensions are required because it has been reported that some prostacyclin derivatives require a flow component to measure the drug effects.23
Figure 4.
Analysis of ATP release from flowing RBCs. (A) 7% RBCs mixing with buffer. Connections made directly with capillary and compression sleeve for the RBC channel and with steel pins for the buffer and waste channels. (B) Standard addition curve for 7% RBCs. R2 = 0.9917. (C) Comparison of the concentration of ATP in normal 7% RBCs and 7% RBCs stimulated with treprostinil (n = 3).
The glycerol/IPA solution can work as a liquid support for channels down to 200 × 200 μm utilizing this PolyJet printer. However, it is well documented that this printer model can achieve a z layer resolution as small as 28 μm. In fact, when printed on the surface of a PolyJet printed device, features designed as small as 125 × 54 μm can be observed. The liquid support method was not able to keep these channels open for unknown reasons. For the fabrication of devices with channels greater than 200 × 200 μm, the liquid support method for production is rapid and can be multiplexed. If the device is kept smaller than 5 cm × 5 cm × 0.5 cm, it utilizes only the top row of the printer and roughly 7 devices can be printed at one time. The actual print time for the devices used in the RBC studies described above is about 30 min, including the time to drop the stage, with an additional 5 min to apply and remove excess liquid support.
Membrane Support.
To determine if the observed surface channel (125 × 54 μm) was a viable feature that could be employed for assays in a reproducible manner, the method of enclosing void space was modified to incorporate a physical barrier. While fundamentally the same as the liquid technique, this membrane supported method is documented in Figure 5. A base layer is printed (Figure 5A), and the stage is dropped by the height of the base layer prior to printing the channel layer (Figure 5B). With PolyJet printing there is no direct control over the slicer function. By breaking the device into three components the software displays the height of the channel layer. After the channel layer is printed the stage is dropped again, but instead of applying the liquid solution, a thin (<10 μm) polycarbonate membrane is carefully laid such that it completely covers the channel area without extending to the edges of the device (Figure 5C). The cover layer is then printed as described for the liquid fill method. The full exploded view of the device is shown in Figure 5E.
Figure 5.
CAD representation of the device fabrication using membrane support (A–E). In (A) the initial base model is printed directly onto the printer stage (i.e., no support material under the base). Next (B) the entire print stage is lowered by the height of the base model and a channel layer is printed. This is important to define the height of the channel as interpreted by the printer. In (C) the entire print stage is lowered again by the height of the channel layer and a polycarbonate membrane is laid such that it fully covers the channel area but not the entirety of the device. Finally (D), a new model (containing ports to access the channel) is printed directly on top of the base model, thereby enclosing the channel. (E) Exploded CAD view of the final Y shaped mixing chip.
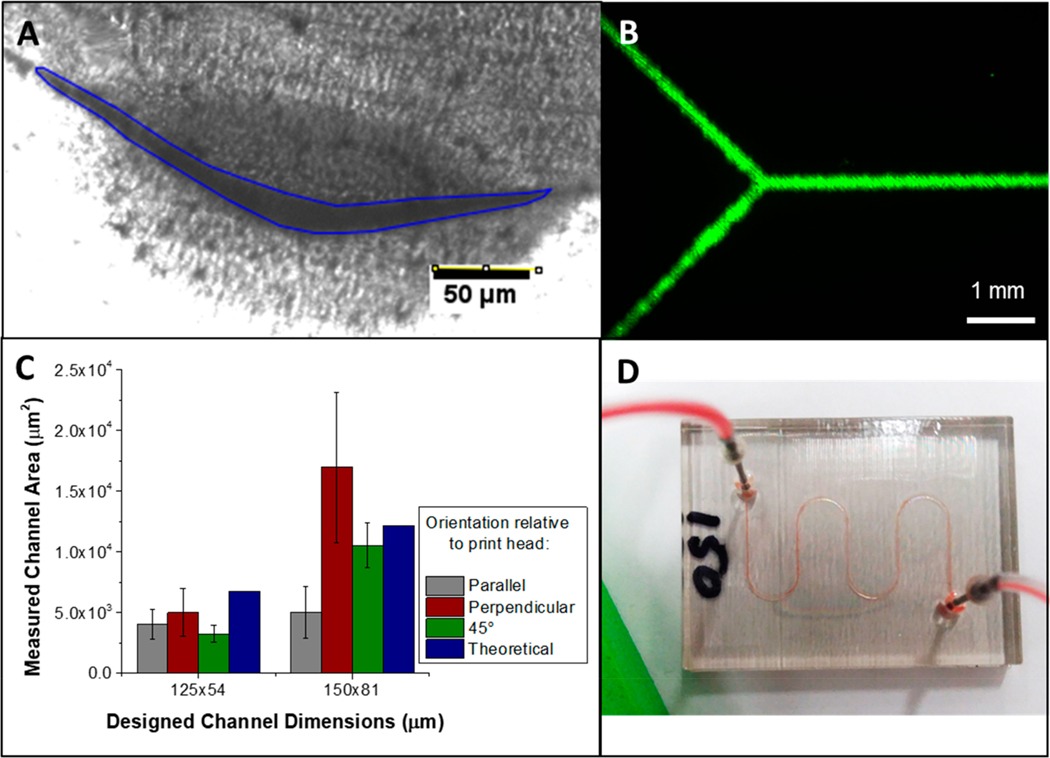
Figure 6 shows the results of this membrane-based postprocessing free technique. Figure 6A shows the cross section of a channel that was designed to be 125 × 54 μm and supported with a polycarbonate membrane. This channel has a maximum height of 15 μm and a corner to corner width of 250 μm, resulting in a cross-sectional area of 3000 μm2. While different from the designed channel dimensions, these results are not unexpected due to the previously mentioned resolution limitations of the printer. While the channel shape is irregular on a Y shaped flow chip (Figure 6B), there is still a continuous flow of reagents for a channel that is 2 cm long with 1 cm long arms and the solution is confined to the channel (no layer delamination occurs). It should be noted that the device shown in Figure 6B has a total volume of 0.26 μL. If this same device were made of more typical PolyJet dimensions of 350 × 350 um, the volume would be 4.8 μL. This reduced dilution has a significant effect on applications that involve measurement of small concentrations of analyte. Figure 6C shows how these types of channels compare when printed in differing orientations relative to the print head movement. The area was measured the same as before with up to 5 points on three different channels and the error representing the pooled standard deviation. While no trend is seen as far as orientation there is significant deviation from the theoretical area for the 45° orientation designed at 125 × 54 μm and for the parallel orientation designed at 150 × 81 μm. Additionally seen here is very large uncertainty in the area. This is due in part to the resolution limitations of the printer and in part due to the lack of rigidity of the membrane.11 We postulate that when the roller comes over the first few layers that are sprayed on the membrane it causes the membrane to flex and push into the void the membrane was protecting. While this method does have these drawbacks, this shows that large fluidic (100–500 μm) channels down to truly microfluidic channels (<100 μm) can be printed utilizing PolyJet technology.24 This technique even applies to complex channels such as the serpentine design seen in Figure 6D. A sample of 14% red blood cells is flowing through a channel designed at 150 × 54 μm. This is significant because this type of complex serpentine geometry would be impossible to print (and clean) with commercially available support. While not discussed, Figure S5 shows a device being developed that has a void of 0.6 cm × 1.5 cm × 3.5 cm that was fully supported by the membrane technique mentioned above. It would be very difficult to produce devices with this range of channel cross sections (from 125 × 54 um to 6 × 15 mm) with traditional fabrication methods.
Figure 6.
(A) Cross sectional image of a 125 × 54 μm channel (outlined in blue) printed with a polycarbonate membrane support. Area measures at 3 × 103 μm2 with a height of 15 μm and a corner to corner width of 250 μm. (B) Fluorescence image of fluorescein flowing through the channel highlighting that there is a continuous channel throughout the device. (C) Summary of measured channel area as compared to the designed channel area and the orientation for which the channel was printed in relation to the print heads. The channels were oriented parallel, perpendicular, and at a 45 deg angle to the direction of movement of the print heads. (D) Double serpentine channel designed at 150 × 54 μm with 14% RBCs in PSS flowing at 15 μL/min.
This technique takes more time and practice to achieve on the smallest scale. If the same 5 cm × 5 cm × 0.5 cm device proposed above was used, 7 devices could be comfortably printed within the first row but print time would be increased to ∼45 min due to the warm up and purge cycles built into each print. In addition, properly laying a membrane takes extra time and skill. A properly laid polycarbonate membrane will be transparent when applied everywhere except the channels. Transparent sections within the channel indicate the membrane has touched the bottom of the channel and the channel will be closed. If the membrane is laid incorrectly the first time there is not adhesion left on the surface of the device for a second membrane to remain in place when the roller goes over it the first time and the device will need to be discarded and refabricated. It is also important that the membrane does not extend all the way to the edge of the device or else a weak spot will be created and lead to the cover layer delaminating.
CONCLUSIONS
Two novel techniques for making enclosed microfluidic channels, as well as large enclosed void spaces, using a PolyJet 3D printer have been presented. The first technique utilizes a liquid to support cover layer prints, while the second technique uses a physical barrier (polycarbonate membrane) to support the additional layers. Both techniques have demonstrated utility with complex channel geometries that would not be viable with traditional PolyJet technology. Additionally, it has been shown that the material used in PolyJet printing is not only sufficient for analyzing complex biological samples but also the optical analysis of small molecules. With the release of these techniques, PolyJet 3D printing no longer becomes limited by the support material but by the resolution limitations of the printer. We feel that this report sets the stage for future work involving applications where smaller dimensions are beneficial (over use of larger channels currently achievable with PolyJet printing) including liquid-based separations, the ability to apply in vivo-like shear stress conditions, and quantitation of key communication molecules with integrated detection schemes. Future work will also involve using this method to incorporate other materials such as ultrathin PDMS membranes for valving applications and 3D scaffolds/fibers for cell culture.
Supplementary Material
ACKNOWLEDGMENTS
The authors would like to acknowledge Jeremy Hix of the IQ Imaging Core Facility at Michigan State University for obtaining the CT data for visualizing the channels. The authors would also like to acknowledge the Institute for Quantitative Health Science and Engineering at Michigan State University for supplying and maintaining the Stratasys J750. This work was funded by the National Institutes of Health (NS105888).
Footnotes
ASSOCIATED CONTENT
Supporting Information
The second file is a compressed (Zip) folder which includes the The Supporting Information is available free of charge on the ACS Publications website at DOI: 10.1021/acs.analchem.9b01302.
Additional figures and data relevant to the paper as denoted in the text (PDF)
Relevant STLs for the ATP mixing device (shown in Figures 3 and 4) as well as the Y flow channel device (shown in Figure 6) (ZIP)
The authors declare no competing financial interest.
REFERENCES
- (1).Whitesides GM Nature 2006, 442, 368–373. [DOI] [PubMed] [Google Scholar]
- (2).Manz A; Graber N; Widmer HM Sens. Actuators, B 1990, 1, 244–248. [Google Scholar]
- (3).Ho CM; Ng SH; Li KH; Yoon YJ Lab Chip 2015, 15, 3627–3637. [DOI] [PubMed] [Google Scholar]
- (4).Temiz Y; Lovchik RD; Kaigala GV; Delamarche E Microelectron. Eng. 2015, 132, 156–175. [Google Scholar]
- (5).Terry SC; Jerman JH; Angell JB IEEE Trans. Electron Devices 1979, 26, 1880–1886. [Google Scholar]
- (6).Harrison DJ; Fluri K; Seiler K; Fan Z; Effenhauser CS; Manz A Science 1993, 261, 895–897. [DOI] [PubMed] [Google Scholar]
- (7).Chen C; Mehl BT; Munshi AS; Townsend AD; Spence DM; Martin RS Anal. Methods 2016, 8, 6005–6012. [DOI] [PMC free article] [PubMed] [Google Scholar]
- (8).Chen C; Wang Y; Lockwood SY; Spence DM Analyst 2014, 139, 3219–3226. [DOI] [PubMed] [Google Scholar]
- (9).Hanson Shepherd JN; Parker ST; Shepherd RF; Gillette MU; Lewis JA; Nuzzo RG Adv. Funct. Mater. 2011, 21, 47–54. [DOI] [PMC free article] [PubMed] [Google Scholar]
- (10).Waldbaur A; Kittelmann J; Radtke CP; Hubbuch J; Rapp BE Lab Chip 2013, 13, 2337–2343. [DOI] [PubMed] [Google Scholar]
- (11).Macdonald NP; Cabot JM; Smejkal P; Guijt RM; Paull B; Breadmore MC Anal. Chem. 2017, 89, 3858–3866. [DOI] [PubMed] [Google Scholar]
- (12).Kanai T; Tsuchiya M Chem. Eng. J. 2016, 290, 400–404. [Google Scholar]
- (13).Gong H; Bickham BP; Woolley AT; Nordin GP Lab Chip 2017, 17, 2899–2909. [DOI] [PMC free article] [PubMed] [Google Scholar]
- (14).Waheed S; Cabot JM; Macdonald NP; Lewis T; Guijt RM; Paull B; Breadmore MC Lab Chip 2016, 16, 1993–2013. [DOI] [PubMed] [Google Scholar]
- (15).Ibrahim D; Broilo TL; Heitz C; de Oliveira MG; de Oliveira HW; Nobre SM; Dos Santos Filho JH; Silva DN J. Craniomaxillofac Surg 2009, 37, 167–173. [DOI] [PubMed] [Google Scholar]
- (16).Castiaux AD; Pinger CW; Spence DM Anal. Bioanal. Chem. 2018, 410, 7565–7573. [DOI] [PubMed] [Google Scholar]
- (17).Edwards J; Sprung R; Spence D; Sprague R Analyst 2001, 126, 1257–1260. [DOI] [PubMed] [Google Scholar]
- (18).Stratasys J735 and J750; https://www.stratasys.com/3d-printers/j735-j750 (March 2019).
- (19).Carlen ET; Bomer JG; van Nieuwkasteele JW; va den Berg A Lab on a Chip Technology (Vol. 1): Fabrication and Microfluidics; Caister Academic Press, 2009; Vol. 1. [Google Scholar]
- (20).Munshi AS; Martin RS Analyst 2016, 141, 862–869. [DOI] [PMC free article] [PubMed] [Google Scholar]
- (21).Ellsworth ML; Sprague RS J. Physiol. 2012, 590, 4985–4991. [DOI] [PMC free article] [PubMed] [Google Scholar]
- (22).Sprague RS; Bowles EA; Hanson MS; DuFaux EA; Sridharan M; Adderley S; Ellsworth ML; Stephenson AH Microcirculation 2008, 15, 461–471. [DOI] [PMC free article] [PubMed] [Google Scholar]
- (23).Genes, L. I.; N, V. T.; Hulvey MK; Martin RS; Spence DM . Lab Chip 2007, 7, 1256–1259. [DOI] [PubMed] [Google Scholar]
- (24).Beauchamp MJ; Nordin GP; Woolley AT Anal. Bioanal. Chem. 2017, 409, 4311–4319. [DOI] [PMC free article] [PubMed] [Google Scholar]
Associated Data
This section collects any data citations, data availability statements, or supplementary materials included in this article.


