

Abstract
Translating human induced pluripotent stem cell (hiPSC)-derived cells and tissues into the clinic requires the streamlined and reliable production of clinical-grade hiPSCs. This unit describes an entirely animal component-free procedure for the reliable derivation of stable hiPSC lines from donor peripheral blood mononuclear cells (PBMCs) using only autologous patient materials and xeno-free reagents. PBMCs are isolated from a whole blood donation from which a small amount of patient serum is also generated. The PBMCs are then expanded prior to reprogramming in an animal component-free erythroblast growth medium supplemented with autologous patient serum, thereby eliminating the need for animal serum. After expansion, the erythroblasts are reprogrammed using either cGMP-grade Sendai viral particles (CytoTune™ 2.1 kit) or episomally replicating reprogramming plasmids (Epi5™ kit), both commercially available. Expansion of emerging hiPSCs on a recombinant cGMP-grade human laminin substrate is compatible with a number of xeno-free or chemically defined medium (some available as cGMP-grade reagents), such as E8, Nutristem, Stemfit, or mTeSR Plus. hiPSC lines derived using this method display expression of expected surface markers and transcription factors, loss of the reprogramming agent derived nucleic acids, genetic stability, and the ability to robustly differentiate in vitro to multiple lineages.
Keywords: Reprogramming, human induced pluripotent stem cells (hiPSCs), episomal reprogramming, Sendai viral reprogramming
INTRODUCTION
This unit provides a set of protocols for the isolation, expansion, and reprogramming of peripheral blood mononuclear cells (PBMC) to human induced pluripotent stem cell (hiPSC) lines without the use of xenogeneic products or integrating vectors. Utilizing only xeno-free and/or cGMP-grade medium, recombinant human proteins, non-integrating vectors, and autologous human serum isolated in parallel with donor PBMCs, this method reliably produces stable hiPSC lines suitable for both in vitro use and the production of cells for therapeutic applications.
This unit only covers a core set of experimental procedures, not the many regulations and requirements that govern human cell-based products intended for clinical use (see COMMENTARY). BASIC PROTOCOL 1 covers the isolation of mononuclear cells. SUPPORT PROTOCOL 1 describes the production of autologous serum (required for the erythroid expansion medium used in BASIC PROTOCOL 2). Isolated PMBCs are expanded as outlined in BASIC PROTOCOL 2, and the expanded PBMCs are reprogrammed using either Sendai viral transduction-(BASIC PROTOCOL 3) or episomal plasmid transfection-based (ALTERNATE PROTOCOL 1) approaches. Emerging hiPSC colonies are picked and expanded using BASIC PROTOCOL 4. Finally, the resulting hiPSC lines are tested for the absence of exogenous nucleic acids (SUPPORT PROTOCOL 2 and SUPPORT PROTOCOL 3) and the presence of markers of the undifferentiated state of pluripotent stem cells (SUPPORT PROTOCOL 4). Coating of plates for hiPSC culture is described in SUPPORT PROTCOL 5.
STRATEGIC PLANNING
Ensure that the laboratory is fully approved and equipped and that the staff is properly trained and qualified to perform these procedures. Informed consent under an active, IRB-approved protocol must be obtained from the PBMC donor prior to the blood draw that will be used to generate hiPSCs. Any donor-identifying information must be handled according to the approved human subject protocol. Sample informed consent- and material transfer agreement documents are available from the International Society for Stem Cell Research web site (www.isscr.org). Refer to the BACKGROUND section for a brief discussion of additional consideration. To practice the procedures described in this unit, PBMCs and allogeneic human serum can be purchased (e.g., Stemcell Technologies, cat. no. 70025.1; Sigma, cat. no. P2918).
It is highly recommended to reprogram only one donor sample at a time. If multiple donor samples have to be processed concurrently, use separate biosafety cabinets, incubators, and sets/aliquots of reagents for each donor to reduce the risk of cross-contamination. This protocol should only be used by experienced laboratory personnel proficient with producing and expanding hiPSCs under feeder-free conditions, such as the protocols described in the manuals of the Cytotune™ 2.1 and Epi-5™ kits or those provided in UNITS 1C.2 and 1C.18 (T. Ludwig & J, 2007; Miyazaki & Kawase, 2015)
NOTE: The following procedures are all performed in a Class II biological hazard biosafety cabinet, unless specified otherwise.
NOTE: All solutions, culture wells, and equipment coming into contact with live cells must be (and must be kept) sterile and tissue-culture grade. Proper aseptic technique must be used accordingly.
NOTE: All cell culture incubations are performed in a humidified 37 °C, >90% Rh, 5% CO2 tissue culture incubator unless otherwise specified.
NOTE: All cell culture media and solutions must be equilibrated to room temperature before use unless otherwise specified.
NOTE: Human samples may contain infectious agents. Wear appropriate personal protective equipment (PPE) gear and follow applicable laboratory safety procedures.
NOTE: When using purchased PBMCs, make sure to review the consent form used for those blood donations to confirm that hiPSC production, use, and sharing are consented to.
NOTE: Follow applicable safety and environment protection guidelines and regulations for the proper use and discarding of hazardous materials or agents.
BASIC PROTOCOL 1
ISOLATING PERIPHERAL BLOOD MONONUCLEAR CELLS USING CPT TUBES
This protocol is used to isolate mononuclear cells and donor-autologous plasma from a venipuncture peripheral blood sample collected into BD Vacutainer® CPT™ Ficoll™Hypaque™/Heparin Tubes. The isolated PBMCs are cryo-preserved until ready to continue with the expansion of the cells (BASIC PROTOCOL 2) and their subsequent reprogramming into hiPSCs (BASIC PROTOCOL 3 or ALTERNATE PROTOCOL 1). The isolated autologous plasma is further processed to yield autologous serum (required for making the erythroid expansion medium) as described in SUPPORT PROTOCOL 1.
Materials
Freshly collected donor blood sample in ≥ 2 Vacutainer CPT tubes (BD, cat. no. 362761)
Ziploc bags (Fisher Scientific, 50-111-3769)
70% Isopropanol wipes (VWR, cat. no. 21910–110)
DPBS−/− (ThermoFisher, cat. no. 14190136)
STEM-CELLBANKER GMP grade (Amsbio, cat. no. 11890)
15 ml Polystyrene Falcon tubes (Corning, cat. no. 352095)
Sterile single-use tissue culture-grade serological pipettes (VWR, cat. no. 53300–421, 53300–501, 53300–567)
-
2ml cryo-vials (ThermoFisher, cat. no. 50000020)
100% isopropyl alcohol (Sigma, cat. no. 190764)
5% CO2 37 °C humidified tissue culture incubator (e.g., Thermo-Forma, model 3110)
Class II biosafety cabinet (e.g., Baker SterilGARD® III Advance, model SG403)
Mr. Frosty (ThermoFisher, cat. no.51000001)
Liquid nitrogen vapor phase cryo-storage unit
Manual single-channel 0.2–2 ml P2000 pipette (Rainin, cat. no.17014390)
Sterile 0.2–2ml P 2000 pipette tips with air filters (Rainin, cat. no.30389237)
Inverted tissue microscope (e.g., ThermoFisher EVOS XL Core) with a 2x/4x/10x/20x lenses (including phase contrast) and a camera/display to allow operation inside a biosafety-cabinet and image acquisition for record keeping.
Metal heat block with holes for 2 ml tubes (37°C) (e.g., Fisher Scientific, cat. non. 88-870-001, 88-870-104)
Centrifuge (e.g., Beckman Allegra X15R) with swing-out buckets for tubes (15 and 50 ml) and plates (e.g., Beckman SX4750, SX4400), with bucket covers
Isolating and Preparing PBMCs and Autologous Serum from CPT Tubes
Request a qualified phlebotomy laboratory to collect 16 ml of peripheral blood from a consented donor into two CPT tubes at 8ml per tube. The CPT tubes must be inverted immediately to prevent clotting.
Transfer the CPT tubes inside a secondary container (such as a Ziploc bag) to the tissue culture facility for immediate processing.
Clean the outside of the tube with a 70% isopropanol wipe and invert the closed tube(s) 10 times.
Load the tube(s) into a swing-out centrifuge bucket and centrifuge at 1800 x g for 30 minutes at room temperature.
-
Retrieve the tubes from the centrifuge, clean the outside of the tubes with a 70% isopropanol wipe, move to a biosafety cabinet, then transfer the top layer of light-yellow plasma (see Figure 1A) using a P2000 pipette into a fresh 15 ml Falcon tube. Collect the plasma from both CPT tubes into the same tube.
The plasma (at least 8ml) should be set aside at room temperature until it is processed further into serum (SUPPORT PROTOCOL 1).
-
Collect the thin layer of PBMCs found directly beneath the plasma layer (see Figure 1A) from both CPT tubes using a P2000 pipette and transfer them to a new 15ml Falcon tube containing 5ml DPBS−/−.
The layer of PBMCs also contains platelets.
Centrifuge the PBMC suspension at 300 x g for 15 minutes at room temperature.
Aspirate and discard the supernatant, taking care not to disturb the pellet. Resuspend and disaggregate the pellet by pipetting with a 10 ml serological pipette using 10ml DBPS−/−.
Centrifuge at 300 x g for 15 minutes at room temperature.
-
Aspirate and discard the supernatant. Completely resuspend the cells in 1 ml DPBS−/−, using a P2000 pipette, then add 5μl of the cell suspension to 95μl of Trypan Blue and count the number of live PBMCs using the Trypan blue exclusion method and a hemocytometer.
Expect about 3×10⁵-3×10⁶ cells per ml of blood collected in step 1..
Centrifuge the cells a final time at 300 x g for 15 minutes at room temperature.
-
During the spin, calculate the number of cryovials needed (2.4×10⁶ cells per tube) and label them.
Leftover cells can be stored as a pellet at −80°C until ready to extract genomic DNA for DNA Fingerprinting.
Aspirate the supernatant and resuspend PBMCs in cold STEMCELLBANKER to a density of 2.4×10⁶ viable cells per ml. Transfer the tube to ice and aliquot 1ml per 2ml cryo-vial.
Transfer labeled cryovials to a (pre-chilled at 0–4 °C) Mr. Frosty prepared with 100% isopropanol as per the manufacturer’s instructions.
Transfer the Mr. Frosty device to −80°C overnight, then store PBMCs in a liquid N2 freezer for up to several years.
Continue with SUPPORT PROTCOL 1 to generate autologous serum from the plasma, and then continue with BASIC PROTOCOL 2 to expand the cells for reprogramming.
FIGURE 1. PBNC isolation, expansion, reprogramming, and hiPSC colony picking.
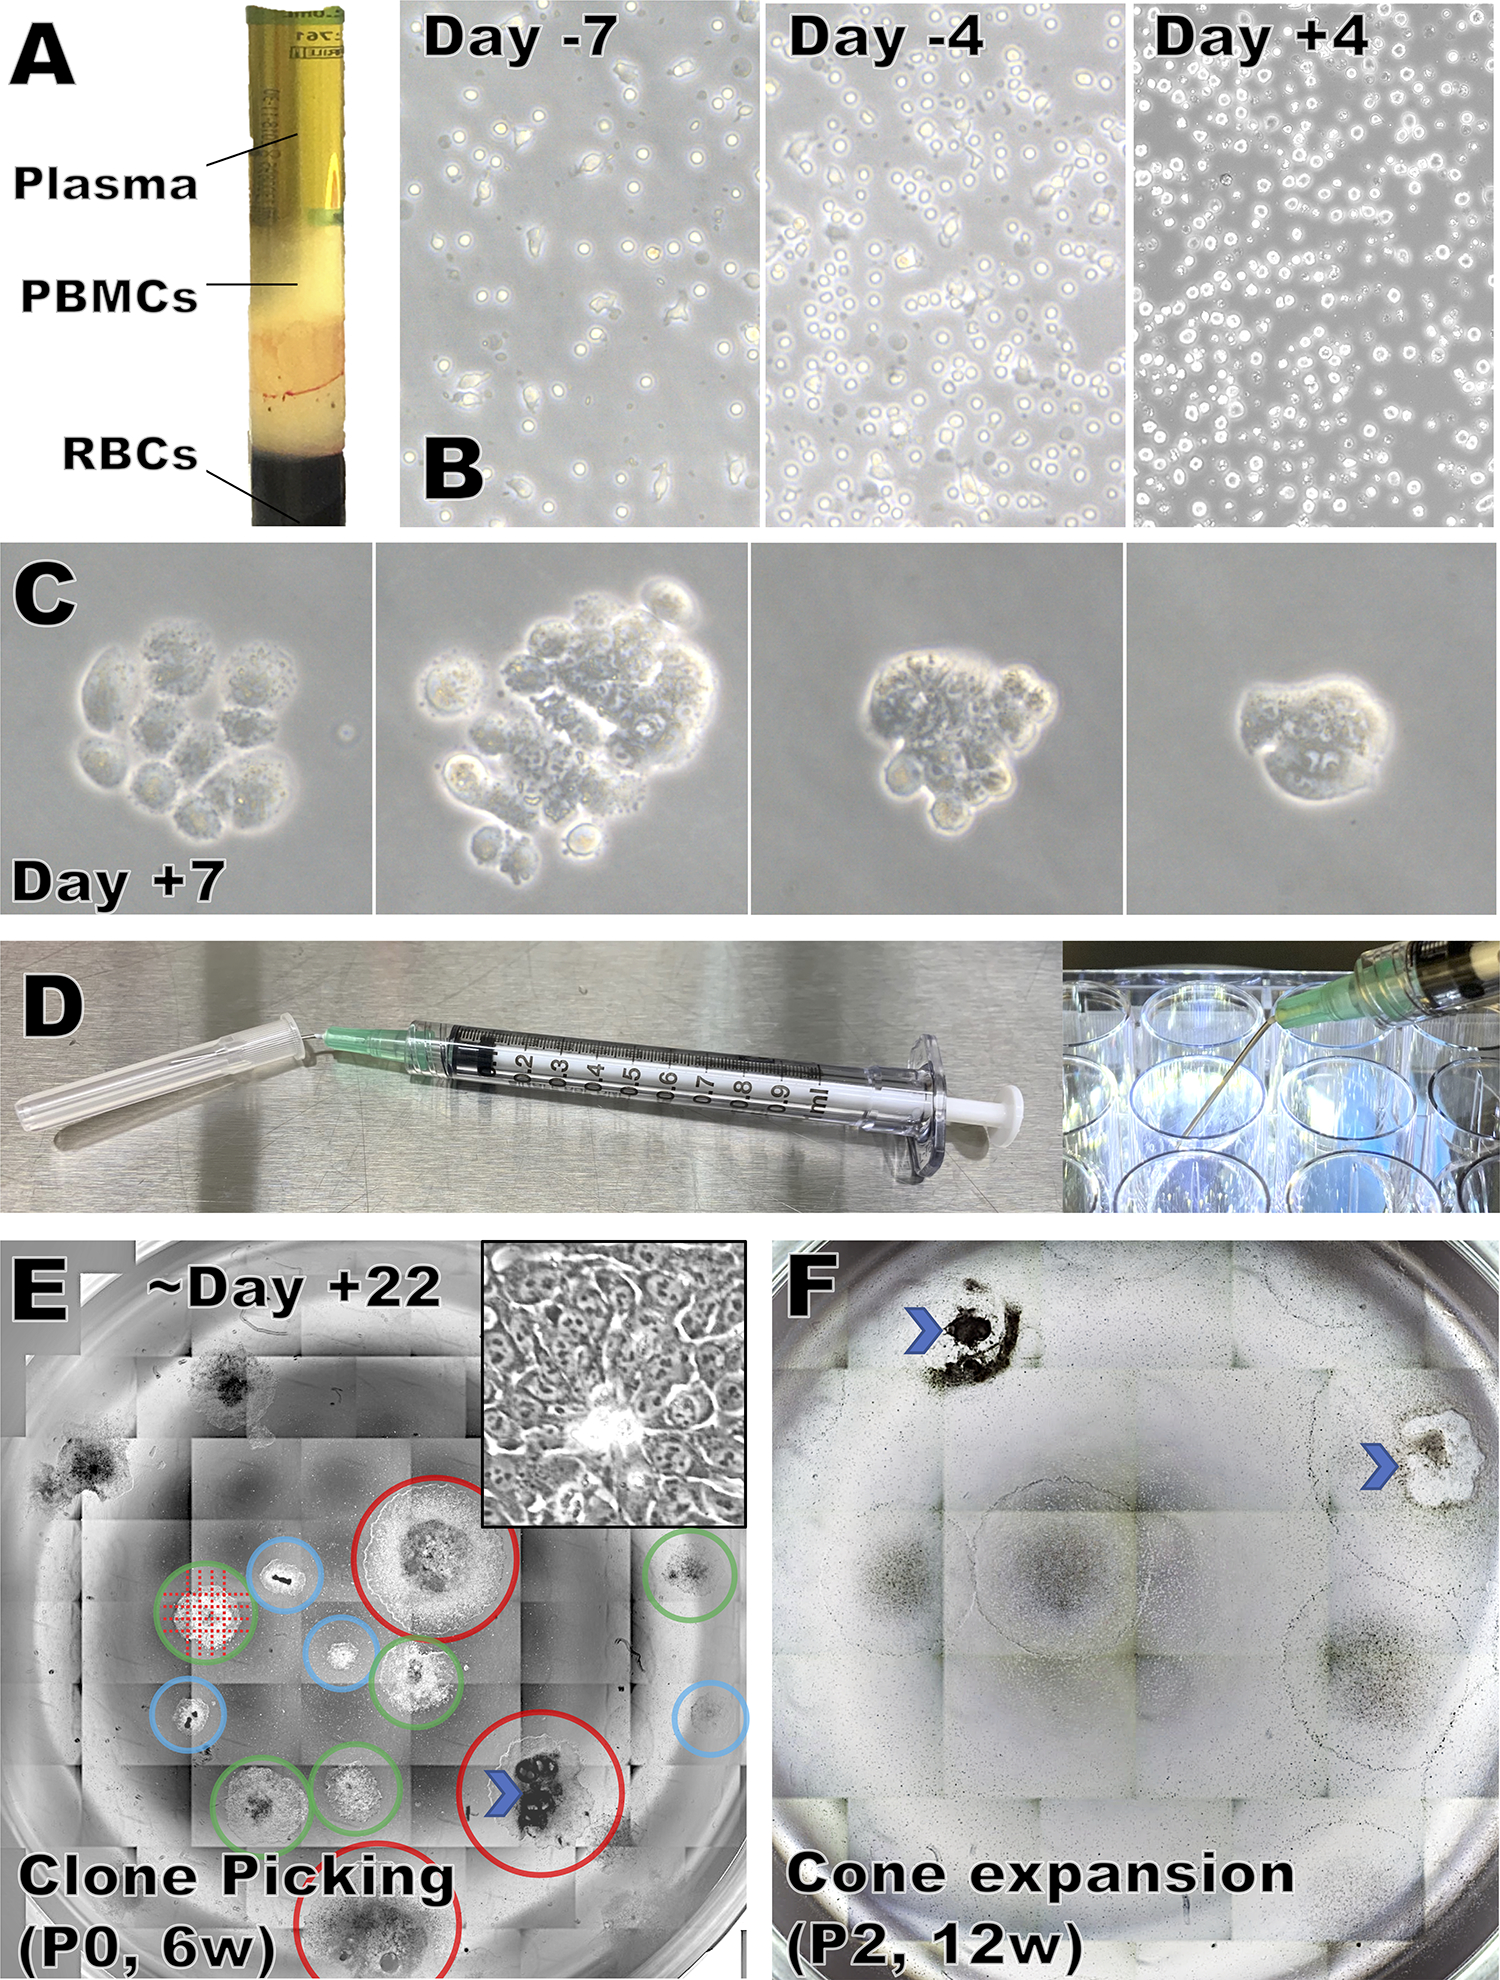
A) CPT tube after centrifugation.
B) Appearance of PBMCs at various days during expansion and after Sendai viral transduction.
C) Emerging cell clusters and colonies, ranging from mostly non-hiPSC like (left) to mostly hiPSC-like (right).
D) Preparation and use of the colony cutting tool
E) Reprogramming well with multiple colonies that are promising but not yet large enough to pick (blue circle), ready to be picked now (green circles), or larger than ideal for picking (red circles). Undifferentiated areas are identifiable by the characteristic small size and nuclear morphology with multiple prominent nucleoli under 10 or 20x Phase contrast microscopy (insert=20x). An area with gross differentiation is marked by a chevron. Colonies are cut as shown by the dotted lines using a sharp tool (D).
F) During expansion, grossly differentiated areas (chevrons) must be removed before the cells are passaged.
SUPPORT PROTOCOL 1
REMOVAL OF CLOTTING FACTORS TO PRODUCE SERUM FROM AUTOLOGOUS PLASMA COLLECTED IN BASIC PROTOCOL 1
PBMC-derived erythroblasts expand more robustly in the presence of serum. To avoid exposing the cells to donor-allogeneic or animal-derived blood products, a small amount of donor-autologous serum can be isolated in parallel with the PBMCs. Six milliliters of autologous serum is enough to expand and reprogram the erythroblasts.
Materials
Donor-autologous plasma (from BASIC PROTOCOL 1)
1 M Calcium Chloride (CaCl2) Solution (Sigma, cat. no. 21115)
2 ml sterile screw-cap tubes (ThermoFisher, cat. no.14-755-228)
70% Isopropanol wipes (VWR, cat. no. 21910–110)
Manual single-channel 0.2–2ml P2000 pipette (Rainin, cat. no.17014390)
Sterile 0.2–2 ml P2000 pipette tips with air filters (Rainin, cat. no.30389237)
Metal heat block with holes for 2 ml tubes (37°C) (e.g., Fisher Scientific, cat. non. 88-870-001, 88-870-104)
Benchtop tube centrifuge (e.g., Eppendorf Centrifuge model 5425)
Class II biosafety cabinet (e.g., Baker SterilGARD® III Advance model SG403)
Centrifuge (e.g., Beckman Allegra X15R) with swing-out buckets for tubes (15 and 50 ml) and plates (e.g., Beckman SX4750, SX4400) with covers
Clotting the isolated autologous plasma to obtain serum
Add CaCl2 solution to the collected donor-autologous plasma (BASIC PROTOCOL 1) to a final concentration of 10 mM (1:100 dilution) and invert the tube several times to mix.
-
Incubate for 1 hour at room temperature.
A gel-like clot should become visible.
Centrifuge the tube at 2000 x g for 10 minutes at room temperature in a swing-out bucket to compact and precipitate the clot at the bottom of the tube.
Transfer the serum (supernatant) to a new 15 ml Falcon tube.
-
Aliquot the donor-autologous serum at 1250μL per 2ml screw-cap tube. Store at −30°C until needed for up to one year.
5 vials (~6ml) of autologous serum are required to expand and reprogram donor PBMCs.
-
When ready to prepare Erythroblast Expansion Medium (see recipe), retrieve the tube(s) of autologous serum, clean the outside using a 70% isopropanol wipe, keep the tube(s) inside a 37 °C heat block until thawed, spin the tube(s) for 10 minutes at 10,000 x g at room temperature. Use the supernatant (1200 μl per tube) to prepare the medium.
Do not re-freeze thawed serum (excess thawed serum can be kept at 0–4 °C for up to two weeks).
BASIC PROTOCOL 2
PBMC EXPANSION IN AN ANIMAL-FREE ERYTHROBLAST EXPANSION MEDIUM CONTAINING AUTOLOGOUS SERUM
PBMCs are expanded for eight days prior to reprogramming (from day −8 to day 0) in an erythroblast expansion medium containing autologous serum, recombinant additives (Erythropoietin, Stem Cell Factor, Interleukin-3, Insulin, Transferrin), dexamethasone, and StemSpan ACF (animal component-free, serum-free, and chemically defined medium.)
Materials
Cryo-preserved PBMCs (BASIC PROTOCOL 1)
StemSpan ACF (Stemcell Technologies, cat. no. 09855)
Erythroblast Expansion Medium (see recipe)
70% Isopropanol wipes (VWR, cat. no. 21910–110)
Trypan Blue solution (ThermoFisher, cat. no.MT25900CI)
Single-use hemocytometer (VWR, cat. no. 82030–468)
12-well tissue culture plates (Greiner 665180)
15 ml Polystyrene Falcon tubes (Corning, cat. no. 352095)
Sterile single-use tissue culture-grade serological pipettes (VWR, cat. no. 53300–421, 53300–501, 53300–567)
Manual single-channel 0.2–2 ml P2000 pipette (Rainin, cat. no.17014390)
Sterile 0.2–2 ml P2000 pipette tips with air filters (Rainin, cat. no.30389237)
5% CO2 37 °C humidified tissue culture incubator (e.g., Thermo-Forma model 3110)
Class II biosafety cabinet (e.g., Baker SterilGARD® III Advance model SG403)
Inverted tissue microscope (e.g., ThermoFisher EVOS XL Core) with a 2x/4x/10x/20x lenses (including phase contrast) and a camera/display to allow operation inside a biosafety-cabinet
Metal heat block with holes for 2 ml tubes (37°C) (e.g., Fisher Scientific, cat. no. 88-870-001, 88-870-104)
Centrifuge (e.g., Beckman Allegra X15R) with swing-out buckets for tubes (15 and 50 ml) and plates (e.g., Beckman SX4750, SX4400) with covers
Day −8: Thawing and plating cryo-preserved PBMCs.
-
1
Transfer 10 ml complete Erythroblast Expansion Medium to a 15 ml Falcon tube. Label this tube ‘E’.
-
2
Add 12ml StemSpan ACF medium to a second 15 ml Falcon tube. Label this tube ‘S’.
-
3
Fill one hole of a 37°C metal heat block with 1 ml sterile water and allow water to reach 37°C.
This will be used to rapidly conduct heat into the frozen vial of cells which is required to rapid thawing. A 37°C water bath can be used instead. However, such water baths are a common source of contamination.
-
4
Remove a frozen vial of PBMCs from the liquid nitrogen freezer and transfer frozen (≤−80°C) to the heat block.
Thaw 1 vial of 2.4 × 10⁶ cells. If the yield is low, thaw additional vials until enough (≥2×10⁶) viable cells have been recovered.
-
5
Hold the vial by the cap and submerge the bottom half of the vial in the water-filled hole of the heat block. Agitate the tube regularly to facilitate thawing. Remove the tube when only a small piece of ice remains.
The entire cap of the vial must always remain well above the water line to avoid potentially non-sterile water from contaminating the sample.
-
6
Quickly clean the outside of the cryo-vial using a 70% Isopropanol wipe, then move the vial into a biological safety cabinet and carefully transfer its contents into tube ‘S’ using a P2000 pipette.
-
7
Using 1 ml of fresh Erythroblast Expansion Medium from tube ‘E’, rinse the cryovial and transfer its contents to tube ‘S’.
-
8
Centrifuge tube ‘S’ at 300 x g, at room temperature for 5 minutes, then aspirate and discard the supernatant.
-
9
Re-suspend the pelleted cells in 1 ml Erythroblast Expansion Medium taken from tube ‘E’.
-
10
Transfer 5 μl of the cell suspension to 95 μl of Trypan Blue and count the number of live PBMCs using the Trypan blue exclusion method and a hemocytometer.
Expect about ≥2×10⁶ cells and >90% viability. If necessary, repeat steps 1–10 until at least 2×10⁶ live cells have been recovered.
-
11
Determine the total volume needed to obtain a concentration of 5 × 10⁵ live cells per ml. Round that volume (in ml) up to the closest integer and add Erythroblast Expansion Medium until the calculated total volume is reached. Plate the entire volume at 1 ml per well into at as many wells of an untreated 12-well tissue culture plate as needed.
For example, for 2.1×10⁶ live cells, use 5 ml (4.2 ml rounded to 5 ml), then plate 1 ml per well into 5 wells.
-
12
Incubate the cells for 24 hours in a CO2 tissue incubator.
Day −7: Plating non-adherent PBMCs
-
13
24 hours after plating, transfer the non-adherent cells from each well to a new well.
See Figure 1B. This is done to select for and retain the non-adherent fraction of the PBMCs.
-
14
Use 200 μl fresh Erythroblast Expansion Medium per well to rinse and collect any remaining non-adherent cells from the original well. Add this to the corresponding new well.
Rarely, a significant number of adherent cells will appear in the second plate; in this case, a second transfer to a new well can be completed on Day −6.
-
15
Return the cells to the incubator when the transfer is complete.
Day −6: Complete Medium Change
-
16
Mix and harvest the cells from the 12-well plate by pipetting with a P2000 pipette and transfer them into a single 15 ml Falcon tube (i.e., cells from all wells are pooled at this stage).
-
17
Add 0.5 ml fresh Erythroblast Expansion Medium to each of collected wells to ensure that the wells and cells left behind do not dry out.
-
18
Centrifuge the cell suspension at 300 x g at room temperature for 5 minutes.
-
19
Aspirate and discard the supernatant without disturbing the cell pellet.
-
20
Re-suspend the pellet in a total volume of fresh Erythroblast Expansion Medium that is equal to 0.5ml per collected well and plate 0.5 ml per well into the original wells that already contain 0.5 ml Erythroblast Expansion Medium (step 17). Return the cells to the incubator.
Days −4 and −2: Complete Medium Change
-
21
Repeat steps 16–20 of “Day −6 Complete Medium Change”
Day 0:
-
22
Continue with BASIC PROTOCOL 3 (Sendai viral reprogramming) or ALTERNATE PROTOCOL 1 (episomal plasmid reprogramming).
Sendai viral reprogramming is the method of choice: it does not require an expensive transfection device, it is generally more efficient, and it does not risk stable integration of plasmid DNA sequences. However, if a suitable transfection device is available, episomal reprogramming may be used to avoid the high cost of the Sendai viral reprogramming kit.
BASIC PROTOCOL 3
REPROGRAMMING OF EXPANDED PBMCS WITH SENDAI VIRAL REPROGRAMMING PARTICLES
On Day 0 (the eighth day of PBMC expansion), the cells are ready to be transduced with Sendai viral reprogramming particles (BASIC PROTOCOL 3). Alternatively, the cells can be reprogrammed by transfecting them with episomally replicating reprogramming factor expression plasmids (ALTERNATE PROTOCOL 1). For additional information about these reprogramming methods, refer to the manuals of the reprogramming kits and (Schlaeger, 2018; Schlaeger et al., 2015).
Materials
Expanded PBMCs (BASIC PROTOCOL 2)
StemSpan ACF (Stemcell Technologies, cat. no. 09855)
Erythroblast Expansion Medium (see recipe)
DPBS−/− (ThermoFisher, cat. no. 14190136)
DPBS+/+ (ThermoFisher, cat. no. 14040117)
70% Isopropanol wipes (VWR, cat. no. 21910–110)
Trypan Blue solution (ThermoFisher, cat. no.MT25900CI)
Single-use hemocytometer (VWR, cat. no. 82030–468)
Cytotune™ 2.1 Sendai viral reprogramming kit (ThermoFisher, cat. no. A34546)
12-well and 6-well tissue culture plates (Greiner, cat. no 665180 and 657160), coated with Laminin-521 (see SUPPORT PROTOCOL 5)
15 ml Polystyrene Falcon tubes (Corning, cat. no. 352095)
Sterile single-use tissue culture-grade serological pipettes (VWR, cat. no. 53300–421, 53300–501, 53300–567)
Manual single-channel 0.2–2 ml P2000 pipette (Rainin, cat. no.17014390)
Sterile 0.2–2 ml P2000 pipette tips with air filters (Rainin, cat. no.30389237)
NutriStem® hPSC XF Medium (Biological Industries, cat. no. 05-100-1A)
Sterile plate seals (Sigma, cat. no. Z369667–100EA)
Parafilm (VWR, cat. no 657160)
2 ml sterile screw-cap tubes (ThermoFisher, cat. no.14-755-228)
5% CO2 37 °C humidified tissue culture incubator (e.g., Thermo-Forma model 3110)
Class II biosafety cabinet (e.g., Baker SterilGARD® III Advance model SG403)
Inverted tissue microscope (e.g., ThermoFisher EVOS XL Core) with a 2x/4x/10x/20x lenses (including phase contrast) and a camera/display to allow operation inside a biosafety-cabinet
4°C Refrigerator
Liquid nitrogen vapor phase cryo-storage unit
Centrifuge (e.g., Beckman Allegra X15R) with swing-out buckets for tubes (15 and 50 ml) and plates (e.g., Beckman SX4750, SX4400) with covers
Day 0: Collect, transduce, and plate expanded PBMCs
-
1
Collect the expanded PBMCs from the 12-well plate (BASIC PROTOCOL 2) with a P2000 pipette into a single 15 ml Falcon tube.
-
2
Rinse the wells with 1 ml StemSpan ACF per well to collect any remaining cells into the same 15ml Falcon tube. Use additional tube(s) if the total volume exceeds 12 ml.
-
3
Centrifuge the tube(s) at 300 x g for 5 minutes at room temperature, then aspirate the spent medium without disturbing the cell pellet(s).
-
4
Completely re-suspend the cell pellet(s) in a total of 1 ml Erythroblast Expansion Medium and disaggregate the cells using a P2000 pipette.
-
5
Transfer 5 μl of the cell suspension to 95 μl of Trypan Blue and count the number of live expanded PBMCs using the Trypan blue exclusion method and a hemocytometer.
Expect to obtain at least 2×10⁶ cells on Day 0 per 2×10⁶ PBMCs plated on Day-8, and >90% viability. Even though there is often little or no gain in total cell numbers, the erythroblast fraction of the Day-8 PBMCs will have expanded significantly. CFU assays (e.g., using Stemcell Technologies’ MethoCult™ H4435 medium) and flow cytometric analysis (using an anti-CD36 antibody) of Day-8 and Day 0 cells can be used to verify a successful net expansion of erythroblasts.
-
6
Adjust the cell density to 5 × 10⁵ per ml by adding Erythroblast Expansion Medium.
-
7
Transfer 1 ml of the suspension to a 2 ml screw-cap tube. Label the tube ‘SeV negative’ and set it aside for the Sendai virus RNA negative control sample preparation (see SUPPORT PROTOCOL 2).
Alternatively, if <1.5×10⁶ live cells are available, use 105 human cells from a different source (e.g., purchased PBMCs) at a later point to prepare the Sendai virus RNA negative control sample.
-
8
Calculate the amount of each virus needed to reach the target multiplicity of infection (MOI) for each virus and transduction:
5 × 10⁵ (1 ml of suspension following the dilution in step 6) live cells should be used for each transduction. The standard MOIs for the three viruses are 5:5:3 (KOS:MYC:KLF). Virus titer information is lot-specific and available online at the manufacturer’s website. The volume (V, in μl) of virus required to transduce 5 × 10⁵ live cells can be calculated as follows:
V = (MOI × 5 × 10⁸) / (viral titer (in units/ml))
Therefore, if the KOS virus titer is 1×10⁸/ml, use 25μl of that virus to transduce 5 × 10⁵ cells at MOI 5.
-
9
Add the calculated volumes of each virus to 0.5 ml of fresh Erythroblast Expansion Medium in a new 15 ml Falcon tube. Slowly pipette the suspension multiple times using a P2000 to ensure that it is thoroughly mixed.
-
10
Using a fresh P2000, mix the cell suspension and transfer 1 ml of the resuspended cells (5 × 10⁵ live cells) to the tube containing the diluted viruses. Slowly pipette the suspension multiple times using a P2000 to ensure that it is thoroughly mixed.
-
11
Plate this suspension (1.5 ml) into a single well of a new 12-well tissue-culture plate
Do not use a coated plate. Use one plate per transduction.
-
12
Repeat steps 9–11 with another 1 ml of the PMBCs from step 6 to generate the cells for the Sendai virus RNA positive control sample preparation (see SUPPORT PROTOCOL 2).
If too few donor-derived cells are available, 5 × 10⁵ live purchased PBMCs resuspended in Erythroblast Expansion Medium should be transduced later to generate the Sendai virus RNA positive control sample.
-
13
OPTIONAL STEP: if sufficient amounts of expanded donor PBMCs and Sendai viral reprogramming particles are still available, additional transductions using other MOIs can be performed in parallel in order to increase the chance of reprogramming success. (e.g., try MOIs of 5:5:5, 7:4:4, and 5:7:3, following steps 8–11.)
When performing multiple transductions of the same sample at different MOIs, perform these steps separately for each transduction, using separate plates and tubes throughout (do not pool the cells from different transductions).
-
14
Seal the plate(s) with a sterile plate seal, secure the plate lid to the plate by wrapping a strip of parafilm around the side of the plate, insert the plate it into a plate centrifuge bucket, close the bucket with a sealing lid, balance the buckets, and centrifuge the plate(s) at 950 x g for 60 minutes at room temperature.
-
15
After centrifugation, take the plate(s) out of the centrifuge, carefully remove the parafilm, move to a biosafety cabinet, and carefully remove the seal while holding the plate firmly to avoid rapid movements and splashing.
-
16
Add 1ml Erythroblast Expansion Medium to each transduction well (changing tips between wells) and incubate the plate(s) overnight in a tissue culture incubator.
Day +1 Sendai virus positive control sample collection and Removal of Virus-Containing Medium
-
17
Collect and transfer the cells transduced to generate the Sendai virus RNA positive control sample (step 12) to a 2 ml screw-cap tube using a P2000 pipette. Label the tube ‘SeV positive’ and set it aside for the Sendai virus RNA positive control sample preparation (see SUPPORT PROTOCOL 2).
-
18
Collect and transfer the cell suspension the reprogramming plate (step 11) to a 15 ml Falcon tube. Rinse the well with 2 ml of StemSpan ACF to collect and transfer any remaining cells into the same tube. Add 1.5 ml fresh Erythroblast Expansion Medium to the collected well. Centrifuge the tube at 300 x g for 10minutes.
-
19
Remove the supernatant and resuspend the cell pellet using a P2000 filled with 500μl of the fresh the Erythroblast Expansion Medium taken from the same well that the cells were collected from, then return the cells to that well. Incubate the plate in the tissue culture incubator until Day +3.
If additional transductions were performed (step 13), repeat steps 18–19 for those plate(s).
Day +3: Plating on LN521-coated Plates
-
20
For each plate (transduction), prepare a 6-well tissue culture plate by coating 4 wells per plate (see SUPPORT PROTOCOL 5).
Execute steps 21–26 separately for each plate.
-
21
Transfer the cells form the 12-well plate to a 15 ml Falcon tube. Rinse the well with 2 ml StemSpan ACF medium and transfer the material to the same Falcon tube to ensure that most of the cells have been collected.
-
22
Centrifuge the collected cells at 300 x g for 10 minutes at room temperature. Resuspend the cells in 1 ml fresh Erythroblast Expansion Medium per tube.
-
23
Transfer 5μl of the cell suspension to 95μl of Trypan Blue and count the number of live cells using the Trypan blue exclusion method and a hemocytometer.
Expect ≥2×10⁵ cells and >90% viability. Adjust the volume if necessary, to keep the cell concentration to ≤3×10⁵/ml.
-
24
Aspirate the DMEM/F12 solution from wells 1–4 of the coated 6-well plate, then add 1.5 ml, 1.47 ml, 1.34 ml, and 750μl Erythroblast Expansion Medium to wells 1–4.
-
25
Transfer 7.5 μl, 35 μl, 165, and 750 μl of the cell suspension to wells 1–4, then mix each well with a P2000 pipette.
Assuming 2.5 × 10⁵ live cells are present, this corresponds to plating densities of about 1875 – 187,500 cells per well.
-
26
Return the plate to a tissue culture incubator.
Day +4: Addition of fresh Erythroblast Expansion Medium
-
27
Add 1.5 ml of fresh Erythroid Expansion Medium to each well (no medium is aspirated).
-
28
Return the plate(s) to a tissue culture incubator until Day +6.
Day +6: Half Medium Change with Erythroblast Expansion Medium
-
29
Add 1.5 ml of StemSpan ACF medium to an empty well on of the plate(s), making sure the medium covers the entire well bottom.
The medium in this well will be used as a reference to estimate the remaining volume in step 30.
-
30
Carefully aspirate the supernatant from each of the four reprogramming wells until about 1.5 ml of medium remains.
Use the liquid level in the StemSpan ACF well as a reference while holding the plate at an angle to make it easier to compare the liquid levels. Use a P2000 pipette to aspirate the medium to allow you to return aspirated medium if too much medium was removed by accident.
-
31
Add 1.5 ml of fresh Erythroid Expansion Medium to each well. Return the plate(s) to a tissue culture incubator at 37°C in a humidified atmosphere of 5% CO2.
Day +7: Initiate Transition to hiPSC Medium
-
32
Carefully aspirate the supernatant from each of the four reprogramming wells until about 1.5 ml of medium remains (as in step 30), then add 1.5 ml fresh NutriStem medium to each reprogramming well. Return the plate to a tissue culture incubator.
Day +8 onwards: Daily Complete Changes of hiPSC Culture Medium
-
33
Aspirate all medium from the reprogramming wells. Feed the wells with 2.5 ml fresh NutriStem medium per well.
-
34
Monitor the wells for the emergence of hiPSC-like colonies (see Figure 1C, E). When hiPSC-like colonies are ready to be picked (see Figure 1E), continue with BASIC PROTOCOL 4, otherwise repeat steps 33–34 daily.
NOTE: Not all colonies will be ready to pick at the same time. Keep feeding wells with colonies that are still emerging until ready to pick. This may happen between as early as day 13 and as late as day 25 after the introduction of the reprogramming agents.
ALTERNATE PROTOCOL 1
REPROGRAMMING OF EXPANDED PBMCS WITH EPISOMAL PLASMIDS
As an alternative to Sendai viral transduction, expanded PBMCs can also be reprogrammed by transfecting them with reprogramming factor expression plasmids that replicate episomally. In the Epi5-kit used in this protocol, replication of the oriP cis-active element containing plasmids is mediated by the EBNA-1 protein that is expressed long with the reprogramming factors. Episomal reprogramming is generally less efficient than Sendai viral reprogramming (Schlaeger et al., 2015). To boost reprogramming efficiencies, the Epi5-kit expresses an alternative and expanded set of reprogramming factors (OCT4, SOX2, KLF4, L-MYC, and LIN-28A) and a dominant-negative version of p53 (mp53DD). To improve initiation of episomal plasmid replication, this kit also includes an additional EBNA-1 expression plasmid (Okita et al., 2013). Episomal reprogramming efficiencies can be increased further by adding inhibitors of certain kinases (ROCK, GSK3β, MEK, and TGFβ-R1, see (Valamehr et al., 2012)) at specific times during reprogramming.
Materials
Expanded PBMCs (BASIC PROTOCOL 2)
Epi5 Episomal iPSC Reprogramming Kit (ThermoFisher, cat. no. A15960)
P3 Nucleofection kit (Lonza, cat. no. V4XP-3012)
StemSpan ACF (Stemcell Technologies, cat. no. 09855)
Erythroblast Expansion Medium (see recipe)
DPBS−/− (ThermoFisher, cat. no. 14190136)
DPBS+/+ (ThermoFisher, cat. no. 14040117)
Trypan Blue solution (ThermoFisher, cat. no.MT25900CI)
Single-use hemocytometer (VWR, cat. no. 82030–468)
15 ml Polystyrene Falcon tubes (Corning, cat. no. 352095)
2 ml sterile screw-cap tubes (ThermoFisher, cat. no.14–755-228)
Inverted tissue microscope (e.g., ThermoFisher EVOS XL Core) with a 2x/4x/10x/20x lenses (including phase contrast) and a camera/display to allow operation inside a biosafety-cabinet
Manual single-channel 0.2–2 ml P2000 pipette (Rainin, cat. no.17014390)
Sterile 0.2–2 ml P2000 pipette tips with air filters (Rainin, cat. no.30389237)
NutriStem® hPSC XF Medium (Biological Industries, cat. no. 05–100-1A)
NutriStem® hPSC XF Medium supplemented with 1x SMC4 (see recipe)
NutriStem® hPSC XF Medium supplemented with 1x SMC3 (see recipe)
5% CO2 37 °C humidified tissue culture incubator (e.g., Thermo-Forma model 3110)
Class II biosafety cabinet (e.g., Baker SterilGARD® III Advance model SG403)
Liquid nitrogen vapor phase cryo-storage unit
4D Nucleofector (Lonza)
Centrifuge (e.g., Beckman Allegra X15R) with swing-out buckets for tubes (15 and 50 ml) and plates (e.g., Beckman SX4750, SX4400) with covers
Benchtop tube centrifuge (e.g., Eppendorf Centrifuge model 5425)
Day 0: Collect, transfect, and plate expanded PBMCs
-
1
For each reprogramming sample, coat all wells of a 6-well tissue culture plate (see SUPPORT PROTOCOL 5) with LN521 and prepare a 15 ml Falcon tube with 10 ml StemSpan ACF medium (label this tube ‘S’).
-
2
Execute steps 1–5 of BASIC PROTOCOL 3 to collect and count the expanded PBMCs.
-
3
Transfer a volume corresponding to 5×10⁵ expanded live PBMCs to a 2 ml screw-cap tube filled with 1 ml DPBS−/−. Label this tube ‘Plasmid DNA negative’ and set it aside for preparation of the episomal plasmid DNA negative control sample (SUPPORT PROTOCOL 3).
Only use the expanded PBMCs in this step if ≥ 2×10⁶ expanded live PBMCs are available. If not enough live PBMCs are present after expansion, use 5×10⁵ human cells from a different source (e.g., purchased PBMCs (Stem Cell technologies, cat. no 70025.1)) as the episomal plasmid DNA negative control sample.
-
4
Add 10 ml DPBS−/− to a new 15 ml Falcon tube, then add 1.5×10⁶ expanded PBMCs. Centrifuge the tube for 10 minutes at 300 x g.
-
5
During the centrifugation, add 12 ml StemSpan ACF to a new 15 ml Falcon tube and prepare the following Nucleofection Mix in a 1.5 ml sterile tube:
165 μl P3 Nucleofection Kit Solution
36 μl P3 Nucleofection Kit Supplement
4 μl Epi5™ Reprogramming Vectors (Tube A)
4 μl Epi5™ p53 & EBNA Vectors (Tube B)
-
6
Aspirate the supernatant above the centrifuged PBMCs (step 4), leaving less than 500 μl of supernatant behind. Resuspend and transfer the cells to a 2 ml screw cap tube. Rinse the Falcon tube with 500 μl of fresh DPBS−/− and transfer to the 2 ml tube. Spin the collected cells for 2 minutes at 300 x g, then use a P200 to carefully remove as much of the remaining liquid as possible without disturbing the cell pellet.
-
7
Add 200 μl Nucleofection Mix, flick the bottom of the tube to loosen the pellet, then use a P200 to carefully resuspend the pellet.
-
8
Transfer 100 μl (containing about 7.5×10⁵ cells) of the mix to a nucleofection cuvette and immediately nucleofect the cells with the Lonza 4D Nucleofector using the CD34+ program.
-
9
Immediately post-nucleofection, take the sterile pipette from the nucleofection kit (or use a P200 pipette), pick up a small amount (about 200 μl) of StemSpan ACF medium from the prepared 15 ml Falcon tube (‘S’) and use it to dilute and transfer the nucleofected cells to the Falcon tube.
Be careful not to overfill the cuvette.
-
10
Repeat steps 8–9 with the remaining 100 μl of cells in nucleofection mix using a new cuvette. Add these cells to the same 15-ml Falcon tube (‘S’).
Execute steps 7–10 as quickly as possible to minimize the time the cells spend in undiluted nucleofection solution, especially after nucleofection!
-
11
Centrifuge the nucleofected cells at 300 x g for 5 minutes at room temperature.
-
12
During the centrifugation, aspirate the DMEM/F12 solution from the coated 6-well plate, then add 1.49 ml, 1.47 ml, 1.44 ml, 1.38 ml, 1.25 ml, 1.00 ml Erythroblast Expansion Medium to wells 1–6.
-
13
Aspirate the supernatant above the nucleofected cells and resuspend the ~ 1.5×10⁶ nucleofected cells in 1.5 ml Erythroblast Expansion Medium using a P2000 pipette.
-
14
Transfer 15μl, 31μl, 62μl, 125μl, 250μl, 500μl (corresponding to 1.5×10⁴ - 5×10⁵ cells) to wells 1–6 (step 12). Mix each well with a P2000 to evenly distribute the cells, then transfer the plate to a tissue culture incubator.
-
15
Transfer the remaining ~500 μl (~5×10⁵) nucleofected cell to a 2 ml screw cap tube. Label the tube ‘Plasmid DNA positive’ and wash the cells three times with 1.5 ml StemSpan ACF medium and then once with 1.5 ml DPBS−/−, spinning the cells at 1000 x g for 3 minutes at room temperature after each resuspension.
The washes are performed to reduce the amount of extracellular plasmid DNA.
-
16
After the last spin, resuspend the pelleted cells in 1 ml DPBS−/−. Use this sample to prepare the episomal plasmid DNA positive control sample (SUPPORT PROTOCOL 3).
Day +2: Addition of Nutristem+SMC4 medium
-
17
Without removing any medium, add 1.5ml NutriStem+SMC4 medium to each well. Return the cells to the tissue culture incubator until Day +4.
The final concentration of the SMC4 inhibitor cocktails will be 0.5x.
Day +4 to +9: Nutristem+SMC4 medium feeds
-
18
On even-numbered days (Days +4, +6, +8): carefully aspirate and discard the entire volume of spent medium from each well, then slowly add 2.5ml NutriStem medium supplemented with SMC4 to each well.
-
19
On odd-numbered days (Days +5, +7, +9): add 2.5ml NutriStem Medium supplemented with SMC4 to each well.
Use extra caution when handling plates filled to the maximum working volume (5ml/well) to avoid spillage and contamination.
Day +10 to +14: Daily complete medium changes with Nutristem+SMC3 medium
-
20
Carefully aspirate and discard the entire volume of spent medium from each well, then slowly add 2.5 ml NutriStem medium supplemented with SMC3 to each well.
The TGFβ-Receptor inhibitor present in SMC4 is removed from the SMC3 cocktail to allow reprogrammed induced pluripotent stem cells to expand.
-
21
Monitor the wells daily for the emergence of hiPSC-like colonies (see Figure 1C, E). When hiPSC-like colonies are ready to be picked (see Figure 1E), continue with BASIC PROTOCOL 4.
NOTE: Not all colonies will be ready to pick at the same time. Keep feeding wells with colonies that are still emerging until ready to pick. This may happen between as early as day 13 and as late as day 25 after the introduction of the reprogramming agents.
Day +15 onwards: Daily complete medium changes with Nutristem
-
22
Aspirate all medium from all wells and discard. Replace medium with 2.5ml fresh NutriStem medium (no inhibitors added) per well.
-
23
Monitor the wells for the emergence of hiPSC-like colonies (see Figure 1C–E). When hiPSC-like colonies are ready to be picked (see Figure 1E), continue with BASIC PROTOCOL 4.
NOTE: Not all colonies will be ready to pick at the same time. Keep feeding wells with colonies that are still emerging until ready to pick. This may happen between as early as day 13 and as late as day 25 after the introduction of the reprogramming agents.
BASIC PROTOCOL 4
PICKING, EXPANDING, AND CRYO-PRESERVING HIPSC CLONES
Emerging colonies should be picked as soon as they are large enough to be cut 3–5 times horizontally and 3–5 times vertically into many multi-cellular (~ 300 cells/fragment) colony fragments (see Figure 1E). This may happen between as early as day 13 and as late as day 25 after the introduction of the reprogramming agents. On Laminin-521, colonies can grow to very large sizes (see Figure 1E,F), but there is no advantage in letting the colonies grow larger than necessary for picking: as the colonies get very large they are more likely to produce differentiated areas or merge into other colonies (see Figure 1E). A total of 24 colonies should be picked. Picking may need to be performed on multiple days if fewer than 24 colonies are ready to be picked on the same day.
Picked hiPSC colonies can be expanded further as described in UNIT 1C.18 (single-cell passaging on Laminin-511-E8, (Miyazaki & Kawase, 2015)), UNIT 1C.2 (clump passaging on Matrigel™, (T. Ludwig & J, 2007)), or using the steps described in this protocol. We recommend using mTeSR Plus and Laminin-511-E8 during expansion, though other media (including Nutristem, E8, StemFit, mTeSR1, TeSR2, and StemFlex) or matrices (Laminin-521 or Matrigel™) also work – see COMMENTARY.
The propensity of human pluripotent stem cells to acquire karyotypic and other genetic abnormalities is low when using mechanical clump passaging methods, but can be significantly elevated when single-cell dissociation methods are used (Buzzard, Gough, Crook, & Colman, 2004; Chan, Yates, Boyer, Schlaeger, & Daley, 2008; Cowan et al., 2004; Garitaonandia et al., 2015; Merkle et al., 2017; Mitalipova et al., 2005). While manual passaging is one of the safest methods to expand karyotypically normal hiPSCs, this method is inefficient, labor-intense, and not easily scalable. In addition, mechanical splitting of hiPSCs cultured on Laminin-coated dishes can be particularly difficult and even damaging to the cells because hiPSCs tend to adhere very strongly to Laminin-521 and 511-E8.
Passaging hiPSCs using chemical (e.g., Versene) and/or enzymatic (TrypLE-Select) methods is much more efficient and scalable, and the cells detach and re-attach easily, even when dissociated into single cells. This feature of Laminin has allowed some groups to passage apparently normal hiPSCs using single cell dissociation and very high split ratios (Miyazaki & Kawase, 2015) (Nakagawa et al., 2014). Nevertheless, we have repeatedly encountered chromosomal abnormalities at higher passages after prolonged single cell passaging of hiPSCs on Laminin-521 in the absence of ROCK inhibitors. To increase the genetic stability of the lines, we therefore recommend dissociating and detaching the colonies as small clumps rather than single cells by avoiding excessive exposure to the dissociating agent and excessive trituration during pipetting. To further reduce the negative effects hiPSC dissociation, the ROCK kinase inhibitor Y27632 (Watanabe et al., 2007) is added during plating and cryo-preservation. If continued mechanical passaging is preferred, clone expansion can be performed using qualified Matrigel™ as the matrix (see COMMENTARY).
In general, particularly difficult clones that exhibit significant amounts of differentiation require extensive removal of the differentiated areas prior to splitting and should be plated at lower split ratios whereas clones that grow robustly often show little or no signs of spontaneous differentiation and can be plated at higher split ratios. Very low passage hiPSCs often change their appearance, growth and plating behavior, and propensity for spontaneous differentiation as they continue to mature and lose the exogenous reprogramming agents. Accordingly, the optimal plating densities may need to be adjusted frequently and empirically.
All clones should be frozen as soon as they have been expanded to at least two 6-well plate wells (typically after at least three passage), and at least 6 clones should be selected for further expansion and analysis.
Materials
Plate with emerging hiPSC colonies (BASIC PROTOCOL 3 or ALTERNATE PROTOCOL 1)
Coated plates (SUPPORT PROTOCOL 5)
DPBS−/− (ThermoFisher, cat. no. 14190136)
15 ml Polystyrene Falcon tubes (Corning, cat. no. 352095)
Sterile single-use tissue culture-grade serological pipettes (VWR, cat. no. 53300–421, 53300–501, 53300–567)
1 ml disposable syringe (Fisher 14-823-30)
21-gauge sterile nonpyrogenic needles (BD, cat. no. 305167)
Manual single-channel 0.2–2 ml pipette (Rainin, cat. no.17014390)
P2000 single channel pipette sterilized 0.2–2 ml tips with air filters (Rainin, cat. no. 30389237)
mTeSR Plus (Stemcell Technologies, cat. no.05825) or other hiPSC medium
DMEM/F12 (Stemcell Technologies, cat. no.36254)
10 mM 2,000x Y27632 stock solution (see recipe)
TrypLE Select (Gibco, cat. no. 12563029)
Versene Solution (Gibco, cat. no. 15040066)
2 ml cryo-vials (ThermoFisher, cat. no.50000020)
STEM-CELLBANKER GMP grade (Amsbio, cat. no. 11890)
5% CO2 37 °C humidified tissue culture incubator (e.g., Thermo-Forma model 3110)
Class II biosafety cabinet (e.g., Baker SterilGARD® III Advance model SG403)
Inverted tissue microscope (e.g., ThermoFisher EVOS XL Core) with a 2x/4x/10x/20x lenses (including phase contrast) and a camera/display to allow operation inside a biosafety-cabinet
Liquid nitrogen vapor phase cryo-storage unit
Day 0: Picking hiPSC Colonies
-
1
Prepare a LN511-E8-coated 24-well plate (see SUPPORT PROTOCOL 5)
-
2
Inspect each well of the reprogramming culture plate(s) (BASIC PROTOCOL 3 or ALTERNATE PROTOCOL 1) under a microscope to identify and mark colonies that are ready to be picked (see Figure 1E).
Emerging hiPSC colonies often do not appear as well-formed and healthy as those formed by established hiPSC lines (compare Figures 1E and 1F). However, any emerging colonies that contain undifferentiated hiPSCs (identifiable by their hallmark nuclear morphology with prominent nucleoli, see Figure 1E), are worth picking.
-
3
Remove any existing areas of grossly differentiated cells inside or near colonies selected for picking by scraping and aspirating them with a P200 pipette tip.
See Figure 1E,F for examples of differentiated areas that should be removed.
-
4
Aspirate the well from which the next colony will be picked and add 600 μl fresh mTeSR Plus medium supplemented with 1x Y27632.
-
5
Score (cut) a selected colony 3–5 times in each direction (horizontally and vertically) using the sharp end of a new 21-gauge needle, creating a cross-hatched pattern of about 16–36 small pieces of the colony (see Figure 1E).
Note: Perform this step using a microscope inside a biosafety cabinet.
Score colonies using a slightly bent needle attached to a syringe (see Figure 1D): attach a needle to the syringe, loosen (but do not remove) the needle cap, then carefully bend the needle by ~30–60 degrees while holding the cap and the syringe. Use a new needle for each colony (clone).
-
6
Remove the DMEM/F12 from the next available well of the coated 24-well plate. Detach the cut colony fragments from the plate by carefully pushing and scraping them with P2000 pipette while slowly pipetting up and down until they are completely detached from the well. Transfer the detached fragments along with the entire medium volume to the 24-well plate well.
If the colony fragments do not detach easily, aspirate the medium and rinse the well twice with 1ml of a 1:1 mix of Versene and TrypLE-Select, then replace this solution with 1ml fresh mTeSR Plus medium supplemented with 1x Y27632, and repeat step 6.
-
7
Rinse the 6-well plate well with 400 μl mTeSR Plus medium supplemented with 1x Y27632 to collect any remaining colony fragments and transfer them to the 24-well plate well. Label the well with the next clone serial number.
-
8
Rinse the picked-from well with 2 ml DMEM/F12 to remove remaining floating cells or colony fragments.
-
9
Repeat steps 4–8 for all additional colonies ready to be picked from this well, and steps 2–8 for all additional wells from which colonies will be picked. Use fresh pipette tips for each step. Incubate the plates in a tissue culture incubator.
-
10
Keep feeding all wells that may produce additional pickable colonies another day (see Figure 1E) with mTeSR Plus (without Y27632).
Continue with steps 2–10 until at least 24 colonies have been picked. Depending on the quality of the colonies and the picking technique, 12–24 hiPSC lines should emerge from 24 picked colonies (the lower end of this range should still be sufficient to obtain at least 3 independent, karyotypically normal hiPSC lines that are free of reprogramming agents.)
If there are many more colonies left in the reprogramming wells after 24 colonies have already been picked, collect and freeze the remaining colonies as a backup as described in steps 25–28.
-
11
Feed each plated well of the 24-well plate daily with 600 μl mTeSR Plus (without Y27632) until the well is ready for splitting as described in the following steps.
Expanding hiPSC Clones using chemical or enzymatic methods
-
12
Check the hiPSC expansion culture wells daily to decide when to split the wells: wells should be split before the cells reach >50% confluency (the culture in Figure 2D is about 50% confluent, meaning that about 50% of the well area is covered by hiPSC colonies), before colonies become too large (no larger than the colonies in Figure 1F), and before differentiated areas expand faster than undifferentiated areas. Assess how many wells will be required for each clone, then coat the required number of wells accordingly (SUPPORT PROTOCOL 5).
During the first few passages, use low split ratios (1:1 – 1:5). The clones should soon begin to grow more robustly and with less differentiation. When this happens, increase the split ratios to keep the splitting frequencies to once every 4–7 days.
Once a line grows robustly, use TABLE 1 as a guide for plating. Use the following formula to estimate how many single cells, small clumps, or large fragments a given well may yield:
# of cells ≈ 400,000 cells * well area covered by undifferentiated hiPSCs/cm2
The area (cm2) refers to the total area covered by high-quality, undifferentiated hiPSCs, i.e., a 12-well plate well (1.9cm2) with ~25% of the area covered by undifferentiated hiPSCs (e.g., Figure 1F) may yield roughly 190k cells, 600 large (300-cell) colony fragments, or 12,000 small (15-cell) clumps and should therefore be plated into 3–8 6-well plate wells.
NOTE: This formula should only be used as a rough guide. Actual cell densities can vary considerably from line to line and depend on culture conditions, as do optimal plating densities. Actual cell numbers can be determined more accurately by completely dissociating a fraction of the collected cells, staining them with Trypan-Blue, and counting live cells using a hemocytometer.
-
13
If necessary, remove/detach and aspirate differentiated areas (see Figure 1F) by scraping using a P200 or P2000 pipette tip.
-
14
Two hours prior to splitting the cells, feed wells that are ready to be split with the mTeSR Plus medium supplemented with 1x Y27632. Refer to TABLE 1 (column D) for medium feed volumes. Feed wells that are not yet ready to be split with mTeSR Plus (no Y27632 added).
-
15
Replace the DMEM/F12 on the coated plates prepared with mTeSR Plus supplemented with 1x Y27632, using half of the volume from TABLE 1 (column D). Label the wells with the clone serial IDs and next passage number.
-
16
Prepare a 15-ml Falcon tube with 5 ml DMEM/F12 for each clone to split. Label each tube with the clone serial number and current passage number.
NOTE: Execute steps 16–22 separately for each clone. When splitting more than three 6-well plate wells of one clone, use one 50-ml Falcon tube with 20 ml DMEM/F12 for every 4–6 wells of a 6-well plate.
-
17
Transfer the medium from the well(s) of one clone into the corresponding Falcon tube(s) containing DMEM/F12(step 16) using a P2000 pipette.
The purpose of the DMEM/F12 is to increase the total volume (to achieve a more efficient removal in step 20 of any carried-over detachment reagent from step 18).
-
18
Rinse the well(s) with Versene, then add Versene (Versene split method) or a 1:1 mix (vol:vol) of Versene:TrypLE-Select (Versene+TrypLE-Select method) to each well (see column C of TABLE 1 for volume information). Place the plate inside a tissue culture incubator. Once every minute, check the progress of the colony disintegration using a microscope.
If after 6 minutes the expected change in colony morphology (Figure 2E) has not taken place, repeat step 18. If the chemical (Versene-only) method is insufficient to detach the cells, switch to the enzymatic (Versene+TrypLE-Select) method.
-
19
Carefully aspirate the well, then try to detach the cells by gentle pipetting using a P2000 pipette and medium (see TABLE 1 column C for volume information) taken from the corresponding Falcon tube.
If pipetting is not enough to dislodge the cells, use the pipette tip (while continuing to pipet slowly) or a tissue culture grade rubber policeman to gently scrape them off the dish. Avoid damaging or completely dissociating the cells. If during this step the cells do not come off readily as small clumps, transfer any cells that have already detached to the Falcon tube, then go back to step 18.
-
20
Transfer the detached cells to the corresponding Falcon tube(s) and spin the tube for 3 minutes at 250 x g at room temperature.
-
21
Resuspend the collected cell clumps in mTeSR Plus with 1x Y27632 using a total volume equal to the total medium volume (TABLE 1 column D) needed to plate the cells.
E.g., when plating into two 6-well plate wells (medium feed volume of 2.5 ml per well), resuspend the cells in 5 ml medium to allow plating of the cells in 2.5 ml per well.
-
22
Plate the resuspended cell aggregates into the corresponding well(s) of the plate(s) prepared in step 15, then place the plates in a tissue culture incubator.
Each plated well will now contain the calculated number of cell clumps in 1.5 times the medium volume from TABLE 1 (column D) per well.
-
23
Feed expanding hiPSC lines every day using 1 volume (TABLE 1, column D) until ready to split again as described in steps 11–22.
NOTE: hiPSCs cultured on Laminin can grow to very high cell densities. If >25% of the growth area is covered by hiPSCs, feed every 12 hours. Split the cells before >50% of the well area is covered by hiPSCs.
FIGURE 2. hiPSC clone expansion.
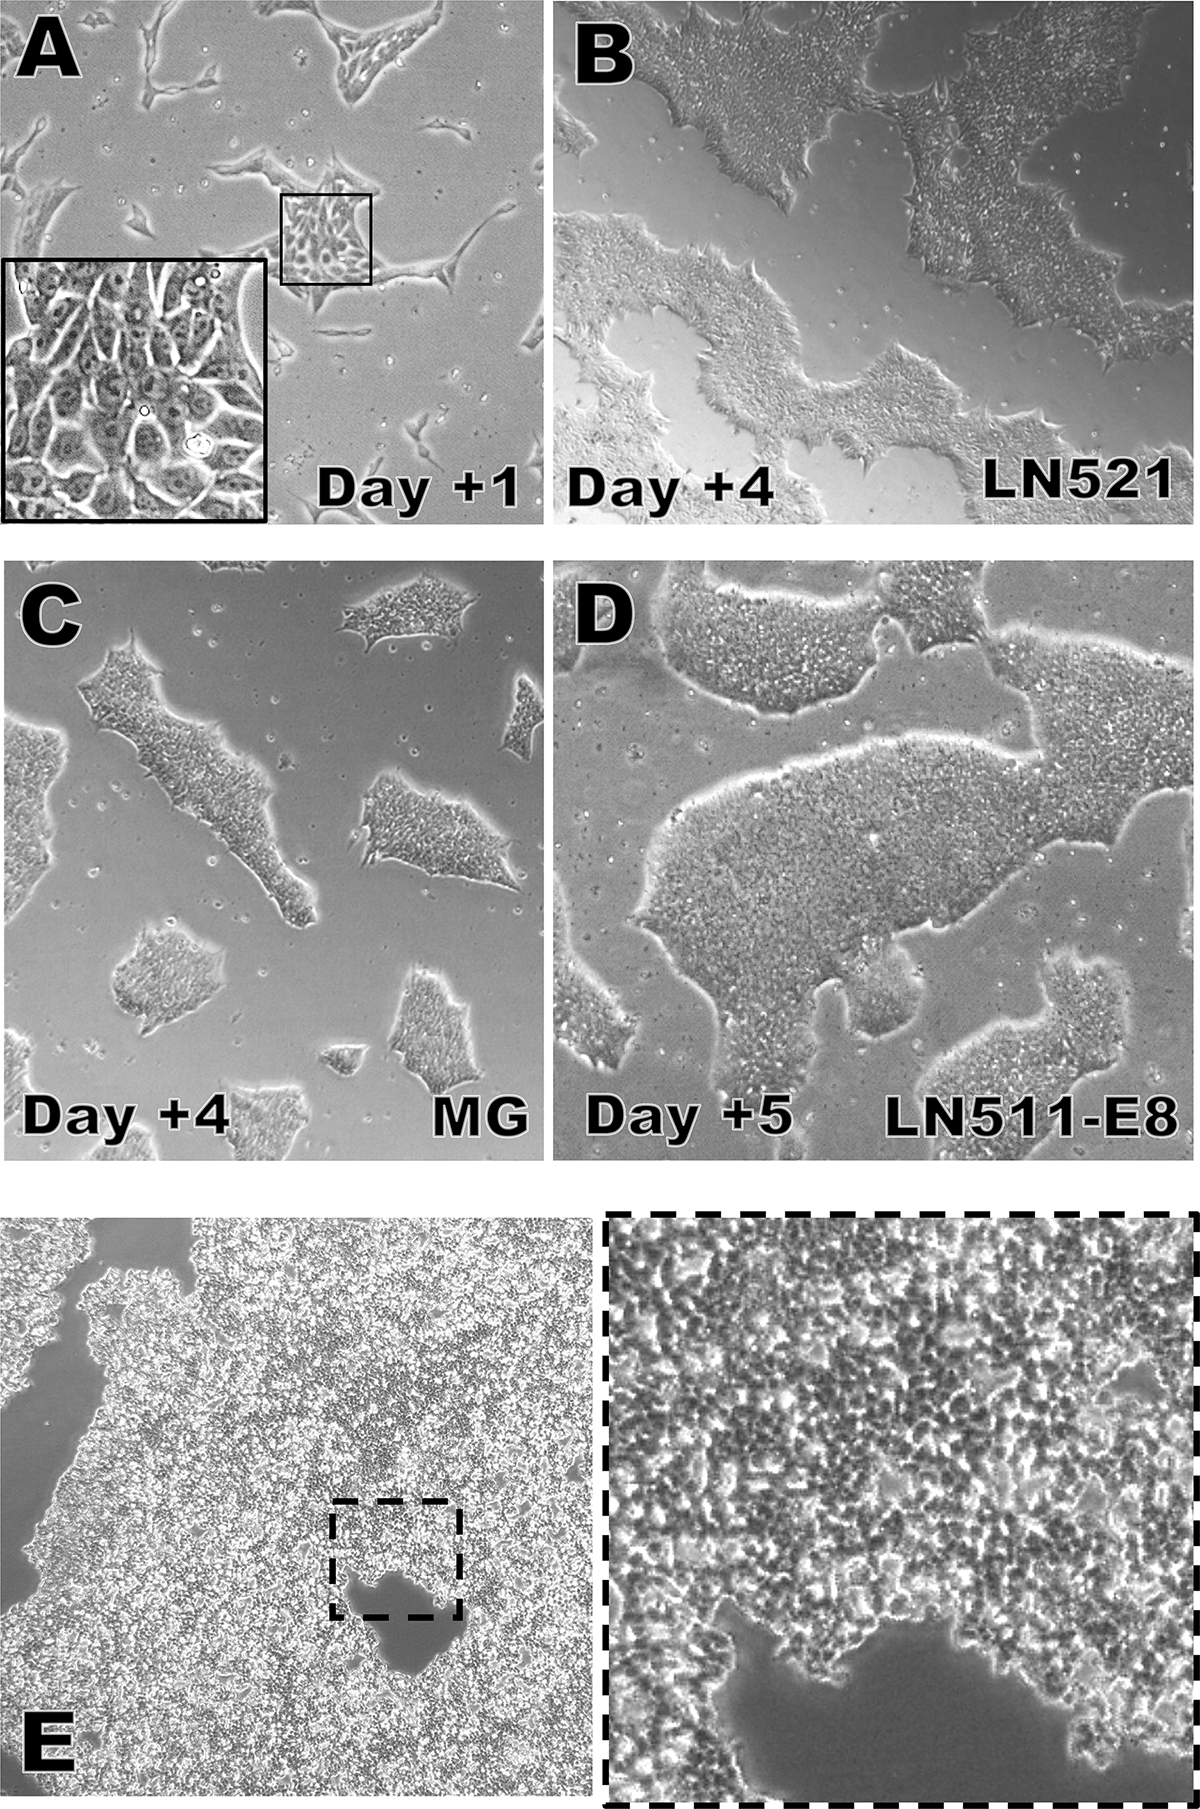
A) Typical appearance of hiPSCs one day after plating on LN-521 (4x; insert=20x).
B) Typical appearance of hiPSCs four days after plating on LN-521 (4x).
C) Typical appearance of hiPSCs four days after plating on Matrigel™ (4x).
D) Typical appearance of hiPSCs five days after plating on LN-511-E8. This culture is ready to be split now (4x).
E) Appearance of hiPSC colonies during dissociation and detachment induced by the Versene+TrypLE-Select passaging method. The dissociation agent should be removed now to avoid excessive dissociation and to limit the production of completely dissociated single cells (left=4x, right=10x).
TABLE 1.
Volumes, areas, and hiPSC plating densities for different Laminin-coated plate types.
| Plate type | Well area | Coating volume | Rinse volume | Versene/ TrypLE-Sel. volume | large fragments (≈200–400 cells) | small clumps (≈5–50 cells) | single cell-dissociated | Medium feed volume |
|---|---|---|---|---|---|---|---|---|
| 96w | 0.34 cm2 | 70 μl | 200 μl | 100 μl | 9 | 90 | 900–10,000 | 150 μl |
| 24w | 1.9 cm2 | 300 μl | 700 μl | 450 μl | 35 | 350 | 5–57,000 | 600 μl |
| 12w | 3.5 cm2 | 500 μl | 1.5 ml | 800 μl | 60 | 600 | 9–105,000 | 1 ml |
| 6w | 9.6 cm2 | 1.0 ml | 3.0 ml | 1.9 ml | 160 | 1,600 | 24–300,000 | 2.5 ml |
Cryo-preserving hiPSC Clones
-
24
Collect the cells from the wells designated for cryo-preservation using the chemical or enzymatic approach described in steps 12–20.
-
25
For the clones selected to keep in culture for further expansion: resuspend each pellet in 2 ml medium plus Y72632. Transfer the amount needed to plate a single well of a 6-well plate into a coated 6-well plate well that contains 2.5 ml medium plus Y27632, then spin the remaining cells again for 3 minutes at 250 x g at room temperature.
For example, if the cells from two collected 6-well plate wells should be plated at a split ratio of 1:6, transfer 167μl (1/12 × 2ml) to the new well.
-
26
Aspirate the supernatant and resuspend the cell pellet in 1 ml of ice-cold STEMCELL BANKER (supplemented with 1x Y27632) per well equivalent.
The resuspension volume should be based on the amount of material present after plating (step 25). For example, if 1/12 of the material collected from 2 wells was used to plate a new well in step 25: resuspend the remaining cells in 1.83 ml (11/12 × 2 ml).
-
27
Aliquot the cells at 0.5 ml per 2-ml cryo-vial.
-
28
Quickly move the labeled cryo-vials to a (pre-chilled at 4°C) Mr. Frosty and transfer the Mr. Frosty device to −80°C overnight, then store the frozen hiPSCs in the vapor phase of a liquid N2 freezer for up to several years.
Pre-chilling the Mr. Frosty device prevents the chilled cell suspension from warming up unnecessarily.
SUPPORT PROTOCOL 2
TESTING SENDAI VIRUS KIT REPROGRAMMED HIPSC FOR ABSENCE OF SENDAI VIRAL RNA
The undifferentiated state of human pluripotent stem cells does not depend on persistent expression of the exogenous reprogramming factors. The Sendai viral particles used for reprogramming have been engineered to contain mutations that reduce the efficiency at which the Sendai virus RNA polymerase is able to replicate the Sendai virus RNA (Ban et al., 2011; Schlaeger, 2018). Consequently, most Sendai viral hiPSC lines eventually become Sendai virus RNA negative over time (Schlaeger et al., 2015). Before a newly established hiPSC line is ready to be used in experiments it must be shown to be free of the exogenous reprogramming factor nucleic acid sequences.
SUPPORT PROTOCOL 2 describes a sensitive RT-QPCR based method for the detection of residual Sendai virus RNA. If all tested clones remain Sendai virus RNA positive they should be re-tested after further expansion until the exogenous RNA is no longer detectable. Alternatively, the immunofluorescence methods described in the Cytotune™ 2.1 kit manual can be followed to test samples for the presence of Sendai virus protein expression.
Materials
Expanded hiPSC lines at Passage 8 or higher (BASIC PROTOCOL 4)
RNeasy micro RNA extraction kit (Qiagen, cat. no. 74004)
MultiScribe™ Reverse Transcription Kit with RNase Inhibitor (ThermoFisher, cat. no.437496)
Nuclease-free PCR-grade H2O (ThermoFischer, cat. no. AM9935)
2ml sterile screw-cap tubes (ThermoFisher, cat. no. 14-755-228)
0.5 ml screw cap tubes (VWR, cat. no. 101093–740)
SeV TaqMan Gene Expression FAM Assay (ThermoFisher, Mr04269880_mr, cat. n. 4331182)
hACTB TaqMan Gene Expression VIC Assay (ThermoFisher, Hs01060665_g1, cat. no. 4448489)
TaqMan Gene Expression Master Mix (ThermoFisher, 4369016)
PCR plates (Eppendorf, cat. no. 0030129547)
PCR plate sealing film for QPCR (Eppendorf, cat. no. 0030127781)
QPCR machine (e.g., Biorad CFX384 Touch Real-Time PCR Detection System)
Nanodrop 2000 Spectrophotometer (ThermoFischer, cat. no ND-2000)
Benchtop tube centrifuge (e.g., Eppendorf Centrifuge model 5425)
RNA isolation and cDNA production
-
1
Spin the 2-ml screw cap tubes (negative and positive control samples, BASIC PROTOCOL 3, steps 7 and 17) or a 2-ml tube containing a test sample (~500,000 freshly collected or thawed cryo-preserved hiPSCs) at 1000xg for 5 minutes at room temperature. Aspirate the supernatant and extract RNA using the Qiagen RNeasy Micro kit, following the steps described in the kit’s manual. Store the RNA at −80 °C.
-
2
Quantify the concentration of each RNA sample using a Nanodrop or equivalent spectrophotometer and adjust the RNA concentration to 50 ng/μl using RNeasy kit elution buffer.
Expect to obtain ≥10μl of RNA, yields of ≥500 ng, and 260 nm/280 nm absorbance ratios of 1.9–2.0 (1.8–2.0 is acceptable).
-
3
Make a RT Reaction master mix for N samples (including the positive and negative control samples and one water-only control sample) by combining (N+1) times:
2.0 μl 10x RT buffer
0.8 μl 25x dNTP Mix (100mM)
2.0 μl 10x RT Random Primers
1.0 μl MultiScribe RT
1.0 μl RNase Inhibitor
3.2 μl Nuclease-free PCR-grade H2O
-
4
Thoroughly mix the RT Reaction master mix and dispense 10 μl per PCR reaction well into a 384-well PCR plate.
Do not use columns 1, 2, 23, 24 or rows A, B, O, P (the wells close the edges often do not seal well, resulting in excessive evaporation and inefficient reactions.)
-
5
Add 10 μl RNA (500ng) or water (for the water-only control sample) per reaction. Mix each reaction, seal the plate with a film, then run the samples on a thermocycler using the following conditions:
10 minutes at 25 °C
120 minutes at 37 °C
5 minutes at 85 °C
Hold at 4 °C
Store the cDNAs at −20 °C in 0.5 ml screw cap tubes until needed, for up to one year.
Sendai Virus QPCR Analysis
-
6
Separately for each TaqMan assay, make a QPCR master mix for N samples (including controls) by mixing (2*N+1) times:
10.0 μl 2x TaqMan® Gene Expression Master Mix
1.0 μl TaqMan® Gene Expression Assay (SeV-FAM or ACTB-VIC)
7.0 μl Nuclease-free PCR-grade H2O
Add 18 μl of the QPCR master mixes into separate wells of a new 384-well PCR plate. Each sample requires two wells with 18 μl of the SeV-FAM QPCR master mix and an additional two wells with 18 μl of the ACTB-VIC QPCR master mix.
The two assays will be run in duplicate and in separate wells to avoid assay interference or signal bleed-through.
Do not use columns 1, 2, 23, 24 or rows A, B, O, P: the wells close the edges often do not seal well, resulting in excessive evaporation, inefficient reactions, and high background.
-
7
Add 2 μl cDNA (or PCR-grade water) per reaction. Mix each sample, seal the plate with a plate seal, then run on a QPCR instrument using the following run conditions:
Reaction volume: 20 μL
Ramp rate: Standard
Hold at 50 °C for 2:00 minutes
Hold at 95 °C for 10:00 minutes
45 cycles [95 °C for 0:15 minutes, 60 °C for 1:00 minutes]
Hold at 4 °C
-
8
Set the signal thresholds on a log-scale Y-axis plot to near the middle of the exponential portion (linear component of slope ~N*log(2)) of the positive control sample curves and above the non-exponential background signal that is sometimes present in negative control samples (see Figure 5).
ACTB Cq values are expected to fall into a range of 15–25. A clone may be considered provisionally Sendai virus RNA negative if its ACTB Cq value falls within that range and its SeV RNA Cq value is ≥45, provided that the SeV positive control sample Cq value is ≤ 32.
If the ACTB Cq values are too low: repeat the PCRs with a lower amount of cDNA per reaction. If the ACTB Cq values are too high: repeat the RNA extraction, cDNA synthesis, and QPCR analysis.
If the data shows that the line is still SeV RNA positive: repeat the analysis after three additional passages. If the line is still positive: re-expand the line from a single colony and repeat the analysis. Provisionally SeV-negative lines must be re-tested regularly to reconfirm the SeV RNA negative status.
FIGURE 5. Quantification of residual Sendai viral RNA by Q-RT-PCR-analysis.
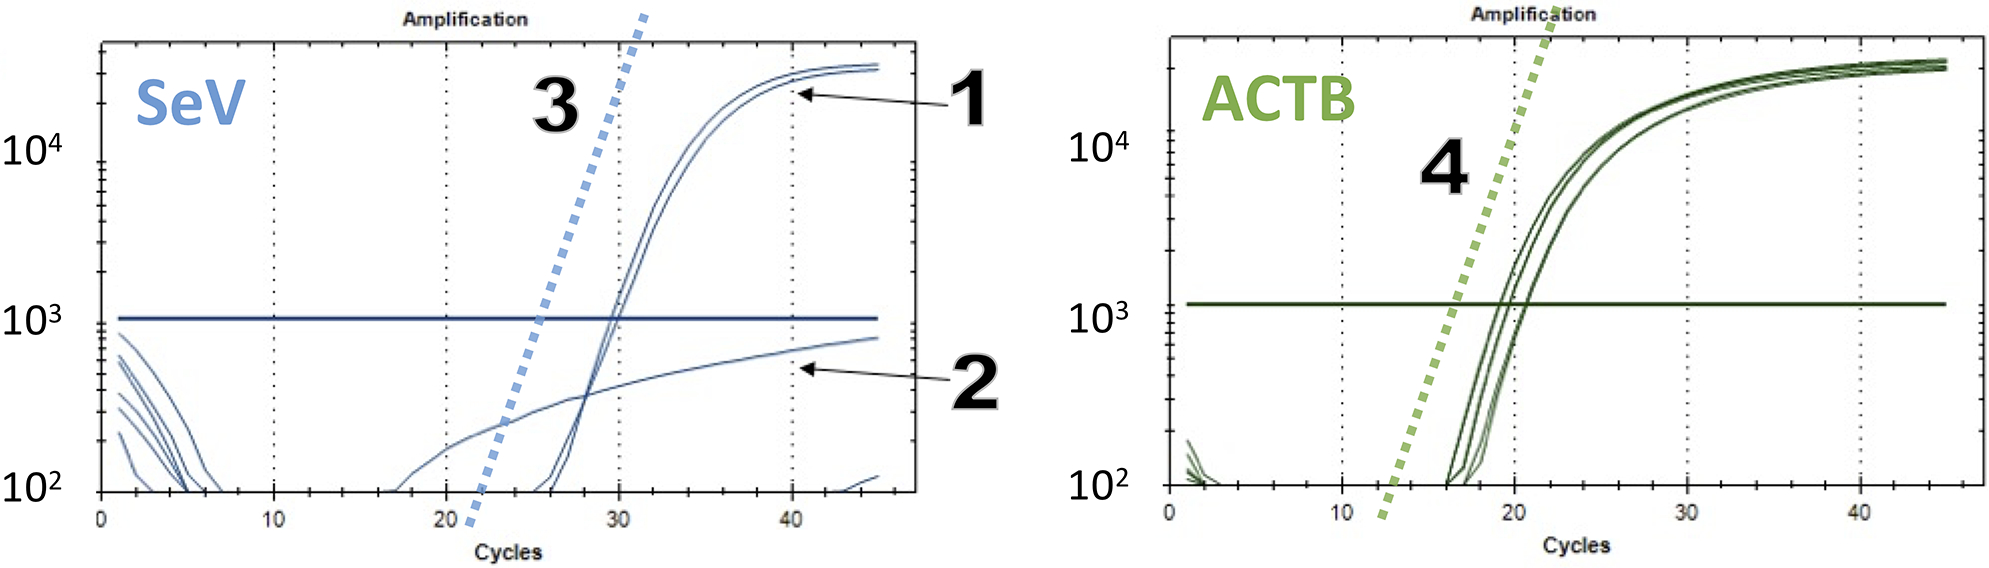
SeV-FAM (left) and ACTB-VIC (right) TaqMan RT-qPCR data plots. (1) positive sample (assay run in duplicate). (2) example of a negative sample assay well with unspecific background signal (note the lack of a linear component). Higher background signals are sometimes seen with water-control DNA-negative samples or with PCR assay wells that were incompletely sealed. The slope of the increase of the signal that is expected for a perfect PCR reaction (2-fold increase per cycle) is shown for the SeV-FAM (3) and ACTB (4) plots as dotted lines. The Cq thresholds (thick horizontal lines) should be set close to the mid-range of the linear component of the curves of positive samples and above the background signal (2), usually to around 1,000–3,000 relative light units.
SUPPORT PROTOCOL 3
TESTING EPI5 KIT REPROGRAMMED HIPSC FOR ABSENCE OF EPISOMAL PLASMID DNA
This support protocol serves the same purpose as SUPPORT PROTOCOL 2 in the context of episomal reprogramming. Expression from episomal plasmids tends to get silenced over time, particularly when the cells have reached the pluripotent state. This can result in cessation of episomal replication and a progressive loss of episomal plasmid load over time that ultimately leads to a complete disappearance of the exogenous episomal DNA sequences. However, episomal plasmids tend to remain detectable for multiple passages and weeks after the initial emergence of the hiPSC colonies, and some clones continue to carry a large plasmid sequence copy number per cell (Schlaeger et al., 2015), possibly due to stable genomic integration of the episomal plasmid(s). When deciding which of the initially >20 episomal hiPSC clones (ALTERNATE PROTOCOL 1 and BASIC PROTOCOL 4) should be selected for further expansion, it is advisable to prioritize clones with the lowest average episomal plasmid copy numbers per genome. SUPPORT PROTOCOL 3 describes a QPCR method that can detect as few as 6 plasmid copies per reaction. This protocol uses a direct lysis method that ensures that the plasmid to gDNA copy number ratio is not altered during extraction.
Materials
Expanded hiPSC lines at Passage 7 or higher (BASIC PROTOCOL 4)
DirectPCR Lysis Reagent (Viagen, cat. no. 301-C)
Proteinase K Solution (Viagen, cat. no. 501-PK)
Nuclease-free PCR-grade H2O (ThermoFisher, cat. no. AM9935)
DPBS +/+ (ThermoFisher, cat. no. 14040117)
DPBS −/− (ThermoFisher, cat. no. 14190136)
PCR plate sealing film for QPCR (Eppendorf, cat. no. 0030127781)
Custom EBNA-1 copy number TaqMan FAM assay (see recipe)
RNaseP Copy Number Reference Standard TaqMan VIC assay (ThermoFischer, cat. no. 4403326)
TaqMan Genotyping Master Mix (ThermoFisher, cat. no. 4371353)
2ml sterile screw-cap tubes (ThermoFisher, cat. no. 14-755-228)
0.5 ml screw cap tubes (VWR, cat. no. 101093–740)
384-well PCR plates (Eppendorf, cat. no. 0030129547)
Two Metal heat blocks with holes for 2 ml tubes (56°C and 85°C; Fisher Scientific, cat. no. 88-870-001, 88-870-104)
QPCR machine (e.g., Biorad CFX384 Touch Real-Time PCR Detection System)
Benchtop tube centrifuge (e.g., Eppendorf Centrifuge model 5425)
DNA isolation
-
1
Spin the 2 ml screw cap tubes (negative and positive control samples, ALTERNATE PROTOCOL 1, steps 3 and 16) or a 2-ml tube containing a test sample (~ 500,000 freshly collected or thawed cryo-preserved hiPSCs) at 1000xg for 5 minutes at room temperature.
-
2
Aspirate the supernatant, flick the bottom of the closed tubes to loosen the cell pellets, then resuspend each cell pellet in 100μl PCR-grade Nuclease-free water. Also prepare another (water-only control) tube with 100μl PCR-grade Nuclease-free water.
-
3
Add 100μl Viagen DirectPCR lysis buffer and 5μl Proteinase K solution to each tube.
-
4
Mix by flicking the closed tube, then incubate the tubes in a heat block at 56C for two hours to lyse the cells. Mix the tubes again by flicking after 1 hour, then inactivate the Proteinase K at 85°C for 45 minutes.
-
5
Spin the tubes at 15,000 x g for 10 minutes at room temperature. Transfer 100 μl from the middle of each the tube to a fresh 0.5 ml screw cap tube.
Store at −20°C for up to one month until ready to assay the extracted DNA.
EBNA QPCR Analysis
-
6
For each TaqMan assay, make a QPCR master mix for N samples (including controls) by mixing (2*N+1) times:
10 μl TaqMan Genotyping Master Mix
1.0 μl TaqMan Assay (EBNA-1-FAM or RNaseP-VIC)
6.5 μl PCR-grade H2O
-
7
Add 17.5 μl of the master mix into separate wells of a new 384-well PCR plate. Each sample requires two wells with 17.5 μl of the EBNA-1-FAM master mix and two additional wells with 17.5 μl of the RNaseP-VIC master mix.
The two assays will be run in duplicate and in separate wells to avoid assay interference or bleed-through.
Do not use columns 1, 2, 23, 24 or rows A, B, O, P (the wells close the edges often do not seal well, resulting in excessive evaporation, inefficient reactions, and high background.)
Additional useful controls include:
Human genomic DNA (e.g., Promega, cat. no. G1471) diluted to 40 ng/2.5 μl, and 46 ag to 46 fg (about 6 to 6000 molecules) of plasmid pCXWB-EBNA1 (Addgene, cat. no. 37624) per 2.5 μl, diluted in a solution of 40 ng/2.5 μl human genomic DNA.
-
8
Add 2.5 μl (corresponding to about 6000 cells) gDNA (or water from the water-control sample) per reaction. Mix each sample, seal the plate with a plate seal, then run on a QPCR instrument using the following run conditions:
Reaction volume: 20 μl
Ramp rate: Standard
Hold at 95 °C for 10:00 minutes
45 cycles [95 °C for 0:15 minutes, 60 °C for 1:00 minutes]
Hold at 4 °C
-
9
Set the signal thresholds on a log-scale Y-axis plot to near the middle of the exponential portion (linear component of slope ~N*log(2)) of the positive control sample curves and above the non-exponential background signal that is sometimes present in negative control samples (as shown for Sendai QPCR in Figure 5).
RNaseP Cq values are expected to fall into a range of 20–30. A clone may be considered provisionally negative for episomal plasmid DNA if its RNaseP Cq value falls within that range and its EBNA-1 Cq value is ≥45, provided that the episomal plasmid DNA positive control sample Cq value is ≤ 30.
If the RNaseP Cq values are too low: repeat the PCRs with a lower amount of gDNA per reaction. If the RNaseP Cq values are too high: repeat the reactions using 9μl gDNA per 20 μl reaction. If the values are still too low, repeat the gDNA extraction and QPCR analysis.
If the data shows that the line is still EBNA DNA positive: repeat the analysis after three additional passages. If the line is still positive: re-expand the line from a single colony and repeat the analysis. Provisionally negative lines must be re-tested regularly to reconfirm the episomal plasmid DNA sequence negative status.
SUPPORT PROTOCOL 4
ASSESSING THE UNDIFFERENTIATED STATE OF HUMAN PLURIPOTENT STEM CELL CULTURES BY MULTI-COLOR IMMUNOFLUORESCENT STAINING AND CONFOCAL IMAGING
This support protocol is used to assess the quality of a hiPSC culture by evaluating the expression of multiple markers associated with the undifferentiated state of human pluripotent stem cells. Advantages of this method over flow-cytometric marker expression analyses include the ability to visually confirm the proper subcellular localization of the signal (e.g., the OCT4-and NANOG signals of undifferentiated interphase cells should be predominantly nuclear) and the ability to correlate the differentiation state with cell and colony morphologies.
This protocol visualizes the expression of up to 5 markers (E-CADHERIN, NANOG, OCT4, TRA-1–60, SSEA-5) simultaneously. Not every laboratory will have access to an imaging instrument that is set up to properly distinguish this many dyes. However, most fluorescent microscopes come equipped with standard filter sets for “Channel 1” (BFP/DAPI/Hoechst), “Channel 2” (FITC/GFP/AlexaFluor-488), “Channel 3” (PE/Cy3/AlexaFluor-555), and often also “Channel 4” (Cy3/APC/AlexaFluor-647). Indeed, a minimal set of channels (1–3) is sufficient to assess what are usually the earliest indicators of differentiation, namely the downregulation of NANOG and/or OCT4 expression. NANOG and OCT4 expression are also the easiest to assess on a per-cell basis: individual NANOG and/or OCT4 negative interphase cells can easily be identified because they contain SytoxGreen positive nuclei that exhibit little or no NANOG and/or OCT4 positivity. In contrast, individual cells that are negative for one or several of the surface markers (E-CADHERIN, TRA-1–60 or SSEA-5) can be difficult to identify if they are surrounded by marker-positive cells.
NOTE: Many imagers are unable to acquire some (or all) parts of the wells of the outermost row(s) and column(s) of microtiter plates because the lens could collide with the skirt of the microtiter plate. This problem can be avoided by only using columns B-G and rows 02–11 of a 96-well plate.
NOTE: The dilutions provided in this protocol should only be interpreted as a starting point for the specific antibodies and dyes provided in TABLE 2. Each staining agent may need to be titrated in order to find the optimal dilution.
TABLE 2:
Confocal Immunofluorescence Imaging Channel Settings
| Channel | Antigen or Target | Antibody Clone | Dye | Ordering Info | Dilution | Excitation (nm) | Emission (nm) | Exposure (ms) | Signal Location |
|---|---|---|---|---|---|---|---|---|---|
| 1 | E-CADHERIN | 36/E-Cadherin | BrilliantViolet-421 | Becton Dickinson, cat. no. 564186 |
1:10 | 405 | 435/40 | 1000 | Surface |
| 2 | NANOG | N31–355 | AlexaFluor-488 | Becton Dickinson cat. no. 560791 |
1:10 | 488 | 510/20 | 1000 | Nuclear |
| 3 | OCT3/4 | 40/Oct-3 | AlexaFluor-555 | Becton Dickinson cat. no. 560306 |
1:10 | 561 | 600/37 | 1000 | Nuclear |
| 4 | TRA-1–60 | TRA-1–60 | AlexaFluor-647 | Becton Dickinson cat. no. 560122 |
1:10 | 640 | 676/29 | 500 | Surface |
| 5 | SSEA-5 | 8e11 | PerCP-Vio700 | Miltenyi, cat. no. 130-106-664 |
1:100 | 488 | 676/29 | 500 | Surface |
| 6 | DNA | n/a | SytoxGreen | ThermoFisher, cat. no. S7020 |
500 nM | 488 | 525/20 | 250 | Nuclear |
NOTE: Human fibroblast and confirmed undifferentiated human pluripotent stem cells can be plated and processed in parallel as negative and positive controls to establish the specificity of the stains and adjust imager settings.
NOTE: Five additional wells plated with confirmed undifferentiated human pluripotent stem cells are needed to run the “fluorescence-minus-one” (FMO)- or isotype-controls that are critical to establish that the observed signals specific under the applied staining, imaging, and image processing conditions.
Materials
Widefield or confocal (preferred) fluorescence imager (e.g., Yokogawa Cell Voyager model CV7000) equipped with a 10x lens and suitable excitation and emission setup (see TABLE 2)
Dyes and antibodies (see TABLE 2)
hiPSCs growing on Matrigel™ or laminin-coated 96-well imaging plates (e.g., Greiner, cat. no. 655090)
DPBS −/− (ThermoFisher, cat. no. 14190136)
DPBS +/+ (ThermoFisher, cat. no. 14040117)
16% PFA solution (Fisher Scientific, cat. no. 50-980-487)
Donkey serum (Sigma, cat. no. D9663)
Mouse Serum (Sigma, cat. no. M5905)
10% Triton-X-100 solution (Sigma, cat. no. 93443)
7.5% Bovine Serum Albumin (Fraction V) Solutions (ThermoFischer, cat. no. 15260037)
2ml sterile screw-cap tubes (ThermoFisher, cat. no.14-755-228)
15 ml Polystyrene Falcon tubes (Corning, cat. no. 352095)
Chemical Fume Hood
Benchtop tube centrifuge (e.g., Eppendorf Centrifuge model 5425)
-
FIJI software suite (https://fiji.sc/)
NOTE: Follow your institute’s safety and environmental guidelines on proper handling and disposing of fixatives.
Immunofluorescence Analysis Sample Preparation and Processing
-
Plate hiPSCs into the wells of a 96-well imaging plate. Feed until the plated colony fragments have reached a size and density equivalent to a culture that would normally be split the next day.
Only use columns B-G and rows 02–11 of a 96-well plate.
Prepare Fixative Solution inside a chemical hood. Prepare 2 ml for every 10 96-well plate wells to be fixed and stained. In a 2 ml tube, dilute 500 μl 16% PFA in 1500 μl DPBS+/+
-
Prepare B/P (Block+Permeabilization)-Solution. Prepare 2ml for every 10 wells. In a 2 ml tube, combine the following, then mix thoroughly:
1043μl DPBS−/−
667μl 7.5% BSA
150μl Donkey Serum
100μl Mouse Serum
40μl 10% Triton-X-100
Spin the two tubes (Fixative and B/P Solution) at 15,000xg for 10 minutes at room temperature. Avoiding the pellet area (even if no pellet is visible), transfer 1900μl of the B/P Solution to a new 2 ml tube (this step is to remove any particulates that are commonly found in serum). Discard the tube containing the remaining ~100μl and put the other two tubes (fixative and P/B Solution) on ice.
Prepare the Wash Solution. For every 10 wells to stain, add 900μl B/P Solution to 8.1ml DPBS−/− in a 15 ml Falcon tube.
-
Remove the culture medium and wash each well twice with DPBS+/+ while working in a biosafety cabinet, then move to a chemical hood and add 150 μl Fixation solution to each well. Incubate for 15 minutes at room temperature.
NOTE: Perform all well aspirations in the same location of each well (e.g., left-most spot of each well). Cells/colonies in this location likely will get scratched or aspirated by accident during washes. Using the same location during all aspirations ensures that the remainder of the well is preserved for staining and imaging.
-
Remove and safely dispose of the Fixation solution, then wash each well three times with 200μl DPBS−/−.
It is possible to store the plate after the last wash (leaving 200 μl DPBS−/− in each well) at 4 °C for several weeks (make sure the plate never dries out: attach a sterile plate seal and store the plate inside a close Ziploc bag in a refrigerator).
After aspirating the DPBS−/− solution, add 100 μl Block+Permeabilization Buffer per well. Incubate for 30 minutes at room temperature.
-
During this time, prepare the staining cocktail for N wells in a 2 ml microcentrifuge tube by combining (N+1) times:
20 μl Wash Solution
4.6 μl DPBS−/−
4μl anti-E-CADHERIN-BrilliantViolet-421
4μl anti-NANOG-AlexaFluor-488
4μl anti-OCT3/4-AlexaFluor-555
4μl anti-TRA-1–60-AlexaFluor-647
0.4μl anti-SSEA-5-PerCP-Vio700
Similarly, prepare the FMO-controls by replacing one dye at a time with an equivalent volume of DPBS−/−.
-
Mix the staining cocktail(s), then spin the tube for 10 minutes at 15,000 x g at room temperature.
This is to precipitate any particulates (such as debris or antibody aggregates) that could otherwise result in non-specific fluorescence signals.
-
Wash each well three times with 140 μl Wash Solution per well, then replace the Wash Solution with 40 μl of the staining cocktail to each well.
Carefully take 40μl from the top of the staining cocktail in the microcentrifuge tube, avoiding the bottom area where precipitated material may have accumulated during step 9.
-
Incubate the plate at room temperature for 2 hours or for up to 20 hours at 4°C in the dark.
Make sure the plate is stored flat (such that the wells are covered evenly by the staining solution) and that the wells never dry out (attach a sterile plate seal and store the plate inside a closed Ziploc bag.)
-
Wash each well three times with 140 μl Wash Buffer per well. During each wash step, incubate the plate for 10 minutes at room temperature in the dark, then aspirate the Wash Solution completely. After the final wash, add 200 μl DPBS−/− per well.
At this point the stained plate can be stored for up to two weeks at 4 °C in the dark as long as it does not dry out (attach a sterile plate seal and store the plate inside a close Ziploc bag.) When ready to image, let the plate equilibrate to room temperature and remove any condensate that may have formed underneath the plate before continuing.
-
Acquire the images using a fluorescence microscope, preferably an automated confocal imager that can image entire wells by taking multiple images per well.
On a CV7000 (or similar) imager, acquire the fluorescence images using a 10x lens, 2×2 binning, 4×5 field-of-view montage, a collapsed (sum) Z-stack extending from −30μm to +30μm (step size 10μm, with the 0μm Z level corresponding to the plane through the center of the nuclei), sCMOS camera(s), and the excitation, emission, and exposure settings provided in TABLE 2 (channels 1–6).
NOTE: Even if the imager is equipped with multiple cameras, each channel should be acquired separately, with only the laser light required for the dye being imaged turned on, in order to minimize the effect of dye bleed-through.
NOTE: The acquired images should be exported as background-subtracted and flatfield (shading)-corrected images.
NOTE: Depending on the imager and antibody batches and formulations, the image acquisition settings may need to be adjusted to avoid over- or under-exposing the images. Wells plated densely (50,000 per well) with human dermal fibroblasts may be used as negative controls and confirmed human pluripotent stem cells (such as WiCell’s WA-09 hESCs) may be used as positive controls.
NOTE: Additional useful controls include unstained wells and five FMO (fluorescence-minus-one) or isotype-control wells in which human pluripotent stem cells are stained with staining cocktails in which one the antibodies was omitted (FMO) or replaced with an appropriate dye-labeled isotype-control antibody).
Prepare the SytoxGreen Staining Solution by diluting the SytoxGreen in DPBS−/− to a final concentration of 500nM. Re-stain each well by replacing the DPBS−/− on each well with 40μl SytoxGreen Staining Solution (40μl per well). Incubate the plate at room temperature for 40 minutes, then replace the SytoxGreen Solution with 200μl DPBS−/−.
-
Re-image the wells using the exact same well locations, imaging positions, and imager settings as in step 13.
NOTE: Due to the spectral overlap of SytoxGreen:DNA and AlexaFluor-488 dyes, the Channel 6 ‘SytoxGreen’ DNA images actually represent approximately the sum of the NANOG and SytoxGreen staining signals. However, using the provided staining and imaging conditions, the SytoxGreen signals far exceed the NANOG antibody signals, making the Channel 6 images essentially identical to what SytoxGreen-only stained wells would look like (this can be confirmed by comparing full-cocktail stained images to NANOG-FMO cocktail stained images).
-
Using an image software suite such as FIJI, pseudo-color, assemble (overlay), montage and crop the individual grayscale images (see Figure 4).
Use images acquired for channels 1–5 from the first imaging run (step 13) and the images for channel 6 from the 2nd imaging run (step 15).
NOTE: Make sure that all image processing steps for a given channel are performed identically for all images of that channel. Programs like FIJI sometimes apply an auto-contrast algorithm to images that can lead to inconsistent signal intensity scales between image sets. Loading all images of one channel into an image stack followed by applying all processing steps to that stack ensures that all images of the channel will be processed identically.
NOTE: The precise locations of the cells may have shifted slightly between these image sets. Manually translate the Channel 6 images along the X and/or Y axes to compensate the shift if necessary.
FIGURE 4. Confocal immunofluorescence analysis of hiPSC marker expression.
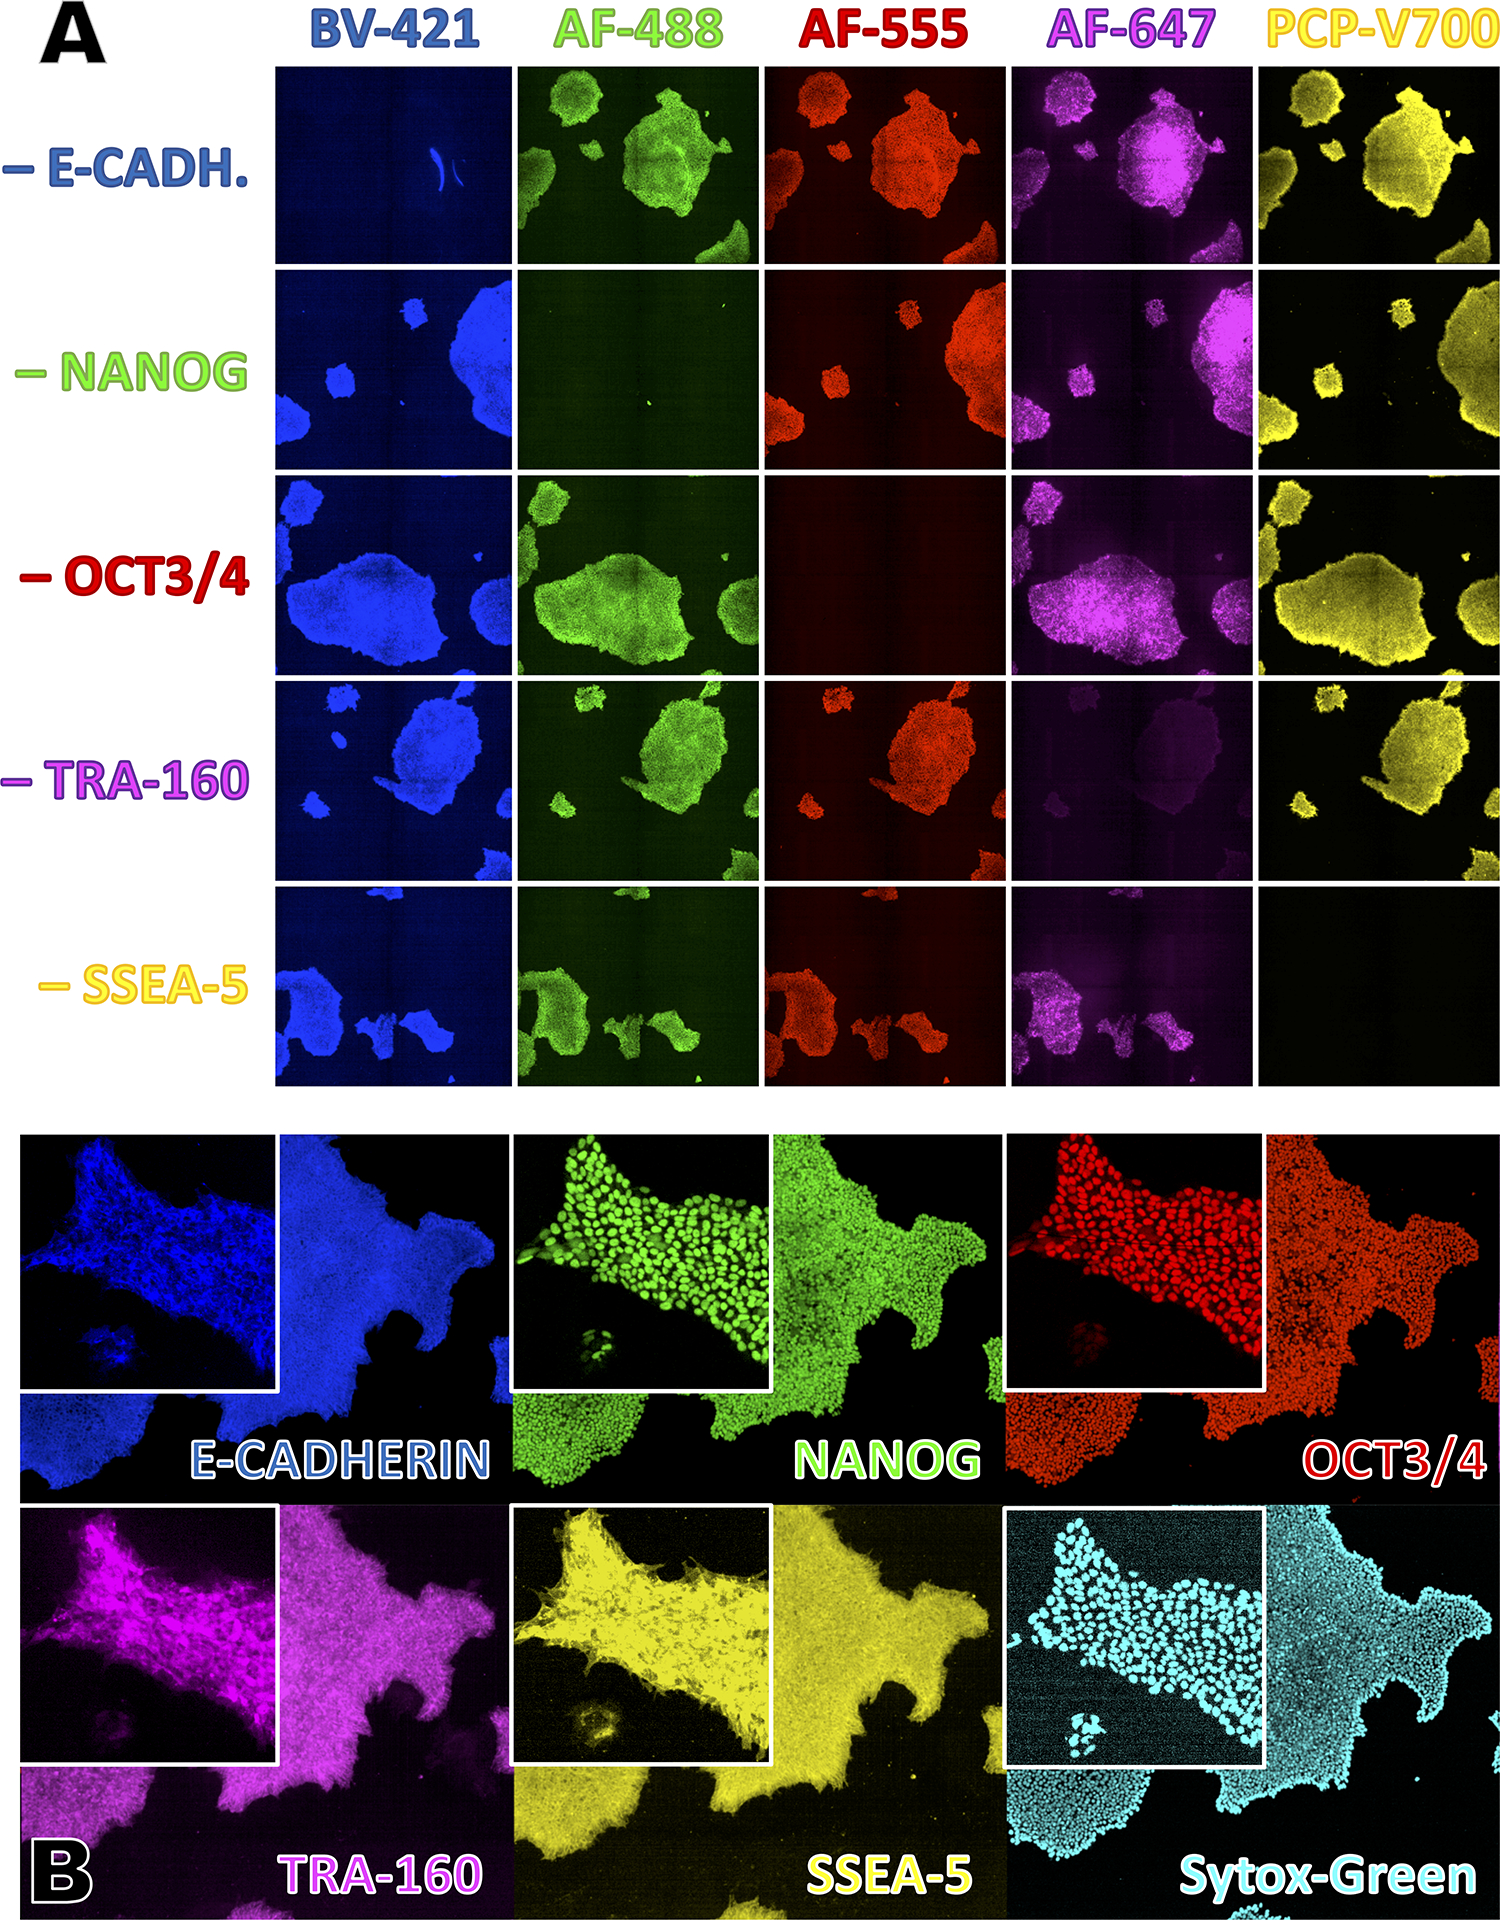
A) hiPSCs stained with the indicated immunofluorescence FMO (fluorescence-minus-one) staining cocktails.
B) hiPSCs stained with the complete immunofluorescence staining cocktail. Inserts show zoomed-in areas to better show the expected subcellular localization of the various stains.
SUPPORT PROTOCOL 5
COATING PLATES WITH EXTRACELLULAR MATRICES TO SUPPORT HIPSC ATTACHMENT AND EXPANSION
Human pluripotent stem cells require a feeder or extracellular matrix layer to support their attachment and growth as adherent cells. Pre-clinical feeder-free hiPSC reprogramming and expansion is frequently done on growth factor reduced Matrigel™ (Xu et al., 2001), a mouse tumor derived extracellular matrix extract rich in Laminins and other matrix glycoproteins. More recently, chemically defined and xeno-free recombinant human Laminins have been shown to support hiPSC reprogramming and expansion. In particular, Laminin-521 and the E8-fragment of Laminin-511 haven been shown to support reprogramming and single cell passaging of hiPSCs (Miyazaki, Isobe, Nakatsuji, & Suemori, 2017; Miyazaki & Kawase, 2015; Wiley et al., 2016).
Materials
Tissue culture grade 96/24/12/6-well plate (Greiner, cat. no. 655090, Fisher Scientific, cat. no. 09761146, Greiner, cat. no. 665180, VWR, cat. no. 82050–842)
Recombinant human Laminin-521 (Biolamina, cat. no. CT521), or
iMatrix-511 (recombinant human Laminin-511, E8 fragment; Takara, cat. no. T303), or hESC-qualified Matrigel™ (Corning 354277)
DPBS −/− (ThermoFisher, cat. no. 14190136)
DPBS +/+ (ThermoFisher, cat. no. 14040117)
DMEM/F12 (Stemcell Technologies, cat. no. 36254)
Parafilm (VWR, cat. no. 52858–076)
Ziploc bags (Fisher Scientific, cat. no. 50-111-3769)
Sterile plate seal (Sigma, cat. no. Z369667)
5% CO2 37 °C humidified tissue culture incubator (e.g., Thermo-Forma model 3110)
Class II biosafety cabinet (e.g., Baker SterilGARD® III Advance model SG403)
Plate Coating
-
Dilute extracellular matrix reagent (keep on ice).
15μg/ml Laminin-521 (dilute in ice-cold DPBS−/−),
15μg/ml Laminin-511 E8 fragment (dilute in ice-cold DPBS+/+), or
200μg/ml Matrigel™ (dilute in ice-cold DMEM/F12).
-
Add the required amount of coating solution (see TABLE 1) to as many wells as needed.
Make sure the entire well surface of every coated well is fully covered by the coating solution.
NOTE: Matrigel™ solution quickly turns into a gel at temperatures above 4 °C.
-
OPTIONAL: Seal the plate(s) with a sterile plate seal, seal the plate lid to the plate using a strip of parafilm, put the sealed plate(s) inside a Ziploc bag. Store the bag in a refrigerator at (4 °C) for up to one week. When ready, carefully remove the parafilm, move the plate to a biosafety cabinet, carefully remove the plate seal.
Make sure the plate(s) are stored flat on a flat surface and check that the entire well bottom is covered with coating solution for the entire time. Hold the plate tightly when removing the parafilm and plate seal to prevent coating solution from splashing.
-
Incubate the plate(s) in a tissue culture incubator at 37 °C for 3 hours.
It is possible store the plate (again) at 4 °C for up to one week as described in step 3.
When ready to use, aspirate the coating solution and wash each well once with the matrix-specific diluent (DPBS−/−, DPBS+/+, or DMEM/F12, see step 1) using the rinse volume in TABLE 1, then add one rinse volume of DMEM/F12 per well. Store the plate in a tissue culture incubator for up to several hours until ready to plate cells (aspirate DMEM/F12 immediately prior to plating cells).
Reagents and Solutions
Erythroblast Expansion Medium
Dissolve 1 g Dexamethasone (Spectrum Chemical, DE123–1GM) in 193.8ml DMSO (Akron, cat. no. AK8899) to make a 10 mM (10,000x) stock. Store in single-use aliquots of 15 μl at −80 °C for up to 6 months.
Dissolve 10 μg recombinant human Stem Cell Factor (carrier-free; R&D Systems, 255B-GMP) in 100μl DPBS−/− to make a 100 μg/ml (333x) stock. Store in single-use aliquots of 15 μl at −80 °C for up to 3 months.
Dissolve 10 μg recombinant human Interleukin-3 (carrier-free; R&D Systems, 203-GMP-010) in 100μl DPBS−/− to make a 100 μg/ml (2,000x) stock. Store in single-use aliquots of 15 μl at −80 °C for up to 3 months.
Dissolve 1 mg recombinant human Erythropoietin (Akron, cat. no. AK9941) in 1 ml DPBS−/− to make a 1 mg / ml) (10,000x) stock. Store in single-use aliquots of 15 μl at −80 °C for up to 3 months.
To make 20ml Erythroblast Expansion Medium, combine:
18.8 ml StemSpan ACF (Stemcell Technologies, cat. no. 09855)
1.2 ml Autologous Patient Serum (6% final), see SUPPORT PROTOCOL 1
200 μL Insulin-Transferrin-Selenium (ITS-G) (100X; Thermo, 41400045; 1x final)
60 μl SCF-CF stock (100μg/ml stock, 300ng/ml final)
10 μL IL-3-CF stock (100μg/ml stock, 50ng/ml final)
2.0 μL Recombinant Human Erythropoietin (1mg/ml stock, 100ng/ml final; when using EPO units, use 10U/ml)
2.0 μL Dexamethasone (10 mM Stock, 1μM final)
Store at 4°C for up to two weeks. Equilibrate to room temperature before use.
SMC4 and SMC3 inhibitor cocktails (1000x Stock):
Dissolve 10 mg Thiazovivin (Tocris, cat. no. 3845) in 1606 μl DMSO (Akron, cat. no. AK8899) to make a 20 mM (4,000x) stock. Store in single-use aliquots of 525 μl at −80 °C for up to 6 months.
Dissolve 10 mg PD0325901 (Tocris, cat. no. TB1614-GMP) in 5187 μl DMSO (Akron, cat. no. AK8899) to make a 4 mM (10,000x) stock. Store in single-use aliquots of 225 μl at −80 °C for up to 6 months.
Dissolve 10 mg CHIR99021 (Tocris, cat. no. TB4423-GMP) in 2149 μl DMSO (Akron, cat. no. AK8899) to make a 10 mM (10,000x) stock solution. Store in single-use aliquots of 225 μl at −80 °C for up to 6 months.
Dissolve 10 mg SB431542 (Tocris, cat. no. TB1614-GMP) in 1301 μl DMSO (Akron, cat. no. AK8899) to make a 20 mM (10,000x) stock solution. Store in single-use aliquots of 225 μl at −80 °C for up to 6 months.
To make 2ml of 1000x SMC4, combine:
500 μl 20 mM Thiazovivin stock solution
200 μl 4 mM PD0325901 stock solution
200 μl 10 mM CHIR99021 stock solution
200 μl 10 mM SB431542 stock solution
900 μl DMSO (Akron, cat. no. AK8899)
Mix, then aliquot this 1000x SMC4 cocktail at 100μl per 500μl screw-cap vial. Store at −80 °C until needed for up to 6 months. Do not re-freeze aliquots. Sterile-filter human pluripotent stem cell medium supplemented with SMC4 before use. Store supplemented medium at 4°C for up to one week.
To make 2ml of 1000x SMC3, combine
500 μl 20 mM Thiazovivin stock solution
200 μl 4 mM PD0325901 stock solution
200 μl 10 mM CHIR99021 stock solution
1100 μl DMSO (Akron, cat. no. AK8899)
Mix, then aliquot this 1000x SMC3 cocktail at 100μl per 500μl screw-cap vial. Store at −80 °C until needed for up to 6 months. Do not re-freeze aliquots. Sterile-filter human pluripotent stem cell medium supplemented with SMC3 before use. Store supplemented medium at 4°C for up to one week.
10mM Y27632 stock solutions
Dissolve 10 mg Y27632 (Tocris, cat. no. TB1254-GMP) in 3123 μl DMSO (10mM stock)
Mix, then aliquot this 2000x Y27632 stock solution at 100μl per 500 μl screw-cap vial. Store at −80 °C until needed for up to 6 months. Do not re-freeze aliquots.
Custom EBNA Copy Number TaqMan Assay (ThermoFisher, cat. no. 4400294)
Forward Primer Sequence: TGTCTGACAGCGACCATGAAG
Reverse Primer Sequence: GATCAATAGACATCTTTATTAGACGACGCT
Probe Sequence: TCTGCACTCCCTGTATTCACTG
Probe Dye, Quencher: FAM, NFQ
COMMENTARY
Background Information
Successful reprogramming of mammalian somatic cells to an embryonic stem cell like pluripotent state was first achieved by retroviral gene transfer mediated expression of the reprogramming factors OCT4, SOX2, KLF4, and c-MYC (Takahashi & Yamanaka, 2006). Since then, reprogramming techniques have been refined and improved upon to allow derivation of high-quality integration-free human iPS cells (summarized in (Schlaeger, 2018; Schlaeger et al., 2015)). This unit provides a suite of protocols to generate patient-specific hiPSC lines free of integrated vectors and undefined xenogeneic reagents. Such lines are well suited for adaptation to in vitro differentiation and the production of hiPSC-derived cell therapy products. The removal of animal products also reduces the variability introduced by fetal calf serum, murine feeder cells or matrices, and other undefined non-autologous reagents that are commonly used in traditional reprogramming protocols. One hiPSC line (#1157) produced under these conditions was used in a recent study that describes the production of hematopoietic stem cells from hiPSCs (Sugimura et al., 2017).
This unit focuses only on a core set of experimental steps and procedures; it is beyond the scope of this manuscript to also cover crucial aspects, such as cGMP facility design and operation or the multitude of – often region/jurisdiction-specific – regulations and requirements that must be followed when manufacturing and manipulating cells for clinical use. For example, in the United States, clinical development and use of hiPSC-derived cell-based therapeutics is subject to oversight and approval by the Food and Drug Administration (FDA) under Section 351 of the Public Health Service Act and Title 21 of the Code of Federal Regulations. To help understand and navigate this complex regulatory landscape, the FDA has generated several guidance publications, including documents on donor eligibility (73072), cGLP (75866), cGTP (82724), cGMP (70975), cell line characterization (document number 70868), small entity compliance (70689), analytical procedures and methods validation (87801), potency testing (79856), pre-clinical assessment (87564), CMC (73624), exploratory IND studies (72325), early-phase cell therapy trial design (106369), cell therapy (72402), and minimal manipulation and homologous use (124138). These documents are accessible at https://www.fda.gov/media/[number]/download; see also (Baghbaderani et al., 2015; Hyun et al., 2008; Kleiderman, Boily, Hasilo, & Knoppers, 2018; Neofytou, O’Brien, Couture, & Wu, 2015) and https://www.fda.gov/vaccines-blood-biologics/guidance-compliance-regulatory-information-biologics,
https://www.fda.gov/vaccines-blood-biologics/biologics-guidances/cellular-gene-therapy-guidances,
Also beyond the scope of this unit is a more detailed discussion of the many additional tests that hiPSCs should be subjected to following their derivation (see (Baghbaderani et al., 2016) for additional information) and how to validate and perform such tests in a compliant manner. At a minimum, before using a hiPSC line in downstream applications it should be subjected to (ideally by a CLIA-certified facility and/or using properly qualified, validated, executed and documents procedures):
(1) genomic DNA STR fingerprint analysis, comparing its fingerprint with that of DNA independently derived from the same donor.
(2) human pathogen and adventitious agent testing (viruses, bacteria, mold, yeast, mycoplasma)
(3) flow cytometric or confocal immunofluorescent expression analysis for markers of undifferentiated hiPSCs such as OCT4, NANOG, E-CADHERIN, TRA160, and SSEA5.
(4) PCR-based testing for the absence of reprogramming agents (episomal plasmid sequences or SeV RNA)
(5) G-Band Karyotype analysis to establish absence of gross chromosomal aberrations
(5) hiPSCs are often also tested for their pluripotency using assays such as the teratoma formation or in vitro differentiation assays including the ScoreCard assay (Bock et al., 2011).
(6) recent advances in NGS technologies have made it feasible and affordable to preform deep genomic sequencing of virtually the entire genome, methylome, transcriptome or focused deep sequencing of cancer-related gene loci, thereby revealing potentially problematic epigenetic or genetic changes at a much higher resolution and sensitivity than can be achieved with G-band karyotype analyses.
Most of these assays should be repeated regularly (e.g., every 10–20 passages) to reconfirm the identity and quality of the hiPSC line.
Critical Parameters and Troubleshooting
It is highly recommended that a user does not attempt to use the protocols of this unit until they have first become proficient at conventional Sendai-viral or episomal reprogramming of PBMCs and feeder-free hiPSC expansion (H. Y. Chen, Tan, & Loh, 2016; Kime et al., 2015; T. Ludwig & J, 2007; Miyazaki & Kawase, 2015; Okita et al., 2011; Park & Mostoslavsky, 2018). Before attempting to reprogram PBMCs and expand the resulting hiPSCs using the procedures described in this unit it is also highly recommended to practice culturing and expanding existing hiPSC lines using the protocols provided in this unit. As with any reprogramming method or other long-term cell culture protocol, consistency and quality of reagents is key. All materials and reagents should meet pre-defined quality standards before they released for used in the tissue culture facility.
During PBMC expansion, medium should be prepared fresh (no more than 2 weeks old), and only the amount needed should be allowed to warm to room temperature prior to use. Care should be taken during all medium changes and cell collection steps, as accidental aspiration of cells or loss during transfer will in turn limit the number of iPSC colonies.
In our experience, the efficiency with which donor PBMCs can be reprogrammed using the protocols provided in this unit can vary significantly. That said, this protocol has been used successfully and independently by three stem cell technicians in our laboratory, attesting its robustness and reproducibility. Nevertheless, we found that some lines grow a lot more robustly and exhibit a healthier overall appearance (fewer dead cells, less differentiation, better plating and freeze/thaw recovery) in some medium/matrix/splitting method combinations compared to others. If many or all of the clones of a reprogramming experiment perform poorly during expansion it is recommended to consider and evaluate alternative culture conditions (see Figure 3).
FIGURE 3. hiPSC clone expansion on different medium-matrix-combinations.
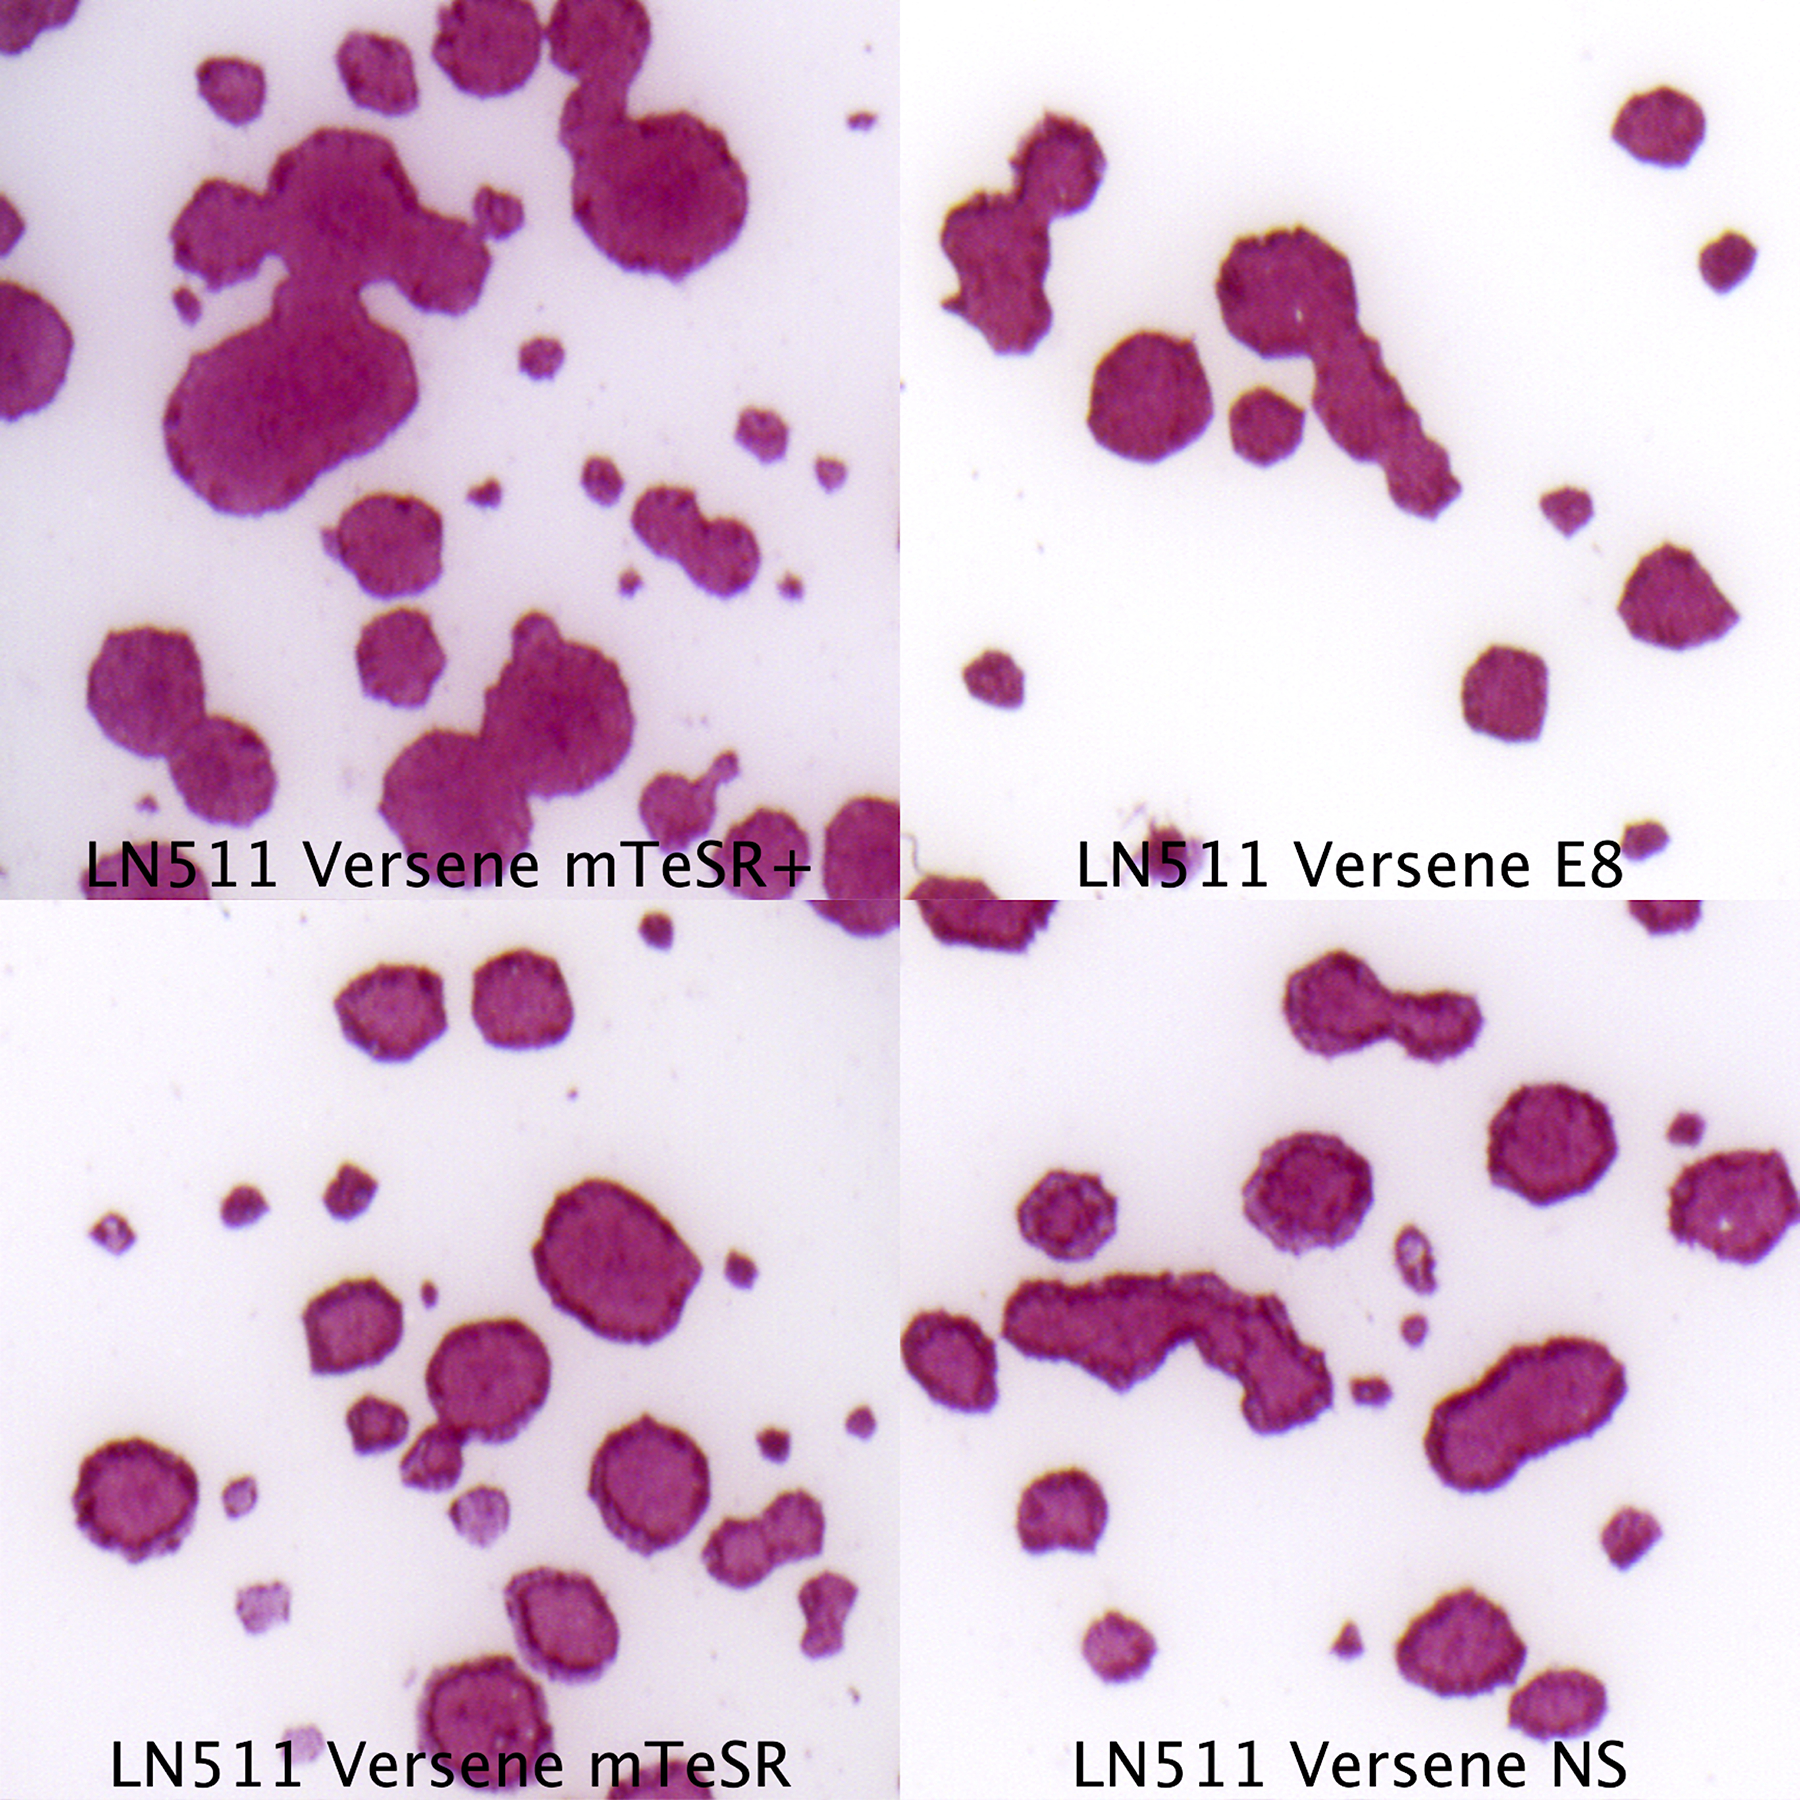
hiPSC can be expanded efficiently using various medium-matrix combinations. Some lines perform better in certain medium-matrix combinations. The colonies in this figure were stained using the chromogenic alkaline phosphatase staining protocol described in UNIT 1C.12 (Manos, Ratanasirintrawoot, Loewer, Daley, & Schlaeger, 2011).
Media and matrices that work well for expanding established hiPSCs and that are available as cGMP-grade, xeno-free, and/or chemically defined reagents (or that can be qualified for use in cell therapy under cGMP) include Nutristem™ (Biological Industries, cat. no. 05-100-1A), E8 (ThermoFisher, cat. no. A1517001, (G. Chen et al., 2011)), StemFit™ Basic03 (Ajinomoto/Reprocell, cat. no. ASB03, (Nakagawa et al., 2014)), mTeSR1 s™ (Stemcell Technologies, cat. no. 85850, (T. E. Ludwig et al., 2006)), and mTeSR Plus™ (Stemcell Technologies, cat. no. 05825), as well as Laminin-521 (Biolamina, cat. no. CT521) (Rodin, Antonsson, Hovatta, & Tryggvason, 2014) and iMatrix Laminin 511-E8 (Takara, cat. no. T303, (Miyazaki & Kawase, 2015; Nakagawa et al., 2014). See (Desai, Rambhia, & Gishto, 2015) for additional examples.
Matrigel™, a mouse tumor-derived product (Corning #354277; (Kleinman et al., 1986)), is a good ECM alternative to Laminin (Xu et al., 2001). Due to its animal-origin, undefined nature, and production as a research-grade reagent, Matrigel™ is potentially less safe than cGMP-grade recombinant human Laminin-521 and considered by the US Pharmacopeia to be a relatively high-risk (Tier-4) ancillary material (Section <1043>, ‘Ancillary Materials For Cell, Gene, And Tissue-Engineered Products’). Nevertheless, it is possible to qualify such a product for use in cell therapy manufacturing following a risk-based approach (https://bioprocessintl.com/upstream-processing/biochemicals-raw-materials/standards-for-ancillary-materials-used-in-cell-and-tissue-based-therapies-346300/, http://www.factwebsite.org/Standards_and_Resources/Subpages/2__CTLM_Read_29NOV2011.aspx). Indeed, Matrigel™-exposed human embryonic stem cell derived oligodendrocyte precursor cells have been approved by the FDA for clinical testing (Priest, Manley, Denham, Wirth, & Lebkowski, 2015). The amount of potential risk that may be introduced has to be weighed against the potential benefits that come with a switch from Laminin based to Matrigel™ based expansion. In our experience, clump passaging is easier to learn, easier to execute, and produces fewer (inadvertently generated) single cell dissociated hiPSCs when the cells are grown on Matrigel™, and it may result in greater overall genetic stability, particularly when compared to repeated single cell passaging/plating on laminin. We found clump passaging on Laminin more challenging than on Matrigel™, possibly because the cells adhere more strongly to Laminin, making it more difficult to dislodge them as intact cell clumps.
The use of single cell passaging to perform routine culture does increase the risk for and frequency of genetic abnormalities arising and quickly becoming ubiquitous in hiPSCs culture. Of course, even hiPSC cultures that are clump passaged are not immune to the emergence of genetic abnormalities — mutations are virtually inevitable for hiPSC cultures, which is why expansion should be kept to a minimum (e.g., through the use of master- and working cell banks) and why frequent genetic (re-)testing (G-Band Karyotype, hPSC Genetic Analysis Kit (Stemcell Technologies, cat. no. 07550), deep sequencing, etc.) has be performed, particularly if the cells are ultimately intended for clinical use.
In conventional, clump-passaging based hiPSC expansion protocols it is generally relatively easy to spot spontaneous differentiation that typically presents as cells with a noticeably different morphology (see Figure 1E,F) that emerge either near the edge or near the center of hiPSC colonies. Scientists who do not have prior experience with single cell passaging on Laminin may find it more difficult to evaluate the differentiation state of their hiPSC cultures because single-cell plated hiPSCs on laminin initially adopt a different (larger, more spread-out) morphology that could be mistaken for differentiation (Figure 2A). On the other hand, once these cells coalesce into clusters, become smaller, and reach higher densities it is possible to miss differentiated cells because they can be difficult to detect if they are intermingled between undifferentiated cells. When in doubt, it is recommended to perform flow cytometry or immunofluorescence microscopy (as described in this unit) to assess the differentiation state of the culture.
Occasionally exogenous (Sendai-virus or plasmid derived) nucleic acids persist far beyond passage 5. In this case it is recommended to subclone those clones that carry the lowest amount of the foreign DNA/RNA per cell. It is also possible to culture Sendai virus RNA positive hiPSCs at elevated temperatures (for 5 days at 39°C instead of 37°C) to further decrease the activity of the temperature-sensitive Sendai viral RNA polymerase. Similarly, loss of episomal plasmids could potentially be accelerated using recently described EBNA1 inhibitors (Messick et al., 2019).
Anticipated Results
This protocol should result in the emergence of 10 to > 100 hiPSC colonies of which ~20% to >95% should eventually grow robustly and as undifferentiated, karyotypically normal and exogenous nucleic acid free hiPSC lines by no later than passage 10–15.
Time Considerations
Practicing hiPSC expansion may take 2–8 weeks. PBMC processing, expansion, and reprogramming takes about 4 weeks. hiPSC clone picking, expansion, banking and QC will take an additional 10 weeks.
ACKNOWLEDGEMENTS
This work was made possible by the generous support of the Boston Children’s Hospital Stem Cell Program and U54DK110805.
REFERENCES
- Baghbaderani BA, Syama A, Sivapatham R, Pei Y, Mukherjee O, Fellner T, … Rao MS (2016). Detailed Characterization of Human Induced Pluripotent Stem Cells Manufactured for Therapeutic Applications. Stem Cell Rev Rep, 12(4), 394–420. doi: 10.1007/s12015-016-9662-8 [DOI] [PMC free article] [PubMed] [Google Scholar]
- Baghbaderani BA, Tian X, Neo BH, Burkall A, Dimezzo T, Sierra G, … Rao MS (2015). cGMP-Manufactured Human Induced Pluripotent Stem Cells Are Available for Pre-clinical and Clinical Applications. Stem Cell Reports, 5(4), 647–659. doi: 10.1016/j.stemcr.2015.08.015 [DOI] [PMC free article] [PubMed] [Google Scholar]
- Ban H, Nishishita N, Fusaki N, Tabata T, Saeki K, Shikamura M, … Nishikawa S (2011). Efficient generation of transgene-free human induced pluripotent stem cells (iPSCs) by temperature-sensitive Sendai virus vectors. Proc Natl Acad Sci U S A, 108(34), 14234–14239. doi: 10.1073/pnas.1103509108 [DOI] [PMC free article] [PubMed] [Google Scholar]
- Bock C, Kiskinis E, Verstappen G, Gu H, Boulting G, Smith ZD, … Meissner A (2011). Reference Maps of human ES and iPS cell variation enable high-throughput characterization of pluripotent cell lines. Cell, 144(3), 439–452. doi: 10.1016/j.cell.2010.12.032 [DOI] [PMC free article] [PubMed] [Google Scholar]
- Buzzard JJ, Gough NM, Crook JM, & Colman A (2004). Karyotype of human ES cells during extended culture. Nat Biotechnol, 22(4), 381–382; author reply 382. doi: 10.1038/nbt0404-381 [DOI] [PubMed] [Google Scholar]
- Chan EM, Yates F, Boyer LF, Schlaeger TM, & Daley GQ (2008). Enhanced plating efficiency of trypsin-adapted human embryonic stem cells is reversible and independent of trisomy 12/17. Cloning Stem Cells, 10(1), 107–118. doi: 10.1089/clo.2007.0064 [DOI] [PubMed] [Google Scholar]
- Chen G, Gulbranson DR, Hou Z, Bolin JM, Ruotti V, Probasco MD, … Thomson JA (2011). Chemically defined conditions for human iPSC derivation and culture. Nat Methods, 8(5), 424–429. doi: 10.1038/nmeth.1593 [DOI] [PMC free article] [PubMed] [Google Scholar]
- Chen HY, Tan HK, & Loh YH (2016). Derivation of Transgene-Free Induced Pluripotent Stem Cells from a Single Drop of Blood. Curr Protoc Stem Cell Biol, 38, 4a.9.1–4a.9.10. doi: 10.1002/cpsc.12 [DOI] [PubMed] [Google Scholar]
- Cowan CA, Klimanskaya I, McMahon J, Atienza J, Witmyer J, Zucker JP, … Melton DA (2004). Derivation of embryonic stem-cell lines from human blastocysts. N Engl J Med, 350(13), 1353–1356. doi: 10.1056/NEJMsr040330 [DOI] [PubMed] [Google Scholar]
- Desai N, Rambhia P, & Gishto A (2015). Human embryonic stem cell cultivation: historical perspective and evolution of xeno-free culture systems. Reprod Biol Endocrinol, 13, 9. doi: 10.1186/s12958-015-0005-4 [DOI] [PMC free article] [PubMed] [Google Scholar]
- Garitaonandia I, Amir H, Boscolo FS, Wambua GK, Schultheisz HL, Sabatini K, … Laurent LC (2015). Increased risk of genetic and epigenetic instability in human embryonic stem cells associated with specific culture conditions. PLoS One, 10(2), e0118307. doi: 10.1371/journal.pone.0118307 [DOI] [PMC free article] [PubMed] [Google Scholar]
- Hyun I, Lindvall O, Ahrlund-Richter L, Cattaneo E, Cavazzana-Calvo M, Cossu G, … Daley GQ (2008). New ISSCR guidelines underscore major principles for responsible translational stem cell research. Cell Stem Cell, 3(6), 607–609. doi: 10.1016/j.stem.2008.11.009 [DOI] [PubMed] [Google Scholar]
- Kime C, Rand TA, Ivey KN, Srivastava D, Yamanaka S, & Tomoda K (2015). Practical Integration-Free Episomal Methods for Generating Human Induced Pluripotent Stem Cells. Curr Protoc Hum Genet, 87, 21.22.21–21. doi: 10.1002/0471142905.hg2102s87 [DOI] [PubMed] [Google Scholar]
- Kleiderman E, Boily A, Hasilo C, & Knoppers BM (2018). Overcoming barriers to facilitate the regulation of multi-centre regenerative medicine clinical trials. Stem Cell Res Ther, 9(1), 307. doi: 10.1186/s13287-018-1055-2 [DOI] [PMC free article] [PubMed] [Google Scholar]
- Kleinman HK, McGarvey ML, Hassell JR, Star VL, Cannon FB, Laurie GW, & Martin GR (1986). Basement membrane complexes with biological activity. Biochemistry, 25(2), 312–318. doi: 10.1021/bi00350a005 [DOI] [PubMed] [Google Scholar]
- Ludwig T, & J AT (2007). Defined, feeder-independent medium for human embryonic stem cell culture. Curr Protoc Stem Cell Biol, Chapter 1, Unit 1C.2. doi: 10.1002/9780470151808.sc01c02s2 [DOI] [PubMed] [Google Scholar]
- Ludwig TE, Levenstein ME, Jones JM, Berggren WT, Mitchen ER, Frane JL, … Thomson JA (2006). Derivation of human embryonic stem cells in defined conditions. Nat Biotechnol, 24(2), 185–187. doi: 10.1038/nbt1177 [DOI] [PubMed] [Google Scholar]
- Manos PD, Ratanasirintrawoot S, Loewer S, Daley GQ, & Schlaeger TM (2011). Live-cell immunofluorescence staining of human pluripotent stem cells. Curr Protoc Stem Cell Biol, Chapter 1, Unit 1C 12. doi: 10.1002/9780470151808.sc01c12s19 [DOI] [PubMed] [Google Scholar]
- Merkle FT, Ghosh S, Kamitaki N, Mitchell J, Avior Y, Mello C, … Eggan K (2017). Human pluripotent stem cells recurrently acquire and expand dominant negative P53 mutations. Nature, 545(7653), 229–233. doi: 10.1038/nature22312 [DOI] [PMC free article] [PubMed] [Google Scholar]
- Messick TE, Smith GR, Soldan SS, McDonnell ME, Deakyne JS, Malecka KA, … Lieberman PM (2019). Structure-based design of small-molecule inhibitors of EBNA1 DNA binding blocks Epstein-Barr virus latent infection and tumor growth. Sci Transl Med, 11(482). doi: 10.1126/scitranslmed.aau5612 [DOI] [PMC free article] [PubMed] [Google Scholar]
- Mitalipova MM, Rao RR, Hoyer DM, Johnson JA, Meisner LF, Jones KL, … Stice SL (2005). Preserving the genetic integrity of human embryonic stem cells. Nat Biotechnol, 23(1), 19–20. doi: 10.1038/nbt0105-19 [DOI] [PubMed] [Google Scholar]
- Miyazaki T, Isobe T, Nakatsuji N, & Suemori H (2017). Efficient Adhesion Culture of Human Pluripotent Stem Cells Using Laminin Fragments in an Uncoated Manner. Sci Rep, 7, 41165. doi: 10.1038/srep41165 [DOI] [PMC free article] [PubMed] [Google Scholar]
- Miyazaki T, & Kawase E (2015). Efficient and scalable culture of single dissociated human pluripotent stem cells using recombinant E8 fragments of human laminin isoforms. Curr Protoc Stem Cell Biol, 32, 1c.18.11–18. doi: 10.1002/9780470151808.sc01c18s32 [DOI] [PubMed] [Google Scholar]
- Nakagawa M, Taniguchi Y, Senda S, Takizawa N, Ichisaka T, Asano K, … Yamanaka S (2014). A novel efficient feeder-free culture system for the derivation of human induced pluripotent stem cells. Sci Rep, 4, 3594. doi: 10.1038/srep03594 [DOI] [PMC free article] [PubMed] [Google Scholar]
- Neofytou E, O’Brien CG, Couture LA, & Wu JC (2015). Hurdles to clinical translation of human induced pluripotent stem cells. J Clin Invest, 125(7), 2551–2557. doi: 10.1172/JCI80575 [DOI] [PMC free article] [PubMed] [Google Scholar]
- Okita K, Matsumura Y, Sato Y, Okada A, Morizane A, Okamoto S, … Yamanaka S (2011). A more efficient method to generate integration-free human iPS cells. Nat Methods, 8(5), 409–412. doi: 10.1038/nmeth.1591 [DOI] [PubMed] [Google Scholar]
- Okita K, Yamakawa T, Matsumura Y, Sato Y, Amano N, Watanabe A, … Yamanaka S (2013). An efficient nonviral method to generate integration-free human-induced pluripotent stem cells from cord blood and peripheral blood cells. Stem Cells, 31(3), 458–466. doi: 10.1002/stem.1293 [DOI] [PubMed] [Google Scholar]
- Park S, & Mostoslavsky G (2018). Generation of Human Induced Pluripotent Stem Cells Using a Defined, Feeder-Free Reprogramming System. Curr Protoc Stem Cell Biol, 45(1), e48. doi: 10.1002/cpsc.48 [DOI] [PMC free article] [PubMed] [Google Scholar]
- Priest CA, Manley NC, Denham J, Wirth ED 3rd, & Lebkowski JS (2015). Preclinical safety of human embryonic stem cell-derived oligodendrocyte progenitors supporting clinical trials in spinal cord injury. Regen Med, 10(8), 939–958. doi: 10.2217/rme.15.57 [DOI] [PubMed] [Google Scholar]
- Rodin S, Antonsson L, Hovatta O, & Tryggvason K (2014). Monolayer culturing and cloning of human pluripotent stem cells on laminin-521-based matrices under xeno-free and chemically defined conditions. Nat Protoc, 9(10), 2354–2368. doi: 10.1038/nprot.2014.159 [DOI] [PubMed] [Google Scholar]
- Schlaeger TM (2018). Nonintegrating Human Somatic Cell Reprogramming Methods. Adv Biochem Eng Biotechnol, 163, 1–21. doi: 10.1007/10_2017_29 [DOI] [PubMed] [Google Scholar]
- Schlaeger TM, Daheron L, Brickler TR, Entwisle S, Chan K, Cianci A, … Daley GQ (2015). A comparison of non-integrating reprogramming methods. Nat Biotechnol, 33(1), 58–63. doi: 10.1038/nbt.3070 [DOI] [PMC free article] [PubMed] [Google Scholar]
- Sugimura R, Jha DK, Han A, Soria-Valles C, da Rocha EL, Lu YF, … Daley GQ (2017). Haematopoietic stem and progenitor cells from human pluripotent stem cells. Nature, 545(7655), 432–438. doi: 10.1038/nature22370 [DOI] [PMC free article] [PubMed] [Google Scholar]
- Takahashi K, & Yamanaka S (2006). Induction of pluripotent stem cells from mouse embryonic and adult fibroblast cultures by defined factors. Cell, 126(4), 663–676. doi: 10.1016/j.cell.2006.07.024 [DOI] [PubMed] [Google Scholar]
- Valamehr B, Abujarour R, Robinson M, Le T, Robbins D, Shoemaker D, & Flynn P (2012). A novel platform to enable the high-throughput derivation and characterization of feeder-free human iPSCs. Sci Rep, 2, 213. doi: 10.1038/srep00213 [DOI] [PMC free article] [PubMed] [Google Scholar]
- Watanabe K, Ueno M, Kamiya D, Nishiyama A, Matsumura M, Wataya T, … Sasai Y (2007). A ROCK inhibitor permits survival of dissociated human embryonic stem cells. Nat Biotechnol, 25(6), 681–686. doi: 10.1038/nbt1310 [DOI] [PubMed] [Google Scholar]
- Wiley LA, Burnight ER, DeLuca AP, Anfinson KR, Cranston CM, Kaalberg EE, … Tucker BA (2016). cGMP production of patient-specific iPSCs and photoreceptor precursor cells to treat retinal degenerative blindness. Sci Rep, 6, 30742. doi: 10.1038/srep30742 [DOI] [PMC free article] [PubMed] [Google Scholar]
- Xu C, Inokuma MS, Denham J, Golds K, Kundu P, Gold JD, & Carpenter MK (2001). Feeder-free growth of undifferentiated human embryonic stem cells. Nat Biotechnol, 19(10), 971–974. doi: 10.1038/nbt1001-971 [DOI] [PubMed] [Google Scholar]